


B18IF...
B24IF...
B30IF...
USE & CARE GUIDE
GUIDE D'UTILISATION ET D'ENTRETIEN MANUAL DE USO Y CUIDADO

Contents
IMPORTANT |
SAFETY INSTRUCTIONS. |
. . . . . |
. . . . . |
. . . |
. |
. |
. . |
. . . . . .. .. .. .. .. .4. . . . . |
|||
Congratulations . . . . . . . . . . . . . . . . . . . . . . . . .. .. .. .. .. .. .. . .. . .. . .. . .. . .. . .. . . .5. . . . . |
. . . |
||||||||||
Your new appliance. . . . . . . . . |
. . . . . |
. . . . . |
. . . |
. |
.. .. .. .. .. .. .. .. .. .. .. .. .. .6. . . . . |
. . |
|||||
Installation . . . . . . . . . . . . . |
. . . . . |
. . . . . |
. .. .. |
.. |
.. |
.. .. |
.. . .. . .. . .. . .. . .. . .. . . . . . . . 7. . . . . . |
. . . |
|||
Connection |
to the |
power supply. . . . |
. . . . . |
. . . . . |
. . . |
. |
. |
. . |
. . .. .. .. .. .. .. .. .. .8. .. .. |
.. . |
|
Connecting the water. . . . . . . . |
. . . . . |
. . . . . |
. . . |
. |
. |
.. .. |
.. .. .. .. .. .. .. .. .. .. .8. .. . |
. . |
|||
Switching |
on |
the |
appliance. . . . . . |
. . . . . |
. . . . . |
. . . |
. |
. |
. . |
.. .. .. .. .. .. .. .. .. .. 8.. .. .. |
.. . |
Switching off and disconnecting the appliance. . . . . . . . . . . . . . . . . . . . . . . . . 8. . . .
Functions . . . . . . . |
. . . . . . |
. . . . . |
. . |
. . . |
. |
.. |
.. .. .. |
.. |
.. .. . .. . .. . .. . .. . .. . .. . . . . . . . . 9. . . . . . |
. . . |
|
Variable interior design. . |
. . . . . |
. . . . . |
. . |
. . . |
. |
. |
. . . |
. |
.. .. .. .. .. .. .. .. .. .. .. ..9.. .. . |
. |
|
Control panel. . . . . . |
. . . . . |
. . . . . |
. . |
. . . |
. |
. .. .. .. .. .. .. .. .. .. .. .. .. .. .. . . . .10. . . . . . . |
. . |
||||
Setting |
the temperature. |
. . . . . . |
. . . . . |
. . |
. . . |
. |
. |
. . . |
. |
.. .. .. .. .. .. .. .. .. .. ..11.. .. .. . |
. |
Super function. . . . . |
. . . . . . |
. . . . . |
. . |
. . . |
. |
. .. .. .. .. .. .. .. .. .. .. .. .. .. .. . . 11. . . . . . . . |
. . |
||||
Setup |
mode. . . . . . |
. . . . . . |
. . . . . |
. . |
. . . |
. |
.. .. .. .. .. .. .. .. .. .. .. .. .. .. . . . . 11. . . . . . . . |
. . |
|||
Settings which can be changed in setup. mode. . . . . . . . . . . . . . . . . . . . . . . 12. . . . .
Vacation Mode. . . . . . |
. . . . . . . . . . |
. . . |
. |
. |
. |
. .. .. .. .. .. .. .. .. .. .. .. .. .. .. . .13. . . . . . . |
. . |
||||||
Sabbath Mode. . . . . . |
. . . . . . . . . . |
. . . |
. |
. |
. |
. .. .. .. .. .. .. .. .. .. .. .. .. .. .. . .13. . . . . . . |
. . |
||||||
Freezing and storing. . . . |
. . . . . . . . . . |
. . . |
. |
. |
. |
. . |
. |
.. .. .. .. .. .. .. .. .. .. .. .. .13. .. . . . |
. |
||||
IceMaker . . . . . . . . |
. . . . . . . . . . |
. . . |
. |
. |
. .. .. .. .. |
.. |
.. |
.. . .. . .. . .. . .. . .. . .. . . . . . . . 14. . . . . . . . |
. . |
||||
How to save energy. . . . |
. . . . . . . . . . |
. . . |
. |
. |
. |
. . |
. |
.. |
.. |
.. .. .. .. .. .. .. .. .. .. ..15.. . . . . . |
. |
||
Defrosting . . . . . . . . |
. . . . . . . . . . |
. . . |
. |
. |
. |
.. .. |
.. |
.. |
.. |
.. |
.. . .. . .. . .. . .. . .. . .. . . . . . . 15. . . . . . . . |
. . |
|
Operating noises. . . . . |
. . . . . . . . . . |
. . . |
. |
. |
. |
. . |
.. .. .. .. .. .. .. .. .. .. .. .. .. ..15. . . . . . . |
. . |
|||||
Cleaning the appliance. . . |
. . . . . . . . . . |
. . . |
. |
. |
. |
. . |
. |
. .. .. .. .. .. .. .. .. .. .. .. .16. .. .. . |
. |
||||
Odors . . . . . . . . . . |
. . . . . . . . . . |
. . . |
. |
.. |
.. |
.. .. |
.. |
.. .. . .. . .. . .. . .. . .. . .. . . . . . . . . . .16. . . . . . . . |
. . |
||||
Warning |
messages via the |
display. . . . . . . . |
. . . |
. |
. |
. |
. . |
. |
. |
. |
. |
. . . .. .. .. .. .. .. ..17.. .. .. . |
. |
Appliance self8test. . . . . |
. . . . . . . . . . |
. . . |
. |
. |
. |
. . |
.. .. .. .. .. .. .. .. .. .. .. .. .. .17. . . . . . . |
. |
|||||
Resetting |
factory settings. |
. . . . . . . . . . |
. . . |
. |
. |
. |
. . |
. |
. |
. |
. .. .. .. .. .. .. .. .. .. .. 18.. .. .. .. |
. |
|
Water filter. . . . . . . . |
. . . . . . . . . . |
. . . |
. |
. .. .. .. .. .. .. .. .. .. .. .. .. .. .. . . . . . 18. . . . . . . . |
. . |
||||||||
Troubleshooting . . . . . . . . . . . . . . . . . . . . . . . . .. .. .. .. .. .. .. . .. . .. . .. . .. . .. . .. . .21. . . . . . . |
. . |
||||||||||||
Changing the bulb. . . . . |
. . . . . . . . . . |
. . . |
. |
. |
. |
. . |
.. .. .. .. .. .. .. .. .. .. .. .. .. .23. . . . . . . |
. |
|||||
Service . . . . . . . . . |
. . . . . . . . . . |
. . . |
. |
. .. .. .. .. .. |
.. |
.. . .. . .. . .. . .. . .. . .. . . . . . . . . .23. . . . . . . . |
. . |
||||||
Warranty . . . . . . . . . |
. . . . . . . . . . |
. . . |
. |
. |
.. |
.. .. |
.. |
.. |
.. |
.. . .. . .. . .. . .. . .. . .. . . . . . . . .24. . . . . . . . |
. . |
||
Français . . . . . . . . . . . . . . . . . . . . . . . .. .. .. .. .. .. .. .. .. .. .. .. .25. .. .. . .
Español . . . . . . . . . . . . . . . . . . . . . . . . .. .. .. .. .. .. ... ... ... ... ... ...50... .. .. .
3

IMPORTANT SAFETY INSTRUCTIONS
READ |
AND |
SAVE |
THESE |
INSTRUCTIONS! |
|
|
|
|
|
|
|
|
|
|
|
||||||||||||||||||||||||
e WARNING |
|
|
|
|
|
|
8. Before |
replacing |
a |
burned9out |
Grounding |
|
instruction |
||||||||||||||||||||||||||
When |
using |
this |
appliance, |
|
|
|
light |
bulb, |
set |
theon/off |
switch |
|
|
|
|
|
|
|
|
|
|
|
|
||||||||||||||||
|
|
|
in |
the |
OFF |
|
position to |
turn offThis appliance |
must |
be |
grounded. |
||||||||||||||||||||||||||||
always |
exercise |
basic |
safety |
|
|
|
the |
lights |
in |
order |
to |
avoid |
|
In the |
event |
of |
a |
malfunction or |
|||||||||||||||||||||
precautions, |
including |
the |
|
|
|
|
|
breakdown, |
grounding will |
reduce |
|||||||||||||||||||||||||||||
|
|
|
|
contact with |
a |
live |
wire |
|
|
||||||||||||||||||||||||||||||
following: |
|
|
|
|
|
|
|
|
|
|
|
filament. |
|
|
|
|
|
|
|
|
|
|
|
||||||||||||||||
|
|
|
|
|
|
|
|
|
|
9. |
A |
burned9out |
light |
bulb |
may |
the risk |
of |
electric |
shock |
by |
|||||||||||||||||||
|
|
|
|
|
|
|
|
|
|
|
|
|
providing |
|
a |
path |
of |
least |
resistance |
||||||||||||||||||||
1. Use |
this |
appliance |
only |
for |
its |
|
|
break |
when |
being |
replaced. |
|
|
||||||||||||||||||||||||||
|
|
|
for the |
electric |
current. |
|
|
|
|||||||||||||||||||||||||||||||
intended purpose |
as |
described |
|
|
NOTE: Setting |
the |
freezer |
|
|
|
|
||||||||||||||||||||||||||||
|
|
|
|
|
|
|
|
|
|
|
|
|
|
|
|||||||||||||||||||||||||
in |
this |
Owner's |
Manual. |
|
|
|
|
temperature |
controls toOFF |
|
Improper |
|
connection |
of |
the |
|
|||||||||||||||||||||||
2. This |
freezer |
must be |
properly |
|
|
does not remove power to theequipment grounding |
conductor |
||||||||||||||||||||||||||||||||
installed |
in |
accordance |
with |
the |
light |
circuit. |
|
|
|
|
|
|
|
|
may result in electric shock. Have |
||||||||||||||||||||||||
Installation |
Instructions |
before |
it |
|
10. |
Do not refreeze frozen foods |
the appliance |
checked |
by |
a qualified |
|||||||||||||||||||||||||||||
|
|
|
|
|
|
|
|
|
|
|
|
|
|||||||||||||||||||||||||||
is |
used. |
|
|
|
|
|
|
|
|
|
|
which |
have |
thawed |
completely. electrician |
or |
service |
technician |
|||||||||||||||||||||
3. Do |
not |
allow |
children |
to climb, |
|
|
|
|
|
|
|
|
|
|
|
|
|
|
if you |
are |
in |
doubt |
as |
to |
whether |
||||||||||||||
|
|
|
|
|
|
|
|
|
|
|
|
|
|
the appliance |
|
has |
been |
properly |
|||||||||||||||||||||
stand |
or |
hang on |
the |
shelves |
|
in |
|
WARNING |
|
|
|
|
|
|
|||||||||||||||||||||||||
|
|
|
|
|
|
|
|
|
|
|
|
|
e |
|
|
|
|
|
|
grounded. |
|
|
|
|
|
|
|
|
|
||||||||||
the freezer. They could seriously |
|
|
|
|
|
|
|
|
|
|
|
|
|
|
|
|
|
|
|
|
|
|
|||||||||||||||||
|
|
|
|
|
|
|
|
|
|
|
|
|
|
|
|
|
|
|
|
|
|
|
|
|
|||||||||||||||
injure |
themselves |
and |
damage |
|
RISK |
OF |
CHILD |
ENTRAPMENT |
Some |
local |
regulations |
may |
require |
||||||||||||||||||||||||||
the |
freezer. |
|
|
|
|
|
|
|
|
Child |
entrapment |
and |
suffocation |
a seperate ground. In such cases, |
|||||||||||||||||||||||||
4. After |
your |
|
freezer is |
in |
|
|
|
are |
not |
problems |
of |
the |
past. |
Junkedthe required |
|
accessory |
ground wire, |
||||||||||||||||||||||
|
operation, |
|
|
|
|
|
|
|
|
|
|
|
|
|
|
|
|
|
|
|
|
|
|
|
|
|
|||||||||||||
do |
not |
touch |
the |
cold |
surfacesor |
abandoned |
refrigeration |
products clamp |
and |
screw |
must |
be |
|
||||||||||||||||||||||||||
in |
the |
freezer |
compartment, |
|
|
are |
still |
dangerous |
- even |
if they |
purchasedwill |
seperately. |
|
|
|
||||||||||||||||||||||||
|
|
sit for •just a few days." If you are |
|
|
|
|
|
|
|
|
|
|
|
||||||||||||||||||||||||||
particularly |
when |
hands |
are |
|
|
|
|
|
|
|
|
|
|
|
|
|
|||||||||||||||||||||||
|
|
|
|
|
|
|
|
|
|
|
|
|
|
|
|
Never |
ground |
|
the appliance |
to |
|||||||||||||||||||
damp or wet. |
Skin |
may adheregetting rid of your old appliance, |
|
||||||||||||||||||||||||||||||||||||
plastic |
plumbing lines, gas |
|
lines or |
||||||||||||||||||||||||||||||||||||
to |
these |
extremely |
cold |
|
|
|
please |
follow |
these |
instructions |
to |
|
|||||||||||||||||||||||||||
|
|
|
help |
prevent |
accidents. |
|
|
|
|
water |
pipes. |
|
|
|
|
|
|
|
|
||||||||||||||||||||
surfaces. |
|
|
|
|
|
|
|
|
|
|
|
|
|
|
|
|
|
|
|
|
|
||||||||||||||||||
|
|
|
|
|
|
|
|
|
|
|
|
|
|
|
|
|
|
|
|
|
|
|
|
|
|||||||||||||||
|
|
|
|
|
|
|
|
|
|
|
|
|
|
|
|
|
|
|
|
|
|
|
|
|
|
|
|
|
|
|
|
|
|
|
|||||
5. Do |
not |
store |
or |
use |
gasoline |
Before |
You Throw |
Away |
Your |
Old |
CFC |
|
DISPOSAL |
|
|
|
|||||||||||||||||||||||
other |
flammable |
vapors |
and |
|
|
Refrigeration |
Product: |
|
|
|
|
|
Your old |
freezer |
may have |
a cooling |
|||||||||||||||||||||||
liquids in |
the |
vicinity |
of |
this |
or- |
Take off |
the |
doors. |
|
|
|
||||||||||||||||||||||||||||
|
|
|
system that |
used |
CFC's |
|
|
||||||||||||||||||||||||||||||||
any other |
appliance. |
|
|
|
|
|
|
|
|
|
|
|
|
|
|
|
|
|
|
|
|
||||||||||||||||||
|
|
|
|
- |
Leave |
the |
shelves |
in |
place |
so |
(chlorofluorocarbons). |
CFC's |
|
are |
|||||||||||||||||||||||||
6. In |
freezers |
with |
an |
automatic |
|
|
|||||||||||||||||||||||||||||||||
|
|
that |
children |
may not |
easily |
believed |
to |
harm |
stratospheric |
||||||||||||||||||||||||||||||
icemaker, |
avoid |
contact |
with |
the |
|||||||||||||||||||||||||||||||||||
climb |
inside. |
|
|
|
|
|
|
|
ozone. |
|
|
|
|
|
|
|
|
|
|
|
|||||||||||||||||||
moving parts of the ejector |
|
|
|
|
|
|
|
|
|
|
|
|
|
|
|
|
|
|
|
|
|
||||||||||||||||||
|
|
|
|
|
|
|
|
|
|
|
|
|
|
|
|
|
|
|
|
|
|
|
|
|
|
|
|
||||||||||||
mechanism, or with the heating |
Electrical |
|
Connection |
|
If you are throwing away an old |
||||||||||||||||||||||||||||||||||
element |
located |
on |
the |
bottom |
|
|
|
refrigeration product, make sure the |
|||||||||||||||||||||||||||||||
of the icemaker. Do not place The |
appliance comes with an UL |
CFC refrigerant is removed for |
|||||||||||||||||||||||||||||||||||||
fingers |
or |
hands |
on |
the |
|
|
listed, |
39wire |
power |
supply |
cord. |
proper disposal by a qualified |
|||||||||||||||||||||||||||
automatic |
icemaking |
|
|
|
|
The |
appliance |
requires |
a |
39wire |
servicer. If you intentionally release |
||||||||||||||||||||||||||||
mechanism |
while |
the |
freezer |
is |
|
this CFC |
refrigerant, |
you can be |
|||||||||||||||||||||||||||||||
plugged |
in. |
|
|
|
|
|
|
|
|
receptacle. |
|
|
|
|
|
|
|
|
|
|
subject to fines and imprisonment |
||||||||||||||||||
|
|
|
|
|
|
|
|
|
|
|
|
|
|
|
|
|
|
|
|
|
|
||||||||||||||||||
7. Unplug |
your freezer |
before |
|
|
The |
receptacle |
must |
be |
installed byunder |
provisions |
of |
environmental |
|||||||||||||||||||||||||||
|
|
|
|
|
|
|
|
|
|
|
|
|
|
|
|
legislation. |
|
|
|
|
|
|
|
|
|
||||||||||||||
cleaning |
and |
making |
repairs. |
|
|
a licensed |
electrician |
only. |
|
|
|
|
|
|
|
|
|
|
|
||||||||||||||||||||
|
|
|
|
|
|
|
|
|
|
|
|
|
|
|
|
|
|
|
|
|
|
|
|
|
|
|
|
||||||||||||
NOTE: We |
strongly |
recommend |
|
|
|
|
|
|
|
|
|
|
|
|
|
|
|
|
|
|
|
|
|
|
|
|
|
|
|
||||||||||
that |
any |
servicing be |
performed |
|
|
|
|
|
|
|
|
|
|
|
|
|
|
|
|
|
|
|
|
|
|
|
|
|
|
||||||||||
by |
a |
qualified |
individual. |
|
|
|
|
|
|
|
|
|
|
|
|
|
|
|
|
|
|
|
|
|
|
|
|
|
|
|
|
|
|||||||
4

IMPORTANT
Save these instructions for local |
Congratulations |
|||||
inspector's |
use. |
Observe all |
|
|||
governing |
codes |
and |
ordinances. |
|
|
|
Note to |
Installer3 Be |
sure to |
|
With the purchase of your new |
||
leave |
have opted for a modern, |
|||||
these instructions |
with |
the |
|
freezer you |
||
|
high2quality |
domestic appliance. |
||||
Consumer. |
|
|
|
|
||
|
|
|
|
|
|
|
Note to Consumer3 Keep these instructions with your Owner's Manual for future reference.
Definitions
Your freezer is distinguished by its economical energy consumption.
Each |
appliance which leaves our |
factory is inspected thoroughly to |
|
ensure |
that it functions properly and |
is in |
perfect condition. |
|
d WARNING |
d |
If you have any questions 3 |
|||||||
|
WARNING - This indicates that |
|
|
|
particularly |
concerning |
installation |
|||
|
|
|
|
|||||||
|
|
|
|
and connection of the appliance 3 |
||||||
|
death or serious injuries may |
|
|
|
please do not hesitate to contact our |
|||||
|
occur as a result of not |
observing |
|
service (see |
"Service"). |
|||||
|
|
|
|
|
|
|
customer |
|||
|
this warning. |
|
|
|
|
Further |
information and a selection |
|||
|
|
|
|
|
|
|
||||
|
|
|
|
|
|
|
||||
|
|
|
|
|
|
|
of our products can be found on our |
|||
|
d CAUTION |
d |
home |
page. |
|
|||||
|
|
|
|
|
|
|
Please |
read these operating |
||
|
CAUTION - This indicates that |
|
|
|
||||||
|
|
instructions as well as the |
||||||||
|
minor or moderate injuries or |
|
installation |
instructions |
and all |
|||||
|
damage may occur as a result |
|
ofinformation enclosed with the |
|||||||
|
not observing this warning. |
|
|
appliance |
and follow |
accordingly. |
||||
i
5

Your new appliance
These operating instructions refer to several models. Diagrams may vary.
1. |
Control |
panel |
4. |
Ice cube container |
7. |
Door |
storage bins |
|||
|
Freezer |
compartment |
|
Capacity |
max. |
11 lbs |
/ 5 kg |
Water |
filter |
|
2. |
|
|
|
|
8. |
|||||
|
for |
storing frozen food |
5. |
Freezer |
storage |
compartment |
|
|
||
3. |
Ice |
maker |
6. |
Freezer |
drawer |
|
|
|
|
|
6

Installation
|
|
|
|
|
Installation |
cavity |
|
|
Installing |
and |
|
|
|
|
|
|
||||||||||||||||||||
d WARNING |
d |
|
|
|
|
|
|
|
||||||||||||||||||||||||||||
|
|
|
|
|
|
|
|
|
|
|
|
|
It is important to observe the |
|
connecting |
the |
|
|
|
|
|
|||||||||||||||
|
|
|
|
|
|
|
|
|
|
|
|
|
|
|
|
|
|
|||||||||||||||||||
Do |
not |
install |
the appliance: |
|
|
specified |
dimensions |
of |
the |
|
|
appliance |
|
|
|
|
|
|
|
|||||||||||||||||
- |
outdoors, |
|
|
|
|
|
|
|
|
installation |
cavity |
for |
a |
trouble8free |
|
|
|
|
|
|
|
|
|
|
|
|
|
|
||||||||
|
|
|
|
|
|
|
|
d CAUTION |
d |
|
||||||||||||||||||||||||||
- |
in an |
environment |
with |
drippinginstallation |
of the appliance |
and |
for |
|
||||||||||||||||||||||||||||
water, |
|
|
|
|
|
|
|
|
|
|
the |
subsequent |
general |
view of the |
|
|
|
|
|
|
|
|
|
|
|
|
|
|
|
|||||||
|
|
|
|
|
|
|
|
|
|
furniture |
front. |
|
|
|
|
|
|
Have the appliance installed by |
an |
|||||||||||||||||
- |
in rooms which are |
at |
risk of |
|
|
|
|
|
|
|||||||||||||||||||||||||||
frost. |
|
|
|
|
|
|
|
|
|
|
In particular ensure that the |
cavity |
|
electrician |
according |
to |
the |
|
|
|
|
|||||||||||||||
|
|
|
|
|
|
|
|
|
|
|
is |
|
|
|
|
|
|
|
|
|
|
|
|
|
||||||||||||
|
|
|
|
|
|
|
|
|
|
|
|
|
square. |
Squareness |
can |
be |
checked |
enclosed |
installation |
instructions. |
|
|
|
|||||||||||||
The appliance is very heavy 9 for |
|
|
|
|
|
spirit level, After |
|
|
|
|
|
|
|
|
|
|
|
|
||||||||||||||||||
empty weight |
see |
the following |
by suitable |
means, |
e.g. |
installing the |
appliance, |
wait |
at |
|||||||||||||||||||||||||||
table: |
|
|
|
|
|
|
|
|
|
|
diagonal |
measurements, |
etc. |
|
|
least |
a |
half |
an hour |
before |
switching |
|||||||||||||||
|
|
|
|
|
|
|
|
|
|
|
|
|
|
|
|
|
|
|
||||||||||||||||||
Freezer |
18" |
|
255 lbs / 115 kgFurniture/fixtures |
|
|
|
on |
the |
appliance. |
During |
transit the |
|||||||||||||||||||||||||
|
|
|
|
oil |
in |
|
the |
refrigeration |
system |
may |
|
|||||||||||||||||||||||||
Freezer |
24" |
|
300 lbs / 135 kg |
new appliance will be mountedhave moved. |
|
|
|
|
|
|
|
|
||||||||||||||||||||||||
Freezer |
30" |
|
335 |
lbs |
/ |
150 kgThe |
|
|
|
|
|
|
|
|
||||||||||||||||||||||
|
|
|
|
|
|
|
|
|
|
|
|
|
securely to adjacent and overhead Before switching on the appliance |
|
||||||||||||||||||||||
|
|
|
|
|
|
|
|
|
|
|
|
|
|
|||||||||||||||||||||||
Installation |
room |
|
|
|
|
furniture/fixtures. |
|
|
|
|
|
for |
the |
first |
time, |
clean |
the |
inside |
of |
|||||||||||||||||
|
|
|
|
For |
this |
reason |
|
|
|
|
|
the |
appliance. |
|
|
|
|
|
|
|
||||||||||||||||
|
|
|
|
|
|
|
|
|
|
|
|
|
|
|
|
|
|
|
|
|
|
|
|
|
||||||||||||
The |
appliance |
should |
be |
installed |
it is essential that |
all |
|
|
|
|
|
|
|
|
|
|
|
|
|
|||||||||||||||||
in |
|
|
furniture/fixtures are |
|
|
|
|
|
|
|
|
|
|
|
|
|
|
|
|
|||||||||||||||||
a dry, well |
ventilated |
room. |
|
|
|
attachable |
|
|
|
|
|
|
|
|
|
|
|
|
|
|
|
|
||||||||||||||
|
|
|
connected securely to the base or |
|
|
|
|
|
|
|
|
|
|
|
|
|
|
|||||||||||||||||||
|
|
|
|
|
|
|
|
|
|
|
|
|
|
|
|
|
|
|
|
|
|
|
|
|
|
|
||||||||||
The ambient temperature should nothe wall |
by suitable |
means. |
|
|
|
|
|
|
|
|
|
|
|
|
|
|
|
|
|
|||||||||||||||||
drop below 55°F (13°C) or rise |
|
|
|
|
|
|
|
|
|
|
|
|
|
|
|
|
|
|
|
|
|
|
|
|
|
|
||||||||||
above 110°F |
(43°C), |
otherwise |
|
|
Base |
|
|
|
|
|
|
|
|
|
|
|
|
|
|
|
|
|
|
|
|
|
|
|||||||||
malfunctions |
may |
occur. |
|
|
|
|
|
|
|
|
|
|
|
|
|
|
|
|
|
|
|
|
|
|
|
|
|
|
||||||||
|
|
|
|
|
|
|
|
|
|
|
|
|
|
|
|
|
|
|
|
|
|
|
|
|
|
|
|
|||||||||
The |
installation |
location should |
not |
To ensure that the appliance is |
|
|
|
|
|
|
|
|
|
|
|
|
|
|
|
|
||||||||||||||||
installed |
securely |
and functions |
|
|
|
|
|
|
|
|
|
|
|
|
|
|
|
|
||||||||||||||||||
be |
exposed |
to |
direct |
sunlight |
and |
properly, |
the base must |
be |
flat |
and |
|
|
|
|
|
|
|
|
|
|
|
|
|
|||||||||||||
not |
placed near a |
heat |
source, such |
|
|
|
|
|
|
|
|
|
|
|
|
|
|
|
|
|
|
|
|
|
|
|
||||||||||
as an oven, |
radiator, |
etc. |
|
|
|
level. |
|
|
|
|
|
|
|
|
|
|
|
|
|
|
|
|
|
|
|
|
|
|
||||||||
|
|
|
The |
base |
must |
be |
made of hard, |
|
|
|
|
|
|
|
|
|
|
|
|
|
|
|||||||||||||||
If installation |
next |
to a |
heat |
|
|
|
|
|
|
|
|
|
|
|
|
|
|
|
|
|
||||||||||||||||
source is |
|
|
|
|
|
|
|
|
|
|
|
|
|
|
|
|
|
|
|
|
|
|
|
|||||||||||||
unavoidable, |
use |
a |
suitable |
|
|
|
rigid |
material. |
|
|
|
|
|
|
|
|
|
|
|
|
|
|
|
|
|
|
|
|
||||||||
|
|
|
|
|
|
|
|
|
|
|
|
|
|
|
|
|
|
|
|
|
|
|
|
|
|
|
||||||||||
insulating |
plate |
or |
observe |
the |
|
|
The |
installation area must be the |
|
|
|
|
|
|
|
|
|
|
|
|
|
|
||||||||||||||
following |
minimum |
|
distances |
from |
|
|
|
|
|
|
|
|
|
|
|
|
|
|
||||||||||||||||||
|
same height as |
the |
rest of |
the |
room. |
|
|
|
|
|
|
|
|
|
|
|
|
|
||||||||||||||||||
the |
heat |
source: |
|
|
|
|
|
|
|
|
|
|
|
|
|
|
|
|
|
|
|
|
||||||||||||||
|
|
|
|
|
|
|
|
|
|
|
|
|
|
|
|
|
|
|
|
|
|
|
|
|
|
|
|
|
|
|
||||||
- 1.2" (3 cm) from an electric cooker,
- 12" (30 cm) from an oil or solid8fuel cooker.
- Freezer |
18" |
560 |
lbs |
/ |
250 |
kg |
- Freezer |
24" |
780 |
lbs |
/ |
350 |
kg |
- Freezer |
30" |
950 |
lbs |
/ |
425 |
kg |
If in doubt, contact an |
architect |
or |
||||
a building |
expert. |
|
|
|
|
|
7

Connection |
|
|
|
Connecting |
the Switching |
|
off |
|
|
|||||||||||||||||||||||
to the |
power |
water |
|
|
|
|
|
and |
|
|
|
|
|
|
|
|
|
|||||||||||||||
supply |
|
|
|
|
|
|
|
A cold water connection is requireddisconnecting |
|
|
||||||||||||||||||||||
|
|
|
|
|
|
|
|
|
|
|
|
|
for operation of the automatic ice |
|
|
|
|
|
|
|
|
|
|
|
|
|||||||
|
|
|
|
|
maker. The water pressure must bethe |
|
appliance |
|
|
|||||||||||||||||||||||
d WARNING |
|
d |
|
|
|
|||||||||||||||||||||||||||
|
|
|
|
|
|
|
|
|
|
|
|
|
between 25 and 120 p.s.i. |
|
|
|
|
|
|
|
|
|
|
|
|
|
||||||
|
|
|
|
|
(1.72<8.25 |
bar). |
|
|
|
|
|
Switching |
off |
|
the |
|
|
|||||||||||||||
Avoid |
Electrical |
Shock |
|
|
|
|
|
|
|
|
|
|
||||||||||||||||||||
Hazard |
|
|
|
|
|
|
|
|
|
The installation must comply with |
appliance |
|
|
|
|
|
|
|||||||||||||||
- Plug |
into |
a |
grounded |
3 |
prong |
local plumbing regulations and localq |
Press |
theon/off |
button. |
|
|
|||||||||||||||||||||
outlet. |
|
|
|
|
|
|
|
|
|
and state |
laws. |
|
|
|
|
|
|
|
|
|
|
|
|
|
|
|
|
|
||||
|
|
|
|
|
|
|
|
|
|
|
|
|
|
|
|
|
i |
|
|
|
|
|
|
|
|
|
|
|
||||
- |
Do |
not |
remove |
ground |
prong. |
A separate shut;off valve |
must |
be |
If |
switching |
off |
the |
appliance |
for |
||||||||||||||||||
installed for the appliance water |
|
|
a |
period |
longer |
|
than 2 weeks, |
|
||||||||||||||||||||||||
- |
Do |
not |
use |
an |
adapter. |
|
|
|
|
|||||||||||||||||||||||
connection. |
|
|
|
|
|
|
remove the water filter. Before |
|
||||||||||||||||||||||||
- |
Do |
not |
use |
an |
extension cord.The shut;off valve for |
the water |
|
|
switching |
on |
the |
appliance |
|
|
||||||||||||||||||
|
|
again, install a new filter |
|
|
||||||||||||||||||||||||||||
|
|
|
|
|
|
|
|
|
|
instructions connection |
must |
not be |
behind |
the |
|
|
||||||||||||||||
Failure |
to |
|
follow |
these |
(see "Exchanging |
|
the |
filter"). |
|
|
||||||||||||||||||||||
can result |
in death, |
fire, |
or |
appliance. |
It is |
recommended to |
|
|
|
|
|
|
|
|
|
|
|
|
||||||||||||||
place the |
shut;off valve |
directly |
next |
|
|
|
|
|
|
|
|
|
|
|
||||||||||||||||||
electrical |
shock. |
|
|
|
|
|
|
|
|
|
|
|
|
|
|
|
|
|
||||||||||||||
|
|
|
|
|
|
to the |
appliance |
(base |
|
unit) or |
in |
Disconnecting |
the |
|
|
|||||||||||||||||
Improper |
connection |
of |
the |
|
|
|
||||||||||||||||||||||||||
another |
easily accessible |
location. |
appliance |
|
|
|
|
|
|
|||||||||||||||||||||||
equipment |
grounding |
conductor |
|
|
|
|
|
|
||||||||||||||||||||||||
|
|
|
|
|
|
|
|
If |
you |
do |
not use |
|
the |
appliance |
for |
|||||||||||||||||
may result |
in |
electric shock. |
|
|
|
|
|
|
|
|
|
|||||||||||||||||||||
|
|
|
|
|
|
|
|
a prolonged |
period: |
|
|
|
|
|
||||||||||||||||||
Have the |
appliance |
checked by |
|
|
|
|
|
|
|
|
|
|
|
|
|
|||||||||||||||||
a qualified |
electrician |
|
or |
service |
|
|
|
|
|
|
|
|
q |
Shut |
off |
the |
water |
supply |
line. |
|||||||||||||
|
|
|
|
|
|
|
|
|
||||||||||||||||||||||||
technician |
if you |
are |
in |
doubt as |
Switching |
on |
|
q |
Shut |
off |
the |
water |
supply |
line |
|
|||||||||||||||||
to |
whether |
the |
appliance |
has |
|
|
||||||||||||||||||||||||||
|
|
several |
hours before |
switching |
|
|||||||||||||||||||||||||||
been |
properly |
grounded. |
|
|
|
the |
|
appliance |
|
|
|
|||||||||||||||||||||
|
|
|
|
|
|
off |
the |
appliance. |
|
|
|
|||||||||||||||||||||
|
|
|
|
|
|
|
|
|
|
|
|
|
|
|
|
|
|
|
||||||||||||||
|
|
|
|
|
|
|
|
|
|
|
|
|
|
|
|
|
|
|
||||||||||||||
|
|
|
|
|
|
|
|
|
|
|
|
|
|
|
|
|
|
|
|
|
|
|
|
|
|
|
||||||
The appliance comes with an UL |
|
|
|
|
|
|
|
|
q |
Remove and discard the water |
||||||||||||||||||||||
listed, 3;wire power |
supply |
cord. |
q Press |
theon/off button. |
|
|
filter. |
Secure |
the |
filter cap! |
|
|
||||||||||||||||||||
The appliance requires a 3;wire |
When |
the |
appliance has been |
|
q |
|
receptacle. |
|
switched |
on, the appliance begins to |
|||
The receptacle must |
|
cool down. When the doors are |
q |
|||
be installed by |
the |
interior lights come |
on. |
|||
a licensed electrician |
only. |
open, |
|
|||
|
|
|
|
|
||
Take all food out of the appliance.
Pull |
out |
the mains plug or switc |
off |
the |
fuse. |
The receptacle |
must |
be fitted |
with |
i |
a 10A fuse or |
higher. |
Please |
observe |
|
in this coherence the following table:
Appliance MAX load at one time
|
|
|
|
|
i |
|
Freezer |
18" |
3.5 |
Ampere |
|||
|
|
|||||
Freezer |
24" |
4.0 |
Ampere |
|
|
|
Freezer |
30" |
4.5 |
Ampere |
|
|
The preset temperatures (factoryq |
Empty |
the |
ice |
cube |
container. |
|
settings) are reached after some |
Clean |
the |
appliance |
interior |
||
hours. Do not |
put any food inq |
|||||
the appliance |
beforehand. |
(see •Cleaning |
the appliance"). |
|||
|
|
|
|
|
||
|
q |
To prevent odors, leave the |
||||
Do not use the first ice cubes |
doors |
open. |
|
|
||
from the ice maker! Discard the |
|
|
|
|
|
|
ice production |
of the first |
|
|
|
|
|
24 hours after |
switching on the |
|
|
|
|
|
icemaker. |
|
|
|
|
|
|
To |
change the |
preset temperatures |
<> |
see •Setting |
the temperature". |
8

To remove the shelves: |
Drawers |
Functions
Door alarm
If one of the appliance doors is left open, an alarm signal sounds after one minute.
The alarm is switched off |
with the |
|
|
|
|
|
|
|
||
alarm offbutton and by closing the |
|
|
|
|
|
|
|
|||
door. If the door has still |
not beenq |
Lift |
the |
shelf |
at |
the |
front, moveq it To remove |
the drawers, lift them |
||
closed |
properly, |
the alarm |
sounds |
upwards |
as |
far |
as |
the notch on slightly and |
remove. |
|
again |
after one |
minute. |
|
the |
guide rail. |
|
|
|
||
Variable interior design
You |
can |
rearrange |
the |
shelves inside |
|
the |
appliance |
and |
the |
containers in |
|
the |
door |
as |
required. |
q |
|
Shelves
Insert the shelf at the required q position and press down.
The height of the shelves can be Door storage bin adjusted.
q Lift the container and remove.
qLift the shelf at the front and move it up or down in the guides.
qLower the shelf to the required position and snap it into the preset openings in the guide.
To |
replace |
the drawers, |
lift them |
|
at |
the |
front |
slightly and |
reinsert |
in |
the |
pullout. |
|
|
Move the drawer upwards and |
||||
slide it |
backwards. |
|
||
qInsert the container at the required height and press down.
9

Control panel
To utilize |
all the functions of your appliance, we recommend that you familiarize yourself thoroughly with th |
panel and |
the setting options. |
A |
on/off button |
|
|
|
F |
< |
> |
|
buttons |
|
||||||
Switches |
|
the |
|
appliance |
on |
and off.Select the menus in Setup mode. |
||||||||||
d |
ATTENTION! |
|
|
|
See |
section |
on •Setup mode". |
|||||||||
|
|
|
|
|
|
|
|
|
|
|||||||
The |
appliance is not isolated from |
The required temperature |
||||||||||||||
the |
mains when switched off by theadjustment |
is activated with the |
||||||||||||||
on/off button. |
|
|
|
< |
|
> |
buttons. |
|
||||||||
B |
ice |
button |
|
|
|
See |
section |
•Setting |
the |
|||||||
|
|
|
temperature". |
|
|
|||||||||||
|
|
|
|
|
|
|
|
|
|
|
||||||
Switches |
|
the |
|
ice maker |
on |
and off. |
|
|
|
|
|
|||||
See also |
the |
|
|
|
|
G |
+ |
+ |
buttons |
|
||||||
section on •Ice maker". |
|
|
|
|
|
|||||||||||
C |
alarm |
off |
button |
|
|
Select |
the |
available |
parameters of |
|||||||
|
|
the |
menu. |
|
|
|
||||||||||
Switches |
|
off |
|
the alarm. |
|
|
|
|
|
|||||||
|
|
|
|
See section on •Setup mode". |
||||||||||||
Warning |
messages via the |
display. |
||||||||||||||
The |
required |
temperature |
||||||||||||||
D |
super |
button |
|
|
|
|||||||||||
|
|
|
adjustment is activated with the |
|||||||||||||
|
|
|
|
|
|
|
|
|
||||||||
Switches |
|
the |
|
Super |
function on and+ + buttons. |
|
|
|||||||||
off. |
|
|
|
|
|
|
|
|
See section on •Setting the |
|||||||
See |
section |
on •Super |
function". |
temperature". |
|
|
||||||||||
E |
Display |
|
|
|
|
|
H |
setup |
button |
|
||||||
The set |
|
temperature |
of |
the |
appliance |
|
|
|
|
|
||||||
|
|
|
|
|
|
|
|
|
This button activates and also ends |
|||||||
is indicated |
on the |
display. |
Activated |
|
|
|
|
|
||||||||
|
|
|
|
|
|
|
|
|
setup mode. When Setup mode is |
|||||||
special functions are indicated via |
ended |
with |
thesetup |
button, the |
||||||||||||
symbols, e.g.SUPER $. |
|
|
changed settings are saved. |
|||||||||||||
In setup mode the menus |
as well Jas vacation |
button |
|
|||||||||||||
the |
setting options are indicated onSwitches Vacation mode on and off. |
|||||||||||||||
the |
display. |
|
|
|
|
|
See section on •Vacation mode". |
|||||||||
See |
section |
on •Setup |
mode". |
|||||||||||||
|
|
|
|
|
|
|
||||||||||
|
|
|
|
|
|
|
|
|
i |
|
Each button depression is |
|||||
|
|
|
|
|
|
|
|
|
|
|
acknowledged by a signal if the |
|||||
|
|
|
|
|
|
|
|
|
|
|
ON setting is activated in Setup |
|||||
|
|
|
|
|
|
|
|
|
|
|
mode, |
TONE menu. |
||||
The Super function is activated, see page 11.
The Vacation Mode is activated, see page 13.
Setting options in setup mode, see page 12.
An Alarm is indicated, see page 17.
A Filter message is indicated, see page 18
10
q Press thesetup button.
Setting |
the |
|
Super |
function |
|
|
|||||
temperature |
|
The Super function is used to freeze |
|
|
|||||||
|
|
|
|
|
large quantities of fresh food and |
|
|
||||
The |
temperature |
can |
be |
set from |
should be |
switched on |
some |
hours |
|
|
|
7 °F |
to ;9°F (;14°C to |
;23°C). |
before the fresh food is placed in the |
|
|
||||||
We recommend a |
setting |
of°F 0 |
freezer. In |
general, 4-6 hours |
is The |
first |
menu (temperature unit) |
||||
(;18 °C). |
|
|
|
adequate. |
If the |
max. freezing |
is displayed. |
||||
|
|
|
|
|
capacity is |
used, 24 hours |
are |
To |
switch |
to the next menu: |
|
|
|
|
|
|
|
|
|
|
|||
required.
When the Super function is activated, the appliance is cooled cold as possible to a preset temperature set at the factory.
The temperature can be changed with the+ buttons (warmer) or (colder). The temperature can be adjusted in °1F (0.5°C) steps.
To adjust the required temperature:
The function is activated by |
pressing |
|
|
|
|||
the super button. |
|
|
|
|
|
|
|
The SUPER $ symbol |
and |
the |
q Press |
the< or> button. |
|
||
The next menu |
and the |
current |
|||||
Super temperature are |
displayed. |
||||||
setting |
(usually |
On/Off) |
are |
||||
|
|
|
|||||
displayed.
qActivate the Setup mode with the < or> buttons.
The FREEZER symbol is displayed.
To select between the different setting options within one menu:
qSet the required temperature
|
with the+ |
(warmer) |
or (colder) |
The |
function is |
ended: |
|
|||||
|
|
|
|
|
|
|
|
|||||
|
buttons. |
|
|
|
- |
|
by |
pressing |
thesuper button |
|
||
|
|
|
|
|
|
|
|
again, |
|
|
|
|
i |
Depending |
on the |
model, |
the |
|
|
|
|
|
|||
|
|
|
|
|
|
|
||||||
|
appliance |
can also be switched- |
by |
activating |
the |
Eco function, |
q |
|||||
|
off via |
the temperature setting. - |
by |
activating |
the |
Vacation |
|
|||||
|
When |
the |
highest |
temperature |
|
|
mode, |
|
|
i |
||
|
|
|
|
|
|
|
|
|||||
|
has been |
reached,OFF is |
|
- |
|
by |
activating |
the |
Sabbath mode. |
|||
|
displayed. |
|
|
|
|
|
|
|
|
|
|
|
|
|
|
|
|
|
|
|
|
|
|
||
Press the + or ; button.
A modified setting is saved when the next menu is selected with the< or >button.
iAfter approx. 2 ½ days the freezer automatically switches back to the temperature set before Super function.
Setup mode
To end setup mode:
qPress thesetup button.
All modified settings are saved.
i |
If no button |
is |
pressed |
within |
|
12 seconds, |
Setup mode |
ends |
|
|
automatically. |
All |
modified |
|
|
settings are saved. The required |
|||
|
temperature |
is displayed |
again. |
|
There are several menus for adjusting the appliance functions to individual requirements. These adjustments can be made in Setup mode.
To activate Setup mode:
11

Settings which |
can be changed in setup mo |
||||
|
|
|
|
|
|
Menu |
|
Setting options |
Displayed text |
||
|
|
|
|
|
|
Temperature |
unit |
°F degrees( |
Fahrenheit) |
°F |
|
|
|
°C degrees( |
Celsius) |
°C |
|
Language |
|
English |
|
ENGLISH |
|
|
|
French |
|
FRANCAIS |
|
Tone |
|
On |
|
TONE |
|
|
|
Off |
|
|
|
Energy1saving |
mode (ECO function) |
On |
|
ECO MODE |
|
|
|
Off |
|
|
|
Temperature |
unit |
Language setting |
|
The temperature can be displayed |
Whenin the appliance has been |
||
degrees Fahrenheit° ( F) or degrees |
switched on, error messages and |
||
Celsius °( |
C). |
|
settings in Setup mode are |
q Press |
thesetup |
button. |
displayed in English. |
|
|||
Alternatively the information can be displayed in French.
The Eco function is activated in setup mode.
q |
Switch |
on Setup |
mode. |
Press |
the+ or( |
button |
to |
|
|
the> button |
q |
||||
q |
Press |
until English |
change ON/OFF. |
|
|
||
|
is displayed. |
|
|
|
|||
|
q |
Press |
thesetup |
button |
to save |
||
|
|
|
|||||
the setting.
The first menu (temperature unit) is displayed.
q Press the+ or( button to switch |
|
to FRANCAIS. |
ECONOMY is displayed. |
|
q Press thesetup button to save The function is ended by
qPress the + or 2 button to switchthe setting.
between degrees Fahrenheit°F) ( |
|
|
|
|
|
|
- |
switching off the Eco function in |
||||
or |
degrees Celsius°C)(. |
Energy'saving |
mode |
|
setup mode |
|
|
|||||
|
|
|
|
|
||||||||
q Press thesetup button to save |
When the Eco function is |
|
- |
activating |
the |
Super function |
||||||
activated, |
|
|
|
|
||||||||
the |
setting. |
the appliance |
switches to |
|
- |
changing |
the |
required |
||||
|
|
energy1saving |
mode. |
This |
Eco |
|
temperature |
of |
the appliance |
|||
|
|
required |
temperature |
set |
at |
the |
- |
switching |
off |
the appliance with |
||
|
|
factory |
is energetically more |
|
||||||||
|
|
|
|
the on/off |
button. |
|||||||
|
|
favourable. The background light of |
|
|||||||||
|
|
|
|
|
|
|
||||||
|
|
the display is |
reduced. |
|
|
|
|
|
|
|
||
12
Vacation |
Mode |
Sabbath |
Mode |
Freezing and |
||
If you are away for a prolonged |
When Sabbath mode is active |
storing |
||||
period, you can switch the appliance |
|
|
|
|
||
to an energetically |
more favourable |
- |
the Super |
function ends |
Store the frozen |
|
mode. When Vacation mode is |
|
(if switched |
on), |
|
||
|
|
|
|
produce |
||
active, |
|
- |
the ice maker |
switches off, |
||
|
|
|||||
- |
the |
appliance |
switches to |
- |
the acknowledge signal is |
|||||
|
energy6saving |
mode (see |
|
deactivated when the button is |
||||||
|
section |
on |
•Eco |
function"), |
|
pressed |
(if |
switched on), |
||
- |
the |
Super |
function ends |
- |
the interior |
light switches off, |
||||
|
(if switched |
on), |
|
- |
the background light of the |
|||||
|
|
|
|
|
|
|
||||
- |
the |
interior |
light |
switches off, |
|
display |
is |
reduced. |
||
- |
the |
ice |
maker |
switches off. |
To |
switch |
on |
Sabbath mode: |
||
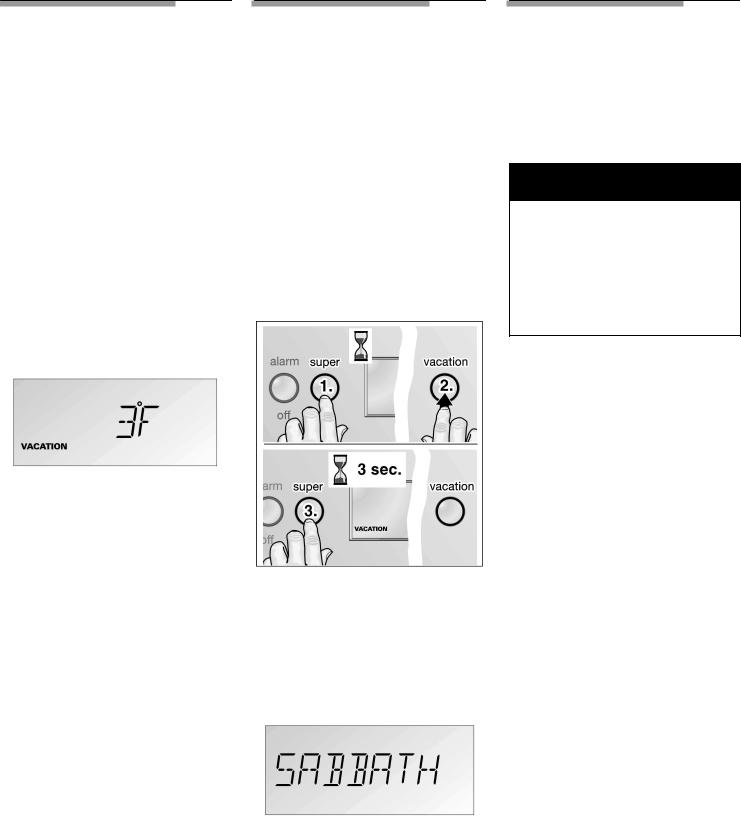
To switch on Vacation mode:
qPress thevacation button.
The VACATION symbol is displayed.
To end Vacation mode, press the |
|
|
|
|
|
vacation button. |
The previous |
|
|
|
|
settings and temperature values are |
|
|
|
|
|
used again. |
q |
Press |
and |
hold |
down superth |
|
|
button. |
|
|
|
|
q |
Press |
thevacation |
button. |
|
|
q |
Hold |
down |
thsuper button for |
|
|
|
a further 3 |
seconds. |
||
|
|
The VACATION symbol flashes |
|||
|
|
on the display. |
|
||
d CAUTION |
d |
|
|
|
|
Do not refreeze frozen |
food which |
|
is thawing or which has thawed. |
||
Boil or fry the food before |
||
refreezing it. |
|
|
No longer store the frozen produce for the max. storage period.
When purchasing deep6frozen food, comply with the following:
-Check whether the packaging is damaged.
- Check the sell6by date.
-The temperature of the
supermarket |
freezer must |
be |
lower than |
°0F (718°C). |
|
If not, the storage life of |
the food |
|
is reduced. |
|
|
-Purchase deep6frozen food last. Wrap in newspaper or place in a
cold bag and take home.
-At home immediately place deep6frozen food in the freezer compartment. Use the deep6frozen food before the sell6by date runs out.
Freezing food yourself
Freeze fresh, undamaged food only. To prevent food from losing its flavour or drying out, place in airtigh containers. Food should be frozen
solid as quickly as possible.
SABBATH is displayed.
To end Sabbath mode, press the vacation button. The previous settings and temperature values are used again.
13

How |
|
to |
|
wrap |
food |
Foods |
|
|
|
Storage |
Time |
|
||||||||||||
correctly |
|
|
|
|
|
|
|
|
Butter |
|
|
|
6 |
to |
9 |
months |
||||||||
q |
Place |
|
the |
food |
in |
the |
|
|
Milk, |
|
Cream |
|
|
|
|
|
|
|||||||
|
wrapping. |
|
|
|
|
Not |
|
|
|
|||||||||||||||
|
|
|
|
|
|
|
|
|
|
|
|
|
|
|
Cream |
cheese |
|
|
|
|
||||
q |
Press |
|
out |
all |
the |
air. |
|
|
|
recommended |
||||||||||||||
|
|
|
Cottage |
cheese |
|
|||||||||||||||||||
q |
Seal |
the |
wrapping. |
|
|
|
|
|
|
|
|
|
||||||||||||
|
|
|
Hard |
cheese |
|
4 |
to |
6 |
months |
|||||||||||||||
|
|
|
|
|
|
|
|
|
|
|
|
|
|
|
|
|||||||||
q |
Label |
|
the |
wrapping |
with |
the |
Eggs |
|
|
|
|
|
|
|
|
|
||||||||
|
|
contents |
and |
date. |
|
|
|
fresh, |
|
in |
shell |
|
Do |
not |
freeze! |
|||||||||
|
|
|
|
|
|
|
|
|
|
|
|
|
|
|
|
|
||||||||
The |
following |
products |
are |
not |
Raw |
yolks and |
whites |
9 |
to |
12 |
|
|
||||||||||||
suitable |
for |
wrapping |
food: |
|
|
|
|
|
|
months |
|
|
||||||||||||
|
|
|
|
|
|
|
|
|
|
|
|
|
|
|
|
|
|
|
|
|
|
|||
Wrapping |
|
paper, |
greaseproof |
paper, Mayonnaise |
|
Do |
not |
freeze! |
||||||||||||||||
cellophane, |
refuse |
|
bags |
and |
used |
Summer |
sausage |
|
|
|
|
|
||||||||||||
shopping |
|
bags. |
|
|
|
|
|
|
|
opened |
|
|
1 |
to |
2 |
months |
||||||||
|
|
|
|
|
|
|
|
|
|
|
|
|
|
|
|
|
||||||||
The |
following |
products |
are |
|
unopened |
|
1 |
to |
2 |
months |
||||||||||||||
suitable |
for |
wrapping |
food: |
|
|
|||||||||||||||||||
|
Bacon |
|
|
|
1 |
month |
|
|
||||||||||||||||
|
|
|
|
|
|
|
|
|
|
|
|
|
|
|
|
|
|
|
|
|||||
Plastic film, polyethylene blown film,Luncheon meat |
|
1 |
to |
2 |
month |
|||||||||||||||||||
aluminium foil and freezer tins. |
Vacuum"packed |
diners, |
3 |
to |
4 |
months |
||||||||||||||||||
These |
products |
can be |
purchased |
|||||||||||||||||||||
from your |
dealer. |
|
|
|
|
|
|
unopened |
|
|
|
|
|
|
||||||||||
|
|
|
|
|
|
Corned |
Beef |
|
1 |
month |
|
|
||||||||||||
The |
following |
products |
are |
|
|
|
|
|||||||||||||||||
|
|
|
|
|
|
(drained) |
|
|
||||||||||||||||
suitable |
for |
sealing |
the |
wrapped Beef, |
|
Veal, Lamb, Pork |
|
|
|
|
|
|||||||||||||
food: |
|
|
|
|
|
|
|
|
|
|
|
|
|
|
|
|
|
|
|
|
|
|
||
Rubber |
bands, |
plastic |
clips, |
string, |
fresh |
|
|
|
|
4 |
to |
12 |
|
|
||||||||||
cold1resistant |
adhesive |
tape or |
|
|
|
|
|
months |
|
|
||||||||||||||
cooked |
|
|
2 |
to |
3 |
month |
||||||||||||||||||
similar. |
|
|
|
|
|
|
|
|
|
|
|
|
|
|
||||||||||
|
|
|
|
|
|
|
|
|
|
|
|
|
|
|
|
|
|
|
|
|
|
|||
|
|
|
|
|
|
|
|
|
|
|
|
|
|
|
Poultry |
|
|
|
|
|
|
|
||
i |
|
Bags |
|
and |
|
polyethylene |
blown |
fresh |
|
|
|
|
9 |
to |
12 |
|
|
|||||||
|
|
|
|
|
|
|
|
|
|
|||||||||||||||
|
|
film can be sealed with a film |
|
|
|
|
|
months |
|
|
||||||||||||||
|
|
sealer. |
|
|
|
|
|
|
|
|
|
|
cooked |
|
|
4 |
to |
6 |
month |
|||||
Thawing |
|
the |
frozen |
Vegetables |
|
|
|
|
|
|
||||||||||||||
|
Asparagus |
|
|
|
|
|
|
|||||||||||||||||
food |
|
|
|
|
|
|
|
|
|
|
|
|
Broccoli, |
green peas, lima |
|
|
|
|
|
|||||
Depending |
on |
the |
type |
and |
|
beans, |
cauliflower |
8 |
to |
10 |
|
|
||||||||||||
purpose |
|
|
|
|
|
|
||||||||||||||||||
of the |
food, |
thaw: |
|
|
|
|
|
Carrots, |
beets and turnips, |
months |
|
|
||||||||||||
- |
|
at |
room |
temperature |
|
|
|
lettuce |
|
|
|
|
|
|
|
|
||||||||
|
|
|
|
Onions, |
peppers |
|
|
|
|
|
|
|||||||||||||
|
|
|
|
|
|
|
|
|
|
|
|
|
|
|
|
|
|
|
|
|
||||
- |
|
in |
the |
refrigerator |
|
|
|
|
Fruits |
|
|
|
|
|
|
|
|
|
||||||
|
|
|
|
|
|
|
|
|
|
|
|
|
|
|
|
|
|
|
|
|
|
|
|
|
- |
|
in |
an |
electric |
oven, |
with/withoutApples |
|
|
|
8 |
months |
|||||||||||||
|
|
hot |
air |
fan |
|
|
|
|
|
|
|
|
|
|
|
|
(cooked) |
|
|
|||||
- |
|
in |
the |
microwave |
oven |
|
|
Apricots, |
berries, |
cherries |
6 |
months |
||||||||||||
|
|
|
|
|
|
|
|
|
|
|
|
|
||||||||||||
|
|
|
|
|
|
|
|
|
|
|
|
|
|
|
Grapes |
|
|
|
1 |
month |
|
|
||
|
|
|
|
|
|
|
|
|
|
|
|
|
|
|
|
|
|
|
|
(whole) |
|
|
||
|
|
|
|
|
|
|
|
|
|
|
|
|
|
|
Pineapples, cut |
|
6 |
to |
12 |
|
|
|||
|
|
|
|
|
|
|
|
|
|
|
|
|
|
|
|
|
|
|
|
months |
|
|
||
|
|
|
|
|
|
|
|
|
|
|
|
|
|
|
Source: United |
States Department of |
||||||||
|
|
|
|
|
|
|
|
|
|
|
|
|
|
|
|
|
|
Agricultuire, FSIS |
|
|
|
|
|
|
IceMaker
As soon as the freezer has cooled
down to |
freezing |
temperature, the |
|
ice |
cube |
tray fills with water. Cold a |
|
is |
blown |
directly |
over the tray. |
As soon as they are frozen, the ice cubes fall into the ice cube container.
When the ice cube container is full, the ice maker switches off automatically.
The ice maker can produce approx. 125 ice cubes within 24 hours.
d CAUTION |
d |
|
|
|
|
Do not place any bottles |
or |
food |
for rapid cooling in the ice cube |
||
container. The ice maker may |
||
become blocked and be |
|
|
damaged. |
|
|
|
|
|
Switching on the ice maker
qMake sure that the ice cube container is under the ice maker and has been inserted as far as possible.
qPress the Iice button (if not yet switched on).
Switching off the ice maker
iThe water supply line must be shut off several hours before the appliance or ice maker is switched off.
To switch off the ice maker:
q Press the ice button.
14

Do |
the |
ice |
|
|
|
|
|
|
|
|
|
|
|
|
|
|
|
|
|
|
|
|
||||||||||
cubes have |
|
|
|
|
|
|
|
|
|
|
|
|
|
|
|
|
|
|
||||||||||||||
|
|
|
|
|
|
|
|
|
|
|
|
|
|
|
|
|
|
|||||||||||||||
an |
|
unusual |
odor? |
|
|
|
|
|
|
to |
save |
Operating |
|
|
|
|
|
|||||||||||||||
Ice is a porous material which canHow |
|
|
|
|
|
|
||||||||||||||||||||||||||
absorb odors from the environment.energy |
|
|
|
|
noises |
|
|
|
|
|
|
|||||||||||||||||||||
Ice cubes which have been in the ice |
|
|
|
|
|
|
|
|
|
|
|
|
|
|
|
|
|
|
||||||||||||||
cube container for a long time may |
|
|
|
|
|
|
|
|
|
|
|
|
|
|
|
|
|
|
||||||||||||||
absorb |
such |
odors, |
stick together |
- |
Install the appliance in a dry, |
Quite |
|
normal |
noises |
|
||||||||||||||||||||||
and |
slowly become |
smaller. |
|
|
|
|
ventilated |
room; do not expose |
|
|
|
|
|
|
|
|
|
|
|
|||||||||||||
|
|
|
|
to direct sunlight and do not |
Grumbling 4 refrigerating unit is |
|
||||||||||||||||||||||||||
|
|
|
|
|
|
|
|
|
|
|
|
|
|
|
||||||||||||||||||
We |
recommend that these |
ice |
cubes |
place near a heat source |
running. Fans in the recirculating air |
|||||||||||||||||||||||||||
are |
no |
longer |
used. |
|
|
|
|
|
|
(e.g. radiator, |
cooker). |
system |
are |
running. |
|
|
|
|
|
|||||||||||||
Other |
means |
of |
preventing odors: |
|
|
If required, |
use |
an |
insulating |
Bubbling, |
humming |
or |
|
gurgling |
|
|||||||||||||||||
|
|
plate. |
|
|
|
|
|
|
|
|
||||||||||||||||||||||
|
|
|
|
|
|
|
|
|
|
|
|
|
|
|
|
|
|
|
|
noises |
4 |
refrigerant |
is |
flowing |
|
|||||||
- |
The |
ice |
cube |
container |
should |
|
|
|
|
|
|
|
|
|||||||||||||||||||
Allow |
warm |
food |
and drinks tothrough |
the |
tubes. |
Water is flowing |
||||||||||||||||||||||||||
|
be |
|
cleaned |
occasionally |
with |
|
- |
|||||||||||||||||||||||||
|
|
|
|
|
cool down |
before |
placing them into the |
ice |
|
maker. |
|
|
|
|
|
|||||||||||||||||
|
warm |
water. Make sure |
that |
you |
|
|
|
|
|
|
||||||||||||||||||||||
|
in the |
appliance. |
|
|
|
|
|
|
|
|
|
|
|
|
|
|||||||||||||||||
|
move |
the ice |
maker |
sensor |
arm |
|
|
Clicking |
4 motor |
is |
switching on |
or |
||||||||||||||||||||
|
|
|
|
|
|
|
|
|||||||||||||||||||||||||
|
up to the STOP position before- |
Defrost frozen |
food by placing |
off. Solenoid |
|
valve |
on |
the water |
|
|||||||||||||||||||||||
|
it |
|
|
|
|
|
|
|
|
|
|
|||||||||||||||||||||
|
cleaning |
the container. |
Rinse |
|
|
in the refrigerator. The low |
connection |
is |
opening/closing. |
|
||||||||||||||||||||||
|
out |
and |
wipe |
dry. |
|
|
|
|
|
temperature of the frozen food |
Rumbling |
4 |
|
ice cubes are falling into |
||||||||||||||||||
- |
Check |
the |
contents |
of |
the |
|
|
|
will refrigerate the food in the |
the ice |
cube |
container. |
|
|
|
|
||||||||||||||||
|
freezer |
for |
spoilt |
or |
out3of3date |
refrigerator compartment. |
Rotating |
noises 4 |
to |
prevent the |
ice |
|||||||||||||||||||||
|
|
|
|
|
|
|
|
|||||||||||||||||||||||||
|
food. |
All |
odorous foods |
should - |
Open |
the |
appliance door as |
|||||||||||||||||||||||||
|
cubes from |
sticking |
together, |
|
||||||||||||||||||||||||||||
|
be |
|
wrapped thoroughly |
or |
|
|
|
briefly |
as |
possible! |
|
|
|
|||||||||||||||||||
|
|
|
|
|
|
|
a metal |
rod |
rotates continuously |
|
||||||||||||||||||||||
|
stored |
in |
airtight |
containers |
to |
|
|
|
|
|
|
|
|
|||||||||||||||||||
|
|
|
|
|
|
|
|
in the ice |
maker. |
|
|
|
|
|
|
|||||||||||||||||
|
prevent the |
build3up |
of |
odors. |
|
|
|
|
|
|
|
|
|
|
|
|
|
|||||||||||||||
|
|
|
|
|
|
|
|
|
|
|
|
|
|
|
|
|
|
|
||||||||||||||
-The water filter may have to be
replaced in some models.
-In some cases the quality of theDefrosting water connection in the house
should be checked.
Noises which can easily be eliminated
The appliance is not level
Level |
the appliance with the aid of |
a spirit |
level. |
Use the height3adjustable feet or place something underneath.
Drawers, baskets or storage areas wobble or stick
Check the |
removable parts |
and, |
|
if required, |
reinsert |
them. |
|
Receptacles are |
touching |
each |
|
other |
|
|
|
Move receptacles away from each other.
15

|
|
|
|
|
|
|
|
|
|
|
|
|
|
|
|
|
q |
Wash and then rinse shelves |
|
|
|
|
|
|
|
|
|
|
|
|
|
|
|||||||||
|
|
|
|
|
|
|
|
|
|
|
|
|
|
|
|
|
|
|
|
|
|
|
|
|
|
|
|
|
|
|
|||||||||||
Cleaning |
the |
|
|
|
and |
containers |
in |
|
lukewarm |
|
Odors |
|
|
|
|
|
|
|
|
||||||||||||||||||||||
|
|
|
soapy |
water. |
|
|
|
|
|
|
|
|
|
|
|
|
|
|
|||||||||||||||||||||||
|
|
|
|
|
|
|
|
|
|
|
|
|
|
|
|
|
|
|
|
|
|
|
|
|
|
|
|
|
|
|
|
|
|
|
|
|
|||||
appliance |
|
|
|
|
|
|
q |
Carefully remove |
persistent dirt |
|
|
|
|
|
|
|
|
|
|
|
|
|
|
||||||||||||||||||
|
|
|
|
|
|
|
with |
a |
soft |
plastic |
brush. |
|
d WARNING |
|
d |
||||||||||||||||||||||||||
|
d WARNING |
|
d |
|
|
q |
To |
prevent |
stains, |
dry shelves |
|
|
|||||||||||||||||||||||||||||
|
|
|
|
|
and containers with a soft cloth |
To avoid electrical shock which |
|
||||||||||||||||||||||||||||||||||
|
To avoid electrical shock which |
|
|
immediately |
after |
cleaning. |
|
can cause |
severe |
personal injury |
|||||||||||||||||||||||||||||||
|
|
|
|||||||||||||||||||||||||||||||||||||||
|
|
q |
Check |
|
the |
ventilation |
openings |
|
or death, disconnect power to |
||||||||||||||||||||||||||||||||
|
can cause |
|
severe |
personal injury |
|
|
appliance |
before |
cleaning. After |
||||||||||||||||||||||||||||||||
|
or death, disconnect power to |
|
on |
the |
panel. |
|
|
|
|
|
|
cleaning, |
reconnect power. |
||||||||||||||||||||||||||||
|
q |
Remove |
dirt with |
|
a |
small brush. |
|||||||||||||||||||||||||||||||||||
|
appliance |
before cleaning. |
|
|
|
|
|
|
|
|
|
|
|
|
|
|
|
|
|
||||||||||||||||||||||
|
|
|
|
|
|
|
|
|
|
|
|
|
|
|
|
|
|
||||||||||||||||||||||||
|
After cleaning, |
reconnect |
power. |
q |
After |
cleaning: |
|
|
|
|
|
|
If the appliance is emitting |
||||||||||||||||||||||||||||
|
|
|
|
|
|
|
|
|
|
|
|
|
|
|
|
|
|
|
|
|
|
|
|||||||||||||||||||
|
|
|
|
|
|
|
|
|
|
|
|
|
|
|
|
|
|
|
|
|
|
|
|
|
|
|
|
|
|||||||||||||
|
|
|
|
|
|
|
|
|
|
|
|
|
|
|
|
|
|
Switch |
on |
the |
appliance |
with |
the |
|
|
odors: |
|
|
|
|
|
|
|
||||||||
|
|
|
|
|
|
|
|
|
|
|
|
|
|
|
|
|
|
on/off |
button. |
|
|
|
|
|
|
unpleasant |
|
|
|
|
|
|
|
||||||||
|
d WARNING |
|
d |
|
|
|
|
|
|
|
|
|
q |
Switch off the appliance with |
|||||||||||||||||||||||||||
|
|
|
|
|
|
|
|
|
|
|
|
|
|
|
|
||||||||||||||||||||||||||
|
|
|
|
i |
|
|
|
|
|
|
|
|
|
|
|
|
|||||||||||||||||||||||||
|
|
|
|
|
|
|
|
|
|
|
|
|
|
|
|
|
Have |
your |
dealer |
|
inform |
you |
|
|
the |
on/off |
button! |
|
|
|
|||||||||||
|
To |
avoid |
personal |
injuries |
or |
|
|
|
|
|
|
|
|
||||||||||||||||||||||||||||
|
|
|
|
about |
special cleaning and careq |
Take |
all |
food |
out |
of |
|
the |
|||||||||||||||||||||||||||||
|
property |
damage, |
observe the |
|
|
|
|
||||||||||||||||||||||||||||||||||
|
|
|
|
information |
for |
appliance |
|
|
|
appliance. |
|
|
|
|
|
|
|
|
|||||||||||||||||||||||
|
following: |
|
|
|
|
|
|
|
|
|
|
|
|
|
|
|
|
|
|
|
|
|
|
|
|||||||||||||||||
|
|
|
|
|
|
|
|
|
|
|
|
|
surfaces. |
|
|
|
|
|
|
|
|
|
|
|
|
|
|
|
|
||||||||||||
|
|
|
|
|
|
|
|
|
|
|
|
|
|
|
|
|
|
|
|
|
|
|
|
|
|
|
|
|
|
|
|
|
|||||||||
|
|
|
|
|
|
|
|
|
|
|
|
|
|
|
|
|
|
|
|
|
|
|
|
|
q |
Clean |
the |
interior. |
|
|
|
|
|
||||||||
- |
Do |
not |
|
clean the |
appliance |
|
with |
Wipe |
appliance |
surfaces |
with |
|
|
|
|
|
|
||||||||||||||||||||||||
|
|
|
|
|
|
|
|
|
|
|
|
|
|
|
|
||||||||||||||||||||||||||
|
a steam |
|
cleaner. |
|
|
|
|
|
|
|
q |
|
|
See |
section on |
•Cleaning the |
|||||||||||||||||||||||||
|
|
|
|
|
|
|
|
|
|
a damp |
cloth. |
|
|
|
|
|
|
|
|||||||||||||||||||||||
|
|
|
|
|
|
|
|
|
|
|
|
|
|
|
|
|
appliance". |
|
|
|
|
|
|
|
|
||||||||||||||||
|
|
|
|
|
|
|
|
|
|
|
|
|
|
|
|
|
|
|
|
|
|
|
|
|
|
|
|
|
|
|
|
|
|||||||||
|
|
|
|
|
|
|
|
|
|
|
|
|
|
|
|
|
|
Then |
immediately |
wipe dry. |
|
|
|
|
|
|
|
|
|
|
|||||||||||
- |
Do |
not |
|
let |
the |
water |
used |
|
for |
|
|
q |
Thoroughly |
clean all |
packing |
||||||||||||||||||||||||||
|
cleaning |
drip |
onto |
the |
light |
or |
|
|
|
|
|
|
|
|
|
|
|
|
|||||||||||||||||||||||
|
|
|
|
|
|
|
|
|
|
|
|
|
|
containers |
used |
in |
the |
||||||||||||||||||||||||
|
control panel. |
|
|
|
|
|
|
|
|
|
|
|
|
|
|
|
|
|
|
|
|
|
|||||||||||||||||||
|
|
|
|
|
|
|
|
|
|
|
|
|
|
|
|
|
|
|
|
|
|
appliance. |
|
|
|
|
|
|
|
|
|||||||||||
|
|
|
|
|
|
|
|
|
|
|
|
|
|
|
|
|
|
|
|
|
|
|
|
|
|
|
|
|
|
|
|
|
|
|
|
|
|
||||
- |
Do |
not |
|
use |
abrasive |
or acidic |
|
|
|
|
|
|
|
|
|
|
|
|
q |
Pack |
strong4smelling |
food in |
|||||||||||||||||||
|
cleaning |
agents or |
solvents |
|
|
|
|
|
|
|
|
|
|
|
|
|
|
||||||||||||||||||||||||
|
|
|
|
|
|
|
|
|
|
|
|
|
|
|
|
airtight |
containers |
to |
|
prevent the |
|||||||||||||||||||||
|
which |
may |
damage |
the |
|
|
|
|
|
|
|
|
|
|
|
|
|
|
|
|
|
||||||||||||||||||||
|
|
|
|
|
|
|
|
|
|
|
|
|
|
|
|
|
build4up |
of |
odors. |
|
|
|
|
|
|||||||||||||||||
|
surfaces |
of |
the |
appliance. |
|
|
|
|
|
|
|
|
|
|
|
|
|
|
|
|
|
|
|
|
|||||||||||||||||
|
|
|
|
|
|
|
|
|
|
|
|
|
|
|
|
|
|
|
|
|
|
|
|
|
|
|
|
||||||||||||||
|
- Never clean shelves and |
|
|
|
|
|
|
|
|
|
|
|
|
|
|
q |
Stack |
food |
in |
the |
appliance. |
||||||||||||||||||||
|
|
|
|
|
|
|
|
|
|
|
|
|
|
|
|
|
|
|
|
|
|
|
|
|
|
|
|
||||||||||||||
|
containers |
in |
the |
dishwasher. |
|
|
|
|
|
|
|
|
|
|
|
|
|
|
q |
Switch on the appliance with the |
|||||||||||||||||||||
|
The |
parts |
may warp. |
|
|
|
|
|
|
|
|
|
|
|
|
|
|
|
|
|
on/off |
button. |
|
|
|
|
|
|
|
||||||||||||
|
|
|
|
|
|
|
|
|
|
|
|
|
|
|
|
|
|
|
|
|
|
|
|
|
|
|
|
|
q |
After |
24 |
hours |
check |
whether |
|||||||
q |
Switch |
off |
the |
appliance |
with |
|
|
|
|
|
|
|
|
|
|
|
|||||||||||||||||||||||||
|
|
|
|
|
|
|
|
|
|
|
|
the |
odors |
have |
been |
eliminated. |
|||||||||||||||||||||||||
|
|
the |
on/off |
button! |
|
|
|
|
|
|
|
|
|
|
|
|
|
|
|
|
|
||||||||||||||||||||
|
|
|
|
|
|
|
|
|
|
|
|
|
|
|
|
|
|
|
|
|
|
|
|
|
|
|
|
|
|
|
|||||||||||
|
|
Pull out the mains plug or |
|
|
|
|
|
|
|
|
|
|
|
|
Eliminating |
persistent |
odors |
||||||||||||||||||||||||
|
|
switch |
off |
the |
fuse. |
|
|
|
|
|
|
|
|
|
|
|
|
|
|
|
q |
Switch off the appliance with the |
|||||||||||||||||||
|
|
|
|
|
|
|
|
|
|
|
|
|
|
|
|
|
|
|
|
|
|
|
|
|
|
|
|
|
|||||||||||||
q |
Clean |
the |
door |
seal |
with water |
|
|
|
|
|
|
|
|
|
|
|
|
|
on/off |
button! |
|
|
|
|
|
|
|
||||||||||||||
|
|
only |
|
and |
dry |
thoroughly. |
|
|
|
|
|
|
|
|
|
|
|
|
|
|
q |
Take all food out of the |
|||||||||||||||||||
|
|
|
|
|
|
|
|
|
|
|
|
|
|
|
|
|
|
|
|
|
|
|
|
|
|
|
|
|
|||||||||||||
q |
Clean |
the |
appliance |
with |
|
|
|
|
|
|
|
|
|
|
|
|
|
|
|
appliance. |
|
|
|
|
|
|
|
|
|||||||||||||
|
|
lukewarm |
water |
and |
a |
little |
|
|
|
|
|
|
|
|
|
|
|
|
|
|
q |
Remove |
shelves |
and |
|
containers. |
|||||||||||||||
|
|
washing4up |
liquid. |
|
|
|
|
|
|
|
|
|
|
|
|
|
|
|
|
|
|
|
|||||||||||||||||||
|
|
|
|
|
|
|
|
|
|
|
|
|
|
|
|
|
|
|
|
|
|
|
|
|
|
|
|
|
|
|
|
|
|||||||||
q |
Do |
not |
let |
the |
water |
used |
for |
|
|
|
|
|
|
|
|
|
|
|
|
q |
Fill the |
interior |
|
with |
wrinkled |
||||||||||||||||
|
|
|
|
|
|
|
|
|
|
|
|
|
newspaper |
(not |
magazine |
||||||||||||||||||||||||||
|
|
cleaning |
|
drip |
onto |
the |
control |
|
|
|
|
|
|
|
|
|
|
|
|
|
|||||||||||||||||||||
|
|
|
|
|
|
|
|
|
|
|
|
|
|
|
|
paper). |
|
|
|
|
|
|
|
|
|
||||||||||||||||
|
|
panel |
or |
light. |
|
|
|
|
|
|
|
|
|
|
|
|
|
|
|
|
|
|
|
|
|
|
|
|
|
|
|
|
|
||||||||
|
|
|
|
|
|
|
|
|
|
|
|
|
|
|
|
|
|
|
|
|
|
|
|
|
|
|
|
|
|
|
|
|
|
||||||||
|
|
|
|
|
|
|
|
|
|
|
|
|
|
|
|
|
|
|
|
|
|
|
|
|
|
|
|
|
q |
Place |
several |
charcoal |
|||||||||
|
|
|
|
|
|
|
|
|
|
|
|
|
|
|
|
|
|
|
|
|
|
|
|
|
|
|
|
|
|
briquettes on |
the |
paper. |
|||||||||
|
|
|
|
|
|
|
|
|
|
|
|
|
|
|
|
|
|
|
|
|
|
|
|
|
|
|
|
|
q |
Close |
the door and leave closed |
||||||||||
|
|
|
|
|
|
|
|
|
|
|
|
|
|
|
|
|
|
|
|
|
|
|
|
|
|
|
|
|
|
for 152 |
days. |
|
|
|
|
|
|
|
|||
16
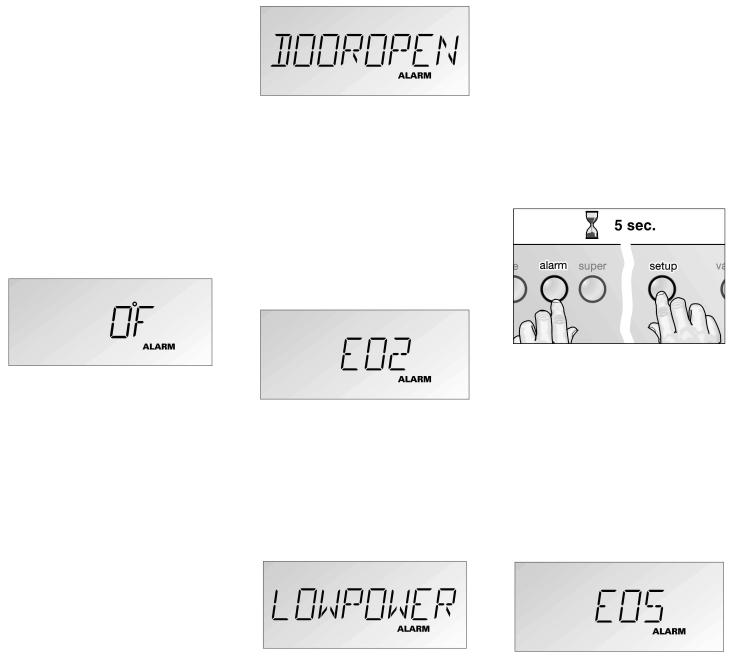
|
|
|
|
|
|
Door |
alarm |
|
|
|
|
|
|
|
|
||
Warning |
|
|
|
|
|
Appliance |
|||||||||||
|
|
|
|
|
|
|
|
|
|||||||||
messages |
|
|
|
|
|
|
|
self!test |
|
|
|
||||||
via the |
display |
|
|
|
|
|
|
Before you call customer service, |
|||||||||
|
|
|
|
|
|
|
|
|
|
|
|
conduct an |
appliance self*test. |
||||
If several |
warning |
messages are |
Cause |
|
|
|
|
q |
Switch |
off the |
appliance and |
||||||
|
|
|
|
|
|
|
|
|
|
||||||||
displayed simultaneously, deal with - |
|
|
|
|
|
||||||||||||
An |
appliance door |
has |
not been |
wait 5 |
minutes. |
||||||||||||
each |
message individually. |
|
|
closed |
properly or |
has |
been |
|
|
|
|
|
|
||||
|
|
|
|
|
|
|
q |
Switch |
on the |
appliance. |
|||||||
While |
a |
warning |
message |
is |
|
open |
too long. |
|
|
||||||||
|
|
|
|
Keep the door |
closed. |
||||||||||||
displayed, |
buttons |
cannot |
be |
|
|
|
|
|
|
|
|||||||
Remedial |
action |
|
|
|
|
|
|
|
|
||||||||
pressed. |
|
|
|
|
|
|
|
|
|
|
|
|
|||||
|
|
|
|
|
Close |
the door. |
|
|
|
|
|
|
|
|
|||
|
|
|
|
|
|
q |
|
|
|
|
|
|
|
|
|||
Temperature |
alarm |
|
The |
display goes |
out. |
|
|
|
|
|
|
|
|||||
|
|
|
|
|
|
|
|
|
|
|
|
||||||
|
|
|
|
|
|
Sensor |
fault |
|
|
|
|
|
|
|
|
||
|
|
|
|
|
|
|
|
q |
Simultaneously hold down |
the |
|
A temperature alarm is |
indicated |
by |
|
|
|
|
setup andalarm |
off buttons |
for |
||
|
|
|
|
5 seconds. |
|
|
|||||
the |
required temperature |
flashing |
|
|
|
|
|
|
|
||
|
|
|
|
|
|
|
|
||||
and |
theALARM symbol coming on. Cause |
|
|
q |
The self*test starts. |
|
|||||
A signal also sounds if |
the |
Tone |
- |
A |
technical |
defect is |
possible. |
Different messages are |
|
||
function has been activated |
in setup |
|
|
|
|
displayed in succession. |
|
||||
mode. |
|
|
Remedial action |
If a fault is detected during the |
|||||||
|
|
|
|
|
|
||||||
|
|
|
|
|
|
|
|
||||
Cause |
|
|
q |
Conduct an |
appliance |
self*test. self*test, theALARM |
symbol and |
||||
- |
Power failure |
|
|
Low |
voltage |
a corresponding error |
message, |
|
|||
|
|
e.g. for a sensor fault, are displayed. |
|||||||||
|
|
|
|
||||||||
-Large quantities of fresh
produce placed in the appliance
-Fault with the appliance
Remedial action
qPress thealarm button.
|
The signal stops. The highest |
The |
display |
light |
has |
gone out. |
Inform |
your |
dealer |
or appliance |
|||||||
|
temperature |
in |
the appliance is |
|
|
|
|
|
|
servicer |
about |
the |
error |
message. |
|||
|
displayed |
for |
|
several |
seconds. |
Cause |
|
|
|
|
|||||||
|
|
|
|
|
|
|
|
|
|
|
|
||||||
q Determine |
the |
cause |
of the |
- |
The |
incoming |
mains voltage |
If the |
appliance self*test |
does not |
|||||||
has |
|
|
|
|
|
||||||||||||
|
temperature |
alarm. |
|
|
dropped |
below the |
permitted |
establish any faults, the required |
|||||||||
|
|
|
|
|
|
|
limit |
value. |
|
|
temperature |
is |
displayed |
on |
|||
i |
|
|
|
|
|
|
|
|
|
|
|
completion |
of |
the |
self*test. |
||
17
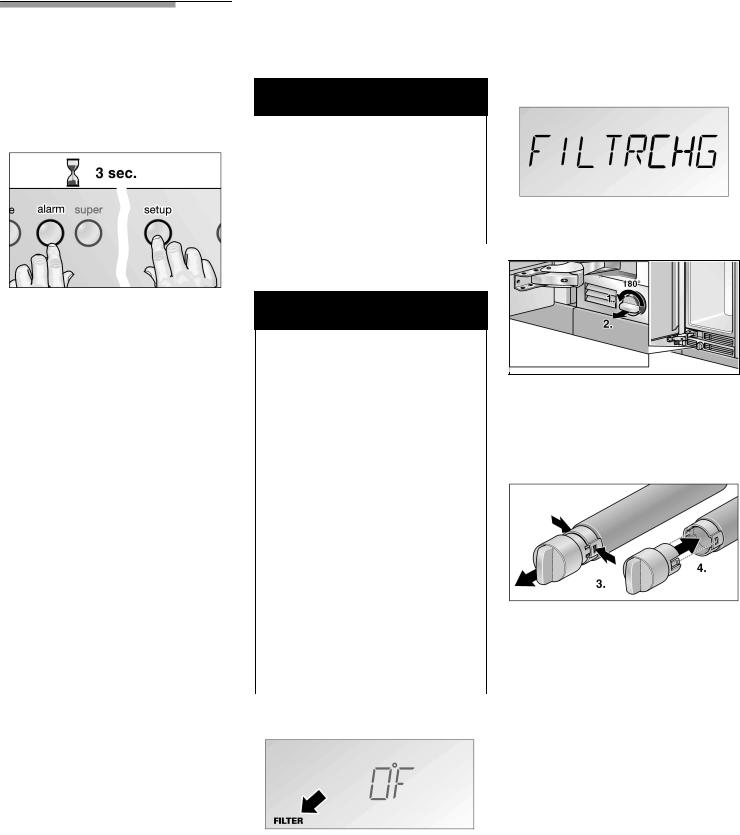
Resetting factory
|
|
|
|
To purchase an |
"UltraClarity" |
|
|
|
|||
Water filter |
|
replacement water filter contact your |
|||
|
local dealer or |
call |
|||
|
|
|
|
||
|
|
|
1-800-944-2904 . |
||
d |
|
If the following |
display is indicated: |
||
WARNING d |
|||||
|
|
|
|
|
|
To |
avoid serious |
illness or |
death, |
||
do not use water that is |
|
|
|||
microbiological or |
chemical |
|
|
||
unsafe or of unknow quality |
|||||
without |
adequate |
disinfection |
or |
||
other treatment before or after |
|||||
use |
of |
filter. |
|
|
|
|
|
|
|
|
|
-The filter has to be changed immediately.
Exchanging the filter
d WARNING d
-After installing a new water filter always discard the ice production of the first 24 hours
after swichting |
on |
the |
icemaker. 1. |
Rotate the filter cap on the base |
||||||
- If ice has not |
been used for |
a |
panel by 90-180° in |
an |
||||||
anti1clockwise |
direction. |
|||||||||
prolonged time, discard all ice |
|
|||||||||
|
|
|
|
|
|
|||||
cubes in the |
bin |
and |
discard |
the2. |
Pull |
the |
used |
filter |
cartridge out |
|
ice production |
of |
the |
next |
|
of |
the |
appliance. |
|
||
24hours.
-If appliance or ice was not
|
actively used for |
several weeks |
|
|
|
|
|
|
|
|
|||
|
or months or ice cubes have |
|
|
|
|
|
|
|
|
||||
|
unpleasant taste |
or odor, |
|
|
|
|
|
|
|
|
|||
|
change water filter. |
|
|
|
|
|
|
|
|
||||
- Air trapped in system may cause |
|
|
|
|
|
|
|
||||||
|
water and cartridge to eject. |
3. Remove |
the |
cap from |
the used |
||||||||
|
Use caution |
when |
removing. |
filter. |
|
|
|
|
|
|
|
||
- |
The |
filter should |
be changed atTake a new |
filter |
cartridge |
out |
of th |
||||||
|
least |
every |
6 months. |
packaging |
and |
remove |
the |
|
|
||||
|
|
|
|
|
|
protective |
cap. |
|
|
|
|
|
|
If |
the following |
display is indicated: |
|
|
|
|
|
||||||
4. Push |
the |
cap |
onto |
the |
new |
filter |
|||||||
|
|
|
|
|
|
cartridge. |
|
|
|
|
|
|
|
The age of the filter is close to the maximum life time. Order a new "UltraClarity" water filter.
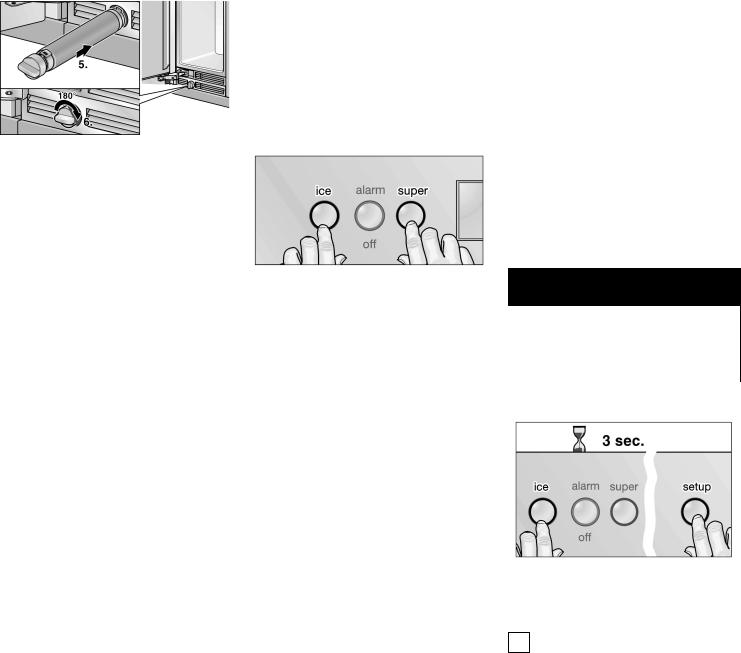
|
|
|
|
|
|
|
|
|
Resetting |
the |
filter |
Deactivating |
the |
filter |
||||||||
|
|
|
|
|
|
|
|
|
display |
|
|
display |
|
|
|
|
|
|
||||
|
|
|
|
|
|
|
|
|
|
|
|
|
|
|
|
|
|
|
||||
|
|
|
|
|
|
|
|
|
i |
If the filter |
display is not reset, |
i |
|
The appliance |
might |
be used |
||||||
|
|
|
|
|
|
|
|
|
|
the next required filter change |
|
|
without a |
"UltraClarity" water |
||||||||
|
|
|
|
|
|
|
|
|
|
cannot be signalled by the |
|
|
filter. If you choose this option |
|||||||||
|
|
|
|
|
|
|
|
|
|
display. |
|
|
|
|
replace the water filter by a |
|||||||
|
|
|
|
|
|
|
|
|
After each filter |
change: |
|
|
water filter substitute |
cartridge. |
||||||||
|
|
|
|
|
|
|
|
|
|
|
In this case the filter display |
|||||||||||
|
|
|
|
|
|
|
|
|
|
|||||||||||||
|
|
|
|
|
|
|
|
|
|
|
|
|
|
|
||||||||
5. |
Push |
the |
filter cartridge |
with |
the |
|
|
|
|
|
might be deactivated to prevent |
|||||||||||
|
|
cap |
|
in a |
horizontal position |
all |
|
|
|
|
|
filter change |
messages. |
|||||||||
|
|
the way into the opening in the |
|
|
|
|
|
To purchase |
a |
water |
filter |
|||||||||||
|
|
base |
|
panel. |
|
|
|
|
|
|
|
|
|
substitute |
cartridge |
contact |
||||||
6. |
Rotate the |
filter cartridge |
by |
|
|
|
|
|
|
|
your local |
dealer or |
call |
|||||||||
|
|
90°-180° gently in a clockwise |
|
|
|
|
|
1-800-944-2904. |
|
|
|
|||||||||||
|
|
direction until the cap is in a |
|
|
|
|
|
|
|
|
|
|
|
|
|
|||||||
|
|
|
|
|
d WARNING |
d |
||||||||||||||||
|
|
horizontal |
position. |
|
|
|
q |
Simultaneously hold |
down the |
|||||||||||||
|
|
|
|
|
|
|
|
|
|
super andice buttons for |
|
|
|
|
|
|
|
|
|
|
||
i |
|
After |
|
changing the filter, |
reset |
To |
avoid serious |
illness |
or death, |
|||||||||||||
|
|
3 seconds. |
|
|
||||||||||||||||||
|
|
the |
filter display. |
|
|
|
|
|
|
|||||||||||||
|
|
|
|
|
|
|
|
do not deactivate the filter display |
||||||||||||||
|
|
|
|
|
|
|
|
|
||||||||||||||
|
|
|
|
|
|
|
|
|
|
|
|
|
while using |
an |
"UltraClarity" water |
|||||||
i |
|
The |
appliance might be |
used |
|
|
|
|||||||||||||||
|
|
|
|
filter. |
|
|
|
|
|
|
||||||||||||
|
|
without a |
"UltraClarity" water |
|
|
|
|
|
|
|
|
|
|
|
||||||||
|
|
|
|
|
|
|
|
|
|
|
|
|
|
|
|
|
||||||
|
|
|
|
|
|
|
|
|
|
|
|
|
|
|
|
|
||||||
|
|
filter. If you choose this option |
|
|
|
To |
deactivate |
the |
filter |
display: |
||||||||||||
|
|
replace the water filter by a |
|
|
|
|
|
|
|
|
|
|
|
|
|
|
|
|||||
|
|
water |
filter |
substitute cartridge. |
|
|
|
|
|
|
|
|
|
|
|
|
|
|||||
|
|
To purchase a water filter |
|
|
|
|
|
|
|
|
|
|
|
|
|
|
|
|||||
|
|
substitute |
cartridge contact your |
|
|
|
|
|
|
|
|
|
|
|
|
|
||||||
|
|
local |
|
dealer or call |
|
|
|
|
|
|
|
|
|
|
|
|
|
|
|
|
|
|
1-800-944-2904.
q Simultaneously hold down the setup andice buttons for
3 seconds.
i Re/activate the filter display by pressing thesuper andice buttons for 3 seconds simultaneously.
19

Filter - Product Data Sheet
20
Troubleshooting
Freezer
Fault |
|
|
|
|
|
|
|
Possible |
cause |
|
|
|
|
|
Remedial |
action |
|
|||
|
|
|
|
|
|
|
|
|||||||||||||
Appliance has no |
cooling capacity.Power failure; |
the |
fuse |
has actuated;Check that the power is on. |
||||||||||||||||
The |
interior |
light |
does not functionthe. |
plug |
has |
not |
been |
inserted in |
|
theThe fuse |
must be |
switched on. |
||||||||
The |
display |
does |
not come on. |
|
|
electrical |
outlet |
properly. |
|
|
Check |
the |
plug. |
|
||||||
|
|
|
|
|
|
|
|
|||||||||||||
The refrigerating unit switches on Appliance door opened |
frequently. |
|
Do not |
open the |
door unnecessarily. |
|||||||||||||||
more |
and more |
frequently and |
|
|
|
|
|
|
|
|
|
|
|
|
|
|
||||
for |
|
|
|
of fresh food placedSwitchin |
on |
Super function. |
||||||||||||||
longer. |
|
|
|
|
|
|
Large quantities |
|||||||||||||
|
|
|
|
|
|
the |
appliance. |
|
|
|
|
|
|
|
|
|
||||
|
|
|
|
|
|
|
|
|
|
|
|
|
|
|
|
|
||||
|
|
|
|
|
|
|
|
|
|
|
|
|
|
|
|
|
||||
|
|
|
|
|
|
|
|
The |
ventilation |
openings |
are |
covered.Remove |
obstacles |
and dirt. |
||||||
|
|
|
|
|
|
|
|
|
|
|
|
|
|
|||||||
The |
temperature |
|
in |
the freezer |
|
|
Temperature |
has |
been |
set |
too low. Set a warmer temperature (see •Setting the |
|||||||||
compartment |
is |
too |
cold. |
|
|
|
|
|
|
|
|
|
|
|
temperature"). |
|
||||
The interior light does not functionThe. bulb is defective.
The light switch is sticking.
Change the bulb (see •Changing the bulb").
Check whether it can be moved.
The appliance is giving off odors.Strong7smelling foods have not |
beenClean the appliance. Pack strong7smelling foods in |
packed in airtight containers. |
airtight containers (see •Odors"). |
|
|
IceMaker
Fault |
|
Possible cause |
|
|
Remedial action |
|
|
|
|
|
|
Ice maker |
does not appear to beThe ice maker is |
not connected to Callthe customer service. |
|||
running. |
|
power supply. |
|
|
|
|
|
|
|
|
|
The ice maker has no water supplyEnsure. that the water supply line is connected properly.
|
|
The freezer |
compartment |
temperatureCheck temperature of the freezer compartment. If |
||||||
|
|
is too |
high. |
|
|
|
required, |
lower |
the temperature. |
|
|
|
|
|
|
|
|
||||
Small ice cubes over a prolongedOther domestic appliances |
which useAvoid using e.g. a dishwasher, washing machine or |
|||||||||
period. |
|
water |
are in |
operation. |
|
|
shower |
at the |
same time. |
|
|
|
|
|
|
|
|
|
|
|
|
Water filter must be changed.
Instructions for changing |
the water filter can be found in |
the enclosed installation |
instructions. |
Wrong water pressure. |
Check water |
pressure. The water pressure must be |
|
between 25 |
and 120 p.s.i. (1.7288.25 bar). |
A wrong water valve has been installed.
Self7tapping valves and 3/16 inch (4.76 mm) saddle
valves |
reduce the water pressure and may eventually |
block |
the pipe. |
The manufacturer is not liable for damage to property due to an incorrect installation or water connection.
21

Fault |
Possible cause |
Remedial action |
Ice cubes have an unpleasant odor/flavor.
Ice which isstored for |
a long time mayDispose of old ice cubes. Use the ice maker more |
|
absorb odors which |
impair their tastefrequently. |
. |
|
|
The ice cube container is dirty. |
|
Empty and wash out the ice cube container. |
|||||||
|
|
|
|
|
|
||||||
|
|
Unsealed packages in the freezer |
|
Check whether the frozen food has been packed in |
|||||||
|
|
transfer odor/flavor particles to the iceairtight containers. |
|
|
|||||||
|
|
cubes. |
|
|
|
|
|
|
|
|
|
|
|
|
|
|
|
|
|
||||
|
|
Clean the inside of the |
appliance. |
|
See section on |
•Odors". |
|||||
|
|
|
|
|
|
|
|
||||
Ice maker is not producing any iceThe. ice cube container |
is |
in the |
falseinsRert the container and slide it backwards to the end |
||||||||
|
|
position. |
|
|
|
|
position (see section •Variable interior design"). |
||||
|
|
|
|
|
|
|
|
|
|||
|
|
The |
water |
pressure is too |
low. |
|
Check water pressure. The water pressure must be |
||||
|
|
|
|
|
|
|
|
between 25 and 120 p.s.i. (1.7268.25 bar). |
|||
|
|
|
|
|
|
|
|
|
|
||
|
|
The |
freezer |
compartment |
temperatureCheck temperature of |
the freezer compartment. |
|||||
|
|
is too high. |
|
|
|
If required, lower |
the |
temperature. |
|||
A wrong water valve has been installedt.
Self5tapping valves and 3/16 inch (4.76 mm) saddle
valves |
reduce the water pressure and may eventually |
block |
the pipe. |
The manufacturer is not liable for damage to property due to an incorrect installation or water connection.
The ice maker is not producing enough ice or the ice cubes are misshapen.
The |
water |
pressure is too low. |
|
Check |
water pressure. |
The water pressure must be |
||
|
|
|
|
between 25 and 120 p.s.i. (1.7268.25 bar). |
||||
|
|
|
|
|
|
|
|
|
The |
freezer |
compartment temperatureCheck |
temperature |
of |
the freezer compartment. |
|||
is too low. |
|
|
If required increase |
the |
temperature. |
|||
|
|
Change the water filter. |
Instructions for changing |
the water filter |
can |
be found in |
|
|
|
|
the enclosed installation |
instructions. |
|
|
|
|
|
|
|
|
|||
Ice |
is |
forming in the supply hoseTheto water pressure is too low. |
Check water pressure. The water pressure must be |
||||
the |
ice |
maker. |
between 25 and 120 p.s.i. (1.7268.25 |
bar). |
|
|
|
Water is flowing out of the appliance.
The |
freezer compartment |
temperatureCheck temperature of |
the freezer compartment. |
||
is too high. |
|
|
If required, lower the |
temperature. |
|
|
|
|
|
||
The |
water pipe in the appliance is Call customer service immediately. |
||||
defective. |
|
|
|
|
|
Close shut!off valve immediately. |
The valve |
may leak if the water pressure is too low. |
The water pressure is too low. |
||
|
The water pressure must be between 25 and 120 p.s.i. |
|
|
(1.7268.25 |
bar). |
A wrong water valve has been installed.
Self5tapping valves and 3/16 inch (4.76 mm) saddle
valves |
reduce the water pressure and may eventually |
block |
the pipe. |
The manufacturer is not liable for damage to property due to an incorrect installation or water connection.
22
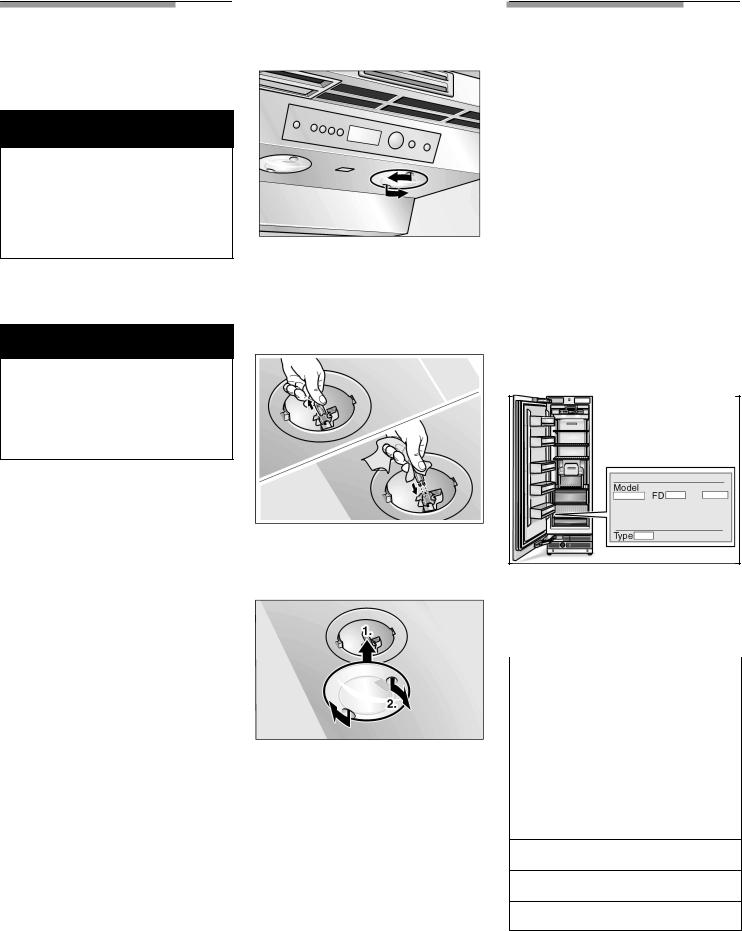
Halogen bulbs above
Changing the bulb
d WARNING d
To avoid electrical shock which can cause severe personal injury or death, disconnect power to appliance before making repairs. After making repairs, reconnect power.
CAUTION
Never touch a halogen bulb with bare fingers.
When inserting a glass halogen bulb, always hold with a soft cloth.
Halogen |
bulb type: |
Service |
20 W/12 |
V/bulb holder G4 |
If you need service, first see the "Troubleshooting" section of this book. After checking "Trouble* shooting," additional help can be found by calling the Bosch Customer Interaction Center, 1-800-944-2904 (toll*free), from anywhere in the U.S.A. In Canada, contact your designated Bosch Canada service company or call
qTo release the cover, turn it 1-800-944-2904 .
anti*clockwise |
until it |
can be |
Write down the following information |
|
removed. |
|
|
||
|
|
about |
your freezer to better help you |
|
|
|
|
||
q Pull out the |
defective |
halogen |
obtain |
assistance or service if you |
bulb. |
|
|
ever need it. |
|
|
|
|
You will need to know your complet |
|
|
|
|
model |
number and serial number. |
qInsert a new halogen bulb. Touch the halogen bulb with a
soft |
cloth only. |
You can find this information on the |
||
|
|
|||
|
|
model and serial number label |
||
|
|
located on the inside wall of the |
||
|
|
freezer |
compartment. |
|
|
|
|
|
|
|
|
Dealer |
name: |
|
|
|
|
|
|
|
|
Address: |
||
|
|
|
|
|
q To |
reattach the cover, insert it |
Phone |
number: |
|
and turn it clockwise until it is |
|
|
||
Purchase date: |
||||
locked. |
|
|
|
|
|
|
Model |
number: |
|
FD number:
Serial number:
Type:
23
 Loading...