


BM 2610951870 07-07 7/26/07 8:20 AM Page 1
IMPORTANT: |
IMPORTANT : |
IMPORTANTE: |
Read Before Using |
Lire avant usage |
Leer antes de usar |
Operating/Safety Instructions 
 Consignes de fonctionnement/sécurité
Instrucciones de funcionamiento y seguridad
FL10
Call Toll Free for |
Pour obtenir des informations |
Llame gratis para |
Consumer Information |
et les adresses de nos centres |
obtener información |
& Service Locations |
de service après-vente, |
para el consumidor y |
|
appelez ce numéro gratuit |
ubicaciones de servicio |
1-877-BOSCH99 (1-877-267-2499) www.boschtools.com
For English Version |
Version française |
Versión en español |
See page 2 |
Voir page 9 |
Ver la página 26 |
|
|
|
BM 2610951870 07-07 7/26/07 8:20 AM Page 2
IMPORTANT SAFETY INSTRUCTIONS
INSTRUCTIONS PERTAINING TO A RISK OF FIRE, ELECTRIC SHOCK,
OR INJURY TO PERSIONS
This Flashlight is intended for Household use only.
WARNING- When using electric appliance, basic precautions should always be followed, Including the following:
-Read all instruction before using the appliance.
-To reduce the risk of injury, close supervision is necessary when an appliance is used near children.
-Use only the charger supplied by the manufacturer to recharge.
-Do not use outdoors.
-To reduce the risk of electrical shock, do not put the unit in water or other liquid. Do not place or store unit where it can fall or be pulled into a tub or sink.
Please read these instructions carefully before operation in order to use the Flashlight effectively and obtain maximum performance. Please keep these instructions for future reference.
1.Follow all operating and safety procedures attached to the charger and battery pack.
2.Use only Bosch battery pack catalog number BAT411.
3.Do not wash the Flashlight with water nor keep in a damp location. If the Flashlight gets wet, dry it off as soon as possible.
4.The Flashlight is ruggedly constructed. It should, however, be handled with care. Do not disassemble or forcibly pivot head beyond it’s stopping point.
5.Check the charge level at least once a month, especially if used for emergency purposes (for example: in your car). If the light seems dimmer, recharge the battery pack.
INSTALLATION INSTRUCTIONS
To Reduce the Risk of Electric Shock, this appliance has a polarized plug (one blade is wider than the other). This plug will fit in a polarized outlet only one way. If the plug does not fit fully in the outlet, reverse the plug. If it still does not fit, contact a qualified electrician to install the proper outlet. Do not change the plug in any way.
! WARNING To reduce the risk of electric shock, disconnect
battery pack before cleaning or servicing.
INSERTING AND RELEASING
BATTERY PACK
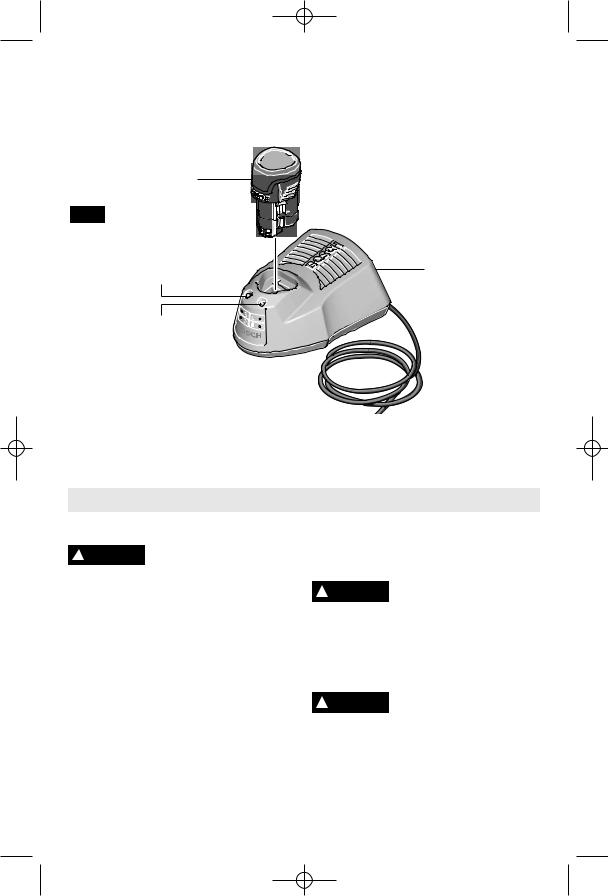
To insert battery, align battery and slide battery pack into tool until it locks into position. Do not force.
Release battery pack from tool by pressing on both sides of the battery release tabs and pull downward (Fig. 1).
OPERATION
1.To turn the Flashlight "ON", squeeze and release trigger switch. To turn Flashlight "OFF", squeeze and release trigger switch (Fig. 1).
2.Your Flashlight has a articulating head that can be pivoted to desired position. To change the position of the head, pivot clockwise until it stops. To return head to it’s original position, pivot the head counter-clockwise until it stops (Fig. 1).
USER-MAINTENANCE INSTRUCTION
Always remove the battery ! WARNING pack from handle base
before changing the bulb.
! WARNING All repairs, electrical or mechanical, should be
attempted only by trained repairmen. Contact the nearest Bosch Factory Service Center, Authorized Service Station or other competent repair service.
1.Rotate lens cap counter clockwise and carefully remove lens cap (Fig. 1).
2.Remove bulb from spring.
3.Reinstall replacement bulb in spring.
4.Reinstall lens cap and rotate clockwise to tighten.
5.Use only 10.8V, .65A bulb part number 2610951871 provided by a Bosch Factory Service Center.
Note: One replacement bulb is provided in the bulb storage compartment. To remove spare bulb, rotate cap counter-clockwise with a dime or a flat tip screwdriver to expose bulb.
-2-

BM 2610951870 07-07 7/26/07 8:20 AM Page 3
Do not position the lighted ! WARNING Flashlight head on or near
flammable or combustible materials. The bulb gets hot during use.
! WARNING The lens gets very hot during use. To reduce the
risk of burns, do not touch hot lens. To reduce the risk of fire, keep away from combustible materials while in operation.
! WARNING Do not splash the lighted Flashlight bulb with
liquids. Hot bulb may shatter when cooler liquids are contacted.
SAVE THESE INSTRUCTIONS
Battery/Charger
Before using battery charger, read all instructions and cautionary markings on
(1) battery charger, (2) battery pack, and (3) product using battery.
Use only the charger which accompanied your product or direct replacement as listed in the catalog or this manual. Do not substitute any other charger. Use only Bosch approved chargers with your product. See Functional Description and Specifications.
Do not disassemble charger or operate the charger if it has received a sharp blow, been dropped or otherwise damaged in any way. Replace damaged cord or plugs immediately. Incorrect reassembly or damage may result in electric shock or fire.
Do not recharge battery in damp or wet environment. Do not expose charger to rain or snow. If battery case is cracked or otherwise damaged, do not insert into charger. Battery short or fire may result.
Charge only Bosch approved rechargeable batteries. See Functional Description and Specifications. Other types of batteries may burst causing personal injury and damage.
Charge battery pack in temperatures above +40 degrees F (4 degrees C) and below
+105 degrees F (41 degrees C). Store tool and battery pack in locations where temperatures will not exceed 120 degrees F (49 degrees C). This is important to prevent serious damage to the battery cells.
Battery leakage may occur under extreme usage or temperature conditions. Avoid contact with skin and eyes. The battery liquid is caustic and could cause chemical burns to tissues. If liquid comes in contact with skin, wash quickly with soap and water. If the liquid contacts your eyes, flush them with water for a minimum of 10 minutes and seek medical attention.
Place charger on flat non-flammable surfaces and away from flammable materials when re-charging battery pack.
The charger and battery pack heat during charging. Carpeting and other heat insulating surfaces block proper air circulation which may cause overheating of the charger and battery pack. If smoke or melting of the case are observed unplug the charger immediately and do not use the battery pack or charger.
Use of an attachment not recommended or sold by Bosch may result in a risk of fire, electric shock or injury to persons.
Battery Care
! WARNING When batteries are not in tool or charger, keep them
away from metal objects. For example, to protect terminals from shorting DO NOT place batteries in a tool box or pocket with nails, screws, keys, etc. Fire or injury may result.
DO NOT PUT BATTERIES INTO FIRE OR EXPOSE TO HIGH HEAT. They may explode.
-3-
BM 2610951870 07-07 7/26/07 8:20 AM Page 4
Battery Disposal
! WARNING Do not attempt to disassemble the battery or
remove any component projecting from the battery terminals. Fire or injury may result. Prior to disposal, protect exposed terminals with heavy insulating tape to prevent shorting.
LITHIUM-ION BATTERIES
If equipped with a lithium-ion battery, the battery must be collected, recycled or disposed of in an environmentally sound manner.
“The EPA certified RBRC Battery Recycling Seal on the lithium-ion (Li-ion) battery indicates Robert Bosch Tool Corporation is voluntarily participating in an industry
program to collect and recycle these batteries at the end of their useful life, when taken out of service in the United States or Canada. The RBRC program provides a convenient alterative to placing used Li-ion batteries into the trash or the municipal waste stream, which may be illegal in your area.
Please call 1-800-8-BATTERY for information on Li-ion battery recycling and disposal bans/restrictions in your area, or return your batteries to a Skil/Bosch/Dremel Service Center for recycling. Robert Bosch Tool Corporation’s involvement in this program is part of our commitment to preserving our environment and conserving our natural resources.”
-4-

BM 2610951870 07-07 7/26/07 8:20 AM Page 5
Functional Description and Specifications
Disconnect battery pack from tool before making any assembly, ! WARNING adjustments or changing accessories. Such preventive safety measures
reduce the risk of starting the tool accidentally.
Model FL10 FlashLight
FIG. 1
LENS CAP
ARTICULATING
HEAD
BULB STORAGE |
BULB |
|
COMPARTMENT |
||
|
||
CAP |
|
TRIGGER
ON/OFF SWITCH
HANDLE
BASE
BATTERY |
BATTERY RELEASE |
TABS |
|
PACK |
|
Model number |
FL10 |
|
|||
Voltage rating |
10.8 V |
|
|
|
|
|
|
|
|||
|
|
|
|
||
Charge time |
30 minutes |
||||
Battery pack |
BAT411 |
|
|||
Charger |
BC430 |
|
|||
Voltage rating |
120 V |
60 Hz |
|||
Bulb |
2610951871 |
||||
-5-
BM 2610951870 07-07 7/26/07 8:20 AM Page 6
IMPORTANT CHARGING NOTES
1.The charger was designed to fast charge the battery only when the battery temperature is between 32˚F (0˚C) and 140˚F (60˚C). If the battery pack is too hot or too cold, the charger will not fast charge the battery. (This may happen if the battery pack is hot from heavy use). When the battery temperature returns to between 32˚F (0˚C) and 140˚F (60˚C), the charger will automatically begin charging.
2.A substantial drop in operating time per charge may mean that the battery pack is nearing the end of its life and should be replaced.
3.Remember to unplug charger during storage period.
4.If battery does not charge properly:
a.Check for voltage at outlet by plugging in some other electrical device.
b.Check to see if outlet is connected to a light switch which turns power “off” when lights are turned off.
c.Check battery pack terminals for dirt. Clean with cotton swab and alcohol if necessary.
d.If you still do not get proper charging, take or send tool, battery pack and charger to your local Bosch Service Center. See “Tools, Electric” in the Yellow Pages for names and addresses.
Note: Use of chargers or battery packs not sold by Bosch will void the warranty.
CHARGER INDICATORS, SYMBOLS AND MEANING
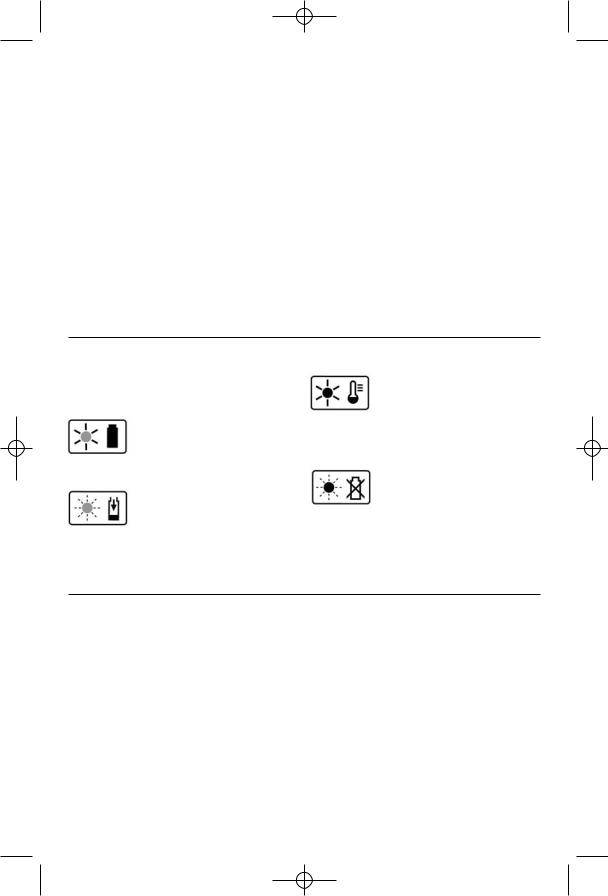
If the indicator lights are “OFF”, the charger is not receiving power from power supply outlet.
If the green indicator light is “ON”, the charger is plugged in but the battery pack is not
inserted, or the battery pack is fully charged and is being trickle charged.
If the green indicator light is “BLINKING”, the battery pack is being fast-charged. Fast-
charging will automatically stop when the battery pack is fully charged.
If the red indicator light is “ON”, the battery pack is too hot or cold for fast-charging. The
charger will switch to trickle charge, until a suitable temperature is reached, at which time the charger will switch automatically to fast-charging.
If the red indicator light is “BLINKING”, the battery pack cannot accept a charge or the
contacts of the charger or battery pack are contaminated. Clean the contacts of the charger or battery pack only as directed in these operating instructions or those supplied with your tool or battery pack.
CHARGING BATTERY PACK (BC430 30 MINUTE CHARGER)
Plug charger cord into your standard power outlet, then insert battery pack into charger (Fig. 2).
The charger’s green indicator light will begin to “BLINK”. This indicates that the battery is receiving a fast charge. Fast-charging will automatically stop when the battery pack is fully charged.
When the indicator light stops “BLINKING” (and becomes a steady green light) fast charging is complete.
The battery pack may be used even though the light may still be blinking. The light may require more time to stop blinking depending on temperature. When you begin the charging process of the battery pack, a steady red light could also mean the battery pack is too hot or too cold.
The purpose of the green light is to indicate that the battery pack is fast-charging. It does not indicate the exact point of full charge. The light will stop blinking in less time if the battery pack was not completely discharged.
-6-
BM 2610951870 07-07 7/26/07 8:20 AM Page 7
When charging several batteries in sequence, the charge time may slightly increase.
When the battery pack is fully charged, unplug the charger (unless you're charging
another battery pack) and slip the battery pack back into the tool.
BATTERY
PACK
FIG. 2
CHARGER
RED LIGHT
GREEN LIGHT
Maintenance
Service
! NO USER SERVICE-ABLE WARNING PARTS INSIDE. Preventive
maintenance performed by unauthorized personnel may result in misplacing of internal wires and components which could cause serious hazard. We recommend that all tool service be performed by a Bosch Factory Service Center or Authorized Bosch Service Station. SERVICEMEN: Disconnect tool and/or charger from power source before servicing.
BATTERIES
Be alert for battery packs that are nearing their end of life. If you notice decreased tool performance or significantly shorter running time between charges then it is time to replace the battery pack. Failure to do so
can cause the tool to operate improperly or damage the charger.
|
Cleaning |
! WARNING |
To avoid accidents, always |
disconnect the tool and/or |
charger from the power supply before cleaning. The tool may be cleaned most effectively with compressed dry air. Always wear safety goggles when cleaning tools with compressed air.
! |
CAUTION |
Certain cleaning agents and |
|
solvents damage plastic |
|||
|
|
parts. Some of these are: gasoline, carbon tetrachloride, chlorinated cleaning solvents, ammonia and household detergents that contain ammonia.
-7-
BM 2610951870 07-07 7/26/07 8:20 AM Page 8
Accessories
! WARNING If an extension cord is necessary, a cord with
adequate size conductors that is capable of carrying the current necessary for your tool must be used. This will prevent excessive voltage drop, loss of power or overheating. Grounded tools must use 3-wire extension cords that have 3-prong plugs and receptacles.
NOTE: The smaller the gauge number, the heavier the cord.
RECOMMENDED SIZES OF EXTENSION CORDS 120 VOLT ALTERNATING CURRENT TOOLS
Tool’s |
Cord Size in A.W.G. |
Wire Sizes in mm2 |
|||||||
|
|
|
|
|
|
|
|
||
Ampere |
|
|
|
|
|
|
|
|
|
Cord Length in Feet |
Cord Length in Meters |
||||||||
Rating |
|||||||||
25 |
50 |
100 |
150 |
15 |
30 |
60 |
120 |
||
|
|||||||||
3-6 |
|
|
|
|
|
|
|
|
|
18 |
16 |
16 |
14 |
0.75 |
0.75 |
1.5 |
2.5 |
||
6-8 |
18 |
16 |
14 |
12 |
0.75 |
1.0 |
2.5 |
4.0 |
|
8-10 |
18 |
16 |
14 |
12 |
0.75 |
1.0 |
2.5 |
4.0 |
|
10-12 |
16 |
16 |
14 |
12 |
1.0 |
2.5 |
4.0 |
— |
|
12-16 |
14 |
12 |
— |
— |
— |
— |
— |
— |
|
|
|
|
|
|
|
|
|
|
|
-8-
 Loading...