


 Loading...
Bosch EXACT 2, EXACT 4, EXACT 6, EXACT 7, EXACT 8 User Manual
...Robert Bosch Power Tools GmbH
70538 Stuttgart
GERMANY
www.bosch-pt.com
1 609 92A 4V3 (2019.02) O / 338
1 609 92A 4V3
EXACT
2 | 4 | 6 | 7 | 8 | 9 | 12 | 60 | 700 | 1100
de |
Originalbetriebsanleitung |
sk |
Pôvodný návod na použitie |
en |
Original instructions |
hu |
Eredeti használati utasítás |
fr |
Notice originale |
ru |
Оригинальное руководство по |
es |
Manual original |
|
эксплуатации |
pt |
Manual original |
uk |
Оригінальна інструкція з |
it |
Istruzioni originali |
|
експлуатації |
nl |
Oorspronkelijke gebruiksaanwijzing |
kk |
Пайдалану нұсқаулығының |
da |
Original brugsanvisning |
|
түпнұсқасы |
sv |
Bruksanvisning i original |
ro |
Instrucțiuni originale |
no |
Original driftsinstruks |
bg |
Оригинална инструкция |
fi |
Alkuperäiset ohjeet |
mk |
Оригинално упатство за работа |
el |
Πρωτότυπο οδηγιών χρήσης |
sr |
Originalno uputstvo za rad |
tr |
Orijinal işletme talimatı |
sl |
Izvirna navodila |
pl |
Instrukcja oryginalna |
hr |
Originalne upute za rad |
cs |
Původní návod k používání |
et |
Algupärane kasutusjuhend |
lv Instrukcijas oriģinālvalodā lt Originali instrukcija
ja zh
zh ko
th
id Petunjuk-Petunjuk untuk Penggunaan Orisinal
vi Bản gốc hướng dẫn sử dụng ar يلصلأا ليغشتلا ليلد
fa یلصا یامنهار هچرتفد
2 |
Deutsch .................................................. |
Seite |
6 |
English ................................................... |
Page |
14 |
Français .................................................. |
Page |
23 |
Español ................................................ |
Página |
31 |
Português .............................................. |
Página |
41 |
Italiano ................................................. |
Pagina |
49 |
Nederlands ............................................. |
Pagina |
58 |
Dansk .................................................... |
Side |
67 |
Svensk .................................................. |
Sidan |
74 |
Norsk..................................................... |
Side |
82 |
Suomi ..................................................... |
Sivu |
90 |
Ελληνικά................................................ |
Σελίδα |
98 |
Türkçe................................................... |
Sayfa 107 |
|
Polski .................................................. |
Strona 115 |
|
Čeština ................................................ |
Stránka 124 |
|
Slovenčina ............................................ |
Stránka 132 |
|
Magyar ................................................... |
Oldal 140 |
|
Русский ............................................. |
Страница 149 |
|
Українська ........................................... |
Сторінка 159 |
|
Қазақ ..................................................... |
Бет 169 |
|
Română ................................................ |
Pagina 178 |
|
Български .......................................... |
Страница 187 |
|
Македонски......................................... |
Страница 196 |
|
Srpski .................................................. |
Strana 205 |
|
Slovenščina .............................................. |
Stran 213 |
|
Hrvatski ............................................... |
Stranica 222 |
|
Eesti.................................................. |
Lehekülg 230 |
|
Latviešu .............................................. |
Lappuse 238 |
|
Lietuvių k. ............................................. |
Puslapis 246 |
|
............................................... |
255 |
|
....................................................... |
263 |
|
.................................................. |
270 |
|
............................................... |
277 |
|
...................................................... |
285 |
|
Bahasa Indonesia..................................... |
Halaman 295 |
|
Tiếng Việt ............................................... |
Trang 303 |
|
يبرع.................................................. |
ةحفصلا 313 |
|
یسرافآ.................................................. |
هحفص 323 |
|
.......................................................... |
|
I |
1 609 92A 4V3 | (14.02.2019) |
|
|
|
Bosch Power Tools |
|
|
|
|
|
|
|
|
|
|
|
|
|
|
|
|
|
|
|
| 3
 (1)
(1)
(2)
(10)
(6) |
(3) |
|
(7)
(8)
(9)
(4)


 (23) (5)
Bosch Power Tools |
|
|
|
1 609 92A 4V3 | (14.02.2019) |
|
|
|
|
|
|
|
|
|
|
|
|
|
|
|
|
|
|
|

4 | |
|
A |
B |
(5) |
(11) |
|
|
APT |
|
(14) |
|
(13) |
|
(12) |
|
C |
D |
|
(15) |
|
(16) |
(6) |
(3) |
|
(17) |
(5) |
(18) |
|
|
|
(4) |
|
(4) |
E |
F |
(8) |
|
(9) |
(3) |
|
|
(19) |
|
1 609 92A 4V3 | (14.02.2019) |
Bosch Power Tools |
|
|
| 5 |
G |
H |
(10) |
|
|
|
|
|
(19) |
|
|
(8) |
(20) |
(6) |
|
|
(21) |
(21) |
|
|
I |
(21) (22) |
Bosch Power Tools |
|
|
|
1 609 92A 4V3 | (14.02.2019) |
|
|
|
|
|
|
|
|
|
|
|
|
|
|
|
|
|
|
|
6 | Deutsch
Deutsch
Sicherheitshinweise
Allgemeine Sicherheitshinweise für
Elektrowerkzeuge
 WARNUNG Lesen Sie alle Sicherheitshinweise, Anweisungen, Bebilderungen
und technischen Daten, mit denen dieses Elektrowerk-
zeug versehen ist. Versäumnisse bei der Einhaltung der Si-
cherheitshinweise und nachfolgenden Anweisungen können
elektrischen Schlag, Brand und/oder schwere Verletzungen
verursachen.
Bewahren Sie alle Sicherheitshinweise und Anweisungen
für die Zukunft auf.
Der in den Sicherheitshinweisen verwendete Begriff „Elektrowerkzeug“ bezieht sich auf netzbetriebene Elektrowerkzeuge (mit Netzleitung) und auf akkubetriebene Elektrowerkzeuge (ohne Netzleitung).
Arbeitsplatzsicherheit
uHalten Sie Ihren Arbeitsbereich sauber und gut beleuchtet. Unordnung oder unbeleuchtete Arbeitsbereiche können zu Unfällen führen.
uArbeiten Sie mit dem Elektrowerkzeug nicht in explosionsgefährdeter Umgebung, in der sich brennbare Flüssigkeiten, Gase oder Stäube befinden. Elektrowerkzeuge erzeugen Funken, die den Staub oder die Dämpfe entzünden können.
uHalten Sie Kinder und andere Personen während der Benutzung des Elektrowerkzeugs fern. Bei Ablenkung können Sie die Kontrolle über das Elektrowerkzeug verlieren.
Elektrische Sicherheit
uDer Anschlussstecker des Elektrowerkzeuges muss in die Steckdose passen. Der Stecker darf in keiner Weise verändert werden. Verwenden Sie keine Adapterstecker gemeinsam mit schutzgeerdeten Elektrowerkzeugen. Unveränderte Stecker und passende Steckdosen verringern das Risiko eines elektrischen Schlages.
uVermeiden Sie Körperkontakt mit geerdeten Oberflächen wie von Rohren, Heizungen, Herden und Kühlschränken. Es besteht ein erhöhtes Risiko durch elektrischen Schlag, wenn Ihr Körper geerdet ist.
uHalten Sie Elektrowerkzeuge von Regen oder Nässe fern. Das Eindringen von Wasser in ein Elektrowerkzeug erhöht das Risiko eines elektrischen Schlages.
uZweckentfremden Sie die Anschlussleitung nicht, um das Elektrowerkzeug zu tragen, aufzuhängen oder um den Stecker aus der Steckdose zu ziehen. Halten Sie die Anschlussleitung fern von Hitze, Öl, scharfen Kanten oder sich bewegenden Teilen. Beschädigte oder
verwickelte Anschlussleitungen erhöhen das Risiko eines
elektrischen Schlages.
uWenn Sie mit einem Elektrowerkzeug im Freien arbeiten, verwenden Sie nur Verlängerungskabel, die auch für den Außenbereich geeignet sind. Die Anwendung einer für den Außenbereich geeigneten Verlängerungsleitung verringert das Risiko eines elektrischen Schlages.
uWenn der Betrieb des Elektrowerkzeuges in feuchter Umgebung nicht vermeidbar ist, verwenden Sie einen Fehlerstromschutzschalter. Der Einsatz eines Fehlerstromschutzschalters vermindert das Risiko eines elektrischen Schlages.
Sicherheit von Personen
uSeien Sie aufmerksam, achten Sie darauf, was Sie tun, und gehen Sie mit Vernunft an die Arbeit mit einem Elektrowerkzeug. Benutzen Sie kein Elektrowerkzeug, wenn Sie müde sind oder unter dem Einfluss von Drogen, Alkohol oder Medikamenten stehen. Ein Moment der Unachtsamkeit beim Gebrauch des Elektrowerkzeuges kann zu ernsthaften Verletzungen führen.
uTragen Sie persönliche Schutzausrüstung und immer eine Schutzbrille. Das Tragen persönlicher Schutzausrüstung, wie Staubmaske, rutschfeste Sicherheitsschuhe, Schutzhelm oder Gehörschutz, je nach Art und Einsatz des Elektrowerkzeuges, verringert das Risiko von Verletzungen.
uVermeiden Sie eine unbeabsichtigte Inbetriebnahme. Vergewissern Sie sich, dass das Elektrowerkzeug ausgeschaltet ist, bevor Sie es an die Stromversorgung und/oder den Akku anschließen, es aufnehmen oder tragen. Wenn Sie beim Tragen des Elektrowerkzeuges den Finger am Schalter haben oder das Gerät eingeschaltet an die Stromversorgung anschließen, kann dies zu Unfällen führen.
uEntfernen Sie Einstellwerkzeuge oder Schraubenschlüssel, bevor Sie das Elektrowerkzeug einschalten.
Ein Werkzeug oder Schlüssel, der sich in einem drehenden Geräteteil befindet, kann zu Verletzungen führen.
uVermeiden Sie eine abnormale Körperhaltung. Sorgen Sie für einen sicheren Stand und halten Sie jederzeit das Gleichgewicht. Dadurch können Sie das Elektrowerkzeug in unerwarteten Situationen besser kontrollieren.
uTragen Sie geeignete Kleidung. Tragen Sie keine weite Kleidung oder Schmuck. Halten Sie Haare und Kleidung fern von sich bewegenden Teilen. Lockere Kleidung, Schmuck oder lange Haare können von sich bewegenden Teilen erfasst werden.
uWenn Staubabsaugund -auffangeinrichtungen montiert werden können, sind diese anzuschließen und richtig zu verwenden. Verwendung einer Staubabsaugung kann Gefährdungen durch Staub verringern.
uWiegen Sie sich nicht in falscher Sicherheit und setzen Sie sich nicht über die Sicherheitsregeln für Elektrowerkzeuge hinweg, auch wenn Sie nach vielfachem Gebrauch mit dem Elektrowerkzeug vertraut sind.
1 609 92A 4V3 | (14.02.2019) |
|
|
|
Bosch Power Tools |
|
|
|
|
|
|
|
|
|
|
|
|
|
|
|
|
|
|
|

Achtloses Handeln kann binnen Sekundenbruchteilen zu
schweren Verletzungen führen.
Verwendung und Behandlung des Elektrowerkzeugs
uÜberlasten Sie das Elektrowerkzeug nicht. Verwenden Sie für Ihre Arbeit das dafür bestimmte Elektrowerkzeug. Mit dem passenden Elektrowerkzeug arbeiten Sie besser und sicherer im angegebenen Leistungsbereich.
uBenutzen Sie kein Elektrowerkzeug, dessen Schalter defekt ist. Ein Elektrowerkzeug, das sich nicht mehr einoder ausschalten lässt, ist gefährlich und muss repariert werden.
uZiehen Sie den Stecker aus der Steckdose und/oder entfernen Sie einen abnehmbaren Akku, bevor Sie Geräteeinstellungen vornehmen, Einsatzwerkzeugteile wechseln oder das Elektrowerkzeug weglegen. Diese Vorsichtsmaßnahme verhindert den unbeabsichtigten Start des Elektrowerkzeuges.
uBewahren Sie unbenutzte Elektrowerkzeuge außerhalb der Reichweite von Kindern auf. Lassen Sie keine Personen das Elektrowerkzeug benutzen, die mit diesem nicht vertraut sind oder diese Anweisungen nicht gelesen haben. Elektrowerkzeuge sind gefährlich, wenn sie von unerfahrenen Personen benutzt werden.
uPflegen Sie Elektrowerkzeuge und Einsatzwerkzeug mit Sorgfalt. Kontrollieren Sie, ob bewegliche Teile einwandfrei funktionieren und nicht klemmen, ob Teile gebrochen oder so beschädigt sind, dass die Funktion des Elektrowerkzeuges beeinträchtigt ist. Lassen Sie beschädigte Teile vor dem Einsatz des Gerätes reparieren. Viele Unfälle haben ihre Ursache in schlecht gewarteten Elektrowerkzeugen.
uHalten Sie Schneidwerkzeuge scharf und sauber.
Sorgfältig gepflegte Schneidwerkzeuge mit scharfen Schneidkanten verklemmen sich weniger und sind leichter zu führen.
uVerwenden Sie Elektrowerkzeug, Zubehör, Einsatzwerkzeuge usw. entsprechend diesen Anweisungen. Berücksichtigen Sie dabei die Arbeitsbedingungen und die auszuführende Tätigkeit. Der Gebrauch von Elektrowerkzeugen für andere als die vorgesehenen Anwendungen kann zu gefährlichen Situationen führen.
uHalten Sie Griffe und Griffflächen trocken, sauber und frei von Öl und Fett. Rutschige Griffe und Griffflächen erlauben keine sichere Bedienung und Kontrolle des Elektrowerkzeugs in unvorhergesehenen Situationen.
Verwendung und Behandlung des Akkuwerkzeugs
uLaden Sie die Akkus nur mit Ladegeräten auf, die vom Hersteller empfohlen werden. Durch ein Ladegerät, das für eine bestimmte Art von Akkus geeignet ist, besteht Brandgefahr, wenn es mit anderen Akkus verwendet wird.
uVerwenden Sie nur die dafür vorgesehenen Akkus in den Elektrowerkzeugen. Der Gebrauch von anderen Akkus kann zu Verletzungen und Brandgefahr führen.
uHalten Sie den nicht benutzten Akku fern von Büroklammern, Münzen, Schlüsseln, Nägeln, Schrauben
Deutsch | 7
oder anderen kleinen Metallgegenständen, die eine
Überbrückung der Kontakte verursachen könnten. Ein
Kurzschluss zwischen den Akkukontakten kann Verbren-
nungen oder Feuer zur Folge haben.
uBei falscher Anwendung kann Flüssigkeit aus dem Akku austreten. Vermeiden Sie den Kontakt damit. Bei zufälligem Kontakt mit Wasser abspülen. Wenn die Flüssigkeit in die Augen kommt, nehmen Sie zusätzliche ärztliche Hilfe in Anspruch. Austretende Akkuflüssigkeit kann zu Hautreizungen oder Verbrennungen führen.
uBenutzen Sie keinen beschädigten oder veränderten Akku. Beschädigte oder veränderte Akkus können sich unvorhersehbar verhalten und zu Feuer, Explosion oder Verletzungsgefahr führen.
uSetzen Sie einen Akku keinem Feuer oder zu hohen Temperaturen aus. Feuer oder Temperaturen über 130°C können eine Explosion hervorrufen.
uBefolgen Sie alle Anweisungen zum Laden und laden Sie den Akku oder das Akkuwerkzeug niemals außerhalb des in der Betriebsanleitung angegebenen Temperaturbereichs. Falsches Laden oder Laden außerhalb des zugelassenen Temperaturbereichs kann den Akku zerstören und die Brandgefahr erhöhen.
Service
uLassen Sie Ihr Elektrowerkzeug nur von qualifiziertem Fachpersonal und nur mit Original-Ersatzteilen reparieren. Damit wird sichergestellt, dass die Sicherheit des Elektrowerkzeuges erhalten bleibt.
uWarten Sie niemals beschädigte Akkus. Sämtliche Wartung von Akkus sollte nur durch den Hersteller oder bevollmächtigte Kundendienststellen erfolgen.
Sicherheitshinweise für Schrauber
uHalten Sie das Elektrowerkzeug an den isolierten Griffflächen, wenn Sie Arbeiten ausführen, bei denen die Schraube verborgene Stromleitungen treffen kann. Der Kontakt der Schraube mit einer spannungsführenden Leitung kann auch metallene Geräteteile unter Spannung setzen und zu einem elektrischen Schlag führen.
uVerwenden Sie geeignete Suchgeräte, um verborgene Versorgungsleitungen aufzuspüren, oder ziehen Sie die örtliche Versorgungsgesellschaft hinzu. Kontakt mit Elektroleitungen kann zu Feuer und elektrischem Schlag führen. Beschädigung einer Gasleitung kann zur Explosion führen. Eindringen in eine Wasserleitung verursacht Sachbeschädigung.
uHalten Sie das Elektrowerkzeug gut fest. Beim Festziehen und Lösen von Schrauben können kurzzeitig hohe Reaktionsmomente auftreten.
uSichern Sie das Werkstück. Ein mit Spannvorrichtungen oder Schraubstock festgehaltenes Werkstück ist sicherer gehalten als mit Ihrer Hand.
uWarten Sie, bis das Elektrowerkzeug zum Stillstand gekommen ist, bevor Sie es ablegen. Das Einsatzwerk-
Bosch Power Tools |
|
|
|
1 609 92A 4V3 | (14.02.2019) |
|
|
|
|
|
|
|
|
|
|
|
|
|
|
|
|
|
|
|
8 | Deutsch
zeug kann sich verhaken und zum Verlust der Kontrolle über das Elektrowerkzeug führen.
uBei Beschädigung und unsachgemäßem Gebrauch des Akkus können Dämpfe austreten. Der Akku kann brennen oder explodieren. Führen Sie Frischluft zu und suchen Sie bei Beschwerden einen Arzt auf. Die Dämpfe können die Atemwege reizen.
uÖffnen Sie den Akku nicht. Es besteht die Gefahr eines Kurzschlusses.
uDurch spitze Gegenstände wie z. B. Nagel oder Schraubenzieher oder durch äußere Krafteinwirkung kann der Akku beschädigt werden. Es kann zu einem internen Kurzschluss kommen und der Akku brennen, rauchen, explodieren oder überhitzen.
uVerwenden Sie den Akku nur in Produkten des Herstellers. Nur so wird der Akku vor gefährlicher Überlastung geschützt.
Schützen Sie den Akku vor Hitze, z. B. auch vor dauernder Sonneneinstrahlung, Feuer, Wasser und Feuchtigkeit. Es besteht Explosi-
onsgefahr.
uSchalten Sie das Elektrowerkzeug sofort aus, wenn das Einsatzwerkzeug blockiert. Seien Sie auf hohe Reaktionsmomente gefasst, die einen Rückschlag verursachen. Das Einsatzwerkzeug blockiert, wenn das Elektrowerkzeug überlastet wird oder es im zu bearbeitenden Werkstück verkantet.
 WARNUNG Der beim Schmirgeln, Sägen, Schleifen, Bohren und ähnlichen
Tätigkeiten entstehende Staub kann krebserzeugend,
fruchtschädigend oder erbgutverändernd wirken. Einige
der in diesen Stäuben enthaltenen Stoffe sind:
Blei in bleihaltigen Farben und Lacken; kristalline Kieselerde in Ziegeln, Zement und anderen Maurerarbeiten; Arsen und Chromat in chemisch behandeltem Holz. Das Risiko einer Erkrankung hängt davon ab, wie oft Sie diesen Stoffen ausgesetzt sind. Um die Gefahr zu reduzieren, sollten Sie nur in gut belüfteten Räumen mit entsprechender Schutzausrüstung arbeiten (z. B. mit speziell konstruierten Atemschutzgeräten, die auch kleinste Staubpartikel herausfiltern).
uVermeiden Sie ein versehentliches Einschalten. Vergewissern Sie sich, dass der Ein-/Ausschalter in ausgeschalteter Position ist, bevor Sie einen Akku einsetzen. Das Tragen des Elektrowerkzeugs mit Ihrem Finger am Ein-/Ausschalter oder das Einsetzen des Akkus in das eingeschaltete Elektrowerkzeug kann zu Unfällen führen.
uVerwenden Sie nur einwandfreie, nicht verschlissene Einsatzwerkzeuge. Defekte Einsatzwerkzeuge können beispielsweise brechen und zu Verletzungen und Sachschäden führen.
uAchten Sie beim Einsetzen eines Einsatzwerkzeugs darauf, dass es fest auf der Werkzeugaufnahme sitzt.
Wenn das Einsatzwerkzeug nicht fest mit der Werkzeugaufnahme verbunden ist, kann es sich wieder lösen und nicht mehr kontrolliert werden.
uSeien Sie beim Eindrehen langer Schrauben vorsichtig, es besteht Abrutschgefahr je nach Schraubenart und verwendetem Einsatzwerkzeug. Lange Schrauben können häufig nicht so gut kontrolliert werden und es besteht die Gefahr, dass Sie beim Eindrehen abrutschen und sich verletzen.
uAchten Sie auf die eingestellte Drehrichtung, bevor Sie das Elektrowerkzeug einschalten. Wenn Sie beispielsweise eine Schraube lösen wollen und die Drehrichtung ist so eingestellt, dass die Schraube eingedreht wird, kann es zu einer heftigen unkontrollierten Bewegung des Elektrowerkzeugs kommen.
uVerwenden Sie das Elektrowerkzeug nicht als Bohrmaschine. Elektrowerkzeuge mit einer Abschaltkupplung sind nicht zum Bohren geeignet. Die Kupplung kann automatisch und ohne Warnung abschalten.
Produktund
Leistungsbeschreibung
Lesen Sie alle Sicherheitshinweise und An-
weisungen. Versäumnisse bei der Einhaltung der Sicherheitshinweise und Anweisungen können elektrischen Schlag, Brand und/oder schwere Verletzungen verursachen.
Bitte beachten Sie die Abbildungen im vorderen Teil der Betriebsanleitung.
Bestimmungsgemäßer Gebrauch
Das Elektrowerkzeug ist bestimmt zum Eindrehen und Lösen von Schrauben, Muttern und anderen Gewindeverschlüssen im angegebenen Abmessungsund Leistungsbereich.
Das Elektrowerkzeug ist nicht als Bohrmaschine geeignet; um Personenund Sachschäden zu vermeiden, sollten Sie niemals ein Elektrowerkzeug mit Abschaltkupplung zum Bohren verwenden.
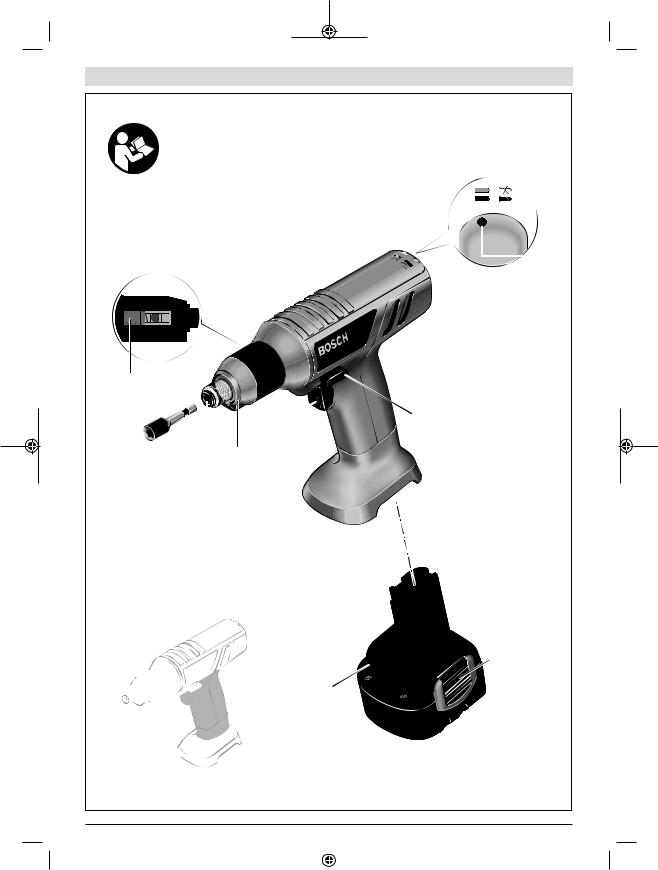
Abgebildete Komponenten
Die Nummerierung der abgebildeten Komponenten bezieht sich auf die Darstellung des Elektrowerkzeuges auf der Grafikseite.
(1)LED-Anzeige Verschraubungen
(2)LED-Anzeige Akku-Ladezustand
(3)Drehrichtungsumschalter
(4)Akku-EntriegelungstasteA)
(5)Akku mit APT-SteckkontaktA)
(6)Ein-/Ausschalter
(7)Markierungsring
(8)Werkzeugaufnahme
(9)Einsatzwerkzeug (z. B. Schrauberbit)
(10)Schieber für Drehmomentvorwahl
(11)LadegerätA)
(12)NetzsteckerA)
(13)Grüne LED-Anzeige am LadegerätA)
1 609 92A 4V3 | (14.02.2019) |
|
|
|
Bosch Power Tools |
|
|
|
|
|
|
|
|
|
|
|
|
|
|
|
|
|
|
|

(14)Rote LED-Anzeige am LadegerätA)
(15)Anschlussbuchse für einen Spannungsadapter am 4EXACTA)
(16)D-Sub-AnschlusssteckerA)
(17)Schrauben am D-Sub-AnschlusssteckerA)
(18)Spannungsadapter
(19)SchnellwechselfutterA)
Deutsch | 9
(20)Arbeitslicht
(21)Einstellwerkzeug
(22)Einstellscheibe
(23)Handgriff (isolierte Grifffläche)
A)Abgebildetes oder beschriebenes Zubehör gehört nicht zum Standard-Lieferumfang. Das vollständige Zubehör finden Sie in unserem Zubehörprogramm.
Technische Daten
Industrie-Akkuschrauber EXACT |
|
2 |
4 |
6 |
Sachnummer |
|
0 602 490 433 |
0 602 490 437 |
0 602 490 431 |
max. Drehmoment harter/weicher Schraubfall nach ISO |
Nm |
2/2 |
4/4 |
6/6 |
5393 |
|
|
|
|
Leerlaufdrehzahl n0 |
min-1 |
600 |
900 |
600 |
Nennspannung |
V |
9,6 |
9,6 |
9,6 |
Drehrichtung |
|
|
|
|
Gewicht entsprechend EPTA-Procedure 01:2014 |
kg |
0,82 |
0,83 |
0,83 |
Schutzart |
|
IP 20 |
IP 20 |
IP 20 |
Industrie-Akkuschrauber EXACT |
|
7 |
8 |
9 |
Sachnummer |
|
0 602 490 439 |
0 602 490 443 |
0 602 490 435 |
max. Drehmoment harter/weicher Schraubfall nach ISO |
Nm |
7/7 |
8/8 |
9/9 |
5393 |
|
|
|
|
Leerlaufdrehzahl n0 |
min-1 |
150 |
680 |
350 |
Nennspannung |
V |
9,6 |
12,0 |
9,6 |
Drehrichtung |
|
|
|
|
Gewicht entsprechend EPTA-Procedure 01:2014 |
kg |
0,87 |
0,87 |
0,83 |
Schutzart |
|
IP 20 |
IP 20 |
IP 20 |
Industrie-Akkuschrauber EXACT |
|
12 |
60 |
700 |
1100 |
Sachnummer |
|
0 602 490 441 |
0 602 490 469 |
0 602 490 447 |
0 602 490 471 |
max. Drehmoment harter/weicher Schraubfall |
Nm |
12/12 |
5,5/5,5 |
8/8 |
4/4 |
nach ISO 5393 |
|
|
|
|
|
Leerlaufdrehzahl n0 |
min-1 |
400 |
60 |
700 |
1050 |
Nennspannung |
V |
12,0 |
9,6 |
12,0 |
9,6 |
Drehrichtung |
|
|
|
|
|
Gewicht entsprechend EPTA-Procedure |
kg |
0,87 |
0,83 |
0,83 |
0,83 |
01:2014 |
|
|
|
|
|
Schutzart |
|
IP 20 |
IP 20 |
IP 20 |
IP 20 |
Ni-Cd-Akku-Pack |
|
9,6 |
9,6 |
12,0 |
12,0 |
14,4 |
14,4 |
Sachnummer |
|
2 607 335 |
2 607 335 |
2 607 335 |
2 607 335 |
2 607 335 |
2 607 335 |
|
|
877 |
659 |
879 |
375 |
881 |
655 |
Zellenzahl |
|
8 |
8 |
10 |
10 |
12 |
12 |
Akku-Spannung |
V |
9,6 |
9,6 |
12,0 |
12,0 |
14,4 |
14,4 |
Kapazität |
Ah |
1,8 |
2,4 |
1,8 |
2,4 |
1,8 |
2,4 |
Gewicht entsprechend |
kg |
0,45 |
0,50 |
0,65 |
0,70 |
0,70 |
0,80 |
EPTA-Procedure 01:2014 |
|
|
|
|
|
|
|
Bosch Power Tools |
|
|
|
1 609 92A 4V3 | (14.02.2019) |
|
|
|
|
|
|
|
|
|
|
|
|
|
|
|
|
|
|
|
10 | Deutsch
Ni-Cd-Akku-Pack |
9,6 |
9,6 |
|
12,0 |
|
12,0 |
14,4 |
14,4 |
|||
empfohlene Ladegeräte |
|
AL 2450 DV |
AL 2450 DV |
|
AL 2450 DV |
AL 2450 DV |
AL 2450 DV |
AL 2450 DV |
|||
|
|
|
|
|
|
|
|
|
|
|
|
Ni-MH-Akku-Pack |
|
|
|
|
|
9,6 |
|
12,0 |
|
14,4 |
|
Sachnummer |
|
|
|
|
|
2 607 335 681 |
2 607 335 683 |
2 607 335 685 |
|||
Zellenzahl |
|
|
|
|
|
8 |
|
10 |
|
12 |
|
Akku-Spannung |
|
|
|
|
V |
9,6 |
|
12,0 |
|
14,4 |
|
Kapazität |
|
|
|
Ah |
2,6 |
|
2,6 |
|
2,6 |
||
Gewicht entsprechend EPTA-Procedure 01:2014 |
|
kg |
0,55 |
|
0,70 |
|
0,80 |
||||
empfohlene Ladegeräte |
|
|
|
|
|
AL 2450 DV |
AL 2450 DV |
|
AL 2450 DV |
||
Geräusch-/Vibrationsinformation
Geräuschemissionswerte ermittelt entsprechend
EN 62841-2-2.
Der A-bewertete Schalldruckpegel des Elektrowerkzeugs beträgt typischerweise 70 dB(A). Unsicherheit K = 3 dB. Der Geräuschpegel beim Arbeiten kann 80 dB(A) überschreiten.
Gehörschutz tragen!
Schwingungsgesamtwerte ah (Vektorsumme dreier Richtungen) und Unsicherheit K ermittelt entsprechend
EN 62841-2-2: Schrauben: ah < 2,5 m/s2, K = 1,5 m/s2.
Der in diesen Anweisungen angegebene Schwingungspegel und der Geräuschemissionswert sind entsprechend einem genormten Messverfahren gemessen worden und können für den Vergleich von Elektrowerkzeugen miteinander verwendet werden. Sie eignen sich auch für eine vorläufige Einschätzung der Schwingungsund Geräuschemission.
Der angegebene Schwingungspegel und der Geräuschemissionswert repräsentieren die hauptsächlichen Anwendungen des Elektrowerkzeugs. Wenn allerdings das Elektrowerkzeug für andere Anwendungen, mit abweichenden Einsatzwerkzeugen oder ungenügender Wartung eingesetzt wird, können der Schwingungspegel und der Geräuschemissionswert abweichen. Dies kann die Schwingungsund Geräuschemission über den gesamten Arbeitszeitraum deutlich erhöhen.
Für eine genaue Abschätzung der Schwingungsund Geräuschemissionen sollten auch die Zeiten berücksichtigt werden, in denen das Gerät abgeschaltet ist oder zwar läuft, aber nicht tatsächlich im Einsatz ist. Dies kann die Schwingungsund Geräuschemissionen über den gesamten Arbeitszeitraum deutlich reduzieren.
Legen Sie zusätzliche Sicherheitsmaßnahmen zum Schutz des Bedieners vor der Wirkung von Schwingungen fest wie zum Beispiel: Wartung von Elektrowerkzeug und Einsatzwerkzeugen, Warmhalten der Hände, Organisation der Arbeitsabläufe.
Montage
uNehmen Sie den Akku vor allen Arbeiten am Elektrowerkzeug (z.B. Wartung, Werkzeugwechsel etc.) sowie bei dessen Transport und Aufbewahrung aus dem Elektrowerkzeug. Bei unbeabsichtigtem Betätigen des Ein-/Ausschalters besteht Verletzungsgefahr.
Lieferumfang
Typ
0 602 490 437/ 0 602 490 471/ 0 602 490 447/ 0 602 490 469
Die Industrie-Akkuschrauber werden ohne Einsatzwerkzeuge, Akku-Pack, Ladegerät, Spannungskonstanter oder Spannungsadapter geliefert. Die Spannungsadapter sind ausschließlich zum Anschluss der Bosch-Industrie-Akkuschrau- ber an den Spannungskonstanter 4EXACT zu verwenden.
Betriebsund Lagerungsumgebung
Das Elektrowerkzeug ist ausschließlich für den
Betrieb an geschlossenen Einsatzorten geeignet.
Für einen einwandfreien Betrieb sollte die zulässige Umgebungstemperatur zwischen –5 °C und +50 °C (23 °F und 122 °F) liegen, bei einer zulässigen relativen Luftfeuchtigkeit zwischen 20 und 95 % frei von Betauung.
Der Akku sollte bei einer Temperatur zwischen 0 °C (32 °F) und 45 °C (113 °F) aufbewahrt werden, um Schaden an den Akkuzellen zu vermeiden.
Ladevorgang
Hinweis: Ladegeräte und Akkus sind nicht im Lieferumfang enthalten.
Der abgebildete Netzstecker kann sich von dem an Ihrem Elektrowerkzeug unterscheiden.
uAchten Sie darauf, dass Ladegerät und Akku für Ihr landesspezifisches Stromnetz geeignet sind.
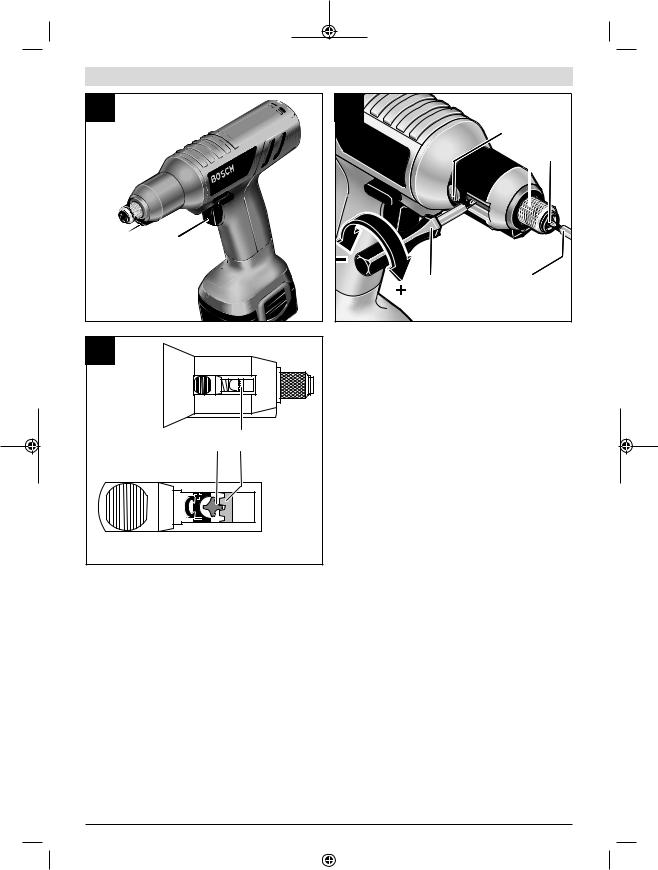
Ladegerät AL 2450 DV (siehe Bild A)
Schließen Sie das Ladegerät (11) mit dem Netzstecker (12) an die elektrische Energieversorgung an und stecken Sie den Akku (5) in der richtigen Position in den Ladeschacht des Ladegeräts.
uWenden Sie beim Einsetzen/Entnehmen des Akkus keine Gewalt an. Akkus mit APT-Steckkontakt (Akku
Pack Top) sind so konstruiert, dass sie nur in der richtigen Position in das Elektrowerkzeug oder Ladegerät eingesetzt werden können.
Die grüne LED-Anzeige (13) beginnt zu blinken. Dies zeigt das Fließen des Ladestroms an. Der Ladevorgang stoppt automatisch, wenn der Akku vollständig geladen ist. Wenn die grüne LED-Anzeige nicht mehr blinkt, sondern gleichmäßig
1 609 92A 4V3 | (14.02.2019) |
|
|
|
Bosch Power Tools |
|
|
|
|
|
|
|
|
|
|
|
|
|
|
|
|
|
|
|
leuchtet, ist der Ladevorgang beendet. Ein akustisches Signal ertönt für etwa 2 Sekunden und signalisiert die vollständige Ladung des Akkus.
Ein Dauerlicht der roten LED-Anzeige (14) signalisiert einen Ladevorgang mit reduziertem Ladestrom. Wenn die rote LED-Anzeige blinkt, ist kein Ladevorgang möglich.
Fehler – Ursachen und Abhilfe
Ursache |
Abhilfe |
LED-Anzeigen leuchten nicht |
|
Netzstecker des Ladegerätes |
Netzstecker (vollständig) in |
nicht (richtig) eingesteckt |
die Steckdose einstecken |
Steckdose, Netzkabel oder |
Netzspannung überprüfen, |
Ladegerät defekt |
Ladegerät ggf. von einer au- |
|
torisierten Kundendienststel- |
|
le für Bosch-Elektrowerkzeu- |
|
ge überprüfen lassen |
Kein Ladevorgang möglich |
|
Akku-Temperatur ist nicht im |
Akku-Temperatur durch Ab- |
zulässigen Bereich |
kühlen oder Erwärmen in den |
|
zulässigen Temperaturbe- |
|
reich zwischen 0 °C (32 °F) |
|
und 45 °C (113 °F) bringen |
Akkukontakte verschmutzt |
Akkukontakte reinigen; z.B. |
|
durch mehrfaches Einund |
|
Ausstecken des Akkus, ggf. |
|
Akku ersetzen |
Akku defekt |
Akku ersetzen |
Akku nicht (richtig) einge- |
Akku (vollständig) in den Ak- |
steckt |
kuLadeschacht einstecken |
Spannungskonstanter (siehe Bild B)
Typ
0 602 490 437/ 0 602 490 471/ 0 602 490 447/ 0 602 490 469
Hinweis: Industrie-Akkuschrauber können alternativ zum Akkubetrieb auch mit einem Spannungskonstanter betrieben werden. Spannungskonstanter und Spannungsadapter sind nicht im Lieferumfang enthalten.
Der abgebildete Netzstecker kann sich von dem an Ihrem Elektrowerkzeug unterscheiden.
uAchten Sie darauf, dass der Spannungskonstanter für Ihr landesspezifisches Stromnetz geeignet ist.
Außer dem Spannungskonstanter 4EXACT und dem passenden Netzkabel benötigen Sie einen Spannungsadapter, der die gleiche Nennspannung aufweist wie Ihr Schrauber.
uDie Spannung am Spannungskonstanter (LED-Anzei- ge) muss mit der Spannung des Schraubers übereinstimmen. Der Spannungskonstanter ist ausschließlich für Bosch-Industrie-Akkuschrauber der Reihen EXACT, ANGLE EXACT und BT-EXACT mit einer Spannung zwischen 9,6 V und 14,4 V geeignet. Ansonsten besteht Brandund Explosionsgefahr.
Deutsch | 11
Anschluss an die Energieversorgung
Hinweis: Beachten Sie bitte, dass bei Lieferung weder ein Akku noch ein Spannungsadapter in das Elektrowerkzeug eingesetzt ist.
uBewahren Sie Akkus nie in einem Akkugerät auf. Akkus halten länger und lassen sich besser aufladen, wenn sie separat aufbewahrt werden. Denken Sie daran, den Akku nach längerer Aufbewahrung vor Gebrauch voll aufzuladen.
Akku laden
Laden Sie den Akku vor dem Einsetzen in das Elektrowerkzeug in einem dafür geeigneten Ladegerät auf. Die genaue Beschreibung des Ladevorgangs entnehmen Sie bitte der Betriebsanleitung des Ladegeräts und den Hinweisen in dieser Anleitung (siehe „Ladevorgang“, Seite 10).
Der Akku ist mit einer NTC-Temperaturüberwachung ausgestattet, welche ein Aufladen nur im Temperaturbereich zwischen 0 °C (+32 °F) und 45 °C (+113 °F) zulässt. Dadurch wird eine hohe Akku-Lebensdauer erreicht. Bei richtigem Gebrauch kann der Akku bis zu 3000-mal wieder aufgeladen werden.
Ein neuer oder längere Zeit nicht verwendeter Akku bringt erst nach ca. 5 Ladeund Entladezyklen seine volle Leistung. Akkus sollten nur dann nachgeladen werden, wenn die LEDAnzeige „Akku-Ladezustand“ des Elektrowerkzeugs rot leuchtet.
Akku einsetzen und entnehmen (siehe Bild C)
Drücken Sie den Drehrichtungsumschalter (3) in die mittlere Position. Dies sperrt den Ein-/Ausschalter (6) in der Position „Aus“, wodurch das unbeabsichtigte Einschalten des Elektrowerkzeugs verhindert wird.
Schieben Sie einen geladenen Akku (5) in den Griff des Elektrowerkzeugs.
Achten Sie darauf, den Akku in der richtigen Position einzusetzen, und dass die Entriegelungstasten (4) spürbar im Griff des Elektrowerkzeugs einrasten.
uWenden Sie beim Einsetzen/Entnehmen des Akkus keine Gewalt an. Akkus mit APT-Steckkontakt (Akku
Pack Top) sind so konstruiert, dass sie nur in der richtigen Position in das Elektrowerkzeug oder Ladegerät eingesetzt werden können.
Um den Akku (5) zu entnehmen, drücken Sie auf beiden Seiten auf die Entriegelungstasten (4) und ziehen den Akku nach unten aus dem Griff.
Spannungsadapter einsetzen und entnehmen (siehe Bild D)
Typ
0 602 490 437/ 0 602 490 471/ 0 602 490 447/ 0 602 490 469
Wählen Sie den zu der Nennspannung Ihres Elektrowerkzeugs passenden Spannungsadapter aus.
Die Spannungsadapter sind je nach Spannung an der Farbe des Gehäuses des D-Sub-Anschlusssteckers (16) zu unterscheiden. Das Gehäuse des D-Sub-Anschlusssteckers für
Bosch Power Tools |
|
|
|
1 609 92A 4V3 | (14.02.2019) |
|
|
|
|
|
|
|
|
|
|
|
|
|
|
|
|
|
|
|
12 | Deutsch
9,6-V-Spannung hat die Farbe Hellblau und das für 12-V-
Spannung die Farbe Rot.
uDas Adaptergehäuse (18) darf nur bei ausgeschaltetem Spannungskonstanter oder vom Spannungskonstanter getrennten Anschlussstecker (16) in den In- dustrie-Akkuschrauber montiert oder demontiert werden.
Drücken Sie den Drehrichtungsumschalter (3) in die mittlere Position. Dies sperrt den Ein-/Ausschalter (6) in der Position „Aus“, wodurch das unbeabsichtigte Einschalten des Elektrowerkzeugs verhindert wird.
Schieben Sie dann das Adaptergehäuse (18) in den Griff des Elektrowerkzeugs. Achten Sie darauf, das Adaptergehäuse in der richtigen Position einzusetzen, und dass die Entriegelungstasten (4) spürbar im Griff des Elektrowerkzeugs einrasten.
Stecken Sie anschließend den Anschlussstecker (16) des zu Ihrem Elektrowerkzeug passenden Spannungsadapters in die Anschlussbuchse (15). Schrauben Sie den Anschlussstecker (16) in der Anschlussbuchse (15) fest, indem Sie die beiden Schrauben (17) handfest anziehen.
Um den Spannungsadapter zu entnehmen, lösen Sie die beiden Schrauben (17) am Anschlussstecker (16) des ausgeschalteten Spannungskonstanters und ziehen den Anschlussstecker aus der Anschlussbuchse (15).
Drücken Sie anschließend auf beiden Seiten auf die Entriegelungstasten (4) und ziehen Sie das Adaptergehäuse (18) aus dem Griff des Elektrowerkzeugs.
Werkzeugwechsel beim Schraubkopf mit
Schnellwechselfutter (siehe Bild E)
uAchten Sie beim Einsetzen eines Einsatzwerkzeugs darauf, dass es fest auf der Werkzeugaufnahme sitzt.
Wenn das Einsatzwerkzeug nicht fest mit der Werkzeugaufnahme verbunden ist, kann es sich wieder lösen und nicht mehr kontrolliert werden.
Einsatzwerkzeug einsetzen
Ziehen Sie das Schnellwechselfutter (19) nach vorn. Stecken Sie das Einsatzwerkzeug (9) in die Werkzeugaufnahme
(8), und lassen Sie das Schnellwechselfutter wieder los. Verwenden Sie nur Einsatzwerkzeuge mit passendem Einsteckende (1/4"-Sechskant).
Versuchen Sie nicht, Bohrer in dieses Schnellwechselfutter einzusetzen. Industrie-Akkuschrauber mit Abschaltkupplung sind nicht zum Bohren geeignet. Die Kupplung kann automatisch und ohne Warnung abschalten. Wenn Sie nach dem Abschalten der Kupplung weiterbohren, kann sich das Elektrowerkzeug Ihrem Griff entwinden, bis die Abschaltkupplung erneut anschlägt.
Einsatzwerkzeug entnehmen
Ziehen Sie das Schnellwechselfutter (19) nach vorn. Nehmen Sie das Einsatzwerkzeug (9) aus der Werkzeugaufnahme (8), und lassen Sie das Schnellwechselfutter wieder los.
Betrieb
Tragen Sie persönliche Schutzausrüstung und immer eine Schutzbrille. Das Tragen per-
sönlicher Schutzausrüstung, wie Staubmaske, rutschfeste Sicherheitsschuhe, Schutzhelm oder Gehörschutz, je nach Art und Einsatz des
Elektrowerkzeuges, verringert das Risiko von Verletzungen.
Inbetriebnahme
Wenn Sie das Elektrowerkzeug starten wollen, sollten Sie zunächst die Drehrichtung mit dem Drehrichtungsumschalter
(3) einstellen:
Das Elektrowerkzeug startet nur, wenn der Drehrichtungsumschalter (3) nicht in der Mitte steht (Einschaltsperre).
Drehrichtung einstellen (siehe Bild F)
uBetätigen Sie den Drehrichtungsumschalter (3) nur bei Stillstand des Elektrowerkzeuges.
Rechtslauf: Zum Eindrehen von Schrauben drücken Sie den Drehrichtungsumschalter (3) nach links bis zum Anschlag
durch.
Linkslauf: Zum Lösen bzw. Herausdrehen von Schrauben drücken Sie den Drehrichtungsumschalter (3) nach rechts bis zum Anschlag durch.
LED-Arbeitslicht einschalten (siehe Bild G)
Das Arbeitslicht (20) ermöglicht das Ausleuchten der Schraubstelle bei ungünstigen Lichtverhältnissen. Sie schalten das Arbeitslicht (20) durch leichtes Drücken des Ein-/ Ausschalters (6) ein. Wenn Sie den Ein-/Ausschalter fester drücken, wird das Elektrowerkzeug eingeschaltet und das Arbeitslicht leuchtet weiter.
uBlicken Sie nicht direkt in das Arbeitslicht, es kann Sie blenden.
Ein-/Ausschalten
Die Schrauber haben eine vom Drehmoment
abhängige Abschaltkupplung, die im angege-
benen Bereich einstellbar ist. Sie spricht an, wenn das eingestellte Drehmoment erreicht ist.
Hinweis: Wenn Sie den Schrauber mit einem Spannungsadapter betreiben, müssen Sie zuerst den Spannungskonstanter in Betrieb nehmen.
Zum Einschalten des Elektrowerkzeugs drücken Sie den Ein-/Ausschalter (6) bis zum Anschlag.
Das Elektrowerkzeug schaltet sich automatisch aus, sobald das eingestellte Drehmoment erreicht ist.
uBei vorzeitigem Loslassen des Ein-/Ausschalters (6) wird das voreingestellte Drehmoment nicht erreicht.
Arbeitshinweise
uNehmen Sie den Akku vor allen Arbeiten am Elektrowerkzeug (z.B. Wartung, Werkzeugwechsel etc.) sowie bei dessen Transport und Aufbewahrung aus dem Elektrowerkzeug. Bei unbeabsichtigtem Betätigen des Ein-/Ausschalters besteht Verletzungsgefahr.
1 609 92A 4V3 | (14.02.2019) |
|
|
|
Bosch Power Tools |
|
|
|
|
|
|
|
|
|
|
|
|
|
|
|
|
|
|
|
uSetzen Sie das Elektrowerkzeug nur ausgeschaltet auf die Mutter/Schraube auf. Sich drehende Einsatzwerkzeuge können abrutschen.
Drehmoment einstellen (siehe Bilder H – I)
Das Drehmoment hängt von der Federvorspannung der Abschaltkupplung ab. Die Abschaltkupplung löst sowohl im Rechtsals auch im Linkslauf bei Erreichen des eingestellten Drehmoments aus.
Zum Einstellen des individuellen Drehmoments nur das mitgelieferte Einstellwerkzeug (21) verwenden.
–Schieben Sie den Schieber (10) am Elektrowerkzeug komplett zurück.
–Stecken Sie das Einstellwerkzeug (21) in die Werkzeugaufnahme (8) und drehen Sie es langsam.
–Sobald in der Gehäuseöffnung eine kleine Ausbuchtung (Einstellscheibe (22)) in der Kupplung zu sehen ist, stecken Sie das Einstellwerkzeug (21) in diese Ausbuchtung und drehen es.
Drehen im Uhrzeigersinn ergibt ein höheres Drehmoment, Drehen gegen den Uhrzeigersinn ein niedrigeres Drehmoment.
–Entnehmen Sie das Einstellwerkzeug (21). Schieben Sie den Schieber (10) wieder nach vorn, um die Kupplung vor Verschmutzung zu schützen.
Hinweis: Die erforderliche Einstellung ist von der Art der Schraubverbindung abhängig und lässt sich am besten im praktischen Versuch ermitteln. Probeverschraubung mit einem Drehmomentschlüssel überprüfen.
uStellen Sie das Drehmoment nur im angegebenen Leistungsbereich ein, da sonst die Abschaltkupplung nicht mehr anspricht.
Drehmomenteinstellung markieren
Zur Kennzeichnung individuell eingestellter Drehmomente können Sie den Markierungsring (7) gegen einen andersfarbigen Markierungsring austauschen.
Wenn Sie beispielsweise einige EXACT-Elektrowerkzeuge mit einem Drehmoment von 4,5 Nm verwenden, können Sie rote Markierungsringe zur Kennzeichnung ihres Drehmoments anbringen. Wenn Sie weitere EXACT-Elektrowerkzeu- ge in einem anderen Montagebereich verwenden, deren Drehmoment auf 7,5 Nm eingestellt ist, können Sie einen andersfarbigen Markierungsring (schwarz, blau, grün oder gelb) anbringen, um das Drehmoment in diesem Bereich zu kennzeichnen. Die verschiedenfarbigen Markierungsringe sind nur als Hilfe für die Monteure gedacht, um schneller erkennen zu können, welches Drehmoment an dem jeweiligen Elektrowerkzeug eingestellt ist.
Drücken Sie den Markierungsring (7) mit einem dünnen Schraubendreherblatt, einem Spachtel oder Ähnlichem ab. Benutzen Sie das Elektrowerkzeug immer mit einem Markierungsring, um sicher zu sein, dass das Gehäuse gegen Staub und Schmutz geschützt ist.
Deutsch | 13
LED-Anzeige
Anzeige Akku-Ladezustand
Ist das Laden des Akkus (5) erforderlich, blinkt die LED-Anzeige (2) grün, und es ertönt ein
akustisches Signal. Nur 6–8 Verschraubungen sind dann noch möglich.
Leuchtet die LED-Anzeige rot, reicht die Kapazität nicht mehr für eine neue Verschraubung oder das Elektrowerkzeug wurde überlastet. Das Elektrowerkzeug kann nicht mehr eingeschaltet werden. Die Einschaltsperre bleibt aktiv, bis der Akku aus dem Elektrowerkzeug gezogen und ein geladener Akku wieder eingesetzt wird.
Wenn Sie mit einem Spannungsadapter arbeiten, zeigt die rote LED-Anzeige (2) eine Überlastung an.
Eine wesentlich verkürzte Betriebszeit des Elektrowerkzeugs nach jeder Aufladung zeigt an, dass der Akku bald ersetzt werden muss. Entsorgen Sie verbrauchte Akkus gemäß den gesetzlichen/ länderspezifischen Bestimmungen.
Anzeige Verschraubungen
Bei Erreichen des voreingestellten Drehmoments löst die Abschaltkupplung aus. Die LED-
Anzeige (1) leuchtet grün.
Wurde das voreingestellte Drehmoment nicht erreicht, leuchtet die LED-Anzeige (1) rot auf, und es ertönt ein akustisches Signal. Die Verschraubung muss noch einmal durchgeführt werden.
Wiederholschutz
Wurde bei einer Verschraubung die Abschaltkupplung ausgelöst, schaltet der Motor ab. Ein Wiedereinschalten ist erst nach 0,7 Sekunden Pause möglich. Sie vermeiden dadurch ein versehentliches Nachziehen bereits fester Verschraubungen.
Wartung und Service
Wartung und Reinigung
uNehmen Sie den Akku vor allen Arbeiten am Elektrowerkzeug (z.B. Wartung, Werkzeugwechsel etc.) sowie bei dessen Transport und Aufbewahrung aus dem Elektrowerkzeug. Bei unbeabsichtigtem Betätigen des Ein-/Ausschalters besteht Verletzungsgefahr.
uHalten Sie das Elektrowerkzeug und die Lüftungsschlitze sauber, um gut und sicher zu arbeiten.
Schmierung des Elektrowerkzeugs
Schmierstoff:
Spezial-Getriebefett (225 ml)
Sachnummer 3 605 430 009
Molykotefett
Motorenöl SAE 10/SAE 20
–Reinigen Sie nach den ersten 150 Betriebsstunden das Getriebe mit einem milden Lösungsmittel. Befolgen Sie die Hinweise des Lösungsmittelherstellers zu Gebrauch und Entsorgung. Schmieren Sie das Getriebe anschließend mit Bosch-Spezial-Getriebefett. Wiederholen Sie
Bosch Power Tools |
|
|
|
1 609 92A 4V3 | (14.02.2019) |
|
|
|
|
|
|
|
|
|
|
|
|
|
|
|
|
|
|
|
14 | English
den Reinigungsvorgang jeweils nach 300 Betriebsstunden ab der ersten Reinigung.
–Ölen Sie die beweglichen Teile der Abschaltkupplung nach 100000 Verschraubungen mit einigen Tropfen Motorenöl SAE 10/SAE 20. Schmieren Sie die gleitenden und rollenden Teile mit Molykotefett. Überprüfen Sie bei dieser Gelegenheit die Kupplung auf Verschleiß, um sicherzugehen, dass die Wiederholbarkeit und Genauigkeit nicht beeinflusst wurden. Anschließend muss das Drehmoment der Kupplung erneut eingestellt werden.
uLassen Sie Wartungsund Reparaturarbeiten nur von qualifiziertem Fachpersonal durchführen. Damit wird sichergestellt, dass die Sicherheit des Elektrowerkzeugs erhalten bleibt.
Eine autorisierte Bosch-Kundendienststelle führt diese Ar-
beiten schnell und zuverlässig aus.
uEntsorgen Sie Schmierund Reinigungsstoffe umweltgerecht. Beachten Sie die gesetzlichen Vorschriften.
Kundendienst und Anwendungsberatung
Der Kundendienst beantwortet Ihre Fragen zu Reparatur und Wartung Ihres Produkts sowie zu Ersatzteilen. Explosionszeichnungen und Informationen zu Ersatzteilen finden Sie auch unter: www.bosch-pt.com
Das Bosch-Anwendungsberatungs-Team hilft Ihnen gerne bei Fragen zu unseren Produkten und deren Zubehör. www.powertool-portal.de, das Internetportal für Handwerker und Heimwerker.
Geben Sie bei allen Rückfragen und Ersatzteilbestellungen bitte unbedingt die 10-stellige Sachnummer laut Typenschild des Produkts an.
Deutschland
Robert Bosch Power Tools GmbH
Servicezentrum Elektrowerkzeuge
Zur Luhne 2
37589 Kalefeld – Willershausen
Unter www.bosch-pt.de können Sie online Ersatzteile bestellen oder Reparaturen anmelden.
Kundendienst: Tel.: (0711) 40040460
Fax: (0711) 40040461
E-Mail: Servicezentrum.Elektrowerkzeuge@de.bosch.com
Anwendungsberatung:
Tel.: (0711) 40040460
Fax: (0711) 40040462
E-Mail: kundenberatung.ew@de.bosch.com
Österreich
Unter www.bosch-pt.at können Sie online Ersatzteile bestellen.
Tel.: (01) 797222010
Fax: (01) 797222011
E-Mail: service.elektrowerkzeuge@at.bosch.com
Schweiz
Unter www.bosch-pt.com/ch/de können Sie online Ersatz-
teile bestellen.
Tel.: (044) 8471511
Fax: (044) 8471551
E-Mail: Aftersales.Service@de.bosch.com
Luxemburg
Tel.: +32 2 588 0589
Fax: +32 2 588 0595
E-Mail: outillage.gereedschap@be.bosch.com
Entsorgung
Elektrowerkzeuge, Akkus, Zubehör und Verpackungen sollen einer umweltgerechten Wiederverwertung zugeführt werden.
Werfen Sie Elektrowerkzeuge und Akkus/Batterien nicht in den Hausmüll!
Nur für EU-Länder:
Gemäß der europäischen Richtlinie 2012/19/EU müssen nicht mehr gebrauchsfähige Elektrowerkzeuge und gemäß der europäischen Richtlinie 2006/66/EG müssen defekte oder verbrauchte Akkus/Batterien getrennt gesammelt und einer umweltgerechten Wiederverwendung zugeführt werden.
Akkus/Batterien:
Ni-Cd: Nickel-Cadmium
Achtung: Diese Akkus enthalten Cadmium, ein hochgiftiges Schwermetall.
Ni-MH: Nickel-Metallhydrid
English
Safety instructions
General Power Tool Safety Warnings
 WARNING Read all safety warnings, instructions, illustrations and specifica-
tions provided with this power tool. Failure to follow all in-
structions listed below may result in electric shock, fire and/
or serious injury.
Save all warnings and instructions for future reference.
The term "power tool" in the warnings refers to your mainsoperated (corded) power tool or battery-operated (cordless) power tool.
Work area safety
uKeep work area clean and well lit. Cluttered or dark areas invite accidents.
1 609 92A 4V3 | (14.02.2019) |
|
|
|
Bosch Power Tools |
|
|
|
|
|
|
|
|
|
|
|
|
|
|
|
|
|
|
|

uDo not operate power tools in explosive atmospheres, such as in the presence of flammable liquids, gases or dust. Power tools create sparks which may ignite the dust or fumes.
uKeep children and bystanders away while operating a power tool. Distractions can cause you to lose control.
Electrical safety
uPower tool plugs must match the outlet. Never modify the plug in any way. Do not use any adapter plugs with earthed (grounded) power tools. Unmodified plugs and matching outlets will reduce risk of electric shock.
uAvoid body contact with earthed or grounded surfaces, such as pipes, radiators, ranges and refrigerators. There is an increased risk of electric shock if your body is earthed or grounded.
uDo not expose power tools to rain or wet conditions.
Water entering a power tool will increase the risk of electric shock.
uDo not abuse the cord. Never use the cord for carrying, pulling or unplugging the power tool. Keep cord away from heat, oil, sharp edges or moving parts.
Damaged or entangled cords increase the risk of electric shock.
uWhen operating a power tool outdoors, use an extension cord suitable for outdoor use. Use of a cord suitable for outdoor use reduces the risk of electric shock.
uIf operating a power tool in a damp location is unavoidable, use a residual current device (RCD) protected supply. Use of an RCD reduces the risk of electric shock.
Personal safety
uStay alert, watch what you are doing and use common sense when operating a power tool. Do not use a power tool while you are tired or under the influence of drugs, alcohol or medication. A moment of inattention while operating power tools may result in serious personal injury.
uUse personal protective equipment. Always wear eye protection. Protective equipment such as a dust mask, non-skid safety shoes, hard hat or hearing protection used for appropriate conditions will reduce personal injuries.
uPrevent unintentional starting. Ensure the switch is in the off-position before connecting to power source and/or battery pack, picking up or carrying the tool.
Carrying power tools with your finger on the switch or energising power tools that have the switch on invites accidents.
uRemove any adjusting key or wrench before turning the power tool on. A wrench or a key left attached to a rotating part of the power tool may result in personal injury.
uDo not overreach. Keep proper footing and balance at all times. This enables better control of the power tool in unexpected situations.
English | 15
uDress properly. Do not wear loose clothing or jewellery. Keep your hair and clothing away from moving parts. Loose clothes, jewellery or long hair can be caught in moving parts.
uIf devices are provided for the connection of dust extraction and collection facilities, ensure these are connected and properly used. Use of dust collection can reduce dust-related hazards.
uDo not let familiarity gained from frequent use of tools allow you to become complacent and ignore tool safety principles. A careless action can cause severe injury within a fraction of a second.
Power tool use and care
uDo not force the power tool. Use the correct power tool for your application. The correct power tool will do the job better and safer at the rate for which it was designed.
uDo not use the power tool if the switch does not turn it on and off. Any power tool that cannot be controlled with the switch is dangerous and must be repaired.
uDisconnect the plug from the power source and/or remove the battery pack, if detachable, from the power tool before making any adjustments, changing accessories, or storing power tools. Such preventive safety measures reduce the risk of starting the power tool accidentally.
uStore idle power tools out of the reach of children and do not allow persons unfamiliar with the power tool or these instructions to operate the power tool. Power tools are dangerous in the hands of untrained users.
uMaintain power tools and accessories. Check for misalignment or binding of moving parts, breakage of parts and any other condition that may affect the power tool’s operation. If damaged, have the power tool repaired before use. Many accidents are caused by poorly maintained power tools.
uKeep cutting tools sharp and clean. Properly maintained cutting tools with sharp cutting edges are less likely to bind and are easier to control.
uUse the power tool, accessories and tool bits etc. in accordance with these instructions, taking into account the working conditions and the work to be performed. Use of the power tool for operations different from those intended could result in a hazardous situation.
uKeep handles and grasping surfaces dry, clean and free from oil and grease. Slippery handles and grasping surfaces do not allow for safe handling and control of the tool in unexpected situations.
Battery tool use and care
uRecharge only with the charger specified by the manufacturer. A charger that is suitable for one type of battery pack may create a risk of fire when used with another battery pack.
Bosch Power Tools |
|
|
|
1 609 92A 4V3 | (14.02.2019) |
|
|
|
|
|
|
|
|
|
|
|
|
|
|
|
|
|
|
|
16 | English
uUse power tools only with specifically designated battery packs. Use of any other battery packs may create a risk of injury and fire.
uWhen battery pack is not in use, keep it away from other metal objects, like paper clips, coins, keys, nails, screws or other small metal objects, that can make a connection from one terminal to another.
Shorting the battery terminals together may cause burns or a fire.
uUnder abusive conditions, liquid may be ejected from the battery; avoid contact. If contact accidentally occurs, flush with water. If liquid contacts eyes, additionally seek medical help. Liquid ejected from the battery may cause irritation or burns.
uDo not use a battery pack or tool that is damaged or modified. Damaged or modified batteries may exhibit unpredictable behaviour resulting in fire, explosion or risk of injury.
uDo not expose a battery pack or tool to fire or excessive temperature. Exposure to fire or temperature above 130°C may cause explosion.
uFollow all charging instructions and do not charge the battery pack or tool outside the temperature range specified in the instructions. Charging improperly or at temperatures outside the specified range may damage the battery and increase the risk of fire.
Service
uHave your power tool serviced by a qualified repair person using only identical replacement parts. This will ensure that the safety of the power tool is maintained.
uNever service damaged battery packs. Service of battery packs should only be performed by the manufacturer or authorized service providers.
Safety Warnings for Screwdrivers
uHold the power tool by insulated gripping surfaces, when performing an operation where the fastener may contact hidden wiring. Fasteners contacting a "live" wire may make exposed metal parts of the power tool "live" and could give the operator an electric shock.
uUse suitable detectors to determine if there are hidden supply lines or contact the local utility company for assistance. Contact with electric cables can cause fire and electric shock. Damaging gas lines can lead to explosion. Breaking water pipes causes property damage.
uHold the power tool securely. When tightening and loosening screws be prepared for temporarily high torque reactions.
uSecure the workpiece. A workpiece clamped with clamping devices or in a vice is held more secure than by hand.
uAlways wait until the power tool has come to a complete stop before placing it down. The application tool can jam and cause you to lose control of the power tool.
uIn case of damage and improper use of the battery, vapours may be emitted. The battery can set alight or ex-
plode. Ensure the area is well ventilated and seek medical attention should you experience any adverse effects. The vapours may irritate the respiratory system.
uDo not open the battery. There is a risk of short-circuit- ing.
uThe battery can be damaged by pointed objects such as nails or screwdrivers or by force applied externally.
An internal short circuit may occur, causing the battery to burn, smoke, explode or overheat.
uOnly use the battery with products from the manufacturer. This is the only way in which you can protect the battery against dangerous overload.
Protect the battery against heat, e.g. against continuous intense sunlight, fire, water and moisture. There is a risk of explo-
sion.
uSwitch the power tool off immediately if the application tool becomes blocked. Be prepared for high torque reactions which cause kickback. The application tool becomes blocked when it becomes jammed in the workpiece or when the power tool becomes overloaded.
 WARNING The dust produced by sanding, sawing, grinding, drilling and
other similar activities may cause cancer, congenital defects or genetic mutations. Some of these dusts contain
substances such as:
Lead in lead-based paint and varnish; crystalline silica in bricks, cement and other building materials; arsenic and chromate in chemically treated wood. The risk of becoming ill depends on how frequently you are exposed to these substances. To reduce the potential danger, you should always wear adequate personal protective equipment (e.g. specially made breathing apparatus that can filter out even the smallest of dust particles) and work only in well-ventilated areas.
uAvoid switching on the tool accidentally. Make sure that the on/off switch is set to the off position before inserting a battery. Accidents can occur as a result of carrying the power tool with your finger on the on/off switch or inserting the battery while the power tool is switched on.
uDo not use application tools that are worn or in otherwise less than perfect condition. Defective application tools can break, for example, causing material damage and personal injury.
uWhen fitting an application tool, make sure that it is held securely in the tool holder. If the application tool is not held securely in the tool holder, it may become loose and consequently uncontrollable.
uBe careful when screwing in long screws – there is a risk of slipping when using particular screws and application tools. Long screws are often difficult to control and there is a danger that you will slip and hurt yourself when screwing them in.
uCheck which rotational direction is set before switching on the power tool. If you want to loosen a screw but the rotational direction is set to tighten the screw, for ex-
1 609 92A 4V3 | (14.02.2019) |
|
|
|
Bosch Power Tools |
|
|
|
|
|
|
|
|
|
|
|
|
|
|
|
|
|
|
|
ample, the power tool may move violently and uncontrollably.
uDo not use the power tool as a drill. Power tools with a shut-off clutch are not suitable for drilling. The clutch can shut off automatically and without warning.
Product Description and
Specifications
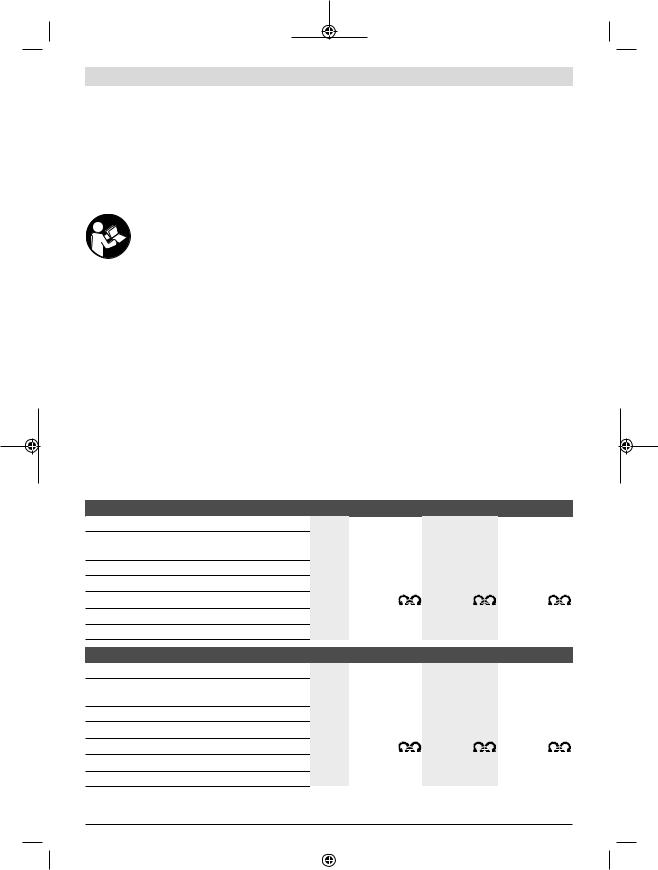
Read all the safety and general instructions.
Failure to observe the safety and general instructions may result in electric shock, fire and/or serious injury.
Please observe the illustrations at the beginning of this operating manual.
Intended Use
The power tool is intended for tightening and loosening screws, bolts, nuts and other threaded connectors in the specified power and dimension ranges.
The power tool is not intended for drilling; in order to prevent personal injury and damage to property, power tools with a shut-off clutch should never be used for drilling.
Product Features
The numbering of the product features refers to the diagram of the power tool on the graphics page.
(1)LED indicator for screwdriving applications
(2)Battery charge LED indicator
English | 17
(3)Rotational direction switch
(4)Battery release buttonA)
(5)Battery with APT contactA)
(6)On/off switch
(7)Marking ring
(8)Tool holder
(9)Application tool (e.g. screwdriver bit)
(10)Slider for preselecting the torque
(11)ChargerA)
(12)Mains plugA)
(13)Green LED indicator on the chargerA)
(14)Red LED indicator on the chargerA)
(15)Connection socket for a voltage adapter on the 4EXACTA)
(16)D-Sub connector plugA)
(17)Screws on the D-Sub connector plugA)
(18)Voltage adapter
(19)Quick-change chuckA)
(20)Worklight
(21)Adjustment tool
(22)Setting disc
(23)Handle (insulated gripping surface)
A)Accessories shown or described are not included with the product as standard. You can find the complete selection of accessories in our accessories range.
Technical data
EXACT industrial cordless screwdriver |
|
2 |
4 |
6 |
Article number |
|
0 602 490 433 |
0 602 490 437 |
0 602 490 431 |
Max. torque, hard/soft screwdriving application accord- |
Nm |
2/2 |
4/4 |
6/6 |
ing to ISO 5393 |
|
|
|
|
No-load speed n0 |
min-1 |
600 |
900 |
600 |
Rated voltage |
V |
9.6 |
9.6 |
9.6 |
Direction of rotation |
|
|
|
|
Weight according to EPTA-Procedure 01:2014 |
kg |
0.82 |
0.83 |
0.83 |
Protection rating |
|
IP 20 |
IP 20 |
IP 20 |
EXACT industrial cordless screwdriver |
|
7 |
8 |
9 |
Article number |
|
0 602 490 439 |
0 602 490 443 |
0 602 490 435 |
Max. torque, hard/soft screwdriving application accord- |
Nm |
7/7 |
8/8 |
9/9 |
ing to ISO 5393 |
|
|
|
|
No-load speed n0 |
min-1 |
150 |
680 |
350 |
Rated voltage |
V |
9.6 |
12.0 |
9.6 |
Direction of rotation |
|
|
|
|
Weight according to EPTA-Procedure 01:2014 |
kg |
0.87 |
0.87 |
0.83 |
Protection rating |
|
IP 20 |
IP 20 |
IP 20 |
Bosch Power Tools |
|
|
|
1 609 92A 4V3 | (14.02.2019) |
|
|
|
|
|
|
|
|
|
|
|
|
|
|
|
|
|
|
|
18 | English
EXACT industrial cordless screwdriver |
|
12 |
60 |
700 |
1100 |
Article number |
|
0 602 490 441 |
0 602 490 469 |
0 602 490 447 |
0 602 490 471 |
Max. torque, hard/soft screwdriving application |
Nm |
12/12 |
5.5/5.5 |
8/8 |
4/4 |
according to ISO 5393 |
|
|
|
|
|
No-load speed n0 |
min-1 |
400 |
60 |
700 |
1050 |
Rated voltage |
V |
12.0 |
9.6 |
12.0 |
9.6 |
Direction of rotation |
|
|
|
|
|
Weight according to EPTA-Procedure 01:2014 |
kg |
0.87 |
0.83 |
0.83 |
0.83 |
Protection rating |
|
IP 20 |
IP 20 |
IP 20 |
IP 20 |
NiCd battery pack |
|
9.6 |
9.6 |
12.0 |
12.0 |
14.4 |
14.4 |
Article number |
|
2 607 335 |
2 607 335 |
2 607 335 |
2 607 335 |
2 607 335 |
2 607 335 |
|
|
877 |
659 |
879 |
375 |
881 |
655 |
Number of cells |
|
8 |
8 |
10 |
10 |
12 |
12 |
Battery voltage |
V |
9.6 |
9.6 |
12.0 |
12.0 |
14.4 |
14.4 |
Capacity |
Ah |
1.8 |
2.4 |
1.8 |
2.4 |
1.8 |
2.4 |
Weight according to EPTA- |
kg |
0.45 |
0.50 |
0.65 |
0.70 |
0.70 |
0.80 |
Procedure 01:2014 |
|
|
|
|
|
|
|
Recommended chargers |
|
AL 2450 DV |
AL 2450 DV |
AL 2450 DV |
AL 2450 DV |
AL 2450 DV |
AL 2450 DV |
NiMH battery pack |
|
9.6 |
12.0 |
14.4 |
Article number |
|
2 607 335 681 |
2 607 335 683 |
2 607 335 685 |
Number of cells |
|
8 |
10 |
12 |
Battery voltage |
V |
9.6 |
12.0 |
14.4 |
Capacity |
Ah |
2.6 |
2.6 |
2.6 |
Weight according to EPTA-Procedure 01:2014 |
kg |
0.55 |
0.70 |
0.80 |
Recommended chargers |
|
AL 2450 DV |
AL 2450 DV |
AL 2450 DV |
Noise/Vibration Information
Noise emission values determined according to
EN 62841-2-2.
Typically, the A-weighted sound pressure level of the power tool is 70 dB(A). Uncertainty K = 3 dB. The noise level when working can exceed 80 dB(A).
Wear hearing protection
Total vibration values ah (triax vector sum) and uncertainty K determined according to EN 62841-2-2: Screwdriving:
ah < 2.5 m/s2, K = 1.5 m/s2.
The vibration level and noise emission value given in these instructions have been measured in accordance with a standardised measuring procedure and may be used to compare power tools. They may also be used for a preliminary estimation of vibration and noise emissions.
The stated vibration level and noise emission value represent the main applications of the power tool. However, if the power tool is used for other applications, with different application tools or is poorly maintained, the vibration level and noise emission value may differ. This may significantly increase the vibration and noise emissions over the total working period.
To estimate vibration and noise emissions accurately, the times when the tool is switched off or when it is running but
not actually being used should also be taken into account. This may significantly reduce vibration and noise emissions over the total working period.
Implement additional safety measures to protect the operator from the effects of vibration, such as servicing the power tool and application tools, keeping their hands warm, and organising workflows correctly.
Assembly
uRemove the battery from the power tool before carrying out work on the power tool (e.g. maintenance, changing tool, etc.). The battery should also be removed for transport and storage. There is risk of injury from unintentionally pressing the on/off switch.
Items included
Type
0 602 490 437/ 0 602 490 471/ 0 602 490 447/ 0 602 490 469
The industrial cordless screwdrivers are supplied without application tools, battery pack, battery charger, constant voltage regulator or voltage adapter. The voltage adapters
1 609 92A 4V3 | (14.02.2019) |
|
|
|
Bosch Power Tools |
|
|
|
|
|
|
|
|
|
|
|
|
|
|
|
|
|
|
|
are to be used exclusively to connect Bosch industrial cordless screwdrivers to the 4EXACT constant voltage regulator.
Operating and storage conditions
The power tool is suitable only for operation at
enclosed work sites.
To ensure smooth operation, the permitted ambient temperature should be between -5 °C and +50 °C (23 °F and 122 °F), at a permitted relative humidity of between 20% and 95%, free of condensation.
The battery should be stored at a temperature of between 0 °C (32 °F) and 45 °C (113 °F) in order to avoid damaging the battery cells.
Charging process
Note: Batteries and chargers not included.
The mains plug pictured here may differ from that on your power tool.
uMake sure that the charger and battery are suitable for your country's mains voltage.
Charger AL 2450 DV (see figure A)
Connect the charger (11) to the power supply with the mains plug (12) and insert the battery (5) correctly into the charging slot on the charger.
uDo not use force to insert/remove the battery. Batteries with APT contact (Akku Pack Top, English: battery pack top) are designed such that they can only be inserted into the power tool or charger in the correct position.
The green LED indicator (13) will start to flash. This indicates that charging current is flowing. The charging process will stop automatically once the battery is fully charged.
When the charging process is complete, the green LED indicator will stop flashing and will be continuously lit. An sound is emitted for approximately two seconds, indicating that the battery is fully charged.
If the red LED indicator (14) is continuously lit, this indicates that charging is being carried out with a reduced charging current. If the red LED indicator is flashing, charging is not possible.
Errors – causes and corrective measures
Cause |
Corrective measures |
LED indicators do not light up |
|
Mains plug of the charger is |
Insert the mains plug (fully) |
not (correctly) plugged in |
into the plug socket |
Plug socket, mains cable or |
Check the mains voltage, |
charger defective |
have the charger checked if |
|
necessary by an authorised |
|
after-sales service centre for |
|
Bosch power tools |
Charging not possible |
|
Battery temperature outside |
Lower or raise the battery |
the permitted range |
temperature until it is in the |
|
permitted temperature range |
|
English | 19 |
|
|
Cause |
Corrective measures |
|
of 0 °C (32 °F) to 45 °C (113 |
|
°F) |
Battery contacts are dirty |
Clean the battery contacts; |
|
e.g. by connecting and dis- |
|
connecting the battery sev- |
|
eral times. Replace battery if |
|
necessary |
Battery defective |
Replace the battery |
Battery is not inserted (cor- |
Insert the battery (fully) into |
rectly) |
the battery charging slot |
Constant voltage regulator (see figure B)
Type
0 602 490 437/ 0 602 490 471/ 0 602 490 447/ 0 602 490 469
Note: As an alternative to battery operation, industrial cordless screwdrivers can also be operated with a constant voltage regulator. Constant voltage regulator and voltage adapter not included.
The mains plug pictured here may differ from that on your power tool.
uMake sure that the constant voltage regulator is suitable for your country's mains voltage.
In addition to the 4EXACT constant voltage regulator and compatible mains cable, you will also need a voltage adapter with the same rated voltage as your screwdriver.
uThe voltage on the constant voltage regulator (LED indicator) must match the voltage of the screwdriver.
The constant voltage regulator is only suitable for Bosch industrial cordless screwdrivers from the EXACT, ANGLE EXACT and BT EXACT series with a voltage of between 9.6 V and 14.4 V. Otherwise there is a risk of fire and explosion.
Connecting to the power supply
Note: On delivery, neither a battery nor a voltage adapter are inserted in the power tool.
uNever store batteries inside a battery-powered tool.
Batteries will remain functional for longer and can be charged more easily if they are stored separately. Please remember to fully charge the battery prior to use after longer periods of storage.
Battery Charging
Charge the battery using a suitable charger before inserting it in the power tool. The charging process in described in detail in the charger's operating manual and the instructions of this manual (see (see "Charging process", page 19)).
The battery features NTC temperature monitoring, which only permits charging in a temperature range between 0 °C (+32 °F) and 45 °C (+113 °F). This achieves a long battery life. If used correctly, the battery can withstand up to 3000 charging cycles.
A new battery or one that has not been used for a long time will only operate at full capacity after approximately five
Bosch Power Tools |
|
|
|
1 609 92A 4V3 | (14.02.2019) |
|
|
|
|
|
|
|
|
|
|
|
|
|
|
|
|
|
|
|
20 | English
charge and discharge cycles. Batteries should only be charged if the battery charge LED indicator on the power tool lights up red.
Inserting and removing the battery (see figure C)
Push the rotational direction switch (3) into the middle position. This locks the on/off switch (6) in the "Off" position and prevents the power tool from being switched on unintentionally.
Push a charged battery (5) into the handle of the power tool. Make sure that you insert the battery correctly and that you can feel the release buttons (4) engage in the handle of the power tool.
uDo not use force to insert/remove the battery. Batteries with APT contact (Akku Pack Top, English: battery pack top) are designed such that they can only be inserted into the power tool or charger in the correct position.
To remove the battery (5), press the release buttons (4) on both sides and pull the battery down and out of the handle.
Inserting and Removing the Voltage Adapter (see figure D)
Type
0 602 490 437/ 0 602 490 471/ 0 602 490 447/ 0 602 490 469
Select the voltage adapter that matches your power tool's rated voltage.
The voltage adapters can be differentiated by the colour of the housing of the D-Sub connector plug (16), which differs according to voltage. The housing of the D-Sub connector plug for a voltage of 9.6 V is light blue, the one for a voltage of 12 V is red.
uThe adapter housing (18) may only be fitted on or removed from the industrial cordless screwdriver when the constant voltage regulator is switched off or when the connector plug (16) is disconnected from the constant voltage regulator.
Push the rotational direction switch (3) into the middle position. This locks the on/off switch (6) in the "Off" position and prevents the power tool from being switched on unintentionally.
Then push the adapter housing (18) into the handle of the power tool. Make sure that you insert the adapter housing correctly and that you can feel the release buttons (4) engage in the handle of the power tool.
Then insert the connector plug (16) for the voltage adapter that is compatible with your power tool into the connection socket (15). Tighten the connector plug (16) in the connection socket (15) by hand-tightening the two screws (17).
To remove the voltage adapter, loosen the two screws (17) on the connector plug (16) of the constant voltage regulator (switched off) and remove the connector plug from the connection socket (15).
Then press the release buttons (4) on both sides and pull the adapter housing (18) out of the handle of the power tool.
Changing the tool – screw head with quick-
change chuck (see figure E)
uWhen fitting an application tool, make sure that it is held securely in the tool holder. If the application tool is not held securely in the tool holder, it may become loose and consequently uncontrollable.
Inserting the application tool
Pull the quick-change chuck (19) forwards. Insert the application tool (9) into the tool holder (8) and release the quickchange chuck again.
Only use application tools with a matching shank (1/4" hexagon).
Do not attempt to insert drill bits into this quick-change chuck. Industrial cordless screwdrivers with a shut-off clutch are not suitable for drilling. The clutch can shut off automatically and without warning. If you continue drilling after the clutch has shut off, the power tool may be wrenched out of your grip until the shut-off clutch engages again.
Removing the application tool
Pull the quick-change chuck (19) forwards. Take the application tool (9) out of the tool holder (8) and release the
quick-change chuck again.
Operation
Use personal protective equipment. Always
wear eye protection. Protective equipment such as a dust mask, non-skid safety shoes, hard hat or hearing protection used for appropriate conditions will reduce personal injuries.
Starting Operation
Always set the rotational direction using the rotational direction switch (3) before starting the power tool:
The power tool will not start if the rotational direction switch
(3) is in the centre (lock-off button).
Setting the Rotational Direction (see figure F)
uOnly operate the rotational direction switch (3) when the power tool is not in use.
Clockwise: To drive in screws, press the rotational direction switch (3) all the way to the left.
Anti-clockwise: To loosen or unscrew screws, press the rotational direction switch (3) all the way to the right.
Switching on the LED worklight (see figure G)
The worklight (20) illuminates the work area in poor lighting conditions. Switch on the worklight (20) by lightly pressing the on/off switch (6). If you press down harder on the on/off switch, the power tool will switch on and the worklight will remain illuminated.
uDo not look directly into the worklight; it can blind you.
1 609 92A 4V3 | (14.02.2019) |
|
|
|
Bosch Power Tools |
|
|
|
|
|
|
|
|
|
|
|
|
|
|
|
|
|
|
|
Switching on/off
The screwdrivers have a torque-dependent
shut-off clutch that can be set to a value in the
specified range. It activates when the set torque is reached.
Note: If you are operating the screwdriver with a voltage adapter, you will need to put the constant voltage regulator into operation first.
To switch on the power tool, press the on/off switch (6) down fully.
The power tool will switch off automatically when the set torque is reached.
uIf the on/off switch (6) is released too early, the preset torque will not be reached.
Practical advice
uRemove the battery from the power tool before carrying out work on the power tool (e.g. maintenance, changing tool, etc.). The battery should also be removed for transport and storage. There is risk of injury from unintentionally pressing the on/off switch.
uOnly apply the power tool to the screw/nut when the tool is switched off. Rotating tool inserts can slip off.
Setting the torque (see figures H – I)
The torque depends on the spring preload of the shut-off clutch. The shut-off clutch is triggered upon reaching the set torque, both in clockwise and anti-clockwise rotation.
Only use the supplied adjustment tool (21) to set the individual torque.
–Slide back the slider (10) on the power tool fully.
–Place the application tool (21) into the tool holder (8) and turn it slowly.
–Once a small protrusion (setting disc (22)) in the clutch can be seen through the opening of the housing, insert the adjustment tool (21) into this protrusion and turn it.
Turning clockwise will result in a higher torque; turning anticlockwise will result in a lower torque.
–Remove the adjustment tool (21). Slide the slider (10) to the front again to protect the clutch from contamination.
Note: The required setting is dependent on the type of threaded connector and can be best determined by practical trials. Check a trial screw application with a torque spanner.
uIf you set the torque to a value outside the specified power range, the shut-off clutch will not be triggered.
Marking the torque setting
To label individually set torques, you can replace the marking ring (7) with a marking ring of a different colour.
If you use certain EXACT power tools with a torque of 4.5 Nm, for example, you can fit red marking rings on these to identify the set torque. If you use other EXACT power tools in a different assembly area with a torque set to 7.5 Nm, you can fit a marking ring of a different colour (black, blue, green or yellow) to identify the torque in this area. The different marking ring colours are only intended as an aid for fitters to facilitate identifying the set torque on a specific power tool.
English | 21
Press the marking ring (7) with a thin screwdriver blade, a spatula or similar implement.
Always use the power tool with a marking ring to be certain that the housing is protected against dust and dirt.
LED indicator
Battery charge indicator
If the battery (5) needs to be charged, the LED indicator (2) flashes green and a sound is emitted. You can only drive in six to eight more
screws.
If the LED indicator lights up red, there is not enough capacity left to drive in another screw or the power tool has overloaded. The power tool can no longer be switched on. The lock-off function remains active until the drained battery has been removed from the power tool and a charged battery inserted.
If you are working with a voltage adapter, the red LED (2) indicates overloading.
A significantly reduced operating time of the power tool after charging indicates that the battery must be replaced soon. Dispose of depleted batteries in accordance with legal/coun- try-specific provisions.
Indicator for screwdriving applications
The shut-off clutch is triggered upon reaching the preset torque. The LED indicator (1) lights
up green.
If the preset torque has not been reached, the LED indicator
(1) lights up red and the tool emits a sound. The screw must be driven in again.
Repeat protection
If the shut-off clutch is triggered while driving a screw, the motor will switch off. You will need to wait 0.7 seconds before you can switch the tool on again. This prevents you from accidentally retightening screws that are already firmly in place.
Maintenance and Service
Maintenance and Cleaning
uRemove the battery from the power tool before carrying out work on the power tool (e.g. maintenance, changing tool, etc.). The battery should also be removed for transport and storage. There is risk of injury from unintentionally pressing the on/off switch.
uTo ensure safe and efficient operation, always keep the power tool and the ventilation slots clean.
Lubricating the power tool
Lubricant:
Special gearbox grease (225 ml)
Article number 3 605 430 009
Molykote grease
Motor oil SAE 10/SAE 20
–Clean the gearbox with a mild solvent after the first 150 operating hours. Follow the solvent manufacturer's instructions on use and disposal. Then lubricate the gear-
Bosch Power Tools |
|
|
|
1 609 92A 4V3 | (14.02.2019) |
|
|
|
|
|
|
|
|
|
|
|
|
|
|
|
|
|
|
|

22 | English
box with Bosch special gearbox grease. Repeat the cleaning process once every 300 operating hours after cleaning has been carried out for the first time.
–After driving 100,000 screws, oil the moving parts of the shut-off clutch with a couple of drops of SAE 10/SAE 20 motor oil. Lubricate the sliding and rolling parts with Molykote grease. Use this occasion to check the clutch for wear to ensure that accuracy and reproducibility have not been affected. You will need to reset the clutch torque once you have done this.
uHave maintenance and repair work performed exclusively by a qualified specialist. This will ensure that the safety of the power tool is maintained.
An authorised Bosch after-sales service point will handle this work quickly and reliably.
uDispose of lubricants and cleaning products in an environmentally friendly manner, taking legal regulations into account.
After-Sales Service and Application Service
Our after-sales service responds to your questions concerning maintenance and repair of your product as well as spare parts. You can find explosion drawings and information on spare parts at: www.bosch-pt.com
The Bosch product use advice team will be happy to help you with any questions about our products and their accessories.
In all correspondence and spare parts orders, please always include the 10 digit article number given on the nameplate of the product.
Great Britain
Robert Bosch Ltd. (B.S.C.)
P.O. Box 98
Broadwater Park
North Orbital Road
Denham Uxbridge
UB 9 5HJ
At www.bosch-pt.co.uk you can order spare parts or arrange the collection of a product in need of servicing or repair. Tel. Service: (0344) 7360109
E-Mail: boschservicecentre@bosch.com
Ireland
Origo Ltd.
Unit 23 Magna Drive
Magna Business Park
City West
Dublin 24
Tel. Service: (01) 4666700
Fax: (01) 4666888
Australia, New Zealand and Pacific Islands
Robert Bosch Australia Pty. Ltd.
Power Tools
Locked Bag 66
Clayton South VIC 3169
Customer Contact Center
Inside Australia:
Phone: (01300) 307044
Fax: (01300) 307045
Inside New Zealand:
Phone: (0800) 543353
Fax: (0800) 428570
Outside AU and NZ:
Phone: +61 3 95415555
www.bosch-pt.com.au
www.bosch-pt.co.nz
Republic of South Africa
Customer service
Hotline: (011) 6519600
Gauteng – BSC Service Centre
35 Roper Street, New Centre
Johannesburg
Tel.: (011) 4939375
Fax: (011) 4930126
E-mail: bsctools@icon.co.za
KZN – BSC Service Centre
Unit E, Almar Centre
143 Crompton Street
Pinetown
Tel.: (031) 7012120
Fax: (031) 7012446
E-mail: bsc.dur@za.bosch.com
Western Cape – BSC Service Centre
Democracy Way, Prosperity Park
Milnerton
Tel.: (021) 5512577
Fax: (021) 5513223
E-mail: bsc@zsd.co.za
Bosch Headquarters
Midrand, Gauteng
Tel.: (011) 6519600
Fax: (011) 6519880
E-mail: rbsa-hq.pts@za.bosch.com
Disposal
The machine, rechargeable batteries, accessories and packaging should be sorted for environmental-friendly recycling.
Do not dispose of power tools and batteries/ rechargeable batteries into household waste!
Only for EU countries:
According to the Directive 2012/19/EU, power tools that are no longer usable, and according to the Directive 2006/66/EC, defective or used battery packs/batteries, must be collected separately and disposed of in an environmentally correct manner.
1 609 92A 4V3 | (14.02.2019) |
|
|
|
Bosch Power Tools |
|
|
|
|
|
|
|
|
|
|
|
|
|
|
|
|
|
|
|
Battery packs/batteries:
Ni-Cd: Nickel cadmium
Warning: These battery packs contain cadmium, a highly
toxic heavy metal.
Ni-MH: Nickel metal hydride
Français
Consignes de sécurité
Avertissements de sécurité généraux pour l’outil
électrique
Lire tous les avertissements de sé-
curité, les instructions, les illustra-
MENT
tions et les spécifications fournis avec cet outil électrique. Ne pas suivre les instructions
énumérées ci-dessous peut provoquer un choc électrique,
un incendie et/ou une blessure sérieuse.
Conserver tous les avertissements et toutes les instruc-
tions pour pouvoir s'y reporter ultérieurement.
Le terme "outil électrique" dans les avertissements fait référence à votre outil électrique alimenté par le secteur (avec cordon d’alimentation) ou votre outil électrique fonctionnant sur batterie (sans cordon d’alimentation).
Sécurité de la zone de travail
uConserver la zone de travail propre et bien éclairée.
Les zones en désordre ou sombres sont propices aux accidents.
uNe pas faire fonctionner les outils électriques en atmosphère explosive, par exemple en présence de liquides inflammables, de gaz ou de poussières. Les outils électriques produisent des étincelles qui peuvent enflammer les poussières ou les fumées.
uMaintenir les enfants et les personnes présentes à l’écart pendant l’utilisation de l’outil électrique. Les distractions peuvent vous faire perdre le contrôle de l’outil.
Sécurité électrique
uIl faut que les fiches de l’outil électrique soient adaptées au socle. Ne jamais modifier la fiche de quelque façon que ce soit. Ne pas utiliser d’adaptateurs avec des outils électriques à branchement de terre. Des
Français | 23
fiches non modifiées et des socles adaptés réduisent le risque de choc électrique.
uÉviter tout contact du corps avec des surfaces reliées à la terre telles que les tuyaux, les radiateurs, les cuisinières et les réfrigérateurs. Il existe un risque accru de choc électrique si votre corps est relié à la terre.
uNe pas exposer les outils électriques à la pluie ou à des conditions humides. La pénétration d‘eau à l’intérieur d’un outil électrique augmente le risque de choc électrique.
uNe pas maltraiter le cordon. Ne jamais utiliser le cordon pour porter, tirer ou débrancher l’outil électrique. Maintenir le cordon à l’écart de la chaleur, du lubrifiant, des arêtes vives ou des parties en mouvement.
Des cordons endommagés ou emmêlés augmentent le risque de choc électrique.
uLorsqu’on utilise un outil électrique à l’extérieur, utiliser un prolongateur adapté à l’utilisation extérieure.
L’utilisation d’un cordon adapté à l’utilisation extérieure réduit le risque de choc électrique.
uSi l'usage d'un outil électrique dans un emplacement humide est inévitable, utiliser une alimentation protégée par un dispositif à courant différentiel résiduel (RCD). L'usage d'un RCD réduit le risque de choc électrique.
Sécurité des personnes
uRester vigilant, regarder ce que vous êtes en train de faire et faire preuve de bon sens dans votre utilisation de l’outil électrique. Ne pas utiliser un outil électrique lorsque vous êtes fatigué ou sous l’emprise de drogues, de l’alcool ou de médicaments. Un moment d’inattention en cours d’utilisation d’un outil électrique peut entraîner des blessures graves.
uUtiliser un équipement de protection individuelle. Toujours porter une protection pour les yeux. Les équipements de protection individuelle tels que les masques contre les poussières, les chaussures de sécurité antidérapantes, les casques ou les protections auditives utilisés pour les conditions appropriées réduisent les blessures.
uÉviter tout démarrage intempestif. S’assurer que l’interrupteur est en position arrêt avant de brancher l’outil au secteur et/ou au bloc de batteries, de le ramasser ou de le porter. Porter les outils électriques en ayant le doigt sur l’interrupteur ou brancher des outils électriques dont l’interrupteur est en position marche est source d’accidents.
uRetirer toute clé de réglage avant de mettre l’outil électrique en marche. Une clé laissée fixée sur une partie tournante de l’outil électrique peut donner lieu à des blessures.
uNe pas se précipiter. Garder une position et un équilibre adaptés à tout moment. Cela permet un meilleur contrôle de l’outil électrique dans des situations inattendues.
Bosch Power Tools |
|
|
|
1 609 92A 4V3 | (14.02.2019) |
|
|
|
|
|
|
|
|
|
|
|
|
|
|
|
|
|
|
|

24 | Français
uS’habiller de manière adaptée. Ne pas porter de vêtements amples ou de bijoux. Garder les cheveux et les vêtements à distance des parties en mouvement. Des vêtements amples, des bijoux ou les cheveux longs peuvent être pris dans des parties en mouvement.
uSi des dispositifs sont fournis pour le raccordement d’équipements pour l’extraction et la récupération des poussières, s’assurer qu’ils sont connectés et correctement utilisés. Utiliser des collecteurs de poussière peut réduire les risques dus aux poussières.
uRester vigilant et ne pas négliger les principes de sécurité de l'outil sous prétexte que vous avez l'habitude de l'utiliser. Une fraction de seconde d'inattention peut provoquer une blessure grave.
Utilisation et entretien de l’outil électrique
uNe pas forcer l’outil électrique. Utiliser l’outil électrique adapté à votre application. L’outil électrique adapté réalise mieux le travail et de manière plus sûre au régime pour lequel il a été construit.
uNe pas utiliser l’outil électrique si l’interrupteur ne permet pas de passer de l’état de marche à arrêt et inversement. Tout outil électrique qui ne peut pas être commandé par l’interrupteur est dangereux et il faut le réparer.
uDébrancher la fiche de la source d’alimentation et/ou enlever le bloc de batteries, s'il est amovible, avant tout réglage, changement d’accessoires ou avant de ranger l’outil électrique. De telles mesures de sécurité préventives réduisent le risque de démarrage accidentel de l’outil électrique.
uConserver les outils électriques à l’arrêt hors de la portée des enfants et ne pas permettre à des personnes ne connaissant pas l’outil électrique ou les présentes instructions de le faire fonctionner. Les outils électriques sont dangereux entre les mains d’utilisateurs novices.
uObserver la maintenance des outils électriques et des accessoires. Vérifier qu’il n’y a pas de mauvais alignement ou de blocage des parties mobiles, des pièces cassées ou toute autre condition pouvant affecter le fonctionnement de l’outil électrique. En cas de dommages, faire réparer l’outil électrique avant de l’utiliser. De nombreux accidents sont dus à des outils électriques mal entretenus.
uGarder affûtés et propres les outils permettant de couper. Des outils destinés à couper correctement entretenus avec des pièces coupantes tranchantes sont moins susceptibles de bloquer et sont plus faciles à contrôler.
uUtiliser l’outil électrique, les accessoires et les lames etc., conformément à ces instructions, en tenant compte des conditions de travail et du travail à réaliser. L’utilisation de l’outil électrique pour des opérations différentes de celles prévues peut donner lieu à des situations dangereuses.
uIl faut que les poignées et les surfaces de préhension restent sèches, propres et dépourvues d'huiles et de graisses. Des poignées et des surfaces de préhension glissantes rendent impossibles la manipulation et le contrôle en toute sécurité de l'outil dans les situations inattendues.
Utilisation des outils fonctionnant sur batteries et précautions d’emploi
uNe recharger qu’avec le chargeur spécifié par le fabricant. Un chargeur qui est adapté à un type de bloc de batteries peut créer un risque de feu lorsqu’il est utilisé avec un autre type de bloc de batteries.
uN’utiliser les outils électriques qu’avec des blocs de batteries spécifiquement désignés. L’utilisation de tout autre bloc de batteries peut créer un risque de blessure et de feu.
uLorsqu’un bloc de batteries n’est pas utilisé, le maintenir à l’écart de tout autre objet métallique, par exemple trombones, pièces de monnaie, clés, clous, vis ou autres objets de petite taille qui peuvent donner lieu à une connexion d’une borne à une autre. Le courtcircuitage des bornes d’une batterie entre elles peut causer des brûlures ou un feu.
uDans de mauvaises conditions, du liquide peut être éjecté de la batterie; éviter tout contact. En cas de contact accidentel, nettoyer à l’eau. Si le liquide entre en contact avec les yeux, rechercher en plus une aide médicale. Le liquide éjecté des batteries peut causer des irritations ou des brûlures.
uNe pas utiliser un bloc de batteries ou un outil fonctionnant sur batteries qui a été endommagé ou modifié. Les batteries endommagées ou modifiées peuvent avoir un comportement imprévisible provoquant un feu, une explosion ou un risque de blessure.
uNe pas exposer un bloc de batteries ou un outil fonctionnant sur batteries au feu ou à une température excessive. Une exposition au feu ou à une température supérieure à 130°C peut provoquer une explosion.
uSuivre toutes les instructions de charge et ne pas charger le bloc de batteries ou l'outil fonctionnant sur batteries hors de la plage de températures spécifiée dans les instructions. Un chargement incorrect ou à des températures hors de la plage spécifiée de températures peut endommager la batterie et augmenter le risque de feu.
Maintenance et entretien
uFaire entretenir l’outil électrique par un réparateur qualifié utilisant uniquement des pièces de rechange identiques. Cela assure le maintien de la sécurité de l’outil électrique.
uNe jamais effectuer d'opération d'entretien sur des blocs de batteries endommagés. Il convient que l'entretien des blocs de batteries ne soit effectué que par le fabricant ou les fournisseurs de service autorisés.
1 609 92A 4V3 | (14.02.2019) |
|
|
|
Bosch Power Tools |
|
|
|
|
|
|
|
|
|
|
|
|
|
|
|
|
|
|
|
Consignes de sécurité pour visseuses
uTenir l'outil électrique par les surfaces de préhension, au cours d'une opération où la fixation peut être en contact avec un câblage caché. Les fixations en contact avec un fil "sous tension" peuvent "mettre sous tension" les parties métalliques exposées de l'outil électrique et provoquer un choc électrique chez l'opérateur.
uUtilisez un détecteur approprié pour vérifier s’il n’y a pas de conduites cachées ou contactez votre société de distribution d’eau locale. Tout contact avec des câbles électriques peut provoquer un incendie ou un choc électrique. Tout endommagement d’une conduite de gaz peut provoquer une explosion. La perforation d’une conduite d’eau provoque des dégâts matériels.
uMaintenez bien l'outil électroportatif en place. Lors du serrage ou du desserrage des vis, des couples de réaction élevés peuvent survenir en peu de temps.
uBloquez la pièce à travailler. Une pièce à travailler serrée par des dispositifs de serrage appropriés ou dans un étau est fixée de manière plus sûre que quand elle est tenue avec une main.
uAvant de poser l’outil électroportatif, attendez que celui ci soit complètement à l’arrêt. L’outil risque de se coincer, ce qui entraînerait une perte de contrôle de l’outil électroportatif.
uSi l’accu est endommagé ou utilisé de manière non conforme, des vapeurs peuvent s’échapper. L’accu peut brûler ou exploser. Ventilez le local et consultez un médecin en cas de malaise. Les vapeurs peuvent entraîner des irritations des voies respiratoires.
uN’ouvrez pas l’accu. Risque de court-circuit.
uLes objets pointus comme un clou ou un tournevis et le fait d’exercer une force extérieure sur le boîtier risque d’endommager l’accu. Il peut en résulter un court-circuit interne et l’accu risque de s’enflammer, de dégager des fumées, d’exploser ou de surchauffer.
uN’utilisez l’accu qu’avec des produits du fabricant.
Tout risque de surcharge dangereuse sera alors exclu.
Conservez l’accu à l’abri de la chaleur (ensoleillement direct, flamme), de l’eau et de l’humidité. Il y a sinon risque d’explosion.
uArrêtez immédiatement l’outil électroportatif dès que l’accessoire se bloque. Attendez-vous à des couples de réaction importants causant des rebonds. L’accessoire se bloque quand il reste coincé dans la pièce ou quand l’outil électroportatif est en surcharge.
La poussière produite lors du
sciage, ponçage, perçage et autres
MENT
activités peut avoir des effets cancérogènes, mutagènes ou tératogènes. Ces poussières peuvent entre autres contenir les substances suivantes : plomb dans les peintures et laques à base de plomb ; silice cristalline dans les briques, le ciment et autres matériaux de maçonnerie ; arsenic et chromates dans le bois traité chimiquement. Le risque de maladie dépend de la fréquence d’ex-
Français | 25
position à ces substances. Pour réduire les risques, ne travaillez que dans des locaux bien aérés en portant des équipements de protection individuelle appropriés (par ex. masques respiratoires capables de filtrer les très petites particules).
uÉvitez toute mise en marche involontaire. Assurezvous que l’interrupteur Marche/Arrêt est en position Arrêt avant de mettre en place un accu. Le fait de porter l’outil électroportatif en laissant le doigt sur l’interrupteur Marche/Arrêt ou de mettre en place l’accu dans l’outil électroportatif lorsque celui ci est en marche peut entraîner des accidents.
uN’utilisez que des accessoires de travail en parfait état et non usés. Les accessoires de travail défectueux peuvent casser et entraîner des blessures et des dégâts matériels.
uLors de la mise en place de l’accessoire de travail, veillez à bien le fixer sur le porte-outil. Si l’accessoire de travail n’est pas correctement fixé, il peut se détacher lors des vissages.
uSoyez vigilant lors du vissage de vis longues, l’outil électroportatif peut glisser avec certains types de vis et certains accessoires. Le vissage de longues vis est difficilement maîtrisable, vous risquez de vous blesser si l’outil électroportatif vient à glisser ou déraper.
uVérifiez le sens de rotation avant de mettre l’outil électroportatif en marche. L’outil électroportatif peut par exemple effectuer un mouvement brusque incontrôlable si vous tentez de dévisser une vis alors que le sens de rotation est réglé sur rotation droite (c’est-à-dire vissage).
uN’utilisez en aucun cas l’outil électroportatif comme perceuse. Les outils électroportatifs munis d’un embrayage d’arrêt ne sont pas conçus pour le perçage. L’embrayage d’arrêt peut se désactiver soudainement, sans prévenir.
Description des prestations et du
produit
Lisez attentivement toutes les instructions
et consignes de sécurité. Le non-respect des instructions et consignes de sécurité peut provoquer un choc électrique, un incendie et/ou entraîner de graves blessures.
Référez-vous aux illustrations qui se trouvent à l’avant de la notice d’utilisation.
Utilisation conforme
L’outil électroportatif est conçu pour le vissage et le dévissage de vis, d’écrous et d’autres éléments filetés dans la plage de dimensions et de puissance indiquée.
L’outil électroportatif n’est pas conçu comme perceuse ; ne jamais utiliser un appareil électroportatif avec couple de coupure pour le perçage, afin éviter des dommages corporels et matériels.
Bosch Power Tools |
|
|
|
1 609 92A 4V3 | (14.02.2019) |
|
|
|
|
|
|
|
|
|
|
|
|
|
|
|
|
|
|
|
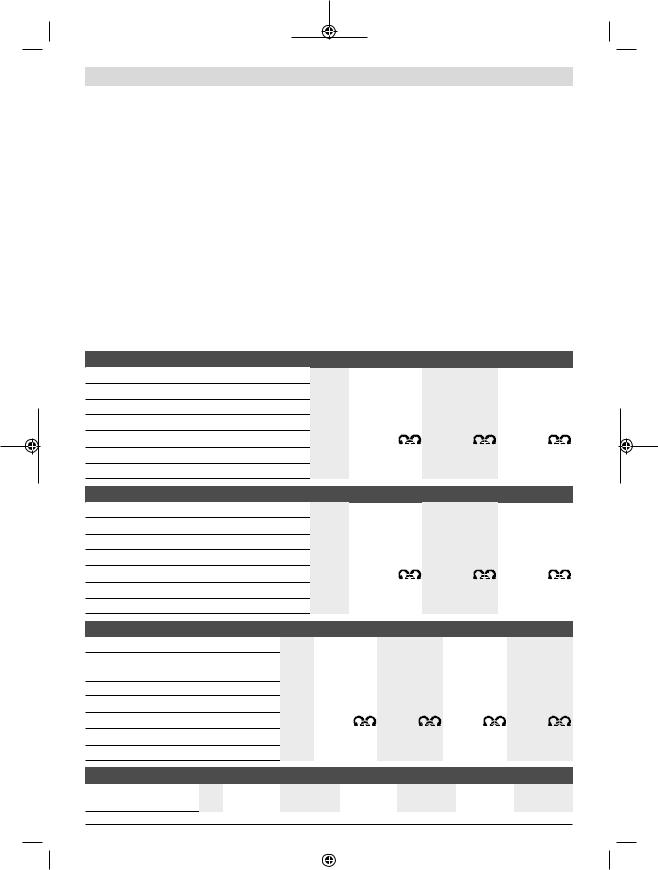
26 | Français
Éléments constitutifs
La numérotation des éléments de l’appareil se réfère à la représentation de l’outil électroportatif sur la page graphique.
(1)LED pour vissages
(2)LED d’état de charge de l’accu
(3)Sélecteur de sens de rotation
(4)Touche de déverrouillage d’accuA)
(5)Accu avec extrémité d’enfichage APTA)
(6)Interrupteur Marche/Arrêt
(7)Anneau de marquage
(8)Porte-outil
(9)Accessoire de travail (p. ex. embout de vissage)
(10)Curseur de présélection de couple
(11)ChargeurA)
(12)Connecteur secteurA)
(13)LED verte du chargeurA)
(14)LED rouge du chargeurA)
(15)Prise pour adaptateur de tension sur l’alimentation 4EXACTA)
(16)Connecteur D-SubA)
(17)Vis du connecteur D-SubA)
(18)Adaptateur de tension
(19)Mandrin à serrage rapideA)
(20)LED d’éclairage
(21)Outil de réglage
(22)Disque de réglage
(23)Poignée (surface de préhension isolée)
A)Les accessoires décrits ou illustrés ne sont pas tous compris dans la fourniture. Vous trouverez les accessoires complets dans notre gamme d’accessoires.
Caractéristiques techniques
Visseuse industrielle sans fil EXACT |
|
2 |
4 |
6 |
Référence |
|
0 602 490 433 |
0 602 490 437 |
0 602 490 431 |
Couple de vissage maxi (dur/tendre) selon ISO 5393 |
Nm |
2/2 |
4/4 |
6/6 |
Régime à vide n0 |
tr/min |
600 |
900 |
600 |
Tension nominale |
V |
9,6 |
9,6 |
9,6 |
Sens de rotation |
|
|
|
|
Poids selon EPTA-Procedure 01:2014 |
kg |
0,82 |
0,83 |
0,83 |
Indice de protection |
|
IP 20 |
IP 20 |
IP 20 |
Visseuse industrielle sans fil EXACT |
|
7 |
8 |
9 |
Référence |
|
0 602 490 439 |
0 602 490 443 |
0 602 490 435 |
Couple de vissage maxi (dur/tendre) selon ISO 5393 |
Nm |
7/7 |
8/8 |
9/9 |
Régime à vide n0 |
tr/min |
150 |
680 |
350 |
Tension nominale |
V |
9,6 |
12,0 |
9,6 |
Sens de rotation |
|
|
|
|
Poids selon EPTA-Procedure 01:2014 |
kg |
0,87 |
0,87 |
0,83 |
Indice de protection |
|
IP 20 |
IP 20 |
IP 20 |
Visseuse industrielle sans fil EXACT |
|
|
12 |
|
60 |
|
700 |
|
1 100 |
Référence |
|
0 602 490 441 |
0 602 490 469 |
0 602 490 447 |
0 602 490 471 |
||||
Couple de vissage maxi (dur/tendre) selon |
Nm |
12/12 |
|
5,5/5,5 |
|
8/8 |
|
4/4 |
|
ISO 5393 |
|
|
|
|
|
|
|
|
|
Régime à vide n0 |
|
tr/min |
400 |
|
60 |
|
700 |
|
1050 |
Tension nominale |
|
V |
12,0 |
|
9,6 |
|
12,0 |
|
9,6 |
Sens de rotation |
|
|
|
|
|
|
|
|
|
Poids selon EPTA-Procedure 01:2014 |
|
kg |
0,87 |
|
0,83 |
|
0,83 |
|
0,83 |
Indice de protection |
|
|
IP 20 |
|
IP 20 |
|
IP 20 |
|
IP 20 |
Accu NiCd |
9,6 |
9,6 |
|
12,0 |
12,0 |
14,4 |
14,4 |
||
Référence |
2 607 335 |
2 607 335 |
2 607 335 |
2 607 335 |
2 607 335 |
2 607 335 |
|||
|
877 |
659 |
|
879 |
375 |
881 |
655 |
||
1 609 92A 4V3 | (14.02.2019) |
|
|
|
Bosch Power Tools |
|
|
|
|
|
|
|
|
|
|
|
|
|
|
|
|
|
|
|

|
|
|
|
|
|
|
|
|
|
|
Français | 27 |
|
|
|
|
|
|
|
|
|
|
|
|
Accu NiCd |
|
9,6 |
9,6 |
|
12,0 |
|
12,0 |
14,4 |
14,4 |
||
Nombre de cellules |
|
8 |
8 |
|
10 |
|
10 |
|
12 |
12 |
|
Tension de l’accu |
V |
9,6 |
9,6 |
|
12,0 |
|
12,0 |
14,4 |
14,4 |
||
Capacité |
Ah |
1,8 |
2,4 |
|
1,8 |
|
2,4 |
|
1,8 |
2,4 |
|
Poids selon EPTA-Proce- |
kg |
0,45 |
0,50 |
|
0,65 |
|
0,70 |
0,70 |
0,80 |
||
dure 01:2014 |
|
|
|
|
|
|
|
|
|
|
|
Chargeurs recommandés |
|
AL 2450 DV |
AL 2450 DV |
|
AL 2450 DV |
AL 2450 DV |
AL 2450 DV |
AL 2450 DV |
|||
|
|
|
|
|
|
|
|
|
|
|
|
Accu NiMH |
|
|
|
|
|
9,6 |
|
12,0 |
|
14,4 |
|
Référence |
|
|
|
|
|
2 607 335 681 |
2 607 335 683 |
2 607 335 685 |
|||
Nombre de cellules |
|
|
|
|
|
8 |
|
10 |
|
12 |
|
Tension de l’accu |
|
|
|
|
V |
9,6 |
|
12,0 |
|
14,4 |
|
Capacité |
|
|
|
Ah |
2,6 |
|
2,6 |
|
2,6 |
||
Poids selon EPTA-Procedure 01:2014 |
|
kg |
0,55 |
|
0,70 |
|
0,80 |
||||
Chargeurs recommandés |
|
|
|
|
|
AL 2450 DV |
AL 2450 DV |
|
AL 2450 DV |
||
Informations sur le niveau sonore/les vibrations
Valeurs d’émissions sonores déterminées selon la norme EN 62841-2-2.
Le niveau de pression acoustique en dB(A) typique de l’outil électroportatif est de 70 dB(A). Incertitude K = 3 dB. Le niveau sonore peut dépasser 80 dB(A) pendant l’utilisation de l’outil.
Portez un casque antibruit !
Valeurs globales de vibration ah (somme vectorielle sur les trois axes) et incertitude K conformément à EN 62841-2-2 : Vissages : ah < 2,5 m/s2, K = 1,5 m/s2.
Le niveau de vibration et la valeur d’émission sonore indiqués dans cette notice d’utilisation ont été mesurés conformément à la norme et peuvent être utilisés pour une comparaison entre les outils électroportatifs. Ils peuvent aussi servir de base à une estimation préliminaire du taux de vibration et du niveau sonore.
Le niveau de vibration et la valeur d’émission sonore indiqués s’appliquent pour les utilisations principales de l’outil électroportatif. Si l’outil électroportatif est utilisé pour d’autres applications, avec d’autres accessoires de travail ou sans avoir fait l’objet d’un entretien régulier, le niveau de vibration et la valeur d’émission sonore peuvent différer. Il peut en résulter des vibrations et un niveau sonore nettement plus élevés pendant toute la durée de travail.
Pour une estimation précise du niveau de vibration et du niveau sonore, il faut aussi prendre en considération les périodes pendant lesquelles l’outil est éteint ou bien en marche sans être vraiment en action. Il peut en résulter au final un niveau de vibration et un niveau sonore nettement plus faibles pendant toute la durée de travail.
Prévoyez des mesures de protection supplémentaires permettant de protéger l’utilisateur de l’effet des vibrations, par exemple : maintenance de l’outil électroportatif et des accessoires de travail, maintien des mains au chaud, organisation des procédures de travail.
Montage
uRetirez l’accu de l’appareil électroportatif avant toute intervention (opérations d’entretien/de maintenance, changement d’accessoire, etc.) ainsi que lors de son transport et rangement. Il y a sinon risque de blessure lorsqu’on appuie par mégarde sur l’interrupteur Marche/ Arrêt.
Accessoires fournis
Type
0 602 490 437/ 0 602 490 471/ 0 602 490 447/ 0 602 490 469
Les visseuses industrielles sans fil sont fournies sans accessoires de travail, ni accu, ni chargeur, ni alimentation stabilisée ou adaptateur de tension. N’utilisez les adaptateurs de tension que pour le raccordement des visseuses industrielles sans fil Bosch à l’alimentation stabilisée 4EXACT.
Fonctionnement et stockage
L’outil électroportatif est exclusivement conçu
une utilisation dans des locaux fermés.
Pour un fonctionnement correct, il faut que la température ambiante soit comprise entre –5 °C et +50 °C (23 °F et 122 °F) et que le taux d’humidité relative de l’air se situe entre 20 et 95 % sans condensation.
L’accu doit être rangé/stocké à une température comprise entre 0 °C (32 °F) et 45 °C (113 °F) pour éviter tout endommagement des cellules de l’accu.
Charge normale
Remarque : Les chargeurs et les accus ne sont pas fournis. La fiche de secteur représentée peut différer de celle de votre outil électroportatif.
uAssurez-vous que le chargeur et l’accu sont adaptés au réseau électrique de votre pays.
Bosch Power Tools |
|
|
|
1 609 92A 4V3 | (14.02.2019) |
|
|
|
|
|
|
|
|
|
|
|
|
|
|
|
|
|
|
|
28 | Français
Chargeur AL 2450 DV (voir figure A)
Raccordez le chargeur (11) au secteur à l’aide de la fiche de secteur (12) et insérez l’accu (5) dans le logement de charge du chargeur.
uNe forcez pas pour insérer/retirer l’accu. Les accus avec extrémité d’enfichage APT (Accu Pack Top) sont conçus de façon à ne pouvoir être introduits que dans le bon sens dans l’outil électroportatif ou le chargeur.
La LED verte (13) se met à clignoter. Cela indique que le courant de charge circule. Le processus de charge s’arrête automatiquement lorsque l’accu est complètement chargé. La fin du processus de charge est signalé par l’arrêt du clignotement de la LED et son allumage en continu. Un signal acoustique retentit pendant env. 2 secondes pour indiquer que l’accu est complètement chargé.
L’allumage en continu de la LED rouge (14) indique que la charge s’effectue avec courant de charge réduit. Quand la LED rouge clignote, aucune charge n’est possible.
Défauts – Causes et remèdes
Cause |
Remède |
Les LED ne sont pas allumées |
|
Le câble d’alimentation sec- |
Raccordez comme il se doit |
teur du chargeur n’est pas |
le câble dans la prise de cou- |
(correctement) branché |
rant |
Prise de courant, câble d’ali- |
Vérifiez la tension du sec- |
mentation secteur ou char- |
teur. Si nécessaire, faites |
geur défectueux |
contrôler le chargeur dans un |
|
centre SAV agréé pour ou- |
|
tillage électroportatif Bosch |
Aucune charge possible |
|
La température de l’accu ne |
Faites en sorte que la tempé- |
se situe pas dans la plage ad- |
rature de l’accu revienne |
missible |
dans la plage de tempéra- |
|
tures admissibles allant de |
|
0 °C (32 °F) et 45 °C (113 °F) |
|
en le refroidissant ou en le |
|
réchauffant |
Contacts de l’accu encrassés |
Nettoyez les contacts, p. ex. |
|
en insérant et retirant l’accu |
|
à plusieurs reprises. Rempla- |
|
cez l’accu si nécessaire |
Accu défectueux |
Remplacez l’accu |
L’accu n’a pas été (correcte- |
Insérez (complètement) l’ac- |
ment) inséré |
cu dans le logement d’accu |
Alimentation stabilisée (voir figure B)
Type
0 602 490 437/ 0 602 490 471/ 0 602 490 447/ 0 602 490 469
Remarque : Les visseuses industrielles sans fil peuvent être alimentées non seulement par accu mais aussi au moyen d’une alimentation stabilisée. L’alimentation stabilisée et les adaptateurs de tension ne sont pas fournis.
La fiche de secteur représentée peut différer de celle de
votre outil électroportatif.
uAssurez-vous que l’alimentation stabilisée est adaptée au réseau électrique de votre pays.
En plus de l’alimentation stabilisée 4EXACT et du câble secteur approprié, vous avez besoin d’un adaptateur de tension disposant ayant la même tension nominale que votre visseuse.
uLa tension de l’alimentation stabilisée (affichage LED) doit correspondre à la tension de la visseuse. L’alimentation stabilisée est exclusivement conçue pour les visseuses industrielles sans fil Bosch des séries EXACT, ANGLE EXACT et BT-EXACT ayant une tension comprise entre 9,6 V et 14,4 V. Il y a sinon risque d’explosion et d’incendie.
Raccordement au réseau d’alimentation
Remarque : L’outil électroportatif est fourni sans accu ni adaptateur de tension.
uNe laissez jamais les accus dans un outil sans fil pendant les périodes de non-utilisation. Les accus durent plus longtemps et se rechargent mieux lorsqu’ils sont rangés séparément. Après une longue période de non-utilisa- tion, pensez à les recharger complètement avant de les réutiliser.
Recharge de l’accu
Avant de monter l’accu dans l’outil électroportatif, chargez-le avec un chargeur approprié. Pour la description détaillée du processus de charge, consultez la notice d’utilisation du chargeur et les indications de la présente notice (voir « Charge normale », Page 27).
Une surveillance de température avec thermistance CTN fait en sorte que l’aspirateur ne puisse être rechargé que dans la plage de température allant de 0 °C (+32 °F) à 45 °C (+113 °F). Cette surveillance de température rallonge la durée de vie de l’accu. Si les consignes d’utilisation sont bien respectées, l’accu peut être rechargé jusqu’à 3 000 fois.
Un accu neuf ou un accu qui n’a pas été utilisé pour une période prolongée n’atteint sa pleine puissance qu’après environ 5 cycles de charge et de décharge. Ne rechargez les accus que lorsque la LED « État de charge de l’accu » de l’outil électroportatif est allumée en rouge.
Mise en place et retrait de l’accu (voir figure C)
Placez le sélecteur de sens de rotation (3) dans la position médiane. Cela verrouille l’interrupteur Marche/Arrêt (6) dans la position « Arrêt » et empêche toute mise en marche involontaire de l’outil électroportatif.
Insérez un accu (5) chargé dans la poignée de l’outil électroportatif.
Veillez à monter l’accu dans la bonne position et à ce que les touches de déverrouillage (4) s’enclenchent de façon perceptible dans la poignée de l’outil électroportatif.
uNe forcez pas pour insérer/retirer l’accu. Les accus avec extrémité d’enfichage APT (Accu Pack Top) sont conçus de façon à ne pouvoir être introduits que dans le bon sens dans l’outil électroportatif ou le chargeur.
1 609 92A 4V3 | (14.02.2019) |
|
|
|
Bosch Power Tools |
|
|
|
|
|
|
|
|
|
|
|
|
|
|
|
|
|
|
|
Pour sortir l’accu (5), appuyez des deux côtés sur les
touches de déverrouillage (4) et sortez l’accu de la poignée
en le tirant par le bas.
Mise en place et retrait de l’adaptateur de tension (voir figure D)
Type
0 602 490 437/ 0 602 490 471/ 0 602 490 447/ 0 602 490 469
Choisissez l’adaptateur de tension adapté à la tension nominale de votre outil électroportatif.
Les différents adaptateurs de tension se distinguent, suivant la tension, par la couleur du boîtier du connecteur D-Sub
(16). Le boîtier du connecteur D Sub pour tension de 9,6 V est bleu clair et celui pour tension de 12 V est rouge.
uL’adaptateur de tension (18) ne doit être inséré et retiré de la visseuse industrielle sans fil que lorsque l’alimentation stabilisée est hors tension ou que le connecteur (16) n’est pas raccordé à l’alimentation stabilisée.
Placez le sélecteur de sens de rotation (3) dans la position médiane. Cela verrouille l’interrupteur Marche/Arrêt (6) dans la position « Arrêt » et empêche toute mise en marche involontaire de l’outil électroportatif.
Insérez ensuite l’adaptateur de tension (18) dans la poignée de l’outil électroportatif. Veillez à monter l’adaptateur de tension dans la bonne position et à ce que les touches de déverrouillage (4) s’enclenchent de façon perceptible dans la poignée de l’outil électroportatif.
Connectez ensuite le connecteur (16) de l’adaptateur de tension à la prise (15). Fixez ensuite le connecteur (16) dans la prise (15) en vissant les deux vis (17) à la main. Pour sortir l’adaptateur de tension, dévissez les deux vis
(17) du connecteur (16) sur l’alimentation stabilisée à l’arrêt et retirez le connecteur de la prise (15).
Appuyez ensuite des deux côtés sur les touches de déverrouillage (4) et sortez l’adaptateur de tension (18) de la poignée de l’outil électroportatif.
Changement d’accessoire sur la tête de vissage
avec mandrin à serrage rapide (voir figure E)
uLors de la mise en place de l’accessoire de travail, veillez à bien le fixer sur le porte-outil. Si l’accessoire de travail n’est pas correctement fixé, il peut se détacher lors des vissages.
Montage d’un accessoire de travail
Tirez le mandrin à serrage rapide (19) vers l’avant. Insérez l’accessoire (9) dans le porte-outil (8) puis relâchez le mandrin à serrage rapide.
N’utilisez que des accessoires dotés d’une queue adaptée (six pans 1/4").
N’essayez pas d’insérer des forets dans ce mandrin à serrage rapide. Les visseuses industrielles sans fil avec embrayage d’arrêt ne sont pas conçues pour effectuer des perçages. L’embrayage d’arrêt peut se désactiver soudainement, sans prévenir. Si vous continuez à percer après le déclenchement de l’embrayage, l’outil électroportatif peut vous échapper
Français | 29
des mains jusqu’à ce que l’embrayage avant que l’embrayage se déclenche à nouveau.
Retrait d’un accessoire de travail
Tirez le mandrin à serrage rapide (19) vers l’avant. Sortez l’accessoire (9) du porte-outil (8) puis relâchez le mandrin à
serrage rapide.
Mise en marche
Utiliser un équipement de protection indivi-
duelle. Toujours porter une protection pour
les yeux. Les équipements de protection individuelle tels que les masques contre les poussières, les chaussures de sécurité antidéra-
pantes, les casques ou les protections auditives utilisés pour les conditions appropriées réduisent les blessures.
Mise en marche
Avant de mettre en marche l’outil électroportatif, n’oubliez pas de régler le sens de rotation à l’aide du sélecteur de sens de rotation (3) :
L’outil électroportatif ne peut se mettre en marche que si le sélecteur de sens de rotation (3) ne se trouve pas en position médiane (verrouillage de mise en marche).
Sélection du sens de rotation (voir figure F)
uN’actionnez le sélecteur de sens de rotation (3) que quand l’outil électroportatif est à l’arrêt.
Rotation droite : Pour serrer des vis, poussez le sélection de sens de rotation (3) jusqu’en butée vers la gauche.
Rotation gauche : Pour desserrer ou dévisser des vis, poussez le sélecteur de sens de rotation (3) jusqu’en butée vers la droite.
Activation de la LED d’éclairage (voir figure G)
La LED d’éclairage (20) permet d’éclairer la vis et la zone de travail dans les endroits sombres. Pour allumer la LED d’éclairage (20), appuyez légèrement sur l’interrupteur Marche/Arrêt (6). Une pression plus forte sur l’interrupteur Marche/Arrêt met en marche l’outil électroportatif ; la LED d’éclairage reste alors allumée.
uNe regardez pas directement la LED. Risque d’éblouissement.
Mise en marche/arrêt
Les visseuses disposent d'un embrayage d'ar-
rêt limiteur de couple avec une plage de ré-
glage assez large. L'embrayage entre en action quand le couple préréglé est atteint.
Remarque : Si vous utilisez la visseuse avec un adaptateur de tension, mettez d’abord en marche l’alimentation stabilisée.
Pour mettre en marche l'outil électroportatif, appuyez sur l'interrupteur Marche/Arrêt (6) jusqu'à la butée.
L'outil électroportatif s'arrête automatiquement dès que le couple réglé est atteint.
uSi l’interrupteur Marche/Arrêt (6) est relâché trop tôt, le couple présélectionné n’est pas atteint.
Bosch Power Tools |
|
|
|
1 609 92A 4V3 | (14.02.2019) |
|
|
|
|
|
|
|
|
|
|
|
|
|
|
|
|
|
|
|
30 | Français
Instructions d’utilisation
uRetirez l’accu de l’appareil électroportatif avant toute intervention (opérations d’entretien/de maintenance, changement d’accessoire, etc.) ainsi que lors de son transport et rangement. Il y a sinon risque de blessure lorsqu’on appuie par mégarde sur l’interrupteur Marche/ Arrêt.
uPositionnez l’outil électroportatif sur la vis/sur l’écrou seulement lorsqu’il est à l’arrêt. Un accessoire en rotation risque de glisser.
Préréglage du couple (voir figures H – I)
Le couple est fonction de la tension initiale (précontrainte) du ressort de l’embrayage d’arrêt. L’embrayage entre en action – tant en rotation gauche qu’en rotation droite – au moment où le couple présélectionné est atteint.
Pour effectuer le préréglage du couple, utilisez l’outil de réglage (21) fourni.
–Glissez le curseur (10) de l’outil électroportatif à fond vers l’arrière.
–Insérez l’outil de réglage (21) dans le porte-outil (8) et tournez-le lentement.
–Dès qu’une petite encoche apparaît dans l’embrayage au niveau de l’ouverture du carter (disque de réglage (22)), enfoncez l’outil de réglage (21) dans cette encoche et tournez-le.
Pour augmenter le couple, tournez dans le sens des aiguilles d’une montre. Pour diminuer le couple, tourner dans le sens inverse.
–Retirez l’outil de réglage (21). Repoussez le curseur (10) vers l’avant afin de protéger l’embrayage des saletés.
Remarque : Le couple requis dépend du type de vissage à effectuer. Le mieux est de le déterminer lors d’essais pratiques. Lors de ces essais pratiques, contrôlez le couple atteint à l’aide d’une clé dynamométrique.
uNe réglez le couple que dans la plage indiquée. En dehors de cette plage, l’embrayage d’arrêt ne joue plus son rôle.
Marquage du réglage de couple
Pour marquer et reconnaître le couple réglé, utilisez des anneaux de marquage (7) de couleur différente selon le couple réglé.
Si vous utilisez par exemple plusieurs outils électroportatifs EXACT réglés à un couple de 4,5 Nm, vous pouvez utiliser des anneaux de marquage rouges pour les distinguer. Si vous utilisez aussi d’autres outils électroportatifs EXACT pour une autre application dont le couple est réglé sur
7,5 Nm, vous pouvez utiliser un anneau de marquage d’une autre couleur (noir, bleu, vert ou jaune) pour marquer le couple utilisé dans cette application particulière. Les anneaux de marquage de différentes couleurs ne servent que d’aide. Ils permettent aux monteurs de reconnaître rapidement à quel couple est réglé chaque l’outil électroportatif. Enlevez l’anneau de marquage (7) à l’aide d’une lame de tournevis fine, d’une spatule ou d’un outil similaire.
Utilisez toujours l’outil électroportatif avec un anneau de marquage pour bien protéger le carter contre la poussière et les saletés.
LED
Affichage de l’état de charge de l’accu
Lorsqu’une recharge de l’accu (5) se révèle nécessaire, la LED (2) clignote en vert et un si-
gnal sonore retentit. Au maximum 6 à 8 vissages sont alors encore possibles.
Si la LED s’allume en rouge, c’est que la capacité ne suffit plus pour un nouveau vissage ou que l’outil électroportatif a été surchargé. L’outil électroportatif ne peut plus être mis en marche. Le verrouillage de mise en marche demeure actif jusqu’à ce que l’accu ait été sorti de l’outil électroportatif et qu’un accu chargé ait été monté.
Si vous travaillez avec adaptateur de tension, l’allumage en rouge de la LED (2) indique une surcharge.
Une baisse notable de l’autonomie de l’outil électroportatif au fil des recharges effectuées indique que l’accu est arrivé en fin de vie et doit être remplacé. Éliminez les accus usagés conformément aux dispositions légales/nationales.
Affichage des vissages
L’embrayage d’arrêt entre en action dès que le couple préréglé est atteint. La LED (1) s’allume
alors en vert.
Si le couple préréglé n’a pas été atteint, la LED (1) s’allume en rouge et un signal sonore retentit. Il faut alors réeffectuer le vissage.
Protection antiredémarrage
Lorsque l’embrayage d’arrêt (c’est-à-dire le limiteur de couple) entre en action, le moteur s’arrête. Une remise en marche n’est possible qu’au bout de 0,7 seconde. Ceci permet d’éviter tout resserrage involontaire de vissages déjà bien serrés.
Entretien et Service après vente
Nettoyage et entretien
uRetirez l’accu de l’appareil électroportatif avant toute intervention (opérations d’entretien/de maintenance, changement d’accessoire, etc.) ainsi que lors de son transport et rangement. Il y a sinon risque de blessure lorsqu’on appuie par mégarde sur l’interrupteur Marche/ Arrêt.
uTenez toujours propres l’outil électroportatif ainsi que les fentes de ventilation afin d’obtenir un travail impeccable et sûr.
Lubrification de l’outil électroportatif
Lubrifiant :
Graisse spéciale pour engrenages (225 ml)
Référence 3 605 430 009
Graisse Molykote
Huile moteur SAE 10/SAE 20
–Après les 150 premières heures de fonctionnement, nettoyez l’engrenage avec un solvant doux. Pour l’utilisation
1 609 92A 4V3 | (14.02.2019) |
|
|
|
Bosch Power Tools |
|
|
|
|
|
|
|
|
|
|
|
|
|
|
|
|
|
|
|
Loading...