


Gene Pulser Xcell™
Electroporation System
Instruction Manual
Catalog Numbers
165-2660, 165-2661, 165-2662, 165-2666, 165-2667, and 165-2668
For technical service
call your local Bio-Rad office or in the U.S. call 1-800-4BIORAD (1-800-424-6723)
On the Web at discover.bio-rad.com

Warranty
The Gene Pulser Xcell electroporation system is warranted against defects in materials and workmanship for 1 year. If any defects occur in the instruments or accessories during this warranty period, Bio-Rad Laboratories will repair or replace the defective parts at its discretion without charge. The following defects, however, are specifically excluded:
1.Defects caused by improper operation.
2.Repair or modification done by anyone other than Bio-Rad Laboratories or an authorized agent.
3.Damage caused by substituting alternative parts.
4.Use of fittings or spare parts supplied by anyone other than Bio-Rad Laboratories.
5.Damage caused by accident or misuse.
6.Damage caused by disaster.
7.Corrosion caused by improper solvent or sample.
This warranty does not apply to the following parts:
Fuses
For any inquiry or request for repair service, contact Bio-Rad Laboratories. Inform Bio-Rad of the model and serial number of your instrument.
IMPORTANT: This Bio-Rad instrument is designed and certified to meet EN61010* and the EMC requirements of EN61326 (for Class A) safety standards. Certified products are safe to use when operated in accordance with the instruction manual. This instrument should not be modified or altered in any way. Alteration of this instrument will:
•Void the manufacturer's warranty
•Void the EN61010 safety certification
•Create a potential safety hazard
Bio-Rad Laboratories is not responsible for any injury or damage caused by the use of this instrument for purposes other than those for which it is intended, or by modifications of the instrument not performed by Bio-Rad Laboratories or an authorized agent.
*EN61010 is an internationally accepted electrical safety standard for laboratory instruments.
Model : Gene Pulser Xcell
Catalog No.: 165-xxxx
Date of Delivery:
Serial No.:
Invoice No.:
Purchase Order No.:
Table of Contents
Section 1 |
Introduction and Safety Information: The Gene Pulser Xcell |
|
|
|
System ........................................................................................................ |
1 |
|
1.1 |
General Safety Information ............................................................................ |
1 |
|
1.2 |
Electrical Hazards ........................................................................................ |
2 |
|
1.3 |
Mechanical Hazards...................................................................................... |
2 |
|
1.4 |
Other Safety Precautions .............................................................................. |
2 |
|
Section 2 |
Unpacking and System Installation ........................................................ |
3 |
|
2.1 |
Unpacking the System Components ............................................................ |
3 |
|
2.2 |
Setting up the System .................................................................................. |
4 |
|
|
2.2.1 Setting up the Gene Pulser Xcell Main Unit and Connecting |
|
|
|
|
the ShockPod (Cat. #s 165-2660, 165-2661, 165-2662, |
|
|
|
165-2666) ........................................................................................ |
4 |
|
2.2.2 Connecting the PC Module to the Gene Pulser Xcell Main |
|
|
|
|
Unit (Cat. #s 165-2660, 165-2662, and 165-2668).......................... |
5 |
|
2.2.3 Connecting the CE Module to the Gene Pulser Xcell Main |
|
|
|
|
Unit (Cat. #s 165-2660, 165-2661, and 165-2667).......................... |
6 |
|
2.2.4 ShockPod (Cat. #s 165-2660, 165-2661, 165-2662, and |
|
|
|
|
165-2669) ........................................................................................ |
6 |
Section 3 |
Gene Pulser Xcell Operating Instructions .............................................. |
8 |
|
3.1 |
Section Overview .......................................................................................... |
8 |
|
3.2 |
Front Panel and Home Screen ...................................................................... |
9 |
|
|
3.2.1 |
Description of Keypad...................................................................... |
9 |
|
3.2.2 |
Home Screen ................................................................................ |
10 |
|
3.2.3 |
Help Screens ................................................................................ |
11 |
3.3 |
Manual Operation........................................................................................ |
12 |
|
|
3.3.1 Manual Operation (Guide Guide) .................................................... |
12 |
|
|
3.3.2 Electroporation using Exponential Decay Pulses ............................ |
12 |
|
|
3.3.3 Electroporation Specifying Time Constant...................................... |
14 |
|
|
3.3.4 Electroporation using Square Wave Pulses .................................... |
15 |
|
|
3.3.5 |
Results Screens ............................................................................ |
17 |
|
3.3.6 Saving a Program from Manual Operation...................................... |
19 |
|
|
3.3.6A Saving in a Location without a Named User Entry................ |
20 |
|
|
3.3.6B Saving in a Location with a Named User Entry .................... |
20 |
|
3.4 |
Pre-Set Protocols........................................................................................ |
21 |
|
|
3.4.1 Using a Pre-set Protocol (Quick Guide) .......................................... |
21 |
|
|
3.4.2 Electroporation using a Pre-Set Protocol........................................ |
22 |
|
|
3.4.3 Modifying Pre-Set Protocol Parameters ........................................ |
25 |
|
|
3.4.4 Saving Changes to Pre-Set Protocols ............................................ |
25 |
|
3.5 |
User Protocols ............................................................................................ |
26 |
|
|
3.5.1 |
Using a User Protocol (Quick Guide) .............................................. |
26 |
|
3.5.2 |
Creating a New User Name .......................................................... |
26 |
|
3.5.3 |
Creating a New User Protocol........................................................ |
26 |
|
3.5.4 |
Modifying a User Protocol .............................................................. |
30 |
|
3.5.5 |
Deleting a User Name and a User Protocol.................................... |
31 |
|
3.5.6 |
Renaming a User Name or a User Protocol .................................. |
33 |
3.6 |
Last Pulse .................................................................................................. |
34 |
|
3.7 |
Optimize Operation .................................................................................... |
34 |
|
3.8 |
Data Management ...................................................................................... |
36 |
|
3.9 |
Measurements ............................................................................................ |
39 |
|
|
3.9.1 |
Sample Resistance Measurements ................................................ |
39 |
|
3.9.2 |
Calibration and Measurement of Capacitors in the |
|
|
CE Module.................................................................................................. |
40 |
|
3.10 |
User Preferences ........................................................................................ |
41 |
|
|
3.10.1 |
Setting the Clock .......................................................................... |
41 |
|
3.10.2 Adjusting the Screen Intensity ........................................................ |
42 |
|
|
3.10.3 |
Sleep Function Setting .................................................................. |
42 |
3.11 |
The Pulse Trac System .............................................................................. |
43 |
|
|
3.11.1 Pulse Trac System Description ...................................................... |
43 |
|
|
3.11.2 Pulse Trac Diagnostic Algorithm .................................................... |
44 |
|
Section 4 |
Overview of Electroporation Theory ...................................................... |
44 |
|
4.1 |
Exponential Decay Pulses .......................................................................... |
45 |
|
4.2 |
Square Wave Pulses .................................................................................. |
45 |
|
Section 5 |
Factors Affecting Electroporation: Optimizing |
|
|
|
Electroporation ........................................................................................ |
48 |
|
5.1 |
Cell Growth ................................................................................................ |
48 |
|
5.2 |
DNA............................................................................................................ |
|
49 |
5.3 |
Electroporation Media ................................................................................ |
49 |
|
5.4 |
Temperature................................................................................................ |
50 |
|
Section 6 |
Electroporation of Bacterial Cells .......................................................... |
52 |
|
6.1 |
Escherichia coli .......................................................................................... |
52 |
|
|
6.1.1 Preparation of Electrocompetent Cells............................................ |
52 |
|
|
6.1.2 |
Electroporation .............................................................................. |
53 |
|
6.1.3 |
Solutions and Reagents ................................................................ |
53 |
6.2 |
Staphylococcus aureus .............................................................................. |
54 |
|
|
6.2.1 Preparation of Electrocompetent Cells............................................ |
54 |
|
|
6.2.2 |
Electroporation .............................................................................. |
54 |
|
6.2.3 |
Solutions and Reagents ................................................................ |
55 |
6.3 |
Agrobacterium tumefaciens ........................................................................ |
56 |
|
|
6.3.1 Preparation of Electrocompetent Cells............................................ |
56 |
|
|
6.3.2 |
Electroporation .............................................................................. |
56 |
|
6.3.3 |
Solutions and Reagents ................................................................ |
57 |
6.4 |
Bacillus cereus ............................................................................................ |
57 |
|
|
6.4.1 Preparation of Electrocompetent Cells............................................ |
57 |
|
|
6.4.2 |
Electroporation .............................................................................. |
57 |
|
6.4.3 |
Solutions and Reagents ................................................................ |
58 |
6.5 |
Pseudomonas aeruginosa .......................................................................... |
58 |
|
|
6.5.1 Preparation of Electrocompetent Cells............................................ |
58 |
|
|
6.5.2 |
Electroporation .............................................................................. |
59 |
|
6.5.3 |
Solutions and Reagents ................................................................ |
59 |
6.6 |
Streptococcus pyogenes ............................................................................ |
60 |
|
|
6.6.1 Preparation of Electrocompetent Cells............................................ |
60 |
|
|
6.6.2 |
Electroporation .............................................................................. |
60 |
|
6.6.3 |
Solutions and Reagents ................................................................ |
61 |
6.7 |
Lactobacillus plantarum .............................................................................. |
61 |
|
|
6.7.1 Preparation of Electrocompetent Cells............................................ |
61 |
|
|
6.7.2 |
Electroporation .............................................................................. |
61 |
|
6.7.3 |
Solutions and Reagents ................................................................ |
62 |
Section 7 |
Electroporation of Fungal Cells.............................................................. |
62 |
|
7.1 |
Saccaromyces cerevisiae ............................................................................ |
62 |
|
|
7.1.1 Preparation of Electrocompetent Cells............................................ |
62 |
|
|
7.1.2 |
Electroporation .............................................................................. |
63 |
|
7.1.3 |
Solutions and Reagents ................................................................ |
64 |
7.2 |
Schizosaccharomyces pombe .................................................................... |
64 |
|
|
7.2.1 Preparation of Electrocompetent Cells............................................ |
64 |
|
|
7.2.2 |
Electroporation .............................................................................. |
65 |
|
7.2.3 |
Solutions and Reagents ................................................................ |
65 |
7.3 |
Pichia pastoris ............................................................................................ |
65 |
|
|
7.3.1 Preparation of Electrocompetent Cells............................................ |
65 |
|
|
7.3.2 |
Electroporation .............................................................................. |
66 |
|
7.3.3 |
Solutions and Reagents ................................................................ |
66 |
7.4 |
Candida albicans ........................................................................................ |
67 |
|
|
7.4.1 Preparation of Electrocompetent Cells............................................ |
67 |
|
|
7.4.2 |
Electroporation .............................................................................. |
67 |
|
7.4.3 |
Solutions and Reagents ................................................................ |
68 |
7.5 |
Dictyostelium discoideum............................................................................ |
68 |
|
|
7.5.1 Preparation of Electrocompetent Cells............................................ |
68 |
|
|
7.5.2 |
Electroporation .............................................................................. |
69 |
|
7.5.3 |
Solutions and Reagents ................................................................ |
69 |
Section 8 |
Mammalian Cells...................................................................................... |
70 |
|
8.1 |
Preparation of Electrocompetent Cells ........................................................ |
70 |
|
|
8.1.1 |
Attached Cells................................................................................ |
70 |
|
8.1.2 |
Suspension Cells............................................................................ |
70 |
8.2 |
Electroporation............................................................................................ |
70 |
|
8.3 |
Solutions and Reagents .............................................................................. |
71 |
|
Section 9 |
References................................................................................................ |
72 |
|
Section 10 |
Specifications and Product Information................................................ |
75 |
|
10.1 |
System Specifications ................................................................................ |
75 |
|
10.2 |
Product Information .................................................................................... |
76 |
|
Section 1
The Gene Pulser Xcell™ Electroporation System
The Gene Pulser Xcell is a pulse generator that uses capacitors to produce controlled exponential or square wave electrical pulses for cell electroporation. The unit is capable of producing pulses of up to 3000 V on a high-voltage circuit, and up to 500 V on a low-voltage circuit. For generating pulses on the high voltage circuit, capacitors of 10, 15, and 25 µF present in the Gene Pulser Xcell main unit are used and generating pulses on the low-voltage circuit requires use of capacitors in the CE Module. Exponential decay (or capacitance discharge) and square wave pulses are the most commonly used types of electrical pulse. An in-depth discussion of these two waveforms can be found in Section 4.
The Gene Pulser Xcell is a modular system, comprising of a main unit and two accessory modules, the CE module and the PC module, in addition to the shocking chamber and a cuvette with incorporated electrodes.
The CE Module is recommended for use with the Gene Pulser Xcell main unit for electroporation of most eukaryotic cells, including mammalian cells and plant protoplasts. The CE Module should only be used with low-resistance media (<1000 ohms). For exponential decay pulses, the CE Module provides a means of controlling the capacitance of the circuit by increasing the time constant of the pulse. For square wave pulses, the CE Module provides the large capacitor necessary for delivering a square wave pulse into low resistance media. This module contains a set of capacitors with a functional range between 50 and 3275 µF and selectable in 25 µF increments. For square wave pulses, the CE Module provides the large capacitance, 3275 µF, necessary for delivering a square wave pulse into low resistance media.
The PC Module is recommended for the electroporation of bacteria and fungi using exponential decay, as well as in other applications where high-voltage pulses are applied to samples of small volume and high resistance. The PC Module selects resistance of 50 ohms 1000 ohms in 50-ohm increments. The unit is used to control the resistance of the circuit by placing resistors in parallel with the sample, thereby providing a means of reducing the time constant of an exponential decay pulse. This provides an effective means of controlling the time constant when using high-resistance media but has little effect on the time constant when using low-resistance media. The PC Module greatly reduces the likelihood of an arc occurring at high voltage. It is not recommended that the PC module be used for square wave pulses due to the increase in droop of the pulse that can occur (see Section 4).
Both the PC Module and CE Module have integral leads that connect to the main unit (see Section 2 for installation) and both units are controlled directly from the user interface on the front panel of the main unit.
1.1General Safety Information
This Bio-Rad instrument is designed and certified to meet the safety requirements of EN61010 and the EMC requirements of EN61326 (for Class A) and conforms to the “Class A” standards for electromagnetic emissions intended for laboratory equipment applications. This instrument is intended for laboratory application only. It is possible that emissions from this product may interfere with some sensitive appliances when placed nearby or in the same circuit as those appliances. The user should be aware of this potential and take appropriate measures to avoid interference.
No part of the Gene Pulser Xcell system should be used if obvious external case damage has occurred or the electronic displays are not functioning as described in the manual. This instrument is only to be used with the components provided (or their authorized additions or replacements) including, but not limited to, supplied cables and ShockPod. The operating temperature range for the Gene Pulser Xcell system and its associated components is 0–35°C.
1
There are no user serviceable parts within the unit. The operator should make no attempt to open any case cover or defeat any safety interlock. This instrument must not be altered or modified in any way. Alteration of this instrument will
•Void the manufacturer’s warranty
•Void the IEC 1010 safety certification
•Create a potential safety hazard
Bio-Rad is not responsible for any injury or damage caused by the use of this instrument for purposes other than those for which it is intended or by modification of the instrument not performed by Bio-Rad or an authorized agent.
1.2Electrical Hazards
The Gene Pulser Xcell produces voltages up to 3,000 volts and is capable of passing very high currents. When charged to maximum voltage, the instrument stores about 400 joules. A certain degree of respect is required for energy levels of this order. System safety features prevent operator access to the recessed input jacks and to the recessed electrode contacts inside the sample chamber. These mechanical interlocks should never be circumvented.
The pulse button is active whenever the character space in the lower right corner is flashing. There is high voltage present whenever the pulse button is depressed and “Pulsing” is shown on the LCD display on the front of the instrument. Because of the built-in safety interlock in the ShockPod, no pulse is delivered to the cuvette when the ShockPod lid is opened. If the capacitor has been partially charged but not fired (for example, when the charging cycle has been interrupted before the pulse is delivered), some charge may remain on the internal capacitor. This charge will dissipate over 1–2 minutes. However, the user cannot make contact with any charged electrical components due to the system safety features.
1.3Mechanical Hazards
The Gene Pulser Xcell contains a patented arc-protection circuit that dramatically reduces the incidence of arcing in the cuvette when high voltage is delivered into the sample. The unit incorporates a circuit that senses the beginning of an arc and diverts current from the sample within <10 µsec, preventing, or greatly reducing, mechanical, visual, and auditory phenomena at the ShockPod. Should an arc occur, the sample chamber is effective in containing these small discharges, but nonetheless we strongly recommend wearing safety glasses when using the instrument.
1.4Other Safety Precautions
Avoid spilling any liquids onto the apparatus. Use only a paper towel or a cloth wet with either water or alcohol to clean the outside surfaces of the Gene Pulser Xcell.
Use only the Bio-Rad cables supplied with the Gene Pulser Xcell.
Use the ShockPod only in the assembled condition. Do not attempt to circumvent the protection of the ShockPod or use it while disassembled.
Verify the display segments periodically.
Read the instruction manual before using the Gene Pulser Xcell Electroporation System. For technical assistance contact your local Bio-Rad office or, in the US, call technical services at 1-800-4BIORAD (1-800-424-6723).
2
Warning: The Gene Pulser Xcell generates, uses, and radiates radio frequency energy. If it is not used in accordance with the instructions given in this manual, it may cause interference with radio communications. The Gene Pulser Xcell has been tested and found to comply with the limits for Class A computing devices (pursuant to Subpart J of Part 15 of FCC Rules) which provide reasonable protection against such interference when operated in a commercial environment. Operation of this equipment in a residential area is likely to cause interference. In this case the user will be required, at their expense, to take whatever measure may be required to correct the interference.
Section 2
Unpacking and System Installation
The Gene Pulser XCell™ can be purchased as three systems as well as component parts:
165-2660 Gene Pulser Xcell Total System for eukaryotic and microbial cells, 100–240 V, 50/60 Hz, exponential decay and square wave delivery, includes main unit, CE Module, PC Module, ShockPod, 15 sterile cuvettes (5 each of 0.1, 0.2, and 0.4 cm gap), instruction manual
165-2661 Gene Pulser Xcell Eukaryotic System, 100/240 V, 50/60 Hz, exponential decay (25–3,275 µF range) and square wave delivery, includes main unit, CE Module, ShockPod, 5 sterile cuvettes (0.4 cm gap), instruction manual
165-2662 Gene Pulser Xcell Microbial System, 100/240 V, 50/60 Hz, exponential decay and square wave delivery, includes main unit, PC Module, ShockPod, 10 sterile cuvettes (5 each of 0.1 and 0.2 cm gap), instruction manual
165-2666 Gene Pulser Xcell main unit, 100/240 V, 50/60 Hz
165-2667 Gene Pulser Xcell CE Module, 25–3,275 µF range controlled by main unit, includes integral leads, 5 sterile cuvettes (0.4 cm gap), instruction manual
165-2668 Gene Pulser Xcell PC Module, 50–1,000 ohm range controlled by main unit, includes integral leads, 10 sterile cuvettes (5 each of 0.1 and 0.2 cm gap)
165-2669 Gene Pulser Xcell ShockPod shocking chamber, includes integral leads for connection to Gene Pulser Xcell, Gene Pulser II, or MicroPulser
2.1Unpacking the System Components
Remove all packing material and connect components on a flat, dry surface near an appropriate electrical outlet.
Upon receiving your instrument, please check that all items listed were shipped. If any items are missing or damaged, contact your local Bio-Rad office.
3

2.2Setting Up the System
2.2.1 Setting Up the Gene Pulser Xcell Main Unit and Connecting the ShockPod (Cat. #s 165-2660, 165-2661, 165-2662, and 165-2666)
Follow this procedure for setting up the Gene Pulser Xcell and connecting the ShockPod. Be sure to turn off the Gene Pulser Xcell main unit before connecting or disconnecting the power cord or any cables.
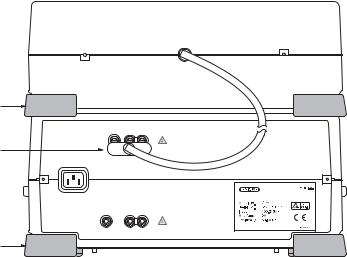
1.Attach the power cord to the three-pronged receptacle on the back of the Gene Pulser Xcell unit (Figure 2.1A). Plug the unit into an appropriate electrical outlet or power strip. There is a foot on the bottom of the Gene Pulser Xcell which may be pulled down to change the viewing angle of the LCD display (Figure 2.1B).
2.Insert the black connector of the ShockPod into the left and center output jacks on the front panel of Gene Pulser Xcell (Figure 2.2); polarity is not important to the electroporation process. The right output jack is not used with the ShockPod.
3.To turn on the Gene Pulser Xcell, press the power switch on the right rear of the instrument (Figure 2.2).
Connectors
to CE Module
CE MODULE
Power Connector 
POWER INLET
PC MODULE
Connectors to PC Module
Fig. 2.1A. Rear panel of Gene Pulser Xcell main unit showing receptacles for the power cord, CE Module, and PC Module.
1 4 7
2 |
3 |
5 |
6 |
|
|
8 |
9 |
|
|
0 |
|
Tilt-up Foot 
Fig. 2.1B. Bottom panel of the Gene Pulser Xcell main unit. The foot may be pulled down to raise the front of the unit.
4
ShockPod
Connectors
Xcell ShockPod 

1 |
2 |
3 |
|
|
|
4 |
5 |
6 |
|
|
|
7 |
8 |
9 |
|
0 |
|

 Power Switch
Fig. 2.2. Connecting the ShockPod to the Gene Pulser Xcell main unit.
2.2.2 Connecting the PC Module to the Gene Pulser Xcell Main Unit (Cat. #s 165-2660, 165-2662, and 165-2668)
The PC Module and CE Module may be connected to the Gene Pulser Xcell main unit in any order and both may be connected at the same time. Before connecting the PC Module to the Gene Pulser Xcell, be sure that the Gene Pulser Xcell is turned off. There is no power switch on the PC Module; it is controlled entirely by the Gene Pulser Xcell main unit.
1.Place the PC Module near the Gene Pulser Xcell main unit. The units, along with the CE Module, are stackable; either the PC Module or the Gene Pulser Xcell main unit can be placed on the bottom. Place the feet of the top unit at the corners of the bottom unit to interlock the two.
2.Insert the red/black connector that is permanently attached to the cable on the back of the PC Module into the appropriately labeled receptacle on the back of the Gene Pulser Xcell main unit (see Figure 2.3). The connector is keyed so that it will insert only into the proper receptacle and in the correct red/black orientation.
Xcell PC Module 
Foot
CE MODULE
POWER INLET
Xcell Main Unit 
PC MODULE
Connections to
PC Module
Foot
Fig. 2.3. Rear view (back panel) of PC Module showing the connection to the Gene Pulser Xcell main unit.
5
2.2.3 Connecting the CE Module to the Gene Pulser Xcell Unit (Cat. #s 165-2660, 165-2661, and 165-2667)
The PC Module and CE Module may be connected to the Gene Pulser Xcell main unit in any order and both may be connected at the same time. Before connecting the CE Module to the Gene Pulser Xcell, be sure that the Gene Pulser Xcell is turned off. There is no power switch on the CE Module; it is controlled entirely by the Gene Pulser Xcell unit.
1.Place the CE Module near the Gene Pulser Xcell main unit. These units, along with the PC Module are stackable in any order. Place the feet of the top unit at the corners of the bottom unit to interlock the two.
2.Insert the red/black connector that is permanently attached to the cable on the back of the CE Module (Figure 2.4) into the appropriately labeled receptacle on the back of the Gene Pulser Xcell main unit (see Figure 2.1). The connector is keyed so that it will insert only into the proper receptacle in the correct red/black orientation.
Xcell CE Module 
Foot
Connections to
CE Module
CE MODULE
Xcell Main Unit 
POWER INLET
PC MODULE
Foot
Fig. 2.4. Rear view (back panel) of the CE Module showing the connection to the Gene Pulser Xcell main unit.
2.2.4ShockPod (Cat. #s 165-2660, 165-2661, 165-2662, and 165-2669)
The ShockPod is designed for one-hand operation. Press the tab on the front of the chamber to release the latch and to open the top. Push the top down gently to close the chamber. The safety design of the system requires that the top be closed before pulsing can occur. Additionally, the top must also be closed to use the ShockPod to measure resistance of electroporation media (see Section 3.9.1). Because of the built-in safety interlock in the ShockPod, no pulse is delivered to the cuvette when the ShockPod lid is opened.
The cuvette slot will accept any commercially available cuvette. Bio-Rad cuvettes are designed with a notch on one of the non-electrode sides so they may be inserted into the cuvette slot only in the proper orientation.
6
Cuvette
Press to Open 

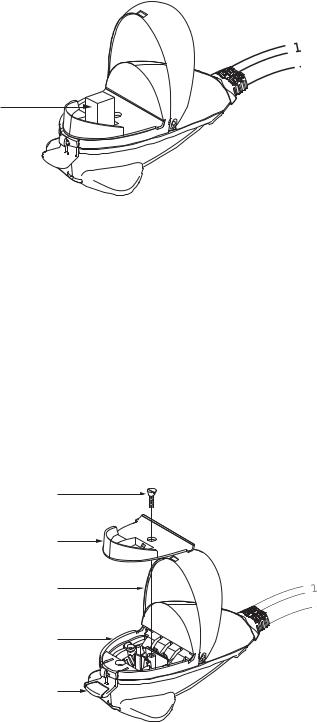
Fig. 2.5. ShockPod with cuvette.
The plastic panel covering the electrode may be removed for cleaning should the electrode become dirty. To clean the unit:
1.Disconnect the ShockPod from the Gene Pulser Xcell main unit.
2.Press the tab to open the chamber.
3.Using a phillips screwdriver, loosen the screw holding the safety panel (Figure 2.5). Lift the screw and the safety panel out of the ShockPod by the lip on the front of the panel.
4.The area around the electrodes may be cleaned with a cotton swab and warm, soapy water. Dry the electrodes using a dry cotton swab or Kimwipe.
5.Reassemble the unit by centering the safety panel on the base of the ShockPod and tightening the screw.
Screw
Safety Panel
Top
Base Unit
Tab
Fig. 2.6. Exploded view of the Gene Pulser Xcell ShockPod.
7
Section 3
Gene Pulser Xcell™ Operating Instructions
3.1 Section Overview
This section describes the operation of the Gene Pulser Xcell. The following summarizes the organization of this section.
Section 3.2 below describes the functions of the keys on the front panel, the Home screen on the LCD display, and the Help functions built into the Gene Pulser Xcell.
•The keys on the front panel of the main unit control the Gene Pulser Xcell. Section 3.2.1 describes the uses of these keys.
•The Home screen provides easy access to programs built into the Gene Pulser Xcell as well as a direct method of manually entering pulse parameters to electroporate a sample. Section 3.2.2 describes these programs.
•On-screen help is built into the software of the Gene Pulser Xcell. This may be accessed from any screen as described in Section 3.2.3.
The Gene Pulser Xcell has three modes of operation: manual operation, pre-set protocols, and user protocols.
Section 3.3 describes the Manual mode, which may be used to rapidly program the parameters necessary for delivering either an exponential decay or a square wave pulse.
•Section 3.3.2 describes delivering an exponential decay pulse.
•Section 3.3.3 describes delivering an exponential decay pulse but specifying a time constant rather than a capacitance and resistance value.
•Section 3.3.4 describes delivering a square wave pulse.
•Section 3.3.6 explains how programmed settings may be saved as user protocols.
Section 3.4 describes the Pre-set protocols in which the pulse parameters have been optimized for a number of commonly used bacterial and fungal species and mammalian cell lines.
•Pre-set Protocols may be called up and used directly (Section 3.4.2) or may be modified prior to being used (Section 3.4.3).
•A modified Pre-set Protocol may be saved as a User Protocol (Section 3.4.4).
Section 3.5 describes a custom mode (User Protocols) in which users may store optimized pulse parameters that they use in their own work.
•User Protocols may be created in any of four ways:
•In the User Protocols menu as a new protocol (Section 3.5.3).
•In the User Protocols menu as an edited (modified) program (Section 3.5.4)
•In the Manual menu as a new protocol (Section 3.3.4).
•In the Pre-set Protocol Menu as a modified protocol (Section 3.4.4).
•User Protocols, once created and saved, may be called up and used directly like Pre-set Protocols (Section 3.5.1).
8
3.2 Front Panel and Home Screen
3.2.1 Description of the keypad
See Figure 3.1 for a view of the Gene Pulser Xcell front panel.
Alpha-numeric keys |
This array of keys permits entering numbers and letters into the Gene Pulser |
|
Xcell. Pressing the Shift key toggles between alphabetic and numeric input. To |
|
type an alphabetic character, press the Shift key to enter alpha mode, then |
|
press the key with the appropriate letter. To type an a, press the 2 key once; to |
|
type a b, press the 2 key twice; to type a c, press the 2 key three times. To use |
|
the same key twice, for example to type a then b, advance the cursor using |
|
the Right Arrow Key. The firmware on Gene Pulser Xcell will automatically |
|
change between alpha and numeric input depending on the parameter being |
|
entered. In Protocol screens and Directory screens where a two-digit entry |
|
must be made, the second digit must be entered within 2 seconds of the first |
|
entry, otherwise the screen will default to the single-digit entry. |
Home key |
Returns the user to the Home screen from anywhere in the program. |
Back key |
Returns the user one level back in hierarchy toward the Home screen. |
Help key |
Displays on-screen help text. |
Save key |
Saves User Names and User Protocols. |
Delete key |
Removes only the last entry in the field; also used to remove User Name and |
|
User Protocol files. |
Clear key |
Removes the entire line of the field. |
Enter key |
Indicates that a choice has been made and moves the cursor to the next |
|
location. |
Arrow keys |
The Up and Down Arrow keys move the cursor up or down one row at a time. |
|
Depending on the screen and location of the cursor, the Right and Left Arrows |
|
may (1) move the cursor right or left one space at a time, (2) toggle forward |
|
and backward one screen when there are multiple screens for the same |
|
menu, or (3) increase or decrease numerical input values. |
Pulse button: |
Results in discharging a pulse. During this time “Pulsing” is shown on the LCD |
|
display. A tone sounds to indicate that the pulse has been delivered. When |
|
multiple pulses are delivered, a tone sounds after the last pulse has been |
|
delivered. The Pulse is discharged to the electrodes if the ShockPod is |
|
connected and the lid is closed. Otherwise, it is discharged safely within the |
|
instrument. |
9

|
Keypad |
|
Pulse |
LCD Screen |
Button |
Connectors to |
Power LED |
Indicator |
Shocking Chamber
Arrow and
Enter Keys
Fig. 3-1. Gene Pulser Xcell front panel. See Section 3.2.1 for an explanation of the key functions.
3.2.2 Home Screen
Upon turning on the power to Gene Pulser Xcell, the unit will run a series of test algorithms, including a check of the Pulse Trac system (see Section 3.11) and the firmware. During this time the LCD will display the Bio-Rad logo, the product name, and the version of firmware. After this instrument initialization, the Home Screen is displayed (Figure 3.2). From this screen it is easy to access the programs described below. You may return to this screen from anywhere in the program by pressing the Home key on the keypad.
Home consists of two screens. The first contains the most commonly used programs. The second contains advanced functions. The Left and Right Arrow keys can be used to toggle between them.
To select a program, when the Home screen is displayed on the LCD screen, press numbers 1–10 on the Alpha-Numeric keypad followed by the Enter key. Alternatively, use the Up and Down Arrow keys to scroll to the desired selection; press Enter to select the program.
1. |
Exponential protocol: |
for delivery of an exponential decay pulse: enables the user to |
|
|
program a set of conditions and to deliver the pulse |
2. |
Time constant protocol: |
for delivery of an exponential decay pulse by specifying a time |
|
|
constant: enables the user to program a set of conditions and to |
|
|
deliver the pulse |
3. |
Square wave protocol: |
for delivery of a square wave pulse: enables the user to program |
|
|
a set of conditions and to deliver the pulse |
4. Pre-set protocols:
pre-programmed optimized settings for electrotransformation of commonly used bacterial, fungal, and mammalian cells
5. |
User protocols: |
a program which allows the user to store up to 144 protocols |
|
|
including all instrument settings and recall these protocols to |
|
|
deliver a pulse |
6. |
Last pulse: |
allows the user to recall the electroporation parameters for the |
|
|
last pulse and to deliver a pulse using the same conditions |
7. |
Optimize: |
allows the user to program electroporation parameters and an |
|
|
increment for voltage that may be changed after each pulse in order |
|
|
to optimize electroporation conditions |
10

8. |
Data management: |
allows the user to access pulse parameters and results for the |
|
|
last 100 pulses logged by date and time |
9. |
Measurements: |
allows the user to measure capacitor values in the Gene Pulser |
|
|
Xcell or CE Module and to measure sample resistance |
10. User Preferences: |
allows the user to adjust the clock, the screen light intensity, and |
|
|
|
the LCD sleep function |
Right and left arrows (> and <) appear at the bottom of the first screen and at the top of the second screen, respectively. These arrows indicate that the Right and Left Arrow keys may be used to toggle between these related screens.
Home Screen
H O M E |
|
||
|
|
||
|
1 |
. |
E x p o n e n t i a l p r o t o c o l |
2 . |
T i m e c o n s t a n t p r o t o c o l |
||
3 . |
S q u a r e w a v e p r o t o c o l |
||
4 . |
P r e - s e t p r o t o c o l s |
||
> 5 . U s e r p r o t o c o l s |
|||
|
|
|
|
H O M E
< 6 . L a s t p u l s e 7 . O p t i m i z e
8 . D a t a m a n a g e m e n t 9 . M e a s u r e m e n t s
1 0 . U s e r p r e f e r e n c e s
Fig. 3.2. Gene Pulser Xcell Home screens. All menu functions may be readily accessed from these screens. Return to the Home screen from anywhere in the program by pressing the Home key. Press the Left and Right Arrow keys to toggle between the two screens.
3.2.3 Help Screens
Help screens are accessible from all screens by pressing the Help key. Each help menu describes the keystrokes that may be entered to choose the next function or to continue the current operation. Where there is more than one help screen, use the Right and Left Arrow keys to scroll between them. To return to the program screen, press the Back key.
11
3.3 Manual Operation
3.3.1 Manual Operation (Quick Guide)
•From the Home screen:
•Press Enter to select exponential decay;
•Press 2, then Enter to select exponential decay but specifying a time constant;
•Press 3, then Enter to select square wave.
•Use the Up and Down Arrow keys to scroll through the parameter value spaces on the screen. When a parameter value is highlighted, use the keypad to enter a value, then press Enter to accept that value.
•When the necessary parameter values have been entered, the Pulse button on the Gene Pulser Xcell is active.
•Press the Pulse button to electroporate the sample.
•Press the Back key to return to the Protocol Detail screen and to deliver another pulse.
3.3.2 Electroporation using Exponential Decay Pulses
See Section 4.1 for a discussion of electroporation using exponential decay pulses.
•When the Home screen (Figure 3.2) is selected, the number 1, corresponding to “Exponential protocol” is highlighted as the default choice. Press Enter to view the Protocol Detail Screen. If the number 1 on the Home screen is not highlighted, press 1 or use the Up or Down Arrow keys to highlight “Exponential protocol”, then press Enter to select. The Protocol Detail screen appears (Figure 3.3).
•The following combination of parameters may be entered:
Capacitance + Voltage
Capacitance + Voltage + Resistance
The three variables may be selected in any order, however, the set voltage will determine whether the high voltage or the low voltage circuit is to be used and will limit the range of the capacitance as indicated in Table 3.1. If a value for the capacitance is chosen that outside the range of the system, this value will default to the closest allowable value.
Specifying a resistance value requires that the PC Module be attached. This is always recommended with high resistance media (i.e., >600 ohm) such as water, sucrose, glycerol, sorbitol, or polyethylene glycol. The PC Module places a resistor in parallel with the sample to reduce the resistance of the circuit. In this way, the time constant of a high-resistance sample may be reduced and controlled.
12
When the Resistance value indicates infinity, no resistors from the PC Module are used. The Measurements function of Gene Pulser Xcell may be used to determine sample resistance (see Section 3.9).
Exponential Decay Protocol Detail Screen
P R O T O C O L D E T A I L : |
E X P O N E N T I A L |
|
||
V o l t a g e |
( V ) |
X X X |
|
|
X |
|
|||
C a p a c i t a n c e ( u F ) |
X X X X |
|
||
R e s i s t a n c e ( o h m ) |
X X X X |
|
||
C u v e t t e |
( m m ) |
|
X |
|
|
|
|
|
|
Fig. 3.3. Exponential Decay Protocol Detail Screen. This screen shows the parameters that may be specified for exponential decay electroporation. Entering the cuvette size is optional and is for user information only.
Table 3.1. Capacitance and voltage ranges for the high voltage / low capacitance circuit and the low voltage / high capacitance circuit of the Gene Pulser Xcell for delivering an exponential decay pulse.
|
Capacitance (uF) |
|
|
Voltage (V) |
|
|
||
|
|
|
Rsample < 600 |
Rsample > 600 |
||||
HV Circuit |
10 – |
50 |
200 |
– |
2500 |
200 |
– |
3000 |
LV Circuit |
25 – |
3275 |
10 |
– |
500 |
10 |
– |
500 |
*Use of the low voltage circuit requires that the CE Module be in place.
•Use the Up and Down Arrow keys to scroll through and highlight the parameter value spaces for capacitance, voltage, or resistance. Use the alpha-numeric keypad to input the desired value, or use the Right and Left Arrow keys to increase or decrease the parameter value by the smallest allowable increment. Use the Delete or Clear keys to change the value. When the desired value has been specified, press Enter. If a value outside the limits of the Gene Pulser Xcell is selected, the value in the field will default to the closest permitted value. Entering a value for cuvette size is optional and is for user information only.
•When the necessary parameter values have been specified, a flashing “P” appears in the character space in the lower right corner of the LCD display indicating that the pulse button on the Gene Pulser Xcell is active and that a pulse may be delivered.
•Press the Pulse button to deliver a pulse. When the Pulse button is depressed, the LCD display will blank then show “Pulsing”. Upon completion, a tone will sound and the pulse measurements will be displayed on the Protocol Results screen (see Figure 3.6, Section 3.3.5).
•Use the Left and Right Arrow keys to toggle between the Protocol Results screen and the last Protocol Detail screen.
13
•With the Protocol Detail screen on the LCD display another pulse can be delivered using the same pulse parameters. To change the pulse conditions, press Enter; the cursor appears in the voltage parameter value. The parameters may be changed as described above. To save the pulse parameters, see Section 3.3.6.
•To review previously delivered pulses, see Section 3.8.
3.3.3 Electroporation Specifying Time Constant
See Section 4.1 for a discussion of electroporation using exponential decay. Use the Gene Pulser Xcell to deliver an exponential decay pulse with a specific time constant as follows.
•From the Home screen (Figure 3.2), press 2 or use the Up or Down Arrow keys to highlight “Time constant protocol”, then press Enter. The Time Constant Protocol Detail screen appears
(Figure 3.4).
•A sample must be in place to use Gene Pulser Xcell in this mode. The following parameters must be entered:
Time constant + Voltage
In time constant mode, Gene Pulser Xcell will maximize the parallel resistance (and minimize the capacitance) in order to maximize the energy delivered to the sample. Therefore, the PC Module is required to deliver pulses using the high voltage circuit, while both the CE Module and PC Module are needed to deliver pulses using the low voltage circuit. The set voltage will determine whether the high voltage or the low voltage circuit is to be used and will limit the range of the capacitance as indicated in Table 3.2. If a voltage is chosen that spans both the low voltage and high voltage range, the Gene Pulser Xcell will preferentially use the low voltage circuit. As indicated in Table 3.2, the acceptable values for the time constant are a function of the sample resistance and the voltage circuit used.
Immediately before delivering a pulse, Gene Pulser Xcell will determine sample resistance to determine whether a pulse can be delivered using the set parameters of voltage and time constant. If the set time constant is outside the range by more than 20%, the Gene Pulser Xcell will show a message indicating the approximate time constant that can be delivered, and ask that you press the pulse button again to deliver the pulse. To estimate sample resistance using Gene Pulser Xcell, see Section 3.9.
Table 3.2. Ranges of time constants that may be achieved using Gene Pulser Xcell at several sample resistances.
Sample resistance |
Time constant range (msec) |
||
|
|
LV Circuit* |
HV Circuit** |
20 ohms |
|
0.5 – 65.5 |
0.2 – 1.0 |
200 ohms |
|
5.0 – 655 |
2.0 – 10 |
>1000 ohms |
|
25 – 3275 |
10 – 50 |
* |
LV Circuit range: |
10 – 500 V |
|
** |
HV Circuit range: |
200 – 3000 V |
|
14
Time Constant Protocol Detail screen
P R O T O C O L D E T A I L : T I M E C O N S T A N T
V o l t a g e ( V ) X X X X
T i m e c o n s t a n t ( m s e c ) X X X X . X
C u v e t t e ( m m ) X
Fig. 3.4. Time Constant Protocol Detail Screen. This screen shows the parameters that may be specified for exponential decay electroporation when the time constant is designated. Entering the cuvette size is optional and is for user information only.
•Use the Up and Down Arrow keys to highlight the parameter value space for voltage or time constant. Use the alpha-numeric keypad to input the desired value, or use the Right and Left Arrow keys to increase or decrease the parameter value by the smallest allowable increment. Use the Delete or Clear keys to correct entries. When the desired value has been specified, press Enter. If a value outside the limits of the Gene Pulser Xcell is selected, the value in the field will default to the closest permitted value. Entering a value for cuvette size is optional and is for user information only.
•When the necessary parameter values have been specified, a flashing “P” appears in the character space in the lower right corner of the LCD display indicating that the pulse button on the Gene Pulser Xcell is active and that a pulse may be delivered.
•Press the Pulse button to deliver a pulse. When the Pulse button is depressed, the LCD display will blank then show “Pulsing”. Upon completion, a tone will sound and the pulse measurements will be displayed on the Protocol Results screen (see Figure 3.7, Section 3.3.5).
•Use the Left and Right Arrow keys to toggle between the Protocol Results screen and the last Protocol Detail screen.
•With the Protocol Detail screen on the LCD display another pulse can be delivered using the same pulse parameters. To change the pulse conditions, press Enter; the cursor appears in the voltage parameter value. The parameters may be changed as described above.
•To save the pulse parameters, see Section 3.3.6.
•To review previously delivered pulses, see Section 3.8.
3.3.4 Electroporation using Square Wave Pulses
See Section 4.2 for a discussion of electroporation using square wave pulses. Use Gene Pulser Xcell to deliver square wave pulses as follows.
•From the Home screen (Figure 3.2), press 3 or use the Up or Down Arrow keys to highlight “Square wave protocol”, then press Enter. The Square Wave Protocol Detail screen appears (Figure 3.5).
15

• The following combination of parameters may be entered:
Pulse length + Voltage
Pulse length + Voltage + Number of pulses + Pulse interval
Square Wave Protocol Detail screen
P R O T O C O L D E T A I L : S Q U A R E W A V E
V o l t a g e ( V ) |
X X X |
X |
|
P u l s e |
l e n g t h ( m s e c ) |
X X X . X X |
|
N u m b e r o f p u l s e s |
1 |
||
P u l s e |
i n t e r v a l ( s e c ) |
0 0 . 0 |
|
C u v e t t e ( m m ) |
|
X |
|
Fig. 3.5. Square Wave Protocol Detail Screen. This screen shows the parameters that may be specified for square wave electroporation. Entering the cuvette size is optional and is for user information only.
Electroporation using square waves may be used to deliver a series of multiple pulses to the cells. This is specified by the parameter “Number of pulses.” The time between each pulse is specified as the “Pulse interval.” The default values for the number of pulses and pulse interval are 1 and 0, respectively; it is only necessary to enter other values if more than one pulse is to be delivered. See Section 4.2 for a discussion of pulse parameters.
The pulse parameters may be selected in any order. However, the set voltage will determine whether the high voltage or the low voltage circuit is to be used. Consequently, the set voltage will limit the ranges of the pulse length and pulse interval as indicated in Table 3.3. If values for the second and third parameters are chosen that are outside the range of the system, the values will default to the closest allowable values.
Table 3.3. Pulse length and pulse interval ranges for the high voltage / low capacitance circuit and the low voltage / high capacitance circuit of the Gene Pulser Xcell for delivering a square wave pulse.
|
Voltage (V) |
Pulse Length |
Pulse Interval |
No. Pulses (max) |
LV Circuit* |
10–500 |
0.05–100 ms |
0.1–10 s |
10 |
HV Circuit |
200–3000 |
0.05–5 msec |
5–30 s |
2 |
*Use of the low voltage circuit requires that the CE Module be in place.
•Use the Up and Down Arrow keys to scroll through and highlight the parameter value space for voltage, pulse length, number of pulses, or pulse interval. Use the alpha-numeric keypad to input the desired value, or use the Right and Left Arrow keys to increase or decrease the parameter value by the smallest allowable increment. Use the Delete or Clear keys to correct entries. When the desired value has been specified, press Enter. If a value outside the limits of the Gene Pulser Xcell is selected, the value in the field will default to the closest permitted value. Entering a value for cuvette size is optional and is for user information only.
16
•When the necessary parameter values have been specified, a flashing “P” appears in the character space in the lower right corner of the LCD display indicating that the pulse button on the Gene Pulser Xcell is active and that a pulse may be delivered.
•Press the Pulse button to deliver a pulse. When the Pulse button is depressed, the LCD display will blank then show “Pulsing”. Upon completion, a tone will sound and the pulse measurements will be displayed on the Protocol Results screen (see Figure 3.8, Section 3.3.5).
•Use the Left and Right Arrow keys to toggle between the Protocol Results screen and the last Protocol Detail screen.
•With the Protocol Detail screen on the LCD display another pulse can be delivered using the same pulse parameters. To change the pulse conditions, press Enter; the cursor appears in the voltage parameter value. The parameters may be changed as described above.
•To save the pulse parameters, see Section 3.3.6.
•To review previously delivered pulses, see Section 3.8.
3.3.5 Results Screens
After delivering a pulse, the LCD displays the results on a Protocol Results screen. This screen shows the results in both graphic and tabular form. Figures 3.6, 3.7, and 3.8 show examples of the results from an exponential decay pulse, an exponential decay pulse in which the time constant was specified, and a square wave pulse, respectively.
Results of the last 100 pulses as well as of the pulse parameters are stored in Gene Pulser Xcell memory and are accessible from the Data Management program (Section 3.8).
17

Exponential Decay: Results Screen
R e s u l t s : E x p o n e n t i a l D e c a y
T C ( m s e c ) |
X X X X . X |
V o l t a g e ( V ) |
X X X X |
Fig. 3.6. Exponential Decay Protocol Results screen. The graph shows the exponential decay pulse. The table gives the calculated time constant (TC) and the delivered voltage (Voltage).
Time Constant: Results screen
R e s u l t s : T i m e C o n s t a n t |
|
|
|
T C ( m s e c ) |
X X X X . X |
|
V o l t a g e ( V ) |
X X X X |
|
C a p a c i t a n c e ( u F ) |
X X X X |
|
R e s i s t a n c e ( o h m s ) X X X X |
|
|
|
|
|
|
|
Fig. 3.7. Time Constant Protocol Results screen. The graph shows the exponential decay pulse. The table gives the delivered time constant (TC) and voltage (Voltage) as well as the selected capacitor (Capacitance) and resistor (Resistance).
Square Wave: Results screen
R e s u l t s : S q u a r e W a v e
|
|
|
|
|
|
|
V o l t a g e |
X X X X |
|
|
|
|
|
|
|
P u l s e L e n g t h |
|
|
|
|
|
|
|
|
( m s e c ) |
X X X . X X |
|
|
|
|
|
|
|
I n t e r v a l |
X X . X |
|
|
|
|
|
|
|
N u m b e r |
X X |
|
|
|
|
|
|
|
% D r o o p |
X X |
Fig. 3.8. Square Wave Protocol Results screen. The graph shows the square wave pulse; note that the x-axis may not be to scale. The table gives the actual pulse length (Pulse Length), the delivered voltage (Voltage), the calculated droop (% Droop), and, when multiple pulses are given, the pulse interval (Interval) and the number of pulses (Number).
18

3.3.6 Saving a program from Manual Operation
A protocol created in manual mode may be saved as a User Protocol as follows.
•Create a protocol as described in Section 3.3.2, 3.3.3 or 3.3.4.
•With the Protocol Detail screen open, press Save.
•The first User Directory screen will appear (Figure 3.9); the second line will read “Choose location for protocol”.
•Use the Right and Left Arrow keys to toggle between the two User Directory screens. Press 1–12 or use the Up and Down Arrow keys to highlight the User Name under which to store the protocol. Press Enter to select the User Name. The User Protocols screen will appear (Figure 3.10); the second line will read “Choose location for protocol”. If it is necessary to create a new User Name, see Section 3.5.2.
•Use the Right and Left Arrow keys to toggle between the two User Protocols screens. Press 1–12 or use the Up and Down Arrow keys to highlight a location for the new protocol. A protocol may be stored in a position without an entry (see Section 3.3.6A) or in a position with an entry (see Section 3.3.6B). If necessary, delete a User Protocol as described in Section 3.5.5.
•To use the saved protocol, press Enter to view the Protocol Detail screen. Press the Pulse button to electroporate the sample.
User Directory screen
U S E R D I R E C T O R Y
C h o o s e l o c a t i o n f o r p r o t o c o l
1 |
. |
U s e r 1 |
2 . |
L a b g u y |
|
3 . |
M a l c o m |
|
4 . |
S m i t h |
|
5 . |
W e s s o n |
|
> 6 .
Fig. 3.9. User Directory screen. This is an example of the first User Directory screen. Toggle between this screen and the second screen with Users 7–12 using the Left and Right Arrow keys. When purchased, the initial User Directory screen will have only numbers without any names.
19
 Loading...