


EM 44
ENGLISH |
Digital Tens Device |
|
|
|
Instructions for use ....................................... |
2 |
|
ESPAÑOL |
Dispositivo digital TENS |
|
|
|
Manual de instrucciones ............................ |
23 |
|
FRANÇAIS |
Appareil de stimulation nerveuse |
|
|
|
transcutanée numérique |
|
|
|
Mode d’emploi .............................................. |
43 |
|
Electromagnetic. |
Compatibility Information......... |
63 |
|
Not made with natural rubber latex
Distributed by/Distribuido por/Distribué par: Beurer North America LP
900 N Federal Highway, Suite 300 Hallandale Beach, FL 33009 www.beurer.com
Questions or comments?
 Call toll free 1-800-536-0366 or contact info@beurer.com
¿Preguntas o comentarios? Llame gratis al
 1-800-536-0366 o póngase en contacto info@beurer.com
 Questions ou commentaires? Appeler gratuitement
  1-800-536-0366 ou communiquez avec info@beurer.com

ENGLISH
Content
1. IMPORTANT SAFETY INSTRUCTIONS |
...................................... 3 |
9. Positioning the Electrodes....................................................... |
13 |
||
2. |
Important information................................................................. |
7 |
10. |
To Use....................................................................................... |
16 |
3. |
Introduction................................................................................. |
8 |
11. |
Care and Maintenance............................................................ |
18 |
4. |
General Information.................................................................... |
8 |
12. |
Troubleshooting Guide........................................................... |
19 |
5. |
Package Contents....................................................................... |
8 |
13. |
Specifications.......................................................................... |
20 |
6. |
Parts and Controls...................................................................... |
9 |
14. |
FCC Statement........................................................................ |
20 |
7. |
Electrode Pad Usage................................................................ |
10 |
15. |
Warranty .................................................................................. |
21 |
8. |
Before First Use........................................................................ |
12 |
|
|
|
READ THIS MANUAL COMPLETELY AND CAREFULLY BEFORE USING THIS PRODUCT
Keep this manual in a safe location for future reference
LEA TODO ESTE MANUAL CON ATENCIÓN ANTES DE USAR ESTE PRODUCTO
Conserve este manual en un lugar seguro para consultarlo en el futuro
LISEZ CE MODE D’EMPLOI COMPLÈTEMENT ET ATTENTIVEMENT AVANT D’UTILISER CE PRODUIT
Conservez ce manuel en lieu sûr pour y faire référence ultérieurement
SAVE THESE INSTRUCTIONS FOR FUTURE REFERENCE
If the instruction manual is damaged or if you no longer have the instruction manual in your possession, please contact Beurer customer service. Please see warranty for service contact.
Dear Customer,
Thank you for choosing this Beurer product. Our name stands for high-quality, thoroughly tested products for applications in the areas of heating, weight management, blood pressure, body temperature, pulse, gentle therapy, massage, beauty and air.
Please read these instructions completely and carefully before using this product and keep them for later reference. Be sure to make them accessible to other users and observe the information they contain.
With kind regards,
Your Beurer team
2
1. IMPORTANT SAFETY INSTRUCTIONS
Signs and symbols
The following signs appear in the Safety Section (page 3) and in this manual on page 4, 5, 7, 8 and 15.
READ AND UNDERSTAND THIS ENTIRE MANUAL INCLUDING THE SAFETY SECTION AND ALL INSTRUCTIONS AND WARNINGS COMPLETELY AND CAREFULLY BEFORE USING THIS PRODUCT. FOLLOW ALL SAFETY INSTRUCTIONS AND WARNINGS TO AVOID HAZARDOUS SITUATIONS AND TO MAKE CORRECT USE OF this product.
WARNING
CAUTION
NOTICE
This is the safety alert symbol. It alerts you to potential personal injury hazards. Obey all safety messages that follow this symbol to avoid possible injury or death.
WARNING indicates a potential hazardous situation which, if not avoided, could result in death or serious injury.
CAUTION Indicates a potential hazardous situation which, if not avoided, may result in minor or moderate injury to the user or patient.
Addresses practices not related to personal injury, such as product and/or property damage.
WARNING
Only use digital TENS units:
−−On people.
−−For the intended purpose and as specified in these instructions for use. Improper use can be dangerous. −−For external use.
−−With the original accessories supplied, which can be re-ordered. Failure to do so invalidates the warranty.
•The long-term effects of chronic electrical stimulation are unknown.
•Do not use expired or worn gel pads which do not adhere properly. This can lead to increased current peaks and skin burns.
•Do not use stimulation over the main arteries around your neck.
•Do not use stimulation over the neck or mouth. Severe spasm of muscles may occur and the contractions may be strong enough to close the airway or cause difficulty breathing.
•Do not apply stimulation directly to the heart area across the chest or on the chest.
•Do not use on your head.
3

•Do not use over swollen, infected, or inflamed areas or skin eruptions, e.g., phlebitis, thrombophlebitis, varicose veins.
•Do not use if you have cancer.
•Never use this product near the following devices: pacemakers or any other embedded electronic medical devices, heart-lung machine and any other life keeping electronic medical devices, electrocardiograph and any other medical screening and monitoring devices. Simultaneous use of the product and any of the above devices will cause malfunction and can be very dangerous to the users.
•To avoid personal injury, do not use the digital TENS unit in the following situations:
−−With implanted electrical devices (such as a pacemaker or defibrillator). −−If you have metal implants or electronic auxiliary devices.
−−If you use an insulin pump.
−−If you have a higher than normal temperature.
−−If you have a known or acute cardiac arrhythmia, or disorders of the heart’s impulse and conduction system. −−If you have a tendency toward internal bleeding.
−−Near the heart. The stimulation electrodes must not be placed on any part of the front ribcage (where the ribs and breastbone are located), especially not on the two large pectorals. This can increase the risk of ventricular fibrillation and induce cardiac arrest.
−−On the skeletal skull structure, or around the mouth, throat or larynx. −−In the neck/carotid artery area.
−−In the genital area.
−−On acutely or chronically diseased (injured or irritated) skin (inflamed skin whether painful or not, reddened skin, rashes, allergies, burns, bruises, swellings, both open and healing wounds, and post-operative scars where the healing process could be affected).
−−after consuming alcohol.
−−if connected to a high-frequency surgical device.
CAUTION
•Do not use the product during pregnancy.
•Do not use if you have heart problems.
•Do not use if you have epilepsy.
•Do not use the device:
−−When there is a tendency to hemorrhage following acute trauma or fracture.
−−Following recent surgical procedures when muscle contraction may disrupt the healing process. −−Over areas of the skin which lack normal sensation.
•Do not use the products near the heart; it may cause fast or irregular heartbeat.
•Some patients may experience skin irritation or hypersensitivity due to the electrical stimulation or electrical conductive medium. The irritation can usually be reduced by using an alternate conductive medium (like gel), or alternate electrode placement.
•Keep product out of the reach of children.
•Use this product only with the leads and electrodes recommended by the manufacturer.
•Never apply the pads to your skin with the power on, which will result in sudden shock. To move the pads to another body part, shut
4
down the device first, and then relocate the pads.
•Two pads should be used together as a pair. Always peel off the protective film on the pads before use. To avoid an electrical shock, do not connect two pads to each other.
•Do not apply pads to the same spot for over 40 minutes at a time.
•Do not use the product whilst asleep, driving, operating machinery, or during any activity in which involuntary muscle contractions may put the user at undue risk of injury.
•Do not use the product in bathroom or a moist environment. Do not use while bathing.
•Do not use the product in the condition of air mixed with flammable gases, substances or explosives.
•Never use this product in concurrence with high frequency surgical equipment; it may result in burns at the site of the stimulator electrodes and possible damage to the control unit.
•Never use this product near a microwave oven, or other high frequency equipment.
•Do not operate the product within three feet (~1m) of shortwave therapy equipment as it may produce instability in stimulator output.
•Do not use this device on patients whose pain syndromes are undiagnosed.
•Do not use this device on babies or infants.
•Using pads that are too small or incorrectly applied could result in discomfort or skin burns.
NOTICE:
•Do not insert the electrode plug into any place other than the jack on the main unit.
•Do not pull on the electrode cord during treatment.
•Do not use the device while wearing electronic devices such as watches as this may damage the device.
•Do not use near a cell phone as this may cause the stimulator to malfunction.
•Do not bend or pull the end of the cord.
•When pulling out the cord from the device, hold the plug and pull.
•Replace the cord when broken or damaged.
•The size, shape and type of pads may affect the safety and effectiveness of electrical stimulation.
•The electrical performance characteristics of pads may affect the safety and effectiveness of electrical stimulation.
•Check the device for signs of wear and tear or damage. If found, or if the device was used improperly, discontinue use and contact customer service.
•Switch the device off immediately if it is faulty or not working properly.
•Do not attempt to open and/or repair the device yourself. Repairs may only be carried out by Customer Service. Failure to comply will result in voiding of the warranty.
•The manufacturer is not liable for damage resulting from improper or careless use.
5
Before using the device, consult your doctor if any of the following applies to you:
•Serious illnesses, in particular if you suspect or have been diagnosed with high blood pressure, a blood coagulation disorder, propensity to thrombo-embolic conditions or recurrent malignant growths.
•Any skin conditions.
•Unexplained chronic pain in any part of the body.
•Diabetes.
•Any sensory impairment that reduces the feeling of pain (e.g. metabolic disorders).
•If you are receiving medical treatment.
•In the event of complaints linked to stimulation treatment.
•If you suffer from persistently irritated skin due to long-term stimulation at the same electrode site.
Battery Handling Safety Precautions
•Keep batteries away from children and pets. Batteries may be harmful if swallowed. Should a child or pet swallow a battery, seek medical assistance immediately.
•Use alkaline batteries.
•Use only the size and type of batteries specified.
•Be sure to follow the correct polarity when installing the batteries. Reversed batteries may cause damage to the device.
•Do not mix different types of batteries together (e.g. Alkaline and Carbon-zinc or rechargeable batteries) or old batteries with fresh ones. Always replace batteries as a simultaneous set.
•If the batteries in the device are depleted or the device will not be used for a long period of time,remove the batteries to prevent damage or injury from possible battery leakage.
•Do not try to recharge batteries not intended to be recharged; they can overheat and rupture (followbattery manufacturer’s directions.)
•Do not dispose of batteries in fire, batteries may explode or leak.
•Clean the battery contacts and also those of the device prior to battery installation.
•Remove discharged batteries from the product and dispose/recycle in compliance with all applicable laws.
The device is not a substitute for medical consultation and treatment. Consult your doctor first if you are experiencing any pain or are suffering from an illness.
6

2. Important information
Signs and symbols
The following symbols are used in these instructions for use, on the packaging and on the type plate for the device and accessories:
READ ALL INSTRUCTIONS BEFORE USE.
Do not use the device with a pacemaker.
Operating
Permissible storage temperature and humidity
Storage
Permissible operating temperature and humidity
Serial number
Type BF applied part
Direct current
Keep dry
7

3. Introduction
This Digital TENS Device features 15 separate programs. In all programs you can set the impulse intensity of each channel individually. You can also set various parameters in programs 13 – 15 to adjust the effect to the application area.
4. General Information
CAUTION
•Patients may experience skin irritation and burns beneath the stimulation electrodes applied to the skin.
•Patients may experience headache and other painful sensations during or following use.
•Patients should stop using the device and should consult with their physicians if they experience adverse reactions from the device.
How does stimulation current work?
The Digital TENS device works on the basis of transcutaneous (meaning “through the skin“) electrical nerve
stimulation (TENS). TENS is a clinically proven, effective, medication-free method of treating certain types of pain which, when used properly, is free of side effects. It is also approved as a means of simple self-treatment.
The pain-relieving effect is caused by suppressing the transmission of pain in the nerve fibers (particularly through high-frequency impulses) and increasing the release of the body‘s own endorphins, which decrease the sensation of pain.
Every condition that calls for the use of TENS must be clarified by your physician. He or she will also give you information about the specific benefits of TENS self-treatment.
5. Package Contents
•1 Digital TENS Device
•1 Belt Clip
•2 Connection Cables
•4 Adhesive Electrodes 1.8 x 1.8 in (45 x 45 mm)
•3 x 1.5 V AAA Batteries
•1 Instruction Manual
Replacement electrodes available for separate purchase on www.amazon.com
4 x adhesive electrodes 1.8 x 1.8 in (45 x 45 mm), item no.: 642.72
8
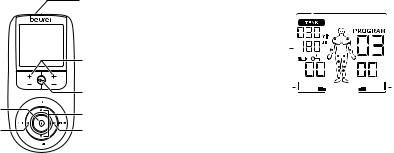
6. Parts and Controls
Buttons:
1ON/OFF button
2ENTER button
3Intensity setting buttons (Ch1 +/- left, Ch2 +/- right)
4Keylock
5Selection button UP and DOWN
6MENU button
7Sockets for electrodes
|
7 |
|
3 |
|
4 |
1 |
5 |
|
|
2 |
6 |
Display (full screen):
1Menu TENS
2Program number
3Impulse intensity channel 2
4Impulse intensity channel 1
5Low battery
6Keylock
7Frequency display (Hz), pulse width (μs) or pause time
8Timer function (remaining time display) or working time
8 |
|
|
|
|
|
|
|
|
|
|
|
|
|
|
1 |
||||||
|
|
|
|
|
|
|
|
|
|
|
|
|
|
||||||||
|
|
|
|
|
|
|
|
|
|
|
|
|
|
|
|
|
|
|
|
|
|
|
|
|
|
|
|
|
|
|
|
|
|
|
|
|
|
|
|
|
|||
7 |
|
|
|
|
|
|
|
|
|
|
|
|
|
|
|
|
|
|
|
2 |
|
6 |
|
|
|
|
|
|
|
|
|
|
|
|
|
|
|||||||
|
|
|
|
|
|
|
|
|
|
|
|
||||||||||
5 |
|
|
|
|
|
|
|
|
|
|
|
|
|
|
|
|
|
|
|
|
|
|
|
|
|
|
|
|
|
|
|
|
|
|
|
|
|
|
|
|
|
||
4 |
|
|
|
|
|
|
|
|
|
|
|
|
|
|
|
|
|
3 |
|||
Button functions
Each time you press a button, the unit beeps to notify you. This beeping cannot be switched off.
ON/OFF
(1)Press briefly to switch the device on.
(2)Press once to interrupt stimulation treatment.
(3)Press and hold to switch off the device (approx. 2 seconds).
9
UP and DOWN
Choice of treatment program, treatment time, frequency, pulse width, operating time, and pause time.
MENU
Return to program selection screen.
ENTER
(1)Menu selection.
(2)Confirmation of a selection made using UP/DOWN, except channel intensity.
Intensity setting buttons (Ch1 +/- left, Ch2 +/- right)
Adjusts impulse intensity.
Keylock
Locks the buttons to avoid them being pressed accidentally.
(1)To activate, press and hold the button until the symbol  is visible in the display (approx. 3 seconds).
(2)To deactivate, press and hold the button until the symbol  disappears from the display (approx. 3 seconds).
7.Electrode Pad Usage
•Do not bend or fold pads. Store pads on the plastic storage sheet when not in use.
•Do not apply ointment or any solvent to the pads or to your skin.
•The pads are pre-gelled and will adhere to your skin.
•Apply the pads only to the skin or to the plastic storage sheet provided.
•Place the pads at least two inches (5 cm) apart on your skin. The pads should never touch each other.
•Always place clean pads in accordance with illustrations provided. Make sure the components are connected properly and the pads are attached to the part of the body you wish to treat.
•Pads should not touch each other when placed onto your skin.
•Do not place on your spine or backbone.
•Pads should not touch any metal object, such as a belt buckle or necklace.
•Pads should not be placed simultaneously on the soles of both feet.
•Pads should not be placed simultaneously on the calves of both legs.
•Do not share pads with another person. This may cause a skin irritation or infection. Pads are intended for use by one person.
•Do not place or relocate the pads while the device is on. Always turn the power off before removing or changing the pad location.
•Do not leave pads attached to the skin after treatment.
•Always pull firmly on electrodes to remove them from the skin to prevent injuries in the unusual case of highly sensitive skin.
•Do not expose the device to direct sunlight or high temperatures.
10
•Protect the device from dust, dirt and humidity. Never immerse the device in water or other liquids.
•The device is suitable for self-treatment.
•If the device does not work properly, or you feel unwell or experience pain, stop using it immediately.
•Do not modify electrodes (e.g. by cutting them). This increases the current intensity, which is potentially hazardous (max. recommended output value for the electrodes is 58.1 mA/sq in (9 mA/cm²), an effective current intensity beyond 12.9 mA/sq in (2 mA/cm²) requires increased awareness).
•Ensure that no metallic objects (e.g. belt buckles or necklaces) come into contact with the electrodes during stimulation. If you are wearing jewellery or have piercings in the area to be treated (e.g. a navel piercing), these must be removed before using the device. Failure to do so could result in spot burns.
•Make sure not to confuse the electrode cables including contacts with your headphones or other devices and do not connect the electrodes to other devices.
•Do not use the device whilst using other devices that transmit electrical impulses into your body.
•Do not use rechargeable batteries and always use the same battery types.
•During the initial few minutes use the device while sitting or lying down to minimise the risk of injuries as a consequence of isolated cases of vagal responses (feeling of faintness). If you feel faint, immediately switch off the device, lie down and support the legs in an elevated position (approx. 5 – 10 min).
11
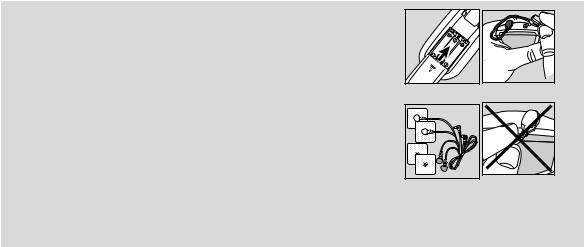
8. Before First Use
1. |
Remove the belt clip from the unit (if attached). |
|
2. |
Remove the battery compartment cover on the rear of the device by sliding it in the |
|
|
direction of the arrow. |
|
3. |
Insert three „AAA“ alkaline batteries in accordance with the polarity markings inside the |
|
|
compartment. |
Fig. 1 |
|
|
|
4. |
Reattach the battery compartment cover. (Fig.1) |
|
5. |
Attach the belt clip, if desired. |
|
6. |
Attach the electrodes to the cables. (Fig.2) |
|
7. |
Insert the plugs of the cables into the sockets on the top of the device. (Fig.3) |
|
|
Do not pull, twist or make sharp bends in the cables. (Fig.4) |
Fig. 2 |
|
|
NOTE:
When the batteries are replaced or removed, all settings are restored to the factory defaults.
Fig. 3
Fig. 4
12

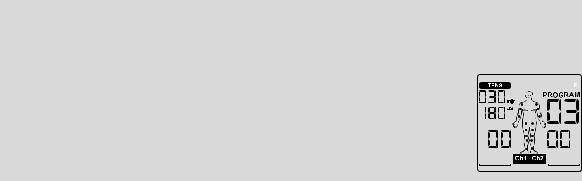
9. Positioning the Electrodes
It is important to position the electrodes properly. Consult your doctor to establish the ideal electrode positions for your intended application area. The figure on the display is intended as an initial aid to help you position the electrodes. Refer to the inside of the cover for more detailed information on how to position the electrodes.
Progr. |
Area of application, |
Phase |
Running |
Possible electrode |
|
Progr. |
Area of application, |
Phase |
Running |
Possible electrode |
no. |
indications |
|
time |
positions |
|
no. |
indications |
|
time |
positions |
|
|
|
(min) |
|
|
|
|
|
(min) |
|
1 |
Pain relief – acute pain |
1 |
30 |
|
|
8 |
Arthritis |
1 |
15 |
|
|
|
|
|
|
|
|
|
2 |
10 |
|
2 |
Pain relief – chronic pain |
1 |
30 |
|
|
|
|
|
|
|
|
(pulse width modulated) |
|
|
|
|
|
|
|
|
|
3 |
Endorphin e•ect (burst) |
1 |
30 |
|
|
|
|
|
|
|
|
|
|
|
1-17, 21, 23-28 |
|
|
|
|
|
12, 13, 25, 28 |
4 |
Chronic pain in the lower |
1 |
30 |
|
|
9 |
Osteoarthritis of the knee |
1 |
30 |
|
|
back |
|
|
|
|
|
joint |
|
|
|
5 |
Pain in the lower back |
1 |
30 |
|
|
|
|
|
|
|
|
|
|
|
10, 11 |
|
|
|
|
|
25 |
6 |
Knee, ankle, joint pain |
1 |
5 |
|
|
10 |
Neck pain |
1 |
30 |
|
|
|
2 |
15 |
|
|
|
|
|
|
|
|
|
|
|
12, 13, 25, 28 |
|
|
|
|
|
1-3 |
7 |
Back pain |
1 |
20 |
|
|
11 |
Menstrual cramps |
1 |
30 |
|
|
|
2 |
20 |
|
|
12 |
Menstrual cramps |
1 |
30 |
|
|
|
|
|
4-11 |
|
|
|
|
|
21 |
13

Ch1 |
|
Ch2 |
|
|
|
|
|
|
|
|
|
|
|
|
|
|
|
|
|
|
|
|
|
|
|
|
|
Ch1 |
Ch2 |
Ch1 |
Ch2 |
Ch1 |
Ch2 |
|
|
|
|
|
|
|
|
|
|
|
|
|
Ch1 |
|
|
|
|
|
|
||
Ch1 |
|
Ch2 |
|
|
|
|
|
Ch1 |
Ch2 |
|
|
|
|
|
Ch1 |
Ch2 |
Ch1 |
Ch2 |
|
Ch1 |
Ch1 |
Ch2 |
|
||||
|
|
|
|
|
|
Ch1 |
|||||||
|
|
|
|
|
|
|
|
|
|
|
|||
|
|
|
|
|
|
|
|
Ch2 |
|
|
|
|
Ch2 |
|
|
|
|
|
|
|
|
Ch2 |
Ch1 |
Ch2 |
Ch1 |
Ch2 |
Ch1 |
|
|
|
|
|
|
|
|
|
Ch2 |
||||
|
|
|
|
|
Ch1 |
Ch2 |
Ch1 |
Ch2 |
|
|
|
|
Ch2 |
|
|
|
|
|
|
|
|
|
Ch1 |
Ch2 |
Ch1 |
||
|
|
|
|
|
|
|
|
|
|
|
|||
Ch1 Ch2 |
|
|
|
|
|
|
|
Ch1 |
Ch12 |
Ch1 |
|
Ch2 |
|
|
Ch1 |
|
|
|
|
|
|
|
|
||||
|
|
|
|
Ch1 |
Ch2 |
|
|
|
|
|
|
|
|
|
|
|
Ch2 |
|
Ch1 Ch12 |
Ch1 |
Ch2 |
|
|
Ch1 Ch2 |
|||
|
Ch2 |
|
|
|
|
|
|
||||||
|
|
|
Ch1 |
|
|
|
|
||||||
Ch1 |
|
|
|
|
|
|
|
|
|
|
|||
|
|
|
|
|
|
|
|
|
|
|
|
|
|
|
|
|
|
Ch2 |
|
|
|
|
|
|
|
|
|
Ch1 |
Ch2 |
Ch2 |
|
|
|
|
|
|
Ch1 |
|
|
|
|
|
|
||
|
|
|
|
|
|
|
||
|
|
|
Ch1 |
|
Ch2 |
|
|
Ch1 Ch2 |
Ch1 |
Ch2 |
Ch2 |
|
|
Ch1 |
Ch2 |
||
|
|
Ch1 |
|
|||||
|
Ch1 |
|
|
|
Ch2 |
|
|
|
|
|
|
|
Ch1 |
Ch2 |
Ch1 |
Ch2 |
Ch1 |
|
|
|
|
Ch1 |
Ch2 |
|
||
|
|
|
|
|
|
Ch2 |
||
|
|
|
|
|
|
|
|
Ch1 |
Ch2 |
Ch2 |
Ch1 |
Ch1 |
Ch2 |
|
|
|
Ch1 |
Ch2 |
Ch1 |
Ch2 |
|
Ch1 |
|
|
|
|
|
|
|
||
|
|
Ch2 |
Ch1 |
Ch2 |
|
|
|
|
|
|
Ch1 Ch2 |
|
|
|
Ch2 |
Ch2 |
|||
|
|
|
|
|
|
|
|||
|
|
|
|
|
|
|
|
||
Ch1 |
Ch2 |
Ch1 Ch2 |
Ch1 |
Ch2 |
Ch2 |
|
Ch2 |
Ch1 Ch1 |
|
|
Ch1 |
Ch1 |
|||||||
|
Ch1 Ch2 |
|
|||||||
14

Distance Between Electrodes:
The larger the distance between electrodes, the larger the stimulated tissue volume. This applies to the area and depth of the tissue volume. At the same time, however, the stimulation intensity of the tissue falls the farther the electrodes are apart. As a result, greater distances between electrodes mean a larger tissue volume is stimulated, but less intensely. Consequently, you must increase the impulse intensity to boost stimulation. Use the following guidelines to select an appropriate electrode distance:
•Sensible distance: 2-6 in (5-15 cm).
•At distances below 2 in (5 cm), the unit stimulates surface structures intensely.
•At distances greater than 6 in (15 cm), large areas and deep structures are stimulated very weakly.
NOTES:
As part of pain relief treatment, position the electrodes of a channel so that the area affected by the pain is between the electrodes or position one electrode directly on the area affected by the pain and the other electrode at least one inch (2 – 3 cm) away.
You may use the electrodes of the second channel to simultaneously treat additional areas affected by pain or use them in conjunction with the electrodes of the first channel to restrict the area affected by pain (position electrodes opposite). In this case, position electrodes as crosses.
Always use all four electrodes for optimum treatment.
Use the electrodes on skin that is clean and has as little hair and oil as possible, in order to extend the life of the electrodes. If required, clean skin with water and remove hair prior to treatment.
If an electrode should come loose during use, the impulse intensity of both channels is reduced to the lowest level. Apply the electrode again and reset the desired intensity level.
WARNING
Exclusively use the electrodes on skin that is clean and preferably free from hair and grease, in order to extend the lifecycle of the electrodes.
Worn electrodes may cause skin irritations as they can no longer ensure an even distribution of current.
We recommend replacing the electrodes after having used them a maximum of 20 times.
If the electrodes partially detach before they have been used 20 times, replace them at an earlier stage. For more information on where to purchase replacement electrodes, see page 8.
15
TENS Program Table
NOTES:
TENS programs 1-12 can’t be customizedsee below.
Electrode positions should surround the area affected by pain. In the event that groups of muscles cause pain, group the electrodes around the affected muscles.
To relieve joint pain, surround the joint with electrodes at the front and back as well as on the left and right of the joint, if possible. The distance between electrodes must be 2 – 6 inches (5 – 15 cm).
Figures 25 and 28 apply to knee and ankle joints.
Burst programs are suitable for all areas of application to be treated with changing signal patterns (to minimize having the area become accustomed to the treatment).
10. To Use
NOTES:
•The device shuts off if it is not in use for two minutes (automatic shutoff). When the unit is switched on again, the LCD screen displays the menu selection and the most recently used menu flashes.
•A short beep sounds when a valid button is pressed. Two short beeps sound when an invalid button is pressed.
•Pause the stimulation at any time by pressing the ON/OFF button. To continue, press the ON/OFF button again and reset the desired impulse intensity.
Procedure for TENS programs 1 – 12:
1.Select a suitable program from the program tables.
2.Place the electrodes on the desired area for treatment. For positioning suggestions, see the „Positioning the Electrodes“ section. Connect the cables to the main unit. The figure on the display is to help you position the electrodes.
3.Select a program.
a.Press the ON/OFF button to switch on the device.
b.Using the UP/DOWN buttons, select the desired program and confirm your selection with the ENTER
button.
4. To return to the previous selection menu, press the MENU button. By holding down the ENTER button, you can skip individual setting steps and start directly with the stimulation treatment.
5. At the start of a session, the impulse intensity of Ch1 and Ch2 is set to 00 by default. No impulses are sent to the electrodes yet. Using the +/- buttons, select the desired impulse intensity (Fig. 3). The impulse intensity of each channel can be set individually.
NOTE: If the program is in a pause phase, the intensity cannot be increased. 6. To end a session early, press the ON/OFF button.
16

Program 13:
Program 13 is a preset program that you can also personalize. In this program, you can set the impulse frequency between 1 and 120 Hz and the impulse width between 50 and 250 μs.
1.Place the electrodes on the desired area for treatment. For positioning suggestions, see the „Positioning the Electrodes“ section. Connect the cables to the main unit. Select Program 13, as described in step 3 in the previous section.
2.Select the desired impulse frequency using the UP/DOWN buttons and press the ENTER button to confirm.
3.Select the desired impulse width using the UP/DOWN buttons and press the ENTER button to confirm.
4.Select the desired treatment time using the UP/DOWN buttons and press the ENTER button to confirm.
5.Select the desired impulse intensity.
Program 14:
Program 14 is a preset burst program that you can also personalize. In this program you can set an impulse width between 50 and 250 μs.
1.Place the electrodes on the desired area for treatment. For positioning suggestions see the „Positioning the Electrodes“ section. Connect the cables to the main unit. Select Program 14.
2.Select the desired impulse width using the UP/DOWN buttons and press the ENTER button to confirm.
3.Select the desired treatment time using the UP/DOWN buttons and press the ENTER button to confirm.
4.Select the desired impulse intensity.
Program 15:
Program 15 is a preset program that you can also personalize. In this program, you can set the impulse frequency between 1 and 120 Hz. The impulse width changes automatically during the stimulation treatment.
1.Place the electrodes on the desired area for treatment. For positioning suggestions see the „Positioning the Electrodes“ section. Connect the cables to the main unit. Select Program 15.
2.Select the desired impulse frequency using the UP/DOWN buttons and press the ENTER button to confirm.
3.Select the desired treatment time using the UP/DOWN buttons and press the ENTER button to confirm.
4.Select the desired impulse intensity.
Custom Function
The Custom Function is a special setting to allow you to access your personal program directly.
Your individual program settings are recalled and activated when the device is switched on.
17

Setting the Custom Function
•Select your program and the corresponding settings as described in chapter 7.
•At the start of treatment, the impulse intensity is set to 00 by default. No impulses are sent to the electrodes yet. Before setting the desired impulse intensity using the intensity setting buttons, press and hold the `CH2-´ button for 5 seconds. Storage in the Custom Function is confirmed by a long beep.
If you switch on the device again, the program you saved using the Custom Function is recalled.
Deleting the Custom Function
To clear the device and gain access to other programs again, press and hold the`CH2-´ button again for approx. 5 seconds. To do this, the impulse intensity must be set to 00. Deletion of the Custom Function is confirmed with a long beep.
11. Care and Maintenance
Adhesive Electrodes:
1.To ensure that the adhesive on the electrodes lasts as long as possible, run the adhesive side under lukewarm water and pat dry with a lint-free cloth. Before cleaning with water, remove the connection cables from the electrodes.
2.Reapply the electrodes to the carrier foil after treatment.
Main Unit:
1.Remove the batteries from the device before cleaning.
2.Clean the device after use with a soft, slightly damp cloth. You can also moisten the cloth with a mild detergent solution. Ensure that no water enters the device.
3.Do not use any chemical or abrasive cleaning agents.
Storage:
1.Remove the batteries from the device if you will not be using it for a prolonged period of time.
2.Do not make sharp bends in the connection cables and electrodes.
3.Disconnect the connection cables from the electrodes.
4.Reapply the electrodes to the carrier foil after use.
5.Store the device and accessories in a cool, well-ventilated space. Never place any heavy objects on the device.
18
12. Troubleshooting Guide
Problem: The device does not switch on. Solutions:
•Ensure batteries have been inserted correctly and are in contact with the terminals.
•Replace batteries, if applicable.
•Contact Customer Service.
Problem: Electrodes do not adhere to the body.
Solutions:
•Clean the adhesive surface of the electrodes using a damp, lint-free cloth. Replace the electrodes if they still do not adhere securely.
•Clean the skin prior to any application; do not use skincare lotions or oils prior to treatment. Shaving may increase the life of electrodes.
Problem: There is no noticeable stimulation.
Solutions:
1.Press the ON/OFF button to pause. Ensure the connection cables are correctly connected to the electrodes and that the electrodes are in firm contact with the treatment area.
2.Ensure the connection plug is firmly connected to the device.
3.Press the ON/OFF button to restart the program.
4.Check electrode positions and ensure that adhesive electrodes do not overlap.
5.Gradually increase the impulse intensity.
• Batteries are weak; replace batteries.
Problem: Unpleasant sensation near the electrodes. Solution:
•The electrodes are not positioned correctly. Check and reposition.
•The electrodes are worn. This may cause irritated skin because of uneven current across the area. Replace the electrodes.
Problem: Skin in the treatment area turns red. Solution:
Immediately stop treatment and wait for the skin color to return to normal. If the redness is directly under the electrode and goes away after a brief time, this is normal and is caused by increased blood flow. Consult your doctor before continuing if the skin irritation persists and is accompanied by an itching sensation or inflammation, as this may be an allergic reaction to the adhesive.
19
13. Specifications
Type: |
EM44 |
Model: |
SEM 44 |
Output wave form: |
Biphasic rectangular pulse |
Pulse length: |
50 – 360 µs |
Pulse frequency: |
1 – 150 Hz |
Max Output Voltage: |
100 Vpp (500 ohm) |
Max Output Current: |
200 mApp (500 ohm) |
Power Supply: |
3 x 1.5 V AAA batteries |
Treatment Time: |
5 – 100 minutes |
Intensity Levels: |
0 – 50 |
Operating Conditions: |
50 °F – 104 °F (10 °C – 40 °C), relative humidity 30 – 85% |
Storage Conditions: |
14 °F – 122 °F (-10 °C – 50 °C), relative humidity 10 – 95% |
Dimensions: |
5.2 x 2.5 x 1.2 in (132 x 63 x 29.5 mm) |
|
including belt clip |
Weight: |
3.5 oz (101 g) including belt clip |
Electrode Pad Size: |
1.8 x 1.8 in (45 x 45 mm) |
Battery Life: |
About 15 hours |
14. FCC Statement
Changes or modifications to the product not expressly approved by the party responsible for compliance could void the user’s authority to
operate the equipment.
NOTE: This equipment has been tested and found to comply with the limits for a Class B digital device, pursuant to Part 15 of the FCC Rules. These limits are designed to provide reasonable protection against harmful interference in a residential installation. This equipment generates, uses and can radiate radio frequency energy and, if not installed and used in accordance with the instructions, may cause harmful interference to radio communications. However, there is no guarantee that interference will not occur in a particular installation. If this equipment does cause harmful interference to radio or television reception, which can be determined by turning the equipment off and on, the user is encouraged to try to correct the interference by one or more of the following measures:
•Reorient or relocate the receiving antenna.
•Increase the separation between the equipment and receiver.
•Connect the equipment into an outlet on a circuit different from that to which the receiver is connected.
•Consult the dealer or an experienced radio/TV technician for help.
Subject to error and change
20
 Loading...