


P735
Quick Start Guide

Package contents
Check your P735 package for the following items:
PASUS P735 device
PBattery
PAC Adapter
PMini-USB cable
PHeadset
PStylus
PProtection case
PGetting Started CD
PUser Manual
PQuick Start Guide
PWarranty Card
NOTE:
If any of the above items is damaged or missing, contact your retailer.
CAUTION:
•To reduce risk of fire, use only correct battery type. Refer to “Installing the SIM card and battery” section for details.
•Do not attempt to disassemble the battery pack.
•Dispose of used batteries properly. Inquire from local authorities for proper disposal of battery.

Getting to know your P735
Layout
3 |
1 |
2 |
20 |
|
Top features
7 |
8 |
9 |
4
5
10
12 |
|
16 |
6 |
|
|
11 |
15 |
18 |
13 |
|
17 |
Left side features |
14 |
|
|
|
Front features

 22 24
22 24 19 21
19 21
25 
 23
23
Rear features |
|
Right side features |
26 |
27 |
28 |
|
|
Bottom features

Device components description
No. |
Item |
Description |
1 |
MiniSD slot |
Allows you to insert a MiniSD storage card. |
2 |
Power button |
Press to turn the power ON or to set suspend mode or to wake |
|
|
device from sleep mode. |
|
|
Press and hold to turn the power OFF. |
3 |
Stylus |
Use the stylus to write, draw, or select items on the touch screen. |
4 |
Camera/Shutter button |
Press to launch the camera. In camera mode, half-press to auto- |
|
|
focus then full-press to take a picture. In video mode, |
|
|
full-press to start recording video and press again to stop. |
5 |
Volume controller |
Press the arrow buttons to adjust the volume. |
6 |
Reset button |
Using the stylus, press reset button to soft-reset your device. |
7 |
Notification LED |
This multi-color LED notifies the following: |
|
|
• Green - Phone fully charged. |
|
|
• Flashing green - Network detected. |
|
|
• Red - Phone is charging. |
|
|
• Flashing red - Event notification. |
|
|
• Flashing blue - Bluetooth® or WLAN(IEEE 802.11b/g) ON. |
8 |
Earpiece receiver |
Allows you to listen to incoming/outgoing calls. |
9 |
Sub camera lens |
This sub camera is for the video conference. |
10 |
LCD touch screen |
This 2.8-inch, 65536-color, 240 x 320-resolution, touchscreen TFT |
|
|
LCD allows you to write, draw, or make selections using the stylus. |
11 |
Call key |
Press to receive an incoming call or make a call. |
12 |
Left Soft key |
Performs the command indicated above the button. |
13 |
Video call button |
Press to make video calls. |

Device components description
No. |
Item |
Description |
|
14 |
Navigation buttons |
Use to move through menus. Press the center to run an application or |
|
|
|
|
in camera mode, press to take a picture. |
15 |
Action button |
Press to carry out the task of selected item. |
|
16 |
Right Soft key |
Performs the task indicated above the button. |
|
17 |
Mode/Task switcher button |
Allows you to switch applications and tasks. |
|
|
|
|
Press and hold this button to turn on/off the flashlight. |
18 |
End key |
Press to end a call or GPRS Connection. |
|
19 |
Camera flashlight |
Allows you to capture images in a dim environment. |
|
|
|
|
Press and hold the mode switcher button to turn this flashlight on/off. |
|
|
|
It works on today screen only. |
20 |
Self-Portrait Mirror |
Position your device until this mirror reflects the image you want to capture. |
|
21 |
Camera lens |
This 2-megapixel camera comes with Auto-Focus (AF) lens and flash |
|
|
|
|
light features. |
22 |
Speaker |
Allows you to listen audio media and phone calls. |
|
23 |
Battery compartment |
Contains the battery that supplies power to the device. |
|
24 |
Voice Commander/record |
Press to launch the voice commander. |
|
|
|
button |
Press and hold to launch the record application to record voice. |
25 |
Hold button |
Slide to enable or disable all keys including the LCD touch screen. |
|
26 |
Earphone port |
Plug headset accessory to this port. |
|
27 |
Mini-USB connector |
Use this connector to synchronize your data or to charge the battery. |
|
28 |
Mic |
Used to make or receive phone calls, record sounds, record voice, or |
|
|
|
|
say voice commands. |
NOTE: The Voice Command utility is supported in selected languages only.

Getting your device ready
Before you can start using your device, you need to install a Subscriber Identity Mode (SIM) card and a charged battery. A SIM card contains your phone number, subscriber details, phone book, and additional phone memory.
Installing the SIM card and battery
1. Remove the battery compartment cover then remove battery.
3.Insert the SIM card with its gold contacts facing down and the notched corner oriented to the upper left corner of the slot.
4.Replace the battery into the compartment with its copper contacts aligned to the copper conductor on the device.
5.Replace battery compartment cover.
CAUTION:
Use only an ASUS qualified battery for this device.
Charging the battery
The bundled battery pack is shipped partially charged. Make sure to charge the battery at least four hours before using it for the first time.
To charge the battery:
1.Connect the AC adapter plug to the
mini-USB connector at the bottom of the device.
2.Connect the AC power plug to a grounded wall socket or power strip. The LED indicator turns red while the phone is charging.
Powering your device
After charging the battery, you are now ready to use your device.
To power on your device:
1.Press and hold the power button to turn ON the device.
2.Follow the succeeding screen instructions to setup your Windows Mobile-based device.
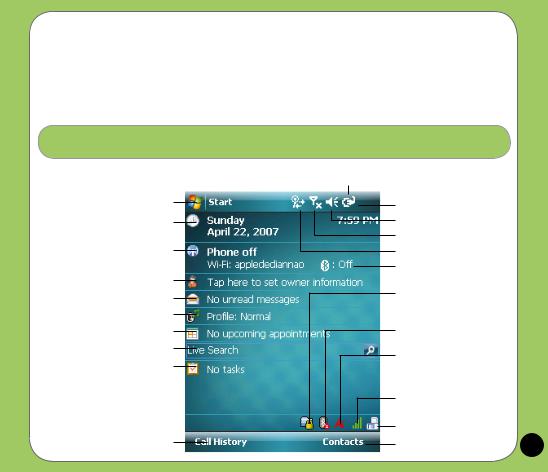
The Today screen
The Today screen displays information useful to you.
Status bar
Tap to open the Start menu
Tap to setup date, time, and alarm.
Displays the current network provider and connection status
Tap to set user information
Tap to open messages
Tap to setup profile
Tap to read or make appointments
Tap to launch live search
Tap to setup tasks
Tap to display call history
Indicates the battery status Tap to adjust volume
Displays the signal status
Tap to view connectivity status
Displays the Bluetooth® connection status
Tap to lock, unlock, or change
My Secrets settings
(Appears only when My Secrets is enabled.)
Tap to change Bluetooth settings
Tap to display system CPU, USB setting, LCD brightness, battery, memory, and MiniSD status
Tap to change WLAN
(IEEE 802.11b) settings
(Appears only when WiFi is turned on and connected to the Internet.)
Tap to change screen orientation
Tap to launch Contacts list
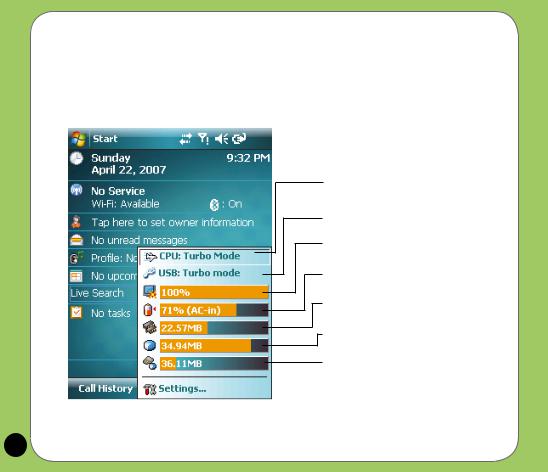
ASUS Status icon
The ASUS status icon allows you to easily check and see the current status of the following device components: CPU, USB, LCD Brightness, battery power, Memory, MiniSD card, and device storage.
To check the status of these components, tap the ASUS Status icon  on the Today screen.
CPU: Allows you to set the CPU mode. Set to Automatic Mode to automatically change the CPU speed according to the CPU loading.
USB: Allows you to set the USB connection mode.
Brightness: Tap to adjust the LCD brightness on battery power or external power.
Power: Displays the remaining battery power and allows you to set advanced power saving features.
Memory: Displays the total, currently used, and remaining memory available.
Storage memory: Displays the total, used, and remaining storage memory.
Storage: Tap to display the contents of the storage card installed. ( Appears only when a MiniSD card is inserted in the
device)
 Settings: Allows you to select the items to display in this ASUS Status pop-up menu.
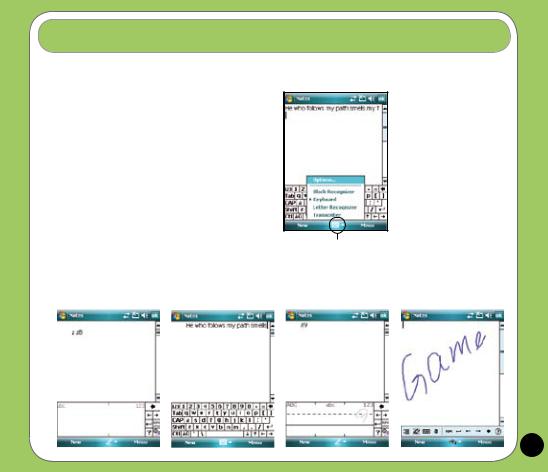
Entering information
Using the Input panel
The Input Panel allows you to select various input methods available on your device including: Block Recognizer, Keyboard, Letter Recognizer, and Transcriber.
Tap the Input panel icon to display shortcut menu and select input method.
Input panel icon
Input panel methods
Block Recognizer |
Keyboard |
|
Letter Recognizer |
|
Transcriber |
|
|
|
|
|
|
|
|
|
|
|
|
|
|
|
 Loading...