


FB 52 AUS

FB 52 AUS
FB 52 IX AUS
Multifunction Oven
Instructions for installation and use
2
Congratulations on choosing an Ariston appliance, which you will find is dependable and easy to use. We recommend
G
A
F
H
that you read the instructions in this owner’ s manual carefully before use f or the best performance and to extend the lif e
of your appliance, as it will provide you with all the instructions you require to ensure its safe installation, use and
maintenance. Always k eep this owner’ s manual close to hand since you ma y need to refer to it in the future. Thank you.
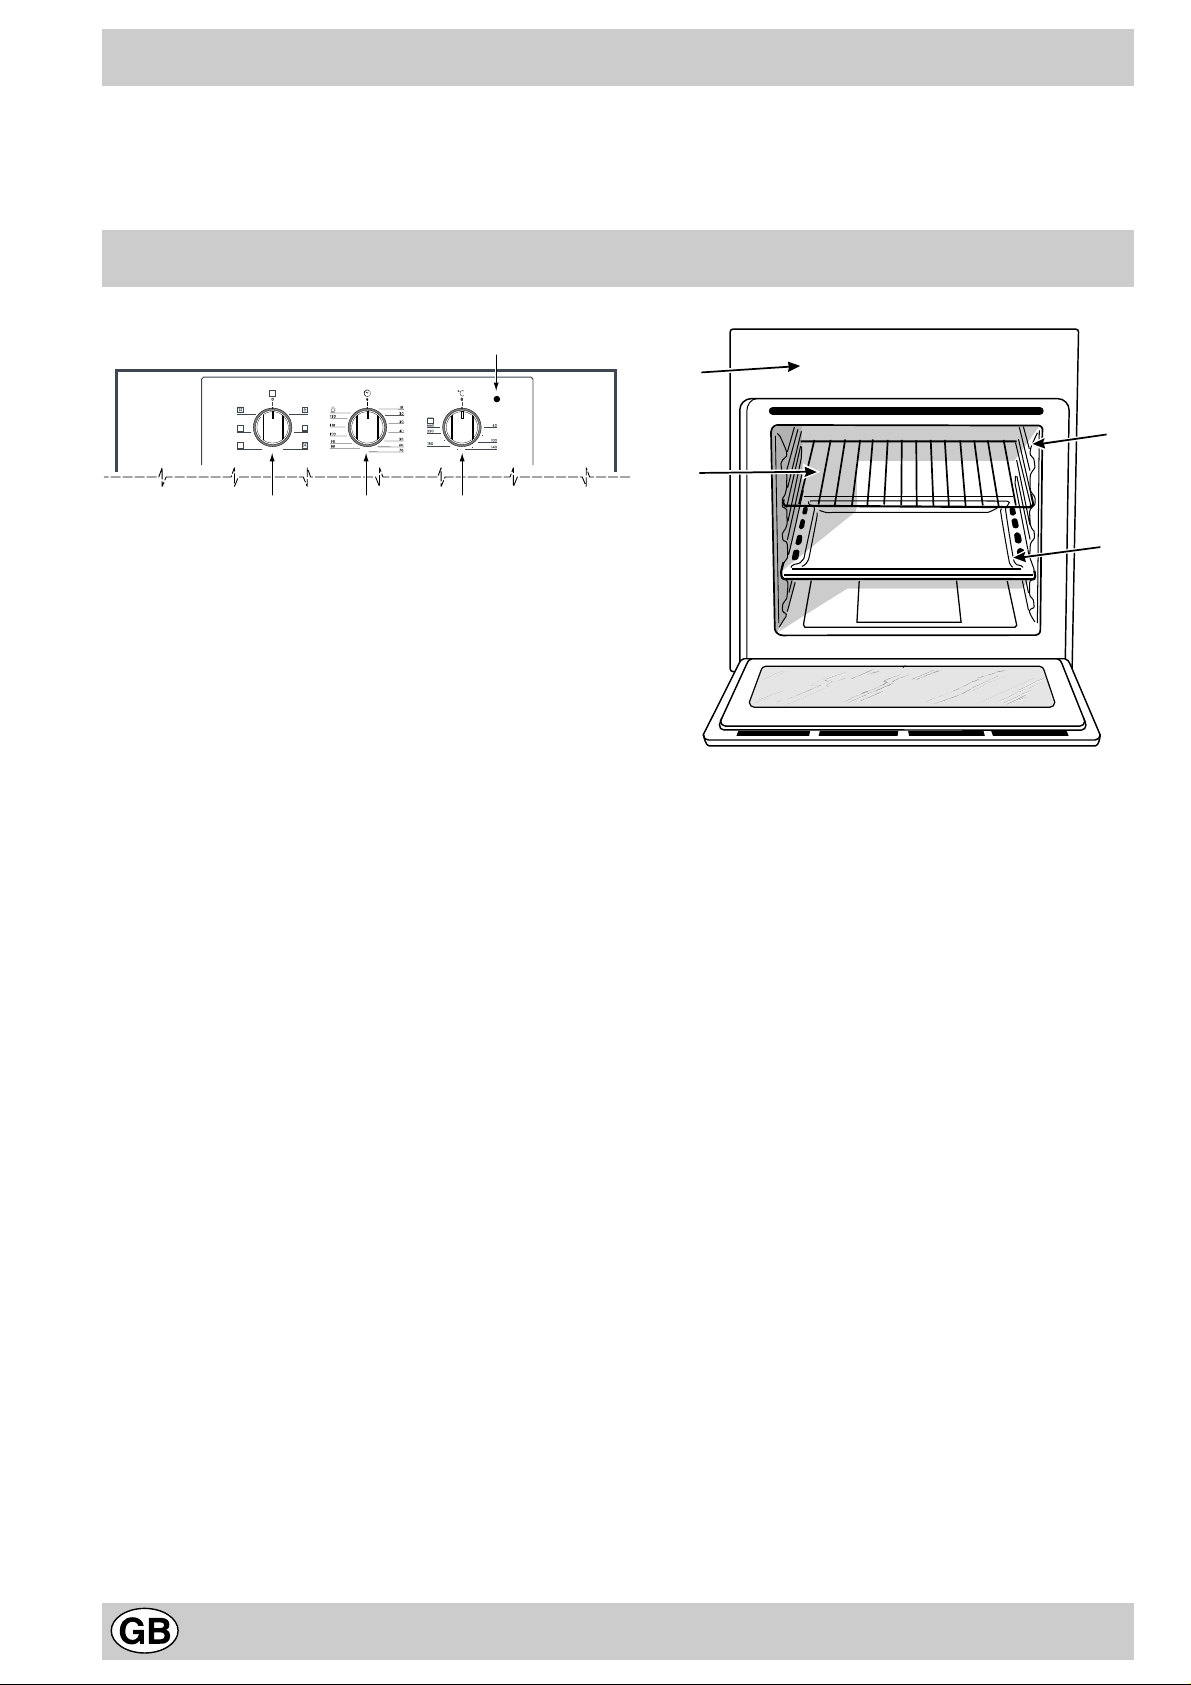
Close-up view
E
B
A. Control Panel
B. Cooking mode selection knob
C. Cooking temperature selection knob
E. Oven indicator light (only available on certain models)
- When lit, it indicates the ovens is heating up to the
temperature set.
I
C
F. Dripping Pan or Baking Sheet
G. Oven Rack
H. Guides for sliding the racks or dripping pan in and
out
I. End Cooking Time Knob (only available on cer tain
models)
2

How to use your oven
This multi-function oven combines the adv antages of traditional convection ov ens with those of the more modern
fan assisted models in a single appliance.
It is an extremely versatile appliance that allows you to
choose easily and safely between 5 different cooking
modes. The various features offered by the oven are selected by means of selector knob “B” and thermostat “C”
situated on the control panel.
Notice: The first time y ou use your appliance, we recommend that you set the thermostat to the highest setting
and leave the ov en on f or about half an hour with nothing
in it, with the oven door shut. Then, open the oven door
and let the room air. The odour that is often detected during this initial use is due to the evaporation of substances
used to protect the oven during storage and until it is installed.
Notice: Place the dripping pan provided on the bottom
shelf of the oven to prev ent any sauce and/or grease from
dripping onto the bottom of the oven only when grilling
food or when using the rotisserie (only available on certain models). F or all other types of cooking, ne ver use the
bottom shelf and never place anything on the bottom of
the oven when it is in operation because this could damage the enamel. Alw ays place your cookware (dishes , aluminium foil, etc. etc.) on the grid provided with the appliance inserted especially along the oven guides
Notice: to use the oven in manual mode (not using the
end cooking time programmer), the 9 symbol must be
aligned with the reference mark on the control panel.
Convection Mode a
Position of thermostat knob “C”: betw een 60°C and Max.
On this setting, the top and bottom heating elements come
on. This is the classic, traditional type of oven which has
been perfected, with exceptional heat distrib ution and reduced energy consumption. The convection oven is still
unequalled when it comes to cooking dishes made up of
several ingredients , e.g. cabbage with ribs, Spanish style
cod, Ancona style stockfish, tender veal strips with rice,
etc. Excellent results are achieved when preparing veal
or beef-based dishes as well (braised meats, stew, goulash, wild game, ham etc.) which need to cook slowly and
require basting or the addition of liquid. It nonetheless remains the best system for baking cakes as well as fruit
and cooking using covered casserole dishes for o ven baking. When cooking in conv ection mode, only use one dripping pan or cooking rack at a time, otherwise the heat
distribution will be unev en. Using the diff erent rack heights
available, you can balance the amount of heat between
the top and the bottom of the oven. Select from among
the various rack heights based on whether the dish needs
more or less heat from the top.
Fan Assisted Mode b
Position of thermostat knob “ C”: Between 60°C and Max.
The heating elements, as well as the fan, will come on.
Since the heat remains constant and uniform throughout
the oven, the air cooks and browns f ood uniformly over its
entire surface. With this mode , you can also cook v arious
dishes at the same time, as long as their respective cooking temperatures are the same. A maximum of 2 racks
can be used at the same time, following the instructions in
the section entitled: “Cooking On More Than One Rack”.
This fan assisted mode is particularly recommended for
dishes requiring a gratin finish or for those requiring considerably prolonged cooking times, such as f or example:
lasagne, pasta bakes, roast chic ken and potatoes, etc…
Moreover, the excellent heat distribution makes it possible to use lower temperatures when cooking roasts . This
results in less loss of juices, meat which is more tender
and a decrease in the loss of weight for the roast. The f an
assisted mode is especially suited for cooking fish, which
can be prepared with the addition of a limited amount of
condiments, thus maintaining their flavour and appearance.
Desserts: the fan assisted mode is also perf ect for baking
leavened cak es.
Moreover, this mode can also be used to thaw quickly
white or red meat and bread by setting the temperature to
80 °C. To thaw more delicate foods, set the thermostat to
60°C or use only the cold air circulation feature by setting
the thermostat to 0°C.
“Top” oven c
Position of thermostat knob “C”: Betw een 60°C and Max.
The top heating element comes on.
This mode can be used to brown food at the end of cooking.
Grill d
Position of thermostat knob “C”: Max
The top central heating element comes on.
The extremely high and direct temperature of the grill
makes it possible to brown the surf ace of meats and roasts
while locking in the juices to keep them tender . The grill is
also highly recommended for dishes that require a high
temperature on the surface: beef steaks, veal, rib steak,
filets, hamburgers etc...
Some grilling examples are included in the “Practical Cooking Advice” paragraph.
Fan Assisted Grill e
Position of thermostat knob “C”: between 60°C and 200°C .
The top central heating element and the fan come on. This
combination of features increases the effectiv eness of the
unidirectional thermal radiation of the heating elements
through forced circulation of the air throughout the ov en.
This helps prevent food from burning on the surface, allowing the heat to penetrate right into the food. Excellent
results are achieved with kebabs made with meats and
vegetables, sausages , ribs, lamb chops, chicken in a spicy
sauce, quail, pork chops, etc.
This mode is also ideal for cooking fish steaks, lik e swordfish, tuna, grouper , stuff ed cuttlefish etc.
End Cooking Time Knob (I) (only available on certain
models)
Some models are equipped with a timer program to control
when the oven shuts off during cooking. To use this feature ,
you must wind the “I” knob one full turn in the clockwise
direction 4 ; Then, turn the knob in the counter-clockwise
direction 5, to set the time by matching up the indicator
3

on the control panel with the number of minutes on the
knob.
At the end of the programmed length of time, the timer will
sound and automatically turn off the oven.
Attention: to use the oven in manual mode without the
cooking control timer, match the indicator on the control
panel with the 9 symbol on the timer knob .
When the oven is not in use, the cooking control timer can
be used like a normal timer.
The oven light
Set knob “B” to the 8 symbol to turn it on. It lights the
oven and sta ys on when any of the electrical heating elements in the oven come on.
Cooling ventilation
In order to cool down the exterior of the appliance, some
models are equipped with a cooling fan which comes on
automatically when the oven is hot.
When the fan is on, a normal flow of air can be heard
exiting between the oven door and the control panel.
Note: When cooking is done, the fan stays on until
the oven cools down sufficiently.
4
 Loading...