


C |
EHC*
2013CC*
2013CC*Ts*
(EN) INSTRUCTION MANUAL.................................... |
2 |
(NL) GEBRUIKERSHANDLEIDING............................... |
40 |
IOAK-2559 / 8054722
(05.2016 / v1)

DEAR CUSTOMER,
The cooker is exceptionally easy to use and extremely efficient. After reading the instruction manual, operating the cooker will be easy.
Before being packaged and leaving the manufacturer, the cooker was thoroughly checked with regard to safety and functionality.
Before using the appliance, please read the instruction manual carefully.
By following these instructions carefully you will be able to avoid any problems in using the appliance.
It is important to keep the instruction manual and store it in a safe place so that it can be consulted at any time.
It is necessary to follow the instructions in the manual carefully in order to avoid possible accidents.
Caution!
Do not use the cooker until you have read this instruction manual.
The cooker is intended for household use only.
The manufacturer reserves the right to introduce changes which do not affect the operation of the appliance.
2

TABLE OF CONTENTS |
|
Safety instructions.............................................................................................................. |
4 |
Description of the appliance.............................................................................................. |
9 |
Installation......................................................................................................................... |
14 |
Operation........................................................................................................................... |
20 |
Baking in the oven – practical hints................................................................................ |
30 |
Cleaning and maintenance............................................................................................... |
33 |
Technical data................................................................................................................... |
39 |
3

SAFETY INSTRUCTIONS
Warning: The appliance and its accessible parts become hot during use. Care should be taken to avoid touching heating elements. Children less than 8 years of age shall be kept away unless continuously supervised.
This appliance can be used by children aged from 8 years and above and persons with reduced physical, sensory or mental capabilities or lack of experience and knowledge if they have been given supervision or instruction concerning use of the appliance in a safe way and understand the hazards involved. Children shall not play with the appliance. Cleaning and user maintenance shall not be made by children without supervision.
Warning: Unattended cooking on a hob with fat or oil can be dangerous and may result in fire.
NEVER try to extinguish a fire with water, but switch off the appliance and then cover flame e.g. with a lid or a fire blanket.
Warning: Danger of fire: do not store items on the cooking surfaces.
Warning: If the surface is cracked, switch off the appliance to avoid the possibillity of electric shock.
During use the appliance becomes hot. Care should be taken to avoid touching heating elements inside the oven.
Accessible parts may become hot during use. Young children should be kept away.
4

SAFETY INSTRUCTIONS
Warning: Do not use harsh abrasive cleaners or sharp metal scrapers to clean the oven door glass since they can scratch the surface, which may result in shattering of the glass.
Warning: Ensure that the appliance is switched off before replacing the lamp to avoid the possibillity of electric shock.
You should not use steam cleaning devices to clean the appliance.
Danger of burns! Hot steam may escape when you open the oven door. Be careful when you open the oven door during or after cooking. Do NOT lean over the door when you open it. Please note that depending on the temperature the steam can be invisible.
5

SAFETY INSTRUCTIONS
●Always keep children away from the cooker.
While in operation direct contact with the cooker may cause burns!
●Ensure that small items of household equipment, including connection leads, do not touch the hot oven or the hob as the insulation material of this equipment is usually not resistant to high temperatures.
●Do not leave the cooker unattended when frying. Oils and fats may catch fire due to overheating or boiling over.
●Do not allow the hob to get soiled and prevent liquids from boiling over onto the surface of the hob. This refers in particular to sugar which can react with the ceramic hob and cause irreversible damage. Any spillages should be cleaned up as they happen.
●Do not place pans with a wet bottom on the warmed up heating zones as this can cause irreversible changes to the hob (irremovable stains).
●Use pans that are specified by the manufacturer as designed for use with a ceramic hob.
●If any defects, deep scratches, cracks or chips appear on the ceramic hob, stop using the cooker immediately and contact the service centre.
●Do not switch on the hob until a pan has been placed on it.
●Do not use pans with sharp edges that may cause damage to the ceramic hob.
●Do not look directly at the halogen heating zones (not covered by a pan) when they are warming up.
●Do not put pans weighing over 15 kg on the opened door of the oven and pans over 25 kg on the hob.
●Do not use harsh cleaning agents or sharp metal objects to clean the door as they can scratch the surface, which could then result in the glass cracking.
●Do not use the cooker in the event of a technical fault. Any faults must be fixed by an appropriately qualified and authorised person.
●In the event of any incident caused by a technical fault, disconnect the power and report the fault to the service centre to be repaired.
●Unlessproperlysupervisedbycaretakersoruponthoroughstudiesoftheoperatingmanual, the appliance must not be operated by persons (including children) of limited physical or psychical abilities, these of limited technical expertise, or unfamiliar with the equipment.
●Never allow children to remain unattended near the cooktop nor to play with the control panel.
The appliance has been designed only for cooking. Any other use (for example for heating) does not comply with its operating profile and may cause danger.
6

HOW TO SAVE ENERGY
Using energy in a responsible way not only saves money but also helps the environment. So let’s save energy! And this is how you can do it:
Use proper pans for cooking.
Pans with thick, flat bases can save up to 1/3 on electric energy. Remember to cover pans if possible otherwise you will use four times as much energy!
Match the size of the saucepan to the surface of the heating zone.
A saucepan should never be smaller than a heating zone.
Ensure heating zones and pan bases are clean.
Soils can prevent heat transfer – and repeatedly burnt–on spillages can often only be removed by products which cause damage to the environment.
Do not uncover the pan too often (a watched pot never boils!).
Do not open the oven door unnecessarily often.
Switch off the oven in good time and make use of residual heat.
For long cooking times, switch off heating zones 5 to 10 minutes before finishing cooking. This saves up to 20% on energy.
Only use the oven when cooking larger dishes.
Meat of up to 1 kg can be prepared more economically in a pan on the cooker hob.
Make use of residual heat from the oven.
If the cooking time is greater than 40 minutes switch off the oven 10 minutes before the end time.
Important! When using the timer, set appropriately shorter cooking times according to the dish being prepared.
Only grill with the ultrafan after closing the oven door.
Make sure the oven door is properly closed.
Heat can leak through spillages on the door seals. Clean up any spillages immediately.
Do not install the cooker in the direct vicinity of refrigerators/freezers.
Otherwise energy consumption increases unnecessarily.
7
UNPACKING |
|
DISPOSAL OF THE APPLIANCE |
|
|
|
|
|
|
During transportation, protective packaging was used to protect the appliance against any damage. After unpacking, please dispose of all elements of packaging in a way that will not cause dam-
age to the environment.
All materials used for packaging the appliance are environmentally friendly; they are 100% recyclable and are marked with the appropriate symbol.
Caution! During unpacking, the packaging materials (polythene bags, polystyrene pieces, etc.) should be kept out of reach of children.
Old appliances should not sim-
ply be disposed of with normal household waste, but should be delivered to a collection and recycling centre for electric and

 electronic equipment. A symbol shown on the product, the instruction manual or the packaging shows that
it is suitable for recycling.
Materials used inside the appliance are recyclable and are labelled with information concerning this. By recycling materials or other parts from used devices you are making a significant contribution to the protection of our environment.
Information on appropriate disposal centres for used devices can be provided by your local authority.
8

DESCRIPTION OF THE APPLIANCE
10
7
3, 4
1
11
8
OC |
5, 6 |
MENU |
2
9
1 Temperature control knob |
|
|
|
2 Oven function selection knob |
|
|
|
3, 4, 5, 6 Heating zone control knobs |
|
8888 |
|
9 |
Oven door handle |
|
|
7 |
Temperatureregulatorsignal light red |
|
|
8 |
Cooker operation signal light yellow |
A |
|
10 Ceramic hob |
|
|
|
11 Electronic programmer* |
|
|
|
|
Control button „-” |
|
Control button”+” |
|
|
|
Menu button |
*optional |
|
|
|
9

DESCRIPTION OF THE APPLIANCE
10
7
3, 4
1
8
OC
5, 6
2
9
1 Temperature control knob
2 Oven function selection knob
3, 4, 5, 6 Heating zone control knobs 7 Temperatureregulatorsignal light red 8 Cooker operation signal light yellow 9 Oven door handle
10 Ceramic hob
10
DESCRIPTION OF THE APPLIANCE
10
7
3, 4
1
8
OC
5, 6
2
9
1 Temperature control knob
2 Oven function selection knob
3, 4, 5, 6 Heating zone control knobs 7 Temperatureregulatorsignal light red 8 Cooker operation signal light yellow 9 Oven door handle
10 Ceramic hob
11
DESCRIPTION OF THE APPLIANCE
Ceramic hob |
|
4a |
5a |
3a |
6a |
Zone heating indicator
4a |
5a |
3a |
6a |
3a |
Ø 18 cm |
4a |
Ø 14,5 cm |
5a |
Ø 21 cm |
6a |
Ø 14,5 cm |
3a Ø 18 / Ø 12 cm
4a Ø 14 x 25 cm
5a Ø 18 cm
6a Ø 14,5 cm
12

SPECIFICATIONS OF THE APPLIANCE
Cooker fittings:
Baking tray* |
Grill grate |
|
(drying rack) |
||
|
Roasting tray*
Sideracks
*optional
13

INSTALLATION
 Making the worktop recess
●The kitchen area should be dry and aired and equipped with efficient ventillation. When installing the cooker, easy access to all control elements should be ensured.
This is a Y–type design built–in cooker, which means that its back wall and one side wall can be placed next to a high piece of furniture or a wall.
●Worktop thickness should be 28 - 40 mm, while its width at least 600 mm. The worktop must be flat and level. Edge of the worktop near the wall must be sealed to prevent ingress of water or other liquids.
●There should be sufficient spacing around the opening, in particular, at least 50 mm distance to the wall and 60 mm distance to the front edge of worktop.
●Worktop must be made of materials, including veneer and adhesives, resistant to a temperature of 100°C. Otherwise, veneer could come off or surface of the worktop become deformed.
●Edge of the opening should be sealed with suitable materials to prevent ingress of water.
●Worktop opening must cut to dimensions as shown on figure
1 |
min |
|
560
50
490
min 60
14

INSTALLATION
 Installing the hob in worktop opening
●Use four “A” brackets for 38 mm thick worktops. Fit the hob into worktop opening as shown on figure 2 and 3. To properly secure hob in 28 mm thick worktop, use four 15x15x50 mm wooden blocks in addition to “A” brackets. Fit the hob into worktop opening as shown on figure 4 and 5.
●Check if adhesive seal is properly applied to the hob's flange.
●Loosely attach fixing brackets to the bottom of the hob
●Remove dust from the worktop, insert hob into the opening and press in firmly,
●Position fixing brackets perpendicularly to the hob's edge and tighten firmly.
2
3
min 50
490
min 60
54
1 - worktop
2 - screw
3 - fixing bracket
4 - hob
5 - seal
1 |
2 |
3 |
560
320
466
15

INSTALLATION
 Installing the hob in worktop opening
5 4
4
15 |
15 |
|
1 - worktop
2 - screw
3 - fixing bracket
4 - hob
5 - seal
6 - wooden block
1 |
6 |
2 |
3 |
|
560 |
|
|
min 50 |
|
|
|
|
270 |
|
50 |
5 |
|
|
|
490 |
|
|
|
min 60 |
416 |
|
50 |
|
|
|
16

INSTALLATION
 Assembly of the oven:
Make an opening with the dimensions given in the diagram for the oven to be fitted.(Fig.A)
Make sure the mains plug is disconnected and then connect the oven to the mains supply.
Partially insert the oven into the prepared opening and connect the oven to the hob. (Fig.B)
The appliance must be earthed. Connect the earth lead of the hob (yellow–green) with the earth terminal of the oven (marked  ) which is located near the connection box
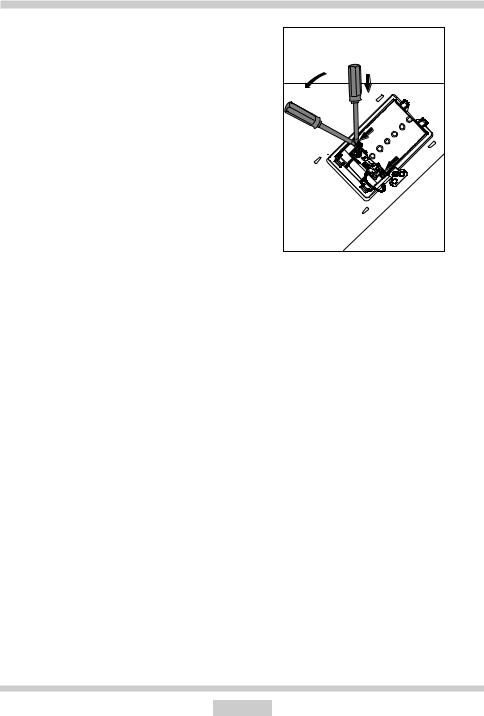
Insert the oven completely into the opening without allowing the four screws in the places shown in the diagram to fall out. (Fig.C)
Fig. B
Fig. A
Fig. C
17
INSTALLATION
Electrical connection
Warning!
All electrical work should be carried out by a suitably qualified and authorised electrician.
No alterations or wilful changes in the electricity supply should be carried out.
Fitting guidelines
The cooker is manufactured to work with three–phase alternating current (400V 3N~50Hz). The voltage rating of the cooker heating elements is 230V. Adapting the cooker to operate with one-phase current is possible by apropriate bridging in the connection box according to the connection diagram below. The connection diagram is also found on the cover of the connection box. Remember that the connection wire should match the connection type and the power rating of the cooker.
The connection cable must be secured in a strain–relief clamp.
Warning!
Remember to connect the safety circuit to the
connection box terminal marked with  . The electricity supply for the cooker must have a safety switch which enables the power to be cut off in case of emergency. The distance between the working contacts of the safety switch must be at least 3 mm.
Before connecting the cooker to the power supply it is important to read the information on the data plate and the connection diagram.
2 |
1 |
|
18
INSTALLATION
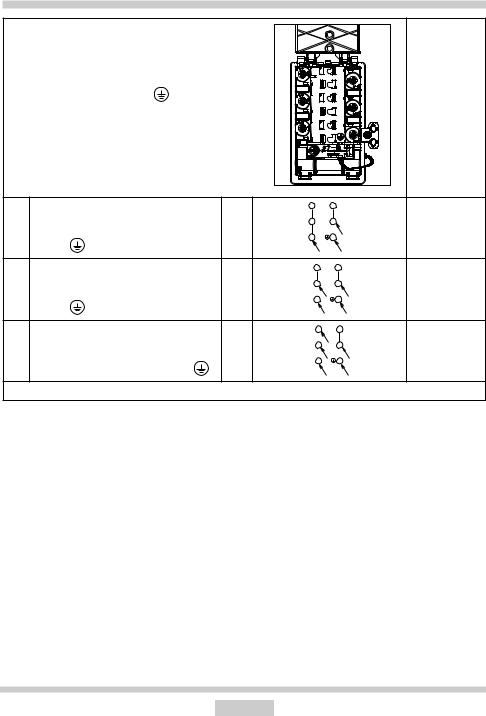
CONNECTION DIAGRAM
Caution! Voltage of heating elements 230V
Caution! In the event of any connection the safety |
Recommen- |
|
wire must be connected to the |
PE terminal |
ded |
|
|
type |
|
|
of connection |
|
|
lead |
1 For 230 V earthed one–phase |
3 |
4 |
|
|
|
|
|
||
connection, bridges connect 1–2–3 |
2 |
5 |
H05VV-F3G4 |
|
terminals and 4–5 terminals, safety |
|
|
||
1 |
|
N |
||
|
. |
|
|
|
wire to |
L1 |
|
PE |
|
2 For 400/230 V earthed two–phase |
3 |
4 |
|
|
connection, bridges connect 2–3 ter- |
2 |
5 |
H05VV-F4G2,5 |
|
minals and 4–5 terminals, the safety |
|
|
||
1 |
L2 |
N |
||
|
. |
|
||
wire to |
|
L1 |
PE |
|
3 For 400/230V earthed three–phase |
3 |
4 |
|
|
|
|
|
||
connection, bridges connect 4–5 ter- |
2 |
L3 5 |
H05VV-F5G1,5 |
|
minals, phases in succession 1,2 and |
L2 |
N |
||
|
|
1 |
|
|
3, earth to 4–5, the safety wire to |
. |
L1 |
PE |
|
L1=R, L2=S, L3=T, N=earth terminal, PE= safety wire terminal
19

OPERATION
Before first use
Remove packaging, clean the interior of the oven and the hob.
Take out and wash the oven fittings with warm water and a little washing–up liquid.
Switch on the ventillation in the room or open a window.
Heat the oven (to a temperature of 250°C, for approx. 30 min.), remove any stains and wash carefully; the heating zones of the hob should be heated for around 4 min. without a pan.
Important!
To clean the oven, only use a cloth well rang out with warm water to which a little washing-up liquid has been added.
Important!
In ovens equippedwith the electronic programmer Ts, the time “12.00” will start flashing in the display field upon connection to the power supply.
The programmer should be set with the current time. (See Electronic programmer ). If the current time is not set operation of the oven is impossible.
TheelectronicprgrammerTsisequipped with electronic sensors which are switched on by touching or pressing the sensor surface for at least one second.
Each sensor reaction is confirmed by the beep.Keep the sensor surface clean at all times.
20
OPERATION
 Controlling the heating zones of the ceramic hob.
Choice of cookware
Choose a pan with a diameter that is at least as large as the heating zone. For roasting tins there is a special widened heating zone of 140x250. Do not use pans with a concave or convex base. Always remember to put a proper cover on the pan. We recommend the use of pans with thick, even bases.
If the heating zones and pans are solied it is impossible to make full use of the heat.
WRONG |
|
WRONG |
|
RIGHT |
|
WRONG |
|
WRONG |
|
|
|
|
|
|
|
|
|
|
|
|
|
|
|
|
|
|
Heat level selection
The heating zones have different levels of heat. The level of heat can be adjusted gradually by turning the appropriate knob to the right or left.
0 Switch off
•MIN. Warming up
1 Stewing vegetables, slow cooking
•Cooking soups, larger dishes
2 Slow frying
•Grilling meat, fish
3 MAX. Fast heating up, fast cooking, frying
0
3
1
2
0
3
1
2
21

OPERATION
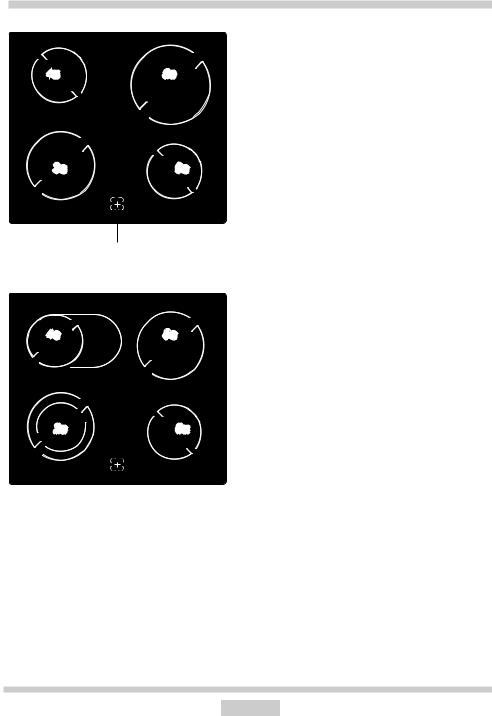
Switching on the wider heating zone
Important!
Only switch on a heating zone by turning the knob clockwise. Turning the knob in the opposite direction can cause damage to the switch.
0
3 
1
2
With the settings 0 1 2 3 the knob operates the internal heating zone and it is possible to smoothly control the amount of heat transferred to a pan. Turning the knob temporarily to the position marked  causes the external heating zone to be switched on. From that point, you can smoothly control the amount of heat trasferred to a pan by both heating zones (internal and external) as the internal switch will switch both zones off only after the knob is set to position 0.
Zone heating indicator
If the temperature of a heating zone exceeds 50°C this is signalled by an indicator which lights up for that zone.
When the heating indicator lights up it warns the person using the cooker against touching a hot heating zone.
For about 5 to 10 minutes after a heating zone is switched off it will still have residual heat that can be used, for example to warm up or keep dishes warm without switching on another heating zone.
22

OPERATION
Electronic programmer*
- work time
A- turn-off time
- timer
- current time
1 - programmer work function selection button
2 - button „-”
3 - button „+”
Current time set-up
After plugging in or reconnecting to a power source after current decay, the display shows 12.00, and the lamp at  flashes,
• set up the current time using buttons 2 and 3.
A 8888

2 1 3
Timer
You can activate the timer at any time, regardless the activity state of other programmer functions. The measured time ranges from 1 minute to 23 hours 59 minutes. With the aim of setting up the timer:
• press button 1 until the lamp at  starts to flash, and the display shows “0.00”,
•set up the timer using buttons 3 and 2, The set-up time is presented on the display, and the lamp at  is turned on.
1200 |
005 |
About 5 sec. after the time set-up has been finished, new data will be memorized and the lamp at  will go out.
The time correction can be done later, pressing button 1 until the lamp at startstoflash. Then you can correct the current time.
Notice!
If the current time is not set up, it is impossible for the oven to work.
*optional
After the set-up time has elapsed, a sound signal turns on and the lamp at  starts to flash again,
• press buttons 1, 2 or 3 to turn the signal off; the lamp will go out, and the display will indicate the current time.
Notice!
If the sound signal is not turned off manually, it will turn off automatically after about 2 minutes.
23

OPERATION
Semi-automatic operation
If the oven is supposed to turn off at specified time, do the following:
•set the oven function knob and temperature control knob in positions where the oven should work,
•press button 1 until the lamp at starts to flash, and the display shows “0.00”,
•set up the needed work time using buttons 3 and 2, within the range from 1 minute to 10 hours.
The set-up time will be memorized after about 5 sec., the display will show the current time again, and the lamp at  will be turned on.

 1000
1000
After the set-up time has elapsed, the oven will turn off automatically, the sound signal will turn on, and the lamp at  will start to flash;
•set up the oven function and temperature control knobs in turn-off positions,
•press buttons 1, 2 or 3 to turn the signal off; the lamp will go out, and the display will indicate the current time.
Notice!
In ovens equipped with one control knob, the oven function knob is combined with the temperature control knob.
Automatic operation
Iftheovenissupposedtoturnonforspecified worktimeandturnoffatspecifiedtime,setup the work time and the work end time:
•press button 1 until the lamp at starts to flash, and the display shows “0.00”,
•set up the needed work time using buttons 3 and 2, within the range from 1 minute to 10 hours.
The set-up time will be memorized after about 5 sec., the display will show the current time again, and the lamp at  will be turned on.
•press button 1 until the lamp at A starts to flash,
•set up the turn-off (work end) time using buttons 3 and 2, which is limited up to 23 hours 59 minutes.
A 1830
•set the oven function knob and temperature control knob in needed positions where the oven should work.
Lamps at  and A are switched on; the oven will start working from the moment resulting from the difference between the set-up work end time and the set-up work time, (e.g. the set-up work time is 1 hour, the set-up work end time is 14.00, so the oven will plug in automatically at 13.00).
24
 Loading...