


PI6513TBD
EN INSTRUCTION MANUAL
NL GEBRUIKERSHANDLEIDING

DEAR CUSTOMER, |
EN |
|
|
Your hob combines exceptional ease of use with excellent effectiveness. Once you have read the instructions, operating your hob will not be a problem.
Before being packed and leaving the factory, the safety and functions of this hob were carefully tested.
We ask you to read the User Manual carefully before switching on the appliance. Following the directions in this manual will protect you from any misuse.
Keep this User Manual and store it near at hand.
The instructions should be followed carefully to avoid any unfortunate accidents.
Important!
The appliance may only be operated when you have read and understood this manual thoroughly.
The appliance is designed solely for cooking. Any other use (eg heating a room) is incompatible with the appliance’s intended purpose and can pose a risk to the user. The manufacturer reserves the right to introduce changes which do not affect the operation of the appliance.
CONTENTS |
|
Basic Information.................................................................................................. |
2 |
Safety instructions..................................................................................................... |
3 |
Description of the appliance....................................................................................... |
6 |
Installation............................................................................................................. |
7 |
Operation............................................................................................................... |
11 |
Cleaning and maintenance....................................................................................... |
22 |
Troubleshooting...................................................................................................... |
24 |
Specification............................................................................................................ |
26 |
Manufacturer’s Declaration
The manufacturer hereby declares that this product meets the requirements of the following European directives:
•Low Voltage Directive 2006/95/EEC,
•Electromagnetic Compatibility (EMC) Directive 2004/108/EEC,
and has thus been marked with the  symbol and been issued with a declaration of compliance made available to market regulators.
2

SAFETY INSTRUCTIONS FOR USE
●Before using the induction hob for the first time, carefully read its user manual. This will ensure user safety and prevent damage to the appliance.
●If the induction hob is operated in immediate vicinity to the radio, television set or other radio-frequency-emitting device, make sure that the hob’s touch sensor controls operate correctly.
●The hob must be connected by a qualified installer.
●Do not install the appliance near a refrigerator.
●Furniture, where the hob is installed must be resistant to temperatures up to 100°C. This applies to veneers, edges, surfaces made of plastics, adhesives and paints.
●The appliance may only be used once fitted in kitchen furniture. This will protect the user against accidental touching the live part.
●Repairs to electrical appliances may only be conducted by specialists. Improper repairs can be dangerous to the user.
●The appliance is not connected to mains when it is unplugged or the main circuit breaker is switched off.
●Plug of the power cord should be accessible after appliance has been installed.
●Ensure that children do not play with the appliance.
●This appliance is not intended for use by persons (including children) with physical, mental or sensory handicaps, or by those who are inexperienced or unfamiliar with the appliance, unless under supervision or in accordance with the instructions as communicated to them by persons responsible for their safety.
●Persons with implanted devices, which support vital functions (eg, pacemaker, insulin pump, or hearing aids) must ensure that these devices are not affected by the induction hob (the frequency of the induction hob is 20-50 kHz).
●Once power is disconnected all settings and indications are erased. When electric power is restored caution is advisable. If the cooking zones are hot, „H” residual heat indicator will be displayed. Also child lock key will be displayed, as when the appliance is connected for the first time.
●Built-in residual heat indicator can be used to determine if the appliance is on and if it is still hot.
●If the mains socket is near the cooking zone, make sure the cord does not touch any hot areas.
●When cooking using oil and fat do not leave the appliance unattended, as there is a fire hazard.
●Do not use plastic containers and aluminium foil. They melt at high temperatures and may damage the cooking surface.
●Solid or liquid sugar, citric acid, salt or plastic must not be allowed to spill on the hot cooking zone.
●Ifsugarorplasticaccidentallyfallonthehotcookingzone,donotturnoffthehobandscrape the sugar or plastic off with a sharp scraper. Protect hands from burns and injuries.
3

SAFETY INSTRUCTIONS FOR USE
●When cooking on induction hob only use pots and pans with a flat base having no sharp edges or burrs as these can permanently scratch the cooking surface.
●Induction hob cooking surface is resistant to thermal shock. It is not sensitive to cold nor hot.
●Avoid dropping objects on the cooking surface. In some circumstances, point impacts such as dropping a bottle of spices, may lead to cracks and chipping of the cooking surface.
●If any damage occurs, seething food can get into the live parts of the induction hob through damaged areas.
●If the cooking surface is cracked, switch off power to avoid the risk of electric shock.
●Do not use the cooking surface as a cutting board or work table.
●Do not place metal objects such as knives, forks, spoons, lids and aluminium foil on the cooking surface as they could become hot.
●Do not install the hob over a heater without a fan, over a dishwasher, refrigerator, freezer or washing machine.
●If the hob has been built in the kitchen worktop, metal objects located in a cabinet below canbeheatedtohightemperaturesthroughtheairflowingfromthehobventilationsystem. As a result it is recommended to use a partition (see Figure 2).
●Please follow the instructions for care and cleaning of induction hob. In the event of misuse or mishandling warranty may be void.
4

HOW TO SAVE ELECTRICITY UNPACKING
Using the electricity in a responsible manner not only savesmoney,butalsohelps protecttheenvironment.So let’s save electricity! This is how it’s done:
●Use the correct cookware.
Cookware with flat and a thick base can save up to 1/3 of electricity. Please remember to covercookwarewiththelid,otherwiseelectricity consumption increased four times!
●Always keep the cooking zones and cookware bases clean.
Dirt prevents proper heat transfer. Often burntstainscanberemovedonly withagents harmful to the environment.
●Avoiding unnecessary lifting the lid to peek into the pot.
●Do not install the hob in the immediate vicinity of refrigerator / freezer.
The electricity consumption is then unnecessarily increased.
The appliance was protected from damage at the time of transport. After unpacking, please dispose of all elements of packaging in a way that will not cause damage
to the environment. All materials used for packaging the appliance are environmentally friendly; they are 100% recyclable and are marked with the appropriate symbol.
Important! Keep the packaging material (bags, Styrofoam pieces, etc.) out of reach of children during unpacking.
DISPOSAL
In accordance with European Directive 2002/96/EC and Polish legislation regarding used electrical and electronic goods, this appliance is marked with the symbol of the crossed-out waste container.
This marking means that the appliance must not be disposed of together with other household waste after it has
been used. The user is obliged to hand it over to waste collection centre collecting used electrical and electronic goods. The collectors, inclu-
ding local collection points, shops and local authority departments provide recycling schemes. Proper handling of used electrical and electronic goods helps avoid environmental and health hazards resulting from the presence of dangerous components and the inappropriate storage and processing of such goods.
5

DESCRIPTION OF THE APPLIANCE
Panel Description
1 |
3 |
5
2 |
4 |
|
 6
6
1 Rear left cooking zone
2 Front left cooking zone
7 3 Rear right cooking zone
4 Front right cooking zone
5 Bridge cooking zones (left)
6 Top glass plate
7 Control Panel
 Control Panel
4
3 |
8 |
2 |
6 |
1 |
7 |
2 |
5 |
1 Slider sensor (heat / time setting)
2 Cooking zone selection sensor
3 Stop'n go function sensor
4 Child lock sensor
5 ON / OFF sensor
6 Keep Food Warm function sensor
7 Booster function sensor
8 Timer and Kitchen Timer sensor
6

INSTALLATION
 Making the worktop recess
•Worktop thickness should be 28 - 40 mm, while its width at least 600 mm. The worktop must be flat and level. Edge of the worktop near the wall must be sealed to prevent ingress of water or other liquids.
•There should be sufficient spacing around the opening, in particular, at least 50 mm distance to the wall and 60 mm distance to the front edge of worktop.
•The distance between the edge of the opening and the side wall of the furniture should be minimum 55 mm.
•Worktop must be made of materials, including veneer and adhesives, resistant to a temperature of 100°C. Otherwise, veneer could come off or surface of the worktop become deformed.
•Edge of the opening should be sealed with suitable materials to prevent ingress of water.
•Worktop opening must cut to dimensions as shown on figure 1.
•Ensure minimum clearance of 25 mm below the hob to allow proper air circulation and prevent overheating. See Figure 2.
Fig.1
1
L(mm) |
W(mm) |
H(mm) |
D(mm) |
A(mm) |
B(mm) |
X(mm) |
X1(mm) |
590 |
520 |
60 |
56 |
560+4 |
490+4 |
50 min |
60 |
|
|
|
|
+1 |
+1 |
|
|
7

INSTALLATION |
|
Fig.2 |
|
|
5÷10mm |
25mm |
|
80mm |
Installing hob in kitchen cabinet |
|
worktop. |
|
500x10mm |
Minimum |
5÷10mm |
10mm |
Installing hob in kitchen worktop above oven with ventilation.
500x50mm |
500x10mm |
|
 Do not install the hob above the oven without ventilation.
8

INSTALLATION
 Connecting to electrical mains
Important!
Electrical connection must be made by a properly certified qualified installer. Do not make any alterations or changes in the appliance electrical system.
 Tips for the installer
The hob is equipped with a terminal block allowing different connections appropriate for a specific type of power supply.
Terminal block allows the following connections:
•Single-phase 230V
•Two-phase 400V 2N
Important!
Remember to connect the neutral lead to correct terminal block clamp, marked with . The electrical system supplying the hob must be protected by a properly selected tripping device or a circuit breaker allowing to disconnect the power supply in an emergency.
Before connecting to the appliance, please carefully read the information provided on the rating plate and wiring diagram.
IMPORTANT! The installer is obliged to provide the user with „appliance electrical connection certificate” (enclosed with the warranty card).
Connecting the hob other than shown on the wiring diagram may damage the hob.
9

INSTALLATION
Connecting to electrical mains
Electrical connection must be made by a properly certified and qualified installer. Before connecting the appliance, check the following:
1.Wiring connection diagram located on the power cord
2.Rated voltage on the rating plate
3.Is the power cord suitable for connecting the appliance
Do not use switches, extension cords, etc., to connect the appliance, as these can cause a fire. The power cord must not come into contact with hot surfaces and sharp edges of the appliance. Any modifications of the existing electrical wiring in the building must be performed only by a qualified electrician. Connection diagram is shown below:
NiebieskiSzary
BlueGrey
BrązowyBrownBlackCzarny
zieloyngree -YellowŻółt-
|
|
|
|
|
|
yzielo |
|
|
|
|
|
||
BlueNiebieskiGrey |
|
Brown |
|
Black |
|
green |
|
|
|
-ŻółtYellow |
|||
Szary |
|
Brązowy |
|
Czarny |
|
- |
|
|
|
|
|
|
|
|
|
|
|
|
|
|
Niebieski |
|
|
|
Brązowy |
|
|
|
Szary |
|
|
Czarny |
||
Blue |
|
Grey |
|
Brown |
|
Black |
|
|
|
|
|||
|
|
|
|
|
|
|
ngreezieloy -YellowŻółt-
Connecting to electrical mains
Electrical connection must be made by a properly certified and qualified installer. Before connecting the appliance, check the following:
1.Wiring connection diagram located on the power cord
2.Rated voltage on the rating plate
3.Is the power cord suitable for connecting the appliance
Do not use switches, extension cords, etc., to connect the appliance, as these can cause a fire. The power cord must not come into contact with hot surfaces and sharp edges of the appliance. Any modifications of the existing electrical wiring in the building must be performed only by a qualified electrician. Connection diagram is shown below:
10
OPERATION
 Before using the appliance for the first time
●thoroughly clean your induction hob first. The induction hob should be treated with the same care as a glass surface.
●switch on the ventilation in the room or open a window, as the appliance could emit an unpleasant smell during first use.
●operate the appliance while observing all safety guidelines.
 Induction cooking zone operation principle
Electric oscillator powers a coil placed inside the appliance. This coil produces a magnetic field, which induces eddy currents in the pot, when it is placed on the hob.
These currents make the pot real transmitters of heat, while the hob glass surface remains cool.
This requires the use of pots whose base is ferromagnetic, in other words susceptible to magnetic fields.
Overall, induction technology is characterized by two advantages:
●the heat is only emitted by the pot and its use is maximised,
●there is no thermal inertia, since the cooking starts immediately when the pot is placed on the hob and ends once it is removed.
The protective device:
If the hob has been installed correctly and is used properly, any protective devices are rarely required.
Fan: protects and cools controls and power components. It can operate at two different speeds and is activated automatically. Fan may runs when the cooking zones are off until the electronic system is sufficiently cooled.
Temperature sensor: Temperature of electronic circuits is continuously monitored by a temperature sensor. If temperature is raised beyond a safe level, this protection system will reduce cooking zone heat setting or shut down the cooking zones adjacent to the overheated electronic circuits.
Pan detection: allows the hob to detect pans placed on a cooking zone. Small objects placed on the cooking zone (eg, spoon, knife, ring ...) will not be recognised as pans and the hob will not operate.
11

OPERATION
 Pan detector
Pan detector is installed in induction hobs. Pan detector starts heating automatically when a pan is detected on a cooking zone and stops heating when it is removed. This helps save electricity.
●When an suitable pan is placed on a cooking zone, the display shows the heat setting.
●Induction requires the use of suitable cookware with ferromagnetic base (seeTable on page 12).
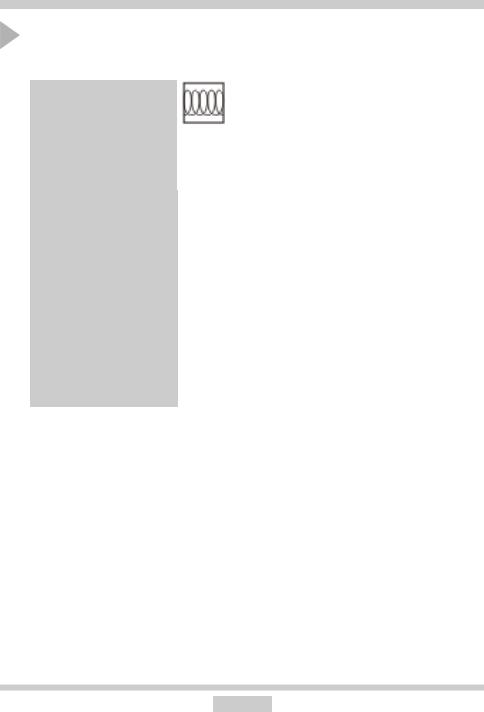
If a pan is not placed on a cooking zone or the pan is unsuitable, the  symbol is displayed.Thecookingzonewillnotoperate.Ifapanisnotdetectedwithin10minutes, the cooking zone will be switched off.
Switch off the cooking zone using the touch control sensor field rather than by removing the pan.
Pan detector does not operate as the on/off sensor.
The induction hob is equipped with electronic touch control sensor fields, which are operated by touching the marked area with a finger.
Each time a sensor field is touched, an acoustic signal can be heard.
When switching the appliance on or off or changing the heat setting, attention should be paid that only one sensor field at a time is touched. When two or more sensor fields are touched at the same time (except timer and child lock), the appliance ignores the control signals and may trigger a fault indication if sensor fields are touched for a long time.
When you finish cooking switch off the cooking zone using touch control sensor fields and do not rely solely on the pan detector.
12
OPERATION
The high-quality cookware is an essential condition for efficient induction cooking.
 Selecting cookware for induction cooking
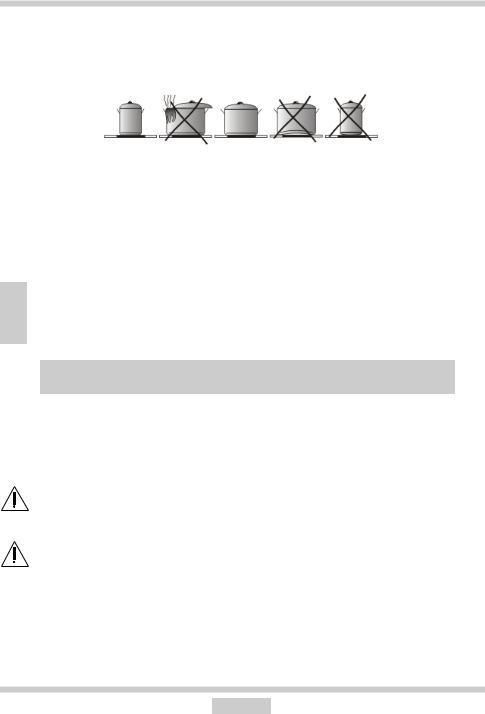
●Always use high-quality cookware with a perfectly flat base: this will prevent local overheating, where food could stick while cooking. Pots and pans with thick steel walls provide superior heat distribution.
●Make sure that cookware base is dry: when filling a pot or when using a pot taken out of the refrigerator make sure its base is completely dry before placing it on the cooking zone. This is to avoid soiling the surface of the hob.
●Lid prevents heat from escaping and thus reduces heating time and lowers energy consumption.
Energyistransferredbestwhencookwaresizecorrespondstothesizeofthecookingzone. Thesmallestandlargestpossiblediametersareindicatedinthefollowingtableanddepend on the quality of the cookware used.
Induction cooking zone |
The base diameter of induction cookware |
|
Diameter (mm) |
Minimum (mm) |
Maximum (mm) |
1, 2, 3, 4 |
140 |
220 |
5 |
200 |
220 x 400 |
When using cookware smaller than the minimum diameter induction hob may not work.
Cookware base has to be flat for optimal temperature control by the induction module.
The concave base or deep embossed logo of the manufacturer interfere with the temperature induction control module and can cause overheating of the pot or pan.
Do not use damaged cookware such as cookware with deformed base due to excessive heat.
13
OPERATION
Selecting cookware for the induction cooking zone
Marking of kitchen |
Check for marking indicating that the |
cookware |
cookware is suitable for induction |
|
cooking. |
|
|
|
Use magnetic cookware (enamelled steel, ferrite sta- |
|
inless steel, cast iron). The easiest way to determine |
|
if your cookware is suitable is to perform the „magnet |
|
test”. Find a generic magnet and check if it sticks to |
|
the base of the cookware. |
Stainless Steel |
Cookware is not detected |
|
With the exception of the ferromagnetic steel cookwa- |
|
re |
Aluminium |
Cookware is not detected |
Cast iron |
High efficiency |
|
Caution: cookware can scratch the hob surface |
Enamelled steel |
High efficiency |
|
Cookware with a flat, thick and smooth base is re- |
|
commended |
Glass |
Cookware is not detected |
Porcelain |
Cookware is not detected |
Cookware with copper |
Cookware is not detected |
base |
|
14
OPERATION
Control Panel
●Immediately after the appliance is connected to electrical mains, all displays will light up briefly. Your induction hob is then ready for use.
●The induction hob is equipped with electronic touch control sensor fields, which are operated by touching with a finger for at least 1 second.
●Touching of a sensor field is accompanied by an acoustic signal to acknowledge.
No objects should be placed on the sensor fields (this could cause an error). Touch sensor fields should be always kept clean.
Switching on the appliance
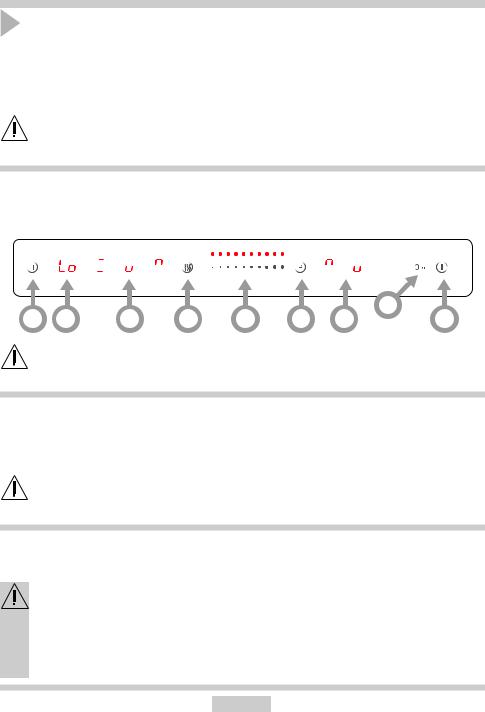
To switch on the appliance touch and hold the on/off sensor field (5) for at least 1 second. The appliance will sound an acoustic signal when it is ready for use. When the appliance is ready for use, 


 is shown on the timer display and

 symbols are shown on cooking zone displays.
4
3 |
8 |
2 |
6 |
1 |
7 |
2 |
5 |
If none of the sensor fields is touched within 60 seconds, the appliance switches itself off.
Switching on the cooking zones
Once the appliance is switched on using the on/off touch sensor (5), select a cooking zone (2) within the next 60 seconds.
1When a cooking zone selection sensor field (2) is touched, a flashing "0" will be displayed on the corresponding heat setting indicator display. The display will flash for about 5 seconds. Set a heat setting during this time.
Acooking zone is active when a number is flashing on its display. This indicates a cooking zone is ready for the heat setting to be set or changed.
Selecting the cooking zone heat setting
While the number "0" is flashing on the cooking zone display, you can start adjusting the heat setting sliding your finger across the slider sensor (1). The default heat setting is "0".
Heat setting selection sensor (1) is a slider type touch control sensor allowing selection of heat setting (1-9) and timer setting (1-99) by touching and sliding your finger across the marked area (1):
sliding right - increase the heat setting sliding left - reduce the heat setting.
It is also possible to select the heat setting directly by touching the appropriate part of the heat setting selection sensor field (1).
15
 Loading...