


COMPETENCE B 8100
The switchable built-in oven
User Instructions
COMPETENCE
MADE IN GERMANY

|
Dear customer, |
|
Please read these operating instructions through carefully. |
|
Above all, please observe the ”Safety” section on the first few pages. |
|
Please retain these operating instructions for later reference. Pass them |
|
on to any subsequent owners of the appliance. |
1 |
Using the warning triangle and/or the use of specific words (Warning!, |
|
Caution!, Important!) information that is important for your safety or |
|
the function of the appliance is highlighted. It is imperative that this |
|
information is observed. |
0 1. |
This symbol guides you step by step through the operation of the appli- |
|
ance. |
2. ... |
|
3. ... |
|
3 |
Next to this symbol you will find additional information and practical |
|
tips on using the appliance. |
2 |
Tips and information about the economical and ecological use of the |
|
machine are marked with the clover. |
In the event of a malfunction, these operating instructions contain information on how to rectify faults yourself, see the ”What to do if ...” section.
In the event of technical problems, our local FACTORY CUSTOMER SERVICE CENTRE is always available to provide assistance (you will find addresses and telephone numbers in the ”Customer Service Centres” section).
Please also take note of the contents of the ”Service” section.
Printed on paper manufactured with environmentally sound processes.
He who thinks ecologically, acts accordingly ...
2

|
Contents |
CONTENTS |
|
Operating Instructions . . . . . . . . . . . . . . . . . . . . . . . . . . . . . . . . . |
. . . 5 |
Safety Instructions . . . . . . . . . . . . . . . . . . . . . . . . . . . . . . . . . . . . . . . . . |
. . . 5 |
Disposal . . . . . . . . . . . . . . . . . . . . . . . . . . . . . . . . . . . . . . . . . . . . . . . . . . . |
. . . 7 |
Appliance Layout . . . . . . . . . . . . . . . . . . . . . . . . . . . . . . . . . . . . . . . . . . . |
. . . 9 |
Control Panel . . . . . . . . . . . . . . . . . . . . . . . . . . . . . . . . . . . . . . . . . . . . . . |
. . . 9 |
Clock Functions . . . . . . . . . . . . . . . . . . . . . . . . . . . . . . . . . . . . . . . . . . . . . |
. . . 10 |
Oven Features . . . . . . . . . . . . . . . . . . . . . . . . . . . . . . . . . . . . . . . . . . . . . . . |
. . . 11 |
Oven Accessories . . . . . . . . . . . . . . . . . . . . . . . . . . . . . . . . . . . . . . . . . . . . |
. . . 12 |
Oven Functions . . . . . . . . . . . . . . . . . . . . . . . . . . . . . . . . . . . . . . . . . . . . . |
. . . 13 |
Prior to Using for the First Time . . . . . . . . . . . . . . . . . . . . . . . . . . . . . |
. . . 15 |
Setting/Changing the Time . . . . . . . . . . . . . . . . . . . . . . . . . . . . . . . . . . . . |
. . . 15 |
Initial Cleaning . . . . . . . . . . . . . . . . . . . . . . . . . . . . . . . . . . . . . . . . . . . . . . |
. . . 16 |
Operating the Oven . . . . . . . . . . . . . . . . . . . . . . . . . . . . . . . . . . . . . . . . . |
. . . 17 |
Inserting/Removing the Fat Filter . . . . . . . . . . . . . . . . . . . . . . . . . . . . . . |
. . . 17 |
Inserting the Shelf and Tray . . . . . . . . . . . . . . . . . . . . . . . . . . . . . . . . . . . |
. . . 17 |
Switching the Oven On and Off . . . . . . . . . . . . . . . . . . . . . . . . . . . . . . . |
. . . 18 |
Changing the Oven Temperature . . . . . . . . . . . . . . . . . . . . . . . . . . . . . . . |
. . . 19 |
Changing the Oven Function . . . . . . . . . . . . . . . . . . . . . . . . . . . . . . . . . . |
. . . 19 |
Fast Warm Up R . . . . . . . . . . . . . . . . . . . . . . . . . . . . . . . . . . . . . . . . . . . . |
. . . 20 |
Using the Automatic Function . . . . . . . . . . . . . . . . . . . . . . . . . . . . . . . . . |
. . . 20 |
Automatic Switching Off . . . . . . . . . . . . . . . . . . . . . . . . . . . . . . . . . . |
. . . 21 |
Automatic Switching On and Off . . . . . . . . . . . . . . . . . . . . . . . . . . . . |
. . . 22 |
Checking Automatic Function Entries . . . . . . . . . . . . . . . . . . . . . . . . |
. . . 22 |
Changing Automatic Function Entries . . . . . . . . . . . . . . . . . . . . . . . . |
. . . 23 |
Deleting Automatic Function Entries . . . . . . . . . . . . . . . . . . . . . . . . . |
. . . 23 |
Information on the Automatic Function . . . . . . . . . . . . . . . . . . . . . . |
. . . 23 |
Setting the Countdown Timer . . . . . . . . . . . . . . . . . . . . . . . . . . . . . . . . . |
. . . 24 |
Switching On/Off the Oven Lighting . . . . . . . . . . . . . . . . . . . . . . . . . . . . |
. . . 25 |
Switching On/Off the Clock Display . . . . . . . . . . . . . . . . . . . . . . . . . . . . |
. . . 25 |
Oven Safety Cut-Out . . . . . . . . . . . . . . . . . . . . . . . . . . . . . . . . . . . . . . . . . |
. . . 25 |
Oven Child Safety Feature . . . . . . . . . . . . . . . . . . . . . . . . . . . . . . . . . . . . |
. . . 26 |
Usage, Tables and Tips . . . . . . . . . . . . . . . . . . . . . . . . . . . . . . . . . . . . . . |
. . . 27 |
Baking . . . . . . . . . . . . . . . . . . . . . . . . . . . . . . . . . . . . . . . . . . . . . . . . . . . . . |
. . . 27 |
Baking Table . . . . . . . . . . . . . . . . . . . . . . . . . . . . . . . . . . . . . . . . . . . . . |
. . . 29 |
3

Contents
Tips on Baking |
. . . . . . . . . . . . . . . . . . . . . . . . . . . . . . . . . . . . . . . . . . . . . . |
32 |
Pies and Gratin Table . . . . . . . . . . . . . . . . . . . . . . . . . . . . . . . . . . . . . . . . . |
32 |
|
Frozen Ready Meals Table . . . . . . . . . . . . . . . . . . . . . . . . . . . . . . . . . . . . . |
33 |
|
Roasting . . . . . . . |
. . . . . . . . . . . . . . . . . . . . . . . . . . . . . . . . . . . . . . . . . . . . . . . |
34 |
Roasting Table |
. . . . . . . . . . . . . . . . . . . . . . . . . . . . . . . . . . . . . . . . . . . . . . |
35 |
Grilling . . . . . . . . |
. . . . . . . . . . . . . . . . . . . . . . . . . . . . . . . . . . . . . . . . . . . . . . . |
37 |
Grilling Table |
. . . . . . . . . . . . . . . . . . . . . . . . . . . . . . . . . . . . . . . . . . . . . . . |
37 |
Bio-Functions . . . |
. . . . . . . . . . . . . . . . . . . . . . . . . . . . . . . . . . . . . . . . . . . . . . . |
38 |
Low Temperature Roasting . . . . . . . . . . . . . . . . . . . . . . . . . . . . . . . . . . . . |
38 |
|
Low Temperature Roasting Table . . . . . . . . . . . . . . . . . . . . . . . . . . . . . . . |
39 |
|
Making Yoghurt . . . . . . . . . . . . . . . . . . . . . . . . . . . . . . . . . . . . . . . . . . . . . |
40 |
|
Proving Dough . . . . . . . . . . . . . . . . . . . . . . . . . . . . . . . . . . . . . . . . . . . . . . |
40 |
|
Drying Fruit, Vegetables . . . . . . . . . . . . . . . . . . . . . . . . . . . . . . . . . . . . . . |
41 |
|
Defrosting . . . . . . |
. . . . . . . . . . . . . . . . . . . . . . . . . . . . . . . . . . . . . . . . . . . . . . . |
42 |
Defrosting Table . . . . . . . . . . . . . . . . . . . . . . . . . . . . . . . . . . . . . . . . . . . . . |
42 |
|
Preserving . . . . . . |
. . . . . . . . . . . . . . . . . . . . . . . . . . . . . . . . . . . . . . . . . . . . . . . |
43 |
Preserving Times . . . . . . . . . . . . . . . . . . . . . . . . . . . . . . . . . . . . . . . . . . . . . |
43 |
|
Suggested Temperatures Table . . . . . . . . . . . . . . . . . . . . . . . . . . . . . . . . . . . |
44 |
|
Cleaning and Care . . . . . . . . . . . . . . . . . . . . . . . . . . . . . . . . . . . . . . . . . . . . . |
45 |
|
Exterior of the Appliance . . . . . . . . . . . . . . . . . . . . . . . . . . . . . . . . . . . . . . . . |
45 |
|
Oven Interior . . . |
. . . . . . . . . . . . . . . . . . . . . . . . . . . . . . . . . . . . . . . . . . . . . . . |
45 |
Accessories . . . . . |
. . . . . . . . . . . . . . . . . . . . . . . . . . . . . . . . . . . . . . . . . . . . . . . |
45 |
Fat Filter . . . . . . . |
. . . . . . . . . . . . . . . . . . . . . . . . . . . . . . . . . . . . . . . . . . . . . . . |
45 |
Side Rails . . . . . . . |
. . . . . . . . . . . . . . . . . . . . . . . . . . . . . . . . . . . . . . . . . . . . . . . |
46 |
Grill Element . . . . |
. . . . . . . . . . . . . . . . . . . . . . . . . . . . . . . . . . . . . . . . . . . . . . . |
47 |
Oven Light Bulb . |
. . . . . . . . . . . . . . . . . . . . . . . . . . . . . . . . . . . . . . . . . . . . . . . |
48 |
Oven Door . . . . . . |
. . . . . . . . . . . . . . . . . . . . . . . . . . . . . . . . . . . . . . . . . . . . . . . |
49 |
Oven Door Glass . |
. . . . . . . . . . . . . . . . . . . . . . . . . . . . . . . . . . . . . . . . . . . . . . . |
50 |
What to do if ... |
. . . . . . . . . . . . . . . . . . . . . . . . . . . . . . . . . . . . . . . . . . . . . . . . |
52 |
Additional Accessories . . . . . . . . . . . . . . . . . . . . . . . . . . . . . . . . . . . . . . . . . |
53 |
|
Installation Instructions . . . . . . . . . . . . . . . . . . . . . . . . . . . . . . . . . . . |
55 |
Technical Data . . . . . . . . . . . . . . . . . . . . . . . . . . . . . . . . . . . . . . . . . . . . . . . . . |
55 |
Regulations, Standards, Directives . . . . . . . . . . . . . . . . . . . . . . . . . . . . . . . . . |
55 |
Safety Instructions for the Installer . . . . . . . . . . . . . . . . . . . . . . . . . . . . . . . . |
56 |
Assembly . . . . . . . . . . . . . . . . . . . . . . . . . . . . . . . . . . . . . . . . . . . . . . . . . . . . . |
57 |
Service . . . . . . . . . . . . . . . . . . . . . . . . . . . . . . . . . . . . . . . . . . . . . . . . . . . . . . |
63 |
4

Operating Instructions
OPERATING INSTRUCTIONS
1 Safety Instructions
Your new appliance is to only to be installed and connected by a qualified specialist.
Please observe this instruction, otherwise the warranty will not cover any damage that may occur.
The safety features of AEG electrical appliances comply with recognised technical standards and the German equipment safety law. However, we also consider it our obligation as a manufacturer to make you aware of the following safety information.
General Safety
•Take care when plugging electrical appliances into mains sockets near the hob. Connecting leads must not touch the hot rings or be trapped under the hot oven door.
•Do not store inflammable substances in the oven. They may ignite when the oven is switched on.
•It is forbidden to clean the appliance with a steam or high pressure cleaner for safety reasons!
•If force is used, above all on the edges of the front pane of glass, the glass may break.
•When you cook, roast and grill, the oven door will become hot. For this reason, always keep small children away.
•Overheated fats and oils catch fire quickly. When you are cooking foods in fat or oil (e.g. chips), please stay close.
•If you use ingredients containing alcohol in the oven, an easily ignitable alcohol air mixture may be created. In this case, open the door carefully. Do not have embers, sparks or naked flames in the vicinity when opening the door. We recommend to leave the dish in the closed oven to cool for approx. 10-15 minutes after switching off the oven.
•Repairs to the appliance are only to be carried out by approved service engineers. Improper repairs can cause significant hazards for the user. If your appliance needs repairing, please contact customer service or your dealer.
•In the case of malfunctions on the appliance: Remove fuses or switch them off.
5

Operating Instructions
Correct Use
•This appliance must not be used for purposes other than that intended, it must only be used for the cooking, roasting, and baking of food in the home.
•Only use the appliance to prepare food.
•Do not use the oven to heat the room.
How to Avoid Damaging Your Appliance
•Do not line your oven with aluminium foil and do not place a baking sheet or dish on the oven floor, otherwise the oven enamel will be damaged by the resulting build up of heat.
•Clean the appliance after each use. This is the easiest time to remove spills; they also do not then become burnt on.
•Juice from fruit that drips from baking sheets will leave marks that cannot be removed. For very moist cakes, use the universal sheet.
•Never pour water directly into the hot oven. The enamel may be damaged.
•Do not sit on the open oven door/open oven drawer.
•Do not store moist food in the oven.
6

Operating Instructions
Eco-Insulation
The oven is fitted in the factory with eco-insulation. This insulation has been tested by independent test institutes for hazardous materials and has been classified as harmless.
2 Disposal
Disposal of Packaging Material
All materials used can be fully recycled.
The plastics are marked as follows:
•>PE< for polyethylene, e.g. as used for the outer wrapping and the bags inside.
•>PS< for polystyrene foam, e.g. as used for the packing pieces, completely free of CFCs.
The cardboard is made from 80% recycled paper.
|
Disposal of Old Appliances |
|
To protect the environment, it is important that worn out appliances |
|
are disposed of in the correct manner. This applies to your old appliance |
|
and, when one day it ceases to be used, also to your new appliance. |
1 |
Warning! Before disposing of old appliances make them inoperable. |
|
Unplug from the mains, sever the power cable, remove or destroy any |
|
snap-action catches or latches. In this way you prevent children at play |
|
from shutting themselves in the appliance (risk of suffocation!) or get- |
|
ting themselves into other hazardous situations. |
2 |
Information on Disposal |
|
• The appliance must not be disposed of with household rubbish. |
• You can obtain information about collection dates or public tips from your local refuse department or council.
• You can also take the appliance to your AEG dealer; he will dispose of it for you for a small contribution towards the costs.
7

Operating Instructions
The Key Features of Your Appliance
•Mains Button: The complete appliance is switched on and off using the mains button. This provides additional safety, particularly if there are children in the house, as it is not possible to accidentally switch on the appliance. This button also makes the appliance easier to use as all functions can be switched off at the touch of one button.
•Safety Cut-Out: The oven has a safety cut-out. If the oven is not switched off or the temperature changed after a certain period of time, the oven switches itself off automatically.
•Child Safety Feature: In addition, this appliance is equipped with a child safety feature for the oven. As soon as the child safety feature is activated, the oven cannot be accidentally switched on.
•Electronic Oven Regulator: The oven is controlled via an electronic regulator that permits precise temperature adjustment. For additional ease of use, the regulator also provides a suggested temperature for each oven function that is selected.
•Heat Protective Glazing: The panes of glass are ventilated from below so that the oven door does not become too hot, by this means any risk of burns is avoided.
•Time Display: A 24 hour display indicates the time when the oven is switched off. However if required, it is possible to switch off this display to save energy.
8

Operating Instructions
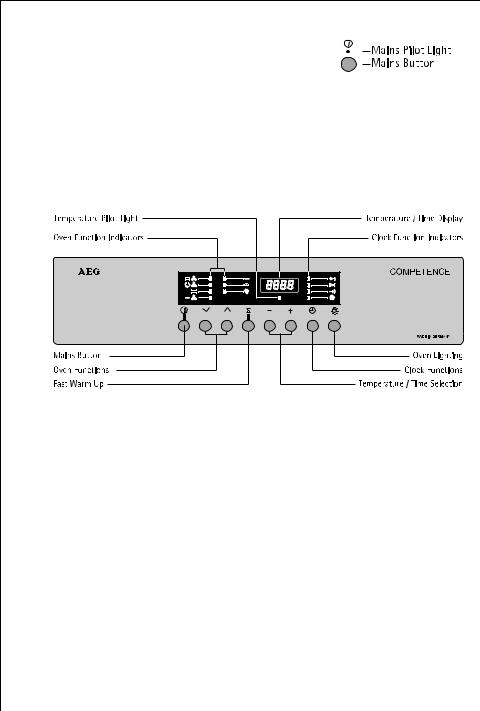
Appliance Layout
Control Panel
Mains Button
For switching the entire appliance on and off.
The appliance is: - switched on when the button is protruding, - switched off when the button is in.
Oven Functions and Function Indicators
Buttons for selecting the required oven function. The selected oven function is indicated by the relevant function indicator.
R Fast Warm Up
Can also be selected after the oven function and temperature have been selected to warm up the oven quickly. When the set temperature is reached, the oven switches automatically to the selected oven function.
Temperature and Time Selection
Button for adjusting times or temperatures, depending on the selected function. The selected setting is displayed digitally in the temperature/ time display.
Clock Functions and Function Indicators
Button for setting the clock function. The function selected is indicated by the relevant function indicator.
9

Operating Instructions
Oven Lighting
Button to switch the oven lighting on and off.
The oven lighting is switched on as long as the oven is operation. However, using this button the lighting can be switched off and switched on again only when needed. In this way you can save energy.
Temperature Pilot Light
The temperature pilot light illuminates as long as the oven is warming up and extinguishes when the temperature set is reached.
Clock Functions
You appliance has a programmable clock that enables you to see the current time, to use the countdown timer as an ”egg timer”, or with the aid of the automatic function, to set up cooking times.
Time
As long as an oven function is not switched on, the actual time is displayed in the temperature/time display via the TIME function.
Countdown Timer
Using the COUNTDOWN function, you can set a maximum ”time interval” of 1 hour 30 minutes. The countdown timer works like a normal kitchen timer and has no effect on oven operation.
Automatic Function
Using the functions COOK TIME and END TIME you can set the clock for the oven so that the oven switches itself on and off automatically.
10

Operating Instructions
Oven Features
Shelf Positions
There are side rails on both sides of the oven, each these has 6 shelf positions for sliding in accessories.
Please note that the shelf positions are counted from top to bottom.
Anti-Tip Device |
|
All slide-in parts are fitted with an |
|
anti-tip device to prevent them |
|
being unintentionally pulled all |
|
the way out |
|
When inserting slide-in parts, the |
|
anti-tip device must be at the rear. |
Fat Filter
The fat filter supplied with your appliance protects the fan in the rear wall of the oven from soiling.
Please always use the filter for roasting using the fan or
d ROTHITHERM on an open shelf, the universal sheet or in open roasting pans.
11
Operating Instructions
Fan Run-On
The fan switches on automatically as soon as the oven is switched on. Once the oven has been switched off, the fan continues running to cool down the appliance and then switches itself off.
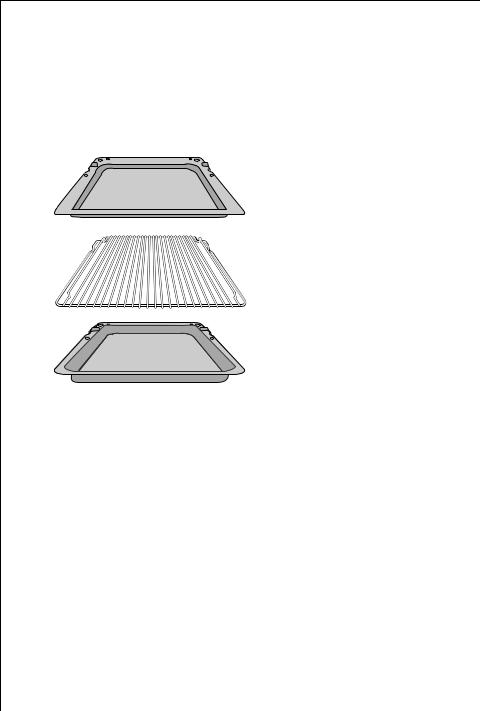
Oven Accessories
The following parts are supplied:
Baking Sheet
For cakes and biscuits
Combination Shelf
For dishes, cake tins, items for roasting and grilling
Universal Sheet
For moist cakes, juicy roasts or as a baking sheet or collecting vessel for fat
12

Operating Instructions
Oven Functions
The following functions are available for the oven:
b PIZZA & BAKING
Using this function, you can optimally bake cakes on one shelf. In addition, this function is suitable for those recipes that require more intensive browning and a crispy base. These include, e.g. pizza, quiche lorraine, cheese cake, etc.
Oven temperatures are generally 20-40 °C lower than for conventional.
The top and bottom heater elements are used and the fan is also switched on.
c FAN COOKING
Fan cooking is particularly suited to baking on several levels at the same time.
Oven temperatures are generally 20-40 °C lower than for conventional.
An annular heater element and part of the lower heater element are used. In addition, a fan in the back wall of the oven ensures that the hot air in the oven is circulated continuously. Hot air reaches all sides of the food.
O CONVENTIONAL
Conventional is suited to baking and roasting on one level. Heat is supplied evenly from above and below.
d ROTHITHERM
Rothitherm is particularly suited to grilling or roasting larger pieces of meat or poultry on one level. This function is also suited to gratinating and browning.
The grill heater element and fan are used simultaneously.
R Fast Warm Up
Using the fast warm up auxiliary function, you can very quickly preheat the empty oven for the above mentioned functions.
Several heaters are used simultaneously for the fast warm up function.
F GRILL
Grill is particularly suited to the grilling or toasting of flat foods, for example, steaks, cutlets, fish or toast.
The heat is supplied from the grill element on the oven ceiling.
13

Operating Instructions
Ü BOTTOM HEAT
Using this oven function you can, for example, re-bake moist cakes using heat from below so that they are crispy.
Here the heater fitted in the base of the oven is used.
A DEFROST
Using the defrost oven function you can, for example, initiate even defrosting or completely defrost cakes, butter, vegetables or other delicate foods.
With this function, only the fan is in operation without heating.
14

Operating Instructions
Prior to Using for the First Time
Setting/Changing the Time
Following the connection of mains power, the TIME function indicator and the temperature/time display flash.
You must then first set the time. The time can set with the appliance either switched on or off.
3 If the time has not been set, the oven cannot be switched on.
Setting the Time
0 1. Press the +or -button and set the required time.
Each time the + button is pressed the time advances one minute, and each time the - button is pressed, the time is set back by one minute.
2.Press the clock W button or wait for approx. 5 seconds.
The time in the temperature/time display changes from flashing to continuous display. The time is thus set.
3 |
If the + or -button is held pressed for more than 2 seconds, the min- |
|
utes start to run forwards or backwards until the button is released. In |
|
this way you can reach the required value more rapidly. |
3 |
If the appliance has been isolated from the mains, e.g. due to a fuse |
|
being switched off, the temperature/time display starts flashing again. |
In this case, set the time again as described.
15

Operating Instructions
Changing the Time
The time setting can be changed with the appliance either switched on or off.
The time set is displayed in the temperature/time display.
0 1. Press the W button as often as necessary until the TIME function indicator flashes.
2. Adjust the time as described above.
Initial Cleaning
Before using the oven for the first time, you should clean it thoroughly. You can switch on the oven light to make cleaning easier.
0 1. Switch on the appliance using the mains button. The mains pilot light above the button illuminates.
2.Press the oven lighting L button.
3.Remove all accessories and the side rails and clean with warm water and washing-up liquid.
4.Also wash out the oven with warm water and washing-up liquid and dry it.
5.Wipe off the front of the unit with a damp cloth only.
3 |
Tip: Use commercially available cleaner for stainless steel fronts, at the |
|
same time these also form a protective film against finger marks. |
1 |
Important: Do not use any caustic, abrasive cleaners! The surface could |
|
be damaged. |
16

Operating Instructions
Operating the Oven
Inserting/Removing the Fat Filter
Always use the fat filter when roasting without any covering on the shelf, on the fat tray or in open roasting dishes.
0 Inserting the Fat Filter
Take hold of the fat filter by the tab and insert the two retainers in the opening on the rear wall of the oven (fan opening) from the top downwards.
0Removing the Fat Filter
Take hold of the tab on the fat filter and remove upwards.
Inserting the Shelf and Tray
All slide-in parts have a small bulge on the left and right. This bulge serves as an anti-tip device and must always face downwards.
Inserting the Shelf
0 Insert the shelf so that the two guide rails face upwards. The antitip device must face downwards and be at the back of the oven.
Inserting the Shelf and Tray
0 When the shelf and fat tray are used together, carefully place the shelf anti-tip device in the protuberances on the fat tray.
17
Operating Instructions
Switching the Oven On and Off
0 1. Switch on the appliance using the mains button.
The mains pilot light above the button illuminates.
2.Set the required function by pressing the X or Y button.
3.The function selected is indicated. A suggested temperature appears in the temperature/time display.
If the suggested temperature is not changed within approx. 5 seconds, the oven starts to warm up. The temperature pilot light indicates that the oven is warming up. When the temperature set is reached, the temperature pilot light goes out.
4.To switch off the oven press X or Y button.
5.To switch off the appliance press the mains button. The mains pilot light above the button goes out.
18

Operating Instructions
Changing the Oven Temperature
|
Following the selection of the oven function, an appropriate suggested |
|
temperature is displayed in the temperature/time display. You can |
|
change this suggested temperature as required, either before or during |
|
baking. |
0 |
Press the + or - button to increase or decrease the temperature. |
3 |
The temperature is changed in 5 °C steps. If the + or - button is |
|
pressed for more than 2 seconds, the temperature display starts to |
count up or down until the button is released. In this way you can reach the required value more rapidly.
Changing the Oven Function
01. Press the X or Y button once. The oven is switched off.
2.Press the X or Y button again and keep pressing until the required function is selected.
If the suggested temperature is not changed, the oven starts to warm up using the newly selected function and the corresponding suggested temperature.
19

Operating Instructions
Fast Warm Up R
|
Following selection of an oven function, the empty oven can be pre- |
|
heated in a relatively short period of time using the auxiliary function |
|
”Fast Warm Up”. |
1 |
Important: Please only place the food to be cooked in the oven when |
|
fast warm up R is complete and the oven is operating in the required |
|
function. |
0 1. |
Set the required oven function (e.g. O CONVENTIONAL). If necessary, |
|
change the suggested temperature. |
2.Press the fast warm up R button.
The indicator above the R fast warm up button illuminates. Fast warm up commences.
When the temperature set is reached, an acoustic signal sounds. The indicator goes out.
The oven continues to heat in the pre-set oven function and at the preset temperature. You can now place your food for cooking in the oven.
3 |
The fast warm up R function cannot be used with the F GRILL, Top |
|
Heat or A DEFROST functions. |
Please see the ”Usage, Tables and Tips” section for recommendations on fast warm up.
Using the Automatic Function
There are two possible ways of using the automatic function:
•Automatic Switching Off: If you have switched on the oven, and simply do not want to forget to switch it off at the right time, using the clock you can set either the cook time or the end time. The oven then switches itself off automatically.
•Automatic Switching On and Off: When you, for example, in the morning or at lunch time want to prepare a dish for the evening, you can set the cook time and also the end time. The oven then switches on automatically at the calculated start time, and switches off again automatically at the end of the cooking time.
–Example: The roast requires cooking for 1 hour: COOK TIME = 1.00. The roast is to be ready at 18:00: END TIME = 18.00.
The oven function can be selected either before or after setting the automatic function.
20
 Loading...