


B 99697-5
B 99698-5 |
GB I E |
Operating Instructions |
Built-in Oven |

2
Guide to use the instructions
The following symbols will be found in the text to guide you throughout the Instructions:
 Safety Instructions
) Step by step instructions for an operation
Hints and Tips
Environmental Information

|
3 |
Contents |
|
Warnings and Important Safety Information ............................................................................................... |
4 |
Description of the appliance ............................................................................................................................. |
6 |
General Features of The Oven Electronic Control ....................................................................................... |
7 |
The electronic oven controls ........................................................................................................................... |
8 |
Buttons ................................................................................................................................................................ |
9 |
Before Using for the first time ....................................................................................................................... |
10 |
Using the Oven ................................................................................................................................................. |
12 |
Use of the oven functions ............................................................................................................................ |
14 |
Meat programmes ........................................................................................................................................... |
15 |
Automatic programmes ................................................................................................................................. |
18 |
Options .............................................................................................................................................................. |
19 |
Memory Menu .................................................................................................................................................. |
23 |
Settings Menu .................................................................................................................................................. |
25 |
Clock Functions ............................................................................................................................................... |
27 |
Additional Functions ....................................................................................................................................... |
33 |
Inserting the Oven Shelf, the Baking Tray and the Dripping Pan .......................................................... |
35 |
Hints and Tips ................................................................................................................................................... |
36 |
Cleaning and Maintenance ........................................................................................................................... |
37 |
Performing Pyrolytic Cleaning ..................................................................................................................... |
39 |
Something not working ................................................................................................................................. |
46 |
Technical Data .................................................................................................................................................. |
47 |
Instructions for the Installer ........................................................................................................................... |
48 |
Electrical connection ...................................................................................................................................... |
48 |
Building-in ........................................................................................................................................................ |
50 |
Service and spare parts ................................................................................................................................... |
51 |
Guarantee/Customer Service ......................................................................................................................... |
52 |
European Guarantee ....................................................................................................................................... |
53 |
This appliance complies with the following E.E.C. Directives:
*2006/98 (Low VoltageDirective);
*93/68 (General Directives);
*89/336 (Electromagnetical Compatibility Directive) . and subsequent modifications
MANUFACTURER:
ELECTROLUX HOME PRODUCTS ITALY S.p.A.
Viale Bologna, 298
47100 FORLÌ (Italy)

4
 Warnings and Important Safety Information
Always keep these user instructions with the appliance. Should the appliance be passed on to third persons or sold, or if you leave this appliance behind when you move house, it is very important that the new user has access to these user instructions and the accompanying information.
These warnings are provided for the safety of the users and those living with them. So read them carefully before connecting and/or using the appliance.
Installation
•The installation must be performed by a qualified person in accordance with the rules and regulations in force. The individual operations for installing the appliance are described under the instructions for the installer.
•Have the appliance installed and connected by a qualified person with specialist knowledge, who will carry it out in accordance with the directives.
•If any modifications to the power supply are required because of the installation, these should also be carried out by a qualified electrician.
•This oven was made as a single appliance or as a combination appliance with electrical hotplate, depending on the model, for single-phase connection to 230 V.
Operation
•This oven is designed for cooking foodstuffs; never use it for other purposes.
•When opening the oven door during or at the end of cooking be careful of the stream of hot air, which comes out of the oven.
•Be very careful when using the cooker. The extreme heat of the heating elements makes the shelves and other parts very hot.
•If you should for whatever reason use aluminium foil to cook food in the oven, never allow it to come into direct contact with the floor of the oven.
•When cleaning the oven, proceed with care: never spray anything onto the grease filter (if fitted), the heating elements and the thermostat sensor.
•It is dangerous to make modifications of any kind to this appliance or to its specifications.
•During the baking, roasting and grilling process, the oven window and the other parts of the appliance get hot, so children should be kept away from the appliance. Take care, if connecting electrical appliances to sockets near the oven, that cables do not come into contact with hot rings or get caught in the oven door.
•Always use oven gloves to take hot ovenproof dishes or pots out of the oven.
•Regular cleaning prevents the surface material from deteriorating.
•Before cleaning the oven, either turn the power off or pull the mains plug out.
•Make sure that the oven is in the “OFF” position, when the oven is no longer being used.
•The appliance must not be cleaned with a superheated steam cleaner or a steam jet cleaner.
•Do not use abrasive cleaners or sharp metal scrapers. These can scratch the glass in the oven door, which may result in the shattering of the glass.
People Safety
•This appliance is intended for use by adults. It is dangerous to allow children to use it or play with it.
•Children should be kept away while the oven is working. Also, after you have switched the oven off, it remains hot for a long time.

5
•This appliance is not intended for use by children or other persons whose physical, sensory or mental capabilities or lack of experience and knowledge prevents them from using the appliance safely without supervision or instruction by a responsible person to ensure that they can use the appliance safely.
Customer Service
•Have checks and/or repairs carried out by the manufacturer’s service department or by a service department authorised by the manufacturer and use only original spare parts.
•Do not attempt to repair the appliance yourself in the event of malfunctions or damage. Repairs carried out by untrained persons may cause damage or injury.
The symbol  on the product or its
packaging indicates that this product is not to be treated as normal household waste. Instead it must be handed over to a collection point for the recycling of electrical and electronic equipment. The correct disposal of this product will help to protect the environment and human health. Environment and health are endangered by incorrect disposal. For more detailed information about recycling of this product, please contact your local town hall, your household waste disposal service or the shop where you purchased the product.

6
Description of the appliance
B 99698-5
TRUE FAN |
|
|
150 |
12.05 |
00.06 |
1
2
3
4
|
|
|
1. |
Control Panel |
|
|
|
||
6 |
5 |
2. |
Air Vents for Cooling Fan |
|
|
|
|
3. |
Grill |
|
|
|
4. |
Oven light |
|
|
|
5. |
Oven Fan |
|
|
|
6. |
Rating plate |
Oven accessories
Grill/roasting pan |
B 99697-5 |
|
Grill trivet |
Removable handles
Shelf (x 2)

7
General Features of The Oven Electronic Control
The touch controls
All the oven functions are controlled by an electronic device. You can select any combination of cooking function, cooking temperature and automatic timing using the touch controls.
Make sure you touch just one control at a time. If you press the control for a longer time, the cooking function which follows the desired one will be selected.
In the event of a power failure, most of the settings will be cancelled. When the power is restored, the settings will have to be reset.
The display switches off automatically after two minutes if no function is selected and none of the touch controls are used. The display shows the time of day, if set.
The Safety Thermostat
This oven is provided with a safety thermostat. In case of malfunctioning of the main thermostat, and consequential over-heating, the safety device will stop the power supply to the appliance. If this happens, call your local Service Force Centre. Under no circumstances should you attempt to repair the appliance yourself.
The cooling fan
The cooling fan operates during cooking. Air is expelled through vents between the oven door and the control panel.
The cooling fan may run on after the oven is switched off to keep the controls cool. This is quite normal.
8
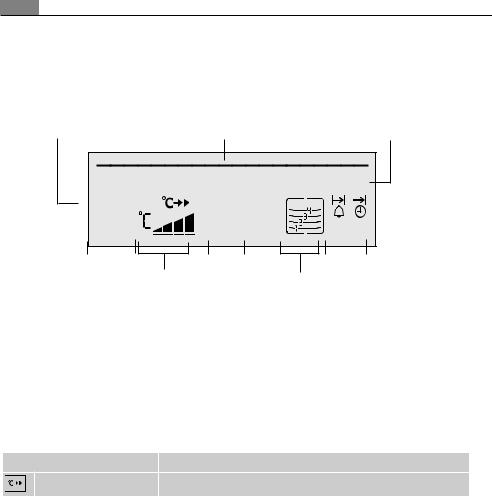
The electronic oven controls
Indicators
Symbol status bar |
Menu status bar |
Text line |
TRUE FAN |
|
|
150 |
12.05 |
00.06 |
|
|
|
|
|
|
|
|
|
|
|
|
|
|
|
|
Heat indicator |
|
|
Shelf positions |
|
|
||||
|
|
|
|
|
|
|
|
Clock |
|
functions |
||
Temperature |
|
Time |
|
|
||||||||
|
|
|
|
Meat core temperature |
Period of operation |
|||||||
Menu status bar
In the menu status bar the current position within a menu is shown by a flashing bar.
When the menu status bar can no longer be seen in the display, the oven begins to heat or the time set begins to count down.
Symbol status bar
Symbol |
Function |
RAPID HEAT UP |
RAPID HEAT UP is in operation. |
9
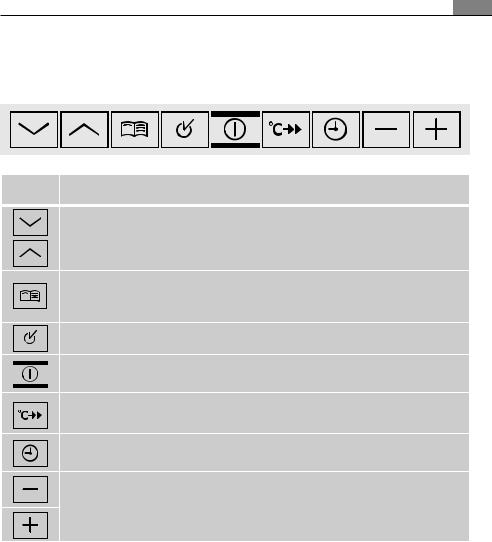
Buttons
Button Function
To select oven functions.
To move down and up in the menu.
To open the Options menu.
To close the Options menu (press and hold button).
Confirm, change to the sub-menu.
To switch appliance on or off.
Switch RAPID HEAT UP on or off.
Select clock functions
To set temperature, time, weight or degree of cooking.

10
Before Using for the first time
Setting the language
1.When the appliance has been connected to the electrical supply, SPRACHE EINSTELLEN - LANGUAGE MENU is shown in the display.
2.Using the arrow buttons  or
or  select the desired language.
3.Confirm selected language with the OK button. From now on the texts in the display appear in the language set.
Setting the clock
1.TIME OF DAY lights up.
In the clock display you see 12.00.
2.Using the or
or button, set the current time.
3.Confirm using the SELECTION  button. The appliance switches itself off and is now ready for use.
If you would like to change one of these base settings at a later date, please refer to the chapter "Clock Functions".
11
Initial cleaning
Cleantheovenbeforeusingitforthefirsttime.
Important: Do not use caustic or abrasive cleaning agents! These can damage the oven surfaces.
For the metal surfaces, use commercially available cleaning agents.
Remove all packaging, both inside and outside the oven, before using the oven.
Remove all oven accessories, and clean them with warm water and a scouring agent.
The oven will work only if the time of day has been set.
Before using for the first time, the oven should be heated up without food.
During this time, an unpleasant odour may be emitted. This is absolutely normal. It is caused by manufacturing residues.
1.Touch the "ON/OFF" control to switch on the oven.
2.Touch the arrow button and select the CONVENTIONAL cooking function .
3.Set the temperature to 250°C using control
.
4.Allow the oven to run empty for approximately 45 minutes.
5.Open a window for ventilation.
This procedure should be repeated with the TRUE FAN function and the DUAL GRILL function for approximately 5-10 minutes.
6.Then let the oven cool down.
7.Open the oven door.
8.Wash the oven in the same way, and wipe dry.
9.Wipe the front of the appliance with a damp cloth.
To open the oven door, always hold the handle in the centre.
12
Using the Oven
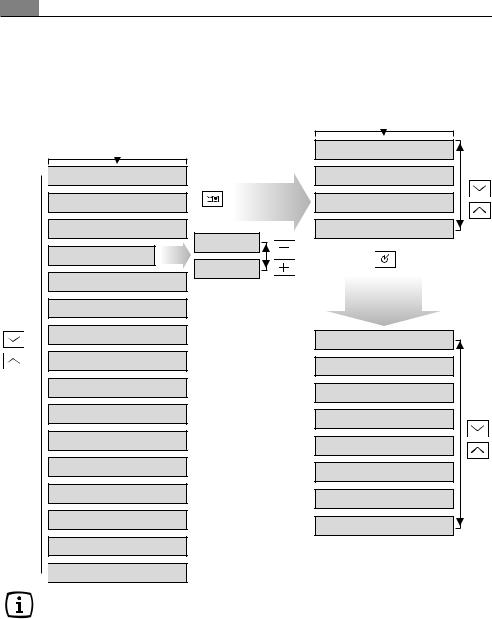
Menu operation in overview
Oven
Functions Menu

 LIGHT
LIGHT
TRUE FAN
FAN BAKING
SLOW COOK
CONVENTIONAL
ROTITHERM
DUAL GRILL
SINGLE GRILL
KEEP WARM
DEFROST
BASE HEAT
POULTRY
PORK
BEEF
VEAL

 GAME
GAME
ONE
TWO
Menu
Options
RECIPE MENU
MEMORY MENU
CLEANING MENU
SETTINGS MENU
HEAT+HOLD MENU
EXTRA TIME MENU
RAPID HEAT UP MENU
RESIDUAL HEAT MENU
DISPLAY MENU
SOUND MENU
LANGUAGE MENU
FACTORY SETTINGS
The display only offers setting options that are possible with the current function after each operational step.
The Oven Functions menu
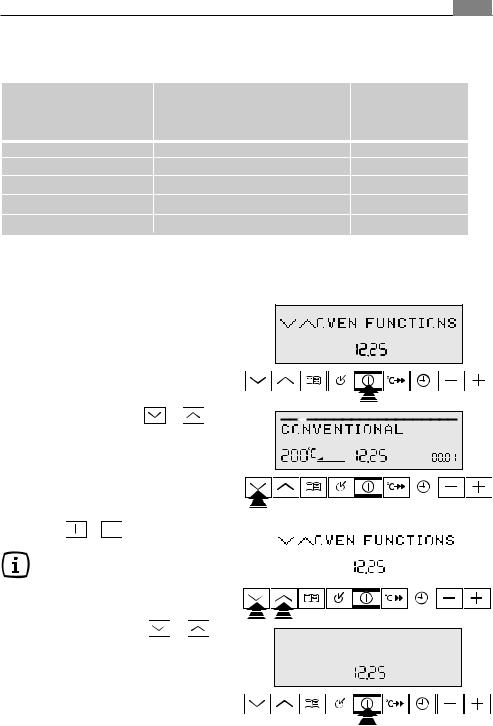
•When you switch the appliance on, you find yourself in the Oven Functions menu.
•Select the desired oven function using the arrow buttons  or
or  . In the menu status bar, the currrent position within the menu is shown.
13
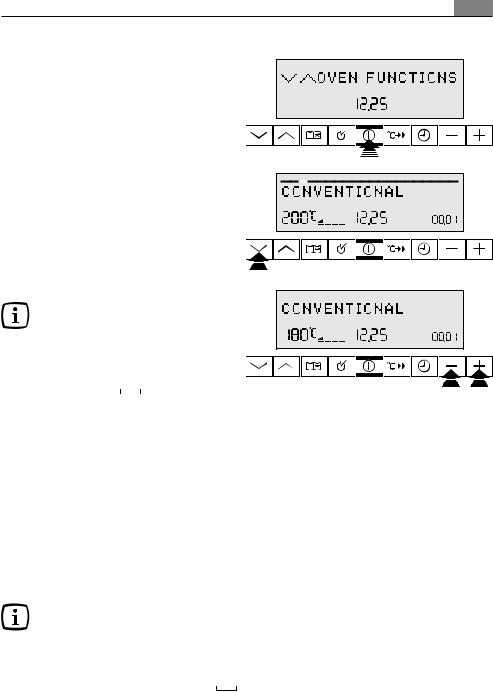
Setting an example oven function
1. Switch on the appliance using the ON/OFF  button.
2. Using the arrow buttons  or
or select the oven function.
A suggested temperature appears in the temperature display.
The oven starts to heat up.
3. With the or
or button, the temperature can be raised or lowered.
When the temperature set is reached, an audible signal sounds.
The Options menu
• Using the OPTION  button, open the Options menu.
•Select the desired option using the arrow
buttons or
or . In the menu status bar, the current position within the menu is shown.
•Use the OK  button to change to the menu of the selected option.
The sub-menus
•Select the desired setting using the arrow
buttons or
or or change to other submenus using the OK
  button.
At the end of every menu there is the menu option BACK.
You use this to go back to the higher menu.
You can cancel a setting procedure by pressing and holding down the OPTION  button.
You will then find yourself back in the Oven functions menu.
14
Use of the oven functions
The oven has the following functions:
Oven function |
|
|
Application |
Heating |
|
|
|
element/fan |
|||
1 |
LIGHT |
|
|
Oven light - The oven light will be on |
None |
|
|
|
|
without any cooking function |
|
2 |
TRUE FAN |
|
|
For baking on two oven levels at the same |
Rear wall heating |
|
|
|
|
time. Set the oven temperatures 20-40°C |
element, fan |
|
|
|
|
lower than when using Conventional. |
|
3 |
FAN BAKING |
|
For baking on one oven level dishes that |
Top heat, rear wall |
|
|
|
|
|
require more intensive browning and a |
heating element, |
|
|
|
|
crispy base. Set the oven temperatures |
fan |
|
|
|
|
20-40 °C lower than when using |
|
|
|
|
|
Conventional. |
|
4 |
SLOW COOK |
|
For preparing especially tender, |
Rear wall heating |
|
|
- ONE |
|
succulent roasts. Slow Cook ONE is pre- |
element, fan |
|
|
- TWO |
is |
set at 120°C, Slow Cook TWO is pre-set |
|
|
|
While |
"ONE" |
at 150°C. After 10 minutes, temperatu- |
|
|
|
flashing, use |
or |
re automatically changes to 80°C until |
|
|
|
buttons to choose |
the oven is switched off. |
|
||
|
between |
"ONE" |
or |
|
|
|
"TWO" |
|
|
|
|
5 |
CONVENTIONAL |
|
For baking and roasting on one oven |
Top heat, bottom |
|
|
|
|
|
level. |
heat |
6 |
ROTITHERM |
|
For roasting larger joints of meat or |
Grill, top heat, fan |
|
|
|
|
|
poultry on one level. The function is |
|
|
|
|
|
also suitable for gratinating and |
|
|
|
|
|
browning. |
|
|
|
|
|
For ROTITHERM select a maximum |
|
|
|
|
|
temperature of 200°C |
|
7 |
DUAL GRILL |
|
For grilling flat foodstuffs in large |
Grill, top heat |
|
|
|
|
|
quantities and for toasting. |
|
8 |
SINGLE GRILL |
|
For grilling flat foodstuffs placed in the |
Grill |
|
|
|
|
|
middle of the grill and for toasting. |
|
9 |
KEEP WARM (*) |
|
To keep dishes warm. |
Top+bottom heat |
|
10 |
DEFROST (*) |
|
For defrosting e. g. flans and gateaux, |
Fan |
|
|
|
|
|
butter, bread, fruit or other frozen foods. |
|
11 |
BASE HEAT |
|
For baking cakes with crispy or crusty |
Bottom heat |
|
|
|
|
|
bases. |
|
(*) Temperature setting cannot be changed
15
Meat programmes
Meat programmes |
Application |
Weight range |
|
with weight input |
|||
|
|
||
POULTRY |
Chicken, duck, goose, turkey |
0.8 to 6.0 kg |
|
PORK |
Roast pork, shoulder of pork |
0.8 to 3.0 kg |
|
BEEF |
Roast beef, pot roast |
0.8 to 2.5 kg |
|
VEAL |
Roast veal |
0.8 to 2.5 kg |
|
GAME |
Vension, rabbit |
0.8 to 3.0 kg |
Usage, Tables, Tips and Recipes
You will find practical information on the various oven functions, programmes and automatic recipes in the accompanying booklet.
Switching the Oven On and Off
Selecting an oven function
1. Switch appliance on using the ON/OFF  button.
2. Using the arrow buttons or select the desired oven function.
A suggested temperature appears in the temperature display.
The oven starts to heat up.
Changing the oven temperature |
|
|
|
|
|
||
|
|
|
|
|
|||
With the |
or |
button the temperatu- |
|
|
|
||
|
|
|
|||||
re can be raised or lowered. |
|
|
|
|
|
||
When the temperature set is reached, an |
|
|
|
||||
audible signal sounds. |
|
|
|
|
|
||
Switching off an oven function |
|
|
|
|
|
||
|
|
|
|
|
|||
|
|
|
|
|
|||
Press the arrow buttons |
or |
until |
|
|
|||
OVEN FUNCTIONS is in the display again.
Turning appliance off completely
Switch appliance off using the ON/OFF button.

16
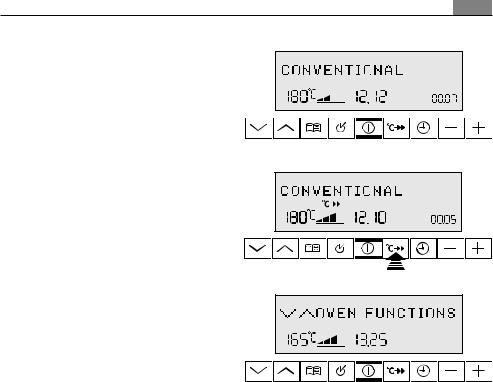
Pre-heating with the RAPID HEAT UP function
After an oven function has been selected, with the additional function RAPID HEAT UP the preheating time can be shortened.
Pre-heating the empty oven is unnecesssary for most baking and roasting sessions, because the temperature set is generally reached in a short time (see booklet “Tables, Tips and Recipes”).
We recommend pre-heating the empty oven using the RAPID HEAT UP function for biscuits that quickly spread into one another, bread rolls and Swiss rolls.
Important: Do not put the food to be cooked into the oven, until RAPID HEAT UP is completed and the oven is operating using the desired function.
1.Set the oven function (e.g. CONVENTIONAL). Change the suggested temperature, if necessary.
2.Press the RAPID HEAT UP button. The symbol
 lights up:
When the bars flash one after another it shows that RAPID HEAT UP is operating.
When the temperature set is reached, the bars of the heat indicator are lit. An audible signal sounds. The symbol  goes out.
The oven now continues heating according to the pre-set oven function and temperature. You can now place the food in the oven.
If you generally prefer to put food into a pre-heated oven, you can switch on the RAPID HEAT UP function permanently (see SETTINGS MENU).
The RAPID HEAT UP function is then switched off with the RAPID HEAT UP  button.
The RAPID HEAT UP function can be switched on with the oven functions TRUE FAN, FAN BAKING, CONVENTIONAL and ROTITHERM.
17
Heat indicator
Heating up indicator
When the oven function has been switched on the four bars that slowly light up one after the other indicate how far the oven has heated up.
RAPID HEAT UP indicator
When the RAPID HEAT UP function has been switched on, the bars that flash one after the other indicate that RAPID HEAT UP is operating.
Residual heat indicator
When the oven has been switched off, the bars that are still lit indicate the remaining residual heat in the oven. The current temperature inside the oven is also displayed.
 Loading...