


 Loading...
Hobart ML-29048, ML-29037, ML-29044, ML-29188, ML-29035 User Manual
...Quantum Scale System
Operator Manual
Models |
|
Quantum Scale |
|
Standard |
ML-29032 |
Narrow |
ML-29035 |
Prepack |
ML-29037 |
Linerless |
ML-29039 |
TCP/IP |
ML-29191 |
Quantum Printer |
|
Standard |
ML-29044 |
Narrow |
ML-29048 |
Quantum Hanging Scale |
ML-29188 |
F–19403B
December 1999
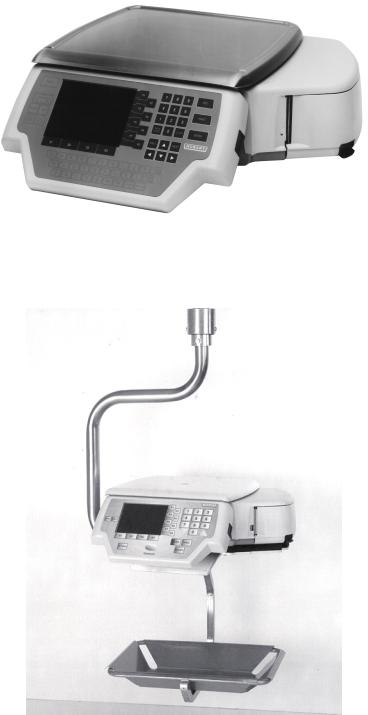
Quantum Scale
Quantum Hanging Scale
|
Quantum Scale System |
Table of Contents |
|
Chapter One: Introduction to This Manual ................................................. |
1-1 |
FCC Note................................................................................................ |
1-2 |
Verify Correctness of Weight & Price...................................................... |
1-2 |
Operator Manual Overview..................................................................... |
1-3 |
How to Use This Manual......................................................................... |
1-4 |
Chapter Two: General Information About the |
|
Quantum Scale System .................................................................................... |
2-1 |
General Information................................................................................ |
2-2 |
Electrical Connections ............................................................................ |
2-2 |
Communication Connections.................................................................. |
2-3 |
Reset Button........................................................................................... |
2-3 |
Control Panel Overview .......................................................................... |
2-4 |
Screen Highlights ................................................................................... |
2-6 |
Mechanical Procedures .......................................................................... |
2-8 |
Removing the Label Cassette ........................................................... |
2-8 |
Removing the Empty Label Roll ........................................................ |
2-9 |
Loading Labels.................................................................................. |
2-9 |
Installing the Label Cassette ............................................................. |
2-13 |
Removing the Scale Platter............................................................... |
2-14 |
Installing the Scale Platter................................................................. |
2-14 |
Adjusting the Scale Feet ................................................................... |
2-15 |
Adjusting Console Position & Screen Contrast ................................. |
2-16 |
HELP Key Functions............................................................................... |
2-17 |
Help on “F” Keys ............................................................................... |
2-18 |
About the Keyboard........................................................................... |
2-18 |
Basic Help ......................................................................................... |
2-19 |
Moving Through the System ............................................................. |
2-20 |
Chapter Three: Start Up Procedures ............................................................................ |
3-1 |
Power-up Sequence ............................................................................... |
3-2 |
Setting Date/Time on Initial Set-Up ....................................................... |
3-4 |
Checking Date/Time ............................................................................... |
3-5 |
Changing Date/Time............................................................................... |
3-5 |
Hobart Corporation, 1997 |
TOC - 1 |

Quantum Scale System
Table of Contents Continued.... |
|
Chapter Four: Understanding & Using the Start a Run Screen |
..........................4-1 |
Start a Run Screen Overview ................................................................. |
4-2 |
Verifying Zero Weight ............................................................................. |
4-3 |
Rezeroing the Scale ............................................................................... |
4-4 |
Weigh Types .......................................................................................... |
4-5 |
Totals Types........................................................................................... |
4-7 |
Selecting Weigh and Totals Types ......................................................... |
4-7 |
Entering Operator ID Numbers............................................................... |
4-8 |
Entering an Operator ID from the Start a Run Screen....................... |
4-8 |
Entering an Operator ID from the Flashkey Screen .......................... |
4-8 |
Chapter Five: Entering Product (PLU) Information .................................................. |
5-1 |
Selecting Flashkeys................................................................................ |
5-2 |
Typing the PLU Number ......................................................................... |
5-4 |
Accessing the On Screen Library ........................................................... |
5-5 |
Auto Look Up .................................................................................... |
5-6 |
Selecting Miscellaneous PLU’s............................................................... |
5-7 |
Miscellaneous By Weight .................................................................. |
5-7 |
Miscellaneous By Count.................................................................... |
5-8 |
Random Weight PLU’s with Proportional Tare ....................................... |
5-9 |
Chapter Six: Weigh Types (Modes of Operation)...................................................... |
6-1 |
Wait on a Customer Mode...................................................................... |
6-2 |
Processing Random Weight PLU’s ................................................... |
6-2 |
Processing By Count, Fluid Ounce & Fixed Weight PLU’s................ |
6-3 |
Voiding a Transaction ....................................................................... |
6-3 |
PrePackaged Products Mode................................................................. |
6-4 |
Processing Random Weight PLU’s ................................................... |
6-4 |
Processing Fixed Weight & Fluid Ounce PLU’s ................................ |
6-5 |
Processing By Count PLU’s .............................................................. |
6-5 |
Print Multiple Labels Mode ..................................................................... |
6-6 |
Processing Fixed Weight PLU’s ........................................................ |
6-6 |
Processing Random Weight PLU’s ................................................... |
6-6 |
Production Entry Mode ........................................................................... |
6-7 |
Processing Fixed Weight PLU’s Only................................................ |
6-7 |
Processing Random Weight PLU’s ................................................... |
6-8 |
Processing Fixed Weight and By Count PLU’s ................................. |
6-8 |
Accumulate Items Mode ......................................................................... |
6-9 |
Processing Random Weight PLU’s ................................................... |
6-11 |
Processing Fixed Weight & Fluid Ounce PLU’s ................................ |
6-11 |
Verify Fixed Weight Mode ...................................................................... |
6-12 |
Processing Fixed Weight PLU’s ........................................................ |
6-12 |
Processing Random Weight and By Count PLU’s............................. |
6-12 |
TOC - 2

|
Quantum Scale System |
Table of Contents Continued.... |
|
Forced Price............................................................................................ |
6-13 |
Random Weight PLU’s....................................................................... |
6-13 |
Random Weight - By Count PLU’s..................................................... |
6-14 |
Fixed Weight PLU’s ........................................................................... |
6-15 |
Forced Tare............................................................................................. |
6-16 |
Forced By Count ..................................................................................... |
6-17 |
Platter Tare ............................................................................................. |
6-17 |
Chapter Seven: Temporary Override of Product Information .............................. |
7-1 |
Overview ................................................................................................. |
7-2 |
By Random Weight ................................................................................. |
7-4 |
Changing the Label Type or Graphic ................................................. |
7-5 |
By Count ................................................................................................. |
7-6 |
By Fixed Weight ...................................................................................... |
7-7 |
By Fluid Ounce........................................................................................ |
7-8 |
Steps to Temporarily Override Product Information ................................ |
7-9 |
Chapter Eight: Cleaning Instructions ........................................................................... |
8-1 |
Cleaning the Exterior of Scale................................................................. |
8-2 |
Cleaning the Printhead............................................................................ |
8-2 |
Chapter Nine: Troubleshooting ...................................................................................... |
9-1 |
Appendix .................................................................................................................................. |
A-1 |
Creating Macros (Using the Save/Recall Key) ........................................ |
A-2 |
Recording a Macro ............................................................................ |
A-2 |
Executing a Macro ............................................................................. |
A-3 |
Deleting a Macro................................................................................ |
A-4 |
Proportional Tare (Percentage Tare) ...................................................... |
A-5 |
Percentage Tare Procedure .............................................................. |
A-5 |
How the Percentage Tare Value is Calculated .................................. |
A-6 |
Working with Labels ................................................................................ |
A-7 |
Label Stock Styles ............................................................................. |
A-8 |
Selecting Label Types (Formats) ....................................................... |
A-10 |
Graphics.................................................................................................. |
A-52 |
Glossary ................................................................................................................................... |
G-1 |
Index .......................................................................................................................................... |
I-1 |
TOC - 3

Quantum Scale System
Chapter One: Introduction to This Manual
♦FCC Note
♦Verify Correctness of Weight & Price
♦Operator Manual Overview
♦How to Use This Manual
Quick Start
For information on quickly processing a transaction, refer to Chapter Six: Weigh Types (Modes of Operation). This chapter gives you
step-by-step instructions for processing a transaction and printing a label for all six modes of operation.
1 - 1 |
Introduction to This Manual |
Quantum Scale System
Quantum Scale System
SAVE THESE INSTRUCTIONS
FCC Note
This equipment has been tested and found to comply with the limits for a Class A digital device, pursuant to part 15 of the FCC Rules. These limits are designed to provide reasonable protection against harmful interference when the equipment is operated in a commercial environment. This equipment generates, uses, and can radiate radio frequency energy and, if not installed and used in accordance with the instruction manual, may cause harmful interference to radio communications. Operation of this equipment in a residential area is likely to cause harmful interference; in which case, the user will be required to correct the interference at his own expense.
Verify Correctness of
Weight & Price
Verification of information on labels should be made routinely. Check the multiplication of price-per-pound times weight, and check the indicated weight against printed weight. Weigh the same package several times to verify consistency. Bear in mind that some packages which weigh near the middle of the .01 lb. increment will normally vary up or down by .01 lb. Greater variation than .01 lb. indicates a need for adjustment of the system. In such cases, or whenever necessary, contact your authorized Hobart service representative.
Introduction to This Manual |
1 - 2 |
Quantum Scale System
Operator Manual
Overview
This manual will use the following methods to explain keystrokes and data entry procedures:
♦The word PRESS means to press a key on the Control Panel.
♦The word TYPE means to press a series of keys on the Control Panel and press [ENTER].
♦The word SELECT means to choose an item from the display, using the Function Keys or Flashkeys.
♦The word ENTER means to press the [ENTER] key on the Control Panel.
♦Words in uppercase enclosed in brackets (for example [ENTER]) represent specific keys.
The following special instructions are used in the manual:
Note
A note is information that you need to know, but it is not an actual step in the procedures.
Tip
A tip is additional information that may be useful when you are using the scale system.

 Look At This
Look At This is information to alert you that you may be doing something that will permanently alter your scale system.
1 - 3 |
Introduction to This Manual |

Quantum Scale System
How to Use This Manual
Refer to the following sections for information about using the Quantum Scale System.
♦Chapter Two: General Information provides you basic information about the Quantum’s features including:
*Standard Features
*Communications Connections
*Reset Button
*Control Panel Overview
*Screen Highlights
*Mechanical Procedures
*HELP Key Functions
♦Chapter Three: Start Up Procedures provides you an overview of the Power-up Sequence and how to set, check or change Date/Time.
♦Chapter Four: Understanding and Using the Start a Run Screen provides you an overview of the screen, verifying zero weight, identifying, understanding and selecting Weigh and Totals Types, and entering Operator ID’s.
♦Chapter Five: Entering PLU Information describes how to enter PLU data (i.e., through Flashkeys, typing the PLU number or pressing the HELP Key to use the On Screen Library).
♦Chapter Six: Weigh Types details how to perform a transaction within each mode of operation (i.e., Wait on a Customer, PrePackaged Products, etc.)
♦Chapter Seven: Temporary Override of Product Information gives you the details of how to temporarily change product information for a specified Weigh Type.
♦Chapter Eight: Cleaning Instructions gives you procedures for cleaning the exterior of the scale and the printhead.
♦Chapter Nine: Troubleshooting provides you operating tips to assist you with unexpected scale problems.
♦The Appendix provides you additional information on the following:
*Creating Macros (Using the Save/Recall Key)
*Percentage Tare (Proportional Tare)
*Label Types
*Graphics
*Glossary of Commonly Used Terms
♦The Index provides you a listing of the topics in this manual and their corresponding page numbers.
Introduction to This Manual |
1 - 4 |
Quantum Scale System
Chapter Two: General Information About
the Quantum
♦General Information
♦Electrical Connections
♦Communication Connections
♦Reset Button
♦Control Panel Overview
♦Screen Highlights
♦Mechanical Procedures
•Removing the Label Cassette
•Removing the Empty Roll
•Loading Labels
•Installing the Label Cassette
•Removing the Scale Platter
•Installing the Scale Platter
•Adjusting Scale Feet
•Adjusting Console Position
•Adjusting Screen Contrast
♦HELP Key Functions
•Help on “F” Keys
•About the Keyboard
•Basic Help
•Moving Through the System
2 - 1 |
General Information |

Quantum Scale System
General Information
Electrical Connections
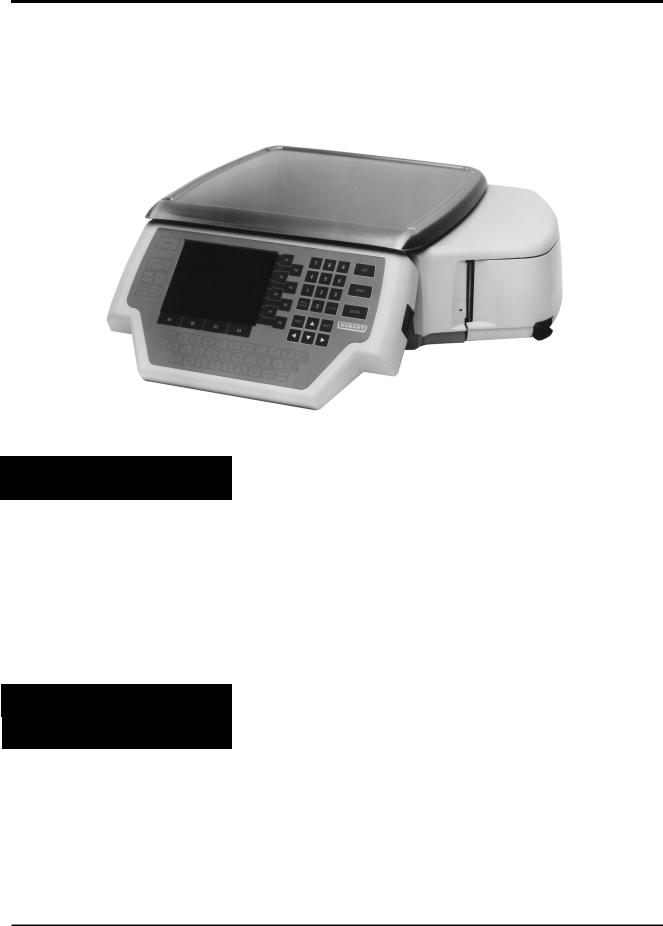
The Quantum Scale System is perfect for your over-the- counter weighing applications. This state-of-the-art weighing system can handle a broad variety of products for deli, bakery, produce, fish and cheese departments. It can also function in a Prepack Scale mode when necessary.
With 512K memory, the system can store information on thousands of products; including NutriFacts which allows you to meet labeling law requirements and Expanded Text for Recipes and Cooking Instructions.
A new feature with the Quantum is Flashkeys which allow easy access to product information. A maximum of 16 Flashkeys can be displayed on a screen at one time. Multiple screens can be programmed to mirror your product case. When an item is called up from memory, the product information can be reviewed or changed before weighing or label printing. This allows quicker and easier service to your customers.
Another new feature is the On Screen Library which provides you with the ability to locate the PLU information using the Class Structure. A detailed description of this feature is found later in this manual.
The Quantum Scale System should be installed or moved only by qualified Hobart-trained service technicians. It can operate in a temperature range from 32oF to 104oF
(0oC to 40o C).
The Power Cord receptacle is located on the bottom side of the Quantum base. The power cord is connected to 120V., 60 Hz., Single (1) Phase electrical power. Once the Quantum is plugged in, the system is ready to begin the Power-up Sequence.
General Information |
2 - 2 |
Quantum Scale System
Communication
Connections
Reset Button
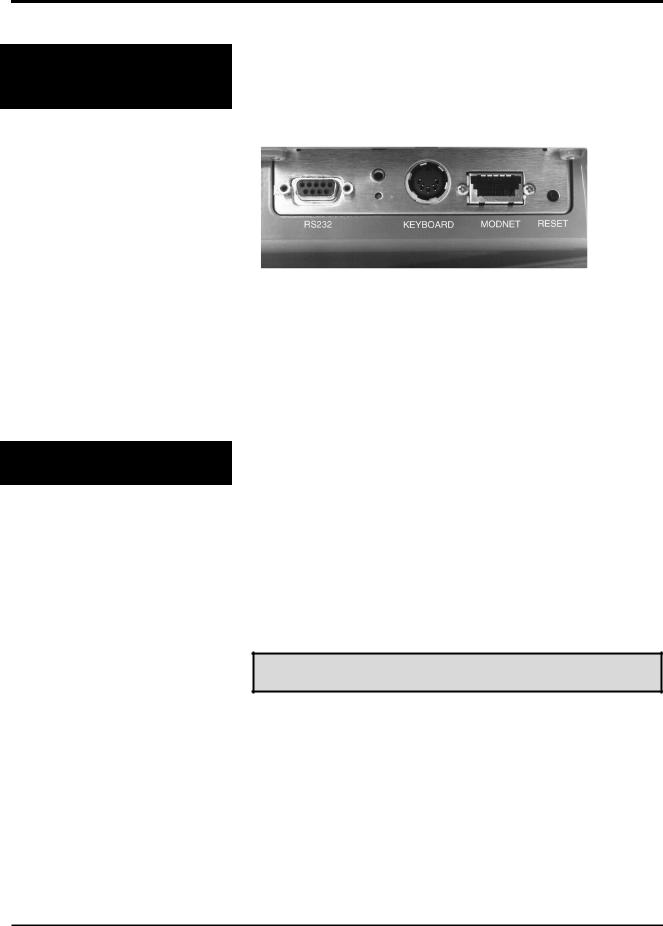
In addition to the Power Cord, there are up to four (4) additional ports.
On the left side of the scale, there are several ports for peripherals such as:
♦Disk Player/Recorder and Cassette Recorder (RS232)
♦IBM PC Keyboard (Keyboard)
♦Floppy Disk Drive or Secondary Printer (MODNET)
♦Future Expansion (i.e., parallel port for Report Printer)
Also located on the left side of the scale is the Reset Button. In the unlikely event the scale stops responding to keyboard input, you will use the Reset Button to reset the scale back to the Start a Run Screen.
To reset the scale, you must:
1.Hold in the Reset Button (small black button) for 2 - 3 seconds. (See Photo above for Reset Button location.)
Note
The POWER key on the front of the Control Panel turns the displays (both operator and customer) ON and OFF. It is only functional from the Start a Run Screen. This key should be used at the end of the day to conserve power.
2 - 3 |
General Information |

Quantum Scale System
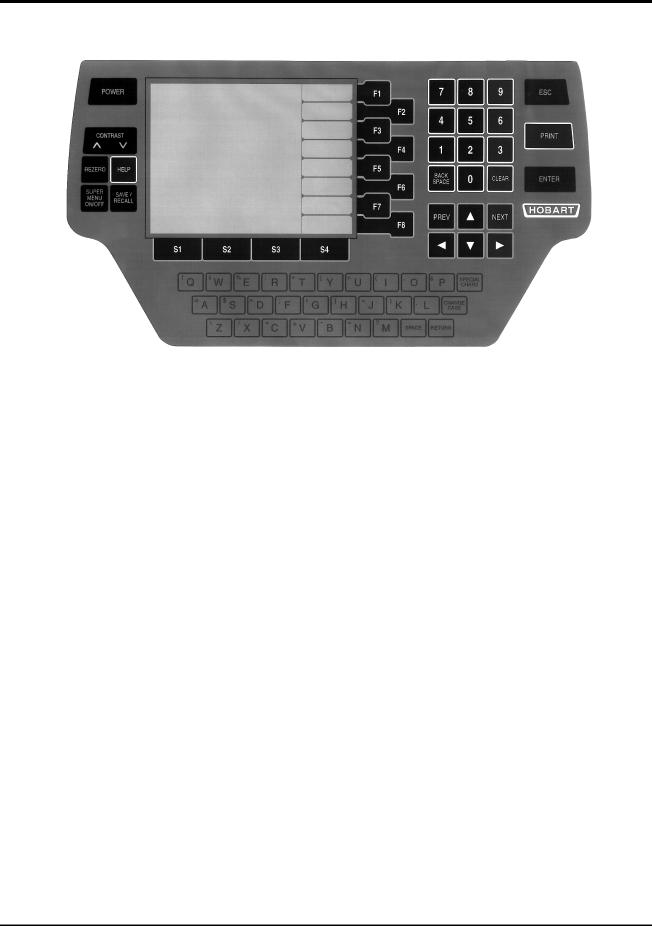
Control Panel
Overview
Key/Highlight |
Function |
|
|
POWER |
Turns the screen and the keyboard ON/OFF. |
|
|
“F” Keys (F1-F8) |
Allows you to make selections from the menu screens or select a row of |
|
Flashkeys. |
|
|
Numeric Keypad |
Allows you to enter numeric data. |
|
|
BACKSPACE |
Allows you to remove the highlighted character or the character to the left of the |
|
cursor. |
|
|
CLEAR |
Allows you to reset a numeric field to zero. This key is not active in a text field. |
|
|
ESC (Escape) |
Allows you to return to the previous screen. Pressing [ESC] will save any |
|
changes you make on a screen. |
|
|
Allows you to print a label or report. |
|
|
|
ENTER |
Allows the scale to accept the selected data and move to the next field. It also |
|
may advance the cursor to the next screen. |
|
|
PREV (Previous) |
Moves you back one screen. |
|
|
NEXT |
Moves you to the next screen. |
|
|
ARROW KEYS |
Allows you to move the cursor from field-to-field (UP and DOWN Arrow Keys) |
|
or from character-to-character (LEFT and RIGHT Arrow Keys) in a field. |
|
|
General Information |
2 - 4 |
Quantum Scale System
Key/Highlight |
Function |
|
|
Alpha Characters |
Allows you to enter upper case or lower case alpha characters while in a text |
|
field. |
|
|
SPECIAL CHARS. |
Press this key to type a special character (found in the upper left corner of each |
|
alpha-key). You must press Special Chars. for each Special Character. |
|
|
CHANGE CASE |
Allows you to switch between Upper or Lower Case. You must press Change |
|
Case each time you want to change the case in a text field. |
|
|
RETURN |
Advances the cursor to the next field or inserts an End-of-Line in a text field. |
|
|
SPACE |
Allows you to type (add) a space between words or characters. |
|
|
“S” Keys (S1-S4) |
Allows you to select the column when selecting a Flashkey. |
|
|
SAVE/RECALL |
Press this key to have the scale remember a series of keystrokes which can be |
|
recalled later by pressing a Flashkey or by entering a reference number (Macro |
|
ID). |
|
|
SUPER MENU ON/OFF |
Allows you to access the Supervisor Menu from the Start a Run Screen or from |
|
any other screen in the Supervisor Mode. |
|
|
REZERO |
Allows you to set the scale to 0.00 pounds from the Start a Run or Run Screen. |
|
|
HELP |
Allows you to access the Help Screens. From the Run Screen in the Operate |
|
Mode, it allows you to access the On Screen Library and select a PLU. |
|
|
CONTRAST |
Allows you to adjust the lightness and darkness of the screen image based on the |
|
viewing angle. |
|
|
Cursor |
Highlights text or the position where you will enter data. |
|
|
2 - 5 |
General Information |
Quantum Scale System
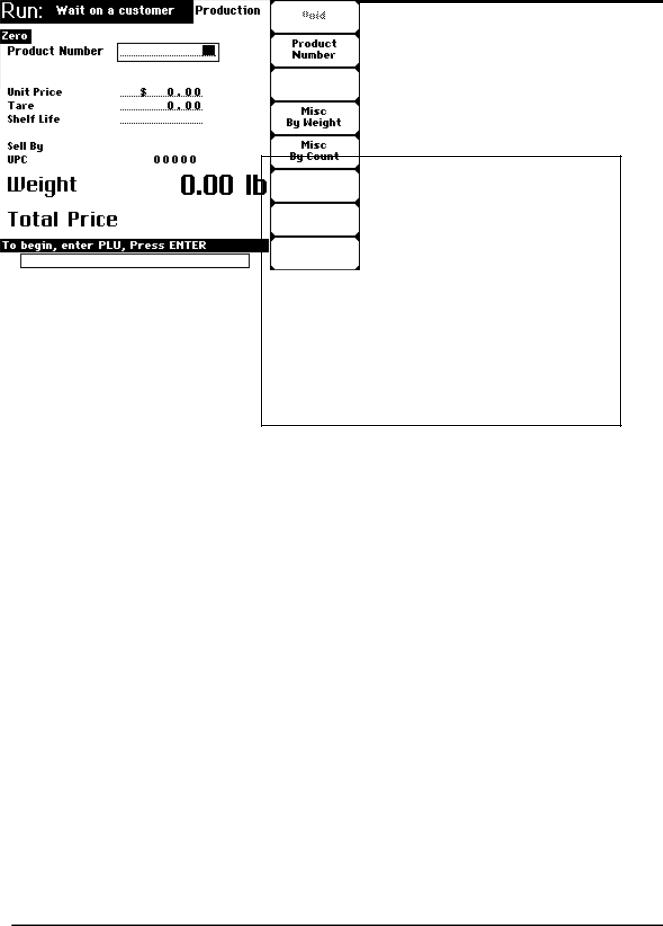
Screen Highlights The Quantum Scale System has several common screen characteristics that assists you in interacting with the scale.
We refer to these as “Screen Highlights.” The highlights act the same regardless of your screen location.
Highlight |
Description |
|
|
Active Field |
A box surrounding text or numeric |
|
fields indicates that this field is the |
|
active field. If you begin typing from |
|
the keyboard or control panel, the |
|
data will be entered into this field. |
Bar Cursor |
A bar cursor ( ) indicates that the |
|
field is a text field. |
Block Cursor |
A block cursor ( ) indicates that the |
|
field is a numeric field. |
Changeable Fields |
If a field has a dotted line (.............) |
|
under it, this means that the field is |
|
able to be changed or edited. |
Grayed Fields |
If a field or selection is grayed, it |
|
means that it is not available for that |
|
particular screen or transaction. |
General Information |
2 - 6 |
|
|
Quantum Scale System |
|
|
|
|
|
|
Highlight |
Description |
|
Screen Highlights |
|
|
|
Prompt Line |
The Prompt Line is white text, |
||
|
|||
|
|
reversed out of a black box. It is |
|
|
|
typically located at the bottom |
|
|
|
portion of the screen. It prompts you |
|
|
|
on what your next step should be. |
|
|
|
Depending on your scale’s |
|
|
|
configuration, it may be black text |
|
|
|
reversed out of a white box. |
|
|
Screen Title |
The Screen Title identifies the screen |
|
|
|
name and function that you are |
|
|
|
attempting to complete. |
|
Highlight |
Description |
|
Control Panel |
|
|
|
ESC (Escape) |
This key on the Control Panel is used |
||
|
|||
|
|
to move you back a level (i.e., one |
|
|
|
screen). |
|
|
“F” Keys |
These keys are located to the right of |
|
|
|
the display screen and are used to |
|
|
|
make menu selections. |
|
|
Left/Right Arrow |
Pressing either of these keys moves |
|
|
Keys |
you within an active field allowing |
|
|
|
you to move the cursor back one |
|
|
|
character at a time. |
|
|
“S” Keys |
These keys are located below the |
|
|
|
display screen and are used to make |
|
|
|
selections of operators, products and |
|
|
|
macros. |
2 - 7 |
General Information |
Quantum Scale System
Mechanical
Procedures
This section explains how to:
♦Remove the Label Cassette
♦Remove Empty Label Roll
♦Load Labels
♦Install the Label Cassette
♦Remove the Scale Platter
♦Install the Scale Platter
♦Adjust the Scale Feet
♦Adjust the Console Position
♦Adjust the Screen Contrast
Note
In order to print different label stock types (Narrow, Wide or Linerless), the Quantum will use different Label Cassettes. This allows you to rapidly change the label stock by simply ejecting one label cassette and replacing it with another one.
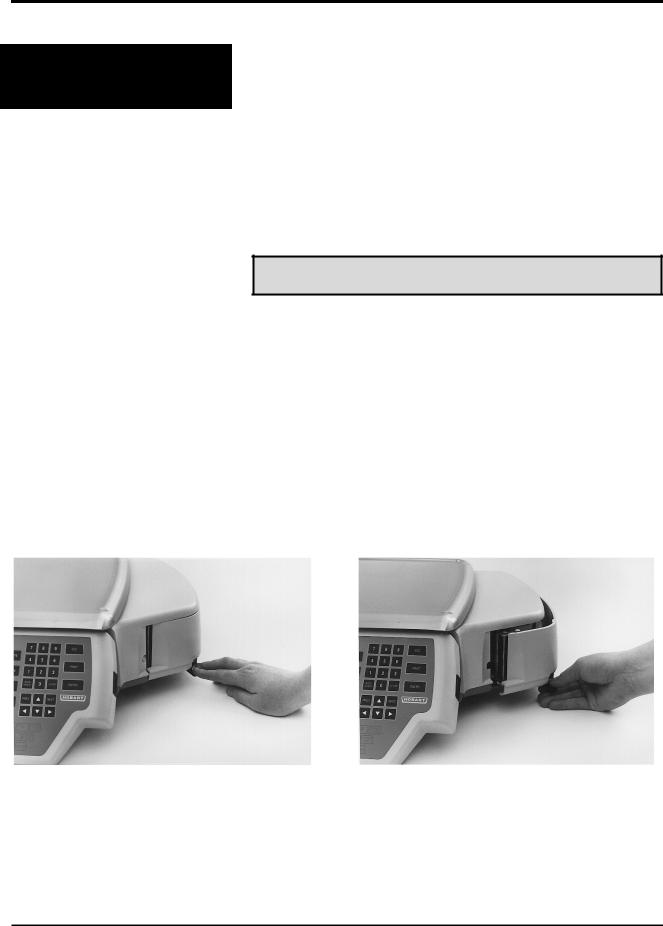
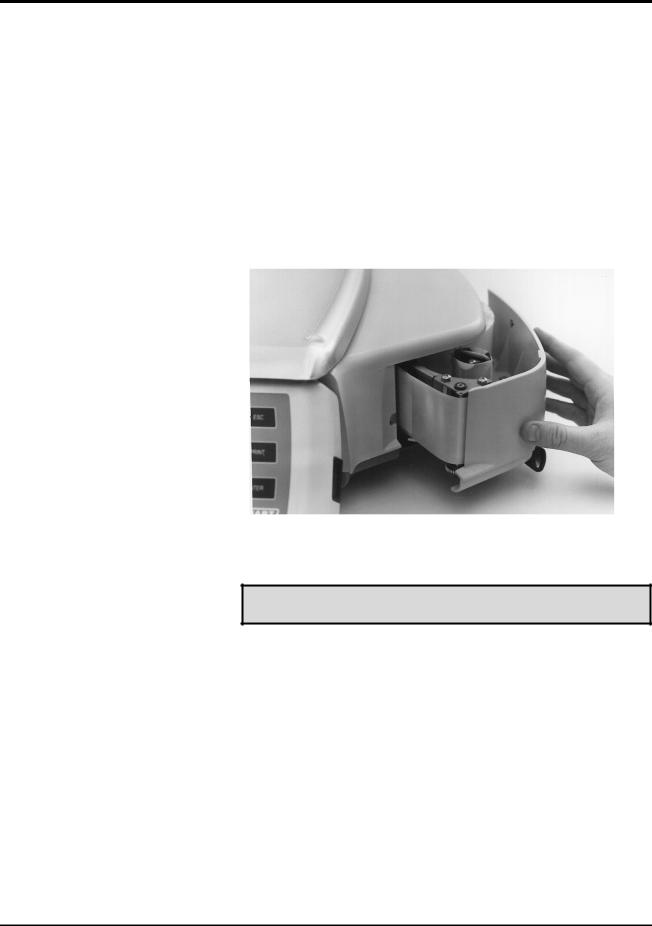
Removing the Label Cassette |
To remove the Label Cassette: |
|
|
1. |
Press down on the black Label Cassette Eject Button. |
|
||
|
|
The Label Cassette will partially eject (@ 1 - 2”). |
|
2. |
Grasp the Label Cassette and slide it out the front. |
Step 1 |
Step 2 |
General Information |
2 - 8 |
Quantum Scale System
To remove the backing paper of an empty label roll:
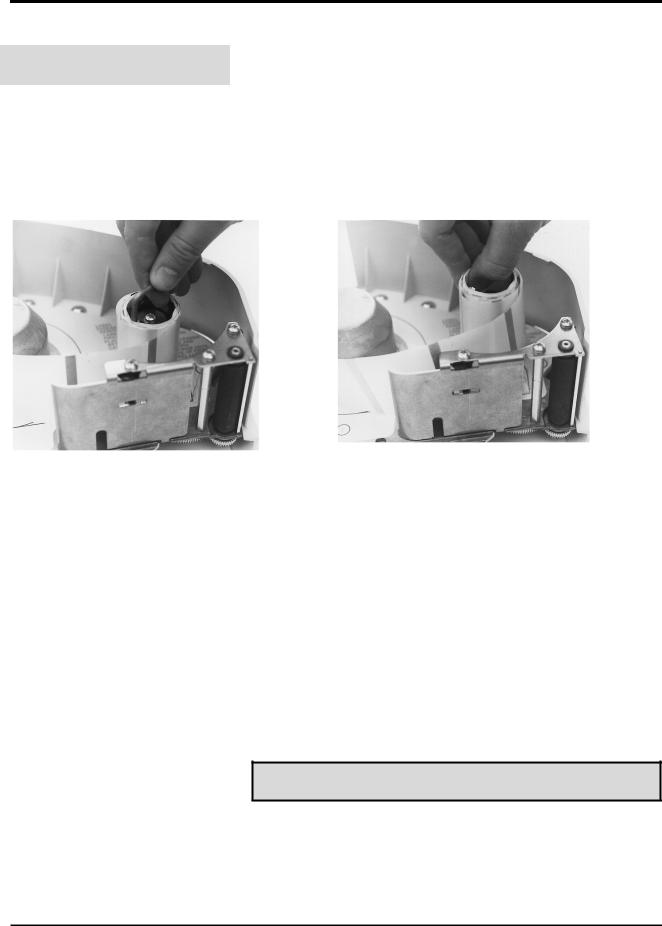
Removing the Empty Roll
1.Remove the Label Cassette by pressing down on the black Label Cassette Eject Button. The Label Cassette will partially eject (@ 1 - 2”).
2.Slide the Label Cassette out the front.
3.Lift up on the metal “L-shaped” piece (called the TakeUp Key) to remove any remaining labels and the backing paper from the label roll.
4.Remove the label roll and dispose.
Step 3 |
Step 4 |
|
|
Loading Labels |
There are several different ways to load labels into the |
|
Quantum, depending on your mode of operation, label |
|
|
|
stock and printing needs. |
You can:
♦Load narrow or standard Die-Cut Labels for single or multiple transactions
♦Stream Die-Cut Labels for Bakery Printer Applications
♦Load Continuous Label Stock
♦Load Listing Paper
♦Load Linerless Label Stock
The following paragraphs describe how to load the label stock for your desired method of operation.
Note
If you want to change label stock, contact your local Hobart
Service Office to make the necessary adjustments.
Your Hobart Representative can create custom labels to accommodate your unique merchandising needs.
2 - 9 |
General Information |
Quantum Scale System
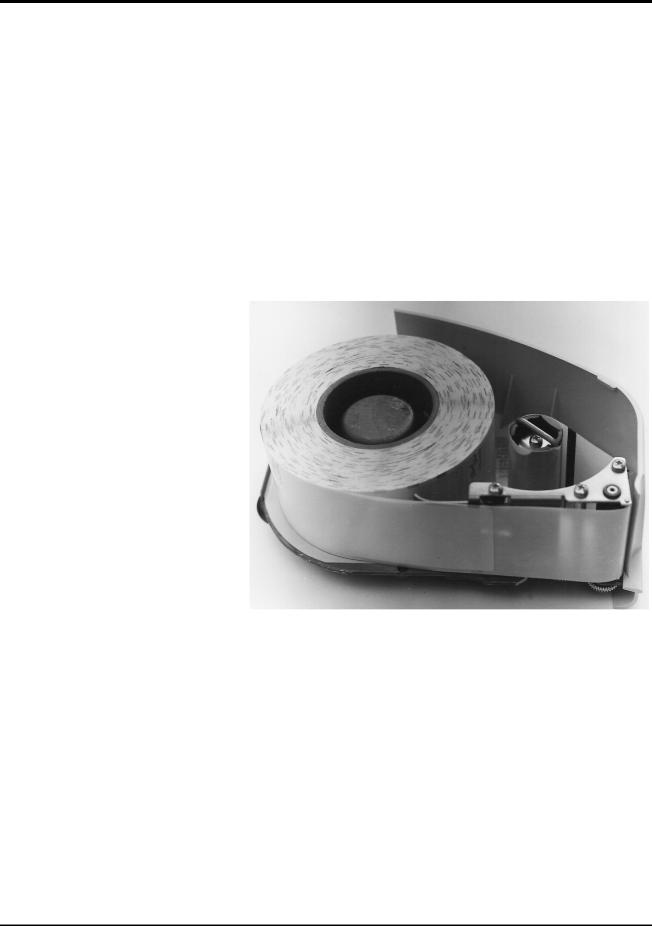
Loading Standard or Narrow |
To load die-cut labels into the scale: |
|
Die-Cut Labels |
1. |
Remove the labels from the first ten (10) inches of the |
|
||
|
|
label roll. |
|
2. |
Place the roll of labels on the Hub in the Label Cassette. |
|
3. |
Thread the Leader between the Peel Bar and the Cassette |
|
|
Housing. |
|
4. |
Wrap the Leader around the Take-Up Spool. |
|
5. |
Slide the Take-Up Key onto the Take-Up Spool, making |
|
|
sure that it is on the outside of the leader. |
|
6. |
Turn the Take-Up Spool counterclockwise to remove |
|
|
any slack in the label stock liner. |
|
7. |
Replace the Label Cassette. |
General Information |
2 - 10 |
Quantum Scale System
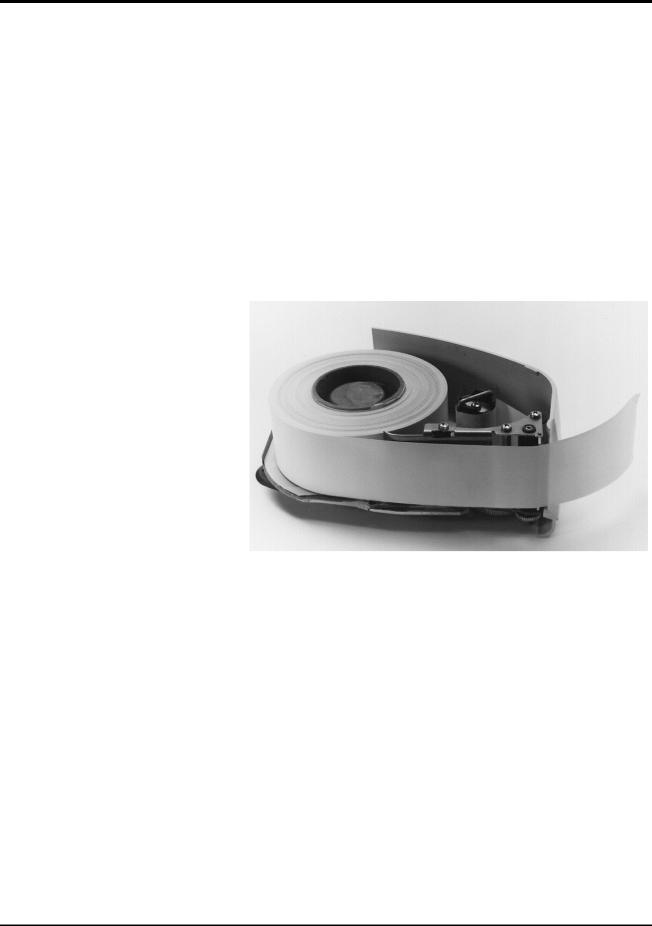
Streaming Die-Cut Labels |
In most bakery printer applications, the process of printing |
(Bakery Printer Applications) |
multiple labels can be speeded up by arranging the labels to |
|
print in the Streaming Mode. This simply means that you |
|
arrange the Label Roll so that it prints a label and then |
|
“spits” it out the front of the scale with the backing paper |
|
still attached. You might use it for example, when you need |
|
to print 100 labels for bread. All the operator has to do after |
|
the labels print is remove the label from the backing paper |
|
and apply it to the package. |
|
If you don’t set up the scale to print in the streaming mode, |
|
the scale would either print labels one at a time and wait for |
|
the operator to remove it or it would just start printing |
|
labels without waiting for the operator to remove the |
|
previous one before printing the next. As you might have |
|
guessed, this can be quite a mess to correct. |
To set-up the Quantum to print in the Streaming Mode:
1.Place the roll of labels on the Hub in the Label Cassette.
2.Thread the Leader so that the Labels come out the front of the Label Cassette.
3.Replace the Label Cassette.
2 - 11 |
General Information |
Quantum Scale System
Loading Continuous Label |
To load Continuous Label Stock: |
|
Stock |
1. |
Peel the label stock from the first ten (10) inches of the |
|
||
|
|
label roll, tear it off and discard. |
|
2. |
Place the roll of labels on the Hub in the Label Cassette. |
|
3. |
Thread the Leader between the Peel Bar and the Cassette |
|
|
Housing. |
|
4. |
Wrap the Leader around the Take-Up Spool. |
|
5. |
Slide the Take-Up Key onto the Take-Up Spool, making |
|
|
sure that it is on the outside of the leader. |
|
6. |
Turn the Take-Up Spool counterclockwise to remove |
|
|
any slack in the label stock liner. |
|
7. |
Replace the Label Cassette. |
Loading Listing Paper Stock |
To load Listing Paper: |
|
|
1. |
Place the roll of Listing Paper on the Hub in the Label |
|
|
Cassette. |
|
2. |
Thread the Listing Paper so that it comes out the front of |
|
|
the Label Cassette. |
|
3. |
Replace the Label Cassette. |
Loading Linerless Labels |
To load Linerless Labels: |
|
|
1. |
Place the roll of Linerless Labels on the Hub in the Label |
|
|
Cassette. |
|
2. |
Thread the Linerless Labels so that it comes out the front |
|
|
of the Label Cassette. |
|
3. |
Replace the Label Cassette. |
General Information |
2 - 12 |
Quantum Scale System
Installing the Label Cassette |
To install the Label Cassettes: |
|
|
1. |
Line the Guide Rail on the Label Cassette with the Track |
|
||
|
|
on the base of the scale. |
|
2. |
Slide the Label Cassette into the Printer Area. The |
|
|
motion should be similar to closing a cash register |
|
|
drawer. |
|
3. |
There will be a slight resistance the last 1 - 2” of travel as |
|
|
the mechanism engages. |
|
4. |
Press it firmly until you hear the cassette latch lock into |
|
|
place. |
Note
One or two blank labels will be discharged as the system determines the size of labels in use. Remove and discard these labels.
2 - 13 |
General Information |

Quantum Scale System
Removing the Scale Platter |
To remove the Scale Platter: |
|
|
1. |
Lift up on the front lip of the platter. |
|
||
|
2. |
Pull it straight up to remove. |
Installing the Scale Platter |
To install the Scale Platter: |
|
|
1. |
Locate the Platter Locating Studs on the bottom of the |
|
||
|
|
platter. |
|
2. |
Rotate the platter in your hands until the Platter |
|
|
Locating Studs are positioned in the upper right-hand |
|
|
and lower left-hand corners. |
|
3. |
Line up the Studs with the hole in the center of the |
|
|
Rubber Platter Mounts on the sub-platter. |
|
4. |
Gently press the platter into place to make sure that it |
|
|
seats. |
General Information |
2 - 14 |
Quantum Scale System
Adjusting the Scale Feet |
There are four (4) Scale Feet located underneath the scale |
|
system. You may need to adjust these feet slightly in the |
|
|
|
event the scale isn’t sitting on the table/case properly. |
|
Proper adjustment of these feet, helps you maintain the |
|
proper scale balance. |
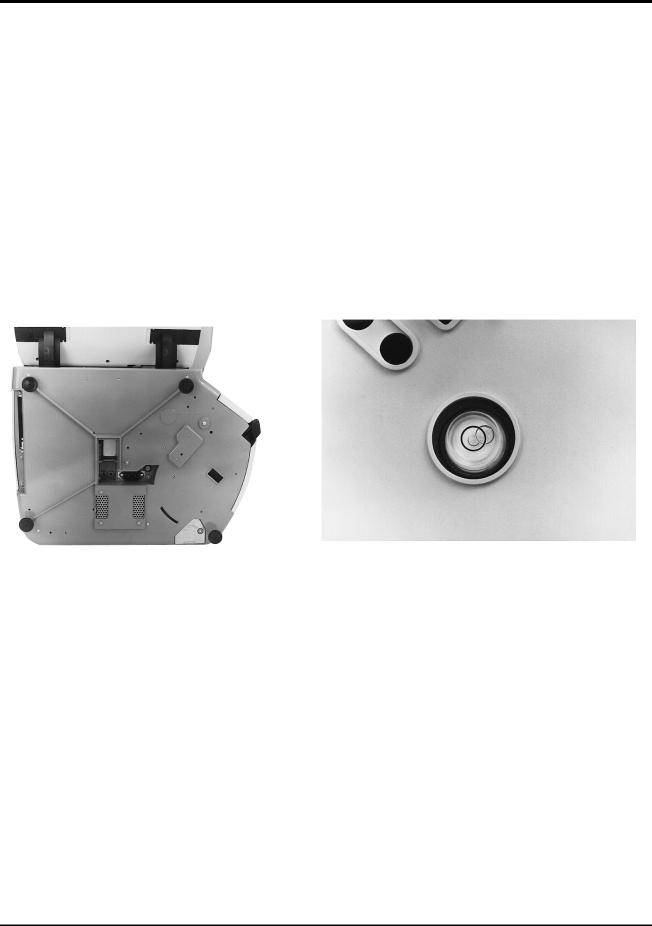
To check scale balance:
1.Remove the Scale Platter.
2.Locate the Level on the Scale Sub-Platter. It can be seen through a hole in the scale main housing.
3.Adjust the feet until the “bubble” is in the middle of the level.
To increase the length of the scale feet:
1.Rotate the feet in the counterclockwise direction.
2.Rotate the lock nut until it is firmly against the scale base housing to lock the adjustment into place.
To decrease the length of the scale feet:
1.Rotate the feet in the clockwise direction.
2.Rotate the lock nut until it is firmly against the scale base housing to lock the adjustment into place.
2 - 15 |
General Information |
Quantum Scale System
Adjusting Console Position |
The Quantum is designed so that you can place the scale |
|
and Screen Contrast |
anywhere in your operation and adjust the screen for best |
|
|
visibility. This adjustment is done by two (2) means: |
|
|
||
|
♦ |
Changing the Console Position |
|
♦ |
Changing the Screen Contrast (Viewing Angle) |
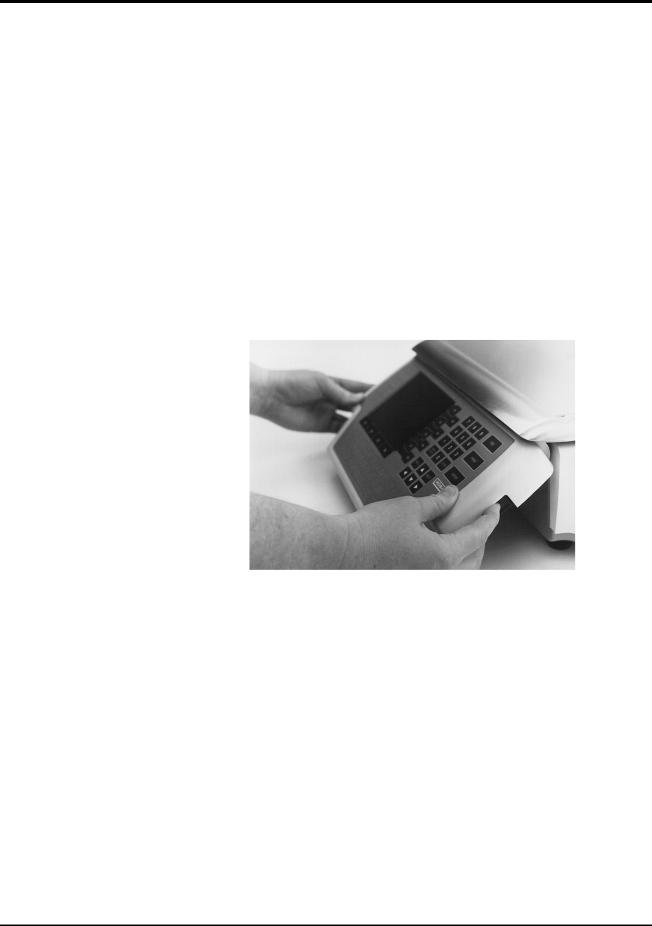
Console Position |
The Console can be pivoted among seven (7) different |
|
positions. To adjust the console position: |
|
1. PRESS the two (2) Console Adjustment Buttons located |
|
on each side of the Console. |
2.Pivot the Console to the desired position for best viewing.
3.Release the Console Adjustment Buttons to lock it into place.
General Information |
2 - 16 |
Quantum Scale System
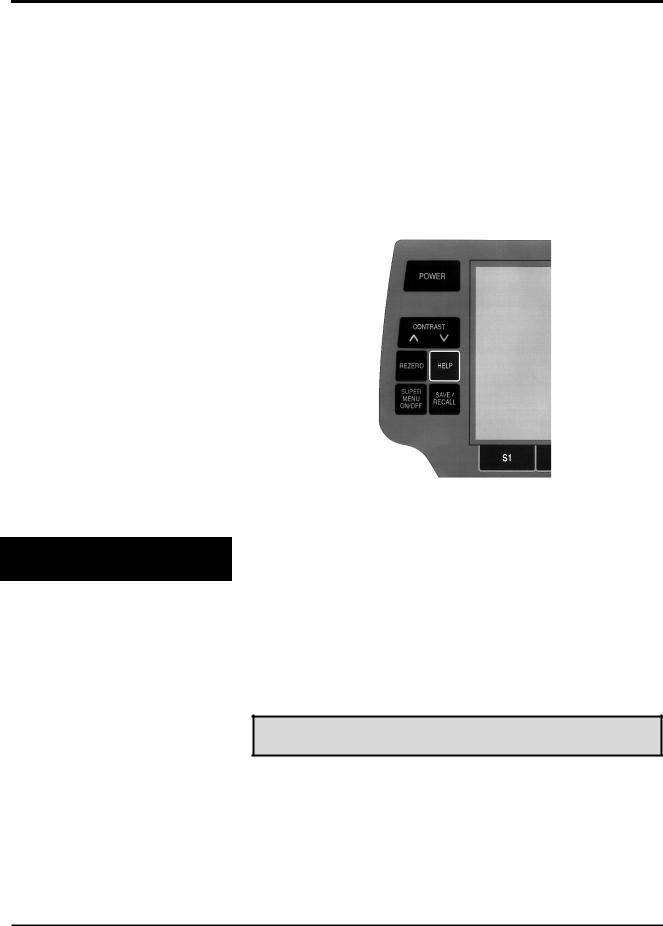
Screen Contrast |
Once you have positioned the Console, you may need to |
|
adjust/set the Screen Contrast. This ensures that you can |
|
see the screen details at the adjusted console position. |
|
To change the screen contrast: |
|
1. PRESS [CONTRAST ▼] to lighten the screen display |
|
-- OR-- PRESS [CONTRAST ▲] to darken the screen |
|
display. |
HELP Key Functions
The Quantum is equipped with context sensitive Help Screens to assist you in quick, efficient scale operation. The HELP Function has four (4) levels of assistance.
♦Help of “F” Keys
♦About the Keyboard
♦Basic Help
♦Moving Through the System
Note
In addition to assisting you with scale operation, you will also press HELP to access the On Screen Library. Refer to the “On Screen Library” section later in this manual for a complete explanation of this function.
2 - 17 |
General Information |

Quantum Scale System
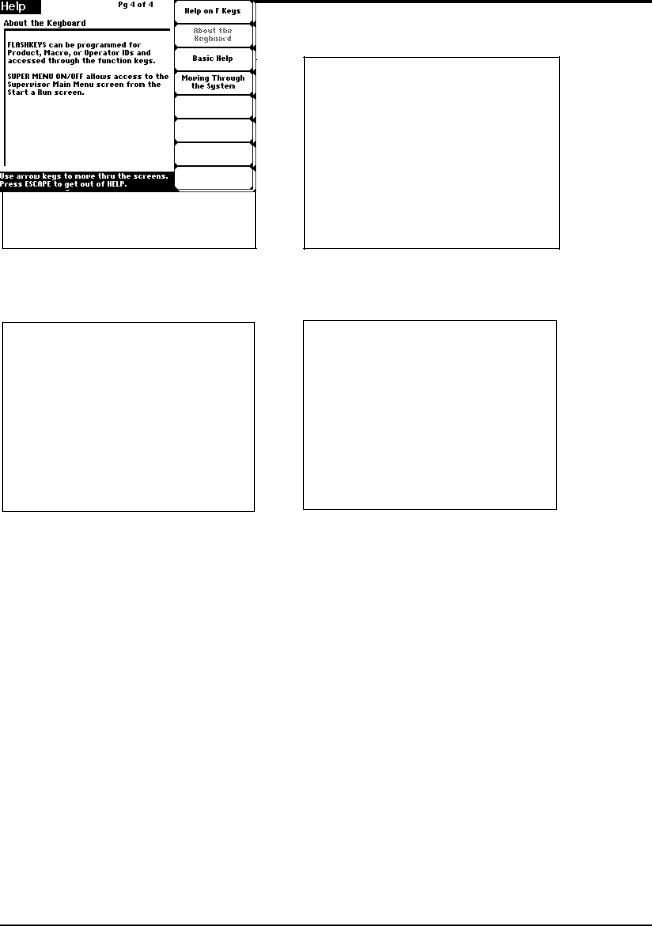
(F1) Help on “F” Keys |
By pressing [F1] on the Help Screen, you get an explanation |
|||
|
of the functions that can be performed when you select the |
|||
|
||||
|
various “F” Keys available for the current function (i.e., the |
|||
|
function for which you pressed HELP). |
|||
|
Example: From the Start a Run Screen: |
|||
|
1. |
PRESS [HELP]. |
||
|
2. |
PRESS [F1] to select Help on “F” Keys. You get an |
||
|
|
|
explanation of Date/Time, the only “F” Key available on |
|
|
|
|
that screen. |
|
|
|
|
|
|
|
|
|
|
|
(F2) About the Keyboard |
By pressing [F2] to select “About the Keyboard,” you get a |
|||
|
detailed explanation of the following keys: |
|||
|
||||
|
♦ |
ENTER |
♦ |
NEXT |
|
♦ |
ESCAPE |
♦ |
PREV (Previous) |
|
♦ |
ARROW KEYS |
♦ |
REZERO |
|
♦ |
BACKSPACE |
♦ |
SAVE/RECALL |
|
♦ |
CLEAR |
♦ |
FLASHKEYS |
|
♦ |
POWER |
♦ |
SUPER MENU ON/OFF |
|
♦ |
|
|
|
General Information |
2 - 18 |
Quantum Scale System
(F3) Basic Help |
When you press [HELP], the default automatically sends |
|
you to the Basic Help Screen(s) for the selected function or |
|
|
|
field. As you might suspect, Basic Help gives you a brief |
|
description of the function or selected field, including notes |
|
to help you process the transaction better. From any other |
|
HELP selection, PRESS [F3] to access Basic Help. |
2 - 19 |
General Information |
Quantum Scale System
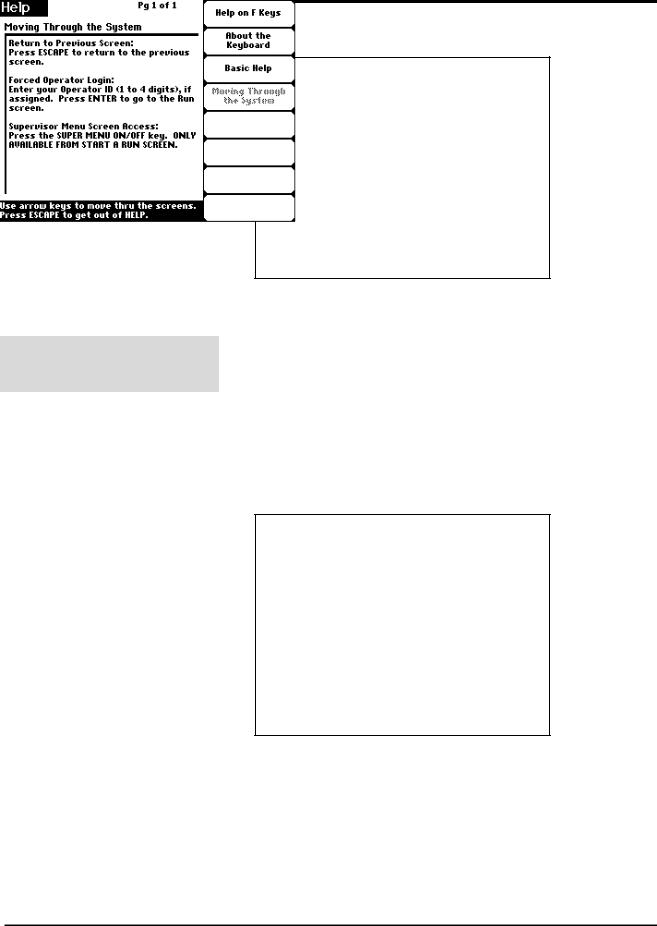
(F4) Moving Through the
System
Moving Through the System is found by pressing [F4] while in the HELP mode. When you select [F4], you get an explanation of how to:
♦Return to the Previous Screen
♦Execute a Forced Operator Log-on
♦Access the Supervisor Menu
General Information |
2 - 20 |
Loading...