


USER GUIDE
TM
SMARTCHILL
Software for the Hobart QuickChiller
• Uses an IBM or compatible personal computer
• Maintains Product List, Chill Type and Targets
• Views Users and Their Status
• Retrieves and Displays Chill Cycle Data / Graphs
• Exports Chill Cycle Data to Spreadsheet
701 S. RIDGE AVENUE
TROY, OHIO 45374-0001
937 332-3000
www.hobartcorp.com
FORM 34673 (June 2001)

TABLE OF CONTENTS
Installing SmartChill . . . . . . . . . . . . . . . . . . . . . . . . . . . 2
Setup . . . . . . . . . . . . . . . . . . . . . . . . . . . . . . . . . . . . . . . 3
Product Editor . . . . . . . . . . . . . . . . . . . . . . . . . . . . . . . 4
User Viewer . . . . . . . . . . . . . . . . . . . . . . . . . . . . . . . . . 5
Chill Cycles. . . . . . . . . . . . . . . . . . . . . . . . . . . . . . . . . . 6
Communication Utilities . . . . . . . . . . . . . . . . . . . . . . . . 7
Print Products, Users or Chill Cycles . . . . . . . . . . . . . 8
About SmartChill . . . . . . . . . . . . . . . . . . . . . . . . . . . . . 8
Options . . . . . . . . . . . . . . . . . . . . . . . . . . . . . . . . . . . . . 9
Offline Operation . . . . . . . . . . . . . . . . . . . . . . . . . . . . 10
Adding Chillers . . . . . . . . . . . . . . . . . . . . . . . . . . . . . . 11
Select Chiller . . . . . . . . . . . . . . . . . . . . . . . . . . . . . . . 12
Exit . . . . . . . . . . . . . . . . . . . . . . . . . . . . . . . . . . . . . . . 12
Minimum System Requirements
Windows 95, 98, ME, NT or 2000
A Pentium II 300MHz
10x CD-ROM drive
64 MB RAM
800 x 600 display, 24 bit color support
INSTALLING SmartChill
1. Insert SmartChill installation disk into your CD-ROM drive.
2. Follow the instructions on the screen. If your computer does not
support automatic installation, follow steps 3 – 5.
3. Use the RUN command from the Windows Start Menu, and type
d:\setup.exe (if d is the drive of the CD-ROM).
4. Press OK.
5. Follow the instructions on the screen.
HOBART CORPORATION, 2001
– 2 –
SETUP
Start SmartChill from the Windows Start menu, by
selecting Programs > SmartChill > SmartChill (unless
placed in another location).
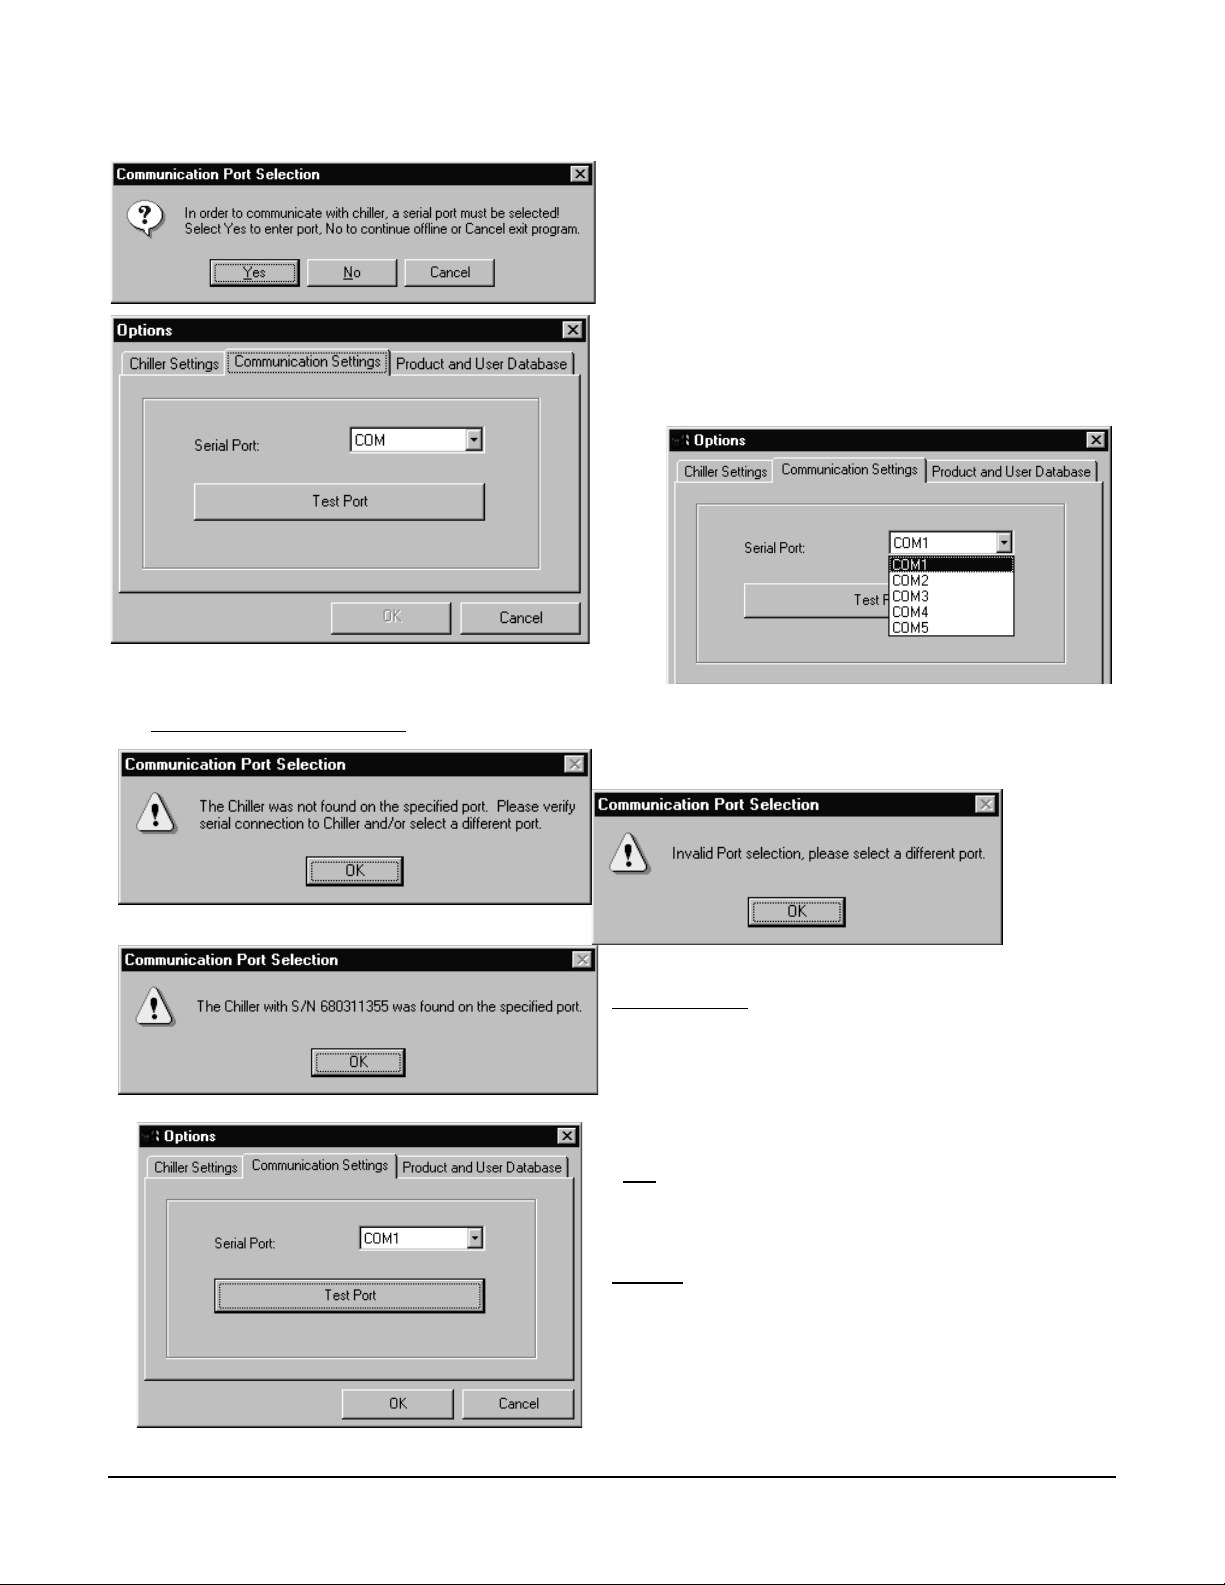
• Press Yes to select a serial communication port.
(Selecting No allows you to explore SmartChill
OFFLINE. Go to page 10.)
• Press ▼ to view serial communication ports
(COM1 – COM5).
1
Possible Error Messages
• Select your serial communication port.
• Press Test Port to check the chiller connection.
Chiller Found
• Press OK.
OK
Accepts the selected serial communication
port. Go to page 4.
Cancel
– 3 –
Ignores the serial communication port
selection and returns to the top screen on this
page.
PRODUCT EDITOR
The Product Editor allows you to create, enable or edit a product and to set the
target chill parameters for each. SmartChill displays the chiller's model and
serial number so you know which files are being edited.
• Displays the first product. Press Next to view
the next product name; press Back to display
the previous product name.
• Press Edit to change the displayed product.
• To add a new product to the list —
Press New.
Enter the name (up to 18 characters).
Press Add.
The new product will be added to the product list in
alphabetical order. Note the change. (Press Cancel
to exit without adding the new product.)
• Press Delete to remove the displayed product
name from the list. Answer Yes or No.
For any product you want to be chilled —
• Select Enable to activate the product.
• Select the Termination Method:
By Temp and the Target Temperature; or
By Time and the Target Chill Time (in
minutes).
• Select the Cooling Method:
Chilling with or without Soft/Surface Protection. (If available on your model, you may also
select Freezing as the cooling method.)
• Select a Hold Temperature from 10 to 40°F after chilling (
temperature will be the air temperature setting during the Holding Mode which begins right after
the chill cycle is completed.
Select — Available from the Chiller pull-down menu, refer to page 12.
•
•
Print Products, Print Users or Print Chill Cycles — Available from the
Chiller pull-down menu, refer to page 8.
•
Options — Available from the Tools pull-down menu, refer to page 9.
•
Communication Utilities —
Available from either the Tools
pull-down menu or from the
Communications Utilities
button at the bottom of the
screen, refer to page 7.
–32 to 20°F after freezing). This
– 4 –

USER VIEWER
User Viewer displays the user names and their
security level.
User names are entered and edited at the chiller
controller.
Select another activity such as Chiller, Tools,
Product Editor, Chill Cycles or Communications
Utilities to exit User Viewer.
If no users have been retrieved
from the chiller, this message
displays. Press OK.
– 5 –

CHILL CYCLES
Chill Cycles displays chill cycle data that has been retrieved (refer to Get Data
on page 7). Chill cycle data includes the chill cycle number, probe number, end
date and time, maximum and minimum temperatures, start date and time, user
and product name if specified, and the interval between temperatures in minutes.
To View a time versus temperature graph for a
particular chill cycle —
• Select only one chill cycle at-a-time by clicking
anywhere in the row for the specific chill cycle.
• Press View Data.
The graph, as shown below, displays.
• Press Hide Data to return to the previous screen.
• Or, select a different chill cycle to be graphed.
• If you click on Select Multiple with no cycles
selected, you will be allowed to then select more
than one chill cycle at-a-time to Export or Delete*.
• Select the chill cycle(s) by clicking anywhere in
the row for the specific chill cycle(s).
Export
Sends the selected chill cycle data to a file
that can be imported into Excel or Lotus
123. Exported chill cycle data files will
.csv
have a
located in the application directory.
Delete
Removes the selected chill cycle data.
* Select Multiple cannot be used with View Data.
extension. The exported file is
– 6 –

COMMUNICATION UTILITIES
After pressing Communications Utilities, SmartChill checks the connection to the
chiller (determining the online status) and displays one of these two screens;
press OK.
The expected chiller connection was found, continue
to the Communication Port Utilities screen.
The chiller was not found on the specified port.
Press OK and re-connect to the chiller.
Send Products
Sends the current product list to the Chiller.
Get Data
Get Machine Information
Displays the chiller model number, serial number,
and SmartChill software version — press OK.
If SmartChill tries to transfer products to the
chiller when the chiller is chilling or freezing,
Controller Busy
displays. Press OK.
Retrieves chill cycle data from the chiller.
Get Users
Retrieves user names and operator or
supervisor status of each from the chiller.
OK
Returns to the Product Editor (page 4).
– 7 –

PRINT PRODUCTS, USERS OR CHILL CYCLES
To print products, users or chill cycles, a printer must have been installed. Also, data
must have been retrieved from the chiller (refer to Get Data and Get Users, page 7).
From the Chiller pull-down menu, the following lists
can be printed —
Print Products
Prints the product number, name, chill mode,
target temp, hold temperature and inserts a
✓ beside any product(s) that are enabled.
Print Users
Prints the user's ID #, name, and security
level.
Print Chill Cycles
Prints the cycle #, probe number, end date
and time, max and min temperatures, user
and product.
Possible Error Message
The Printing Error message displays if a
printer has not been installed. Press OK.
ABOUT SmartChill
To view the software version, pull
down the Help menu and select About.
OK
System Info...
Returns to the previous display.
Displays Microsoft Windows
System Information.
– 8 –

OPTIONS
From the Tools pull-down menu, select Options —
• The chiller connection is verified. Press OK.
Chiller Settings — see display at left.
Communication Settings — see display below.
• Press ▼ to check the serial
communication port selection.
• Press Test Port to verify that the
chiller is connected on the serial
communication port.
Product and User Database
Restore Products
Removes any changes to your current
product file, returning the product list to the
factory list (if you answer Yes).
Clear Users
Removes all users from the computer's
database (if you answer Yes).
Chiller was found.
Press OK.
OK Returns to the Product Editor screen.
Cancel
Returns to the Product Editor without
changing the serial communication port
setting.
– 9 –

OFFLINE OPERATION
If a chiller has never been connected to SmartChill,
no chiller files are present. In addition, no edit
changes can be made to products and users cannot
be viewed. As a result, SmartChill cannot export or
delete chill cycles because there are none.
Press OK.
SmartChill does allow you to view the product list
while OFFLINE.
Next
Views the next product from the product list.
Back
Views the previous product.
SmartChill allows you to connect to a chiller
from Tools, Options or from Tools,
Communications Utilities or from the
Communications Utilities button at the bottom
of the screen.
Connect the chiller to the communications
port. Then, answer Yes.
If the chiller is found, press OK. The Options
screen displays, press OK. Refer to
Communications Port Utilities, page 7.
– 10 –
If the chiller is not found, press OK. Refer to
page 3, Setup.

ADDING CHILLERS
Once SmartChill has been operated with a chiller
connected, the menu screens identify the chiller.
Adding an additional chiller's files to the SmartChill
database is easy.
• Connect the new chiller to the RS232 port on
the computer.
• The new chiller can be added by doing one of
the following:
Start SmartChill. The new chiller will
automatically be added.
If SmartChill was already running, select
Communication Utilities (available from the
Tools pull-down menu or from the
Communication Utilities button at the bottom
of the screen).
If SmartChill was already running, select
Tools, Options (available from the Tools pulldown menu).
• The new chiller's serial number will be displayed.
Press OK.
• A new chiller has been connected to
SmartChill.
Yes Changes to the new chiller's settings.
If the new chiller was found using
Communications Utilities, go to page 7.
If the new chiller was found using Tools,
Options, go to page 8.
No Ignores the new chiller's settings and
returns to the previous chiller's settings.
– 11 –

SELECT CHILLER
This option is only available if two or more chillers
have previously been connected. Remember that
only one chiller can be connected to SmartChill at-atime.
• From the Chiller pull-down menu, press Select
(Ctrl + S). This allows you to select the chiller and
edit that chiller's files as previously described.
• Select the chiller you want (click-on it). When it is
the one highlighted, press OK.
Once the chiller has been selected, you can perform
any of the following tasks:
Edit, delete or add products, page 4.
View users, page 5.
Export or delete chill cycle data, page 6.
You can retrieve data from the selected chiller or
send products to it, page 7; or perform any other
SmartChill tasks, pages 8 – 11.
Once you have completed any updates to the files for
one chiller, you may choose the next chiller and
perform any updates to that chiller's files. SmartChill
allows you to work on more than one chiller's files.
However, you must work on them one chiller at-a-time.
EXIT
There are three buttons on the top right corner of
the main screen. Some screens only have the
The first button minimizes SmartChill to an
icon but it remains live on the computer.
.
The second button is inactive in SmartChill.
The third button closes that screen. Close
• Select Exit from the Chiller pull-down menu.
FORM 34673 (June 2001) Printed in U.S.A.
– 12 –
the main screen to exit SmartChill.
 Loading...