


982_CIB_3ATT 2/4/05 9:52 AM Page 1
USER’S MANUAL
Part 2
Two-Line Speakerphone 982
Please also read
Part 1 — Important
Product Information
© 2005 Advanced American Telephones. All Rights Reserved.
AT&T and the Globe Design are trademarks of AT&T Corp., licensed to Advanced American Telephones.

982_CIB_3ATT 2/4/05 9:52 AM Page 2

982_CIB_3ATT 2/4/05 9:52 AM Page i
CONTENTS |
|
PRODUCT OVERVIEW............. |
1 |
BEFOREYOU BEGIN.................. |
2 |
Parts List ............................................... |
2 |
Tools Needed ...................................... |
2 |
INSTALLATION ............................. |
3 |
Before You Install ................................ |
3 |
Battery Installation ............................. |
3 |
Low Battery Warning Tone .............. |
4 |
Table/Desk Installation ...................... |
5 |
Wall Installation .................................. |
8 |
Switchable Data Port ...................... |
10 |
Headset Jack ...................................... |
10 |
TELEPHONE |
|
OPERATION .................................. |
11 |
Make a Call ........................................ |
11 |
Answer a Call ................................... |
11 |
End a Call ........................................... |
11 |
Switch Between Handset, |
|
Headset, and Speakerphone ..... |
12 |
RINGER Volume ............................... |
12 |
Handset/Speakerphone/ |
|
Headset Volume ........................... |
12 |
Redial ................................................... |
13 |
Automatic Redial .............................. |
13 |
Hold ..................................................... |
14 |
Switch Between Lines |
|
During a Call ................................. |
14 |
Mute .................................................... |
15 |
Flash ..................................................... |
15 |
Temporary Tone ............................... |
15 |
Conference Calls ............................. |
16 |
Lights and What They Mean ........ |
17 |
TELEPHONE MEMORY .......... |
18 |
One-Touch Dialing ........................... |
18 |
Two-Touch Dialing ........................... |
18 |
Directory Card ................................. |
18 |
Store a Memory Number ............. |
19 |
Dial a Memory Number ................ |
19 |
Erase a Memory Number ............. |
19 |
GENERAL PRODUCT |
|
CARE .................................................. |
20 |
TECHNICAL |
|
SPECIFICATIONS....................... |
21 |
IN CASE OF DIFFICULTY..... |
22 |
INDEX................................................ |
25 |
CONTENTS |
i

982_CIB_3ATT 2/4/05 9:52 AM Page ii

982_CIB_3ATT 2/4/05 9:52 AM Page 1
PRODUCT OVERVIEW
This AT&T Two-Line Speakerphone 982 can be used with one or two incoming telephone lines and features a speakerphone for hands-free use.
It is hearing-aid compatible and can also be used hands-free with a two-band 2.5mm headset (purchased separately). This phone can be used on a table or desk or mounted on a wall and does not require AC power for operation.
(Four AA batteries are required to power the LINE lights and the Auto Redial feature, and for the headset to work correctly in all conditions.) The 982 has 24 memory locations for faster dialing of commonly called numbers.
This User’s Manual contains detailed instructions for installing and operating your AT&T Two-Line Speakerphone 982. Please be sure to follow the directions carefully.
OVERVIEW |
PRODUCT
1

982_CIB_3ATT 2/4/05 9:52 AM Page 2
BEGIN |
BEFOREYOU
BEFOREYOU BEGIN
Parts List
Your box should include:
USER’S MANUAL
Part 2
Two-Line Speakerphone 982
Please also read
Part 1 — Important
Product Information
© 2003 Advanced American Telephones. All Rights Reserved.
AT&T and the Globe Design are trademarks of AT&T Corp., licensed to Advanced American Telephones.
This User’s |
Quick |
Manual |
Start |
|
Guide |
QUICK START GUIDE
Two-Line Speakerphone 982
This Quick Start Guide provides basic instructions. For additional installation options and complete instructions which allow you
to use all features of this phone, refer to your Two-Line Speakerphone 982 User's Manual, Part 2.
INSTALLATION
Battery Installation
Before using the telephone, you should install four AA batteries (purchased separately). You can use the phone without batteries to dial and receive calls using the handset. However, the LINE lights and the Automatic Redial feature will not work, and the speakerphone and optional headset may not work correctly in all conditions. To use the speakerphone without batteries, you must press and hold Kfor one second.
This product is designed to operate optimally with two telephone lines. If you choose to install only one telephone line, the phone will continue to operate normally as long as the unused line is not selected. For example, if you press lwhen there is only one line installed and that line is connected to the L1/L2 jack, you will not be able to use the phone properly. Simply press L and begin again.
NOTE: If you do not install batteries, you will hear a low battery warning tone every time you lift the handset or press K.
CAUTION: Always unplug the line cord(s), before installing new batteries.
1 Turn the telephone upside down.
continued on page 2
1
Telephone base with wedge attached
Handset
Coiled handset cord
Seven-foot black line cord (4-connector)
Seven-foot clear line cord (2-connector)
Eight-inch line cord
Tools Needed
You will also need the following to install your phone:
• Four AA batteries.
2
982_CIB_3ATT 2/4/05 9:52 AM Page 3
INSTALLATION
BeforeYou Install
To use this product as a two-line phone, you must have a two-line modular wall jack or two separate one-line modular wall jacks. To use both lines
of a two-line telephone, your local telephone company must provide two telephone numbers.
Battery Installation
Before using the telephone, you should install four AA batteries (purchased separately). You can use the phone without batteries to dial and receive calls using the handset. However, the LINE lights and the Automatic Redial feature will not work, and the speakerphone and optional headset may not work correctly in all conditions. To use the speakerphone without batteries, you must press and hold Kfor one second.
This product is designed to operate optimally with two telephone lines.
If you choose to install only one telephone line, the phone will continue to operate normally as long as the unused line is not selected. For example, if you press lwhen there is only one line installed and that line is
connected to the L1/L2 jack, you will not be able to use the phone properly. Simply press Land begin again.
NOTE: If you do not install batteries, you will hear a low battery warning tone every time you lift the handset or press K.
CAUTION: Always unplug the line cord(s), before installing new batteries.
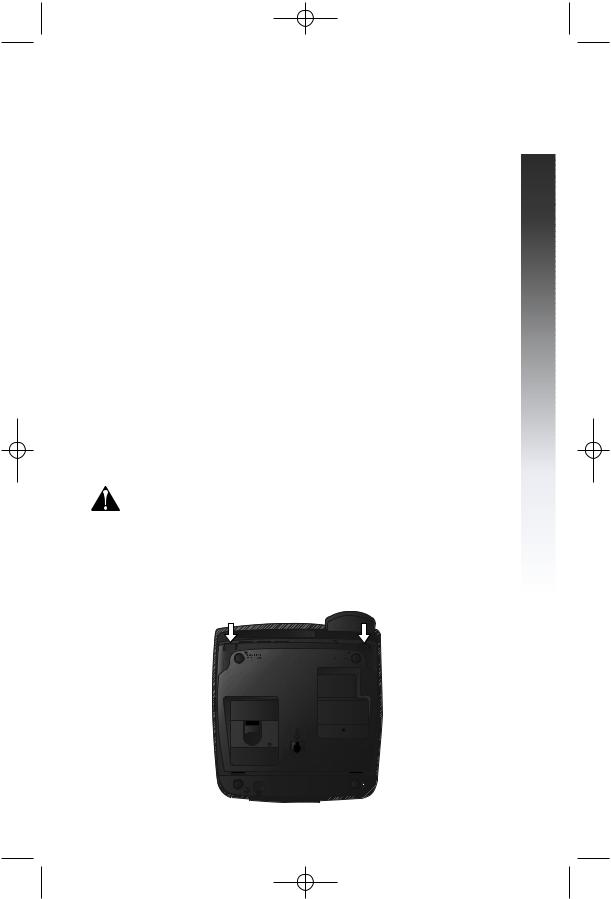
1Turn the telephone upside down.
2If the base wedge is attached, remove the wedge by pressing the tabs as shown and then pulling the wedge away from the base.
continued on page 4
INSTALLATION |
3
982_CIB_3ATT 2/4/05 9:52 AM Page 4
INSTALLATION |
Battery Installation continued from page 3
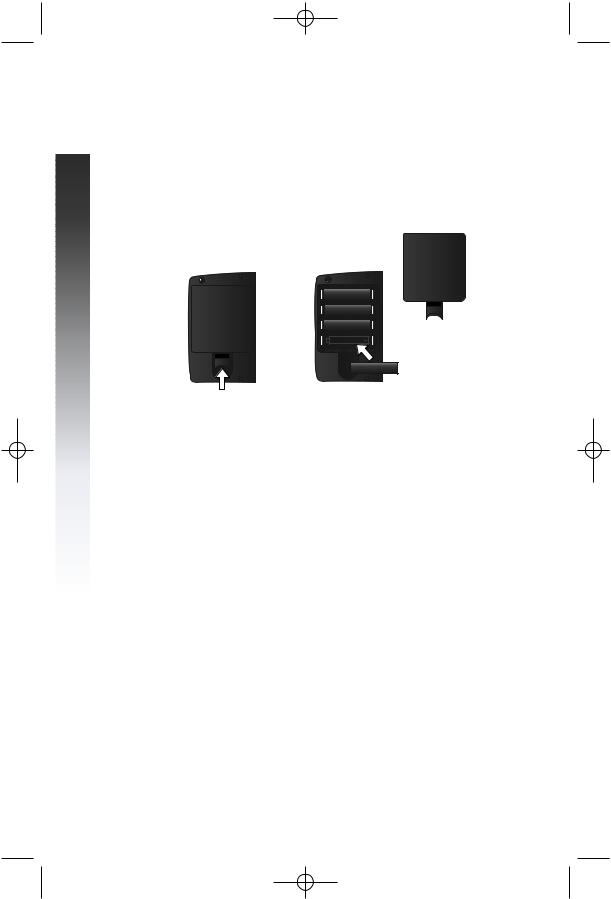
3Press the tab as shown and pull to remove the battery cover. Insert four new AA batteries (purchased separately) following the polarity markings in the battery compartment.
4 Replace the battery cover.
Low Battery Warning Tone
Depending on your batteries, the low battery warning tone may be delayed by a few days. The following symptoms indicate that the batteries in your telephone are low and need to be replaced, even though you have not yet heard the low battery warning:
•The Automatic Redial feature does not work or is not working properly, or
•hcannot be used to make or answer calls.
If you experience either of these symptoms, try replacing the batteries following the instructions in "Battery Installation" beginning on page 3.
4

982_CIB_3ATT 2/4/05 9:52 AM Page 5
Table/Desk Installation
1Attach the wedge.
Insert the bottom tabs into the slots as shown. Push gently on the tabs at the large end of the base while locking them into place against the base.
INSTALLATION |
2Connect the line cord(s) to the telephone and your modular jack(s).
•If you have a single two-line wall jack, use only the black (4-connector) line cord. Plug one end into the jack labeled L1 OR L1/L2 on the back of the telephone. Plug the other end into the wall jack. Make sure the cord snaps firmly into place at both ends.
Two-line modular wall jack
Black telephone line cord
continued on page 6
5
982_CIB_3ATT 2/4/05 9:52 AM Page 6
INSTALLATION |
Table/Desk Installation continued from page 5
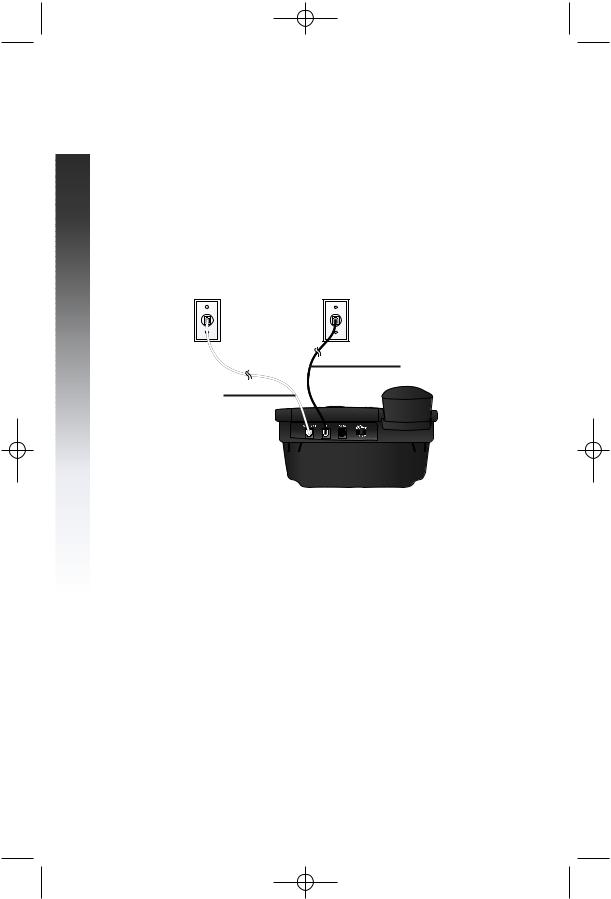
•If you have two one-line wall jacks, use both long line cords. Insert one end of the first cord into the jack labeled L1 OR L1/L2 on the back of the phone. Then, plug the other end into the wall jack for Line 1. Insert one end of the other cord into the jack on the back of the phone labeled L2. Then, plug the other end into the wall jack for Line 2. Make sure the cords snap firmly into place at both ends.
Modular wall jack |
Modular wall jack |
for Line 1 |
for Line 2 |
Telephone line cord
Telephone
line cord
3Connect the handset to the telephone.
Plug one end of the coiled handset cord into the handset, then plug the other end into the jack on the left side of the telephone base.
4Set Dial Mode.
This product comes set for touch tone dialing. Make sure you choose the correct dialing method (TONE or PULSE); dial pulse dialing will not work if you have touch tone service.
To set your telephone for dial pulse (rotary) service, lift the handset and press a LINE button, then press G, #, #, #, 3. To change back to touch tone service, press G, #, #, #, 8.
To switch from pulse to tone dialing during a phone call, see “Temporary Tone” on page 15.
6
 Loading...