Zte Spro 2 User Manual
User Guide

Welcome to AT&T
Thank you for purchasing the ZTE Spro™ 2 Smart Projector. To get the most from your new device, check out our videos and interactive tutorials at att.com/Tutorials.
CES Innovation |
Best Projector |
Award Honoree |
CES 2015 |
CES 2015 |
The Very Best |
GSMA Best Mobile Enabled |
Top Pick |
of CES 2015 |
Consumer Electronics |
|
|
Device Honoree |
i
Contents |
|
Getting Started............................................................................................................................................. |
1 |
Setting Up................................................................................................................................................... |
1 |
Powering On/Off..................................................................................................................................... |
4 |
Turning On/Off the Projector........................................................................................................... |
5 |
Using Touch Control............................................................................................................................. |
6 |
Getting to Know Your ZTE Spro 2 Smart Projector............................................................... |
8 |
Key Components................................................................................................................................. |
10 |
Home Screen.......................................................................................................................................... |
11 |
Entering Text............................................................................................................................................... |
15 |
Google Keyboard................................................................................................................................. |
15 |
Google Voice™ Typing...................................................................................................................... |
16 |
Changing Input Methods................................................................................................................. |
16 |
Choosing Input Settings.................................................................................................................. |
16 |
Editing Text.............................................................................................................................................. |
17 |
Projection..................................................................................................................................................... |
18 |
Projecting the Screen Content.................................................................................................... |
18 |
Projecting From a microSD™ Card............................................................................................. |
18 |
Projecting an HDMI® Source or an Apple Device................................................................ |
19 |
Projecting With Miracast® (Wi-Fi® Display)............................................................................ |
20 |
Using Miracast and Mobile Hotspot Simultaneously......................................................... |
21 |
Adjusting Projector Settings.......................................................................................................... |
22 |
Hangouts™ (Messaging)...................................................................................................................... |
23 |
Opening the Hangouts Screen.................................................................................................... |
23 |
Sending a Message............................................................................................................................. |
23 |
Replying to a Message...................................................................................................................... |
24 |
Forwarding a Message...................................................................................................................... |
24 |
Changing Messaging Settings........................................................................................................ |
24 |
ii |
iii |
Connecting to Networks and Devices......................................................................................... |
25 |
Connecting to Mobile Networks.................................................................................................. |
25 |
Connecting to Wi-Fi........................................................................................................................... |
26 |
Using Wi-Fi Direct®............................................................................................................................. |
30 |
Connecting to Bluetooth® Devices............................................................................................. |
31 |
Connecting to Your Computer via USB................................................................................... |
34 |
Connecting to a USB Device......................................................................................................... |
36 |
Sharing Your Mobile Data Connection..................................................................................... |
37 |
Connecting to Virtual Private Networks................................................................................. |
40 |
Browsing the Internet............................................................................................................................ |
41 |
Opening a Web Page With Browser............................................................................................ |
41 |
Browsing Options................................................................................................................................. |
41 |
Using Multiple Browser Tabs.......................................................................................................... |
42 |
Downloading Files............................................................................................................................... |
42 |
Changing Browser Settings............................................................................................................ |
42 |
Using Google Chrome™.................................................................................................................. |
43 |
Entertainment.......................................................................................................................................... |
44 |
Opening Your Gallery........................................................................................................................ |
44 |
Playing Videos....................................................................................................................................... |
45 |
Playing Music........................................................................................................................................ |
46 |
Recording Voice Memos................................................................................................................. |
49 |
Applications............................................................................................................................................... |
50 |
Calendar.................................................................................................................................................. |
50 |
Downloads............................................................................................................................................. |
50 |
File Manager........................................................................................................................................... |
50 |
File Share.................................................................................................................................................. |
51 |
WPS Office.............................................................................................................................................. |
51 |
Google™ Applications........................................................................................................................... |
52 |
Drive.......................................................................................................................................................... |
52 |
Gmail™...................................................................................................................................................... |
52 |
Google Now™....................................................................................................................................... |
54 |
Google+™............................................................................................................................................... |
54 |
Maps™...................................................................................................................................................... |
54 |
Play Store................................................................................................................................................ |
55 |
Voice Search......................................................................................................................................... |
55 |
YouTube™............................................................................................................................................... |
55 |
Settings........................................................................................................................................................ |
56 |
Network Settings................................................................................................................................ |
56 |
Device Settings.................................................................................................................................... |
58 |
System Settings.................................................................................................................................. |
60 |
For Your Safety.......................................................................................................................................... |
64 |
General Safety...................................................................................................................................... |
64 |
Radio Frequency (RF) Energy...................................................................................................... |
65 |
FCC Regulations.................................................................................................................................. |
66 |
Distraction.............................................................................................................................................. |
67 |
Product Handling................................................................................................................................ |
67 |
Electrical Safety................................................................................................................................... |
70 |
Radio Frequency Interference..................................................................................................... |
70 |
Explosive Environments.................................................................................................................. |
71 |
Specifications............................................................................................................................................ |
72 |
Warranty....................................................................................................................................................... |
73 |
LIMITED WARRANTY......................................................................................................................... |
74 |
How to Get Warranty Service....................................................................................................... |
74 |
Other Warranty Programs.............................................................................................................. |
74 |
iv |
v |
Getting Started
Setting Up
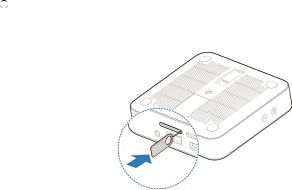
Installing a microSD Card (not included) or micro-SIM Card
You do not need to turn off the ZTE Spro 2 to install or remove the microSD or micro-SIM card. However, before removing the microSD card when the device is on, you need to unmount it. See Removing the microSD Card From Your ZTE Spro 2.
NOTES:
Some applications may require a microSD card to work properly if it stores certain data on it. Therefore, it is recommended that you keep a microSD card installed and do not remove or replace it unnecessarily.
The micro-SIM card is already installed. If you need to swap micro-SIM cards, the process is similar to microSD card installation.
Turn your ZTE Spro 2 upside down. Push the point of the microSD/micro-SIM pin into the hole on the microSD card slot.
vi |
1 |
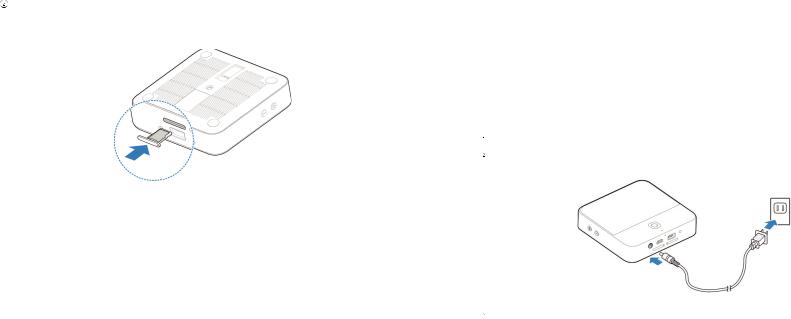
Place the microSD card in the tray making sure it is properly oriented.
WARNING!
To avoid damage to the device, do not use any other kind of SIM card, or any non-standard micro-SIM card cut from a SIM card. You can get a standard micro-SIM card from your mobile service provider.
Charging the Battery
Your ZTE Spro 2’s battery has enough power to turn on. Fully charge the battery as soon as possible.
WARNING!
Use only ZTE-approved chargers and cables. The use of unapproved accessories could damage your device or the built-in battery.
CAUTION: Do not try to remove or change the built-in rechargeable battery in your device by yourself. By doing so will violate the warranty policy.
Plug the AC adapter into the power socket on your ZTE Spro 2. Plug the AC adapter into an electrical outlet.
Disconnect the adapter when the battery is fully charged.
NOTE: If the power of battery is extremely low, you may not be able to power on the device even when it is being charged. In this case, try again after charging it for at least 20 minutes. Contact customer service if you still cannot power on after prolonged charging.
2 |
3 |

Powering On/Off
Ensure that the micro-SIM card is in your device and the battery is charged.
•PressandholdthePower Button to power on your device.
•Toturnitoff,pressandholdthePower Button to open the options menu. Tap Power off > OK.
Completing the Setup Screens
When you power on your device for the first time or after factory resetting it (see Backup & Reset), the setup screens appear to help you set up certain features and preferences on your device.
On the welcome screen, tap the language field to select the language you want to use and then tap Start.
Connect to a Wi-Fi network and tap Next, or tap Skip.
If prompted, set up date, time, and time zone and then tap Next. Check Automatic date & time to synchronize date and time with the network.
Sign in to or create a Google account on your device. You can also tap Not now, but you must link your device to a Google account to use certain Google applications.
Configure the Google location options and tap Next.
Enter the owner name for the device to personalize some apps, or leave the fields blank. Then tap  .
.
Tap Next to accept the terms of Google services and privacy policy.
Tap Finish to complete the setup.
Switching to Sleep Mode
To save battery power, you can press the Power Button to switch your device to sleep mode. The screen will be turned off and unresponsive to tapping but other functions will still work.
Your device also goes into sleep mode by itself after a while of inactivity. You can set how long the time should be in SETTINGS > Device > Display > Sleep.
Waking Up Your Device
Press the Power Button to turn on the screen.
Press and hold the screen to unlock it.
NOTE: If you have set an unlock pattern, PIN, or password for the device (see System Settings – Security), you’ll need to draw the pattern or enter the PIN/ password to unlock the screen.
Restarting Your ZTE Spro 2 Smart Projector
If the screen freezes or takes too long to respond, try pressing and holding the Power Button for about 10 seconds to restart the device.
Turning On/Off the Projector
You can use the projector embedded in your
ZTE Spro 2 to project pictures onto large surfaces.
There are several ways that you can turn the projector on and off.
•Swipeupordownonthescreenwiththreefingers.
•Swipedownonthestatusbarfromthetopofthe screen and tap Projector below Control Switch.
•PressandholdthePower Button and tap
Turn on projector or Turn off projector.
•FromtheAPPS tab of the home screen, tap Settings > Projector and tap the switch next to Projector on the Projector settings screen. You can also open
the Projector settings screen from the
SETTINGS tab of the home screen.
4 |
5 |
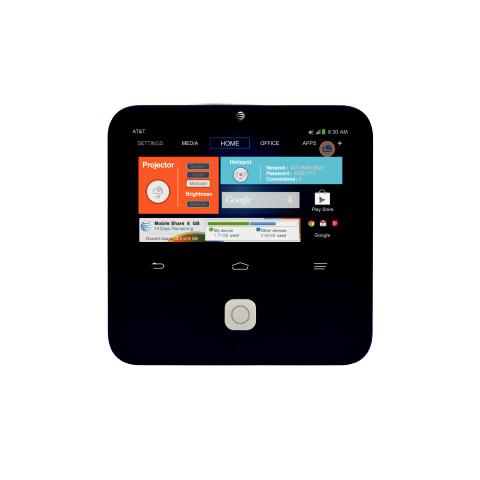
•FromtheHOME tab of the home screen, tap on the Projector tile.
•Iftheprojectorfloatingbuttonisenabled,tap > Projector off or Projector on.
NOTE: Forbestresults,projectatarightangleontoanon-reflectivewhiteflat surface 6.6 feet to 16.4 feet from your ZTE Spro 2. See Projection for more information on using the ZTE Spro 2 as a projector.
WARNING!
Do not look directly into the projection lens or point the lens toward people or animals’ eyes when the projector is on, as this may cause injury to the eyes.
Using Touch Control
Your ZTE Spro 2’s touch screen enables you to control actions through a variety of touch gestures.
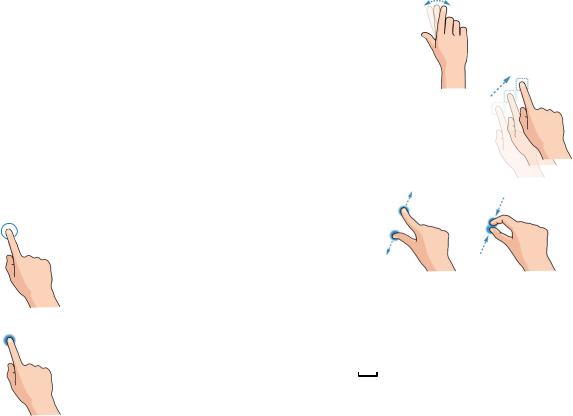
Tap
When you want to type using on-screen keyboards, select items on the screen such as application and settings icons, or press the on-screen buttons, simply tap them with your finger.
Press and Hold
To open the available options for an item (for example, a message or link in a web page), press and hold the item.
6
Swipe or Slide
To swipe or slide means to quickly drag your finger vertically or horizontally across the screen.
Drag
To drag, press and hold your finger with some pressure before you start to move your finger. While dragging, do not release your finger until you have reached the target position.
Pinch
In some apps (such as Maps, Browser, and Gallery), you can zoom in and out by placing two fingers on the screen at once and spreading them apart (to zoom in) or pinching them together (to zoom out).
Rotate the screen
For most screens, you can automatically change the screen orientation between landscape and portrait by holding the device upright or turning it on its side.
NOTE: The Auto-rotate screen check box needs to be selected for the screen orientation to automatically change. Tap  > SETTINGS > Device > Display >
Auto-rotate screen.
You can also access the screen rotation control by swiping down on the status bar and tapping Auto Rotate.
7
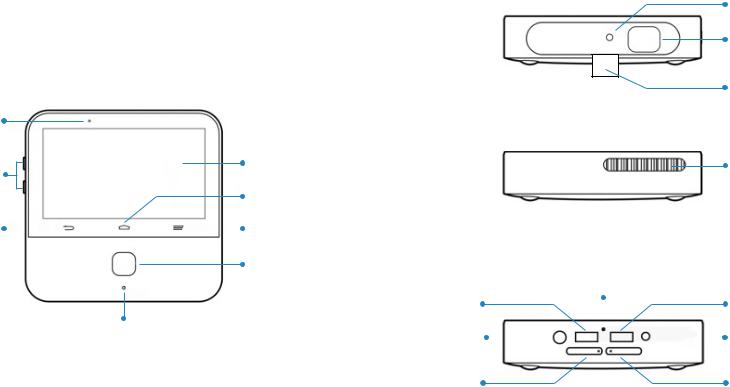
Getting to Know Your ZTE Spro 2 Smart Projector
Top View
Indicator Light
Touch Screen
Volume
Home
Back |
|
|
|
Menu |
|
|
Power/Lock
Main Microphone
Front View
Side View
Back View
Auxiliary
Microphone
Focus Sensor
Projection
Lens
Kickstand
Ventilation
Port
HDMI Port |
|
|
|
USB Port |
||
|
||||||
Power Socket |
|
|
|
|
|
Headset Jack |
|
|
|
|
|
||
|
|
|
||||
micro-SIM |
|
|
|
microSD |
||
Card Slot |
|
|
|
Card Slot |
||
8 |
9 |

Key Components
Component |
Functions |
|
|
|
|
Home Key |
•TaptoreturntotheHOMEtabofthehomescreen. |
|
•PressandholdtoopentheGoogleNowapp. |
||
|
||
Menu Key |
•Taptogetoptionsforthecurrentscreen. |
|
•Pressandholdtoseerecentlyusedapps. |
||
|
||
Back Key |
Tap to go to the previous screen. |
|
|
|
|
Projection Lens |
Project images on a surface. |
|
|
|
|
Focus Sensor |
Analyze the clarity of the projected image in order for |
|
the projector to adjust its focus automatically. |
||
|
||
|
•Pressandholdtoenableordisableairplanemode, |
|
|
turn the projector or sound on/off, power on/off, or |
|
Power/Lock |
restart your ZTE Spro 2. |
|
•Presstoturnthedisplayonoroff. |
||
|
||
|
•Presstwicequicklywhentheprojectoristurnedonto |
|
|
adjust its focus automatically. |
|
Volume Up/Down |
Press or hold to turn the volume up or down. |
|
|
|
|
Main Microphone / |
Transmit your voice. The auxiliary microphone is useful |
|
Auxiliary Microphone |
for canceling ambient noise. |
|
Ventilation Port |
Exhaust the hot air when the projector is on. |
|
|
|
WARNING!
•Donotlookdirectlyintotheprojectionlensorpointthelenstowardpeople or animals’ eyes when the projector is on as this may cause injury to the eyes.
•Donotplaceanythingneartheventilationholesasthismaycauseinternalheat buildup. Do not place your hand near the ventilation holes as this may cause injury.
10
Home Screen
The home screen is the starting point for your ZTE Spro 2’s applications, functions, and menus. You can customize your home screen by adding tabs, folders, and application shortcuts, or remove them as you like.
Navigating Your Home Screen
Your home screen comes with a series of tabs. Tap a tab to access the items in it. Tap the APPS tab to find all your applications. Tap other tabs to find application shortcuts, folders and widget tiles. With widget tiles, you can manage important functions of your device right from the home screen.
Personalizing Your Home Screen
Add a Tab
Tap  to add a new tab to the home screen.
Edit a Tab
Press and hold the tab and then tap to delete the tab and all items in it, or tap the tab name to enter a new tab name.
NOTE: Some tabs, such as the APPS tab and the HOME tab, are pre-configured and cannot be edited.
11
Add an Application Shortcut
Press and hold an application icon in the APPS tab or any shortcut in any other tab.
Drag the item to the name of the tab that you want to put the item in. The screen will display the content in that tab.
Drag the item to an empty spot in the tab and release your finger.
Remove an Application Shortcut
Press and hold an application icon in any tab other than the APPS tab.
Drag the icon to  at the bottom and release your finger.
Organize Shortcuts With Folders
Press and hold an application icon in any tab other than the APPS tab.
Drag the icon to at the bottom and release your finger. A new folder is created and the icon is moved into the folder.
To add more shortcuts into the folder, press and hold them and drag them to the folder and release them.
NOTE: To remove a shortcut from a folder, tap the folder to display its content, and then press and hold the shortcut and release it after dragging it out of the folder.
Rename a Folder
Tap a folder to open it.
Tap the folder name twice.
Enter a new name and tap Done or tap any area outside the folder to save the name.
Uninstall or Disable an Application
Press and hold an application icon in the APPS tab of the home screen.
Tap on the app you want to uninstall or tap on the app you want to disable.
Tap OK.
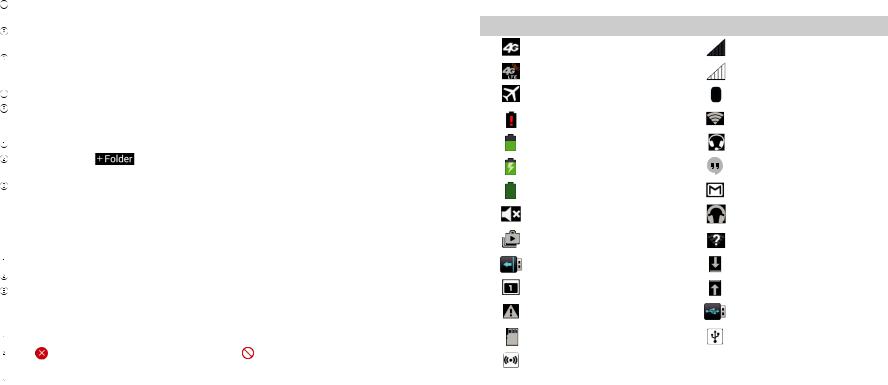
Status and Notification Icons
Your ZTE Spro 2 will tell you exactly what’s going on by showing you simple icons.
Indicator |
What it means |
Indicator |
What it means |
|
|
|
|
|
3G connected |
|
No signal |
|
|
|
|
|
4G LTE connected |
|
Signal strength |
|
|
|
|
|
Airplane mode |
|
Bluetooth on |
|
|
|
|
|
Battery empty |
|
Connected to a Wi-Fi® |
|
|
network |
|
|
|
|
|
|
Battery partially drained |
|
Wired headset connected |
|
|
|
|
|
Battery charging |
|
New SMS/MMS/Hangouts |
|
|
messages |
|
|
|
|
|
|
Battery full |
|
New Gmail message |
|
|
|
|
|
Silent mode |
|
Music playing |
|
|
|
|
|
Updates available from |
|
Open Wi-Fi network |
|
Play Store |
|
detected |
|
Unmount external USB |
|
Downloading data |
|
device |
|
|
|
|
|
|
|
Upcoming event |
|
Sending data |
|
|
|
|
|
microSD card removed |
|
External USB device |
|
|
connected |
|
|
|
|
|
|
microSD card safely |
|
USB tethering on |
|
unmounted |
|
|
|
|
|
|
|
Mobile hotspot on |
|
|
|
|
|
|
12 |
13 |

Using the Notifications Panel
The Notifications panel provides quick access to alerts such as new messages, calendar events, and software updates.
•ToopentheNotificationspanel,swipedownonthestatusbaratthetopofthe home screen.
•Swipeleftorrighttoclearindividualnotificationsortap to clear all.
•Tap to access the full settings menu.
•ToclosetheNotificationspanel,swipeupfromthebottomofthescreen or tap  .
.
•TaptheiconsbelowControl Switch to turn on or off designated features directly, or drag the brightness bar to adjust screen brightness.
Reopening Recently Used Applications
Press and hold  from any screen. The device will display recently used applications.
Tap the application you want to open.
Entering Text
You can enter text using the on-screen keyboard. Some apps open it automatically. In others, open it by tapping where you want to type. Tap  to hide the on-screen keyboard.
Google Keyboard
The Google keyboard provides a layout similar to a desktop computer keyboard.
•Tapthealphabetickeystoenterletters.Pressandholdsomespecifickeysto enter associated accented letters or numbers. For example, to enter è, press and
hold |
and the available accented letters and number 3 appear. Then slide to |
||||
choose è. |
|
|
|
|
|
• Tap |
to use uppercase. Double-tap |
to lock uppercase. This key also |
|||
changes to indicate the current case you are using: |
for lowercase, |
for |
|||
uppercase, and |
when locked in uppercase. |
|
|
||
•Tap to delete the text before the cursor.
•Tap to select numbers and symbols. You can then tap
  to find more.
•Tap to use Google voice typing.
•Pressandhold to change the input languages or set up the Google keyboard.
14 |
15 |

Google Voice Typing
Google voice typing uses the Google voice recognition service to convert speech to text.
Tap to access the voice typing feature when you are using the Google keyboard.
When you see the microphone image, speak what you want to type.
You can continue entering text to keep it or to delete it.
NOTE: Say “comma,” “period,” “question mark,” “exclamation mark,” or “exclamation point” to enter punctuation.
Changing Input Methods
In addition to the preinstalled keyboard and input methods, you can install other text input apps and change the input method freely.
When you use the on-screen keyboard to enter text, the icon |
appears on |
the status bar. |
|
Open the Notifications panel and tap Choose input method. Select the input method you want.
Choosing Input Settings
Choose the input method settings by tapping  > SETTINGS > System >
Language & input.
In the KEYBOARD & INPUT METHODS section, you can set the default input method and choose the settings for each installed input method. Tap a checkbox next to a keyboard type to enable that option.
Editing Text
•Move the insertion point: Tap where you want to type. The cursor blinks in the new position, and a tab appears below it. Drag the tab to move the cursor.
•Select text: Press and hold or double-tap within the text. The nearest word highlights, with a tab at each end of the selection. Drag the tabs to change the selection.
• Cut or copy: Select the text you want to manipulate. Then tap |
or |
, or in |
landscape mode tap Edit > Cut / Copy. |
|
|
• Replace text with the clipboard text: Select the text you want to replace. Then |
|
tap |
or PASTE, or in landscape mode tap Edit > Paste. |
•Insert text from the clipboard: Move cursor to the insertion point and then press and hold the tab below the cursor. Release your finger and tap PASTE.
16 |
17 |
 Loading...