


 Loading...
Available applications and services are subject to change at any time.
Table of Contents
Get Started |
1 |
Your Tablet at a Glance |
1 |
Set Up Your Tablet |
1 |
Activate Your Tablet |
2 |
Sprint Account Information and Help |
3 |
Sprint Account Passwords |
3 |
Manage Your Account |
3 |
Tablet Basics |
5 |
Your Tablet’s Layout |
5 |
Turn Your Tablet On and Off |
6 |
Turn Your Screen On and Off |
6 |
Touchscreen Navigation |
7 |
Your Home Screen |
7 |
Home Screen Overview |
8 |
Customize the Home Screen |
8 |
Status Bar |
9 |
Enter Text |
10 |
Android Keyboard |
10 |
Google Voice Typing |
11 |
Swype |
11 |
TouchPal Keyboard (Tablet) |
12 |
Tips for Editing Text |
14 |
People |
15 |
Get Started with People |
15 |
Access People |
15 |
The Contacts List |
15 |
Contacts List Options |
16 |
Add a Contact |
17 |
Edit a Contact |
18 |
Add or Edit Information for a Contact |
18 |
Assign a New Picture to a Contact |
18 |
Join a Contact |
19 |
Delete a Contact |
19 |
i

Synchronize Contacts |
19 |
Share a Contact |
20 |
Accounts |
21 |
Gmail / Google |
21 |
Create a Google Account |
21 |
Sign In to Your Google Account |
22 |
Access Gmail |
22 |
Send a Gmail Message |
22 |
Read and Reply to Gmail Messages |
23 |
23 |
|
Add an Email Account |
24 |
Add an Exchange ActiveSync Account |
24 |
Compose and Send Email |
25 |
View and Reply to Email |
26 |
Manage Your Email Inbox |
26 |
Email Account Settings |
27 |
Delete an Email Account |
27 |
Add the Email Widget |
27 |
Social Networking Accounts |
28 |
28 |
|
28 |
|
YouTube |
29 |
Google+ |
29 |
Apps and Entertainment |
31 |
Google Play Store |
31 |
Find and Install an App |
31 |
Create a Google Wallet Account |
32 |
Request a Refund for a Paid App |
32 |
Open an Installed App |
32 |
Uninstall an App |
33 |
Get Help with Google Play |
33 |
Google Maps |
33 |
Music |
34 |
Music Player |
34 |
Google Play Music App |
36 |
Sprint Music Plus |
37 |
Google Play Movies & TV App |
38 |
ii

Web and Data |
39 |
Wi-Fi |
39 |
Turn Wi-Fi On and Connect to a Wireless Network |
39 |
Check the Wireless Network Status |
40 |
Connect to a Different Wi-Fi Network |
40 |
Launch a Web Connection |
40 |
Connections Optimizer |
40 |
Data Services General Information |
41 |
Your User Name |
41 |
Data Connection Status and Indicators |
42 |
Virtual Private Networks (VPN) |
42 |
Prepare Your Tablet for VPN Connection |
42 |
Set Up Secure Credential Storage |
42 |
Add a VPN Connection |
43 |
Connect to or Disconnect from a VPN |
43 |
Browser |
44 |
Launch the Web Browser |
44 |
Learn to Navigate the Browser |
44 |
Browser Menu |
45 |
Select Text on a Web Page |
46 |
Go to a Specific Website |
46 |
Adjust Browser Settings |
46 |
Create Website Settings |
49 |
Reset the Browser to Default |
49 |
Set the Browser Home Page |
49 |
Create Bookmarks |
50 |
Create a New Homepage |
50 |
Add Bookmarks to Your Home Screen |
50 |
Camera and Video |
52 |
Take Pictures |
52 |
Open or Close the Camera |
52 |
Viewfinder Screen |
52 |
Take a Picture |
52 |
Review Screen |
53 |
Record Videos |
53 |
Camera Settings |
54 |
Video Camera Settings |
55 |
iii

View Pictures and Videos Using Gallery |
56 |
Open or Close Gallery |
56 |
View Pictures and Videos |
56 |
Zoom In or Out on a Picture |
57 |
Watch Video |
57 |
Work with Pictures |
57 |
Share Pictures and Videos |
58 |
Send Pictures or Videos by Email |
58 |
Send Pictures or Videos Using Bluetooth |
59 |
Share Pictures and Videos on Facebook |
59 |
Share Photos on Flickr |
59 |
Share Pictures on Picasa |
60 |
Share Videos on YouTube |
60 |
Share Photos or Videos on Google+ |
60 |
Tools and Calendar |
62 |
Calendar |
62 |
Add an Event to the Calendar |
62 |
Invite Guests to Your Calendar Event (Google Account Only) |
63 |
Calendar Event Alerts |
63 |
View Calendar Events |
64 |
Erase Calendar Events |
64 |
Show or Hide Calendars |
65 |
Choose Google Calendars to Synchronize With Your Tablet |
65 |
Send a vCalendar |
66 |
Clock |
66 |
Alarm |
66 |
Calculator |
67 |
File Manager |
67 |
Sound Recorder |
67 |
Voice Commands |
68 |
Bluetooth |
68 |
Turn Bluetooth On or Off |
68 |
The Bluetooth Settings Menu |
68 |
Change the Device Name |
69 |
Connect a Bluetooth Headset or Car Kit |
69 |
Reconnect a Headset or Car Kit |
70 |
Disconnect or Unpair from a Bluetooth Device |
70 |
iv

Send and Receive Information Using Bluetooth |
70 |
microSD Card |
72 |
Insert a microSD Card |
72 |
Remove a microSD Card |
73 |
View microSD Card Memory |
74 |
Format the microSD Card |
74 |
Unmount the microSD Card |
74 |
Use the Tablet’s microSD Card as a USB Drive |
74 |
Transfer Files Between Your Tablet and a Computer |
75 |
Update Your Tablet |
75 |
Update Your Tablet Firmware |
75 |
Update Your Android Operating System |
77 |
Update Your Profile |
77 |
Update Your PRL |
77 |
Sprint Worldwide Wireless Service |
78 |
Activate Sprint Worldwide Service on Your Account |
78 |
Your Tablet’s SIM Card for International CMDA Roaming |
78 |
Enable Global Roaming Mode |
78 |
International Data Roaming |
79 |
Get Started With Sprint Worldwide Data Services |
79 |
International Roaming Status Messages |
79 |
Contact Sprint for Assistance with International Service |
80 |
Settings |
82 |
Airplane Mode |
82 |
Wi-Fi Settings |
82 |
Bluetooth Settings |
83 |
Mobile Networks |
83 |
Enable Data Services |
83 |
Data Usage Settings |
83 |
More Settings |
84 |
VPN Settings |
84 |
Sound Settings |
84 |
Volumes |
84 |
Default Notifications |
85 |
Missing Notification Alert |
85 |
Touch Sounds |
85 |
Screen Lock Sound |
85 |
v

Vibrate on touch |
85 |
Display Settings |
85 |
Brightness Settings |
85 |
Wallpaper Settings |
86 |
Sleep |
86 |
Storage Settings |
87 |
Internal Memory |
87 |
SD Card |
87 |
Battery Settings |
87 |
Apps |
88 |
Connect to PC |
88 |
Activate this device |
88 |
Location Access |
89 |
Security Settings |
89 |
Screen Lock |
89 |
Owner Information |
91 |
Encrypt tablet |
91 |
Encrypt External SD Card |
91 |
Make Passwords Visible |
91 |
Device Administrators |
92 |
Unknown Sources |
92 |
Credential Storage |
92 |
Language & Input Settings |
92 |
Language Settings |
92 |
Spell Checker |
93 |
Personal Dictionary |
93 |
Default Text Input |
93 |
Android Keyboard Settings |
93 |
Google Voice Typing Settings |
93 |
Swype Settings |
94 |
TouchPal Keyboard Settings |
94 |
Voice Search Settings |
94 |
Text-to-Speech Output Settings |
94 |
Pointer Speed |
95 |
Back Up & Reset |
95 |
Accounts |
96 |
Date & Time Settings |
96 |
vi
Accessibility Settings |
97 |
Developer Options |
97 |
System Updates |
97 |
About tablet |
98 |
Copyright Information |
99 |
Index |
100 |
vii
Get Started
The following topics give you all the information you need to set up your tablet and wireless service the first time.
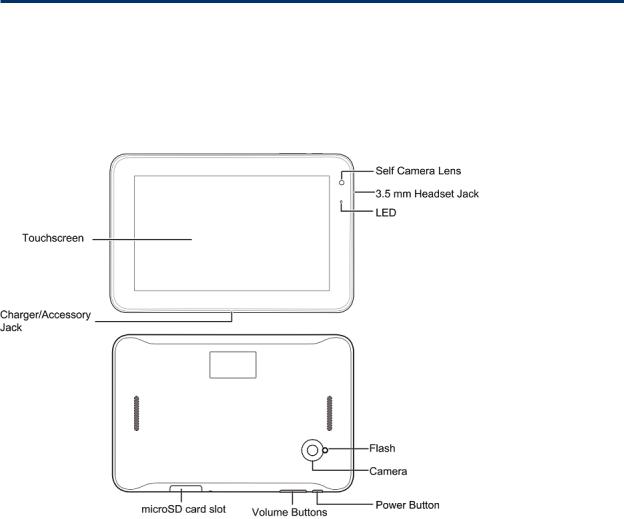
Your Tablet at a Glance
The following illustration outlines your tablet’s primary external features and buttons.
Set Up Your Tablet
You must first charge the battery to begin setting up your tablet.
1. Charge your battery.
• Plug the USB connector into the charger/accessory jack on your tablet.
GetStarted |
1 |
•Plug the USB cable into the AC adapter, and then plug the AC adapter into an electrical outlet. Fully charging a battery may take up to three hours.
Note: Your tablet’s battery should have enough charge for the tablet to turn on and find a signal. You should fully charge the battery as soon as possible.
2. Press and hold the Power button to turn the tablet on.
•If your tablet is activated, it will turn on and search for Sprint service.
•If your tablet is not yet activated, see Activate Your Tablet for more information.
Activate Your Tablet
Follow the instructions below to activate your tablet if it has not already been activated. Depending on your account or how and where you purchased your tablet, it may be ready to use or you may need to activate it on your Sprint account.
nIf you purchased your tablet at a Sprint Store, it is probably activated and ready to use.
nIf you received your tablet in the mail and it is for a new Sprint account or a new line of service, it is designed to activate automatically.
•When you turn the tablet on for the first time, you should see a Hands Free Activation screen, which may be followed by a PRL Update screen and a Firmware Update screen. Follow the onscreen instructions to continue.
nIf you received your tablet in the mail and you are activating a new tablet for an existing number on your account (you’re swapping tablets), you can activate on your computer online or directly on your tablet.
n Activate on your computer:
GetStarted |
2 |
• Go to sprint.com/activate and complete the online instructions to activate your tablet.
n Activate on your tablet:
•Turn on your new tablet. (Make sure the old one is turned off.) Your tablet will automatically attempt Hands-Free Activation.
•Touch Activate to override auto-activation and start the manual activation wizard.
•Follow the on-screen prompts to complete the activation process.
To confirm activation, open the browser and try browsing the Web. If your tablet is still not activated, visit sprint.com/support for assistance. If you do not have access to the Internet, call Sprint Customer Service at 1-888-211-4727.
Tip: Do not press the Power button while the tablet is being activated. Pressing the Power button cancels the activation process.
Note: If you are having any difficulty with activation, visit sprint.com/support.
Sprint Account Information and Help
Find out about account passwords and information about managing your account and finding help.
Sprint Account Passwords
You will need to create passwords to protect access to your personal account information, your data services account. As a Sprint customer, you enjoy unlimited access to all your information.
Account User Name and Password
If you are the account owner, you will create an account user name and password when you sign on to sprint.com/mysprint. (Click Sign in/Register and then click Sign up now! to get started.) If you are not the account owner (if someone else receives the bill for your Sprint service), you can get a sub-account password at sprint.com/mysprint.
Data Services Password
With your Sprint tablet, you may elect to set up an optional data services password to control access and authorize purchases.
For more information, or to change your passwords, sign on to sprint.com/mysprint.
Manage Your Account
Manage your Sprint account from your computer.
Online: sprint.com/mysprint
nAccess your account information.
nCheck your minutes used (depending on your Sprint service plan).
nView and pay your bill.
GetStarted |
3 |
nEnroll in Sprint online billing and automatic payment.
nPurchase accessories.
nShop for the latest Sprint tablets.
nView available Sprint service plans and options.
nLearn more about data services and other products like games, ringtones, screen savers, and more.
GetStarted |
4 |
Tablet Basics
Your tablet is packed with features that simplify your life and expand your ability to stay connected to the people and information that are important to you. The following topics will introduce the basic functions and features of your tablet.
Your Tablet’s Layout
The illustrations and descriptions below outline your tablet’s basic layout.
Key Functions
nSelf Camera Lens takes pictures and records videos while facing the screen, and allows you to video conference.
n3.5 mm Headset Jack allows you to plug in either a stereo headset or a headset for convenient, hands-free conversations.
nLED displays a tablet notification, charging status, or alert.
nFlash helps illuminate subjects in low-light environments when the camera is focusing and capturing a picture or video.
nCamera lets you take pictures and videos.
nPower Button lets you turn the tablet on or off or turn the screen on or off, restart the tablet, or switch your tablet to silent mode, vibration mode, or airplane mode.
TabletBasics |
5 |
nVolume Button allows you to adjust the ringtone or media volume.
nmicroSD card slot allows you to install and remove a microSD card.
nCharger/Accessory Jack allows you to connect the tablet charger or the USB cable (included).
nTouchscreen displays all the information needed to operate your tablet, such as the Contacts list, and the date and time. It also provides one-touch access to all of your features and applications.
CAUTION! Inserting an accessory into the incorrect jack may damage the tablet.
Turn Your Tablet On and Off
The instructions below explain how to turn your tablet on and off.
Turn Your Tablet On
n Press and hold the Power button.
Turn Your Tablet Off
1.Press and hold the Power button to open the tablet options menu.
2.Touch Power off to turn the tablet off.
Your screen remains blank while your tablet is off (unless the battery is charging).
Turn Your Screen On and Off
Your tablet allows you to quickly turn the screen off when not in use and to turn it back on and unlock it when you need it.
Turn the Screen Off When Not in Use
nTo quickly turn the screen off, press the Power button. Pressing the Power button again will turn on your tablet screen and show the lock screen.
To save battery power, the tablet automatically turns off the screen after a certain period of time when you leave it idle. You will still be able to receive emails while the tablet’s screen is off.
Note: For information on how to adjust the time before the screen turns off, see Sleep.
Turn the Screen On and Unlock It
1.To turn the screen on, press the Power button.
2.Drag  toward
  to unlock it.
•If you have set up a screen lock, you will be prompted to draw the pattern or enter the password or PIN. See Screen Lock.
TabletBasics |
6 |
Touchscreen Navigation
Your tablet’s touchscreen lets you control actions through a variety of touch gestures.
Touch
When you want to type using the onscreen keyboard, select items onscreen such as application and settings icons, or press onscreen buttons, simply touch them with your finger.
Touch and Hold
To open the available options for an item (for example, a contact or link in a Web page), touch and hold the item.
Swipe or Slide
To swipe or slide means to quickly drag your finger vertically or horizontally across the screen.
Drag
To drag, press and hold your finger with some pressure before you start to move your finger. While dragging, do not release your finger until you have reached the target position.
Flick
Flicking the screen is similar to swiping, except that you need to swipe your finger in light, quick strokes. This finger gesture is always in a vertical direction, such as when flicking the contacts or message list.
Rotate
For most screens, you can automatically change the screen orientation from portrait to landscape by turning the tablet sideways. When entering text, you can turn the tablet sideways to bring up a bigger keyboard. See Android Keyboard for more details.
Note: The Auto-rotate screen check box needs to be selected for the screen orientation to automatically change. Touch  >
>  > Settings > Accessibility > Auto-rotate screen.
Pinch and Spread
“Pinch” the screen using your thumb and forefinger to zoom out or “spread” the screen to zoom in when viewing a picture or a Web page. (Move fingers inward to zoom out and outward to zoom in.)
Your Home Screen
The home screen is the starting point for your tablet’s applications, functions, and menus. You can customize your home screen by adding application icons, shortcuts, folders, widgets, and more.
TabletBasics |
7 |
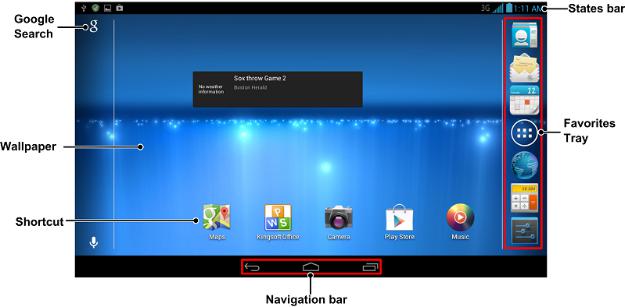
Home Screen Overview
Your home screen extends beyond the initial screen. Swipe the screen left or right to display additional screens.
Tip: Touch  to return to the main home screen from any other home screen.
Customize the Home Screen
Learn how to add, move, or remove items from the home screen.
Add Items to the Home Screen
1.Touch  >
>  .
.
2.Touch the APPS tab or the WIDGETS tab on top.
3.Touch and hold an application icon or a widget. Then drag it to the position you want in the home screen and release it.
Move or Remove Items on the Home Screen
n Touch and hold the item you want to move or remove from the home screen.
•To move the item, drag it to a new area and release it.
•To remove the item, drag it to the  at the top-left of the screen and release it.
Note: Removing an item from the home screen will not remove it from your apps list.
TabletBasics |
8 |
 User Guide")
Status Bar
The status bar at the top of the home screen provides tablet and service status information on the right side and notification alerts on the left. To view notification alerts, touch the status bar and drag it down.
Status Icons
Icon |
Status |
Bluetooth® active
GPS active
Wi-Fi® active
Downloading
Vibrate
Silent
Network (full signal)
3G(data service)
Airplane mode
Sync active
Alarm set
Battery (charging)
Battery (full charge)
Notification Icons
Icon |
Notification |
New email
New Gmail
Event
Music playing
TabletBasics |
9 |
Icon |
Notification |
USB connection
Enter Text
You can type on your tablet using one of the available touchscreen keyboards.
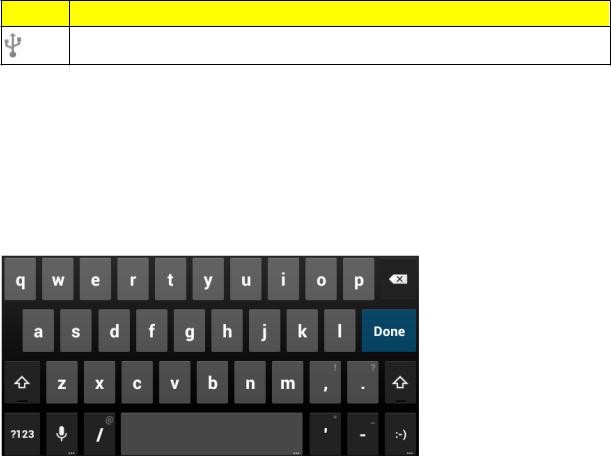
Android Keyboard
The Android Keyboard provides a layout similar to a desktop computer keyboard. Turn the tablet sideways and the keyboard will change to a larger layout as the tablet switches to the landscape display.
Note: The Auto-rotate screen check box in  >
>  > Settings > Accessibility needs to be selected for using the keyboard in landscape mode. The landscape QWERTY keyboard is not supported in all applications.
nTouch the alphabetic keys to enter letters. Touch and hold some specific keys to enter associated accented letters or numbers. For example, to enter È, touch and hold  . As the available accented letters appear, slide your finger to choose È and release.
nTouch  to use uppercase. Double-tap
  to lock uppercase. This key also changes to indicate the current case you are using:
  for lowercase,
  for uppercase, and
  when locked in uppercase.
nTouch  to delete the text before the cursor.
nTouch  to select numbers. You can then touch
  to find more. Also, often used symbols are displayed on top of the keyboard.
nTouch and hold  and then swipe to choose the emoticons.
TabletBasics |
10 |
n Touch and hold  and swipe to change the input languages or Android keyboard settings.
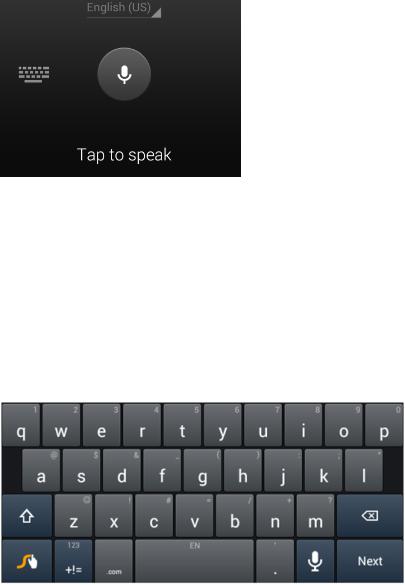
Google Voice Typing
Google Voice typing uses Google voice recognition to convert speech to text.
nTouch  to turn on/off voice input from the Android keyboard.
nTouch  to start Google voice typing.
nTouch  to switch to keyboard input.
Swype
The Swype™ keyboard lets you enter words by drawing a path from letter to letter in one continuous motion. When you lift your finger after the last letter of a word, a space is automatically added.
nTouch the alphabetic keys to enter letters. Touch and hold a key to enter the number or symbol located on the top of the key. Keep holding the key to bring up a series of characters available on that key, including associated accented letters, symbols or numbers.
nFor example, in English mode, touch and hold  to enter 5. Keep holding
  to open a character and number list. You can select to enter T, or 5.
TabletBasics |
11 |
nTouch  to use uppercase or lowercase. This key also indicates the current case:
  for lowercase,
  for uppercase, and
  when locked in uppercase.
nTouch  to enter a space. Touch and hold this key to open a pop-up menu for language selection.
nTouch  to select numbers and symbols. Touch
  to enter the alternate symbol on a key. Touch
  to go back to enter letters. Touch and hold
  to open a simple keyboard with numbers and certain symbols.
nTouch  to use an emotion. You can touch and hold
  to find more emoticons.
nTouch  to delete a character before the cursor.
nTouch  to start a new line.
nTouch and hold  to open the Swype settings.
To enter text via Swype:
Move your finger from letter to letter to trace a word without lifting the finger until you reach the end of the word.
To enter the word “here”. Put your finger on “h”, and without lifting, slide it to “e”, and then to “r”, and back to “e”. When complete, lift your finger off the screen and the matched words are displayed.
Tips for using Swype Text Input:
nTo enter double letters, scribble slightly or make a loop on the letter. For example, to get the "ll" in "hello", scribble (or make a loop) on the "l" key.
nLift your finger at the end of the word. A space is added automatically when you “Swype” the next word.
For more information about using Swype and its additional capabilities, including using voice entry
and personalizing your Swype dictionary, touch and hold  from the Swype keyboard display and then touch How to Swype. You can also visit swype.com for more information.
TouchPal Keyboard (Tablet)
The TouchPal keyboard is another alternative keyboard. Like the Sywpe keyboard, it also allows you to enter words by sliding your fingers through the letters.
TabletBasics |
12 |
nTouch the alphabetic keys to enter letters.
nTouch  to use uppercase or lowercase. Double-tap
  to lock uppercase.
nSlide right on  to enable word prediction. Slide left on
  to disable word prediction.
nTouch  to change input language.
nTouch  to enter digits, symbols, emoticons and other pre-defined texts. Touch
  to find more. Touch
  to go back to enter letters.
nTouch  to start a new line.
nTouch or hold  to delete text before the cursor.
nTouch  to access the quick settings of TouchPal keyboard.
nTouch  to access the main settings menu of the TouchPal keyboard.
nTouch  to open text editing options. You can select, cut, copy, paste, and delete text, or move the cursor.
nTouch  to resize the keyboard.
nTouch  to use voice input.
nTouch  to hide the onscreen keyboard. You can touch the text field again to show the keyboard.
TabletBasics |
13 |
Tips for Editing Text
Your tablet gives you many options to make entering text easier, including copying, cutting, and pasting text, using voice-to-text input, customizing the user dictionary, using predictive text, and more.
nMove the insertion point: Touch where you want to type. The cursor blinks in the new position, and a tab appears below it. Drag the tab to move the cursor.
nSelect text: Touch and hold or double-tap within the text. The nearest word highlights, with a tab at each end of the selection. Drag the tabs to change the selection.
nCut or copy: Select the text you want to manipulate. Then touch the Cut  or Copy
  button to cut or copy the text to the clipboard.
nReplace text with the clipboard text: Select the text you want to replace. Then touch  or
or
PASTE.
nInsert text from the clipboard: Move cursor to the insertion point and then touch and hold the tab below the cursor. Release the finger and touch PASTE.
TabletBasics |
14 |

People
The People application lets you store and manage contacts from a variety of sources, including contacts you enter and save directly in your tablet as well as contacts synchronized with your Google Account, your PC, and compatible email programs (including Exchange Server).
Get Started with People
Before using People, it’s best to learn a few basics.
Before Getting Started
Your tablet automatically sorts the Contacts entries alphabetically. You can create a Google contact, a phone (tablet) contact, or a Corporate (Microsoft Exchange ActiveSync) contact.
nGoogle contacts are synchronized between your tablet and a Google Account you set up on your tablet.
nPHONE contacts are stored locally on the tablet.
Note: If the tablet is ever reset to its factory default parameters, locally stored contacts (PHONE contacts) can be lost.
Access People
There are a few ways to display Contacts.
nTouch  >
>  > People.
– or –
Touch  (the People shortcut) on the home screen.
The Contacts List
Learn how to view and navigate through your tablet’s Contacts list.
n Touch  >
>  > People. You will see the Contacts list.
People |
15 |

nContacts List: The Contacts list displays all contacts currently stored in your tablet, including Google contacts and PHONE contacts.
nCreate Contacts: Touch  to add a contact.
Scroll through the list to view all your contacts. To see a specific entry, scroll to it and touch it.
Tip: If you have a lot of contacts stored, you’ll see a slider on the left when you’re flicking up or down the list. To go directly to a letter, touch and hold the slider and drag it to a letter.
Contacts List Options
The ( ) key provides access to optional features in the Contacts list.
1.Touch  >
>  > People.
2.Touch  to display the main contacts list options.
•Select Item(s): Select one or more contacts to share or delete.
•Share: Share one or more contacts via Buletooth, Email, Gmail, or WiFi Direct.
•Delete: Delete one or more contacts.
•Place on Home screen: Add a contact widget to home screen.
•Contacts to display: Set the type of contacts that your tablet displays in the contacts list.
•Import/export: Import/export contacts from or to the microSD card, or share visible contacts.
•Accounts: Manage the sync options for your accounts.
People |
16 |
•Settings: Set some additional display options for the contacts list.
•GAL: Access the GAL (Global Address List) information under a specific account.
Add a Contact
You can add contacts from your tablet’s application. Enter details such as name, phone numbers, email addresses, mailing addresses, and more.
1.Touch  >
>  > People.
2.Touch  to add a contact.
3.If you have multiple account types associated with your tablet, select a contact type.
•Select Google if you want to save contacts to your Google Account; these will be synced automatically with your Google Account online.
•Select PHONE as the sync account if you want your contacts on your tablet only; they will not be synced with your Google Account.
4.Use the keyboard to enter as much information as you want.
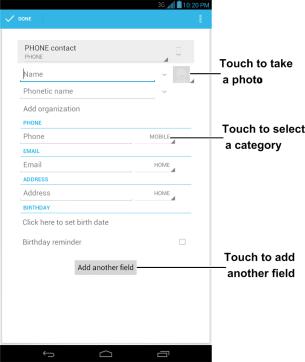
•Touch the picture icon  to assign a picture to the contact. See Assign a New Picture to a Contact.
•Touch  to select categories for phone numbers, email addresses, addresses, and more.
•Touch Add another field to include additional information such as IM address, Notes, Nickname, Website, etc.
Note: To add more phone numbers, email addresses, etc., touch Add newunder the entry field. 5. When you have finished adding information, touch DONE.
People |
17 |
Edit a Contact
Once you’ve added a contact, you can add or edit any of the information in the entry, assign a picture, set a birthday reminder, and more.
Add or Edit Information for a Contact
Use the Edit contact menu to add or edit information for an existing contact.
1.Touch  >
>  > People.
2.Touch a contact to display it, and then touch  .
.
3.Touch any field you want to change or add. See Add a Contact.
4.Add or edit the information, and then touch DONE.
Note: To select a type (label) for a phone number, email address, or postal address (such as Mobile, Home, Work, etc.), touch to the right of the field and select the appropriate type.
Note: To add more phone numbers, email addresses, etc., touch Add newunder the entry field.
Assign a New Picture to a Contact
Follow the instructions to take a new picture and assign it directly to an existing contact.
1. Touch  >
>  > People.
People |
18 |
2.Touch a contact to display it, and then touch  .
.
3.Touch the picture icon  next to the Name field.
4.Touch Choose photo from Gallery and select a photo from your gallery, or touch Take photo to take a new picture with the camera.
•You may be prompted to size the picture for use with contacts. Touch and drag the square to frame the portion of the picture to use. Touch and drag the side of the square to resize the square. Touch OK after you crop the picture.
Join a Contact
When you have contacts from various sources (Gmail), you may have multiple similar entries for a single contact. Your tablet’s Contacts application lets you link multiple entries into a single contact.
1.Touch  >
>  > People.
2.Touch a contact to display it, and then touch  .
.
3.Touch  > Join.
4.Touch another entry to link it to the original contact.
Delete a Contact
You can delete a contact from the contacts details page.
1.Touch  >
>  > People.
2.Touch a contact to display it, and then touch  > Delete.
3.Touch OK.
Synchronize Contacts
Syncing data from your managed accounts lets you add and manage new or existing contacts from your online or remote accounts to your tablet. Prior to syncing, you must have an active Google account with associated contacts, and be signed into your account with the tablet.
Syncing data from your managed accounts lets you add and manage new or existing contacts from your online or remote accounts to your tablet. Prior to syncing, you must have an active Google account with associated contacts, and be signed into your account with the tablet.
If auto sync is turned on, your tablet can sync contacts automatically.
To sync contacts when auto sync is turned off:
1. Touch  >
>  > People.
People |
19 |
2.Touch  > Accounts.
3.Touch the email account containing the contacts you wish to synchronize.
4.Touch Contacts or  > Sync now.
5.Your People then reflects any updated contact information.
•This update process works both ways. For example, any changes on the tablet are updated to your online accounts after sync.
Share a Contact
You can quickly share contacts using Bluetooth, email or Gmail.
1.Touch  >
>  > People.
2.Touch a contact to display it, and then touch  > Share.
3.In the Share contact via menu, select a method:
•Bluetooth to send the information via Bluetooth. See Bluetooth for information on pairing and sending via Bluetooth.
•Email to send the information as an email attachment. If prompted, select an email account. Address the message, add a subject and a message, and then touch SEND. See Compose and Send Email for details on sending email.
•Gmail to send the information as a Gmail attachment. Address the message, add a subject and a message, and then touch SEND. See Send a Gmail Message for details.
•WiFi Direct to send the information via Wi-Fi Direct.
People |
20 |

Accounts
With wireless service and your tablet’s messaging capabilities, you have the opportunity to share information through many different channels and accounts, including Gmail (Google), personal and corporate email, and social networking accounts.
Gmail / Google
You will need a Google Account to access several tablet features such as Gmail, Google Maps, and the Google Play applications. Before you are able to access Google applications, you must enter your account information. These applications sync between your tablet and your online Google Account.
Create a Google Account
If you do not already have a Google Account, you can create one online or using your tablet.
Note: Although you need a Gmail account to use certain features of your tablet, such as Google Play, you do not need to use Gmail as the default account for your tablet.
Create a Google Account Online
1.From a computer, launch a Web browser and navigate to google.com.
2.On the main page, click SIGN IN > SIGN UP.
3.Follow the onscreen prompts to create your free account.
4.Look for an email from Google in the email box you provided, and respond to the email to confirm and activate your new account.
Create a Google Account Using Your Tablet
1.Touch  >
>  > Settings > Add account.
2.Touch Google and then touch New.
3.Enter your First name and Last name, and then touch the Next arrow.
4.Enter a desired Username, and then touch the Next arrow.
5.When prompted, enter and reenter a password, and then touch the Next arrow.
6.Create a security question and answer, enter a secondary email address to help you recover your password if you ever lose it, and then touch the Next arrow.
Note: When setting up a new Google Account, either on your tablet or online, you will be prompted to add a secondary email address. Enter a second Gmail address or any other email address from which you currently send and receive email. This address is used to authenticate your account
Accounts |
21 |

should you ever encounter problems or forget your password. It is strongly encouraged for Android users so you can regain access to Google services and purchases on your tablet.
7.On the Finish account screen, select your Web history and additional Google Play options and then touch the Next arrow.
8.Enter the letters from the Authenticating screen and then touch the Next arrow.
9.After your tablet connects with the Google servers, select the items you would like to sync with your tablet and then touch the Next arrow.
Sign In to Your Google Account
If you have a Google Account but have not yet signed in with your tablet, follow these instructions to sign in to your Google Account.
1.Touch  >
>  > Settings > Add account.
2.Touch Google, and then touch Existing.
3.Enter your Gmail username and password, and then touch the Next arrow or Done.
4.After your tablet connects with the Google servers, select the items you would like to sync with your tablet and then touch the Next arrow.
Access Gmail
Access your personal Gmail account directly on your tablet.
1.Touch  >
>  >
>  Gmail.
2.Do any of the following:
•View more email messages: If the inbox is full, swipe your finger up the screen to view more messages and conversations.
•Read a new email message: Touch the unread message or the conversation with an unread message (just-arrived items display in bold).
•Select messages and conversations: Touch and hold the email or conversation.
•View the inbox of your other Gmail account:
o Touch |
at the top of the inbox, and then touch the account you want to view. |
• Refresh the inbox: Touch  > Refresh.
Send a Gmail Message
Use your tablet to send Gmail messages.
Accounts |
22 |
Loading...