


TELSTRA PULSE™
3G MOBILE SMART PHONE
USER MANUAL
Copyright © 2013. All rights reserved.
No part of this publication may be excerpted, reproduced, translated or utilized in any form or by any means, electronic or mechanical, including photocopying and microfilm, without the prior written permission of ZTE Corporation.
The manual is published by ZTE Corporation. We reserve the right to make modifications on print errors or update specifications without prior notice check at zte.com.au for the latest version.
Version 1.5 Prepaid |
November 2013 |
LET’S GET THIS SHOW ON THE ROAD
You must be excited about your brand new Telstra Pulse™. You’ll soon be chatting, texting and sharing photos on the go. This guide will help you get to know your mobile phone and all the fancy things it can do. So you get the most out of your new Telstra Pulse™, set aside some time to explore and play around with all its features.
By the way, your brand new phone is Blue Tick approved which means it’s recommended for rural and regional handheld coverage.
Before you get started ensure you have an active Telstra Next G® SIM card.
2
WHAT’S INSIDE
04 A quick look around your device
05 Getting Started
24 Phone Calls
31 Contacts
35 Messages and Emails
43 Getting Connected
46 Using the Browser
52 Using multimedia functions
61 Google Applications
66 Security
69 Troubleshooting
73 Warranty & Safety information
3

4
GETTING STARTED
INSERT YOUR SIM CARD
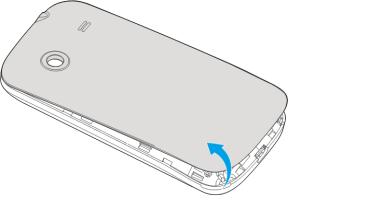
1. Remove the battery cover by opening from the thumb notch:
 Thumb notch
5

2. Insert your SIM card carefully into the SIM slot as shown:
6
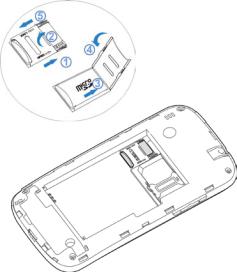
3.The handset supports microSD memory cards up to 32GB. If you wish to expand the device memory then slide the bar as shown to open the card holder.
7

4.Insert the battery with the gold contacts located against the gold springs
5.Replace the battery cover and press to click into place.
6.Insert the charger lead carefully, damage to the USB port is not covered under warranty.
8
CHARGE THE BATTERY
•Only use the AC charger and USB lead supplied.
•Insert the charger lead carefully.
•Check the plug and socket are aligned correctly.
•Do NOT use excessive force which may damage the USB port.
•Be careful to avoid tripping or pulling on the lead whilst it is plugged in.
•Physical damage to the USB port is NOT covered by warranty.
•The phone can also be charged by connecting it to a computer using the USB lead supplied.
•The phone can be charged in the ON or OFF state. When switched OFF “Charging” is displayed. When switched ON the battery icon animates until fully charged.
•If the phone is off after charging press the power key to switch it on.
•Avoid high temperatures and direct sunlight. The battery will not charge when over 45°C
9
TIPS TO MAXIMISE BATTERY LIFE
•Do not leave the battery in a discharged state. Charge the battery promptly when flat.
•If the battery is in a deep discharge state it can take 30 minutes to start charging. Leave it on charge to recover the battery.
•Keep your handset and battery cool. High temperatures degrade the battery more quickly.
•Normal charge time is 2-3 hours. Do not charge more than 24hrs.
•After 2-3 charge / discharge cycles the battery life will improve. From then on use top up charging to recharge frequently and always charge promptly when flat.
•When not using the phone for long periods charge to approx 40% and remove the battery.
•With low network signal conditions battery life is reduced.
•Turn off Bluetooth and Wi-Fi when not in use, and set the screen brightness to automatic to maximise battery life.
10
POWER ON & OFF
•Make sure that your SIM card and battery are inserted.
•Press and hold the Power Key to power on your handset.
•To power off your handset, press and hold the Power Key
•Select Power off > OK.
GOOGLE ACTIVATION WIZARD: CREATE OR LOG IN TO A GOOGLE ACCOUNT
We recommend you log in or create a Google account to enable on line services such as Email, Play Store and to protect your handset and data in case of loss or theft.
Follow the on screen wizard to create or log in to an existing Google account.
Handy Hint
If you set a lock code on your device and then forget the pattern or PIN or password it can be reset using your Google Account.
11
WAKE UP FROM SLEEP MODE
•Press the Power Key to wake up.
•Long press the unlock button to unlock (default setting).
SWITCH YOUR HANDSET TO SLEEP MODE
Press the Power Key  to enable sleep mode. The handset is put into to a low-power state with the display off.
Sleep Mode activates automatically and the timeout can be adjusted from Menu > Settings > Display > Sleep
Handy Hint
If you have forgotten your unlock pattern, PIN or password use your Google Account password to reset the phone. Or from the locked screen press the Emergency Call button and enter *983*987# then follow the prompts to reset your device.
12
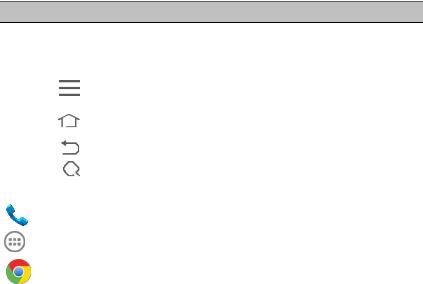
MAIN KEY FUNCTIONS
Keys Function
|
Hold down to power on your phone. |
Power Key |
Press to switch to sleep mode. Press to wake up. |
|
Hold down for Silent mode, Flight mode or Power off. |
|
|
Options |
Press to get the options on the current screen |
|
|
Home |
Press to return to the Home Screen from any screen. |
|
Hold down to see the recently used applications. |
|
|
Back |
Press to go to the previous screen. |
|
|
Search |
Press to search in the Browser, Contacts, or Messages |
|
|
Volume Keys |
Use to control the volume Up and Down |
|
|
|
Calls – Open the dialler application |
|
|
|
Apps – Open the Applications menu |
|
|
|
Browser – go to the browser homepage |
|
|
13
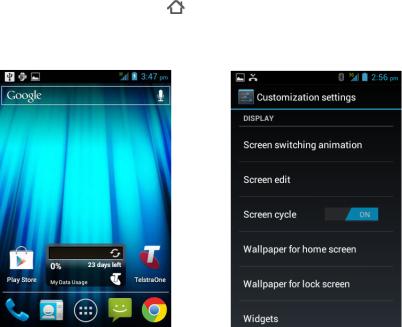
CUSTOMISE THE HOME SCREEN
Slide the Home Screen left or right to view additional pages. Long press on the screen to access the customisation settings
HOME SCREEN - LONG PRESS ON BACKGROUND – CUSTOMISATION SETTINGS
14

ADD OR REMOVE ICONS
•Go to Apps  then long press on any icon to add it to the desktop.
•Move the icon to the desired position or page on your home screen then release to drop it into place.
•To delete the icon long press it then drag and drop it on the
Remove tab at the top.
OPEN APPS |
HOLD & DROP TO COPY |
DRAG TO REMOVE TO DELETE |
15
16
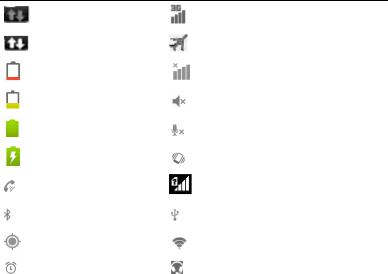
PHONE STATUS AND NOTIFICATION ICONS
Data connected |
Signal strength |
|
|
in use |
Flight mode |
|
|
Battery is very low |
No signal |
|
|
Battery is low |
Speaker is muted |
|
|
Battery is full |
Microphone is muted |
|
|
Battery is charging |
Vibrate mode enabled |
|
|
Speaker mode is on |
No SIM card installed |
|
|
Bluetooth is on |
USB connected |
|
|
GPS is on |
Connected to a Wi-Fi network |
|
|
Alarm is set |
Headset connected |
|
|
17
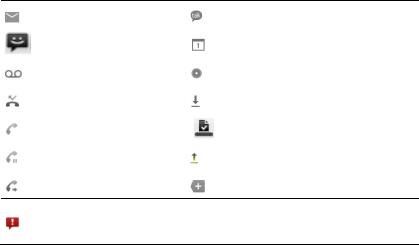
NOTIFICATION ICONS
New Email |
New instant message |
|
|
New SMS/MMS |
Upcoming event |
|
|
New voicemail |
Song is playing |
|
|
Missed call |
Downloading data |
|
|
Call in progress |
Content downloaded |
|
|
Call on hold |
Uploading data |
|
|
Call forwarding on |
More notifications |
Problem with SMS/MMS delivery (check the number, check you have service, check you have data enabled for MMS)
18
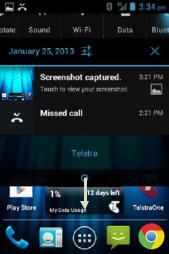
THE NOTIFICATIONS PANEL
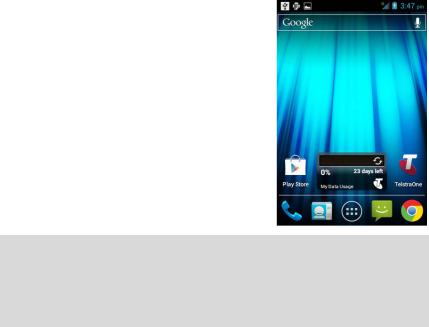
The Notifications Panel at the top of the Home Screen shows useful device status information, and quick settings controls.
Pull down the bar at the top of the display to view the Notifications panel:
19

APPLICATIONS MENU
Tap  to access Applications. Swipe to see more...
You can install additional applications from Play Store 
20
INSTALL APPLICATIONS 
A Google account is required to access Play Store. Tap the Play Store icon on the Home Screen to download and install applications from Google Play Store.
ALLOW NON-MARKET APPLICATIONS
Go to Settings > Security > Unknown sources.
UNINSTALL APPLICATIONS
•Tap  to access Applications.
•Press and hold the application to remove
•Drag the icon to Uninstall, tap OK to confirm
•Most pre installed system apps cannot be uninstalled.
MULTI-TASKING
Run multiple applications simultaneously. Press the Home key from any application to launch, open or view something else. The original application will be suspended until you return to it.
21

OPEN RECENTLY USED APPLICATIONS
Long press the Home Key  from any screen to view recently used or open applications.
CUSTOMISE YOUR PHONE FROM THE SETTINGS MENU
There are three ways to access Settings: |
|
•Swipe down from the top of the screen and tap |
. |
•From the home screen tap Apps > Settings
•From the home screen tap Options  > System settings
22

SETTINGS MENU
Wireless & |
Manage Wi-Fi, Bluetooth, Data usage, Call |
networks |
settings. Select More for Flight Mode, Virtual |
|
Private Networks, Tethering and Wi-Fi direct. |
|
|
Sound |
Sound levels, ringtones, notifications, vibrate. |
|
|
Display |
Brightness, screen timeout, orientation etc. |
|
|
Storage |
Check memory status. Mount or unmount the |
|
SD card. |
|
|
Battery |
Check the battery status and usage. |
|
|
Apps |
Check which Apps are installed and running. |
|
|
Accounts & sync |
Manage your account and configure sync |
|
settings. |
|
|
Location services |
Enable location and GPS services. |
|
|
|
23 |

SETTINGS MENU
Security |
Set screen lock modes, encrypt your device |
|
and add credentials. |
|
|
Language & input |
Set the language and keyboard options. |
|
|
Backup & reset |
Set Backup options and perform a full factory |
|
reset. |
|
|
Date & time |
Set the date, time, time zone, and date/time |
|
format. Enable automatic time update. |
|
|
Accessibility |
Set accessibility options. |
|
|
Developer options |
View Developer options. |
|
|
About phone |
View the phone status, system updates, and |
|
legal information. |
|
|
24
 Loading...