


 Loading...
Z3351S
User Manual

About This Manual
Thank you for choosing this ZTE mobile device. In order to keep your device in its best condition, please read this manual and keep it for future reference.
Copyright
Copyright © 2019 ZTE CORPORATION
All rights reserved.
No part of this publication may be quoted, reproduced, translated or used in any form or by any means, electronic or mechanical, including photocopying and microfilm, without the prior written permission of ZTE Corporation.
Notice
ZTE Corporation reserves the right to make modifications on print errors or update specifications in this manual without prior notice. This manual has been designed with the utmost care to ensure the accuracy of its content. However, all statements, information and recommendations contained therein do not constitute a warranty of any kind, either expressed or implied. Please refer to For Your Safety to be sure to use your phone properly and safely. We offer self-service for our smart terminal device users. Please visit the ZTE official website (at www.zteusa.com) for more information on self-service and supported product models. Information on the website takes precedence.
2

Disclaimer
ZTE Corporation expressly disclaims any liability for faults and damages caused by unauthorized modifications of the software.
Images and screenshots used in this manual may differ from the actual product. Content in this manual may differ from the actual product or software.
Trademarks
ZTE and the ZTE logos are trademarks of ZTE Corporation.
Android™ is a trademark of Google LLC.
The Bluetooth® word mark and logos are registered trademarks owned by the Bluetooth SIG, Inc. and any use of such marks by ZTE Corporation is under license.
microSDHC Logo is a trademark of SD-3C, LLC.
Other trademarks and trade names are those of their respective owners.
Version No.: R1.0
Edition Time: March 21, 2019
3

Contents |
|
Getting Started.............................................................. |
9 |
Getting to Know Your Phone .................................................................... |
9 |
Knowing the Keys ....................................................................................... |
11 |
Installing the nano-SIM Card and the microSDHC™ Card............ |
12 |
Installing the Battery (Included) ........................................................... |
14 |
Charging the Battery ................................................................................ |
14 |
Powering Your Phone On/Off ................................................................ |
16 |
Setting Up Your Phone for the First Time .......................................... |
16 |
Locking/Unlocking the Screen and Keys........................................... |
16 |
Getting to Know the Home Screen...................................................... |
17 |
Personalizing ............................................................... |
19 |
Changing the System Language .......................................................... |
19 |
Switching to Vibration or Silent Mode................................................ |
19 |
Using Do Not Disturb Mode................................................................... |
20 |
Applying New Wallpapers....................................................................... |
21 |
Using Night Light....................................................................................... |
22 |
Showing or Hiding the Navigation Keys............................................ |
22 |
Protecting Your Phone With Screen Locks ........................................ |
23 |
Protecting Your Phone With Screen Pinning .................................... |
24 |
Knowing the Basics ..................................................... |
26 |
Phone Status Icons .................................................................................... |
26 |
Notification Icons....................................................................................... |
27 |
4
Using Quick Settings................................................................................. |
27 |
Managing Shortcuts.................................................................................. |
28 |
Organizing With Folders .......................................................................... |
29 |
Rearranging the Primary Shortcuts ..................................................... |
30 |
Using App Shortcuts ................................................................................. |
30 |
Entering Text ................................................................................................ |
31 |
Opening and Switching Apps ................................................................ |
35 |
Connecting to Networks and Devices ..................... |
36 |
Connecting to Mobile Networks........................................................... |
36 |
Connecting to Wi-Fi................................................................................... |
37 |
Using Wi-Fi Direct....................................................................................... |
39 |
Connecting to Bluetooth Devices ........................................................ |
39 |
Connecting to Your Computer via USB............................................... |
41 |
Using the microSDHC Card as Portable or Device Storage ......... |
42 |
Phone Calls ................................................................... |
46 |
Placing and Ending Calls.......................................................................... |
46 |
Answering or Rejecting Calls ................................................................. |
47 |
Working With the Call History................................................................ |
48 |
Using Options During a Call ................................................................... |
50 |
Managing Multi-party Calls .................................................................... |
51 |
Adjusting Your Call Settings ................................................................... |
52 |
Contacts........................................................................ |
62 |
Adding a New Contact ............................................................................. |
62 |
Importing, Exporting, and Sharing Contacts.................................... |
62 |
5
Setting a Ringtone for a Contact .......................................................... |
64 |
Joining Duplicate Contacts .................................................................... |
65 |
Separating Contact Information........................................................... |
65 |
Web Accounts .............................................................. |
66 |
Adding or Removing Accounts ............................................................. |
66 |
Configuring Account Sync ...................................................................... |
67 |
Gmail ............................................................................ |
68 |
Setting Up the First Email Account ...................................................... |
68 |
Checking Your Emails ............................................................................... |
68 |
Writing and Sending an Email............................................................... |
69 |
Responding to an Email........................................................................... |
69 |
Adding and Editing Email Accounts.................................................... |
70 |
Changing General Email Settings ........................................................ |
71 |
Messages...................................................................... |
72 |
Opening the Messages Screen.............................................................. |
72 |
Sending a Message ................................................................................... |
72 |
Adding an Attachment............................................................................. |
73 |
Replying to a Message ............................................................................. |
74 |
Forwarding a Message ............................................................................. |
74 |
More Message Options............................................................................ |
75 |
Web Browser................................................................ |
76 |
Opening the Browser................................................................................ |
76 |
Using Multiple Browser Tabs.................................................................. |
76 |
Downloading Files..................................................................................... |
77 |
6
Changing Browser Settings .................................................................... |
77 |
Camera.......................................................................... |
78 |
Capturing a Photo...................................................................................... |
78 |
Using Manual Camera Mode.................................................................. |
79 |
Using Other Camera Modes ................................................................... |
80 |
Recording a Video ...................................................................................... |
80 |
Customizing Camera Settings ............................................................... |
81 |
Photos........................................................................... |
83 |
Opening Gallery.......................................................................................... |
83 |
Sharing Your Photos or Videos............................................................... |
83 |
Deleting Unwanted Photos or Videos................................................. |
83 |
Working With Pictures .............................................................................. |
84 |
Play Music..................................................................... |
86 |
Playing Your Music..................................................................................... |
86 |
Managing Playlists ..................................................................................... |
86 |
More Apps .................................................................... |
88 |
Calculator ...................................................................................................... |
88 |
Clock ............................................................................................................... |
88 |
Google Apps................................................................................................. |
89 |
Settings......................................................................... |
91 |
Network & Internet .................................................................................... |
91 |
Connected Devices.................................................................................... |
94 |
Apps & Notifications.................................................................................. |
95 |
7
Battery............................................................................................................ |
97 |
Features ......................................................................................................... |
97 |
Display ........................................................................................................... |
97 |
Sound............................................................................................................. |
98 |
Storage........................................................................................................... |
99 |
Security & Location.................................................................................... |
99 |
Accounts ..................................................................................................... |
102 |
Accessibility................................................................................................ |
102 |
Google ......................................................................................................... |
102 |
System.......................................................................................................... |
103 |
Troubleshooting........................................................ |
105 |
For Your Safety........................................................... |
107 |
General Safety........................................................................................... |
107 |
FCC RF Exposure Information (SAR) .................................................. |
108 |
FCC Regulations ....................................................................................... |
110 |
Hearing Aid Compatibility (HAC) Regulations for Mobile Phones |
|
........................................................................................................................ |
111 |
CTIA Requirements.................................................................................. |
113 |
Distractions ................................................................................................ |
114 |
Product Handling..................................................................................... |
115 |
Electrical Safety......................................................................................... |
120 |
Radio Frequency Interference............................................................. |
121 |
Explosive Environments ........................................................................ |
122 |
8
Getting Started
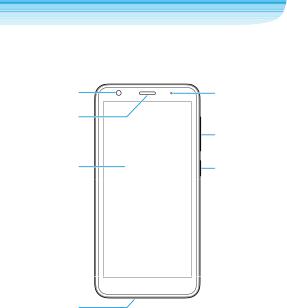
Getting to Know Your Phone
Front camera
Earpiece/
Speaker
Touch screen
Microphone
Indicator light
Volume key
Power key
9
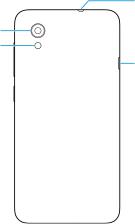
Headset jack
Back camera
Flash
Charging/ micro-USB jack
10
Knowing the Keys
Key |
Function |
|
Power key |
Press and hold to power off, restart, turn on |
|
|
or off airplane mode, or toggle sound, |
|
|
silence, and vibration. |
|
|
Press to turn off or on the screen display. |
|
|
|
|
Volume key |
Press or hold either end of the key to turn the |
|
|
volume up or down. |
|
|
|
|
|
Touch to return to the home screen from any |
|
(Home key) |
application or screen. |
|
Touch and hold to use the Google Assistant. |
||
|
||
|
|
|
(Back key) |
Touch to go to the previous screen. |
|
|
||
|
|
|
|
Touch to see recently used apps. |
|
(Recent apps key) |
Double-tap to switch to the most recent |
|
|
application. |
11

Installing the nano-SIM Card and the microSDHC™ Card
There is no need to power off the phone before installing or removing the nano-SIM card.
The microSDHC card (optional, not included) can be installed and removed while the phone is turned on. When the phone is on, unmount the microSDHC card before removing it (see Using the microSDHC Card as Portable or Device Storage).
WARNING!
To avoid damage to the phone, do not use any other kind of SIM cards, or any non-standard nano-SIM card cut from a SIM card. You can get a standard nano-SIM card from your service provider.
1.Place your finger into the slot at the bottom of the back cover, and gently lift and remove the cover.
12

2. Install the nano-SIM card and the microSDHC card as shown.
nano-SIM card microSDHC card
13

Installing the Battery (Included)
Power off your phone before removing or replacing the battery.
1.Place your finger into the slot at the bottom of the back cover, and gently lift and remove the cover.
2.Insert the battery by aligning the metal contacts on the battery with the metal contacts in the battery compartment. Gently push down on the battery until it clicks into place.
3. Replace the back cover.
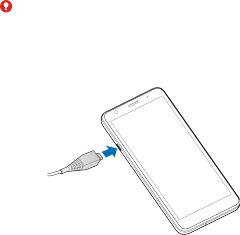
Charging the Battery
Your phone’s battery should have enough power for the phone to turn on, find a network signal, and make a few calls. You should fully charge the battery as soon as possible.
14
If the battery is low, a pop-up message will appear on the screen.
WARNING!
Use only ZTE-approved chargers and USB cables. The use of unapproved accessories could damage your phone or cause the battery to explode.
1.Connect the charger adapter to the charging jack. Do not use force.
2.Connect the charger to a standard AC power outlet. If the phone is on, you’ll see a charging icon, such as  or
or  , appear in the status bar.
3.Disconnect the charger when the battery is fully charged.
 NOTE:
NOTE:
If the battery is extremely low, you may be unable to power on the phone even when it is being charged. In this case, try again after
15
charging the phone for at least 20 minutes. Contact customer service if you still cannot power on the phone after prolonged charging.
Powering Your Phone On/Off
Press and hold the Power key to turn on your phone.
To turn it off, press and hold the Power key to open the options menu. Touch Power off > Touch to power off.
Setting Up Your Phone for the First Time
When you first power on your phone after you purchase it or reset it to factory settings, you need to do some settings before using it.
Select the language field and follow the on-screen prompts to set up your phone.
Locking/Unlocking the Screen and Keys
Your phone allows you to quickly lock the screen and keys (put the phone into sleep mode) when not in use and also to turn the screen back on and unlock it when you need it.
To lock the screen and keys:
To quickly turn the screen off and lock the keys, press the Power key.
 NOTE:
NOTE:
To save battery power, the phone automatically turns off the screen after some time of inactivity. You will still be able to receive messages and calls while the phone screen is off.
16
To unlock the screen and keys:
1.Press the Power key to turn the screen on.
2.Swipe up on the screen.
-or -
Swipe from  to dial a number, or swipe from
  to open the camera.
- or -
Touch a notification twice consecutively to open the related app.
 NOTE:
NOTE:
If you have set an unlock pattern, a PIN, or a password for your phone (see Protecting Your Phone With Screen Locks), you’ll need to draw the pattern or enter the PIN/password to unlock your screen.
Getting to Know the Home Screen
The home screen is the starting point for your phone’s applications, functions, and menus. You can customize your home screen by adding shortcuts, folders, and more.
Extended Home Screen Panels
Your home screen is extendable, providing more space for shortcuts or folders. After adding new home screen panels, swipe right or left on the home screen to see the extended panels. You can also remove home screen panels.
17
To add a new home screen panel:
1.Touch and hold a shortcut or a folder on the home screen.
2.Drag the item to the right edge of the screen. A new home screen panel is created.
3.Release your finger to put the item on the new panel.
To delete a home screen panel:
A home screen panel is deleted automatically when you remove all items (shortcuts and folders) from it. See Remove Shortcuts.
18

Personalizing
Changing the System Language
1.Swipe up on the home screen and touch Settings > System > Languages & input > Languages. The first language in the list is the default system language.
2.Touch Add a language and then the language you need.
3.Touch and hold a language and move it to the top to switch to that language.
 NOTE:
NOTE:
To remove languages from the list, touch  > Remove and select the languages you want to delete.
Switching to Vibration or Silent Mode
You can set the phone to vibration or silent mode by using one of the following methods.
Press the Volume key when no media application is active to
show the volume management window. Touch  to switch the phone to vibration mode. In vibration mode, touch
  to switch the phone to silent mode.
Swipe down from the top of the screen to open the notification panel and drag the panel downwards. Touch Ring, Vibrate, or Silent to switch the phone to vibration or silent mode or turn on the sound.
19
Press and hold the Power key and select Ring, Silent, or Vibrate to switch the phone to silent or vibration mode or turn on the sound.
Using Do Not Disturb Mode
You can limit interruptions with Do not disturb mode. This mode silences your phone so that it doesn’t make sounds or vibrate when you don’t want it to.
To turn on Do not disturb mode:
1.Swipe down from the top of the screen with two fingers to access the Quick Settings.
2.Find and touch the word “Do not disturb.”
To set behavior, exceptions, and schedule for Do not disturb mode:
1.Swipe up from the home screen and touch Settings > Sound > Do Not Disturb.
2.Touch the following options as you need:
Sound & vibration: Turn on or off sound/vibration for listed items in Do not disturb mode.
Notifications: Set notification behavior in Do not disturb mode. You can block sound or visuals from notifications, or customize more restrictions. Note that critical notifications for phone activity and status cannot be blocked.
Calls: When Do not disturb is on, incoming calls are blocked. You can adjust settings to allow friends, family, or other contacts to reach you.
20
Messages, events & reminders: When Do not disturb is on, messages, reminders, and events will be muted, except for the items you allow.
Duration: Turn off Do not disturb automatically, manually, or set the duration each time you turn on Do not disturb.
Turn on automatically: Use rules to turn on/off Do not disturb automatically. Touch an existing rule to set or use it, or touch Add rule to create new rules.
Applying New Wallpapers
You can set the wallpaper for the home screen or lock screen.
1.Touch and hold an empty place on the home screen.
2.Touch Wallpapers.
3.Swipe left or right on the wallpaper panel along the bottom of the screen to select a wallpaper, or touch My photos to choose the image you want to use as the wallpaper.
4.Touch SET WALLPAPER and follow the instructions on the screen.
 NOTES:
Alternatively, you can swipe up on the home screen and touch
Settings > Display > Wallpaper to set the wallpaper.
For images from My photos, pinch or spread to select the part you want to use.
21
Using Night Light
You can enable Night Light to tint the screen amber for eye care, or set a schedule when Night Light will be turned on.
1.Swipe up on the home screen and touch Settings > Display > Night Light.
2.Touch TURN ON NOW to enable Night Light. - or -
If you want to set a schedule when Night Light will be turned on automatically, touch Schedule and select an option.
3.Drag the slider below Intensity to adjust the eye care effect when Night Light is on.
Showing or Hiding the Navigation Keys
1.Swipe up on the home screen and touch Settings > Features > Navigation keys >  .
.
2.To hide the navigation keys, switch off Always show navigation bar and touch  on the navigation bar. To display the navigation keys again, swipe up from the bottom of the screen.
22
Protecting Your Phone With Screen Locks
You can protect your phone by creating a screen lock. When it is enabled, you need to swipe up on the screen, and then draw a pattern or enter a numeric PIN or password to unlock the phone’s screen and keys.
1.Swipe up on the home screen and touch Settings > Security & location > Screen lock.
2.Touch None, Swipe, Pattern, PIN, or Password.
Touch None to disable screen lock protection.
Touch Swipe to enable screen lock and allow unlocking with a “swipe” gesture. You can unlock the screen by swiping up on the screen.
Touch Pattern to create a pattern that you must draw to unlock the screen.
Touch PIN or Password to set a numeric PIN or a password that you must enter to unlock the screen.
3.For Pattern, PIN, or Password lock, select whether to protect your phone by requiring your pattern, PIN or password before it starts up. Then follow the on-screen prompts to continue.
 NOTE:
NOTE:
When this feature is enabled, your phone cannot receive calls, messages, or notifications until it starts up.
4.For Pattern, PIN, or Password lock, select how you would like notifications and their contents to show when the phone is locked, and then touch DONE.
23

NOTE:
Remember the pattern, PIN or password you set. Otherwise, you will have to contact the customer service to upgrade the phone software.
Protecting Your Phone With Screen
Pinning
You can use the screen pinning feature to keep an app in view, so others cannot switch to other apps or access your personal information.
Turn On Screen Pinning
1.Swipe up on the home screen and touch Settings > Security & location > Advanced > Screen pinning.
2.Touch the On/Off switch.
3.Touch YES.
4.To add security for unpinning, switch on Lock device when unpinning and set up a screen lock as prompted, or switch on
Ask for unlock pattern/PIN/password before unpinning if you’ve set a screen lock already.
Pin a Screen
1.Ensure that screen pinning is turned on.
2.Open the app you want to keep in view.
3.Touch  .
.
24
4.If there are many app tabs, swipe up to find  on the front-most tab.
5.Touch  .
.
Unpin the Screen
1.To unpin the screen and return to normal use, touch and hold  and
and  .
.
2.If screen lock is enabled for screen pinning, swipe up on the lock screen and draw the pattern or enter the PIN/password.
25
Knowing the Basics
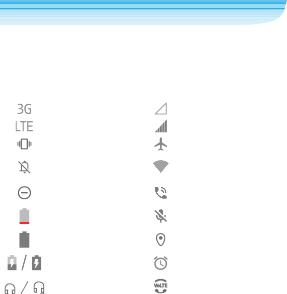
Phone Status Icons
The status bar at the top of the home screen provides phone and service status icons on the right side. Below are some of the icons you may see.
|
3G connected |
|
No signal |
|
|
|
|
|
4G LTE connected |
|
Signal strength |
|
|
|
|
|
Vibration on |
|
Airplane mode |
|
|
|
|
|
Silent mode on |
|
Connected to a Wi-Fi® |
|
|
network |
|
|
|
|
|
|
|
|
|
|
Do not disturb mode |
|
Speaker on |
|
on |
|
|
|
|
|
|
|
Battery low |
|
Phone microphone off |
|
|
|
|
|
Battery full |
|
Location service active |
|
|
|
|
|
Battery charging |
|
Alarm set |
|
|
|
|
|
Wired headset |
|
VoLTE available |
|
connected |
|
|
|
|
|
|
|
|
|
|
26
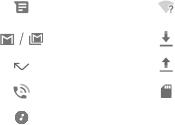
Notification Icons
The status bar at the top of the home screen provides notification icons on the left side. Below are some of the icons you may see.
|
New text or MMS |
|
New Wi-Fi network |
|
message(s) |
|
detected |
|
|
|
|
|
New message(s) from |
|
Downloading data |
|
the Gmail™ app |
|
|
|
|
|
|
|
|
|
|
|
Missed call |
|
Sending data |
|
|
|
|
|
Call in progress |
|
microSDHC card |
|
|
mounted |
|
|
|
|
|
|
|
|
|
|
Song playing |
|
|
|
|
|
|
Using Quick Settings
The Quick Settings make it convenient to view or change the most common settings for your phone.
Open the notification panel and you can find a few Quick Settings on the top. To open the Quick Settings panel and find all setting tiles, drag the notification panel downwards, or swipe down from the top of the screen with two fingers.
To turn on or off settings quickly:
1.Open the Quick Settings panel.
2.To turn on or off a setting, touch its tile. Touch and hold certain
27
tiles to access more setting options. For example, touch and hold the Wi-Fi tile to open Wi-Fi settings.
To customize the Quick Settings panel:
You can add, remove or rearrange the tiles on the Quick Settings panel.
1.Open the Quick Settings panel.
2.Touch  at the bottom and do one of the following.
Touch and hold a tile and drag it to the position you want.
Touch and hold a tile and drag it to the section below Drag here to remove to hide it.
In the Hold and drag to add tiles section, drag a tile up to show it in the Quick Settings panel.
Managing Shortcuts
Add Shortcuts
1.Swipe up on the home screen to add shortcuts.
2.Slide to browse the available applications.
3.Touch and hold an application icon and drag it to a home screen panel.
 NOTE:
NOTE:
While holding the item, you can drag it to the right edge of the screen to create a new home screen panel and put the item on it.
28

Remove Shortcuts
1.Touch and hold a shortcut on the home screen.
2.Drag it to  to remove it.
Organizing With Folders
You can create folders on the home screen and add several shortcuts to a folder.
You can move or remove folders the same way as moving or removing shortcuts.
1.On the home screen, touch and hold the shortcut you want to add into a folder.
2.Drag the shortcut over another shortcut you want to add to the same folder and release it. A new folder will be created and both shortcuts are added into the folder.
3.To add more shortcuts into the folder, touch and hold each shortcut and drag it over the folder before releasing it.
NOTE:
Touch the folder and then touch the name field to rename the folder.
29
Rearranging the Primary Shortcuts
The home screen includes a customizable primary shortcuts area at the bottom of all home screens. You can keep up to four items in the primary shortcuts area. Drag shortcuts or folders in or out of the area to rearrange them.
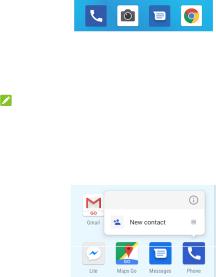
Using App Shortcuts
The app shortcuts feature allows you to quickly access common app functions from the home screen and the app list screen.
NOTE:
Not all apps support the app shortcuts feature.
1.Touch and hold an app icon on the home screen or the app list screen.
2.From the displayed menu, touch the function you want to use in the app.
30
Loading...