


TELSTRA 4GX WI-FI (MF910V)
USER MANUAL
Copyright © 2016. All rights reserved.
No part of this publication may be excerpted, reproduced, translated or utilized in any form or by any means, electronic or mechanical, including photocopying and microfilm, without the prior written permission of ZTE Corporation.
The manual is published by ZTE Corporation. We reserve the right to make modifications on errors or update specifications without prior notice.
The worst case simultaneous Wi-Fi and RF SAR result for this device is 1.918W/Kg in the Body Position with 10mm separation.
Search ‘ZTE Australia’ on Facebook , Google+ and Twitter to keep in touch.
Version 1.0 |
Jan 2016 |
CHECK YOUR SYSTEM REQUIREMENTS
Your 4GX Wi-Fi will connect to any Wi-Fi enabled device that supports Wi-Fi 802.11 b/g/n
A web browser is required to log in to your Wi-Fi hotspot if you wish to make any configuration changes.
USB driverless connection is also supported for Windows (not RT), and MAC operating systems:
•Windows 10, 8 (not including RT) / 7 / XP / Vista
•MAC OS X 10.7 and above
Using the USB connection requires administrator rights to install and run the software.
We suggest you switch off your anti-virus software before connecting the hotspot - In some cases protection software can prevent automatic installation.
Page 1 of 31
It is possible to start the installation process manually by clicking the Autorun icon when it appears.
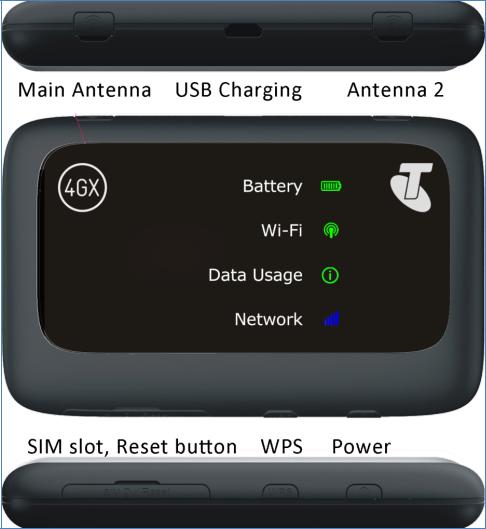
GET TO KNOW YOUR DEVICE
Page 2 of 31
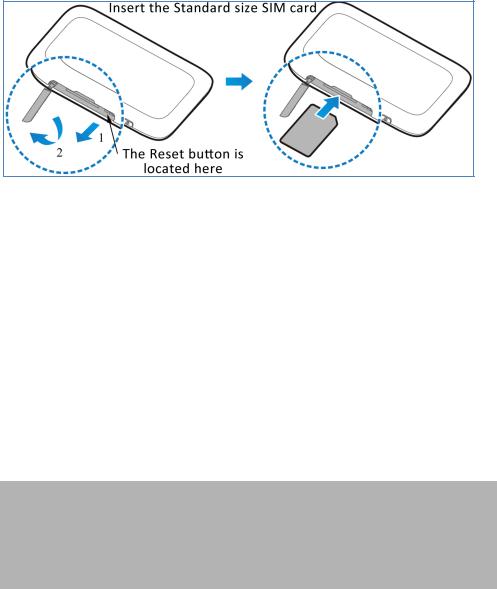
INSERT YOUR STANDARD SIZED SIM CARD
This device supports a Standard sized SIM card ONLY (2FF). Do not use a microSIM or SIM card adaptor which may damage your device.
The SIM card is pre-installed and needs to be activated. You may need this information if you need to replace or check your SIM card.
1.Locate the SIM slot on the side of the device as shown above.
2.Open the SIM slot cover.
3.Insert your SIM card carefully as shown. The gold contacts must be facing up with the cut corner towards the middle of the device.
4.Push the SIM fully home until it clicks into place.
5.For reference the Reset button is also located under the SIM slot cover.
6.Note: If you replace the SIM card with the device powered On, it will restart to read the new SIM card.
IMPORTANT
This device supports a standard SIM or 2FF size.
Do not insert a micro SIM (3FF) or use a micro to mini SIM adaptor.
Use of 3rd party adaptors or non approved SIM card can damage your device. Physical damage to the SIM card slot is not covered by warranty and will make your device unusable.
TIPS
Remember to keep your Security Card handy and in a safe place. You will need it to log onto your device.
Remember to keep your plastic SIM card holder. It has a record of your SIM card details which you should keep handy.
The Reset button is located under the SIM slot cover. With the device switched on,
Page 3 of 31
press the Reset button until the LED’s go out. A reset will restore all settings to factory default.
Use the default Wi-Fi SSID and Password shown on the device sticker to log in via Wi-Fi.
You can also connect directly to a computer using the USB lead provided, log into the web interface and access the Wi-Fi SSID and Password from the Wi-Fi Settings menu.
See Connect Devices via Wi-Fi (below) for more instructions.
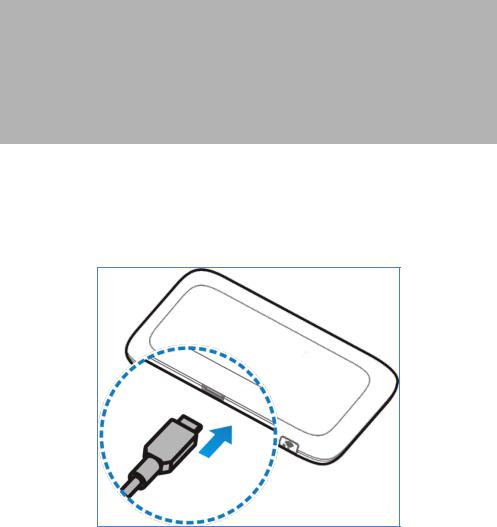
CHARGE YOUR WI-FI HOTSPOT
Connect your charger as shown. Take care to check the orientation of the charger lead and insert carefully into the charging port on the device.
•Only use the genuine charger and USB lead provided. Use of third party adaptors can damage your device.
•Typical charging time is 3-4 hours using the standard charger. Charging from a USB source (ie laptop) will take longer.
•During periods of high continuous activity with multiple users, high download rates or low network signal, charging by USB will not have sufficient current to charge the device. In this situation the battery will discharge so it is preferable to use the mains charger.
•Always insert and remove the charging lead with care and take care not to trip or pull on the lead harshly which could damage your device.
Page 4 of 31

•Physical damage to the charging port is not covered by warranty.
•If the device is off while charging, press the power key as normal to switch on the device.
•The device can be left always on and connected to the charger if required.
•During periods of high continuous activity, high download rates or low network signal it is normal for the device to get hot.
•If the internal temperature of the device exceeds 45C then the battery cannot be charged due to safety limitations with Li-ion batteries.
POWER UP YOUR WI-FI HOTSPOT
Press and hold the Power key for 1-2 seconds until the LED’s light up. The Wi-Fi hotspot will be available after about 20 seconds.
Check the condition of your Wi-Fi hotspot as shown by the LED’s.
To switch your device Off, press and hold the power key for 5 seconds until the LED’s starts to shut down.
LED’S INDICATORS
|
BATTERY |
Green, Battery is charged |
|
INDICATOR |
Flashing, Battery is charging |
|
|
Red, Battery is low |
|
WI-FI |
Green – Wi-Fi is active and connected |
|
INDICATOR |
|
|
|
|
|
DATA USAGE |
Green, Data credit is healthy (less than 85% used) |
|
INDICATOR |
Orange, Data credit is low (more than 85% used) |
|
|
Red, Data credit is expired (more than 99% used) |
|
NETWORK |
Blue, Registered on 4G – Flashing, device is Connected to |
|
INDICATOR |
the 4G Network |
|
|
Green, Registered on 3G or 2G – Flashing, device is |
|
|
Connected to the 3G or 2G Network |
|
|
Red, Device is not connected eg No SIM card, Locked SIM |
|
|
or No Network available |
TIPS
When running on battery during periods of inactivity it is normal for the LED’s to go out to preserve battery life. Press the power key briefly to confirm the device status if required.
When connected to the charger the LED’s remain lit all the time.
Page 5 of 31

CONNECT DEVICES BY WI-FI
Your Wi-Fi hotspot can connect up to ten devices via Wi-Fi providing internet access for all your devices on the go.
•On the devices you wish to connect make sure Wi-Fi is switched on, then search for Wi-Fi devices.
•The Wi-Fi hotspot will show up as TPW4G_xxxxxx, click on this device to connect.
•Consult your device security sticker and enter the default Password which is case sensitive. Any letters entered must be in upper case (capitals).
Connection example for Windows 7 computer:
1.On your task bar, next to the clock, click on the Network Interface icon
2.Click on the Wireless device called TPW4G_xxxxxx
3.Enter the password exactly as shown on the sticker observing the correct case for all letters
4.With Connect Automatically enabled your computer will remember the password and connect to your Wi-Fi device when it is on and in range.
TIP
If you cannot log on via Wi-Fi, connect using the USB connection where you can check your Wi-Fi settings, or update your password. See later for details.
QUICK REFERENCES
Browser |
http://m.home (or http://192.168.0.1) |
home page |
|
|
|
Administrator |
password |
login |
|
|
|
Default SSID |
TPW4G_xxxxxx |
|
This is printed on the Security Card supplied in the box |
|
|
Default Wi-Fi |
10 characters which are case sensitive. |
Key |
This is printed on the Security Card supplied in the box |
|
|
Restore |
From the powered up state: |
defaults |
Open the SIM slot on the device. Locate the Reset button and |
|
use a small object such as a pin or paperclip to press the button. |
|
Press the Reset button briefly until the LED’s go out. |
|
All passwords and settings will be restored to defaults and |
|
|
|
Page 6 of 31 |

the hotspot will reboot.
Use the default credentials from the Security Card to log back onto your device.
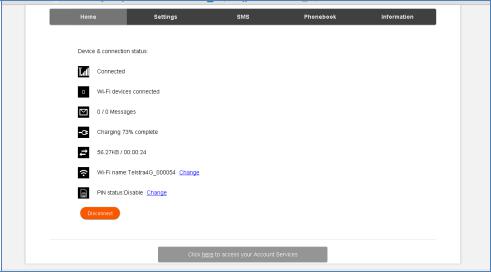
WEB INTERFACE, MODEM HOMEPAGE
•The default login password is ‘password’
•The home page shows a brief summary of the device status and your remaining data from Telstra.
•Software update notifications (if applicable) will be shown on this page as per the example above.
STATUS ICONS – WEB INTERFACE
Page 7 of 31

NO NETWORK ACCESS
•No Network Access can be any of the following conditions:
•A missing, faulty or incorrectly inserted SIM. Check you have inserted your SIM card the right way and pushed it fully home until it clicks into place.
•A Non-Telstra SIM card. This device is Network Locked to Telstra, contact Telstra to unlock your device.
•A PIN locked SIM card. Log into the web interface then enter the PIN code for your SIM card.
•A PUK locked SIM card. You may have entered the wrong PIN code too many times. Contact Telstra to obtain your PIN Unlocking Key (PUK) code. Log into the web interface to enter your PUK and PIN code
•A PUK blocked SIM card. If you enter the wrong PUK code too many times the SIM card is permanently blocked. Contact your dealer to obtain a replacement SIM card.
•No Service, you are out of network coverage.
INTERNATIONAL ROAMING
•The Roaming icon indicates you are connected to a foreign network.
•If Roaming is enabled on your data plan then roaming data charges will apply when connected via a roaming network.
•Contact your carrier to discuss your data charges and roaming options.
NETWORK LOCKED DEVICE
•This device is network locked to Telstra. If you use an alternate carrier SIM you need to contact Telstra for the unlocking code. An unlocking fee may apply.
INSTALLATION NOTES
•If you choose to install the device via the USB connection then a CDROM drive will pop up on first installation.
•Double-click Setup.exe to install the software.
•The installation will create a new shortcut on your desktop and a new program listing under Start-Programs.
•If you have problems with the installation please contact your supplier or see our website, ztemobiles.com.au for more assistance and FAQ’s or call our hotline
Page 8 of 31
on 1300 789 475 (ZTE Support hotline is available during normal business hours, AEST 10am to 4pm)
•If you can’t connect to the internet check your SIM card is inserted correctly, contact your service provider and check your account is active.
•To uninstall the application:
Windows users: Start > All Programs > TELSTRA 4GX WI-FI > Uninstall
MAC Users:
•Double click the Telstra Modem CDROM on the desktop to install the modem.
•To uninstall, go to Applications and run Uninstall TELSTRA 4GX WI-FI
WEB INTERFACE GUIDE
HOME TAB
The home tab shows you how many users are connected and shows your network connection state and data usage summary.
•The device will automatically connect to the network so it shows the Disconnect button status by default.
•To change this behaviour press Disconnect first, then go to Settings > Network Settings > WAN Connection Mode, and select Manual.
•The number of devices connected to your Wi-Fi hotspot is displayed
•You can click on Change to rename your hotspot SSID and enable or disable the SIM PIN
Page 9 of 31
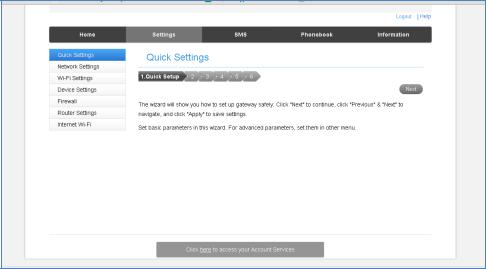
SETTINGS > QUICK SETTINGS
Step through the Quick Settings wizard to quickly review your current default settings.
Page 10 of 31
 Loading...