


Driver’s Handbook
FM, FH
This is a complete Driver's Handbook with all the information that can exist in our chassis unique handbooks.
The information in the chassis unique handbooks is steered on variants and its content varies. This can cause duplicated information in this complete handbook, which can make it difficult to read correctly. It is only intended for internal use.
From build week 937 each truck has its unique handbook which is possible to order at pubstore@elanders.com.
DEAR VOLVO OWNER
THANK YOU FOR CHOOSING VOLVO.
This vehicle binder describes the driving and care of your truck and instructions for the tachograph. It also contains documents such as the Warranty book, Volvo Action Service card and Driver service documents.
In order for your truck to retain its high safety, reliability and long life, we recommend that you heed our advice regarding the driving and care of your vehicle.
If there is anything else you wonder about concerning service, maintenance, oils or the care of your truck or your are missing some documentation in the binder, please contact your dealer.
Additional useful information about your truck and its functions can be found online: http://www.volvo.com
The specifications and illustrations in this binder are not binding and we reserve the right to change them without prior information.
©1998 Volvo Trucks AB, Gothenburg.
Reproduction of the contents of this vehicle binder, wholly or in part, is prohibited by law without written permission from Volvo Trucks AB.
The prohibition covers all forms of reproduction, through printing, copying, recording on tape, etc.

The following levels of notification and warning are used in this binder.
Note! |
Indicates a situation, use or circumstance that should be emphasised. |
Important! |
Indicates a situation, use or circumstance that is important to be aware of to avoid personal |
|
injury or damage to the product. |
Caution! |
Indicates a potentially dangerous situation that, unless avoided, may lead to minor or moderate |
|
personal injury or damage to the product. |
Warning! |
Indicates a potentially dangerous situation that, unless avoided,may lead to death, serious |
|
personal injury or damage to the product. |
Danger! |
Indicates a potentially dangerous situation that, unless avoided,will lead to death or serious |
|
personal injury. |

Symbols
The following symbols may be found on your truck.
The meaning of the symbols is as follows:
Use protective goggles |
Read information in the driver's binder |
Keep out of reach of children |
Corrosive |
Avoid sparks or naked flame |
Explosive |

Table of Contents
Introduction................................................... |
1 |
LVD system................................................. |
1 |
EBS.............................................................. |
1 |
Air suspension.............................................. |
1 |
Booster......................................................... |
2 |
Dynafleet...................................................... |
2 |
Running in...................................................... |
4 |
Starting and stopping.................................... |
5 |
Starting instructions..................................... |
5 |
Starting instructions..................................... |
5 |
Start the truck............................................... |
5 |
Stopping the truck........................................ |
6 |
Stopping the truck........................................ |
6 |
Stopping the truck........................................ |
6 |
Parking......................................................... |
7 |
Clutch........................................................... |
7 |
Keys............................................................. |
7 |
Start the engine............................................ |
8 |
Warming up............................................... |
11 |
Change idling speed................................... |
11 |
Fuel heater.................................................. |
12 |
Instruments and controls............................ |
13 |
Overview.................................................... |
13 |
Gauges........................................................ |
17 |
Symbols...................................................... |
19 |
Lighting and headlamps............................. |
22 |
Windscreen wipers..................................... |
25 |
Rain sensor................................................. |
25 |
Parking brake............................................. |
26 |
Trailer brake............................................... |
29 |
Electric trailer brake................................... |
29 |
Air suspension............................................ |
30 |
Information display..................................... |
33 |
General, about the display.......................... |
33 |
The first that is shown................................ |
34 |
General, about messages............................ |
34 |
Information messages................................ |
35 |
Warning messages..................................... |
35 |
Stop message.............................................. |
36 |
Alarm, warning and information |
|
symbols...................................................... |
36 |
Status symbols........................................... |
40 |
Other Symbols........................................... |
41 |
Menu structure........................................... |
42 |
Show menus............................................... |
45 |
Step between the menus............................. |
45 |
Change a setting......................................... |
45 |
Temperature, outside.................................. |
47 |
Temperature, engine oil............................. |
47 |
Temperature, gearbox................................ |
47 |
Voltmeter/Ammeter................................... |
47 |
Gear position.............................................. |
48 |
Pressure, primary tank............................... |
48 |
Fuel consumption....................................... |
48 |
Leg data...................................................... |
49 |
Remaining fuel........................................... |
49 |
AdBlue....................................................... |
49 |
Trip meter................................................... |
50 |
Average speed............................................ |
50 |
Estimated time of arrival............................ |
51 |
Time and Date............................................ |
51 |
Alarm clock................................................ |
52 |
Driving/rest time........................................ |
53 |
Black Panel................................................ |
53 |
Backlight.................................................... |
53 |
Favourite Display, setting.......................... |
54 |
Night/Day................................................... |
56 |
Vehicle Messages....................................... |
56 |
Tyre pressure.............................................. |
56 |
Set wheel ID............................................... |
57 |
Set reference pressure................................ |
57 |
Reset........................................................... |
58 |
ATS............................................................ |
58 |
Start regeneration....................................... |
58 |
Abort regeneration..................................... |
59 |
Activate/Deactivate ATS........................... |
59 |
System conditions...................................... |
59 |
Soot/ash level............................................. |
60 |
Programming, p-heater timer..................... |
60 |
Reset, p-heater timer.................................. |
61 |
Language.................................................... |
61 |
Units........................................................... |
61 |
|
|
Table of Contents |
|
|
Time/Date.................................................. |
62 |
Fuel consumption....................................... |
90 |
|
Display lighting.......................................... |
63 |
Leg data...................................................... |
90 |
|
Change password....................................... |
63 |
Remaining fuel........................................... |
91 |
|
Traction control.......................................... |
64 |
AdBlue....................................................... |
91 |
|
DAS............................................................ |
64 |
Trip meter................................................... |
91 |
|
LCS............................................................ |
64 |
Average speed............................................ |
92 |
|
Fleet limits................................................. |
64 |
Driving/rest time........................................ |
92 |
|
Ammeter sensor calibration....................... |
66 |
Time and Date............................................ |
92 |
|
Fleet ID...................................................... |
66 |
Menu structure........................................... |
93 |
|
Trailer detection......................................... |
67 |
Black Panel................................................ |
93 |
|
Day running lights automatic..................... |
68 |
Night/Day................................................... |
94 |
|
Draining/priming........................................ |
68 |
Backlight.................................................... |
94 |
|
Fault diagnostics........................................ |
69 |
Contrast...................................................... |
94 |
|
Instrument panel cluster self test................ |
70 |
Language.................................................... |
94 |
|
Part number................................................ |
71 |
Units........................................................... |
95 |
|
Vehicle data............................................... |
72 |
Time/Date.................................................. |
95 |
|
Vehicle ID.................................................. |
72 |
Program...................................................... |
96 |
|
Total value................................................. |
73 |
Reset........................................................... |
96 |
|
Trip data..................................................... |
73 |
Traction Control......................................... |
97 |
|
Reset trip data............................................ |
74 |
Day Running Light.................................... |
97 |
|
Password.................................................... |
74 |
Draining/priming........................................ |
97 |
|
Service reminder........................................ |
75 |
Fault diagnostics........................................ |
97 |
|
Estimated lining wear................................ |
77 |
Part number................................................ |
99 |
|
Monitoring of the wheel brakes................. |
78 |
Calibration ID............................................ |
99 |
|
High brake temperature warning............... |
78 |
Service reminder........................................ |
99 |
|
Resetting fault codes.................................. |
78 |
Numeric language, general...................... |
102 |
|
Position and content................................... |
80 |
Display control stalk................................ |
102 |
|
Display....................................................... |
81 |
Text strings............................................... |
103 |
|
Display control stalk.................................. |
82 |
Stop message............................................ |
103 |
|
General, about messages............................ |
82 |
Change language...................................... |
104 |
|
Information messages................................ |
82 |
Menus, general......................................... |
104 |
|
Warning messages..................................... |
83 |
Password-protected menus....................... |
104 |
|
Stop message.............................................. |
83 |
Menus available when driving................. |
104 |
|
Acknowledge messages............................. |
83 |
Menus with stationary vehicle................. |
108 |
|
Alarm, warning and information |
|
Numerical translation table...................... |
116 |
|
symbols...................................................... |
84 |
Driving |
127 |
|
Status symbols........................................... |
88 |
|||
Other Symbols........................................... |
89 |
Driving hints............................................ |
127 |
|
Gear position.............................................. |
89 |
Hill start aid.............................................. |
130 |
|
Temperature, outside.................................. |
89 |
Reversing camera..................................... |
131 |
|
Engine oil pressure..................................... |
89 |
Reversing Warner.................................... |
133 |
|
Temperature, engine oil............................. |
89 |
Traction Control System (TCS)............... |
133 |
|
Voltmeter/Ammeter................................... |
90 |
Front wheel drive..................................... |
135 |
|

Table of Contents
Differential lock....................................... |
136 |
When the vehicle must be braked |
|
Differential lock....................................... |
140 |
manually................................................... |
202 |
Differential locks..................................... |
143 |
Brake protection....................................... |
202 |
Automatic engagement of the |
|
Driving at low speed................................ |
203 |
differential lock (DLC – Diff Lock |
|
If the ACC does not work........................ |
204 |
Control).................................................... |
146 |
Powertronic |
205 |
Auxiliary brakes....................................... |
148 |
||
Brake Blending........................................ |
152 |
Powertronic, general................................ |
205 |
ABS.......................................................... |
152 |
Gear shifter............................................... |
205 |
ESP — Electronic Stability Program....... |
153 |
Buttons..................................................... |
206 |
Control of engine torque.......................... |
153 |
Display..................................................... |
207 |
Brake lining wear equalisation................. |
154 |
Driving programs..................................... |
209 |
Panic braking function............................. |
154 |
Automatic gear changing......................... |
209 |
Manual gearbox....................................... |
154 |
Kickdown................................................. |
210 |
Hydraulic bogie lift.................................. |
158 |
Manual gear changing.............................. |
210 |
Bogie........................................................ |
159 |
Select starting gear................................... |
210 |
Tridem...................................................... |
165 |
Autoneutral.............................................. |
211 |
Steered rear axle....................................... |
168 |
Brake interlock......................................... |
211 |
Cruise control........................................... |
169 |
Dual driver stations.................................. |
212 |
Constant engine speed control................. |
170 |
Auxiliary brakes....................................... |
212 |
Lane Keeping Support............................. |
170 |
Actions with gearbox malfunction........... |
212 |
Lane Change Support............................... |
172 |
Reversing with loads................................ |
212 |
Driver Alert Support................................ |
174 |
Rocking free............................................. |
213 |
Power take-off.......................................... |
176 |
Marshalling.............................................. |
213 |
High range lock-up.................................. |
179 |
Idling speed.............................................. |
213 |
High range lock-up.................................. |
181 |
Oil temperature........................................ |
214 |
Tying down the truck on a ferry.............. |
182 |
Retarder temperature................................ |
214 |
Ride height memory................................. |
187 |
Oil pressure.............................................. |
215 |
ADR |
193 |
Oil filter.................................................... |
215 |
Checking the oil level.............................. |
215 |
||
General..................................................... |
193 |
I-Shift |
217 |
Turn off the power................................... |
193 |
||
Turn on the main switch.......................... |
194 |
I-shift, general.......................................... |
217 |
Turn on power for 20 minutes................. |
195 |
Gear selector............................................ |
217 |
Adaptive cruise control |
197 |
Buttons..................................................... |
219 |
Display..................................................... |
220 |
||
General..................................................... |
197 |
Program packages.................................... |
222 |
Engaging ACC......................................... |
198 |
Automatic shifting................................... |
225 |
Disengage ACC....................................... |
199 |
Manual shifting........................................ |
228 |
Inactivate ACC......................................... |
199 |
Reverse gears........................................... |
229 |
Change speed........................................... |
199 |
In case of gearbox malfunction................ |
230 |
Change the time gap................................. |
200 |
Starting on hills........................................ |
230 |
When the truck itself adjusts the speed.... |
201 |
Driving off road....................................... |
231 |

Table of Contents
Clutch....................................................... |
231 |
I-Shift.......................................................... |
232 |
I-Shift, general......................................... |
232 |
Program packages.................................... |
232 |
Function description................................. |
234 |
Gear shifter............................................... |
236 |
Buttons..................................................... |
238 |
Display..................................................... |
239 |
Automatic gear change............................ |
241 |
Manual gear changing.............................. |
246 |
Reverse gears........................................... |
247 |
Actions with gearbox malfunction........... |
248 |
Fuel economy driving.............................. |
248 |
Hill start................................................... |
250 |
Driving on poor roads and in |
|
difficult conditions................................... |
251 |
Disengaging............................................. |
251 |
Starting when stuck.................................. |
251 |
Full VEB/VEB+ in manual mode............ |
253 |
Extra down-changing for |
|
maximum engine brake in low gears....... |
253 |
Changing driving direction...................... |
253 |
Driving with the gearbox-mounted |
|
power take-off engaged............................ |
253 |
Rocking to empty the platform................ |
254 |
Driving on rollers..................................... |
254 |
Loading and unloading............................. |
255 |
General..................................................... |
255 |
Ride height control................................... |
255 |
Loading and unloading height memory... |
258 |
Quick unloading....................................... |
265 |
Using the air suspension with the |
|
ignition turned off.................................... |
267 |
Loading and unloading with the |
|
main switch off........................................ |
270 |
Fetch the swap body................................. |
276 |
Leave the swap body................................ |
281 |
Fetch a container...................................... |
284 |
Deliver a container................................... |
286 |
Load indicator.......................................... |
287 |
Exhaust cleaning........................................ |
291 |
General..................................................... |
291 |
Driving a truck with a Euro 4 or |
|
Euro 5 engine........................................... |
294 |
Filling with AdBlue................................. |
297 |
Cleaning the AdBlue tank........................ |
299 |
Diesel particulate filter............................. |
299 |
Cab.............................................................. |
303 |
Air suspension equipment........................ |
303 |
Seats......................................................... |
309 |
Adjusting the steering wheel.................... |
313 |
Doors........................................................ |
314 |
Central locking......................................... |
316 |
Main switch.............................................. |
318 |
Air conditioning ECC (Electronic |
|
Climate Control)...................................... |
318 |
Air conditioning MCC (Manual |
|
Climate Control)...................................... |
323 |
Climate control system HEAT................. |
326 |
Cab heater PH-CAB................................. |
328 |
Cab and engine heater PH-ENGCA......... |
333 |
Rest heater SS-HEAT.............................. |
341 |
Luggage compartment hatch.................... |
343 |
Electrically operated sun roof.................. |
344 |
Lighting.................................................... |
344 |
Electrical power outlet............................. |
351 |
Bunk bed.................................................. |
351 |
Lower bunk.............................................. |
352 |
Smoke detector......................................... |
353 |
Tilt the cab............................................... |
354 |
Mobile telephone, communication |
|
equipment................................................. |
359 |
Alarm on.................................................. |
359 |
Alarm without motion detectors.............. |
360 |
Alarm off.................................................. |
361 |
Starting the assault alarm......................... |
361 |
Switching off the assault alarm................ |
362 |
Go into service mode............................... |
362 |
To get out of service mode....................... |
363 |
Assistance button..................................... |
363 |

Table of Contents
Refrigerator |
364 |
Introduction.............................................. |
386 |
|
General Overview.................................... |
387 |
|||
Safety instructions.................................... |
364 |
Main Functions........................................ |
395 |
|
General..................................................... |
364 |
Tips and Tricks........................................ |
405 |
|
Usage........................................................ |
364 |
Main Functions........................................ |
405 |
|
Starting the refrigerator............................ |
365 |
Tips and tricks.......................................... |
428 |
|
Turning off the refrigerator...................... |
365 |
Telephone |
430 |
|
Voltage protector..................................... |
365 |
|||
Tilting the cab.......................................... |
366 |
Getting started.......................................... |
430 |
|
Cleaning................................................... |
366 |
Calling...................................................... |
432 |
|
Defrosting................................................ |
366 |
While making a call................................. |
435 |
|
Interior lighting........................................ |
366 |
Managing messages................................. |
436 |
|
Fault tracing............................................. |
367 |
Menus....................................................... |
438 |
|
Tips on saving energy.............................. |
367 |
Measures with malfunctions.................... |
443 |
|
Technical specifications........................... |
367 |
Booster |
444 |
|
Fridge |
368 |
|||
Booster..................................................... |
444 |
|||
Safety instructions.................................... |
368 |
Installation................................................ |
444 |
|
General..................................................... |
368 |
Methods of use......................................... |
444 |
|
Usage........................................................ |
368 |
Fuses........................................................ |
444 |
|
Starting the refrigerator box..................... |
369 |
Indicator lamps......................................... |
444 |
|
Switching off the refrigerator box............ |
369 |
Subwoofer controls and switch................ |
445 |
|
Voltage protector..................................... |
369 |
Fault tracing............................................. |
445 |
|
Tilting the cab.......................................... |
370 |
Dynafleet |
447 |
|
Cleaning................................................... |
370 |
|||
Defrosting................................................ |
370 |
Dynafleet.................................................. |
447 |
|
Fault tracing............................................. |
370 |
Technical description............................... |
448 |
|
Tips on saving energy.............................. |
371 |
Controls.................................................... |
450 |
|
Technical specifications........................... |
372 |
Display..................................................... |
452 |
|
Alcolock |
373 |
Menus and symbols.................................. |
453 |
|
Using the menus....................................... |
454 |
|||
Start up..................................................... |
373 |
Starting the system................................... |
455 |
|
Restarting the vehicle............................... |
375 |
Shutting off the system — stand by......... |
456 |
|
Sharing a vehicle...................................... |
376 |
Transferring data...................................... |
456 |
|
Energy conservation................................. |
380 |
General..................................................... |
457 |
|
Volume control........................................ |
381 |
Mail.......................................................... |
457 |
|
Language selection................................... |
382 |
Mail menu................................................ |
458 |
|
Dates........................................................ |
383 |
General driving and resting times............ |
459 |
|
General messages and errors.................... |
383 |
Orders....................................................... |
461 |
|
Technical messages and errors................. |
384 |
Logs.......................................................... |
462 |
|
Radio/CD |
386 |
Driver coaching........................................ |
464 |
|
Emergency & Assistance......................... |
465 |
|||
Safe Operation of the Radio..................... |
386 |
Tachograph download menu.................... |
465 |

Table of Contents
Settings..................................................... |
467 |
System errors and warnings..................... |
468 |
External equipment................................... |
470 |
Roof air deflector, setting instructions..... |
470 |
Short low cab FH..................................... |
472 |
Long low cab FH..................................... |
473 |
Globetrotter FH........................................ |
474 |
Roof air deflector, setting instructions..... |
476 |
Globetrotter XL FH.................................. |
478 |
Roof air deflector, setting instructions..... |
483 |
Short low cab FM..................................... |
485 |
Long low cab FM..................................... |
486 |
Globetrotter FM....................................... |
487 |
Globetrotter LXL FM.............................. |
488 |
Front mirror.............................................. |
490 |
Ladder...................................................... |
491 |
Side underrun guard................................. |
492 |
Lower the spare wheel............................. |
494 |
Raise the spare wheel............................... |
495 |
Spare wheel retainer behind the cab........ |
496 |
Turntable, general advice......................... |
499 |
Couple the trailer...................................... |
500 |
Moving the turntable................................ |
502 |
Maintenance............................................... |
504 |
General information................................. |
504 |
Checks before driving.............................. |
504 |
Checks when fuelling............................... |
508 |
Changing wiper blades............................. |
509 |
Replace the battery in the remote |
|
control...................................................... |
510 |
Changing bulbs........................................ |
510 |
Engine wash............................................. |
516 |
Washing the chassis................................. |
516 |
Wash the cab............................................ |
516 |
Polishing and waxing............................... |
517 |
Care of upholstery.................................... |
518 |
Paintwork damage.................................... |
519 |
Care of aluminium rims........................... |
521 |
Care of steel rims..................................... |
521 |
Tools........................................................ |
522 |
General information about oils and |
|
greases...................................................... |
523 |
Engine...................................................... |
525 |
Fuel system.............................................. |
530 |
Diesel fuel— quality and function........... |
531 |
Changing fuel filter.................................. |
536 |
Filter for fuel tank ventilation.................. |
537 |
Priming the fuel system........................... |
537 |
Draining the fuel tank.............................. |
538 |
Changing filter......................................... |
539 |
Drain the cooling system......................... |
542 |
Service intervals....................................... |
544 |
Anti-freeze............................................... |
544 |
Fill with coolant in an empty system....... |
545 |
Viscous fan............................................... |
545 |
Electrically controlled fan........................ |
545 |
Check the drive belts (Multi-V)............... |
546 |
Working on the electrical system............. |
546 |
Instructions for electrical welding........... |
547 |
Connection of electrical accessories........ |
548 |
Checking electrolyte level in batteries..... |
549 |
Charge status............................................ |
550 |
Specifications for the electrical system.... |
551 |
Manual gearbox and I-shift...................... |
552 |
Automatic gearbox................................... |
559 |
Transfer gearbox...................................... |
562 |
Driving front axle..................................... |
566 |
Flywheel mounted power take-off........... |
570 |
Compact retarder...................................... |
571 |
Air drier, general...................................... |
575 |
Checking the air drier............................... |
576 |
Charging with air from an external |
|
compressed air source.............................. |
577 |
Brake lining.............................................. |
577 |
Servo steering........................................... |
578 |
Hydraulic pusher axle and trailing |
|
wheel axle................................................ |
579 |
Rear axle.................................................. |
580 |
Rear axle with hub reduction................... |
587 |
Tyres........................................................ |
588 |
Changing wheels...................................... |
593 |
Disc wheel for disc brakes....................... |
600 |
Painting rims............................................ |
601 |
Table of Contents |
|
Spare wheel in Combi-box....................... |
602 |
Snow chains............................................. |
602 |
Hydraulic bogie lift.................................. |
603 |
Bodywork................................................. |
603 |
Cab tilt pump............................................ |
604 |
Central lubrication................................... |
604 |
Changing air filter for air |
|
conditioning system................................. |
605 |
Refrigerant............................................... |
606 |
Parking heater.......................................... |
606 |
Chassis lubrication................................... |
607 |
Type plates, location................................ |
615 |
Fuses and relays......................................... |
617 |
General..................................................... |
617 |
Electrical distribution unit, left- |
|
hand drive trucks...................................... |
618 |
Electrical distribution unit, right- |
|
hand drive trucks...................................... |
619 |
Main fuses................................................ |
620 |
In relay and fuse box................................ |
622 |
To superstructure..................................... |
626 |
If something happens................................ |
628 |
Air suspension in locked mode................ |
628 |
Airbag...................................................... |
630 |
Warning signs and first-aid...................... |
631 |
Fire extinguisher...................................... |
631 |
Starting with starting cables..................... |
632 |
Towing..................................................... |
635 |
Back-up function...................................... |
641 |
In case of gearbox malfunction................ |
641 |
If the vehicle gets stuck............................ |
642 |

Introduction 1
LVD system
The vehicle is equipped with software that registers different types of information about the vehicle. The information will be transferred to Volvo Trucks AB and used in product development and fault tracing in engines and vehicles. Information that is saved concerns, among other things, speed, fuel consumption and torque. Volvo Trucks AB and its authorised workshops will make use of this information. Questions concerning the use of this information can be made to Volvo Action Service..
EBS
EBS generation 3 functions in a different way to earlier braking systems. In previous braking systems a particular pressure to the pedal gave a particular pressure to the braking system. With EBS 3 a particular pressure on the pedal will give a particular reduction of speed. The same depression of the pedal gives the same reduction of speed, but the pressure to the brake cylinders on the axles varies with the axle load.
After changing loads, the first brake application can feel strange, since the system must learn the new axle loads.
EBS adapts the braking pressure to the trailer so that the trailer brakes to the same degree as the truck.
Air suspension
This truck has full air suspension and thus has bellows instead of leaf springs. The amount of air in the bellows can be regulated, and determines the ride height.
The air suspension is electronically controlled (ECS, electronically controlled suspension) and maintains constant ride height irrespective of load

2Introduction
weight and positioning. Ride height can also be controlled manually, by using the control box.
In order for the air suspension to work, the pressure in the air tanks must be greater than 8 bar. The air suspension is activated after starting or when the parking brake is released or when the air suspension control box is used. None of the suspension functions will work before the system has been started by one of these methods.
This truck has rear air suspension and thus has bellows instead of rear leaf springs. The amount of air in the bellows can be regulated, and determines the ride height.
The air suspension is electronically controlled (ECS, electronically controlled suspension) and maintains constant ride height irrespective of load weight and positioning. Ride height can also be controlled manually, by using the control box.
In order for the air suspension to work, the pressure in the air tanks must be greater than 8 bar. The air suspension is activated after starting or when the parking brake is released or when the air suspension control box is used. None of the suspension functions will work before the system has been started by one of these methods.
Booster
Volvo's multi-channel booster VA 400.8 is a premiumclass eight-channel power amplifier for motor vehicles. If has integrated cross-overs for all channels and a number of sub-woofer controls for individual adjustments. The booster is factory installed and preset to give a natural and well balanced sound.
Dynafleet
Dynafleet is a system for transport planning combined with vehicle planning, message handling and automatic reporting of vehicle status and driver times.

Introduction 3
The driver communicates continually with the office. The traffic officer in the office can direct the vehicle to various places for various missions. The driver can send messages to other drivers, to the office or privately. Contact between the driver and the office means that much of the order administration can be administered in a simple way and more effective manning of transport is achieved. Communication with the central office takes place via the GSM mobile phone network.
The system collects information from the tachograph and the engine control unit. Dynafleet provides the driver with information about the vehicle and driving activities. This makes it possible to have a better transport administration and follow-up of the running costs of the vehicle, the work contribution of the driver and how economically the driver drives.
The section “Design and function” describes the most basic functions that all drivers must be familiar with. In the “System management” section there is a system overview and a description of how the system is started. The remaining sections describe the system functions in more detail.

4Running in
Drive carefully during the truck's first 5 000 km. Keep the engine speed within the green area on the tachometer.
Do not drive fast with a heavy load. Keep an eye on the warning lamps!
REMEMBER to leave the truck for warranty service after 4 weeks operation or 10 000 km mileage, depending on which occurs first. (With vehicles manufactured in Europe the guaranteed service is only offered if they have automatic transmission, fly-wheel mounted power take-off or all-wheel drive)
All Volvo engines are test driven before delivery. This means that we have control of all fits and decline all responsibility for any damage caused by careless driving.
Note!
During the first 1 500 km, the truck's power train shall not be subject to heavy loads, since this can cause abnormally high temperatures in gears and drives.

Starting and stopping |
5 |
Starting instructions
Put the gear selector in the neutral or tilted position or the engine will not start.
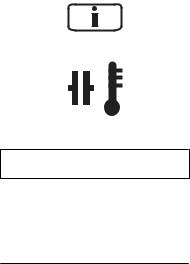
When the air pressure to the gearbox is too low, a warning will be displayed automatically. An icon will appear on the display at the same time as the information lamp comes on. Wait until the lamp has gone out before driving off.
Information lamp
Symbol for low air pressure to gearbox
Starting instructions
Put the gear shift lever in the neutral or tilted position, otherwise the engine will not start.
If the air pressure to the gearbox is too low, a warning will be shown automatically in the display. An icon will appear in the display at the same time as the information lamp lights. Wait until the lamp has gone out before driving off. Then move the gear shift lever to A, M or R to be able to drive.
Start the truck
To start the truck, select neutral position N and turn the key. The truck cannot be started if the gear shift lever is in the A, M or R position.
J3014466
Information lamp
J3008849
Icon for low air pressure to gearbox

6Starting and stopping
Stopping the truck
When the vehicle is stationary:
•Apply the parking brake.
•Move the gear selector to N, neutral.
•Switch off the engine.
Stopping the truck
When the vehicle is stationary:
•Apply the parking brake.
•Move the gear shift lever to N, neutral.
•Switch off the engine.
Stopping the truck
When the vehicle is stationary:
•Apply the parking brake.
•Move the gear shift lever to N, neutral.
•Switch off the engine.
 Caution!
Always apply the parking brake and put the gear selector in N when the vehicle is parked or whenever the driver leaves the driver position.
 Caution!
Always apply the parking brake and move the gear shift lever to N when the truck is parked or if the driver must leave the cab for some reason.
 Caution!
Always apply the parking brake and move the gear shift lever to N when the truck is parked or if the driver must leave the cab for some reason.
Starting and stopping |
7 |
Parking
Since the gearbox does not have a “parking position” the truck's parking brake must always be used when the driver has parked the vehicle and left the cab. For longer stops and when the driver leaves the driver's seat, the gear shift lever must also be moved to position N.
Clutch
The clutch is of the dry disc type, i.e. no torque converter. Therefore, never pull away in high gears by slipping the clutch. If the clutch overheats, the information lamp will light and a symbol will appear in the display.
If the information lamp lights when the vehicle is started and the truck is already moving, continue to drive.
If the information lamp lights when the vehicle is started and the truck is stationary, move the gear shift lever to the A or R position and let the engine run at idle until the light goes out.
When starting in manual mode, choose 1st gear to avoid straining the clutch.
J3014466
J3008835
 Caution!
Never hold the vehicle stationary on an uphill slope by using the accelerator pedal. The clutch could overheat, which could cause it to fail.
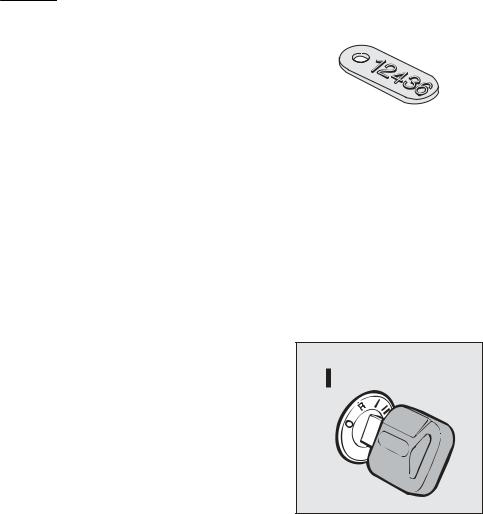
Keys
All keys have the same number as on the separate number tag. Remove the number tag from the key ring, to ensure that no unauthorized person can see the tag. Put or tape the tag in a safe place (there is self adhesive tape on the back).
Note!
Do not have other keys on the same key-ring as the ignition key. The ignition key contain electronics which can be affected.
8Starting and stopping
J3014615
Number tag. Remove the number tag from the key-ring and store it in a safe place.
Start the engine
1 Switch on the main switch.
2 Check that
•the parking brake is applied
•the gear lever is in neutral.
•auxiliary brakes are in position 0
3 Turn the starter key to drive position
J7008414

Starting and stopping |
9 |
4 The display will show the oil level in the engine. If the engine has been running during the previous 20 minutes nothing will be shown. The value shown under the graph is the difference between the engine max and min oil volumes.
5 If the truck has air bags, the symbol for this is shown on the display
Note!
If the key is turned directly from off position to start position, there will be a delay of about 1 second before the starter motor is activated. During this time the starter motor shows no response as it is activated via EMS. When starting from radio position there is however no such delay.
Note!
If the key is turned directly from the off to the starting position, it is not certain that the automatic radio code entry will function. To avoid this problem, wait a short while in the drive position before starting.
J3008842
6 Check that all the instrument panel lamps are working
10 Starting and stopping
7 If the engine has air intake heating, turn the key to the air intake heating position and release the key
J3015694
8 Wait until the pre-heating symbol goes out
9 Start the engine
Run the starter motor by turning the key to the start position. If the engine does not start, the starting attempt will be automatically shut off after 15 seconds. A new attempt can be made if the key is first turned back to 0 position and then to the start position.
If the overheating protection is triggered, a message is shown on the display when the overheating protection is activated. The message shows how long the starter motor must be allowed to cool before it will be possible to try to start the truck again, usually 10–15 minutes.
10 Hold down the brake pedal for a few seconds to enable the cruise control. The air suspension is
J0008226
Preheating symbol
J3015695
 Warning!
Do not use start gas. An explosion can cause considerable damage.
Starting and stopping 11
activated first after the parking brake is released or if the air suspension control box is used.
If the temperature of the coolant is below 50°C when the engine is started the engine speed will be limited to 1000 rpm for 15 seconds
Warming up
Warm the engine up by driving with low engine speed rather than running the engine while stationary. Avoid revving up excessively and high engine speed.
After starting let the clutch out in order to warm up the gearbox. The oil pump in the gearbox will begin working and will quickly attain working temperature.
Note!
It is especially important that the gearbox should be warmed up if it the outside temperature is below 0°C.
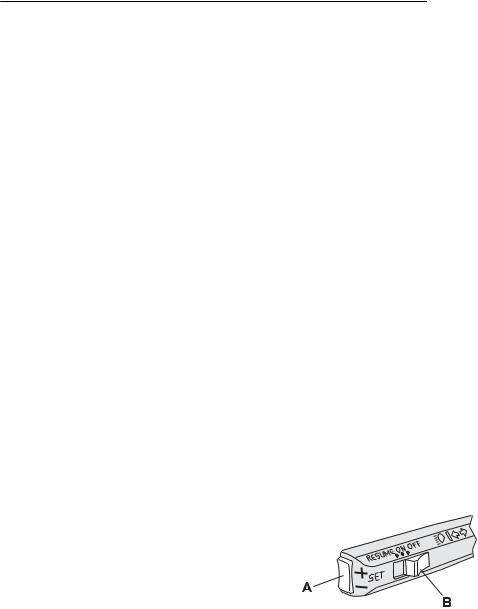
Change idling speed
The preset idle speed can be altered between 550 rpm and 650 rpm. When the truck is delivered, the idle speed is normally 600 rpm. (To change the idle speed temporarily, i.e. when the PTO is in use, see section "Constant engine speed control")
Conditions:
•The temperature of the coolant should exceed 50°C.
•The truck should remain stationary with the engine idling (the accelerator must not be depressed) when the adjustment is begun.
Procedure:
1Depress the brake pedal. The brake pedal should be depressed during the entire procedure.
2 Hold B in RESUME for three seconds.
3 Release B. Idling speed will fall to the lowest possible
setting.
4 Adjust engine speed with SET (A).
J0008305
5Hold B in RESUME and at the same time depress SET (A) for more than three seconds.

12 Starting and stopping
6Release the switches.
7Release the brake pedal. The new idling speed is set.
If an error has been made during the adjustment sequence the previous idling speed will be retained.
Fuel heater
Trucks equipped with Fuel Heater have electrically heated fuel lines which prevents the fuel from freezing on its way to the engine. Fuel Heater is used in extreme cold conditions to heat the fuel before starting and while driving.
Activate the function by pressing in the switch in the |
|
|
instrument panel. For the fuel to be warmed up before |
|
|
starting, the function should be activated at least |
J192368 |
|
5 minutes before starting. |
||
Switch for fuel heater |
||
Fuel Heater is active as long as the switch is held |
||
|
pressed in, but the effect varies according to needs. The function is switched off automatically when the ignition is switched off.

Instruments and controls 13
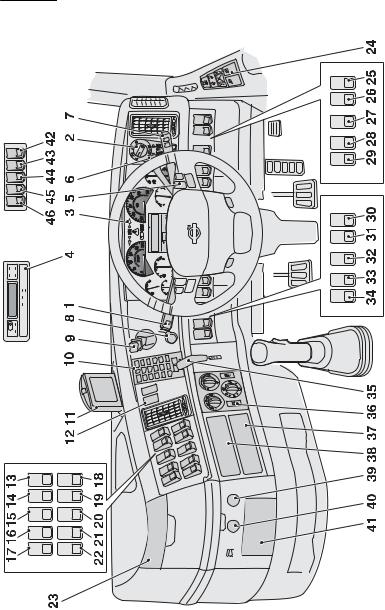
Overview
J0010472
14 Instruments and controls
J0010474

Instruments and controls 15
1 |
Stalk for direction indicators, cruise control and engine speed control |
2 |
Lighting control panel |
3 |
Instrument with driver information display |
4 |
Tachograph |
5 |
Buttons for radio and telephone |
6 |
Stalk for auxiliary brake |
7 |
Stalk for windscreen wiper and driver information display |
8 |
Blocking valve |
9 |
Parking brake |
10Phone
11Display for Dynafleet and reversing camera
12Buttons for Dynafleet and integrated telephone
13 - 22 |
Switch for reversing lights |
|
Switch for rotating beacon |
|
Switch for reversing camera |
Switch for parking heater
Switch for inner lighting
Switch for auxiliary brake
Switch for bogie lift
Switch for differential lock
Switch for ADR
Switch for front wheel drive
Switch for cornering lights
Switch for switching off movement sensor
Switch for Volvo Action Service
Switch for panic alarm
23Bottle holder
24Door control panel

16 Instruments and controls
25-29 |
Switch for working lights |
|
Switch for hydraulic kit or body |
|
Switch for container lock |
|
OBD-outlet |
30-34 |
Switch for fifth wheel |
|
Switch for spotlights |
Switch for cab tilt
Switch for power take-off
Switch for Emergency Assistance Button
35Stalk for trailer brake or switch for trailer brake, EBS or extra equipment
36Climate control system
37Radio, tachograph or Dynafleet
38Radio or Dynafleet
39USB port
40Electrical outlet 12 V (Max 10 A)
41Ashtray
42Roof sign
43Electric roof hatch
44Thermostat
45Spotlights
46Switch for cab interior lighting
Instruments and controls 17
Gauges
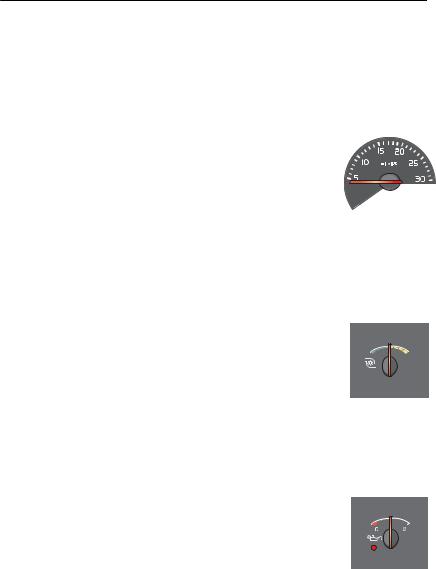
Tachometer
The tachometer is divided into three fields indicated by LEDs: Green LEDs, red LEDs and a field between them with extinguished LEDs.
Use the green zone for normal driving.
Use the extinguished zone for engine braking. Never let the engine go into the red zone.
Charge pressure gauge
To give good fuel economy, the needle should stay still when driving on a flat road.
Oil pressure gauge
If the warning lamp lights up stop immediately and switch the engine off! Investigate the cause. If the lamp lights while the engine is running, an acoustic alarm sounds. In addition the STOP lamp lights and a warning message is shown on the display.
When driving with the engine at normal temperature, the needle should stay between 3 and 5.5 bar (300– 550 kPa). The oil pressure may drop when the engine is idling. This is not dangerous if the oil pressure increases again when engine speed increases.
J201128
J201133
J201132
18 Instruments and controls
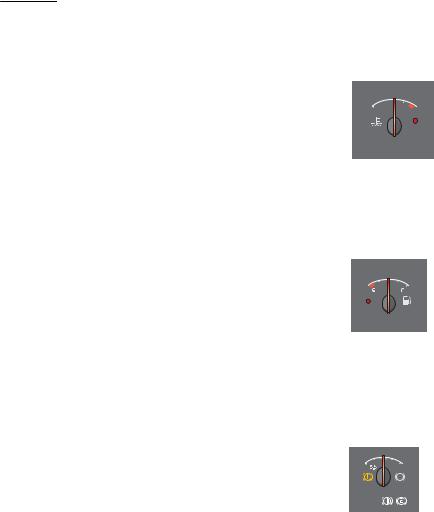
Temperature gauge for coolant
Stop immediately if the warning lamp lights! Let the engine idle until the warning lamp goes out and the temperature drops.
Under normal driving conditions, the pointer should stay below the red zone.
J201131
Fuel gauge
When the warning lamp lights, there is 7–10% of the fuel left in the tank.
J201134
Air pressure gauge for brakes
Stop immediately if a warning lamp lights! If the lamp lights while the engine is running, an acoustic alarm sounds. In addition the STOP lamp lights and a
warning message is shown in the display. The warning lamp lights if the air pressure in the braking system is too low. Investigate the cause of the pressure drop.
When the engine is started after it has not run for a while, the air pressure can have dropped to a level too low for driving away. The warning lamp will remain
lit until the air pressure has risen to the correct level. If J201135 there is no air in the braking system, it can take some
time before the indicator needle begins to move.
During driving the needle should remain within the green zone, but when braking it may go below the green zone for a short time.
Instruments and controls 19
When “1” lights, the gauge shows the air pressure in the front brake circuit and when “2” lights, the air pressure in the rear brake circuit is shown.
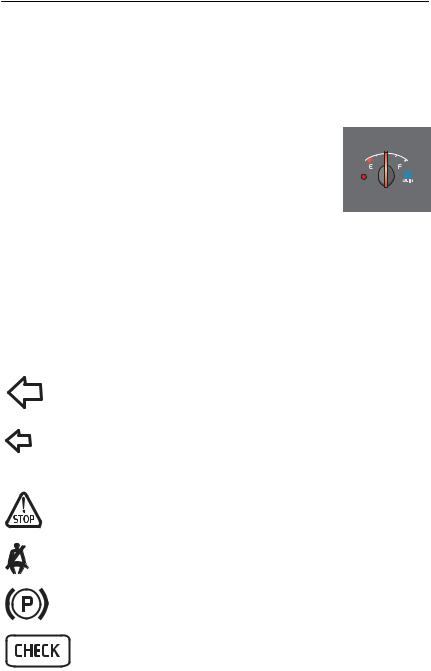
Level gauge for AdBlue
This gauge indicates the approximate amount of
AdBlue in the tank. The red sector and the yellow
LED indicate when AdBlue should be filled.
J201136
Symbols
The symbols shown on the driver information display are described in section describing the display.
Symbol |
Meaning |
Note |
|
Left indicator on |
In the case of a fault the arrow flashes twice as |
|
|
fast. |
|
|
|
|
Left indicator on (trailer) |
In the case of a fault the arrow flashes twice as |
|
|
fast. |
|
|
Note! Fault indication will not occur if LEDs are |
|
|
used for the trailer lighting. |
|
Stop, there is a fault on the truck |
Lights up together with another symbol |
|
|
or with a message on the display. |
|
|
|
|
Seat belt reminder |
|
|
|
|
|
Parking brake applied |
|
|
|
|
|
Check |
Lights up together with some other symbol or |
|
|
together with a message on the display. |
|
|
|
 Loading...