


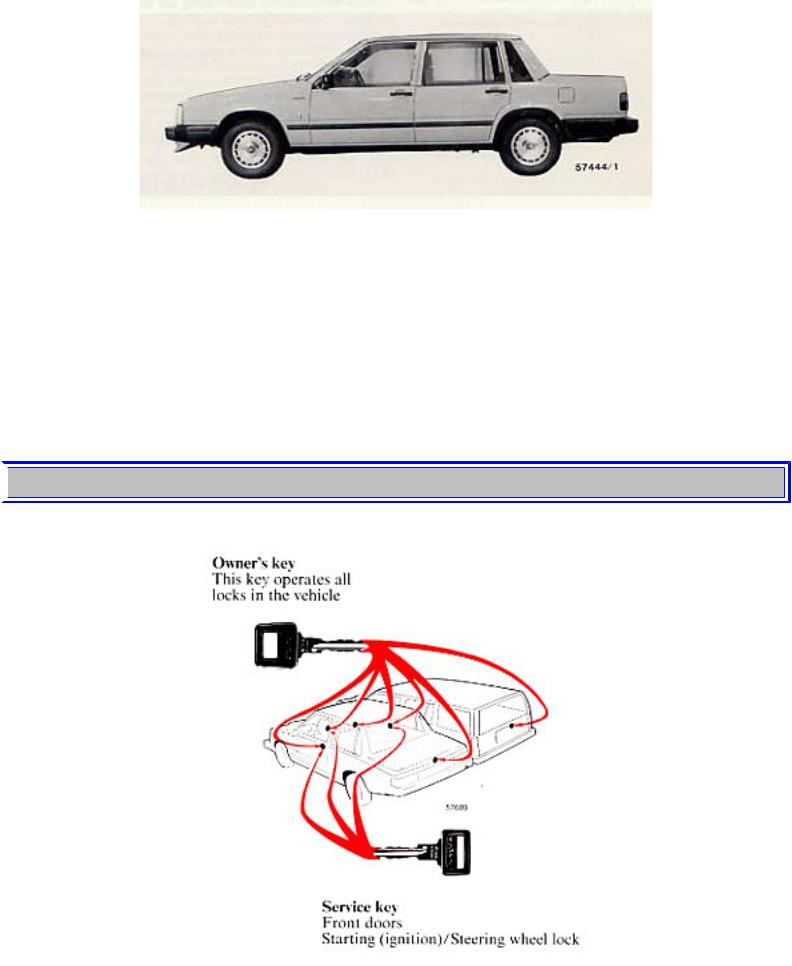
1986 Volvo 740 GL, GLE, Turbo
1 9 8 6 VOLVO
740 GL, GLE, Turbo
 Contents
A comprehensive index is located at the back of this manual.
Presentation
Instruments and controls
Body and interior
Starting and driving
Wheels and tires
In case of emergency
Car care
Service and routine maintenance
Specifications
Index
All information, illustrations and specifications contained in this manual are based on the latest product information available at the time of publication. Volvo reserves the right lo make model changes at any time, or to change specifications or design, without notice and without incurring obligation.
 pg. 2 Presentation
file:///K|/ownersdocs/1986/1986_740/86740_00.htm (1 of 3)12/30/2006 7:51:26 AM
1986 Volvo 740 GL, GLE, Turbo
This Owner's manual provides information on driving and maintaining your Volvo
It should be noted that there are certain differences among model versions and market requirements; thus, you may find features described and/or pictured in this manual that do not appear on your car. Should you require more detailed information with regard to adjustments or repairs please contact your Volvo dealer.
Do not export your Volvo to another country before investigating that country's applicable safety and exhaust emission requirements. In some cases it may be difficult or impossible to comply with these requirements. Modifications to the emission control system(s) may render your Volvo not certifiable for legal operation in the U.S., Canada, and other countries.
 pg. 3 Keys
file:///K|/ownersdocs/1986/1986_740/86740_00.htm (2 of 3)12/30/2006 7:51:26 AM

1986 Volvo 740 GL, GLE, Turbo
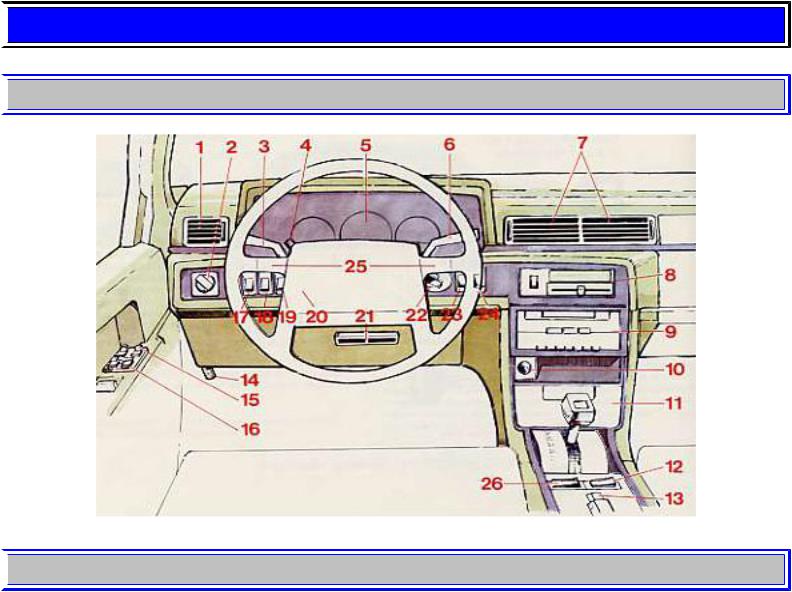
The key number codes are stamped on a separate tag supplied with the keys. This tag should be separated from the key ring and kept in a safe place (the back of the tag is coated with adhesive tape). In the event the original keys are lost, duplicates may be ordered from your Volvo dealer.
The central locking system is described in detail in section "Door and locks".
Top of Page
file:///K|/ownersdocs/1986/1986_740/86740_00.htm (3 of 3)12/30/2006 7:51:26 AM
1986 Volvo 740 GL, GLE, Turbo
1 9 8 6 VOLVO
740 GL, GLE, Turbo
 Instruments and controls
 pg. 4 Instruments, Switches and controls
 pg. 5 Instruments, Switches and controls
1 |
Air louver |
20 |
2 |
Headlights, parking lights |
15 |
3 |
Turn signals, Cruise Control (optional) |
12,13 |
4 |
Hazard warning flashers |
12 |
5 |
Instruments |
6 |
6 |
Wiper/washer |
14 |
7 |
Air louvers |
20 |
file:///K|/ownersdocs/1986/1986_740/86740_01.htm (1 of 25)12/30/2006 7:51:27 AM

1986 Volvo 740 GL, GLE, Turbo |
|
||
8 Heating and ventilation |
20 |
||
9 Audio cassette/tuner |
24 |
||
10 |
Cigarette lighter |
18 |
|
11 |
Ash tray |
18 |
|
12 |
Electrically-heated passenger seat |
17 |
|
13 |
Parking brake |
18 |
|
14 |
Hood release handle |
35 |
|
15 |
Space for additional equipment |
|
|
16 |
Electrically operated windows |
19 |
|
17 |
Rear fog lamps |
16 |
|
18 |
Fog lights (standard on Turbo optional GL, |
16 |
|
GLE) |
|||
|
|||
19 |
Space for additional equipment |
- |
|
20 |
Space for additional equipment |
- |
|
21 |
Air louver |
20 |
|
22 |
Starting (ignition) switch/steering wheel lock |
11 |
|
23 |
Space for additional equipment |
|
|
24 |
Rear window demister |
17 |
|
25 |
Horn |
- |
|
26 |
Electrically-heated driver's seat |
17 |
|
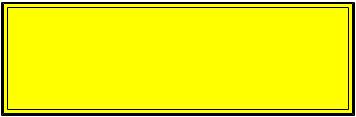
The pages in this section provide a detailed description of the vehicle's instruments and controls. Note that vehicles may be equipped differently, depending on special legal requirements, etc.
 pg. 6 Instruments
file:///K|/ownersdocs/1986/1986_740/86740_01.htm (2 of 25)12/30/2006 7:51:27 AM

1986 Volvo 740 GL, GLE, Turbo
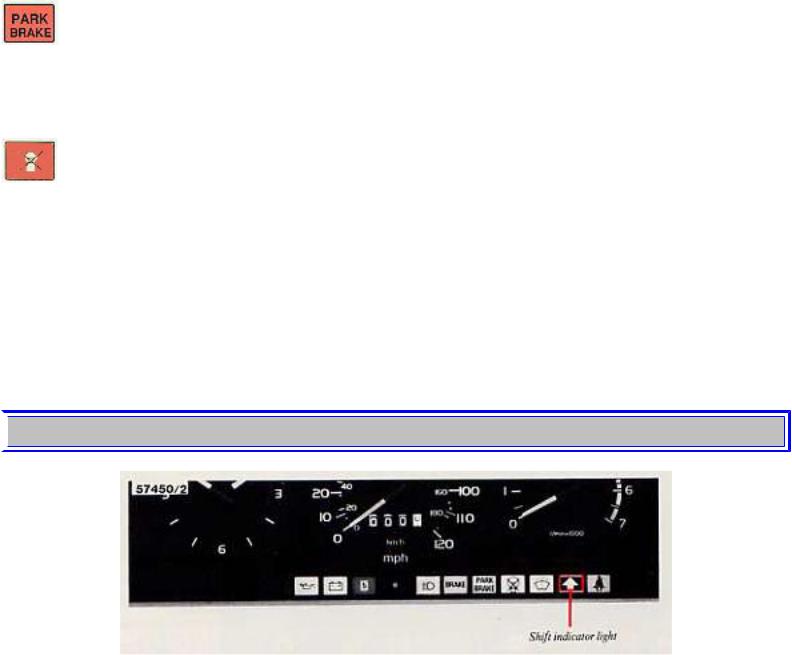
NOTE: Canadian model speedometers/odometers indicate kilometers only.
1 Voltmeter (Turbo models)
2 Fuel gauge
3 Clock reset knob
4 Quartz crystal clock
5Speedometer
6Trip odometer
7Trip odometer reset knob
8Odometer
9Tachometer (GLE, Turbo models)
10Instrument panel lamps rheostat
11Temperature gauge
12Boost gauge (Turbo models)
 pg. 7 Instruments
Quartz crystal clock
To reset the hands, push in the reset knob and turn.
Tachometer (GLE, Turbo models)
Reads thousands of engine rpm. Red striped range for momentary use, during acceleration. Engine should not be operated in red range.
Maximum continuous rpm is 6000.
file:///K|/ownersdocs/1986/1986_740/86740_01.htm (3 of 25)12/30/2006 7:51:27 AM
1986 Volvo 740 GL, GLE, Turbo
Trip odometer
Used form measuring shorter distances. (last figure represents 1/10 mile or 1/10 km)
Trip odometer reset knob
Push in to reset.
Temperature gauge
The pointer should be approximately midway on the gauge face when driving. If the pointer enters the red range repeatedly, check coolant level and fan belt tension. (See "Coolant" and "Drive belts")
WARNING!
Allow engine to cool before adding coolant.
Fuel gauge
The fuel tank capacity is approx. 15.8 US gals (60 liters).
The red range represents approx. 3.2 US gals (12 liters). See "refueling" for further information.
Instrument panel lamps rheostat
Clockwise = brighter.
Counterclockwise = dimmer.
Voltmeter (turbo-engine cars only)
The voltmeter indicates the voltage in the electrical system and thereby also the state of the battery. While the car is being driven the pointer should be within the black field.
Should the pointer point to the upper or lower red field when driving, this may indicate some fault in the electrical system.
Boost pressure gauge (turbo-engine cars only)
The boost pressure gauge is divided into sections.
Black section: The engine acts as a normally-aspirated engine. Best fuel economy is achieved while driving in this range.
Yellow section: The turbo is engaged.
Red section(if applicable): The pressure in the intake manifold is too high. Drive the car carefully to a Volvo dealer for inspection.
file:///K|/ownersdocs/1986/1986_740/86740_01.htm (4 of 25)12/30/2006 7:51:27 AM

1986 Volvo 740 GL, GLE, Turbo
 pg. 8 Indicator and warning lights
1 (Not connected)
2 Low engine oil level (certain models)
3 (Not connected)
4 (Not connected)
5 (Not connected)
6 Low engine oil pressure
7 Alternator not charging
8 Overdrive (5th gear) engaged (manual transmission)
9 High beams
10 Brake failure
11 Parking brake applied
12 Bulb failure
13 Low washer fluid level.
If the lamp glows continuously when the engine is running, there is only about 1/2 - 1 US qts. remaining in the washer fluid reservoir.
14 Shift indicator light
(manual transmission models) or 4th gear disengaged (Turbo models with automatic transmission) 15 Fasten seat belts
16 (Not connected)
17 Turn signal, left
18 Turn signal, right
Indicator light, low oil level (certain models)
file:///K|/ownersdocs/1986/1986_740/86740_01.htm (5 of 25)12/30/2006 7:51:27 AM

1986 Volvo 740 GL, GLE, Turbo
Check the oil level indicator light before starting the car - it takes only a few seconds. The car should be standing on level ground and the engine should be cold. Turn the ignition key to the start position so that the warning lights illuminate. If the oil level is adequate, the oil level light will go off after two seconds. If the oil level is low, the light will stay on until the engine is started. If low, check level with dipstick and add oil as required.
NOTE! If you turn the ignition key too far and start the engine, no indication of the oil level will be given. Moreover, if you switch the engine off after a few seconds and then check the oil level as indicated, the result you obtain will be incorrect because a certain amount of oil will have been pumped out of the oil pan.
 pg. 9 Warning lights
The warning lights described on this page should never stay on when driving
When the ignition key is turned on, and before the engine starts, all of the warning lights should be on to test the function of the bulbs. Should a light not go off after the engine has started, the system indicated should be inspected. (However, the parking brake reminder light will not go off until the parking brake is fully released.)
Alternator warning light
If the light comes on while the engine is running, check the tension of the alternator drive belt as soon as possible.
NOTE: This warning light is illuminated if the alternator is not charging. However, parking brake, brake failure and bulb failure warning lights will be illuminated at the same time due to the design of the system.
Brake failure warning light
If the light comes on while driving and the brake pedal can be depressed further than normal, it is an indication that one of the brake circuits is not functioning.
Stop immediately, open hood and check brake fluid level (see section "Brake fluid, power steering".) Fluid level below MIN mark: Do NOT drive. Tow car to shop for check/repair of brake system.
Fluid level between MIN and MAX mark: proceed immediately and with caution to a Volvo dealer for an inspection of the brake system.
file:///K|/ownersdocs/1986/1986_740/86740_01.htm (6 of 25)12/30/2006 7:51:27 AM
1986 Volvo 740 GL, GLE, Turbo
Oil pressure warning light
If the light comes on during driving, the oil pressure is too low. Stop the car and then stop the engine immediately and check the engine oil level. See section titled "Engine oil".
After hard driving, the light will come on occasionally when the engine is idling. This is normal, provided it goes off when the engine speed is increased.
Parking brake reminder light
This light will be on when the parking brake (hand brake) is applied. The parking brake lever is situated between the front seats.
Bulb failure warning light
The light will come on if any of the following bulbs are defective: one of the low beam headlights
one of the tail lights
one of the brake lights (when the brake pedal is depressed). Check the fuse and bulb.
See sections titled "Replacing bulbs" and "Fuses". Should the warning light come on after a defective outside bulb has been replaced, the corresponding bulb on the other side of the car should also be replaced.
 pg. 10 Shift indicator light
Shift indicator light (Manual transmission cars only)
The Volvo shift indicator light (S.I.L.) is a device designed to help you get even better gas mileage from your Volvo car. Studies have shown that the best fuel economy is obtained by shifting gears at low engine rpm and high relative engine load. The Volvo S.I.L. is calibrated to show you when to shift for improved mileage without sacrificing smooth acceleration.
Use of the S.I.L. is simple. Shift to the next higher gear as soon as the light comes on. You may find after using the S.I.L. for some time that your natural shifting rhythm will adapt to the S.I.L's suggestion.
file:///K|/ownersdocs/1986/1986_740/86740_01.htm (7 of 25)12/30/2006 7:51:28 AM
1986 Volvo 740 GL, GLE, Turbo
Obviously, there will be times when you need to shift later than the light would indicate (for example, when climbing hills or trailer towing). using the light regularly, however, should result in a mileage improvement of six percent or more, depending on how you normally drive.
Programming instructions for shift indicator
If the current supply to the control unit is cut (battery disconnected), the control unit will have to be reprogrammed as the control unit memory will be erased.
Drive the car in each gear (first gear not necessary) for approximately 8 seconds.
The gear change indicator light will flicker once (0.5 seconds), as each gear is programmed.
Note: Remove the foot completely from the clutch pedal after each gear change when programming the control unit.
 pg. 11 Starting (ignition) switch
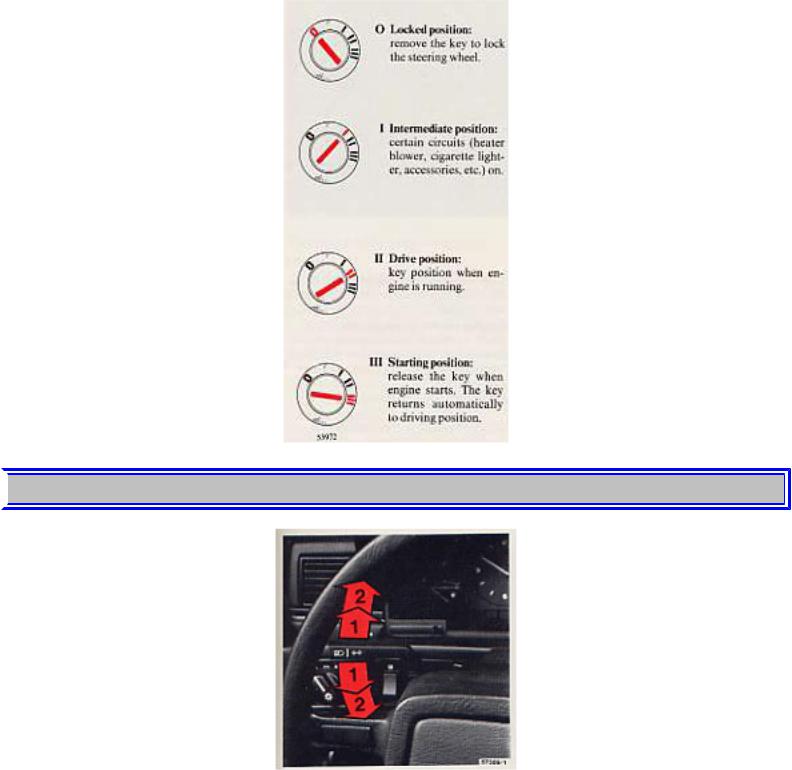
Starting (ignition) switch/steering wheel lock
The steering wheel lock might be under tension when the car is parked. Turn the steering wheel slightly to free the ignition key.
A chime will sound if the starting key is left in the ignition lock and front door on the driver's side is opened.
file:///K|/ownersdocs/1986/1986_740/86740_01.htm (8 of 25)12/30/2006 7:51:28 AM
1986 Volvo 740 GL, GLE, Turbo
 pg. 12 Turn signals, Hazard warning flasher
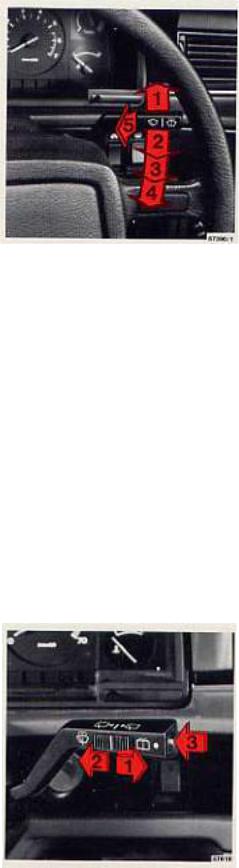
Turn signals
1 Lane change position.
In maneuvers such as lane changing, the driver can flash the turn signals by moving the turn signal lever to the first stop and holding it there. The lever will return to the neutral position when released.
2 Signal lever engaged for normal turns.
file:///K|/ownersdocs/1986/1986_740/86740_01.htm (9 of 25)12/30/2006 7:51:28 AM

1986 Volvo 740 GL, GLE, Turbo
NOTE: Defective turn signal bulb will cause turn signal indicator and remaining signal lights to flash more rapidly than normal.
3 High beam/low beam switch (headlights on).
Move the lever towards the steering wheel and release it.
3 Headlight flasher (headlights off).
Move the lever towards the steering wheel. The headlight high beam will be on until the lever is released.
Hazard warning flasher
The four-way flasher should be used to indicate that the vehicle has become a traffic hazard.
NOTE: Regulations regarding the use of the hazard warning flasher may vary from state to state.
 pg. 13 Windshield, Tailgate wipers/washers
file:///K|/ownersdocs/1986/1986_740/86740_01.htm (10 of 25)12/30/2006 7:51:28 AM
1986 Volvo 740 GL, GLE, Turbo
Wiper/washer
1 Intermittent wiper.
With switch in this position, the wipers will sweep approximately every seventh second.
2 "Single sweep" position.
Switch returns automatically when released.
3 Wipers, low speed.
4 Wipers, high speed.
5 Windshield wiper/washer.
The wiper will make 2-3 complete sweeps after the lever is released.
Tailgate window wiper/washer (wagon)
The tailgate window wiper/washer is operated by a switch at the end of the wiper lever.
file:///K|/ownersdocs/1986/1986_740/86740_01.htm (11 of 25)12/30/2006 7:51:28 AM
1986 Volvo 740 GL, GLE, Turbo
1 The wiper operates continuously.
2 Intermittent position: the wiper strokes approximately every 15 seconds.
3 Tailgate washer (note that the wiper also operates when this button is depressed). After the button is released the wiper strokes 2-3 additional times before stopping.
The electrical circuit is protected by fuse 14, located in the central electrical unit. See the section entitled "Fuses".
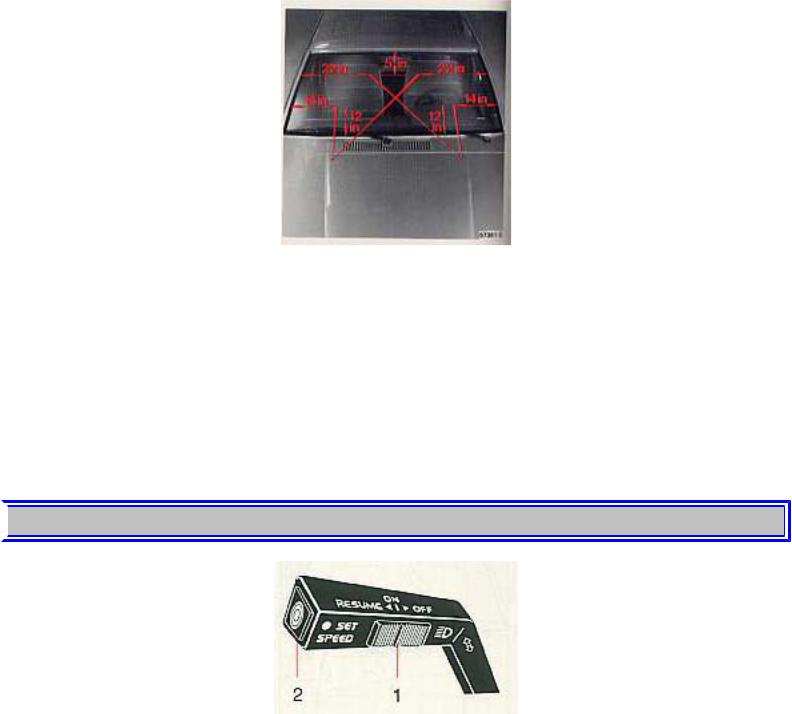
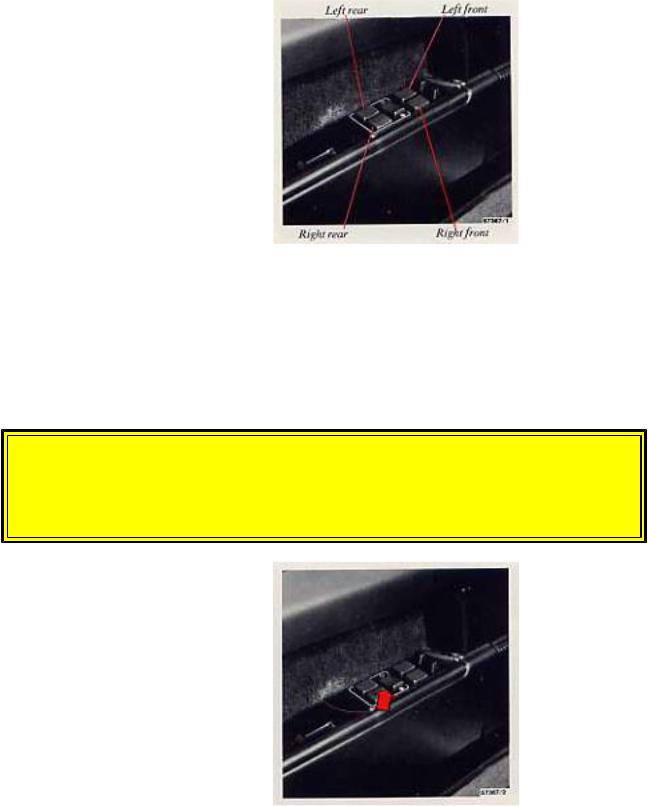
Adjusting washer nozzles
The washer jets should spray the windshield as shown. Use the edge of a small screwdriver to adjust the nozzles, if necessary.
Washer fluid reservoir
The washer fluid reservoir is located in the engine compartment and holds approx. 0.5 US gal. (2.0 liters) on sedan models and approx. 0.8 US gal (3.2 liters) on wagon models. (See back cover for locations.)
During cold weather, the reservoir should be filled with windshield washer solvent.
 pg. 14 Cruise control
Cruise control
file:///K|/ownersdocs/1986/1986_740/86740_01.htm (12 of 25)12/30/2006 7:51:28 AM
1986 Volvo 740 GL, GLE, Turbo
(optional on certain models)
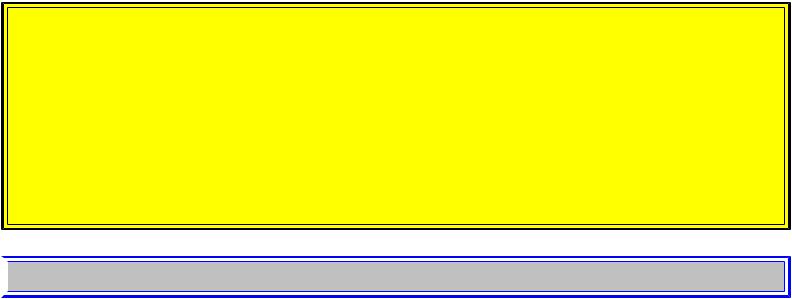
The cruise control switches are located on the turn signal switch lever.
To engage and set desired speed:
1.Set switch (1) to ON.
2.Accelerate to desired cruise speed.
NOTE: The cruise control cannot be engaged at speeds below 22 mph (35 km).
3. Depress SET SPEED switch (2).
Operating brake pedal or clutch pedal (where applicable)
This will automatically disengage the cruise control. Previously selected cruise speed is retained in the memory and by momentarily setting the switch to RESUME position that speed will be re-engaged.
NOTE: The vehicle will accelerate very quickly should there be a substantial speed differential when the switch is reset to RESUME. It is therefore recommended that the vehicle be accelerated manually and the switch reset to RESUME when the speed differential is reduced.
Acceleration
Momentary acceleration, such as for passing, does not interrupt cruise control operation. The previously selected speed will be maintained without having to set switch to RESUME.
To disengage the cruise control system:
set switch (1) to position OFF, or depress brake pedal, or depress clutch pedal (where applicable). Switching off the starting (ignition) switch is will automatically disengage the cruise control system.
WARNING!
The cruise control should not be used in heavy traffic or when driving on wet or slippery roads.
If the gear shift is moved to Neutral while the cruise control is engaged, then depress the brake pedal momentarily, or set the cruise control switch (1) to OFF. This will disengage the cruise control and prevent overreving the engine.
NOTE: When driving on a grade, actual vehicle speed may vary slightly from the set cruise control speed.
 pg. 15 Lighting
file:///K|/ownersdocs/1986/1986_740/86740_01.htm (13 of 25)12/30/2006 7:51:28 AM
1986 Volvo 740 GL, GLE, Turbo
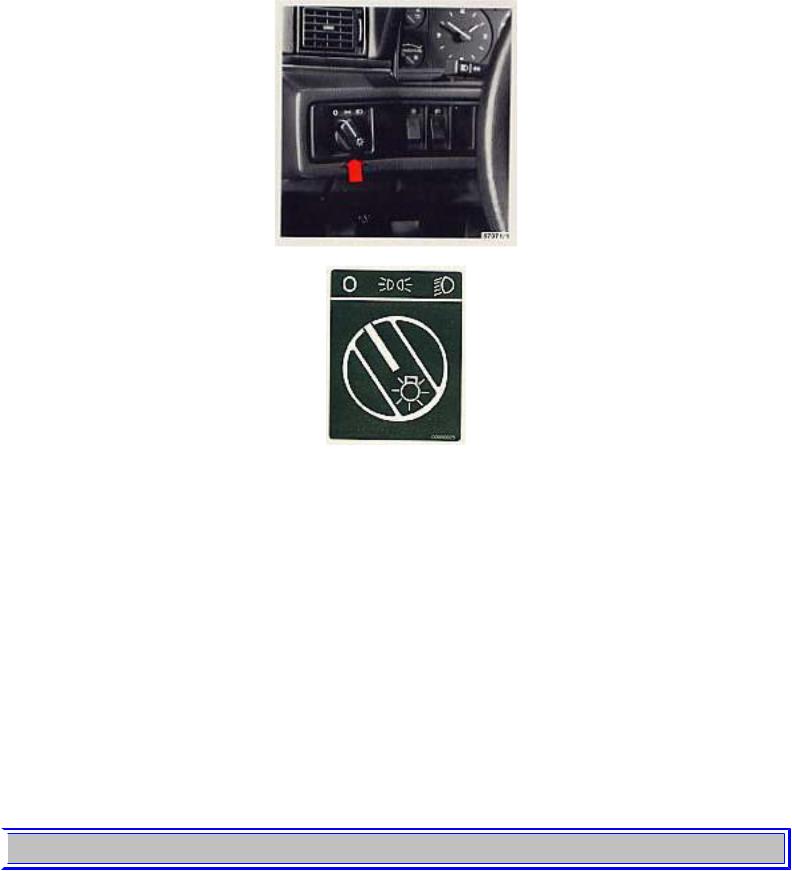
Headlights and position lights
 All lights off
 Parking lights on
 Headlights and parking lights are on if starting (ignition) switch is in position I or II.
If the headlight switch is in position  all lights will go out when starting (ignition) switch is switched off.
With the headlight switch in position,  the parking lights will stay on.
Switch from high to low beams, and vice versa, by moving the turn signal switch lever on the left side of the steering column towards the steering wheel.
 pg. 16 Rear fog lights, Front fog lights, Power antenna
file:///K|/ownersdocs/1986/1986_740/86740_01.htm (14 of 25)12/30/2006 7:51:28 AM
1986 Volvo 740 GL, GLE, Turbo
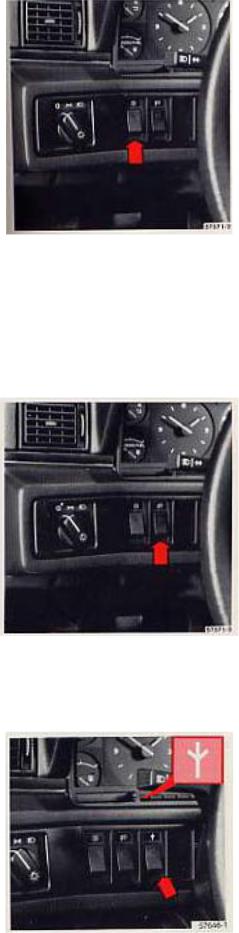
Rear fog lights
The rear fog lights are considerably brighter than the normal tail lights and should be use only when atmospheric conditions, such as fog, rain, snow, smoke or dust reduce the daytime or nighttime visibility of other vehicles to less than 500 ft. (152 meters). (The headlights must be switched on.)
Note that local regulations governing the use of these lights may vary.
Auxiliary front fog lights (optional on certain models)
Auxiliary front fog lights can be switched on only with the low-beam headlights on.
file:///K|/ownersdocs/1986/1986_740/86740_01.htm (15 of 25)12/30/2006 7:51:28 AM
1986 Volvo 740 GL, GLE, Turbo
Power antenna (optional on certain models)
The power antenna switch can be used to retract the antenna when the audio system is turned on. This will permit operation of the cassette drive with the antenna in the down position.
CAUTION: Always lower the antenna when entering a garage or car wash to avoid antenna damage.
 pg. 17 Rear window demister. Heated front seats
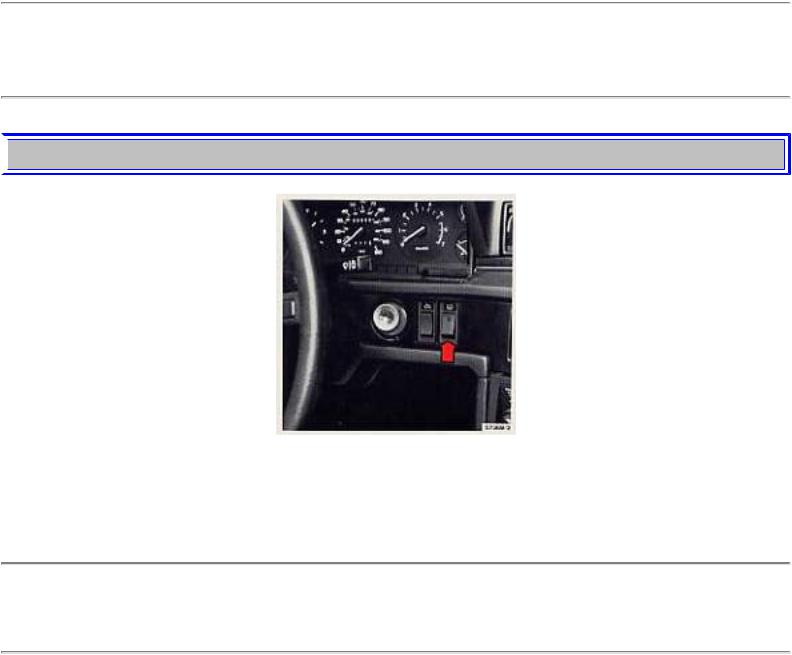
Rear window demister
To operate, depress the switch. The indicator lamp in the switch will come on. The system will be switched off automatically after 10-15 minutes or when the starting (ignition) key is switched off.
CAUTION: Do not place items that may damage the printed circuit against the inner surface of the rear window. Do not scrape the inner surface of the rear window glass with a hard object or use an abrasive window cleaner, otherwise damage to the printed circuit will occur.
file:///K|/ownersdocs/1986/1986_740/86740_01.htm (16 of 25)12/30/2006 7:51:28 AM
1986 Volvo 740 GL, GLE, Turbo
Heated front seats (certain models)
The front seats are equipped with electrically-heated backrests and seat cushions. The heating is thermostatically-controlled and switches on automatically when the seat temperature drops below 50°F (10°C) and switches off at about 95°F (+35°C). Use the switches to disengage the seat heating manually.
 pg. 18 Parking brake, Cigarette lighter, Ash trays
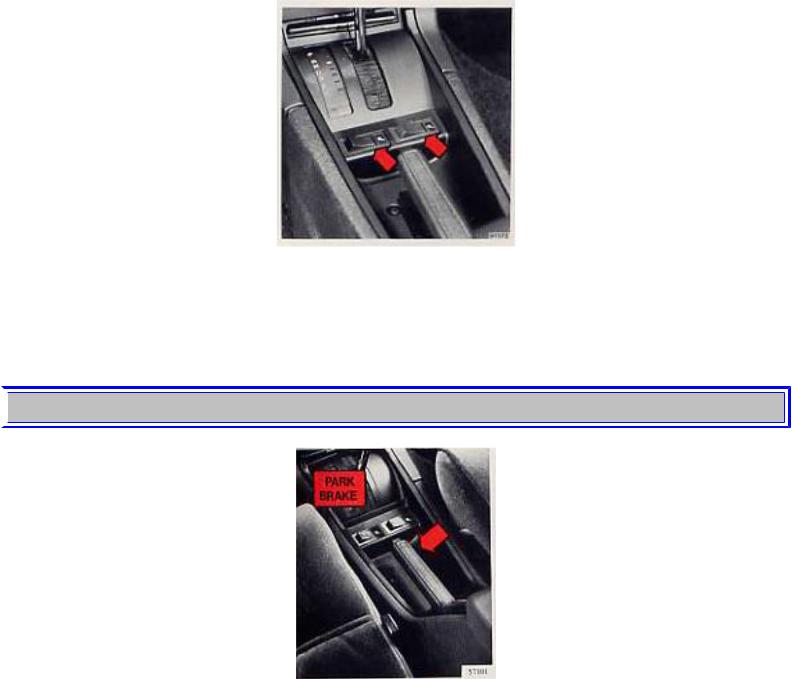
Parking brake (hand brake)
The lever is situated between the front seats. The brake is applied to the rear wheels.
Always use the parking brake (hand brake) when parking. On hills, also turn the front wheels toward the curb.
In order to obtain the best possible performance of the parking brake, the brake linings should be broken in. (See section titled "Brake system").
file:///K|/ownersdocs/1986/1986_740/86740_01.htm (17 of 25)12/30/2006 7:51:28 AM
1986 Volvo 740 GL, GLE, Turbo
Cigarette lighter
To operate, depress the knob fully. When the knob automatically releases, the cigarette lighter is ready for use.
The starting (ignition) switch must be switched on (to position I or II) for the cigarette lighter to function.
Ash trays
To remove the ash trays depress the center spring and remove.
 pg. 19 Electrically operated windows
file:///K|/ownersdocs/1986/1986_740/86740_01.htm (18 of 25)12/30/2006 7:51:28 AM
1986 Volvo 740 GL, GLE, Turbo
Electrically-operated windows (certain models)
The electrically operated windows are controlled by switches from the driver's armrest as shown in the above illustration.
The starting (ignition) switch must be ON (position II) for the electrically operated windows to function. The window is lowered if the rear part of the switch is pressed and raised if the front part of the switch is pressed.
WARNING!
Remove the starting (ignition) key when children are left unattended in the vehicle.
Cut-out switch for electrically-operated rear-door windows
If the car is equipped with rear door power windows, this function can be disabled by a switch located on the driver's door armrest. This switch is positioned 90° in relation to the other switches.
 The rear door windows can be raised or lowered with the respective door switch as well as the switch on the driver's door.
file:///K|/ownersdocs/1986/1986_740/86740_01.htm (19 of 25)12/30/2006 7:51:28 AM
1986 Volvo 740 GL, GLE, Turbo
 The rear door windows cannot be raised or lowered with the respective door switch but instead only with the corresponding switch on the driver's door.
 pg. 20 Heating and ventilation
Heating and ventilation
Your Volvo is equipped with:
●Heating system
or
●Heating system combined with air conditioning.
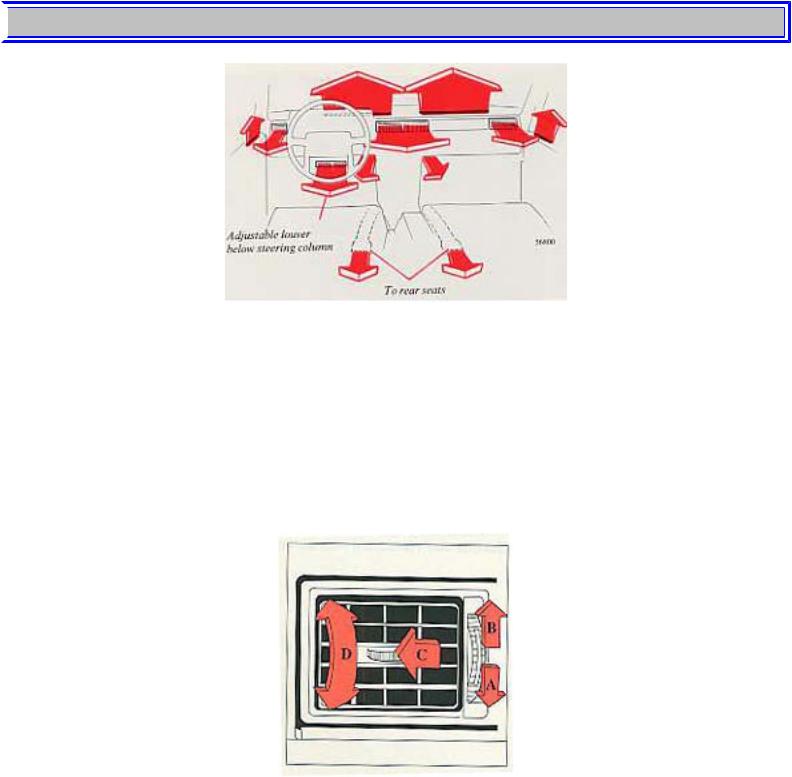
Depending on which function you select, warm or cool/cold air is distributed to the different parts of the passenger compartment. An additional driver's air louver is located beneath the steering column and can be adjusted upwards, downwards, or closed as desired.
Air louvers (dash)
AOpen
BClosed
file:///K|/ownersdocs/1986/1986_740/86740_01.htm (20 of 25)12/30/2006 7:51:28 AM
1986 Volvo 740 GL, GLE, Turbo
C Directing air flow horizontally
D Directing air flow vertically
 pg. 21 Heating and ventilation
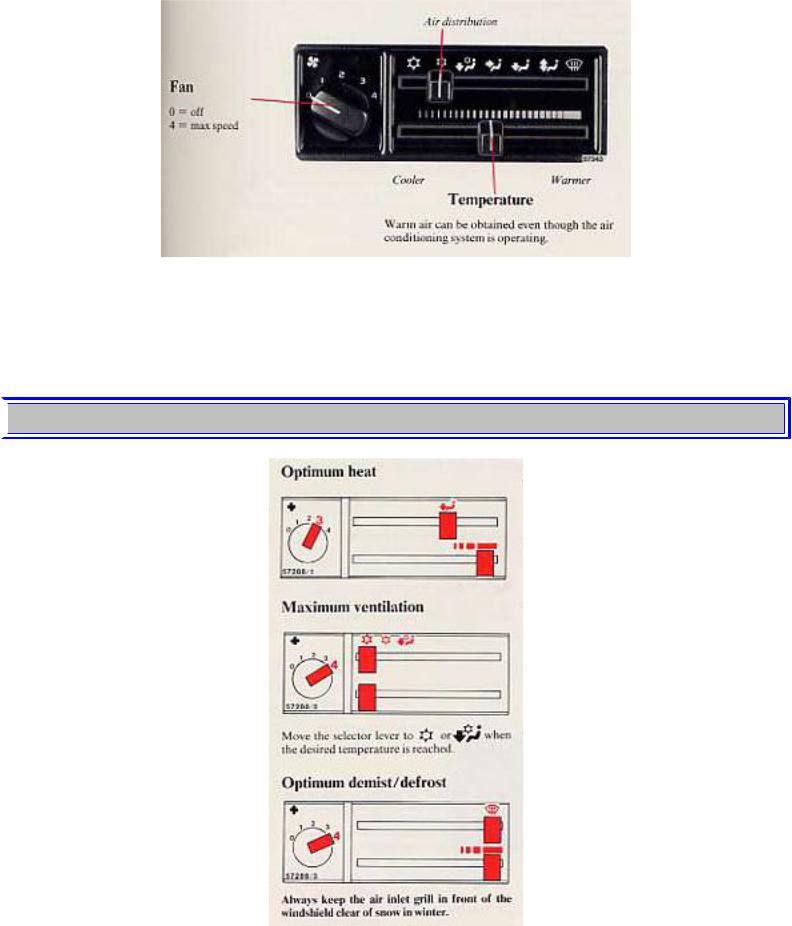
Heating and ventilation system without air conditioning
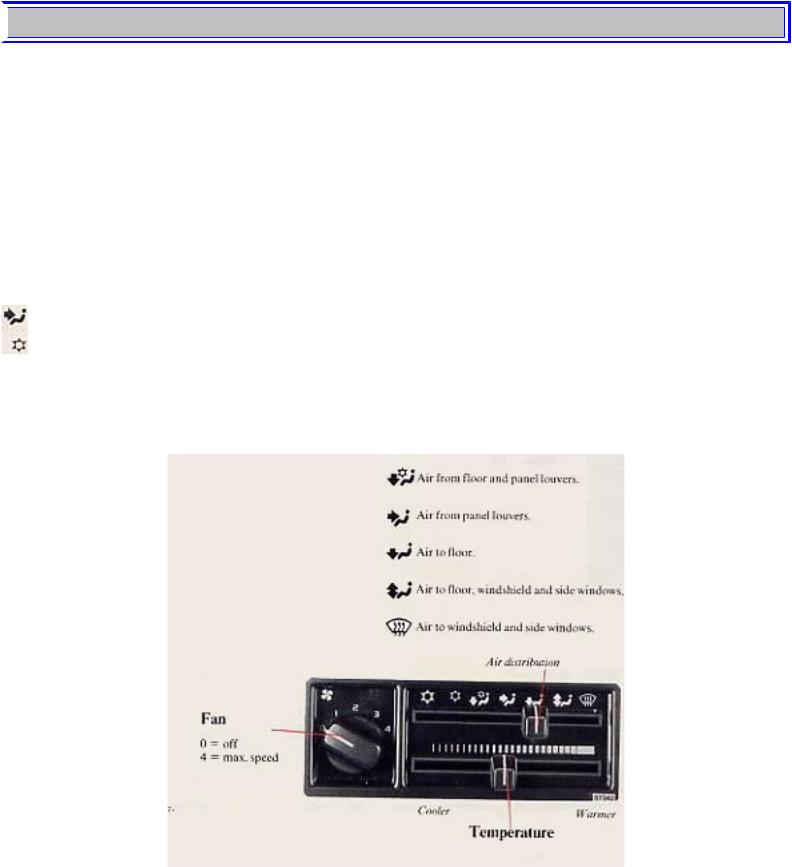
Air distribution
 Recirculation interior air enters through panel vents. Very little air is drawn from outside. Use this position to avoid circulating dense exhaust gases (as when driving through a tunnel). Do not use this position for more than 10-15 minutes as very little fresh air will be supplied.
 Air from panel louvers.
On the system without air conditioning these two symbols represent identical functions. (With air
conditioning the upper sign position emits cooled air).
Always keep the air inlet in front of the windshield clear of snow in winter.
file:///K|/ownersdocs/1986/1986_740/86740_01.htm (21 of 25)12/30/2006 7:51:28 AM
1986 Volvo 740 GL, GLE, Turbo
NOTE: A certain amount of air will always enter through the dash air louvers as long as they are open; independent of the position of the air distribution control.
 pg. 22 Heating and ventilation
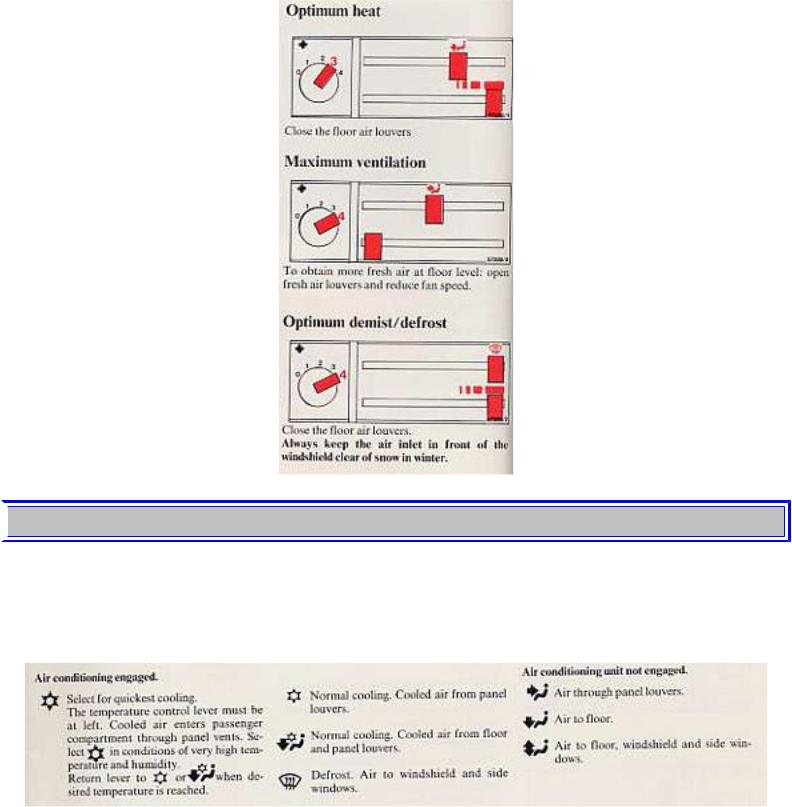
Heating and ventilation system with air conditioning
Air distribution
file:///K|/ownersdocs/1986/1986_740/86740_01.htm (22 of 25)12/30/2006 7:51:28 AM
1986 Volvo 740 GL, GLE, Turbo
NOTE: A certain amount of air will always enter through the dash air louvers as long as they are open; independent of the position of the air distribution control.
Close the dash air louvers to obtain maximum air flow to floor or windshield. Open the two outer air louvers if the side windows become misted.
 pg. 23 Heating and ventilation
Additional information and tips
file:///K|/ownersdocs/1986/1986_740/86740_01.htm (23 of 25)12/30/2006 7:51:28 AM

1986 Volvo 740 GL, GLE, Turbo
●The air conditioning compressor is engaged only if the temperature is above 46°F (+8°C).
●In all three air conditioning positions the fan runs at speed 1 if the switch is at "0". This is a safety measure to prevent formation of ice in the system.
●When the outside air isn't fresh
When the outside air is contaminated with exhaust gases, smoke, etc. (as when driving through a tunnel), move the lever to  for a few minutes. In this position very little air is drawn in to the passenger compartment from outside. Do not, however, leave the lever in this position for more than 10-15 minutes, since hardly any fresh air is being supplied.
Regulate the temperature with the temperature control lever.
 pg. 24 Audio Cassette/Tuner controls and indicators
file:///K|/ownersdocs/1986/1986_740/86740_01.htm (24 of 25)12/30/2006 7:51:28 AM
1986 Volvo 740 GL, GLE, Turbo
The diagram above identifies the controls and indicators for Audio/Cassette Tuner TD-3141.
For complete operating instructions, maintenance guidelines, and specifications, please consult your Audio Cassette/Tuner Instruction Booklet. The Booklet also contains information on radio reception and the radio antenna.
Contents | Top of Page
file:///K|/ownersdocs/1986/1986_740/86740_01.htm (25 of 25)12/30/2006 7:51:28 AM
1986 Volvo 740 GL, GLE, Turbo
1 9 8 6 VOLVO
740 GL, GLE, Turbo
 Body and interior
 pg. 25 Body and interior
The seats, seat belts, doors, etc. are described on the following pages.
Rear-view/side-view mirrors |
26 |
Interior light, sun roof |
27 |
Front seats |
28 |
Child safety |
29 |
Seat belts |
30 |
Doors and locks |
32 |
Trunk, long load storage |
34 |
Hood |
35 |
Passenger compartment, storage spaces |
36 |
Station wagon tailgate, storage spaces |
37 |
Folding rear seat (wagon) |
39 |
Cargo space lighting, spare tire, jack (wagon) 41
 pg. 26 Rear/side-view mirrors, Make-up mirror
file:///K|/ownersdocs/1986/1986_740/86740_02.htm (1 of 22)12/30/2006 7:51:29 AM
1986 Volvo 740 GL, GLE, Turbo
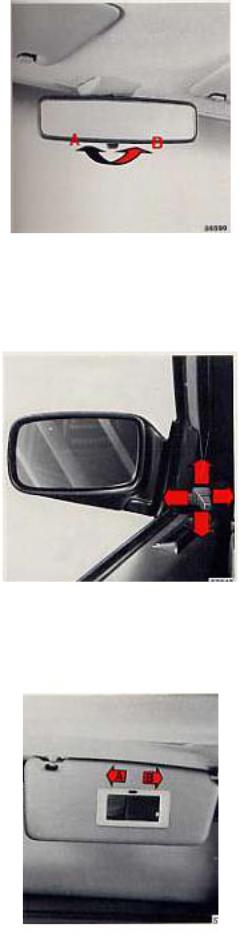
Rear-view mirror
A Normal position
B Night position, reduces glare from following headlights
Side-view mirrors
Use the lever to adjust.
file:///K|/ownersdocs/1986/1986_740/86740_02.htm (2 of 22)12/30/2006 7:51:29 AM
 Loading...