

English
ENTER
ENTER
ENTER
ENTER
MUTE
SOURCE
CD4402, CD4502
CD4802, CR4402
User manual
Mode d’emploi
Bedienungsanleitung
Gebruiksaanwijzing
Istruzioni d’uso
Instrucciones de manejo
Modo de emprego
Bruksanvisning
Betjeningsvejledning
Käyttöohje
Français
Deutsch
Nederlands
Italiano
Español
Português
Svenska
Dansk
Suomi
www.vdodayton.com
ENTER
ENTER
ENTER
ENTER
MUTE
MUTE
SOURCE
Key
Mute the selected source
MAIN MENU...
SOURCE
Key
SOURCE MENU...
ANNOUNCE MENU...
ENTER
Key in TUNER source
TUNER MENU...
TUNER INIT MENU...
ENTER
Key in CD or MP3 source
CD MENU...
Scan Time
Chimes set
Nav
Tuner
RDSmem Dyn
SAM
Band
Scan preset
SAM
Scan type
Intro scan
Logic
TA Volume
Nav lvl
CD/Tape/MP3
TMC
Start AST
Tuning
Search lvl
CD name
Auxiliary
Phone
SDVC type
CDC
Traffic
Start memo
Name
Tuner
Del name
Warn. LED
Phone lvl
Brightness
Auxiliary
News
PTY search
Save in
Compress
Chimes lvl
Phone Vol.
Install
DAB
Optimize
AF
Tuner Init
Repeat
ENTER
Key in TAPE source
ENTER
Key in DAB source
DAB MENU...
TAPE MENU...
Random
Intro scan
Band
Save in
SAM
Dolby Nr
Learn
SAM
SAM
PTY search
Store PAD
Recall PAD
SOUNDSOUND Key
Loudness
SOUND MENU...
EQ Style
SOUND INIT
MENU...
Balance
Fader
Loud Low
Customize
Bass
Treble
Subwfr vol
Sound Setup
Loud High
Bass Freq.
Treb Freq.
Leveller
Subwoofer
Sub ampli Auto EQ
COMPUTERCOMPUTER Key
CAR COMPUT
MENU...
COMP. INIT MENU...
Clock
Speed (unit)
Time
Set hour
Reset
Battery
Temperat.
Comp. Init
Set minutes
Clock type
Temp. Units
Frost Warn.
Spd Units
Speed Warn.
Dist. (unit)
Clock mode
Trip Warn. Bat. Warn.
Info Line Spd Calib.
PDC Calib.
DISPLAYDISPLAY Key
Animations
Analyser 2 Scrn Saver Trigger
SAM
Sound Reset
SAM
ANIMATION MENU...
Display infos
Analyser 1
DSC Style
SAM
D1
9
10
13
15
D2
C1, C2, C3, D1 and D2 connectors
are accessories sold separately
(see your dealer).
JIN brackets are sold separately
(see your dealer).
.
B'
A'
C1'
C2'
C3'
A
B
F
F
C1
C2 C3
A
B
C
F
1
2
3
4
5
6
7
8
9
10
11
12
13
14
15
16
17
18
19
20
D1
11
12
13
14
15
16
123
456
7
8
123
456
7
8
D2
21
25
26
22
232427
28
DINDIN
JINJIN
4
3
11 12
1
2
+12V
SDVC
+12V
10A
!
A
3
R R
R L
F L
F R
B
+ -+ -
+ -+ -
+ -+ - + -+ -
or
not used +
5
PDC
Subwoofer
FL
FL
FRFR
RLRL
RRRR
FRFR
FLFL
RLRL
Subwoofer
C2
4
C1
remote
control
temp.
sensor
6
CDC
C3
DAB
7
D1
telephone
subwoofer
8
D2
nav
SELECT MODE
Recall RDS Program
aux IN
2
1
2
3
1
1
8
10
4
9
65 11
2
3
7
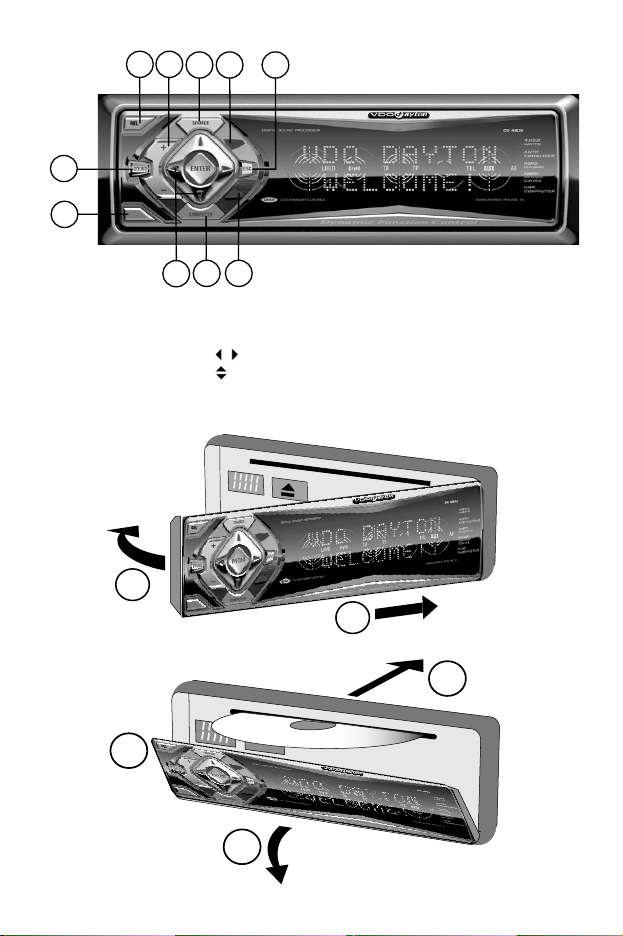
1 - POWER
2 - REL
3 - + / 4 -
5 - SOURCE
6 - DISPLAY
7 - ENTER
8 - SOUND
9 - COMPUTER
10 - MUTE
11 - ESC

SOUNDSOUND Key
Loudness
SOUND MENU...
EQ Style
SOUND INIT
MENU...
Balance
Fader
Loud Low
Customize
Bass
Treble
Subwfr vol
Sound Setup
Loud High
Bass Freq.
Treb Freq.
Leveller
Subwoofer
Sub ampli Auto EQ
COMPUTERCOMPUTER Key
CAR COMPUT
MENU...
COMP. INIT MENU...
Clock
Speed (unit)
Time
Set hour
Reset
Battery
Temperat.
Comp. Init
Set minutes
Clock type
Temp. Units
Frost Warn.
Spd Units
Speed Warn.
Dist. (unit)
Clock mode
Trip Warn. Bat. Warn.
Info Line Spd Calib.
PDC Calib.
DISPLAYDISPLAY Key
Animations
Analyser 2 Scrn Saver Trigger
SAM
Sound Reset
SAM
ANIMATION MENU...
Display infos
Analyser 1
DSC Style
SAM
D1
9
10
13
15
D2
C1, C2, C3, D1 and D2 connectors
are accessories sold separately
(see your dealer).
JIN brackets are sold separately
(see your dealer).
.
B'
A'
C1'
C2'
C3'
A
B
F
F
C1
C2 C3
A
B
C
F
1
2
3
4
5
6
7
8
9
10
11
12
13
14
15
16
17
18
19
20
D1
11
12
13
14
15
16
123
456
7
8
123
456
7
8
D2
21
25
26
22
232427
28
DINDIN
JINJIN
4
3
11 12
1
2
+12V
SDVC
+12V
10A
!
A
3
R R
R L
F L
F R
B
+ -+ -
+ -+ -
+ -+ - + -+ -
or
not used +
5
PDC
Subwoofer
FL
FL
FRFR
RLRL
RRRR
FRFR
FLFL
RLRL
Subwoofer
C2
4
C1
remote
control
temp.
sensor
6
CDC
C3
DAB
7
D1
telephone
subwoofer
8
D2
nav
SELECT MODE
Recall RDS Program
aux IN
D1
9
10
13
15
D2
C1, C2, C3, D1 and D2 connectors
are accessories sold separately
(see your dealer).
JIN brackets are sold separately
(see your dealer).
.
B'
A'
C1'
C2'
C3'
A
B
F
F
C1
C2 C3
A
B
C
F
1
2
3
4
5
6
7
8
9
10
11
12
13
14
15
16
17
18
19
20
D1
11
12
13
14
15
16
123
456
7
8
123
456
7
8
D2
21
25
26
22
232427
28
DINDIN
JINJIN
4
3
11 12
1
2
+12V
SDVC
+12V
10A
!
A
3
R R
R L
F L
F R
B
+ -+ -
+ -+ -
+ -+ - + -+ -
or
not used +
5
PDC
Subwoofer
FL
FL
FRFR
RLRL
RRRR
FRFR
FLFL
RLRL
Subwoofer
C2
4
C1
remote
control
temp.
sensor
6
CDC
C3
DAB
7
D1
telephone
subwoofer
8
D2
nav
SELECT MODE
Recall RDS Program
aux IN

INTRODUCTION
BEFORE STAR
Thank you for purchasing this VDO-DAYTON
product which has been designed and
manufactured according to applicable Safety
Regulations, following the highest standards
and subjected to rigorous testing.
Please familiarise yourself with the device by
reading carefully this instruction manual.
Use the device as intended, then keep this
manual handy in your car for future reference.
Environment
This booklet is printed on low-chlorine
recyclable paper.
Using the Radio Interface
This set is easy to operate with few control
elements and a clearly structured menu.
For use, this VDO-DAYTON set allows:
1- 6 keys to reach the menus (see keys and
corresponding menus in the cover front).
2- keys to reach the function inside the
menus or sub-menus.
3- keys to select a value for the pre-
viously chosen function.
4-
+/- keys to increase/decrease the volume.
5- ESC key to escape the function or to
validate the option modified value.
By either a short or long press on the six first
keys, you get different menus described in the
front and back cover pages.
CONTENTS
Introduction . . . . . . . . . . . . . . . . . .1
Before starting . . . . . . . . . . . . . . . . . . . .1
Contents . . . . . . . . . . . . . . . . . . . . . . . .1
General Information . . . . . . . . . . . .2
Installation . . . . . . . . . . . . . . . . . . .2
Preparation . . . . . . . . . . . . . . . . . . . . . . .2
Connectors . . . . . . . . . . . . . . . . . . . . . . .2
Mounting . . . . . . . . . . . . . . . . . . . .4
TING
Metal Sleeve . . . . . . . . . . . . . . . . . . . . . .4
Car Radio . . . . . . . . . . . . . . . . . . . . . . . .4
Equipments . . . . . . . . . . . . . . . . . . . . . . .5
Security . . . . . . . . . . . . . . . . . . . . . .6
Front . . . . . . . . . . . . . . . . . . . . . . . . . . .6
Warnings . . . . . . . . . . . . . . . . . . . . . . . .6
Identification Number . . . . . . . . . . . . . . .6
Configuration . . . . . . . . . . . . . . . . .6
Precautions . . . . . . . . . . . . . . . . . . .7
Main Functions . . . . . . . . . . . . . . . .8
Main Menu . . . . . . . . . . . . . . . . . . .8
Tuner . . . . . . . . . . . . . . . . . . . . . . .10
Tuner Menu . . . . . . . . . . . . . . . . . . . . .10
Tuner Initialisation Menu . . . . . . . . . . . .12
CD, CDC or MP3 Player* . . . . . . . .13
CD/MP3 Menu . . . . . . . . . . . . . . . . . . .14
Tape* . . . . . . . . . . . . . . . . . . . . . . .15
Tape Menu . . . . . . . . . . . . . . . . . . . . . .16
DAB* / ** . . . . . . . . . . . . . . . . . . .16
DAB Menu . . . . . . . . . . . . . . . . . . . . . .16
Audio . . . . . . . . . . . . . . . . . . . . . . .17
Sound Menu . . . . . . . . . . . . . . . . . . . . .17
Sound INIT Menu . . . . . . . . . . . . . . . . .19
Car Computer . . . . . . . . . . . . . . . .20
Car Computer Menu . . . . . . . . . . . . . . .20
Car Computer Initialisation . . . . . . . . . . .21
Announcements . . . . . . . . . . . . . .22
Animations . . . . . . . . . . . . . . . . . .23
Setting Values . . . . . . . . . . . . . . . .25
Accessories* . . . . . . . . . . . . . . . . .28
Abbreviations . . . . . . . . . . . . . . . .28
Trouble-Shooting . . . . . . . . . . . . . .28
Radio Reference . . . . . . . . . . . . . .30
Index . . . . . . . . . . . . . . . . . . . . . . .30
English
1

!
GENERAL INFORMATION
INSTALLATION
With this VDO-DAYTON set, you have a highperformance car radio which can be connected to various accessories to empower the
functionality of your system.
RDS
The RDS (Radio Data System) system uses a
sub-frequency from the FM band to transmit
information. This car radio uses the RDS information to offer you:
1- Display of the station-name,
2- Station selection according to programme
type (PTY),
3- Automatic retuning to best Alternative
frequency (AF) for the same programme,
4- Listening to Traffic Announcements (TA),
news bulletins and alarm messages.
TMC*
Thanks to the RDS, the TMC (Traffic Message
Channel) transmits data to the navigation
system which will display these Traffic
Announcements (TA): so, you will be informed about all traffic situations.
Note
: TMC is not yet available in all countries
& not supported by all RDS broadcasters.
DAB**
The DAB (Digital Audio Broadcasting) provides you the ultimate in radio reception (CD
quality and additional services) thanks to a
dynamic switch algorithm between DAB and
equivalent FM RDS station.
Depending on the services level, the radio
shows you radiotext information thanks to
Program Associated Data (PAD).
If your car is fitted with fully ISO connectors,
you can directly install the car radio.
If your car's connectors comply with other
standards, see your dealer to obtain specific
adapter cables (see figures in the installation
card) then carry out the installation yourself
(see PREPARATION).
Note
: Ensure that the cables cannot be
damaged by sharp edges or moving parts.
PREP
ARATION
The device must be connected to a 12V DC
electrical system with a negative terminal
earth (car chassis).
Warning: Installation that does
not conform to these
requirements may result in
malfunction, damage or fire!
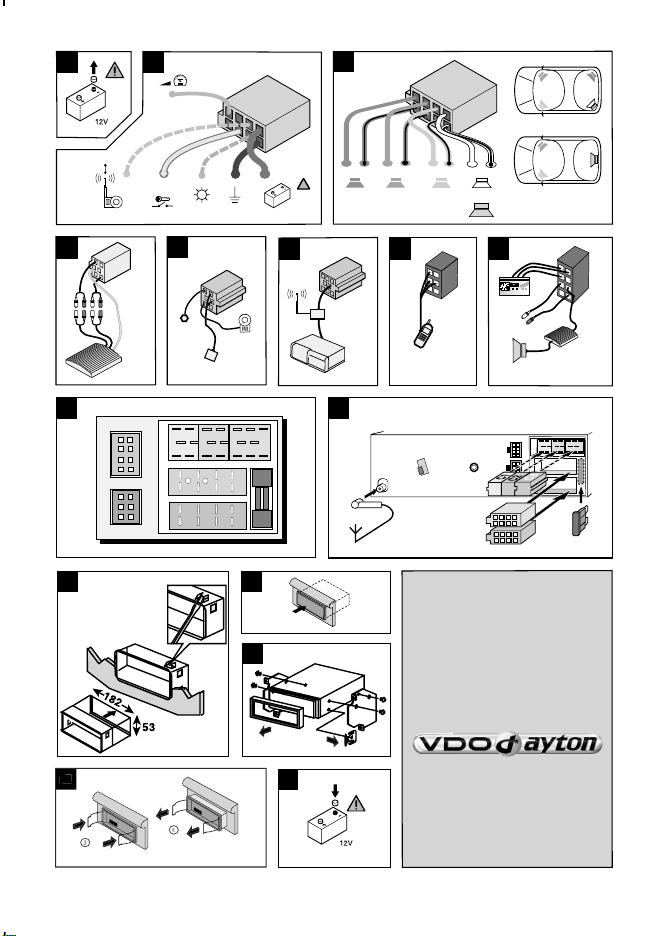
To avoid the risk of a short circuit during installation, disconnect the negative terminal of
the battery until the set has been securely
installed and connected.
(see Installation card Fig.1).
CONNECTORS
Connector A
(see Fig.2)
a-Power Supply
1- Brown wire A8: connect to an earthing
point on the car chassis.
2- Red wire A7: connect to a permanent 12V
supply, main power supply for the set.
Ensure that this connection can handle a
current of 10A.
3- Yellow/orange wire A4: connect to the
switched 12V supply of the ignition.
Note
: The ON/OFF logic function exists only
with a A7 wire for permanent voltage.
* Depending on radio reference: see table at the end.
** For this accessory, see your dealer.
2

b-Optional connections
!
!
Electronic or Motorised Antenna
Connect to pin A5 the power supply for an
electronic antenna or the control wire for the
relay of an automatic motorised antenna. Use
the small connector supplied.
Note 11
: Do not use this connection for direct
power supply to the antenna motor.
Note 22
: Use passive antenna with long wire:
some antennas may create waveband reception problems.
Pilot Light
When the car headlights are switched on, the
control key lighting remains on even when
the car radio is switched off.
Connect pin A6 to the dashboard wiring,
using the small connector provided.
SDVC and Speed Warning
The SDVC (Speed Dependent Volume Control) automatically increases or decreases the
volume according to the speed of the car. The
speed limit warning can be used to indicate
that you have exceeded a given speed.
Connect pin A1 to a signal from the speedometer (some cars are already prepared: e.g.
some VW and Vauxhall/Opel models). Please
contact your dealer for this point.
If not, use a more detailed installation requiring extra equipment: this must be accomplished by a technician, familiar with mechanical
and electrical car systems, to accomplish this
task. After connection, see CONFIGURATION.
Connector B
This connector is used to connect the four
loudspeakers: left and right fronts, left and
right rears (see Fig.3)
Warning: Do not connect any
loudspeaker leads to earth or
directly to a booster / amplifier
or via an external fader (unless
equipped to receive such an
high level input) !
The four loudspeakers should be connected
as follows:
Front Rear
Right (+) Grey wire B3 Blue wire B1
Right (-) Grey/black Blue/black
wire B4 wire B2
Left (+) Green wire B5 White wire B7
Left (-) Green/black White/black
wire B6 wire B8
Connector C
These specific set connectors
belong to accessories sold
separately (see your dealer)
a-Yellow Connector C1
Cables used for line out (see Fig.4).
You can connect a power amplifier with 2 or
4 additional loudspeakers or a subwoofer to
this set using the RCA cable.
1- Use the red socket to connect right chan-
nel and white socket, left channel.
2- Use the blue wire (Pin 6) to connect a
remote amplifier.
b-Green Connector C2
Cables used for Car Computer control (car
Park Distance Control, temperature sensor,
wired remote control) (see Fig.5).
Temperature Sensor
You can connect a temperature sensor to the
Pin 7 that will automatically give you a visual
and audible signal when the outside temperature drops below 3°C. Use the Car Computer
menu to display the temperature.
Warning: The temperature sensor is only an aid and cannot be
used to determine exact road
conditions. You are entirely responsible for deciding whether it
is prudent to continue driving.
PDC
Use the Pin 10 (Input) and Pin 12 (Output) to
connect the car Park Distance Control.
English
3

Wired Remote Control
Use the Pins 8 & 9 to connect remote control
accessories.
c-Blue Connector C3
Cable used for separately available CD changer (see Fig.6).
Note
: The set only accept CD changer and
DAB box with digital output (see CD changer
installation).
Connector D
These specific set connectors
belong to accessories sold
separately (see your dealer)
a-Connector D1
This connector is used to connect your telephone to the set (see Fig.7)
Telephone In
Use these inputs (Pins 12 & 14) to connect the
audio output from your mobile phone for
amplifying the sound through the speakers.
Telephone supply
Use this Pin 13 to connect your car kit and
have a permanent supply for it.
Telephone Mute
Use this input (Pin 15) to connect your telephone.
Note
: Before using your telephone, set the
phone system and configure its appropriate
detection level in the Main Menu.
Telephone Remote
Use this input (Pin 16) to connect your remote
telephone accessory which activate or not the
radio car kit (radio On/Off).
b-Connector D2
This connector is used to connect the audio
interface for external equipments as navigation system, subwoofer and traffic messages
channel (see Fig.8).
Navigation Interface
Use the Navigation interfaces (Pins 21 & 25)
to transmit TMC data to your VDO-DAYTON
Navigation system.
Output Subwoofer Amplifier
Use these interfaces (Pins 22 & 23) to connect
a subwoofer amplifier.
Note
: Before using the subwoofer, you need
to switch it ON and select its low frequency
threshold in the Sound Init Menu, and adjust
its volume in the Sound Menu.
Audio In
Use these inputs (Pins 24, 27 & 28) to connect
others auxiliary audio equipments.
Navigation mute
Use this input (Pin 26) to connect your navigation system.
Note
: Before using your navigation system,
you need to set the navigation system and to
configure its appropriate detection level in the
Main Menu.
MOUNTING
MET
AL SLEEVE
1- Insert the metal sleeve in the opening
(182x53mm) of the car dashboard or console (See Installation card, Fig.11).
For CD Player optimal performance, the
metal sleeve must be positioned within
limits shown: angle between 0° to +20°.
2- Fix the sleeve by pushing the metal tags
outwards with a screwdriver (see Fig.11).
CAR RADIO
Connecting the radio
(See Fig.9 and Fig.10)
1- Check that the battery is disconnected.
4

2- Insert antenna connector E in the antenna
!
socket (good reception is only possible
with a good antenna) : use the antenna
adapter if necessary. Use the J hook on
the back of the set to secure fixing.
3- Insert the power supply connector in
socket A7.
4- Insert the loudspeakers connectors in so-
cket B (B1 to B8).
· (optional) Remove the protective cover
from socket C.
· (optional) Insert the yellow line-out
connector in socket C1.
· (optional) Insert the blue connector for
the CDC or DAB in socket C3.
· (optional) Insert the green connector in
socket C2. The green connector fits
between yellow connector C1 and blue
connector C3. You need at least one of
these connections to keep C2 in place.
Mounting a DIN radio
(See Fig.12)
1- Slide the radio into the metal sleeve until
the springs on either side snap into the
sleeve openings.
2- Reconnect the negative terminal of the
car battery (see Fig.15): the installation is
now complete.
Note
: The buffer mounting, directly mounted
on the back side allows safety tenure.
Mounting a JIN radio**
(See Fig.13)
1- Remove the frame front of your radio.
2- Insert your radio through the back side of
the dashboard until the brackets on either
side fit with the screw holes..
3- Screw both side of your car radio with the
M5 x 6 mm max. length screws.
4- Mount the frame front.
5- Reconnect the negative terminal of the
car battery (see Fig.15): the installation is
now complete.
Removing the radio
(see Fig.14)
You can unlock the radio using the two left
and right U-brackets provided.
1- Check that the battery is disconnected.
2- Remove the front.
3- Insert each well positioned U-bracket in its
corresponding side socket until they lock.
4- Remove the radio from the metal sleeve.
Warning: When mounting or
removing the radio, handle
carefully the connectors
to avoid damages.
EQUIPMENTS
(see list of accessories at the end)
Replacing the fuse
1- Remove the fuse F from the connector
block at the rear of the radio.
2- Replace it with a new 10A blade-type fuse
Note 11
: The new fuse must be of same value
and same type, otherwise the set will not be
adequately protected.
Note 22
: If you do not follow this procedure,
you risk damaging the set which invalidate
the guarantee.
Suppressing Interference
Most modern cars have adequate interference suppression. If you experience interference, consult your garage.
Using Remote Control**
As an accessory, you can use two types of
infrared to remote control your set:
1- Credit Card Format.
2- Steering Wheel.
Installing an external amplifier
You can use the subwoofer output (Connector D2) to connect an external amplifier:
set this equipment in the Sound Init Menu.
English
** For this accessory, see your dealer
5

Installing a subwoofer
!
As a major element of your sound reproduction system, you can install a subwoofer.
Two main configurations are offered:
1- Without an external amplifier (see Fig.3):
a/ Connect the subwoofer speaker on B
(Pins 7 and 8: Rear left) then set ON the
subwoofer amplifier in the Sound Init
Menu.
b/ Select a low frequency threshold in the
Sound Init Menu: 40 or 80 Hz.
Note
: In this case, the loudspeaker Rear right
is switched OFF.
2- With an external amplifier (see Fig.8):
a/ connect the subwoofer speaker on an
external amplifier, then connect this one
on D2 (Pin 23: subwoofer output).
b/ set OFF the subwoofer amplifier in the
Sound Init Menu.
c/ Select a low frequency threshold in the
Sound Init Menu: 40 or 80 Hz.
Note 11
: Before using the subwoofer, you can
adjust its volume in the Sound Menu.
Note 22
: In this case, you keep independent the
four loudspeakers switched ON in B.
SECURITY
Replacing the front
1- Put the right side whole of the front into
the socket of the set.
2- Push the left side of the front into place
until it clicks into position.
Note 11
: If you hear a warning signal, the front
is not properly replace.
Note 22
: To ensure good connection between
the set and the detachable unit, it is advisable
to clean carefully the connections with a
cotton swab from time to time.
W
ARNINGS
Warning LED
When the engine is switched off and the front
is removed, the warning LED flashes.
You can switch off the warning LED (see Main
menu, Warning LED function).
Security Warning Stickers
Stick the Security Warning stickers provided
on the windows of your car.
IDENTIFICATION NUMBER
The set has a unique identification number
shown on the security card (see separate installation card).
Warning: Do not leave the Secu-
rity Card in your car. This one will
prove your owner-ship if the set
is stolen, the front lost or if the
set requires after-sales service.
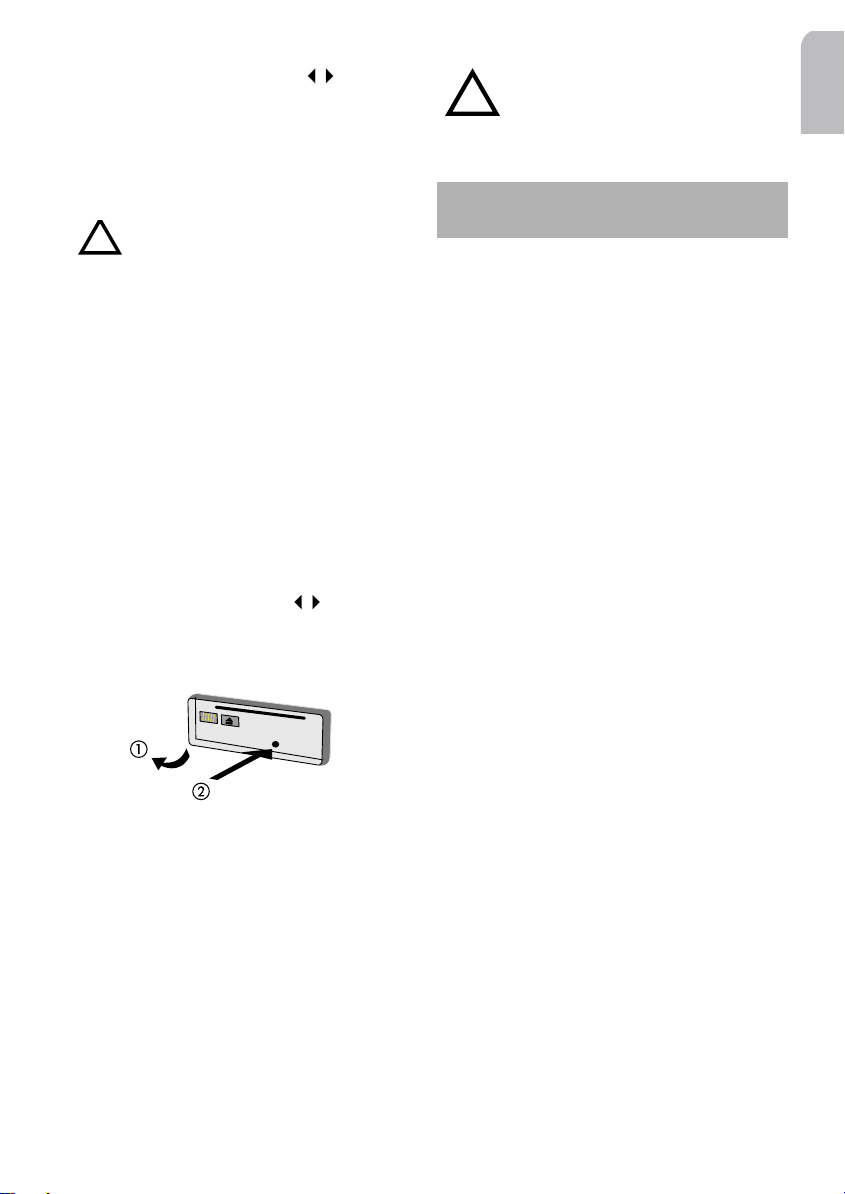
FRONT
Removing the front
1- Press the REL key.
2- Pull the front towards you.
3- Take the detachable front with you when
you leave the car.
4- Keep the front in its protective cover.
Note
: if you leave the front when you leave
the car, the set will beep 10 seconds after
removal of the ignition key.
6
CONFIGURATION
Calibrating the Speed
Use this function to manually calibrate the
speed value according to current car speed.
1- Switch ON the motor of your car with the
contact key.
2- Switch ON the car radio.
3- While the car is stopped, long press on the
COMPUTER key.
4- Select SPD CALIB. with the keys.
!
!
5- Press ENTER to calibrate the set: a short
message is displayed.
6- After having launched this calibration,
drive to 30 miles.
7- Press ENTER to validate the speed.
Warning: Pay attention to the
local traffic regulations.
8- A message warns you if the calibration is
successful or failed: the SDVC level value
is set to 3 (see Sound menu).
Note
: If you want to abort the calibration
before reaching the speed, press ESC.
Calibrating the Auto Equalizer
This function measures the frequency curves
of the speakers and adjust the settings for
optimal reproduction by compensating the
weak areas of the car acoustic spectrum.
Those settings (a 5-bands curve for each speaker) are stored in non-volatile memory.
1- Long press the SOUND button.
2- Select AUTO EQ with the keys.
3- Press ENTER.
4- Remove the front.
Warning: In case, you have connected a subwoofer to your installation,
deconnect this one before launching
the calibration process.
PRECAUTIONS
Caring the SET
If any solid objects or liquid fall into the unit,
unplu it and have it checked by qualified
personnel before operating it any further.
Caring the CD
- Avoid making fingerprints on the disc
when you handle it.
- Store the disc in its box immediately after
ejecting it, to avoid dust and damage to
the surface.
- Do not expose discs to heat or sunlight.
Caring the TAPE
- Use only good quality cassettes (60 or 90
mn), as chromium dioxide cassettes.
- Replace cassettes in their boxes imme-
diately after use to protect them from
dust and dirt and prevent the tapes from
unwinding.
- Never expose cassettes to heat, direct
sunlight or moisture.
- Clean the head once or twice a month
using a wet-tape cleaning cassette.
English
5- Insert the microphone in the socket.
6- Position the microphone at the place you
want to listen to the radio.
A series of high beeps advise you to leave the
vehicle before the calibration starts. When the
autoequalization is complete, the set will
switch Off automatically: the EQ Style is
automatically set to Auto EQ.
Note
: To be successful, the auto-equalization
acquisition needs 2 or 4 speakers to be connected (direct or via an amplifier).
Caring the road
Do not use the telephone while driving, because it may create a traffic hazard. It is also
illegal in some areas.
Caring the others
Keep the volume at a moderate level. This will
allow you to hear outside sounds and to be
considerate to the people around you.
7

MAIN FUNCTIONS
Switching On/Off
Press POWER to switch the set ON or OFF.
Note
: If you turn OFF the contact key and you
leave your car without switching OFF your car
radio, this one will switch OFF automatically.
Selecting a source
Your car radio is designed for different types
of sources You can select them by a short
press on the SOURCE key.
Press the SOURCE key to display and select
the source you want to play.
- DAB*: ,
- Tuner (radio): ,
- CD/Tape: ,
- CD Changer (CDC): ,
- Auxiliary: .
Note 11
: When a source is ON, its correspon-
ding icon is highlighted on the front.
Note 22
: The sound options (Volume, Balance,
Fader, Subwoofer and auto-equalization) are
the same for all sources.
Controlling the volume
a-Volume
Use the keys
volume automatically increases or decreases if
the SDVC connection has been installed and
selected (see Installation).
Note
: Make sure that you can always hear the
traffic (horns, sirens, etc.).
b-Mute
1- Press MUTE, to mute the audio system.
2- Press MUTE again if you want to restore
the last audio source heard.
Note 11
events can occur: Announcements (Traffic,
News, Navigation), Telephone calls, Alarms.
+/- to adjust the volume: the
: In this state, the following audible
Note 22
: Some cars, mobile phones or navi-
gation system can automatically interrupt the
audio output if they are linked to the set.
c-Wake up
The car radio can be used as an intermediate
system by other devices (telephone input) to
reproduce audio via the vehicles build-in
speakers. So, the telephone is able to wake
up the radio when a call occurs.
Displaying Source Informations
Short press on the DISPLAY key to display
informations (track, time, info line, etc.) about
the chosen source (Tape, CD, CDC, DAB).
MAIN MENU
The main menu allows you to configure the
main options of your car radio.
1- Long press the MUTE key to get the MAIN
INIT MENU (see options in cover pages).
2- Use the keys to select an option.
3- Use the keys to set the option value.
4- Press ESC to enter the value.
Defining the Scan Time
With this function, you can define the time
before jumping to the next station (Tuner,
DAB) or track (CD, CDC, tape).
1- Long press MUTE.
2- Select SCAN TIME using the keys.
3- Use the keys, to select a number of
seconds (10s by default).
4- Press ESC to enter the value.
Using radio when not running
This function allows the use of the car radio
when the vehicle is not running (only if the A7
wire is connected to a permanent supply).
1- Long press MUTE.
2- Select LOGIC with the keys.
* Depending on radio reference: see table at the end
8

3- Use the keys, to select ON (default va-
lue) or OFF.
4- Press ESC to enter the value.
Note
: The set will turn OFF after 1 hour or if
the battery voltage becomes < 9 volts.
Setting an Auxiliary Equipment
This function enables or disables an auxiliary
device connected to the set.
1- Long press MUTE.
2- Select AUXILIARY using the keys.
3- Use the keys, to select ON (default va-
lue) or OFF.
4- Press ESC to enter the value.
Switching the Warning LED
This function enables/disables the blinking
LED (contact Off or remove front).
1- Long press MUTE.
2- Select WARN LED using the keys.
3- Use the keys, to select ON (default
value) or OFF.
4- Press ESC to enter the value.
Setting the Chimes Audio Level
This function allows you to set the chimes
audio level.
1- Long press MUTE.
2- Select CHIMES LVL with the keys.
3- Use the keys, to select a value between
1 and 5 (2=default value).
4- Press ESC to enter the value.
Note
: Chimes bleeps are priority audible
effects even in “mute” state.
Selecting Chimes
This function allows you to select pre-recorded chimes for audible system feedback.
1- Long press MUTE.
2- Select CHIMES SET with the keys.
3- Short press ENTER to get the chimes menu
4- Use the keys, to select a chime type:
keypress, confirmation, announcement, warning, errors, welcome, by-by or car intrusion.
5- Use the keys to select a bleep which
will be associated to the previously selec-
ted chime type.
6- Press ESC to enter the value.
Setting the Message Audio Level
This function allows you to adapt the
messages audio level.
1- Long press MUTE.
2- Select TA VOLUME with the keys.
3- Use the keys, to select a value.
4- Press ESC to enter the value.
Setting a Phone Equipment
This function enables/disables the phone
detection for the car radio.
1- Long press MUTE.
2- Select PHONE with the keys.
3- Use the keys, to select NO (default
value), Mute or IN.
4- Press ESC to enter the value.
Note
: Set to IN if the Tel audio is connected to
the Tel IN wire. In same case, you need to set
the phone detection level (see dealer).
Setting the Phone Detection Level
This function allows to configure the phone
message detection level (Tel mute wire).
1- Long press MUTE.
2- Select PHONE LVL with the keys.
3- Use the keys, to select LOW (default
value) or HIGH.
4- Press ESC to enter the value.
Note
: You need to select the value according to the
connected equipment (telephone, loudspeakers).
Setting the Phone Volume
This source independent function adjusts the
phone level between its min. and max. value
(-30 to +30).
1- Short press MUTE.
2- Select PHONE VOL with the keys.
3- Use the keys to select a value (0 equal
the default value).
4- Press ESC to enter the value.
English
9

Setting a Navigation System
This function enables/disables the navigation
messages detection for the car radio.
1- Long press MUTE.
2- Select NAV with the keys.
3- Use the keys, to select NO (default
value), Mute or IN.
4- Press ESC to enter the value.
Note
: Set to IN if the Nav audio is connected
to the audio IN wires. In same case, you need
to set the navigation detection level (see your
dealer to fill in the next option).
Setting Navigation Detect Level
This function allows to configure the navigation message detection level (Nav mute wire).
1- Long press MUTE.
2- Select NAV LVL with the keys.
3- Use the keys, to select LOW (default
value) or HIGH.
4- Press ESC to enter the value.
Note
: You need to select the value according
to the type of the connected equipment.
Setting the SDVC
This function allows you to switch Off the
SDVC or to select one of the five curves in
order to adjust the sensibility of the volume
control related to the car speed.
1- Long press MUTE.
2- Select SDVC TYPE with the keys.
3- Use the keys, to set Off, curve 1, curve
2, curve 3, curve 4 or curve 5.
4- Press ESC to enter the value.
Note 11
: It is better to set this function after
calibrating the speed (see Configuration):
otherwise SDVC will be without calibration.
Note 22
: You choose a SDVC curve according
to the state of your environment noise.
Setting the Light Display Brightness
This source independent function adjusts the
brightness of light display between its min.
and max. value (1 to 10).
1- Long press MUTE.
2- Select BRIGHTNESS with the arrows.
3- Use the arrows to select a value.
4- Press ESC to enter the value.
Launching Loudspeakers Installation
Use this function to verify the installation of
your loudspeakers.
1- Short press ENTER.
2- Select INSTALL with the keys.
3- Press ENTER to launch the function: a
beep is emitted for each well installed
loudspeaker.
4- Switch OFF/ON the set.
TUNER
You can set the radio stations options after
selecting the tuner source. Then by either a
short or long press on ENTER, you get two
different tuner menus (see cover pages).
Search Left/Search Right
Use the keys to scroll through the selected waveband.
Search Up/Search Down
Use the keys to scroll through the memorised stations list of the waveband.
TUNER MENU
1- Press the SOURCE key to select TUNER
2- Short press ENTER to get TUNER MENU.
3- Use the keys, to select an option.
4- Use the keys to set the option value.
5- Press ESC to enter the value.
Selecting a waveband
With this function, you can select a band in a
scrolling list.
1- Short press ENTER.
2- Select BAND with the keys.
10

3- Select the stations memorised in the pre-
sets with the keys:
- FM 1,2,3. Manual presets FM
- FM memo RDS alphabetical list
- FM AST Automatically stored FM
stations list
- MW 1,2,3. Manual presets MW
- MW AST Automatically stored
MW stations list
- LW Manual presets LM
- SW Manual presets SW
4- Press ESC to enter the value.
Note
: The stations in FM memo are only
stations created and updated by RDS memo.
Storing automatically a station
You can automatically memorise the 10 most
powerful stations on FM and MW bands.
1- Short press ENTER.
2- Select BAND with the keys.
3- With the keys, select an FM or MW
band exclusively.
4- Use the keys to select START AST.
5- Press ENTER to memorize the station.
Note
: This function works only with selected
FM bands (FM 123, FM memo, FM AST) or
MW bands (MW 123, MW AST): you cannot
store stations from LW or SW bands.
Starting RDS Stations Memo
This function allows you to memorize up to
50 RDS stations from the FM band and to
display them in alphabetical order.
1- Short press ENTER.
2- Select BAND with the keys.
3- With the keys, select FM memo.
4- Use keys to select START MEMO.
5- Press ENTER to memorize the stations and
display them in alphabetical order.
Note
: This function only works with the selec-
ted band FM memo.
Searching a Program Type
It is possible to search for FM stations using
the PTY code (Programme TYpe).
This one gives you direct access to preselected
types of program (e.g. News, Affairs, etc).
1- Short press ENTER.
2- Select PTY SEARCH with the keys.
3- Use the keys to select the program type
required.
4- Press ENTER to launch the search. At the
end, you will hear a beep followed by the
first stations found.
Note
: PTY not yet operational in all countries.
Searching the best reception
When the AF function is activated, the set will
remain tuned to the current station but will
continue to search for the best received
frequency. Deactivate this function only if you
hear short interruptions.
1- Short press ENTER.
2- Select AF with the keys.
3- Use the keys, to set ON (default value)
or OFF.
4- Press ESC to enter the value.
Scanning Stations or Presets
This function allows you to scan the stations
or the presets (see Tuner Init menu: Selecting
the scanning type) of the current band.
1- Short press ENTER.
2- Select SCAN PRESET with the keys.
3- Press ENTER to launch the scan: a messa-
ge displays the stations.
Note
: Before starting this function, you need
to select the scanning type (see Tuner Init).
Setting the Tuning Mode
This function lets you define the tuning mode
for searching a station.
1- Short press ENTER.
2- Select TUNING with the keys.
3- Use the keys to select MANUAL or
AUTO (automatic: default value).
4- Press ESC to enter the value.
Note
: After one minute, the function auto-
matically returns in AUTO mode.
English
11

Naming a Radio Frequency
Use this function to name a radio frequency
with a maximum of 12 letters for each title:
this name will be displayed during playback.
1- Short press ENTER.
2- Select NAME with the keys.
3- Press ENTER to display an alphanumeric
list as typewriter.
4- Scroll through the letters with the
keys and use the keys to get the
upper-case letters, the lower-case letters,
the numbers or the symbols.
5- Press ENTER to display the character, and
repeat this operation for each character.
6- At the end of the word, select [ ].
7- Press ENTER to confirm the name.
Note 11
: The title is attributed when all charac-
ters and spaces are confirmed. If the memory
is full, the NAME function is no longer available: you have to delete a name.
Note 22
: To delete a character, select [] at
the beginning of the alphanumeric list and
press ENTER.
Saving a station in memory
You can save up to 30 stations on the FM and
MW wavebands and 10 stations on LW and
SW wavebands.
1- Short press ENTER.
2- Select SAVE IN with the keys.
3- Use the keys to select a memory
number.
4- Press ESC to enter the value.
Note
: It is not possible to manually save sta-
tions from the FM AST or MW AST bands.
Moving to the Tuner Init Menu
Use this function to directly move to the Tuner
Init Menu.
1- Short press ENTER.
2- Select TUNER INIT with the keys.
3- Press ENTER to get the tuner initialisation
menu (see next menu).
Note
: You can have access to this menu by
long pressing the ENTER key.
Moving to the Main Menu
Use this function to get the Main Menu.
1- Short press ENTER.
2- Select SAM with the keys.
3- Press ENTER to get the Main Menu.
TUNER INITIALISA
1- Press the SOURCE key to select TUNER
2- Long press ENTER to get the TUNER INIT
MENU (see options in cover page).
3- Use the keys to select an option.
4- Use the keys to set the option value.
5- Press ESC to enter the value.
TION MENU
Selecting the Scanning Type
On your current waveband and for a scan
time defined, you can select the scanning
type: stations or presets stations.
1- Long press ENTER.
2- Select SCAN TYPE with the keys.
3- Use the keys, to select:
- STATIONS to review all the stations on
the current waveband,
- PRESETS to review all the pre-selected
stations on the current waveband.
4- Press ESC to enter the value.
Note
: You can modify the scan time in the
Main menu.
Searching better Transmitter
With this function, the set can search for local
or distant transmitters for better reception of
the wavebands (in FM only).
1- Long press ENTER.
2- Select SEARCH LVL with the keys.
3- Use the keys to select:
- DISTANT (default value) for more powerful distant transmitters,
- LOCAL for lower-powered local stations.
4- Press ESC to enter the value.
Note
: After a while, the function returns to
Distant mode (default value).
12

Selecting the Continent Area
!
!
With this function, you can select the continent area for tuning.
1- Long press ENTER.
2- Select TUNER with the keys.
3- Use the keys to select the continent:
USA, EURO, ASIA.
4- Press ESC to enter the value.
CD, CDC OR MP3 PLAYER*
You can set the CD options after selecting the
CD source. Then by either a short or long
press on the ENTER key, you get two different
CD menus (see cover pages).
Note
: The CD Player uses 12 cm CD and can
read MP3 CD (only CD4802): in this case, you
get the MP3 menus.
Warning: Do not load damaged ,
exotic or unusually shaped CD.
Loading CD in the CD Player
1- Press REL to open the front.
2- Move completely down the front.
3- Insert the CD (label upwards) into the slot.
4- Close the front: the display shows CD
Player briefly, then the playback starts.
Warning: If you load a MP3 CD, it
may take one minute to read the
MP3 files before hearing music.
Note 11
: If the CD is already inserted, use the
SOURCE key to select CD.
Note 22
: During playback the screen shows
manually entered name of the disk (see TITLE
ENTRY paragraph), current track number and
elapsed time of the current track.
Note 33
: Some disks contain text data (song
titles, singer's name, etc.) which are displayed
on screen during playback*.
Note 44
: TA and NEWS announcements may
interrupt CD playback.
Ejecting CD from the CD Player
1- Press REL to open the front.
2- Press the key.
3- Close the front.
Note
: In eject error case, the CD is reloaded.
Loading CD in the CD changer
If a CD changer is connected, you can use the
following function (for more information
about the CD changer, see your dealer).
1- Check that the CD magazine is loaded.
2- Select CD CHANGER with the SOURCE
key: playback of the first CD begins.
3- Select the CD required with the keys:
the playback of the CD begins.
Note 11
: The Information is displayed on screen
as for the CD Player.
- If the magazine is not in place, the screen
displays INSERT MAG.
- If the magazine is empty, the screen displays
INSERT DISC.
Note 22
: TA and NEWS announcements may
interrupt CD playback.
Note 33
: At the end of the disc, the next disc is
automatically played : any disc missing from
the magazine is automatically disregarded.
Ejecting CD from the CD changer
1- Press OPEN to open the front.
2- Press the key.
3- Close the front.
Note
: In eject error case, the CD is reloaded.
Listening to MP3 files*
All VDO Dayton are ISO/DIN compliant, making them an easy fit in most dashboards.
So, you are able to listen to MP3 files burned
on a CD-R or CD-RW disc in ISO9660 format
(level 2, 32 characters), Mac or Linux.
English
* Depending on radio reference: see table at the end
13

The CD-MP3 supports:
1- Sampling frequency: 32 kHz, 44,1 kHz or
48 kHz.
2- Fixed bit rate as well as variable bit rates:
32 kbit/s to 320 kbit/s.
3- All channel modes (stereo, joint stereo,
dual and monaural).
4- 400 tracks per disc (250 files per dir., 250
dir. per CD, 8 levels of directory).
5- ID3 Tags (v1.1) to display titles and artists
names with 32 characters.
Note 11
: If a CD Player contains both CD audio
tracks & MP3 files, it only plays MP3 files.
Note 22
: If you use a multisession disc, the CD
Player will only play the first session.
The CD playing takes into account the random, scan, next, previous or repeat-track
settings.
It may be interrupted in different cases (set
switched off, announcement, audio mute,
source change).
In Normal mode, when the end of the album
is reached, the playing function continues
with the first track of the next album.
Previous/Next Track
(previous/next MP3 files*)
Press respectively the keys for previous
and next track (files for MP3).
Playback begins with the chosen track.
Previous/Next Disc
This function handles next or previous disc
(album for MP3) from the cartridge selection.
Press the respective the keys for previous
and next disc.
Fast Backward/Forward
Long press the respective the keys for fast
backward and fast forward.
Normal playback resumes when you press
ENTER or ESC.
Displaying CD Text*
Some discs can deliver CD text information:
track title and highlight scan information (disc
title only delivered for the first 20 tracks of the
current disc, and only the 20 first highlights).
Limitations: function only available for CD
4502 and CD 4802.
Changing Directory in MP3 CD*
1- Select a directory with the keys.
2- Playback begin on the first file in the
chosen directory.
CD/MP3 MENU
1- Press the SOURCE key to select the CD
2- Short press ENTER to get the CD MENU.
3- Use the keys to select an option.
4- Use the keys to set the option value.
5- Press ESC to enter the value.
Starting the Track Scanning
(MP3 Files scan*)
Use this function to activate the track scan for
listening the first few seconds of each track.
1- Short press ENTER.
2- Select INTRO SCAN with the keys.
3- Press ENTER to launch the scan: a mes-
sage displays the tracks.
Note
: You can set the number of seconds
sampled in the main menu.
Naming the CD
Use this function to name up to 50 CD with a
maximum of 12 letters in each title: this name
will appear on display during playback.
1- Short press ENTER.
2- Select CD NAME with the keys.
3- Press ENTER to display an alphanumeric
list as typewriter.
4- Scroll through the letters with the
keys and use the keys to get the
upper-case letters, the lower-case letters,
the numbers or the symbols.
5- Press ENTER to display the character, and
repeat this operation for each character.
* Depending on radio reference: see table at the end
14

6- At the end of the word, select [ ].
7- Press ENTER to confirm the name.
Note 11
: The title is attributed when all charac-
ters and spaces are confirmed. If the memory
is full, the CD NAME function is no longer
available: you have to delete a CD name.
Note 22
: To delete a character, select [] at
the beginning of the alphanumeric list and
press ENTER.
Deleting the CD name
1- Short press ENTER.
2- With the keys, select DEL NAME.
3- Use the keys, to select the name you
want to delete, then press ENTER.
Setting the Sound Compression
This function allows you to compress the
digital sound signal.
1- Short press ENTER.
2- With the keys,select COMPRESS
3- Use the keys to select the value: LOW,
MID, HIGH or OFF (default value).
4- Press ESC to enter the value.
Setting the Repeat Playback
(Repeat current MP3 Files*)
This function allows you to repeat the current
tracks of your CD.
1- Short press ENTER.
2- With the keys, select REPEAT.
3- Use the keys to set the value: ON to
activate, OFF to deactivate.
4- Press ESC to enter the value.
Moving to the Main Menu
Use this to directly move to the Main Menu.
1- Short press ENTER.
2- Select SAM with the keys.
3- Press ENTER to get the Main Menu.
TAPE*
You can set the tape options after selecting
the tape source. Then by either a short or long
press on the ENTER key, you get two different
tape menus (see cover pages).
Playback
1- Press REL to open the front.
2- Insert a cassette (open side to the right).
3- Close the front : the display shows TAPE
DECK and the playback begins.
Note 11
: If the cassette is already loaded, use
the SOURCE key to select TAPE.
Note 22
: TA and NEWS announcements may
interrupt cassette playback.
Changing Cassette Side
Use keys to change sides before the tape end.
Note
: When one side ends, playback of the
other side continues automatically.
Previous/Next Track
Press keys to reach previous or next track.
Note
: Sound is muted until the chosen track is
reached. The pause between tracks must be
at least 3 seconds.
English
Setting the Random Playback
(Random MP3 Files playback*)
This function allows you to playback
randomly the different tracks of your CD.
1- Short press ENTER.
2- With the keys, select RANDOM.
3- Use the keys to set the value: ON to
activate, OFF to deactivate.
4- Press ESC to enter the value.
* Depending on radio reference: see table at the end
Fast Rewind/Fast Forward
1- Long Press the keys for fast rewind or
2- Press ENTER or ESC to get the play-back:
Ejecting a cassette
1- Press REL to open the front.
2- Press the key.
fast forward.
the radio will switch on.
15

3- Remove the cassette and close the front.
Note
: In eject error case, the tape is reloaded.
DAB* / **
TAPE MENU
1- Press the SOURCE key to select TAPE.
2- Short press ENTER to get the TAPE MENU.
3- Use the keys to select an option.
4- Use the keys to set the option value.
5- Press ESC to enter the value.
Starting the Track Scanning
Track scan allows you to hear the first few
seconds of each track.
1- Press ENTER.
2- Select INTRO SCAN with the keys.
3- Press ENTER to launch the scan: a mes-
sage displays the tracks.
Note
: You can set the number of seconds
sampled (see Main Menu).
Setting Noise Reduction System
The Dolby B NR system can only be activated if the recorded cassette uses this process.
1- Press ENTER.
2- Select DOLBY NR with the keys.
3- Select ON or OFF with the keys to acti-
vate or deactivate the Dolby system.
4- Press ESC to enter the value.
Note
: The Dolby Noise Reduction system is
manufactured under licence from Dolby
Laboratories Corporation. Dolby and the symbol D are registered trademarks of Dolby
Laboratories Licensing Corporation.
Moving to the Main Menu
Use this function to directly move to the Main
Menu.
1- Short press ENTER.
2- Select SAM with the keys.
3- Press ENTER to get the Main Menu.
You can set the digital radio stations parameters after selecting the DAB source. Then by
either a short or long press on ENTER key, you
get different DAB menus (see cover pages).
The tuner DAB allows you to switch automatically from FM to DAB (station receivable
in DAB) or from DAB to FM (station no more
receivable in DAB).
Note
: Use the Optimize option in the An-
nounce menu to set the FM/DAB switch.
DAB MENU
1- Press the SOURCE key to select the DAB
2- Short press ENTER to get the DAB menu.
3- Use the keys to select an option.
4- Use the keys to set the option value.
5- Press ESC to enter the value.
Selecting a band
With this function, you can select a band in a
scrolling list.
1- Short press ENTER.
2- Select BAND with the keys.
3- Select the stations memorised in the
presets with the keys.
- DAB 123 Manually selected DAB
- DAB Memo DAB band
in alphabetical order
4- Press ESC to enter the value.
Selecting the DAB stations
This function selects the DAB memo band and
sorts all available stations in DAB frequencies
(50 stations max. are memorised).
Following the Learn, first station by alphabetical order is tuned.
1- Short press ENTER.
2- Select LEARN with the keys.
3- Select the stations memorised in the pre-
sets with the keys.
4- Press ESC to enter the value.
* Depending on radio reference: see table at the end
** For this accessory, see your dealer
16

Searching a Program Type
It is possible to search for DAB stations using
PTY code (Programme TYpe), which gives you
direct access to preselected types of program
(e.g. News, Business, Sports, etc).
1- Short press ENTER.
2- Select PTY SEARCH with the keys.
3- Use the keys to select the PTY.
4- Press ENTER to launch the search. At the
end, you will hear a beep followed by the
first stations found.
4- Press ESC to enter the value.
Note
: PTY not yet operational in all countries.
Storing the PAD
This function stores in memory, the Program
Associated Data (PAD) of the selected service
together with its service name.
1- Short press ENTER.
2- Select STORE PAD with the keys.
3- Press ENTER.
Recalling the PAD
This functionality recalls the Program Associated Data message stored in memory, with
its service name.
1- Short press ENTER.
2- Select RECALL PAD with the keys.
3- Press ENTER.
4- Use the keys to view the entire PAD.
5- Press ESC to enter the value.
Saving a DAB station in memory
With this function, you can preset 30 stations
from the DAB 123 bands.
1- Short press ENTER.
2- Select SAVE IN with the keys.
3- Use the keys to select a memory num-
ber for saving.
4- Press ESC to enter the value.
menu (see next menu).
Moving to the Main Menu
Use this function to get the Main Menu.
1- Short press ENTER.
2- Select SAM with the keys.
3- Press ENTER to get the Main Menu.
AUDIO
You can set the audio options by either a
short or long press on the SOUND key.
Depending of this key press, you get two
different sound menus (see cover page).
SOUND MENU
1- Short press the SOUND key to get the
SOUND MENU.
2- Use the keys to select an option.
3- Use the keys to set the option value.
4- Press ESC to enter the value.
Note
: Loudness, Balance, Fader, Subwoofer
and Auto-Equalisation effects are the same
for all sources.
Switching the Loudness Curve
This source independent function activates
the loudness response curve.
1- Short press SOUND.
2- Select LOUDNESS with the keys.
3- Use the keys to select ON or OFF
(default value).
4- Press ESC to enter the value.
Note
: Loudness curve can be changed for
both bass and treble in Sound Init Menu.
Selecting a Sound Style (1)
With this source dependant function, you can
select a preset sound effect among others.
1- Short press SOUND.
2- Select DSC STYLE with the keys.
3- Use the keys to select one predefined
styles: Bass/Treble, Rock, Classic, Pop,
Vocal (default value), Jazz, Direct SND.
4- Press ESC to enter the value.
Selecting a Sound Style (2)
With this source dependant function, you can
select a preset sound effect among others.
1- Short press SOUND.
2- Select EQ STYLE with the keys.
English
17

3- Use the keys to select one predefined
styles: Auto EQ, Custom1, ..., Custom5.
4- Press ESC to enter the value.
Setting the Bass Level
This source dependant function adjusts the
bass level between a min. and max. value.
1- Short press SOUND.
2- Select BASS with the keys.
3- Use the keys to adjust the bass level: -9 to +9.
4- Press ESC to enter the value.
Note 11
: The bass frequency threshold can be
changed in the Sound Init Menu.
Note 22
: This memorised value may be re-used
for the "Bass/Treble" Preset-Sound effect.
Setting the Treble Level
This source dependant function adjust the
treble level between a min. and max. value.
1- Short press SOUND.
2- Select TREBLE with the keys.
3- Use the keys to adjust the treble level:
-9 to +9.
4- Press ESC to enter the value.
Note 11
: The treble frequency threshold can be
changed in the Sound Init Menu.
Note 22
: This memorised value may be re-used
for the "Bass/Treble" Preset-Sound effect.
Setting the balance (LR speakers)
This source independent function adjusts the
balance between the left and right speakers.
1- Short press SOUND.
2- Select BALANCE with the keys.
3- Use the keys to adjust the setting:
Right +1 to +9, Middle, Left +1 to 9.
4- Press ESC to enter the value.
Setting the balance (RF speakers)
This source independent function adjusts the
balance between the front and rear speakers.
1- Short press SOUND.
2- Select FADER with the keys.
3- Use the keys to adjust the setting: Rear
+1 to +9, Middle, Front +1 to 9.
4- Press ESC to enter the value.
Note
: In phone in and navigation in sources,
this setting is fixed and cannot be changed.
Setting the Subwoofer Volume
This source independent function adjusts the
subwoofer level between its min. and max.
value (0 to 12).
1- Short press SOUND.
2- Select SUBWFR VOL with the keys.
3- Use the keys to select a value.
4- Press ESC to enter the value.
Note 11
: The subwoofer frequency threshold
can be changed in the Sound Init Menu.
Note 22
announce messages, the subwoofer level is
fixed to 0 (not OFF) and cannot be changed.
: In phone-in source and during
Moving to the Sound Init Menu
Use this function to move to Sound Init Menu.
1- Short press SOUND.
2- Select SOUND SETUP with the keys.
3- Press ENTER to get the Sound Init Menu
(see next menu).
Note
: You can have access to this menu by
long pressing the SOUND key.
Moving to the Main Menu
Use this function to directly move to the Main
Menu.
1- Short press SOUND.
2- Select SAM with the keys.
3- Press ENTER to get the Main Menu.
SOUND INIT MENU
1- Long press the SOUND key to get the
Sound Init Menu (see cover page).
2- Use the keys to select an option.
3- Use the keys to set the option value.
4- Press ESC to enter the value.
18

Resetting the Sound Init
This function allows to completely reset the
sound init parameters.
1- Long press SOUND.
2- Select SOUND RESET with the keys.
3- Press ENTER to launch the resetting.
Setting Loudness for Low Freq.
This source independent function adapts the
loudness response curve for low frequencies.
1- Long press SOUND.
2- Select LOUD LOW with the keys.
3- Use keys to select a level value: level 0
to level 3.
4- Press ESC to enter the value.
Setting Loudness for High Freq.
This source independent function adapts the
loudness response curve for high frequencies.
1- Long press SOUND.
2- Select LOUD HIGH with the keys.
3- Use keys to select a level value: level 0
to level 3.
4- Press ESC to enter the value.
Defining Bass Freq. Threshold
This source dependant function defines the
bass frequency threshold.
1- Long press SOUND.
2- Select BASS FREQ with the keys.
3- Use the keys to choose 80 Hz (default
value) or 40 Hz.
4- Press ESC to enter the value.
Note
: The setting is memorised to be re-used
for the "Bass/Treble" Preset-Sound effect.
Defining Treble Freq. Threshold
This source dependant function defines the
treble frequency threshold.
1- Long press SOUND.
2- Select TREBLE FREQ the keys.
3- Use the keys to choose 5kHz (default
value) or 7 kHz.
4- Press ESC to enter the value.
Note
: The setting is memorised to be re-used
for the "Bass/Treble" Preset-Sound effect.
Switching the Automatic Leveller
This function allows an automatic levelling
between the different sources (including only
tuner, DAB, CD, CDC, and Tape ; excluding
Auxiliary, Navigation-In and Phone-In).
1- Long press SOUND.
2- Select LEVELLER with the keys.
3- Use the keys to set ON (default) or OFF.
4- Press ESC to enter the value.
Note
: If you disabled this function, you cannot
select any manual offset for volume level
between the different sources.
Defining Subwoofer Threshold
This function sets the low pass filter frequency
for the subwoofer amplifier.
1- Long press SOUND.
2- Select SUBWOOFER with the keys.
3- Use the keys to set the value to Freq40,
Freq80 or OFF.
4- Press ESC to enter the value.
Switching Subwoofer Amplifier
This function allows you to activate the internal subwoofer amplifier of the radio.
1- Short press SOUND.
2- Select SUB AMPLI with the keys.
3- Use the keys to set ON or OFF.
4- Press ESC to enter the value.
Note
: In Phone IN source and during announ-
cements, the subwoofer level is fixed to 0 (not
OFF) and cannot be changed.
Starting the Auto-Equalizer
Use this function to start the auto-equalizer
calibration (see Configuration).
1- Long press SOUND.
2- Select AUTO EQ with the keys.
3- Press ENTER.
Note
: When Autoequalization is active, you
can stop it by switching OFF the set.
English
19

Customizing the Sound Reproduction
Use this function to tune the front/rear speakers to your own convenience by setting for
each the amplitude level of the five available
frequency bands.
1- Short press SOUND.
2- Select EQ STYLE with the keys.
3- Use the keys to select one custom
value: Custom 1 to Custom 5.
4- Long press SOUND.
5- Select CUSTOMIZE with the keys.
6- Use the keys to select the speakers to
adjust: Front Speak or Rear Speak.
7- Press ENTER to validate your choice.
8- In the display, use:
- the keys to select a frequency band:
80Hz, 200Hz, 500Hz, 2kHz or 8KHz.
- the keys to adjust the amplitude level:
from -12dB to +12dB.
Note
: If you want to copy one speaker setting
to an other (Left to Right or Right to Left),
move the small cursor above the copy arrow,
(Copy R-L or Copy L-R) then press ENTER.
CAR COMPUTER
3- Use the keys to display the total driven
time (TOT) or the trip time (TRIP).
4- Press ESC to enter the value.
Displaying the temperature
Use this function to display the temperature.
1- Short press COMPUTER.
2- Select TEMPERATURE with keys: the
set displays the outside temperature.
3- Press ESC to quit.
Displaying the battery voltage
Use this function to display the current
battery voltage (accuracy: 0,1 V).
1- Short press COMPUTER.
2- Select BATTERY with the keys: the set
displays the battery voltage.
3- Press ESC to quit.
Note
: The battery indicates the voltage at the
car radio input, not at the engine level.
Displaying the clock
Use this function to display the hour and the
minutes of the clock.
1- Short press COMPUTER.
2- Select CLOCK with the keys: the set
displays the current time.
3- Press ESC to quit.
By either a short or long press on the COMPUTER key, you get two different menus to set
the computer parameters (see cover pages).
CAR COMPUTER MENU
1- Short press the COMPUTER key to get the
CAR COMPUTER MENU.
2- Use the keys to select an option.
3- Use the keys to set the option value.
4- Press ESC to enter the value.
Displaying the time
Use this function to display the time.
1- Short press COMPUTER.
2- Select TIME with the keys.
20
Displaying the speed
Use this function to display the current speed,
the average speed or the maximum speed
ever reached.
1- Short press COMPUTER.
2- Select SPEED with the keys.
3- Use the keys to select: CUR (current
speed), AVG (average speed) or MAX
(maximum speed ever reached).
4- Press ESC to enter the value.
Displaying the distance
1- Short press COMPUTER.
2- Select DISTANCE with the keys.
3- Use the keys to display the total driven
distance or the trip distance.
4- Press ESC to quit.

Moving to the CC Init Menu
Use this function to move to the Init Menu.
1- Short press COMPUTER.
2- Select COMP. INIT with the keys.
3- Press ENTER to get the Car Computer Init
menu (see next menu).
Moving to the Main Menu
Use this function to directly move to the Main
Menu.
1- Short press COMPUTER.
2- Select SAM with the keys.
3- Press ENTER to get the Main Menu.
CAR COMPUTER INITIALISATION
1- Long press the COMPUTER key to get the
CAR COMPUTER INIT MENU.
2- Use the keys to select an option.
3- Use the keys to set the option value.
4- Press ESC to enter the value.
Setting the hour
Use this function to set the clock hour.
1- Long press COMPUTER.
2- Select SET HOUR with the keys.
3- Use the keys to set the hour.
4- Press ESC to enter the value.
Note
: You can only modify the hour if the
clock is in manual mode
Setting the minute
Use this function to set the clock minute.
1- Long press COMPUTER.
2- Select SET MINUTE with the keys.
3- Use the keys to set the hour.
4- Press ESC to enter the value.
Note
: You can only modify the minutes if the
clock is in manual mode.
Setting the Clock Type
Use this function to set the clock format: 12
hours or 24 hours.
1- Long press COMPUTER.
2- Select CLOCK TYPE with the keys.
3- Use the keys to choose 12 H or 24 H
(default value).
4- Press ESC to enter the value.
Selecting Updating Clock Mode
Use this function to manually set the clock or
to automatically update it via RDS.
1- Long press COMPUTER.
2- Select CLOCK MODE the keys.
3- Use the keys to choose between RDS
(default value) or Manual.
4- Press ESC to enter the value.
Selecting Temperature Units
Use this function to select the unit for displaying the temperature.
1- Long press COMPUTER.
2- Select TEMP. UNITS with the keys.
3- Use the keys to choose the units: C
(Celsius: default value) or F (Fahrenheit).
4- Press ESC to enter the value.
Switching the Frost Warning
Use this function to set the frost warning: as
soon as the temperature becomes lower than
3 °C, a warning is generated.
1- Long press COMPUTER.
2- Select FROST WARN with the keys.
3- Select ON or OFF with the keys to acti-
vate/deactivate the function.
4- Press ESC to enter the value.
Note
: You can use this function only if the
temperature sensor is connected.
Selecting Speed Units
Use this function to select the unit for displaying the speed.
1- Long press COMPUTER.
2- Select SPD UNITS with the keys.
3- Use the keys to set the units: Km/h or mph.
4- Press ESC to enter the value.
English
21

Setting the Speed Warning
Use this function to set the speed value for
warning, if you exceed this value.
1- Long press COMPUTER.
2- Select SPEED WARN with the keys.
3- Use the keys to select a speed: 100,
110, 120, 130 or 140 km/h.
4- Press ESC to enter the value.
Note
: Speed warning bleeps are generated
with a frequency dependent on the difference
between stored speed and current car speed.
Current source is still audible in background.
Starting the Speed Calibration
Use this function to start speed calibration.
1- Long press COMPUTER.
2- Select SPD CALIB with the keys.
3- Press ENTER to start the calibration.
Note
calibration process.
Starting PDC Calibration
Use this function to start PDC calibration.
1- Long press COMPUTER.
2- Select PDC CALIB with the keys.
3- Press ENTER to start the calibration.
Switching the Trip Warning
Use this function to set a trip warning. So, if
you drive more than 2 hours, a warning will
be displayed every 15 minutes.
1- Long press COMPUTER.
2- Select TRIP WARN with the keys.
3- Use the keys to select ON or OFF to
activate/deactivate the function.
4- Press ESC to enter the value.
Resetting the parameters
Use this function to reset the Car Computer
parameters.
1- Long press COMPUTER.
2- Select RESET with the keys.
3- Press ENTER to launch the resetting.
ANNOUNCEMENTS
Switching the Battery Warning
Use this function to set a battery value for
warning: so, if the battery voltage is below
this value, a warning will be displayed.
1- Long press COMPUTER.
2- Select BAT. WARN with the keys.
3- Use the keys to set the value.
4- Press ESC to enter the value.
Selecting Infos to be displayed
Use this function to set what will be displayed first line after pressing three times, the
DISPLAY key.
1- Long press COMPUTER.
2- Select INFO LINE with the keys.
3- Use the keys to select the informations
to be displayed: temperature, clock,
speed, time, distance or battery.
4- Press ESC to enter the value.
* Depending on radio reference: see table at the end
You can reach the Announce Menu by a long
press on the SOURCE key (see cover pages).
Updating RDS Dynamic Memory
You can automatically update all FM memo
stations while listening other sources.
1- Long press SOURCE.
2- Select RDSMEM DYN with the keys.
3- Use the keys to set the function: ON
4- Press ESC to enter the value.
Note
if the set is OFF when the key is engaged.
Activating the TMC*
Switch ON this function to open the Traffic
Message Channel for sending numeric data
to the dynamic navigation system.
1- Long press SOURCE.
2- Select TMC with the keys.
: See Configuration for the complete
(default value) or OFF.
: The electric antenna will stay out even
22

3- Use the keys to set the function: ON
(default value) or OFF.
4- Press ESC to enter the value.
Note
: You cannot open the TMC if the Traffic
and/or the News are activated.
ANIMATIONS
You can reach the Animations Menu by a long
press on DISPLAY key (see cover pages).
Switching the animations
Activating Traffic Announcement
You can activate the TA mode to allow you
listening traffic announcements.
1- Long press SOURCE.
2- Select TRAFFIC with the keys.
3- Use the keys to set the function: ON
(default value) or OFF.
4- Press ESC to enter the value.
Note
: If the radio does not provide TA, the set
will search for a providing transmitter.
Activating the News Bulletin
You can activate the News mode to allow you
listening news bulletins.
1- Long press SOURCE.
2- Select NEWS with the keys.
3- Use the keys to set the function: ON
(default value) or OFF.
4- Press ESC to enter the value.
Note
: If the radio does not provide News, the
set will search for a providing transmitter.
Setting the FM/DAB Switch*
Use this function to set the switch which
automatically commute the tuner DAB from
FM to DAB and DAB to FM.
1- Long press SOURCE.
2- Select OPTIMIZE with the keys.
3- Use the keys to set the function: ON
(default value) or OFF.
4- Press ESC to enter the value.
Moving to the Main Menu
Use this function to get the Main Menu.
1- Long press SOURCE.
2- Select SAM with the keys.
3- Press ENTER to get the Main Menu.
* Depending on radio reference: see table at the end
Use this function to set the animation display.
1- Long press DISPLAY.
2- Select ANIMATIONS with the keys.
3- Use the keys to select ON or OFF.
4- Press ESC to enter the value.
Note
vate animations non related to the bargraph.
Setting the first Layer
This function allows you to select the desirecd
bargraph of the first layer according to your
equipment type.
1- Long press DISPLAY.
2- Select ANALYSER1 with the keys.
3- Use the keys to choose one represen-
4- Press ESC to enter the value.
Setting the second Layer
This function allows you to select the desirecd
bargraph of the second layer according to
your equipment type.
1- Long press DISPLAY.
2- Select ANALYSER2 with the keys.
3- Use the keys to choose one represen-
4- Press ESC to enter the value.
Selecting a Screen Saver
This function allows you to select an animation for the screen saver.
1- Long press DISPLAY.
2- Select SCRN SAVER with the keys.
3- Use the keys to select a screen saver
4- Press ESC to enter the value.
English
: Setting Off the animation, you deacti-
tation: Fill Peak, Peak Hold, Propeller,
Analog, Magic Eyes, Bass Eyes or OFF.
tation: bargraph1 to 9, or OFF.
animation: rain, space invader, Las Vegas
pixel show, piston or comet.
23

Setting the Screen Saver Time
This function allows you to configure the time
for activating the screen saver.
1- Long press DISPLAY.
2- Select TRIGGER with the keys.
3- Use the keys, to select: None (default
value), 10, 30 or 60 sec.
4- Press ESC to enter the value.
Note
: User actions, announcements, tele-
phone mute or loading a disc can interrupt
the screen saver.
Moving to the Main Menu
Use this function to directly move to the Main
Menu.
1- Long press SOURCE.
2- Select MAIN with the keys.
3- Press ENTER to get the Main Menu.
24

34
arrowsv arrows
Select scan duration for CD tracks or radio stations
Scan time
5 seconds / 10 seconds / 15
seconds
Activate/deactivate ON/OFF Logic function limiting use of the
installation to 1 after removal of ignition key
Logic
On / Off
Activate/deactivate auxiliary source
Auxiliary
On / Off
Activate/deactivate visual temperature warning
Warm LED
On / Off
Volume of key tones
Chimes lvl
0 / 1 / 2 / 3 / 4
Choice of key tones for various activities:
Chimes set
Key press
Confirm
Announce
Warning
Errors
Welcome
Bye bye
Press enter
Off / Chime 1 / 2 / 3 / 4 / 5
Off / Chime 1 / 2 / 3 / 4 / 5
Off / Chime 1 / 2 / 3 / 4 / 5
Off / Chime 1 / 2 / 3 / 4 / 5
Off / Chime 1 / 2 / 3 / 4 / 5
Off / Chime 1 / 2 / 3 / 4 / 5
Off / Chime 1 / 2 / 3 / 4 / 5
Select volume level for Traffic Announcement, News bulletins
and Alarm messages
TA Volume
0 / 1 / 2 / 3 / 4
Select:
> IN if you wish to amplify the received call through the car speakers
> NO if no car phone is connected
> MUTE to automatically interrupt the radio during phone
Phone
In / No / Mute
Select LOW or HIGH according to phone’s mute signal
Phone lvl
Low / High
Increase/Decrease the phone volume
Phone Vol.
-30 to +30
Select:
> IN if you wish to amplify the guidance voice messages through the
car speaker
> NO if no navigation computer connected to the set
> MUTE to automatically interrupt the radio during the guidance voice
messages
Nav
In / No / Mute
Select LOW or HIGH according to the navigation computer’s
mute signal
Nav lvl
Low / High
Select the SDVC compensation volume level (only when
connected and calibrated, see SDVC).
Level 1 gives a smaller increase while level 4 gives a greater
increase with respect to the car’s speed.
SDVC type
Off / Curve 1 / 2 / 3 / 4
To adjust the light display brightness
Brightness
1 to 10
Launch the installation
Install
SETTING VALUES
34
arrowsv arrows
Select the waveband
Band
Start the automatic station storage
Start AST
Load the RDS memory on the current waveband
Start Memo
Select the Programme TYpe
PTY Search
News / Affairs / Info / Sport…
Activate/Deactivate Alternative Frequency function
AF
On / Off
Start scan on the current waveband
Scan Preset
On / Off
Select:
> MANUAL for a manual search,
> AUTO for automatic scanning.
Tuning
Auto / Manual
Give a name to the radio frequency
Name
Save a station in memory number X
Save in
Empty X
Move to the tuner init menu
Tuner Init
Move to the main menu
SAM
Main Menu
Tuner Menu
FM 123 / FM Memo / FM AST /
MW 123 / MW AST / LW / SW
English
25

Tuner Init Menu
34
arrowsv arrows
Select the scan type
Scan type
Stations / Presets
Select the search level
Search lvl
Distant / Local
Adjust the tuner to the continent
Tuner
USA, EURO, ASIA
34
arrowsv arrows
Activate/Deactivate the scan track
Intro scan
On / Off
Activate/Deactivate the Dolby reproduction
Dolby Nr
On / Off
Move to the main menu
SAM
34
arrowsv arrows
Activate/Deactivate the scan track
Intro scan
On / Off
Give a name to the CD
CD Name
Delete the CD name
Del Name
Activate/Deactivate the sound compression
Compress
On / Off
Activate/Deactivate the track repetition
Repeat
On / Off
Activate/Deactivate the random track play
Random
On / Off
Move to the main menu
SAM
34
arrowsv arrows
Select the waveband
Band
DAB customize, DAB memo
Activate/Deactivate the PAD
Learn
On / Off
Select the Programme TYpe
PTY search
News / Affairs / Info / Sport…
Store the PAD (selected services with service name)
Store PAD
On / Off
Recall the PAD (selected services with service name)
Recall PAD
Save PAD in memory number X
Save in
Empty X
Move to the main menu
SAM
34
arrowsv arrows
Activate/Deactivate the loudness
Loudness
On / Off
Select a pre-defined styles
DSC Style
User, Rock, Classic, Pop, Vocal,
Jazz, Direct SND
Select a pre-defined styles
EQ Style
EQ Style, Custom1 – Custom5
Increase/decrease the bass level
Bass
-9 to +9
Increase/decrease the treble level
Treble
-9 to +9
To adjust the balance between left and right speakers
Balance
Right 1 to 9, Middle, Left 1 to 9
To adjust the fader between front and rear speakers
Fader
Rear 1 to 9, Middle, Front 1 to 9
Increase the subwoofer volume
Subwfr Vol
0 / +1 to +12
Move to the Sound Init menu
Sound Setup
Move to the main menu
SAM
CD, CDC and MP3 Menu
Tape Menu
DAB Menu
Sound Menu
26
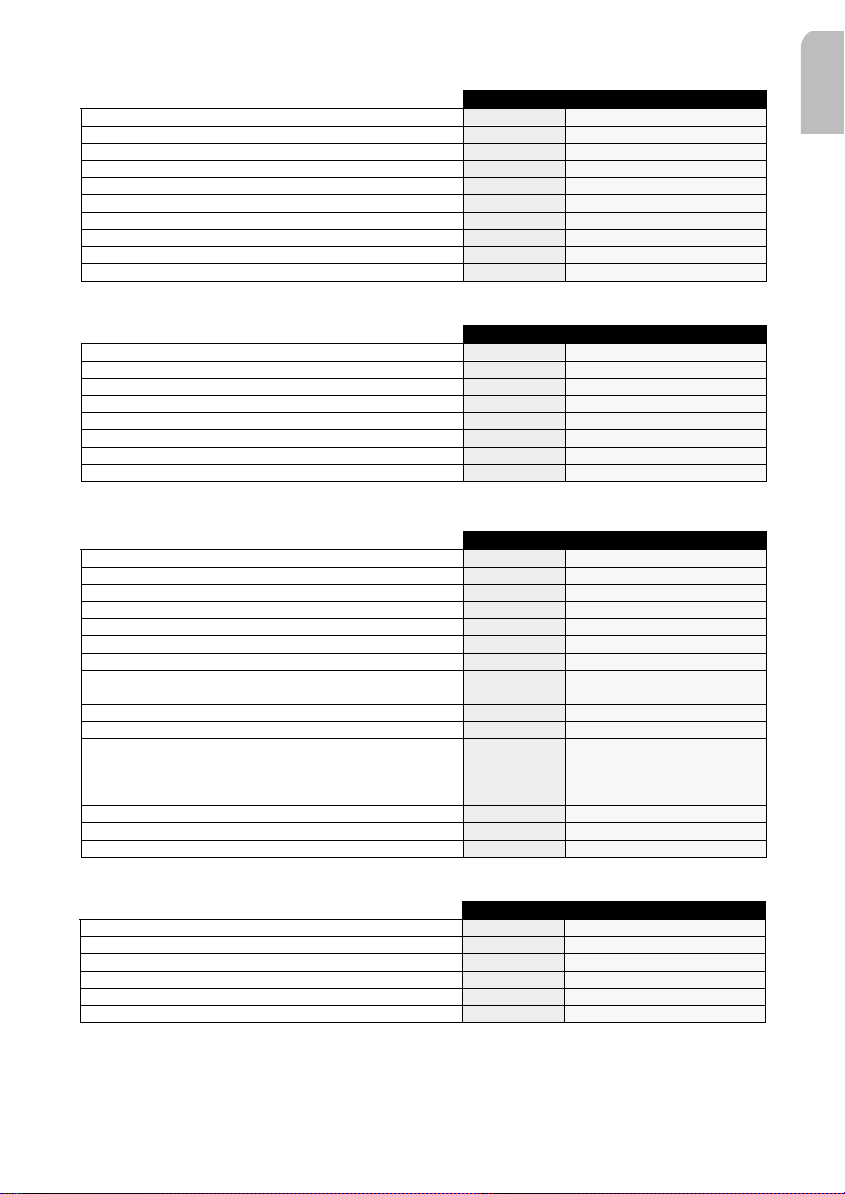
Sound Init Menu
34
arrowsv arrows
Reset the sound parameters
Reset
Amplification level to be activated (LOUDNESS in low freq.)
Loud Low
0 / Level 1 / Level 2 / Level 3
Amplification level to be activated (LOUDNESS in high freq.)
Loud High
0 / Level 1 / Level 2 / Level 3
Select bass frequency threshold
Bass Freq
40 Hz / 80 Hz
Select treble frequency threshold
Treb Freq
5 kHz / 7 kHz
Automatic audio source sound level balancing On/Off
Leveller
On / Off
Sub Woofer ON/OFF at frequency of 40 or 80 Hz
Subwoofer
Off / Freq 40 / Freq 80
Activate/Deactivate the Sub Amplifier
Sub Ampli
On / Off
Auto-equalizer
Auto EQ
To adjust the amplitude level of the speaker frequency band
Customize
Front speaker / Rear speaker
34
arrowsv arrows
Set the hour
Set hour
Set the minute
Set minutes
Time display format
Clock type
24 h / 12 h
Activate the RDS clock mode
Clock mode
RDS / Manuel
Select the temperature units
Temp unit
°C / °F / No
Set the frost warning
Frost warn
On / Off
Select the speed units
Spd unit
Km/h / mph
Set the speed warning
Speed warn
100 km/h / 110 km/h / 120 km/h
/ 130 km/h / 140 km/h
Set the trip warning
Trip warn
On / Off
Set the battery warning
Bat. warn
On / Off
Select the information displayed
Info line
Temperature / Clock / Avg
speed / max speed / cur speed /
total time / trip time / total dist. /
battery
Start the speed calibration
Spd calib.
Start the PDC calibration
PDC calib.
Reset the parameters
Reset
English
Car Computer Menu
Display the time
Display the current temperature
Display the current battery voltage
Adjust the time
Select the speed unit
Display the distance covered (trip/total)
Move to the Car Computer Init Menu
Move to the main menu
Car Computer Init Menu
Announce Menu
Activate/Deactivate Dynamic RDS memory fill/update
Activate/Deactivate Traffic Message Channel option
Activate/Deactivate Traffic Announcement mode
Activate/Deactivate News mode
Activate/Deactivate the automatic switch between FM/DAB
Move to the main menu
34
Time
Temperat.
Battery
Clock
Speed (unit)
Dist (unit)
Comp. Init
SAM
34
RDSmem Dyn
TMC
Traffic
News
Optimize
SAM
arrows
arrows
arrows
v
Tot / Trip
Hour / Minutes
Km/h / mph
Trip / Tot
arrows
v
On / Off
On / Off
On / Off
On / Off
On / Off
27

Animations Menu
34
arrowsv arrows
Activate/deactivate the display animation
Animations
On / Off
Select a bargraph related to the first layer
Analyser 1
Fill Peak / Peak Hold / Propeller
/ Analog / Magic Eyes / Bass
Eyes / Off
Select a bargraph related to the second layer
Analyser 2
Bargraph1 – Bargraph9 / Off
Select a screen saver animation
Scrn Saver
Rain, Space invider, Las Vegas
pixel show, piston, comet
Set the time to activate the screen saver
Trigger
None, 10s, 30s, 1mn
Move to the main menu
SAM
ACCESSORIES* ABBREVIATIONS
Optional accessories available:
- Connectors C1 (CA1310), C2 (CA1311),
C3 (CA1312), D1 (CA1313), D2 (CA1314)
- External temperature sensor.
- External speed sensor.
- Infra red remote control (Steering Wheel
RC, Credit Card Format).
- CD changer (4, 6, 10 discs UART SPDIF).
- Auxiliary.
- External phone (mute and audio).
- External navigation mute.
- Line out to external amplifier.
- External power amplifier.
- External Park Distance Controller.
- External antenna.
TROUBLE-SHOOTING
May be, it will happen that your car radio will
not functioning as you expected it to. Before
calling for service, please read this user manual and review carefully the setting values :
you may find that a function cannot work
properly with the value, you defined.
AF Alternative Frequency
CC Car Computer
CDC Compact Disc Changer
LR Left Right speakers
PAD Program Associated Data
PDC Park Distance Control
PTY Program Type
RDS Radio Data System
RF Rear Front speakers
SAM Software Access Menu
SDVC Speed Dependent Volume Control
TA Traffic Announcement
TP Traffic Program
Nevertheless, if you need to send your set for
reparation, always send it complete with
detachable front (do not try to open the car
radio to operate it yourself).
* Depending on radio reference: see table at the end
28
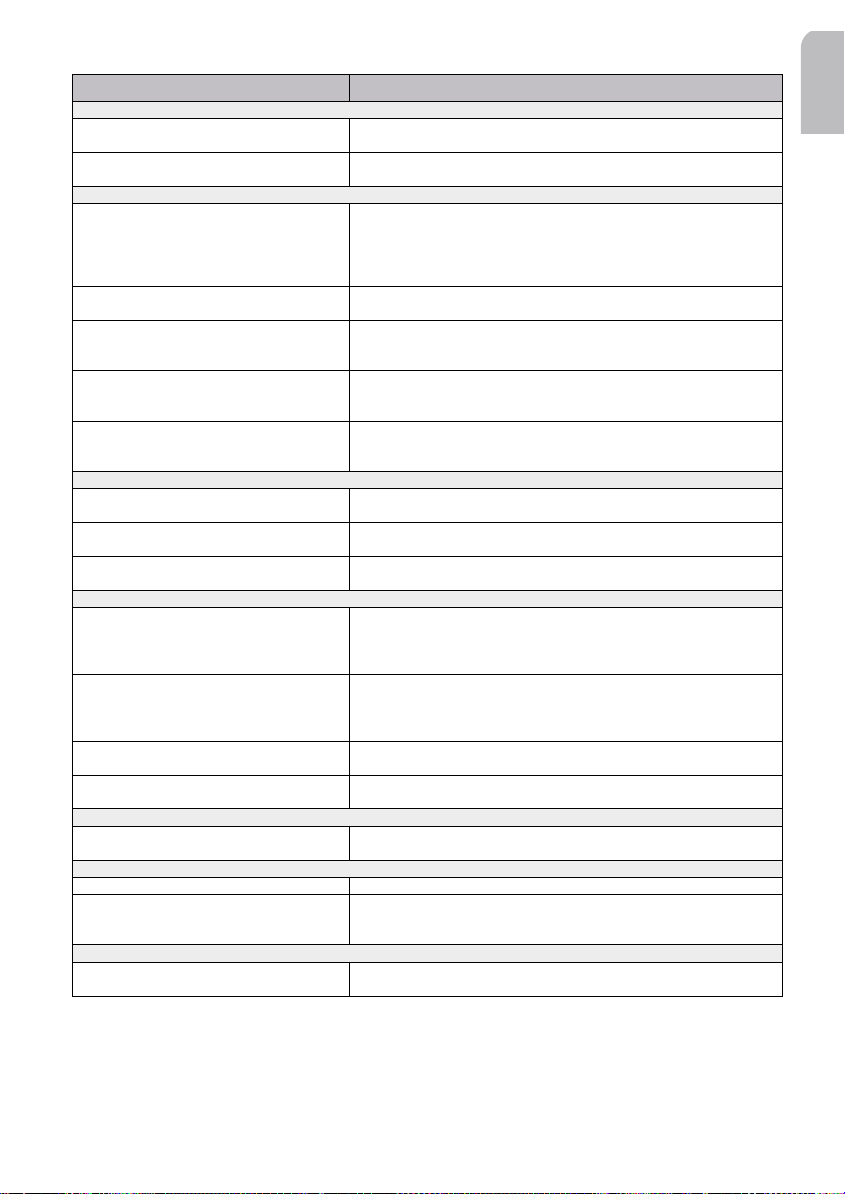
SYMPTOMS CAUSE/REMEDY
NO POWER Verify:
The radio does not function. > the set is well inserted in the dashboard (see MOUNTING).
The set does not function and the display
screen does not light up.
NO SOUND Verify:
The display screen lights up but the set gives
no sound (or only a whistle).
There is no sound from the loudspeakers
(front and rear), either for radio or for CD.
There is no sound from the rear loudspeakers
after having installed a subwoofer.
There is no sound from the loudspeakers after
having connected a telephone.
There is no sound from the subwoofer after
having connected an external amplifier
SOUND TROUBLE Verify:
The sound level is too low during traffic
announcements or news bulletins
The sound level decreases Display the set temperature: if the temperature is too hot, the sound level
The telephone sound is distorted > decrease the telephone sound volume until no more distorsion.
CD ERRORS Verify:
During use of the CD player or the MP3
player, the set does not function and displays
ERROR CD.
During use of the CD changer, the set does
not function and displays ERROR CD.
The Fast Forward function does not work
with your CD.
CD name not available in the CD menu Delete at least one CD name using the Del name function. Remember
CDC ERROR Verify:
The display shows CDC ERR The link between the CD changer and the amplifier is inoperative.
TEMPERATURE ERROR Verify:
The display shows TEMP ERR Verify the temperature sensor is well connected (see INSTALLATION).
The display shows HI TEMP The audio system has switched to heat-protection mode: the sound level
FUNCTION ERROR Verify:
SDVC not available > the speedometer is well connected in A1 (see CONFIGURATION)
> the set is well connected (see Installation Card and INSTALLATION)
> Switch off the set.
> Check the fuse (see INSTALLATION).
> Increase the volume: if you are listening to the radio, move to an area
where the station reception is better.
> Check the antenna and its connection (see INSTALLATION).
> Check if the station search is finished.
> If your mobile phone is connected, check the Phone setting.
Verify the speakers connections to C1 (see INSTALLATION) and the
speakers balance (see Sound Menu).
Verify your subwoofer installation:
> connection on the left rear connector C1 (see INSTALLATION)
> the subwoofer amplifier setting to ON (see Sound Setup Menu).
Verify your telephone installation:
> connection inside the TEL IN connector D1 (see INSTALLATION)
> the detection level setting (see Main Init Menu).
Verify your external amplifier installation:
> connection of the external amplifier on D2 (see INSTALLATION)
> the subwoofer amplifier setting to OFF (see Main Init Menu).
Adjust the volume for announcements (see Sound Setup Menu).
automatically decreases.
> increase with the set, the phone volume (see Main Init Menu).
> the CD is properly inserted in the CD player,
> the player contains at least one CD,
> the disc has been correctly inserted ; no dirty, exotic or damaged disc
has been loaded ; the player front is properly shut.
> the magazine is properly inserted in the CD changer,
> the changer contains at least one CD,
> the discs have been correctly inserted ; no dirty, exotic or damaged
discs have been loaded ; the changer front is properly shut.
Verify that your CD is not a MP3 CD: in that case, this function doesn’t
work with MP3 CD.
that you can’t name more than 50 CD names.
Contact your dealer.
is reduced. The audio system will return to normal performance as soon
as the ambient temperature has dropped.
> the speed calibration is not calibrated (see CONFIGURATION)
English
29

CD4402 CD4502 CD4802 CR4402
Source
DAB No
Yes Yes Yes
Functions
Listening MP3 files No No
Yes
Displaying CD text No
Yes Yes
Changing directory No No
Yes
Opening the TMC No
Yes
No
Yes
Setting the FM/DAB switch No
Yes Yes Yes
RADIO REFERENCE
May be, it will happen that you cannot find
an expected function. So, before calling for
service, please check this table and review
carefully the functions which work with your
reference car radio.
INDEX
Activating the News Bulletin . . . . . . .23
Activating the TMC* . . . . . . . . . . . . . .22
Activating Traffic Announcement . . . .23
Calibrating the Auto Equalizer . . . . . . .7
Calibrating the Speed . . . . . . . . . . . . . .6
Changing Cassette Side . . . . . . . . . . .15
Changing Directory in MP3 CD* . . . . .14
Connecting the radio . . . . . . . . . . . . . .4
Controlling the volume . . . . . . . . . . . .8
Customizing the Sound Reproduction 20
Defining Bass Freq. Threshold . . . . . .19
Defining Subwoofer Threshold . . . . .19
Defining the Scan Time . . . . . . . . . . . .8
Defining Treble Freq. Threshold . . . . .19
Deleting the CD name . . . . . . . . . . . .15
Displaying CD Text* . . . . . . . . . . . . . .14
Displaying Source Informations . . . . . .8
Displaying the battery voltage . . . . .20
Displaying the clock . . . . . . . . . . . . . .20
Displaying the distance . . . . . . . . . . .20
30
Displaying the speed . . . . . . . . . . . . .20
Displaying the temperature . . . . . . . .20
Displaying the time . . . . . . . . . . . . . .20
Ejecting a cassette . . . . . . . . . . . . . . .15
Ejecting CD from the CD changer . . . .13
Ejecting CD from the CD Player . . . . .13
Fast Backward/Forward . . . . . . . . . . .14
Fast Rewind/Fast Forward . . . . . . . . .15
Installing a subwoofer . . . . . . . . . . . . .6
Installing an external amplifier . . . . . .5
Launching Loudspeakers Installation .10
Listening to MP3 files* . . . . . . . . . . . .13
Loading CD in the CD changer . . . . .13
Loading CD in the CD Player . . . . . . .13
Mounting a DIN radio . . . . . . . . . . . . . .5
Mounting a JIN radio** . . . . . . . . . . . .5
Moving to the CC Init Menu . . . . . . . .21
Moving to the Sound Init Menu . . . . .18
Moving to the Tuner Init Menu . . . . .12
Naming a Radio Frequency . . . . . . . . .12

Naming the CD . . . . . . . . . . . . . . . . . .14
Playback . . . . . . . . . . . . . . . . . . . . . . .15
Previous/Next Disc . . . . . . . . . . . . . . .14
Previous/Next Track . . . . . . . . . . .14, 15
Recalling the PAD . . . . . . . . . . . . . . . .17
Removing the front . . . . . . . . . . . . . . .6
Removing the radio . . . . . . . . . . . . . . .5
Replacing the fuse . . . . . . . . . . . . . . . .5
Resetting the parameters . . . . . . . . . .22
Resetting the Sound Init . . . . . . . . . .19
Saving a DAB station in memory . . . .17
Saving a station in memory . . . . . . . .12
Scanning Stations or Presets . . . . . . .11
Search Left/Search Right . . . . . . . . .10
Search Up/Search Down . . . . . . . . . .10
Searching a Program Type . . . . . .11, 17
Searching better Transmitter . . . . . . .12
Searching the best reception . . . . . . .11
Selecting a band . . . . . . . . . . . . . . . . .16
Selecting a Screen Saver . . . . . . . . . . .23
Selecting a Sound Style (1) . . . . . . . . .17
Selecting a Sound Style (2) . . . . . . . . .17
Selecting a source . . . . . . . . . . . . . . . . .8
Selecting a waveband . . . . . . . . . . . .10
Selecting Chimes . . . . . . . . . . . . . . . . .9
Selecting Infos to be displayed . . . . .22
Selecting Speed Units . . . . . . . . . . . . .21
Selecting Temperature Units . . . . . . .21
Selecting the Continent Area . . . . . . .13
Selecting the DAB stations . . . . . . . . .16
Selecting the Scanning Type . . . . . . . .12
Selecting Updating Clock Mode . . . . .21
Setting a Navigation System . . . . . . .10
Setting a Phone Equipment . . . . . . . . .9
Setting Loudness for High Freq. . . . .19
Setting Loudness for Low Freq. . . . .19
Setting Navigation Detect Level . . . . .10
Setting Noise Reduction System . . . .16
Setting the balance (LR speakers) . . .18
Setting the balance (RF speakers) . . .18
Setting the Bass Level . . . . . . . . . . . .18
Setting the Chimes Audio Level . . . . . .9
Setting the Clock Type . . . . . . . . . . . .21
Setting the first Layer . . . . . . . . . . . . .23
Setting the FM/DAB Switch* . . . . . . .23
Setting the hour . . . . . . . . . . . . . . . . .21
Setting the Light Display Brightness .10
Setting the Message Audio Level . . . .9
Setting the minute . . . . . . . . . . . . . . .21
Setting the Phone Detection Level . . . .9
Setting the Phone Volume . . . . . . . . . .9
Setting the Random Playback . . . . . .15
Setting the Repeat Playback . . . . . . .15
Setting the Screen Saver Time . . . . . .24
Setting the SDVC . . . . . . . . . . . . . . . .10
Setting the second Layer . . . . . . . . . .23
Setting the Sound Compression . . . . .15
Setting the Speed Warning . . . . . . . .22
Setting the Subwoofer Volume . . . . .18
Setting the Treble Level . . . . . . . . . . .18
Setting the Tuning Mode . . . . . . . . . .11
Starting PDC Calibration . . . . . . . . . . .22
Starting RDS Stations Memo . . . . . . .11
Starting the Auto-Equalizer . . . . . . . .19
Starting the Speed Calibration . . . . . .22
Starting the Track Scanning . . . . .14, 16
Storing automatically a station . . . . .11
Storing the PAD . . . . . . . . . . . . . . . . .17
Suppressing Interference . . . . . . . . . . .5
Switching On/Off . . . . . . . . . . . . . . . . .8
Switching Subwoofer Amplifier . . . . .19
Switching the animations . . . . . . . . . .23
Switching the Automatic Leveller . . .19
Switching the Battery Warning . . . . .22
Switching the Frost Warning . . . . . . .21
Switching the Trip Warning . . . . . . . .22
English
31

Switching the Warning LED . . . . . . . . .9
Updating RDS Dynamic Memory . . . .22
Using radio when not running . . . . . . .8
Using Remote Control** . . . . . . . . . . .5
Using the Radio Interface . . . . . . . . . .1
Warning LED . . . . . . . . . . . . . . . . . . . . .6
32

ENTER
ENTER
ENTER
ENTER
MUTE
SOURCE
Car MMultimedia SSystems
VDO DDayton TThe CCar BBrand
3111 115 34291.1 06/01 fr
 Loading...