


Mod. PRO EXPRESS
Mod. PRO EXPRESS TURBO
INSTRUCTIONS FOR USE - STEAM GENERATOR
NOTICE D’EMPLOI - GENERATEUR DE VAPEUR
GEBRUIKSAANWIJZING - STOOMGENERATOR
GEBRAUCHSANWEISUNG - DAMPFGENERATOR
BRUGSANVISNING - DAMPGENERATOR
BRUKSANVISNING - ÅNGSTATION
KÄYTTÖOHJE - SILITYSKESKUS
ISTRUZIONI PER L’USO - GENERATORE DI VAPORE
Nнcтpyкция пo зкcплyaтaции - ПАРОГЕНЕРАТОРЕ |
035613 - 45/06 |
GB
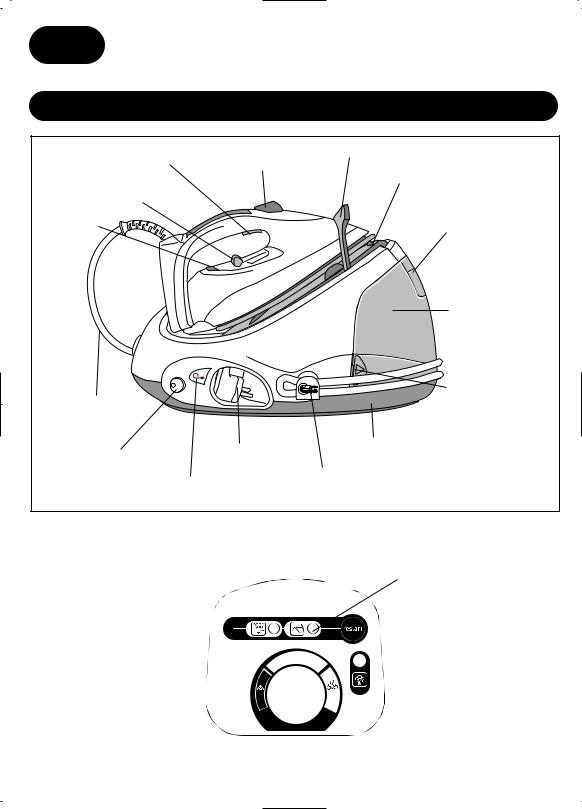
1- UNDERSTANDING YOUR STEAM GENERATOR
Steam control button |
Turbo steam button |
Iron retaining hoop |
(depending on the model) |
|
|
|
|
|
Temperature control |
|
Iron rest |
|
|
|
slide for the iron |
|
|
Thermostat |
|
|
light |
|
|
Iron-base steam cord
Steam generator boiler Illuminated Power cord storage space (in the base unit)
on / off switch
Power cord reel button |
Boiler rinse plug and steam |
|
cord fastener clip |
||
|
Removable water
tank filler cover
Removable water tank
Handles for removing and replacing
the water tank
|
|
Control panel |
|||||
|
|
|
|
|
|
|
Red “removable |
|
|
|
|
|
|
|
water tank empty” |
|
|
|
|
|
|
|
light |
Orange “boiler |
|
|
|
|
|
|
|
rinse” light |
|
|
|
|
|
|
“Restart” button |
|
|
|
|
|
|
||
Steam output |
|
|
|
|
|
Green “steam ready” light |
|
|
|
|
|
||||
|
|
|
|
|
|
||
control dial |
|
|
|
|
|
|
|
|
|
|
|
|
|
||
|
|
|
|
|
|
|
|

2- LOCKING SYSTEM FOR RETAINING THE IRON ON THE BASE
Your steam generator is equipped CLIC with a retaining clip which locks
the iron on its casing for easier transport and storage
Lock
Unlock |
3- PREPARING YOUR STEAM GENERATOR
1.To carry your steam generator by the iron handle :
-place the iron on the iron rest of the generator and raise the retaining hoop over the iron until it locks into place (audible click) (1).
-grasp the handle of the iron to carry your steam generator (2).
2.Place your steam generator on a stable, horizontal heat-resistant surface.
3.Grasp the handles of the removable tank and pull horizontally to remove it (3).
4.Fill up the water tank taking care not to exceed the maximum level just below the filler cover (4).
5.Replace it firmly in its housing, making sure it is fully into place (5).
 Loading...