


MANUAL OF USE AND MAINTENANCE
MANUEL D’UTILISATION ET D’ENTRETIEN
MANUAL DE USO Y MANUTENCION
MANUALE D’USO E MANUTENZIONE

1 - ENGLISH

IMPORTANT
We recommend to carefully and fully read the present manual before using your TAYLOR machine.
In your own interest, pay particular attention to the following warnings:
The non-observance of this warning can jeopardize the user’s health and the correct operation of the machine.
A careful observance of these warnings can lead to a top performance of the machine.
The machine is covered by guarantee according to the conditions reported in the Seller’s
In the following field, please write your machine serial number in capital letters
In the following field, please write your machine serial number in capital letters
Serial number
Distributor’s stamp
ENGLISH - 2

Congratulations on purchasing a machine TAYLOR.
The present manual, enclosed to the machine, is integrant and essential part of the machine and shall be delivered to the final user. Before performing any kind of operation, it is recommended to carefully study the reported instructions, as only a careful reading allows you getting the highest performance from your machine. The following pages report all information necessary to correctly install, commission, adjust and service your machine. TAYLOR reserves the right to carry out all changes necessary to improve its product or manual without prior notice and to insert them in the subsequent issues.
Never touch the machine with hands and tools during production or maintenance and cleaning operations, without making sure that the machine is in STOP position, the master switch is off and/or the multipolar plug disconnected.
TAYLOR declines any liability for accidents deriving from an improper use of the machine due to the non-compliance with the above-mentioned recommendations.
INDEX
1. INSTALLATION |
|
|
|
|
1.1 Preliminary inspection ………………………………………. |
4 |
|||
1.2 Field of use |
………………………………………. |
4 |
||
1.1 Limits of use |
………………………………………. |
4 |
||
1.2 Machine outfit |
………………………………………. |
4 |
||
1.3 Marking |
|
………………………………………. |
4 |
|
1.4 Start-up |
|
………………………………………. |
5 |
|
2. OPERATION |
………………………………………………………. |
6 |
||
2.1 Control panel, controls and components ……………….. |
6 |
|||
2.2 Whipped cream delivery |
……………………………….. |
6 |
||
2.3 Timed delivery ……………………………………………….. |
7 |
|||
2.4. Regulation conservation temperature ……………………… |
7 |
|||
2.5 Alarm display ……………………………………………….. |
8 |
|||
2.6 Cream whipper regulation |
……………………………….. |
8 |
||
3. MAINTENANCE AND CLEANING |
……………………………….. |
10 |
||
3.1 Washing and lubrication |
……………………………….. |
10 |
||
4. TROUBLE-SHOOTING |
|
……………………………….. |
12 |
|
5. APPENDICES |
……………………………………………………….. |
I |
||
5.1 Machine specification |
|
……………………………….. |
I |
|
5.2 Refrigerant circuit diagram |
……………………………….. |
II |
||
3 - ENGLISH

1 INSTALLATION
1.1 Preliminary inspection
The machine travels at the customer’s risk. In case packing is damaged, immediately inform the carrier.
Immediately inform the carrier also in case of damage to the machine, even if you open the packing a few days after the delivery.
It is always advisable to accept the good SUBJECT TO INSPECTION.
The equipment shall be assembled with great care: falls and shocks can damage it without showing external damages.
1.2 Field of use
Equipment suitable for the production and cooling of whipped cream for appropriate legal purposes.
1.3 Limits of use
Other uses are not allowed unless previous authorization from the manufacturer. The equipment is not suitable for dangerous or flammable liquids.
Max. room temperature: cl. No=32° (according to the data reported on the nameplate). According to the EN standards in force, the equipment is not suitable for mobile applications.
1.4Machine outfit
- N°1 cleaning rod
- N°1 gasket dismantling tool
1.5Marking
SERIAL NUMBER
MODEL
GAS
FREQUENCY
VOLTAGE |
AMPS |
|
ENGLISH - 4

fig. 1
fig. 2
fig. 3
fig. 4
5 - ENGLISH
1.6 Start-up
In the tank a packet is present with the following components for assembly:
sleeve, labyrinth, cock, drip collector.
-Insert the sleeve into the apposite guide, until it reaches the pump inlet (pict1). Insert the labyrinth into the sleeve
(pict 2), insert the spacer (only C007)
-Mount the tap and turn it clockwise 45° (pict 3)
-Insert the drip collector into its seat (pict 4) Before starting up the machine, it is necessary to thoroughly clean all components and sterilize the parts in contact with the product.
-The installation of the equipment shall be carried out by authorized technical personnel only, that shall also take care of maintenance according to the standards in force
-Make sure that the supply voltage and mains power comply with the values reported on the rating plate
-Connect the machine to a power supply source with efficient earthing contact, interpose an automatic safety switch or provided with adequately rated fuses. The feeder shall be well stretched, avoiding rolling and overlapping. It must not be exposed to possible shocks or tampering attempts; it must not be positioned near liquids or water or source of heat; it must not be damaged, if so, make it be replaced by qualified personnel before connecting the machine to the mains
-Do not expose the machine to the sunlight or other sources of heat
-Lay the equipment on a flat surface and leave at least 10 cm between the machine side panels and the walls or other obstacles
-The side housing the air condenser shall be easily accessible for cleaning.

fig. 5
fig. 6
fig. 7
fig. 8
2. OPERATION
2.1 Control panel, controls
1.ON/OFF button with leds indicating: “connected equipment under voltage” (right led), “machine enabled” (left led);
2.CLEAN: Led “machine under cleaning”;
3.DISPLAY showing: temperature monitoring in the tank – alarms display – delivery time in seconds;
4.SET: Pushbutton to switch on timed delivery; thermostat regulation
5.Led indicating machine under cooling;
6.Delivery pushbutton;
7.Washing drain plug;
8.Tap;
9.Dispensing piston
10.Tank cover. (fig.5)
11.Tank thermometer
2.2Whipped cream delivery
1.Wash and sanitize the machine according to the instructions reported in the paragraph “Washing and lubrication”
2.Turn the master switch “ON”, the left led lights up, The compressor cools down the tank until the conservation temperature is reached.
3.For C004 model, pour only cold cream in perfect state of preservation into the tank. Introduce no more than 2,5 liters of liquid cream, which in any case shall never reach the base of the pump (pict 6)
For C007 model, pour only cold cream in perfect state of preservation into the tank. Introduce no more than 6 or 9 liters of liquid cream into removable tank.
4.Rotate the “cream regulator” on the desired position
(see paragraph 2.5) (pict 7)
5.To dispense whipped cream, press the pushbutton to deliver the desired quantity (pict 8)
ENGLISH - 6

-Avoid pouring the liquid cream on the pump, during tank filling
-Make sure that sugar is well dissolved in cream to avoid that lumps obstruct the suction silicone hose
-In any case, the addition of quantities of sugar superior to 8%-10% of the liquid cream is not recommended because it can limit the increase in volume.
-Never add solids, such as pieces of hazelnut, chocolate and so on, which could obstruct the pump and damage the equipment
-Avoid to use the pump dry
-Avoid to use the pump with water only
-During operation, always keep the tank cover closed, to avoid the penetration of dust and impurities into the product
-Before starting dispensing whipped cream, check that the temperature displayed by the
thermometer on the control panel ranges between +1°C(33,8°F) and +5°C(41°F). Warmer temperatures do not allow cream whipping and hygienic preservation .
-
2.3 Timed delivery
This function is useful in case it is necessary to perform frequent cream deliveries at constant times. The machine is supplied with delivery time set to zero. To insert a value, proceed as follows:
1.Press pushbutton “SET”, the value “0.0” appears on the display, at the same time press pushbutton “ON-OFF” to set the new time value. By pulse pressing it, the value on the display increases 0,2 seconds each time, up to a maximum of 6 seconds, then it return to zero and the cycle starts again. Keep the pushbutton “ON-OFF” pressed and the value on the display quickly passes by.
2.Release the pushbutton and the delivery time value is confirmed. The display shows the cream temperature.
3.Press the delivery pushbutton and the pump starts up until the time, previously set up, is expired.
4.To reset the time value, or to change it, follow the above-mentioned instructions.
2.4 Regulation conservation temperature
This function is useful in case it is necessary to regulate the temperature of the thermostat into the product tank. To insert a new temperature value, proceed as follows:
1.Verify that the machine is connected to the electrical net (right led on button ON/OFF is lighted up) and the machine is OFF (left led on button ON/OFF is off).
7 - ENGLISH
2.Press contemporaneously buttons “ON/OFF” and “SET”, on display will appear the temperature of the thermostat.
3.Keep “SET” pressed and press button “ON/OFF” to insert new temperature value.
4.Ones reached the new value, release button “SET” and “ON/OFF” to store the data.
5.Start the machine pressing “ON/OFF” (left red is on).
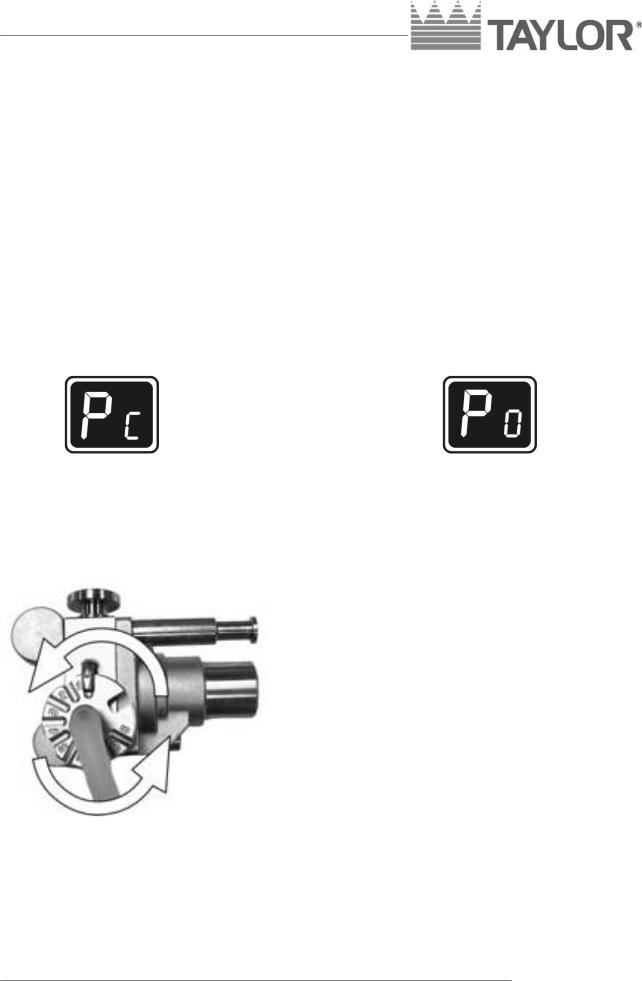
2.5 Alarm display |
|
If the display shows the following |
If the display shows the following |
symbols, the meaning is “short-circuited |
symbols, the meaning is “disconnected |
probe”. |
probe”. |
In both cases it is necessary to ask for the intervention of a technician.
2.6 Cream whipper regulation
C004 - C007 are suitable to whip fresh cream, vegetable and “rebuilt” cream” with percentage of fats ranging between 26 and 40%.
To get a well-whipped cream, it is necessary to act on the “cream regulator” located on the pump body side and to establish the most suitable positions among the 9 present for the kind of cream used and the kind of product to deliver.
Rotate the regulator to low values (1,2,…) to get a less whipped product; rotate it towards higher values (…,8,9) to get a cream richer in air (pict 9).
fig. 9
ENGLISH - 8
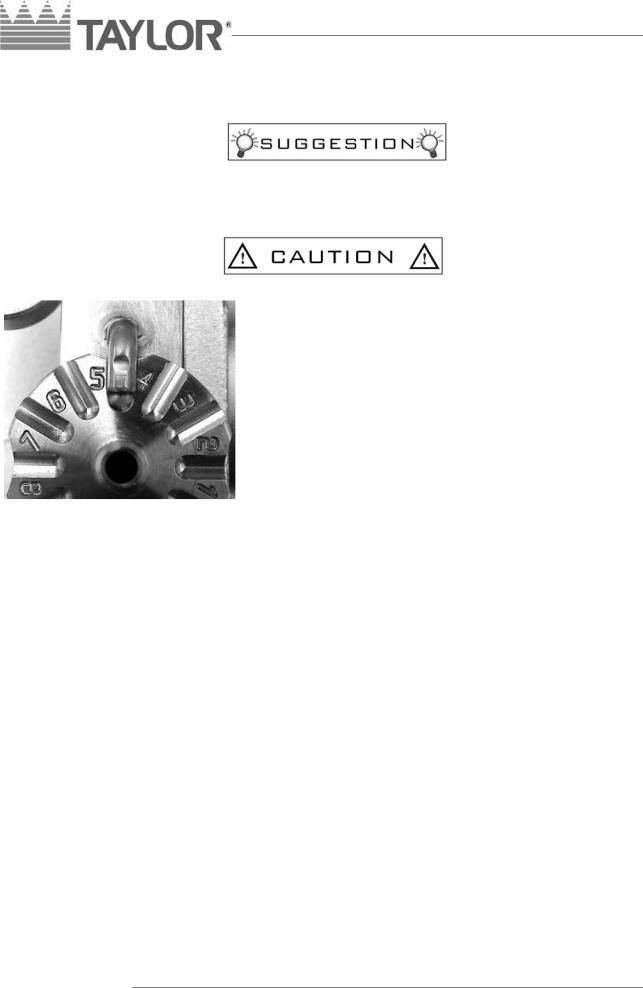
Only by means of the “cream regulator”, it is possible to have the correct air-liquid mix and therefore an excellent whipped cream.
For a correct regulation, it is always advisable to start from position no. 1 and progressively rotate the regulator towards the other positions until the desired product can be obtained.
Different creams require different position for whipping.
Some vegetable creams and in general creams with high percentages of fats cannot be whipped when the “cream regulator” is set on high positions.
Always make sure that the position indicator is always connected with a notch and never between two notches (pict 10).
fig. 10
9 - ENGLISH
3. MAINTENANCE
During maintenance operations, never touch the machine with hands or tools without making sure that the machine is in STOP position, the master switch is off and/or the multipolar plug disconnected.
In case of troubles, make sure that they are not caused by a lack of servicing. On the contrary, ask for the intervention of a technician. In case it is necessary to replace a piece, always ask a distributor or an authorized retailer for ORIGINAL spare parts.
fig. 11
fig. 12
3.1 Washing and lubrication.
Bacteria and moulds easily proliferate due to the presence of fats in cream, that is why it is necessary to carefully wash and clean all parts in contact with the product. Rustless materials and/or made of plastic for food industry used for our machines, in conformity with the most severe international standards, make washing operations easier, however they cannot prevent mould proliferation, etc. caused by insufficient cleaning.
TAYLOR recommends to clean the tank and the pump at least twice a week and in any case in compliance with the sanitary standards in force in the country of installation.
In the evening, after sales, in case a complete washing cycle is not foreseen, it is advisable to dismantle the star nozzle, the cock, the sleeve and the labyrinth, wash and sanitize them.
Periodically remove O-rings by means of the apposite extractor and carefully wash them.
To perform a correct cleaning of cream whipping machine C004-C007, proceed as follows:
1.Turn the machine off and remove cream residues (pict 12) .
2.Pour cleaning solution into the tank. Let the solution act for some minutes (pict.11).
3.At this point it is possible, but not necessary to carry out a pre-soak cycle. To this purpose, press the delivery pushbutton for max. 3-4 seconds.
During this period, the display visualizes (--) and the led “CLEAN” lights up until the delivery pushbutton is released. Attention: to prevent pump
ENGLISH - 10
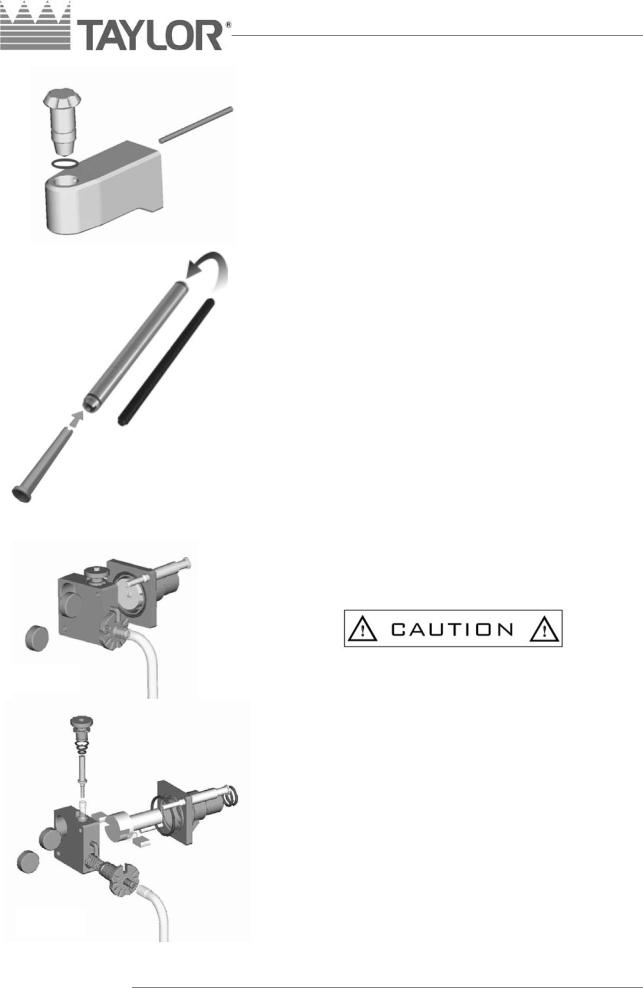
fig. 13
 Only mod. C007
fig. 14
fig. 15
fig. 16
11 - ENGLISH
wear, make it run only for the time necessary to cleaning .
4.Counterclockwise turn the tap to remove it: a) draw out the dispensing cock and disassemble it (pict 13); b) remove the sleeve by drawing it outwards and take the labyrinth out (pict 14); c) clockwise turn the pump to extract it from its seat.
Accurately wash.
5.Disassemble the pump according to the following instructions: a) unscrew the two knobs; b) remove the cover (pict 15); c) draw the rotor with the scrapes out; d) take the shutter and the rubber non-return valve out; e) extract the “cream regulator” with relevant spring and suction hose. Wash with detergent solution and clean the suction hose with the apposite cleaning rod; then sanitize (pict 16).
6.To mount the pump again, follow the opposite sequence, remember to apply a thin layer of specific lubricant on the rotor.
7.Empty the tank of the detergent, rinse with a plenty of water and then sanitize. Before restart the production of whipped cream, completely drain the sanitizer.
8.Mount the cock, the sleeve, the labyrinth and the pump on the machine again.
9.Press the pushbutton ON/OFF so that both leds are lighted up.
-To preserve plastic components and the rotor, never make use of solvents and/or diluents during washing.
-Chemical products for sanitization shall be used according to the standards in force and with utmost caution.
-After each sanitization, do not touch sterilized parts with hands, towels, sponges or others.
-Avoid to use the pump dry.
-Avoid to use for a long period the pump with water only

4. TROUBLE-SHOOTING
|
TROUBLE |
|
|
POSSIBLE CAUSES |
|
|
REMEDIES |
|
|
|
|
|
|
|
|
|
|
|
|
|
|
Lack of power supply |
|
|
Check the presence of voltage in |
|
|
The equipment does not work and |
|
|
|
|
the mains |
|
|
|
|
|
|
|
|
|
||
|
the warning lights are off |
|
|
|
|
|
|
|
|
|
|
Automatic breaker tripped or |
|
|
Send for the technician |
|
|
|
|
|
|
|
|
|
||
|
|
|
|
power current fuses blown |
|
|
|
|
|
|
|
|
|
|
|
|
|
|
|
|
|
|
|
|
|
|
|
|
|
|
Machine not enabled |
|
|
Press the master switch ON/OFF |
|
|
The machine is on, but the |
|
|
|
|
|
until both warning lights light up. |
|
|
temperature in the tank does not |
|
|
|
|
|
|
|
|
|
|
|
|
|
|
|
|
|
fall |
|
|
Lack of refrigerant in the cooling |
|
|
Send for the technician |
|
|
|
|
|
|
|
|
||
|
|
|
|
system |
|
|
|
|
|
|
|
|
|
|
|
|
|
|
|
|
|
|
|
|
|
|
|
The product in the tank is frozen |
|
Wrong thermostat temperature |
|
|
Increase the seted thermostat |
|
|
|
|
|
|
temperature |
|
|||
|
|
|
|
|
|
|
|
|
|
|
|
|
|
|
|
|
|
|
The product in the tank is too |
|
|
Wrong thermostat temperature |
|
|
Reduce the seted thermostat |
|
|
warm |
|
|
|
|
temperature |
|
|
|
|
|
|
|
|
|
||
|
|
|
|
|
|
|
|
|
|
|
|
|
Wrong pump regulation |
|
|
Turn the “cream regulator” to |
|
|
|
|
|
|
|
higher positions |
|
|
|
|
|
|
|
|
|
|
|
|
|
|
|
|
|
|
|
|
|
The cream comes out liquid |
|
|
Stuck non-return valve |
|
|
Wash the shutter and the rubber |
|
|
|
|
|
|
non-return valve |
|
||
|
|
|
|
|
|
|
|
|
|
|
|
|
|
|
|
|
|
|
|
|
|
The cream is not suitable for |
|
|
Use another kind of cream |
|
|
|
|
|
whipping |
|
|
|
|
|
|
|
|
|
|
|
|
|
|
|
|
|
|
|
|
|
|
|
|
|
|
Wrong pump regulation |
|
|
Turn the “cream regulator” to lower |
|
|
|
|
|
|
|
positions |
|
|
|
Cream comes out slowly and it is |
|
|
|
|
|
|
|
|
|
|
|
|
|
|
|
|
|
too rich in air |
|
|
|
|
|
Make sure that the tracer is in |
|
|
|
|
|
Tracer not aligned with notches |
|
|
connection with the cream |
|
|
|
|
|
|
|
|
regulator notches |
|
|
|
|
|
Possible obstruction of the |
|
|
Wash labyrinth and cock with |
|
|
The pump works, but no cream |
|
|
labyrinth and the cock holes |
|
|
warm water. |
|
|
|
|
|
|
|
|
|
|
|
comes out of the cock |
|
|
Ice presence in the labyrinth |
|
|
Increase the seted thermostat |
|
|
|
|
|
|
|
|
||
|
|
|
|
|
|
temperature |
|
|
|
|
|
|
|
|
|
|
|
|
|
|
|
|
|
|
|
|
ENGLISH - 12

1 - FRANÇAIS

IMPORTANT
Nous vous recommandons de lire attentivement et entièrement ce manuel avant d’utiliser votre machine TAYLOR.
Nous vous conseillons vivement de faire particulièrement attention aux avertissements suivants :
Si vous ne respectez pas cet avertissement-ci, vous courez des risques pour votre santé et/ou pour le bon fonctionnement de la machine.
Vous pourrez obtenir de votre machine un maximum de prestations uniquement si vous respectez attentivement ces conseils.
La machine est sous garantie aux conditions illustrées par le vendeur.
Veuillez bien indiquer dans le champ ci-dessous le numéro d’immatriculation de votre machine
Numéro d’immatriculation
Cachet du concessionnaire
FRANÇAIS - 2

Compliments ! Vous avez choisi une machine TAYLOR. Le présent manuel fourni avec cette machine doit être considéré comme une partie intégrante et essentielle de celle-ci et il devra être remis à l’utilisateur final. Avant d’effectuer toute opération, veuillez étudier attentivement les instructions qu’il contient : seule une lecture attentive vous permettra d’obtenir de votre machine un maximum de prestations. Dans les pages qui suivent figurent toutes les indications permettant d’effectuer correctement les opérations d’installation, de fonctionnement, de réglage et d’entretien ordinaire. TAYLOR se réserve le droit d’apporter toutes les modifications nécessaires dans le but d’améliorer son produit ou son manuel technique, en insérant les variantes dans les éditions successives.
Ne jamais toucher la machine avec les mains ou avec des outils, lors des opérations de production ainsi que de nettoyage et d’entretien, avant d’avoir vérifié au préalable si la machine est bien en fonction STOP, si l’interrupteur général est bien ouvert et/ou si la fiche de courant multipolaire est bien déconnectée.
TAYLOR décline toute responsabilité en cas d’éventuel d’accident qui se produirait suite à la non-application des points susdits durant l’utilisation de ses machines.
TABLE DES MATIERES
1. INSTALLATION |
………………………………………………… |
4 |
|
1.1Inspection préliminaire ………………………………………… |
4 |
||
1.2Utilisations |
|
………………………………………… |
4 |
1.3Limites d’utilisation |
………………………………………… |
4 |
|
1.4Matériel en dotation |
………………………………………… |
4 |
|
1.5Marquage |
|
………………………………………… |
4 |
1.6Mise en marche |
|
………………………………………… |
5 |
2. FONCTIONNEMENT ………………………………………………… |
6 |
||
2.1 Tableau de contrôle, commandes et composants …………. |
6 |
||
2.2 Distribution de crème fouettée |
…………………………. |
6 |
|
2.3 Distribution temporisée |
…………………………………. |
7 |
|
2.4 Régulation de la température de conservation...................... |
7 |
||
2.5 Affichage des alarmes |
…………………………………. |
8 |
|
2.6 Réglage du fouetteur de crème |
…………………………. |
8 |
|
3. ENTRETIEN ET NETTOYAGE |
…………………………………. |
10 |
|
3.1 Lavage et lubrification |
…………………………………. |
10 |
|
4. RECHERCHE DES PANNES |
…………………………………. |
12 |
|
5. ANNEXES |
…………………………………………………………. |
I |
|
5.1 Caractéristiques techniques |
…………………………………. |
I |
|
5.2 Schéma du circuit frigorifique …………………………………. |
II |
||
3 - FRANÇAIS

1 INSTALLATION
1.1 Inspection préliminaire
La machine voyage aux risques et périls de l’acquéreur; si vous remarquez que l’emballage est abîmé, faites immédiatement une réserve au transporteur.
Emettez également une réserve au transporteur tout de suite après le déballage, même s’il a lieu quelques jours après la livraison, si vous remarquez que la machine est abîmée.
Il est toujours préférable d’accepter la marchandise SOUS RESERVE DE VERIFICATION. L’appareil doit être déplacé avec soin; les chutes et les chocs peuvent l’endommager même sans qu’il y ait de dommages apparents.
1.2 Utilisations
Appareil destiné au refroidissement et à la production de crème fouettée pour les usages autorisés par la Loi.
1.3 Limites d’utilisation
Les autres usages sont interdits sauf autorisation préalable du fabricant. L’appareil ne convient pas aux liquides dangereux ou inflammables.
Température ambiante maximum : cl. N=32° (conformément aux données figurant sur la plaquette).
En accord avec les normes EN en vigueur, l’appareil ne se prête pas aux applications mobiles.
1.4Matériel en dotation
- N°1 Goupillon
- N°1 Extracteur joints
1.5Marquage
N° IMMATRIC.
MODELE
GAZ
FREQUENCE
TENSION |
AMPERE |
FRANÇAIS - 4
 Loading...