


MOON PHASE

Welcome to theTaylor® WeatherGuide System. Simple,reliable, accurate…it allows you to monitor indoor or outdoor locations from one room. The base unit reads indoor conditions, while the remote sensor wirelesslyreports outdoor weather conditions back to the base unit for an all-in-one weather display.
Plan your work day,play day,every day. Now that’s smart!
Powering the WeatherGuide™.................................................................. |
|
3 |
|
How to Set Up the WeatherGuide™ ...................................................... |
3 |
||
How to Display the WeatherGuide™ ...................................................... |
5 |
||
Atomic Clock |
|
|
|
Atomic Clock Setting ................................................................ |
|
6 |
|
Manual Clock Setting.................................................................. |
|
7 |
|
Alarm ............................................................................................ |
2 |
8 |
|
Snooze |
10 |
||
|
|||
How to Read the WeatherGuide™........................................................ |
11 |
||
Temperature/Humidity Displays ............................................ |
12 |
||
Minimum/Maximum Records ................................................ |
13 |
||
Barometric Pressure ................................................................ |
|
14 |
|
History Records........................................................................ |
|
14 |
|
Programming Altitude .............................................................. |
|
15 |
|
Comfort Level Readings |
.......................................................... |
16 |
|
Temperature/Humidity Trends .............................................. |
16 |
||
Weather Forecast .................................................................... |
|
17 |
|
Moon Phase/Tide Levels.......................................................... |
18 |
||
Backlight ...................................................................................... |
|
19 |
|
°F/°C Switch .............................................................................. |
|
19 |
|
Low Battery Display ................................................................ |
|
19 |
|
TroubleShooting |
|
|
|
Disconnected Signals................................................................ |
|
20 |
|
Transmission Collision ............................................................ |
|
21 |
|
Problem Solving ........................................................................ |
|
22 |
|
How to Set up Your WeatherGuide |
|
System |
Base Unit |
™ |
|
|
|
|
Your WeatherGuide™ bas unit may b |
powered by either an AC |
|
adaptor (included) r 2 AAA batteries (not includ d). |
||
Adaptor ower – ins r the connector end of the adaptor into |
||
the jack on the side of the base nit. Plug the other end into the |
||
pr per electrical outlet. |
|
|
Battery Power – Remove the battery compartment cover on |
||
the back of the nit. Install 2 AAA batterie . Replace the battery |
||
compar ment cover. |
|
|
Important:Power the base unit befor |
installing batteries in the re- |
|
m te s nsor,or the units’ ransmissions ma not properlyconnect. |
||
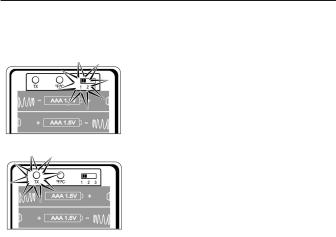
Remote S nsor
Unscrew th 4 screws securing the remote sensor’s battery compartment c ver located on the b ck of the unit. Install 2 AAA batteries. (Tip: Lithium batteries are r commende in extremely cold or hot locations.)
First, power up the base unit, using either the AC adaptor or 2 AAA batteries. Next, install 2 AAA batteries into the remote sensor. Place the base unit as close as possible to the remote unit.
There 3is a Channel switch in the remote sensor battery compartment. Move the
switch to Channel 1.
Move channel switch to Channel 1
Press the “TX” button located inside the remote sensor battery compartment.This will send a transmission signal to the base unit.The red LED Indicator light will flash
when a signal is transmitted.
Press the Tx button to send transmission signal to base unit
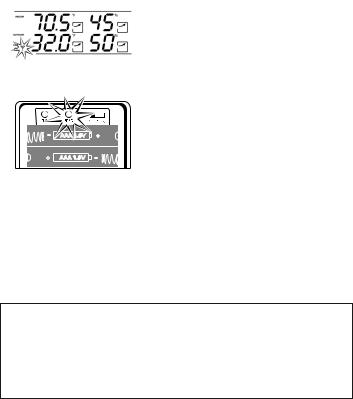
Transmission successful
If the transmission is successful,the remote
sensor readings and a “  ” icon will appear on the base unit. If dashes are still displayed on the receiver unit, press the Tx button again.
To change the remote sensor’s temperature display to Celsius, press the “+C/F” button inside the remote’s battery compartment.
|
Replace the remote’s battery compart- |
Select °F or °C for remote |
ment cover. |
The remote will automatically transmit readings to the base unit.
• The first remote registered will transmit every 53 seconds.
• If a second remote is registered,4it will transmit every 56 seconds.
• If a third remote is registered, it will transmit every 59 seconds.
Note: A maximum of 3 remote sensor units can be registered. Should you purchase one or two additional remote units (Model 1536, sold separately) to expand your thermometer monitoring capabilities to multiple locations, slide the CH switch to Channel 2 to register the second sensor and select Channel 3 to register the third sensor.The Channel number assigned will appear on the remote’s LCD screen.
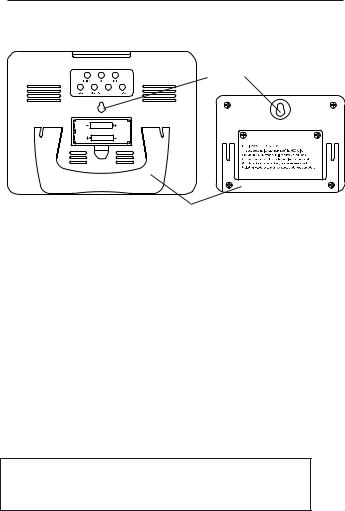
Table top – use the Table Stand on the back of the base and remote sensor units
Wall– use the keyhole on the back of the base and remotesensor units.
Keyhole
Base Unit |
TableStand |
Remote Sensor |
Base unit location – |
5 |
|
|
|
Place the unit indoors in a well-ventilated location awayfrom direct sunlight.
Remote sensor location –
The transmission range of the remote sensor is 100 feet.The effective transmission range is vastly affected by obstacles such as walls, sheds, trees, etc.Try various set ups for the best results. Shorten the distance between receiver and remote units when necessary. Place indoor in a well ventilated location away from direct sunlight. Place the sensor in a dry, shaded area. Direct sunlight will heat the casing and inflate temperatures readings.
Important: Though the remote unit is weather proof, it should be placed away from direct sunlight, rain, snow and should never be submerged in water.
A maximum of 3 remote sensor units can be registered. One remote sensor is included.To purchase additional Remote Sensors (Taylor model 1536), please visit www.partshelf.com.
Your WeatherGuide™ has a radio-controlled clock/calendar that sets itself to the radio signal transmitted by the U.S.Atomic Clock located in Colorado.To synchronize the atomic clock:
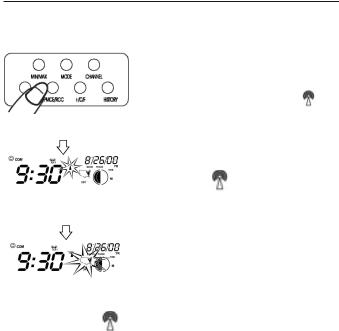
1.Press and hold the “-PMCE/RCC” button on the back of the base unit.The
|
|
|
|
|
|
unit will beep.The antenna icon |
will |
|||
Press and hold -PMCE/RCC to |
|
flash on the screen. |
|
|
||||||
synchronize atomic clock. Release |
Please |
note: |
reception |
may |
take |
|||||
when unit beeps. |
|
|||||||||
|
|
|
|
|
|
2-10 minutes. |
|
|
|
|
|
|
|
|
|
|
2. When |
the |
icon is |
steady, |
the |
Steady Icon = Atomic clock |
|
|||||||||
|
Atomic |
Clock |
has been |
successfully |
||||||
synchronized |
|
|||||||||
(may take up to 24 hours to |
|
synchronized. |
|
|
|
|||||
capture signal). |
|
|
|
|
||||||
|
|
|
|
|
|
3. Choose your time zone by pressing the |
||||
|
|
|
|
|
|
|||||
|
|
|
|
|
|
“PMCE/RCC” button. |
|
|
||
Press PMCE/RCC to choose |
|
|
|
|
|
|
||||
time zone. |
|
|
|
|
|
|
||||
Please note: If the |
icon disappears, the Atomic time signal is not |
|||||||||
|
|
|
|
|
|
6 |
|
|
|
|
available at the moment.Try another location later away from possible sources of interference, such as mobile phones, appliances, computers, refrigerators,TVs, etc. Daytime conditions such as sunlight and other atmospheric interferences can affect synchronization; try setting the clock during evening hours. Please note:if the signal is weak,it may take up to 24 hours for the atomic clock to establish a connection. In the meantime, the clock may be manually set. Once the atomic signal is found, it will override the manually programmed time and date.
The Atomic Clock will have a daily synchronization at 2:05 am Pacific Time every day. Each reception cycle is 2.5 minutes minimum and 10 minutes maximum.
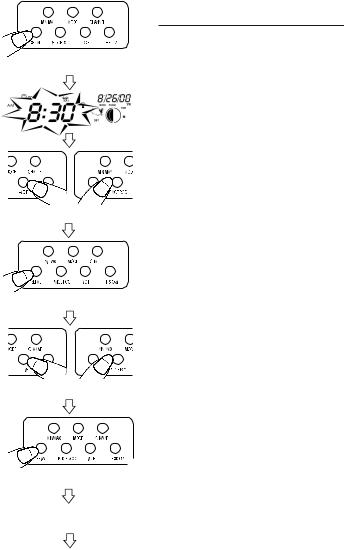
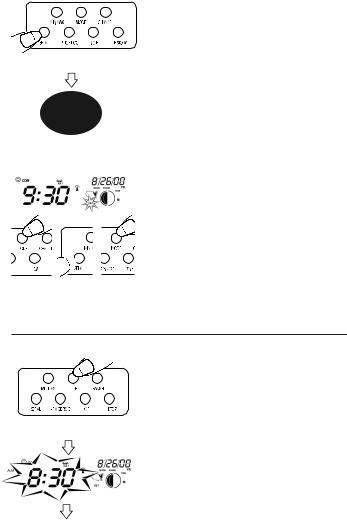
Press and hold SET/AL to start clock setting
Press +C/F or -PMCE/RCC to reset seconds.
Press SET/AL to enter seconds.
 Press +C/F or -PMCE/RCC to change minutes.
Press SET/AL to enter minutes.
Repeat to set rest of clock/calendar settings.
Tomanually set the clock:
1. Press and hold the “SET/AL” button. The unit will beep.
2. Press “+C/F” or “-PMCE/RCC” to set the seconds to zero. Press “SET/AL” to enter.
3. Press “+C/F” or “-PMCE/RCC” to change the hours. Press“SET/AL” to enter.
4. Press “+C/F” or “-PMCE/RCC” to change the minutes. Press “SET/AL” to enter.
5. Press “+C/F” or “-PMCE/RCC” to choose either the month/date or day/month display.Press “SET/AL”to enter. 7
6. Press “+C/F” or “-PMCE/RCC” to change the year. Press “SET/AL” to enter.
7. Press “+C/F” or “-PMCE/RCC” to change the month or day. Press “SET/AL” to enter.
8. Press “+C/F” or “-PMCE/RCC” to change the date or month. Press “SET/AL” to enter.
9. Press “+C/F” or “-PMCE/RCC” to choose a language* display. Press “SET/AL” to enter.
10. Press “+C/F” or “-PMCE/RCC” to choose either the 12 or 24 hour time display.Press“SET/AL” to enter.
11. The clock/calendar is now set.
(*language options are: EN (English), DA (Danish), ES (Spanish), NE (Dutch), FR (French), IT (Italian), GE (German).)
HowPress toSET/ALSetaftertheAlarmchoosing 12/24 hour tim .
Tip: Hold down the “+C/F” or “-PMCE/RCC” buttons to advance the digits quickly.
Clock is set
Daylight Savings Time – to turn DST on, press “MODE” until “OFF” appears in the clock digits. Press and hold the “SET/AL” button until it switches to “ON”. DST is8now on. Press “MODE” to return to the clock display.
 Press M
 hen press nd hold SET/AL, hen press Mode
to change DST.
Your WeatherGuide™ has 2 separate alarm settings.
Toset one alarm:
1. Press the “MODE” button on the back of the base unit.The unit will beep.The clock time changes to the alarm time. “A1” appears next to the time.
 Loading...