


 Loading...
TAYLOR C850, C852, C854, C856, C858 User Manual
...Clamshell Grill |
|
Taylor Models C850, C852, C854, C856, C858, & C860 |
|
This equipment chapter is to be inserted |
|
in the appropriate section of the |
|
Equipment Manual. |
|
Manufactured exclusively for |
|
McDonald's® By |
|
Taylor Company® |
|
750 N. Blackhawk Blvd. |
|
Rockton, IL 61072 |
|
McDonald's® Hotline: |
|
(877-435-7623) |
|
service@taylor-company.com |
|
TABLE OF CONTENTS |
|
Warranty ......................................................................................................................................................... |
3 |
Introduction ..................................................................................................................................................... |
3 |
Safety .............................................................................................................................................................. |
3 |
Parts Identification/Function and Exploded View ............................................................................................ |
6 |
Important to The Operator ............................................................................................................................ |
27 |
Equipment Setup and Close Procedures ...................................................................................................... |
31 |
Menu Screens ............................................................................................................................................... |
35 |
Sausage, Circular Bacon and Patty Placement Guide ................................................................................. |
47 |
Standby Procedures ..................................................................................................................................... |
49 |
Cleaning After Each Run of Product (Using Lower Release Sheets) ........................................................... |
49 |
Cleaning After Each Run of Product (Not Using Lower Release Sheets) ..................................................... |
50 |
Daily Cleaning Procedures (Using Lower Release Sheets) ......................................................................... |
52 |
Cleaning Procedure-24 Hour Stores (with Lower Release Sheets) .............................................................. |
60 |
Daily Cleaning Procedures (without Lower Release Sheets) ........................................................................ |
60 |
Cleaning Procedure-24 Hour Stores (without Lower Release Sheets) ......................................................... |
67 |
Quarterly Recovery Mode Procedures .......................................................................................................... |
67 |
Troubleshooting Guide .................................................................................................................................. |
73 |
Equipment Troubleshooting .......................................................................................................................... |
74 |
Product Troubleshooting ............................................................................................................................... |
75 |
Limited Warranty on Equipment .................................................................................................................... |
76 |
Limited Warranty on Parts ............................................................................................................................ |
78 |
Ordering/Service Information ........................................................................................................................ |
81 |
Warranty
Warranty information is contained in this Equipment Manual. Refer to the warranty information listed in the Limited Warranty on Equipment and Limited Warranty on Parts sections and to the warranty classifications listed in the Parts Identification/Function section when service is performed on your machine.
It is recommended that the operator take the necessary time to carefully read through the complete warranty information.Thoroughly understand your warranty protection before you begin operation.
For any questions pertaining to the Taylor Warranty, please contact Taylor Company, Rockton, Illinois 61072.
This manual is for the exclusive use of licensees and employees of McDonald's Corporation.
©2006 McDonald's Corporation |
November, 2006 (Original Publication) |
Printed in |
All Rights Reserved |
(Updated July, 2019 ) |
The United States of America |
|
EM SD11 |
|
|
|
|
WARRANTY |
SAFETY |
Warranty information is contained in this Equipment Manual. Refer to the warranty information listed in the Limited Warranty on Equipment and Limited Warranty on Parts sections and to the warranty classifications listed in the Parts Identification/Function section when service is performed on your machine.
It is recommended that the operator take the necessary time to carefully read through the complete warranty information. Thoroughly understand your warranty protection before you begin operation.
For any questions pertaining to the Taylor Warranty, please contact Taylor Company, Rockton, Illinois 61072.
INTRODUCTION
Note: These machines are intended to be used for commercial applications, for example in kitchens of restaurants, canteens, hospitals, and in commercial enterprises such as bakeries, butcheries, etc., but not for continuous mass production of food.
The models contained in this Operator’s Manual are the C850, C852, C854, C856, C858, and C860. The Model C850 is an electric grill with one upper platen. The Model C852 is an electric grill with two independent upper platens. The Model C854 is an electric grill with one upper platen and a shortened lower cooking surface. The Model C856 is an electric grill with two independent upper platens and two independent shortened lower cooking plates. The Model C858/C860 is an electric grill with three independent upper platens and three independent lower cooking plates.
These grills provide automatic leveling of the plates. They are capable of cooking a variety of products and feature two cooking options, Auto and Manual.
Auto Option: The grills automatically detect the product placed on the grill plate (menu items that are cooked double-sided, only) and set the appropriate cooking parameters.
Manual Option: After the operator selects the desired product to be cooked, the grills set the appropriate cooking parameters.
These grills provide all the features of a flat grill, as well as the advantages of two-sided cooking.
DANGER! Improper installation, adjustment, alteration, service, or maintenance can cause property damage, injury, or death. Read the installation, operating, and maintenance instructions thoroughly before installing or servicing this machine.
Always follow these safety precautions when operating the grill:
NOTICE! DO NOT operate this machine without reading this operator's manual. Failure to comply may result in machine damage or personal injury. This manual should be kept in a safe place for future reference.
IMPORTANT! This machine is to be used only by trained personnel. It is not intended for use by children or people with reduced physical, sensory, or mental capabilities or lack of experience and knowledge, unless given supervision or instruction concerning the use of the machine by a person responsible for their safety. Children should be supervised to ensure that they do not play with the machine.
WARNING! DO NOT install the machine in an area where a water jet could be used. DO NOT use a water jet to clean or rinse the machine. Failure to follow this instruction may result in serious electrical shock. In addition, water may collect inside the machine and destroy electrical components and cause injury from hot steam.
WARNING! DO NOT operate this machine unless it is properly grounded. Failure to comply may result in equipment damage or personal injury.
3

 WARNING! All repairs must be performed by an authorized Taylor service technician. The main power supplies to the machine must be disconnected prior to performing any repairs. Failure to comply may result in equipment damage or personal injury.
These grills are designed for indoor use only.
Note: Only instructions originating from the factory or its authorized translation representative(s) are considered to be the original set of instructions.
IMPORTANT! This machine is provided with an equipotential grounding lug that is to be properly attached to the rear of the frame by the authorized installer. The installation location is marked by the equipotential bonding symbol (5021 of IEC 60417-1) on the removable panel and the frame.
 WARNING! Avoid injury.
•DO NOT operate this machine unless it is properly grounded.
•DO NOT operate this machine with larger fuses than specified on the data label.
•DO NOT operate this machine unless all service panels and access doors are attached with screws.
•All repairs must be performed by an authorized Taylor service technician.
•The main power supplies to the machine must be disconnected prior to performing any repairs.
•Only authorized Taylor service technicians or licensed electricians may install a plug or replacement cord on this machine.
•Stationary machines which are not equipped with a power cord and a plug or other device to disconnect the machine from the power source must have an all-pole disconnecting device with a contact gap of at least 1/8 in. (3 mm) installed in the external installation.
•Machines that are permanently connected to fixed wiring and for which leakage currents may exceed 10 mA, particularly when disconnected
or not used for long periods, or during initial installation, shall have protective devices such as a GFI to protect against the leakage of current installed by the authorized personnel to the local codes.
•Supply cords used with this machine shall be oil-resistant, sheathed flexible cable not lighter than ordinary polychloroprene or other equivalent synthetic elastomer-sheathed cord (code designation 60245 IEC 57) installed with the proper cord anchorage to relieve conductors from strain, including twisting, at the terminals and protect the insulation of the conductors from abrasion.
If the supply cord is damaged, it must be replaced by the manufacturer, service agent, or similarly qualified person, in order to avoid a hazard.
Failure to follow these instructions may result in severe injury or death from electrocution.
 WARNING! This machine must be isolated from all combustible construction and materials including but not limited to walls, partitions, furniture, floors, curtains, paper, boxes, and decorations. Failure to comply may result in fire and cause destruction and severe injury.
 WARNING! For your safety DO NOT store or use gasoline or other flammable vapors or liquids in the vicinity of this or any other machine. Failure to comply could result in a fire hazard.
IMPORTANT!
•DO NOT obstruct the ventilation openings at the rear of this machine.
•DO NOT obstruct the flow of air in and around the machine.
•DO NOT operate this machine unless all service panels and access doors are attached with screws.
Failure to comply may result in personal injury from gas or electrical components.
4
CAUTION! Use extreme caution while setting up, operating, and cleaning the machine to avoid coming in contact with hot grill surfaces or with hot grease.
Failure to comply may result in burn injuries.
 CAUTION! The machine must be placed on a level surface.
•To ensure thorough cleaning, the machine must be pulled away from the wall. When pulling the machine away from the wall for cleaning and before returning the grill to its original position, first always check to ensure that all four casters are aligned and parallel with the machine from front to back and that the lock nuts are tight. If the casters are properly aligned, unlock the front casters and use care to smoothly and slowly roll the machine into or out of place. (Do not lift.) If there is a discontinuity in the floor, use extra care to ensure that the machine remains as level as possible from side to side. Failure to do so may cause the machine to tip, leading to machine damage or personal injury. When returning the machine to its original position, use extreme caution to smoothly and slowly roll the machine back into place and lock the front casters.
Failure to follow these instructions may cause the grill to tip and can result in severe equipment damage or personal injury.
NOTICE! All warning labels that have been attached to the machine point out safety precautions to the operator.
NOTICE! The procedure(s) in this manual include the use of chemical products. These chemical products will be highlighted with boldface letters followed by the abbreviation HCS in the text portion of the procedure. See the Hazard Communication Standard (HCS) manual for the appropriate Material Safety Data Sheet(s) (MSDS).
This machine is made using USA sizes of hardware. All metric conversions are approximate.
Noise Level: Airborne noise emission does not exceed 70 dB(A) when measured at a distance of 39 in. (1.0 m) from the surface of the machine and at a height of 62 in. (1.6 m) from the floor.
IMPORTANT! If the crossed-out waste container symbol is affixed to this machine, it signifies that this machine is compliant with the EU Directive as well as other similar legislation in effect after August 13, 2005. Therefore, it must be collected separately after its use is completed and cannot be disposed as unsorted municipal waste. The user is responsible for delivering the product to the appropriate collection facility, as specified by your local code.
For additional information regarding applicable local laws, please contact the municipal facility and/or local distributor.
5
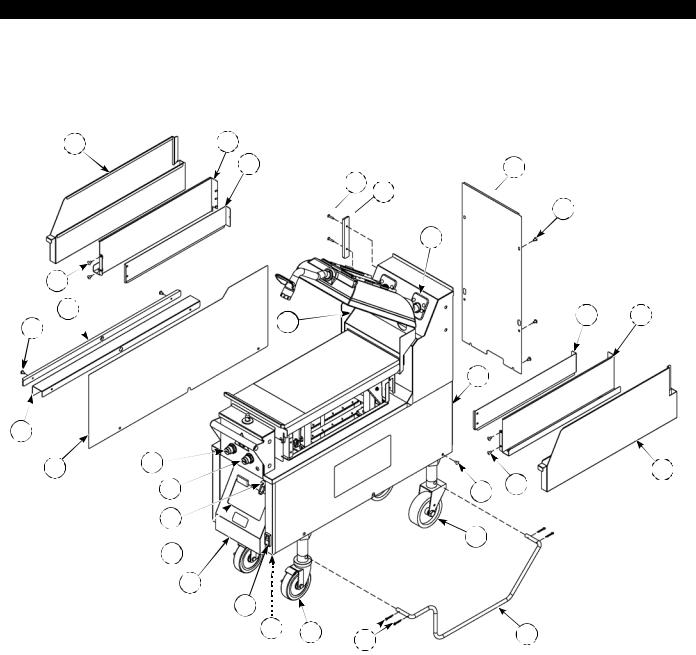
PARTS IDENTIFICATION/FUNCTION AND EXPLODED VIEW
C850 Exploded View
4
26
1 |
2 |
3 |
7 |
4 
 5
5 


 8
8
6
12
27 |
24 |
3 |
9 |
|
|||
|
|
|
|
|
|
12 |
|
25 |
23 |
|
|
10 |
|
|
|
||
|
22 |
|
8 |
11 |
|
21 |
|
13 |
|
|
20 |
|
|
|
|
|
|
|
|
|
19 |
|
|
|
|
18 |
|
|
|
|
17 |
16 |
15 |
14 |
|
|
|
|
Figure-1
6
C850 Exploded View
Item |
Part No. |
Description |
Qty. |
Function |
Warr. |
|
Class |
||||||
|
|
|
|
|
||
|
|
|
|
|
|
|
1 |
X84969 |
Can A.-Grease-L |
1 |
Container for grease. |
103 |
|
|
|
|
|
|
|
|
2 |
X84224 |
Shroud-Upper Side |
1 |
Metal bracket that the grease can slides |
103 |
|
|
|
|
|
into, securing it next to the lower grill plate. |
|
|
|
|
|
|
|
|
|
3 |
X84325 |
Shroud A. - Lower - Left |
2 |
Left/right access panel. |
103 |
|
|
|
|
|
|
|
|
4 |
070695 |
Screw-10-32X1/2 Phil |
4 |
Fastens bumpers to panels. |
000 |
|
|
|
|
|
|
|
|
5 |
084549 |
Bumper |
2 |
Protects grill from damage. |
000 |
|
|
|
|
|
|
|
|
6 |
X73600-SER |
Kit A.-Grease Shield |
2 |
Fastens grease shields to rear shroud. |
000 |
|
|
|
|
|
|
|
|
7 |
082959 |
Panel-Rear |
1 |
Provides access to internal components for |
103 |
|
|
|
|
|
service and cleaning. |
|
|
|
|
|
|
|
|
|
8 |
024298 |
Screw-10-32X3/8 Phil |
34 |
Secures the panel to the frame. |
000 |
|
|
|
|
|
|
|
|
9 |
X84225 |
Shroud A.-Upper -Right |
1 |
Metal bracket that the grease can slides |
103 |
|
|
|
|
|
into, securing it next to the lower grill plate. |
|
|
|
|
|
|
|
|
|
10 |
X84608 |
Can A.-Grease-R |
1 |
Container for grease. |
103 |
|
|
|
|
|
|
|
|
11 |
027408 |
Screw-10-32X1/4 SLTD Truss |
|
Secures the panels to the frame. |
|
|
|
|
|
|
|
|
|
12 |
082958 |
Panel-Side-Right |
1 |
Provides access to internal components for |
103 |
|
|
|
|
|
service and cleaning. |
|
|
|
|
|
|
|
|
|
13 |
078377-1 |
Caster-5 7-5/8 Stem |
2 |
Allows grill mobility. |
103 |
|
|
|
|
|
|
|
|
14 |
086984-1 |
Outrigger A.-Right |
1 |
Stabilizes grill. |
000 |
|
|
|
|
|
|
|
|
15 |
087002 |
Pin-Cotter 1/8 x 1 in. |
8 |
Secures the outrigger to the caster. |
000 |
|
|
|
|
|
|
|
|
16 |
073240-3 |
Caster-5 7-5/8 Stem-Swivel w/ |
2 |
Prevents grill movement when the brake is |
103 |
|
|
|
Lock |
|
used. |
|
|
|
|
|
|
|
|
|
17 |
086985-1 |
Outrigger-Left |
1 |
Stabilizes grill. |
000 |
|
|
|
|
|
|
|
|
18 |
076989-WP |
Switch-Rocker- DPST 10A |
1 |
Activates power to the grill and the exhaust |
103 |
|
|
|
|
|
fans. |
|
|
|
|
|
|
|
|
|
19 |
X84230 |
Door A.-Control |
1 |
Houses the controls. |
103 |
|
|
|
|
|
|
|
|
20 |
X85623-SER |
Touchscreen A. |
1 |
Controls all functions of the grill. |
- - - |
|
|
|
|
|
|
|
|
21 |
068583 |
Cover A.-USB Waterproof |
1 |
Protects USB port from water damage. |
103 |
|
|
|
|
|
|
|
|
22 |
076012 |
Button-Operator-Black |
1 |
Activates the Cook cycle, keeps the upper |
000 |
|
|
|
|
|
platen in the closed position, and displays |
|
|
|
|
|
|
STANDBY on the control. When pressed |
|
|
|
|
|
|
twice with 1-second intervals between |
|
|
|
|
|
|
presses, the upper platen will automatically |
|
|
|
|
|
|
lower into the Standby position. |
|
|
|
|
|
|
|
|
|
23 |
076011 |
Button-Operator- |
1 |
Cancels Standby mode, raises the upper |
000 |
|
|
|
Red |
|
platen, and deactivates the Cook cycle. |
|
|
|
|
|
|
|
|
|
24 |
X85465 |
Shield A.-Rear GRS |
1 |
Prevents grease migration. |
000 |
|
|
|
|
|
|
|
|
25 |
082957 |
Panel-Side-Left |
1 |
Provides access to internal components for |
103 |
|
|
|
|
|
service and cleaning. |
|
|
|
|
|
|
|
|
|
26 |
085447 |
Spacer Bumper |
1 |
Protects grill from damage. |
000 |
|
|
|
|
|
|
|
|
27 |
084613 |
Bumper |
1 |
Protects grill from damage. |
000 |
|
|
|
|
|
|
|
7

C852 Exploded View
|
3 |
4 |
5 |
|
2 |
|
|
||
|
6 |
|
||
|
|
8 |
||
|
|
|
|
9
7
1

25 |
27 |
|
26
|
|
|
|
|
10 |
24 |
21 |
|
|
|
9 |
23 |
|
|
|
||
|
|
|
|
|
|
22 |
20 |
|
|
|
11 |
|
|
|
|
|
|
|
19 |
|
|
|
|
|
18 |
17 |
|
|
|
4 |
|
16 |
|
|
|
|
15 |
|
4 |
|
|
|
|
14 |
|
||
|
|
|
1 |
13 |
|
|
|
2 |
|
||
|
|
|
|
||
|
|
|
|
|
|
|
|
3 |
|
|
12 |
|
|
|
4 |
|
|
1
14
13
1
Figure-2
8
C852 Exploded View
Item |
Part No. |
Description |
Qty. |
Function |
Warr. |
|
Class |
||||||
|
|
|
|
|
||
|
|
|
|
|
|
|
1 |
027408 |
Screw-10-32X1/4 SLTD Truss |
16 |
Secures the panels to the frame. |
000 |
|
|
|
|
|
|
|
|
2 |
X84969 |
Can A.-Grease-L |
2 |
Container for grease. |
103 |
|
|
|
|
|
|
|
|
3 |
X84224 |
Shroud A.-Upper*LFT |
2 |
Metal bracket that the grease can slides into, |
103 |
|
|
|
|
|
securing it next to the lower grill plate. |
|
|
|
|
|
|
|
|
|
4 |
X84325 |
Shroud A. - Lower - Left |
4 |
Left/right access panel. |
103 |
|
|
|
|
|
|
|
|
5 |
070695 |
Screw-10-32X1/2 PHIL |
4 |
Fastens bumper onto panel. |
000 |
|
|
|
|
|
|
|
|
6 |
084549 |
Bumper |
1 |
Protects grill from damage. |
000 |
|
|
|
|
|
|
|
|
7 |
X73600-SER |
Kit A.-Grease Shield |
4 |
Fastens grease shields to rear shroud. |
000 |
|
|
|
|
|
|
|
|
8 |
084215 |
Panel-Rear |
1 |
Provides access to internal components for |
103 |
|
|
|
|
|
service and cleaning. |
|
|
|
|
|
|
|
|
|
9 |
024298 |
Screw-10-32X3/8 SLTD Truss |
54 |
Secures the panel to the frame. |
000 |
|
|
|
|
|
|
|
|
10 |
082958 |
Panel-Side-Right |
1 |
Provides access to internal components for |
103 |
|
|
|
|
|
service and cleaning. |
|
|
|
|
|
|
|
|
|
11 |
078377 |
Caster-5 7-5/8 Stem |
2 |
Allows grill mobility. |
103 |
|
|
|
|
|
|
|
|
12 |
X84608 |
Can A.-Grease-R |
2 |
Container for grease. |
103 |
|
|
|
|
|
|
|
|
13 |
X84225 |
Shroud A.-Upper-Right |
2 |
Metal bracket that the grease can slides into, |
103 |
|
|
|
|
|
securing it next to the lower grill plate. |
|
|
|
|
|
|
|
|
|
14 |
073240 |
Caster-5 7-5/8 Swivel w/Lock |
2 |
Prevents grill movement when the lock is used. |
103 |
|
|
|
|
|
|
|
|
15 |
076989-WP |
Switch-Rocker- DPST 10A |
1 |
Activates power to the grill and the exhaust |
103 |
|
|
|
|
|
fans. |
|
|
|
|
|
|
|
|
|
16 |
X84265-23 |
Control A.-Right |
1 |
Controls all functions of the grill. |
- - - |
|
|
|
|
|
|
|
|
17 |
X85623-SER |
Touchscreen A. |
1 |
Controls all functions of the grill. |
- - - |
|
|
|
|
|
|
|
|
18 |
X84255 |
Door A.-Welded |
2 |
Houses the controls and the fan interlock |
103 |
|
|
|
|
|
switch. |
|
|
|
|
|
|
|
|
|
19 |
068583 |
Cover A.-USB Waterproof |
2 |
Protects USB port from water damage. |
103 |
|
|
|
|
|
|
|
|
20 |
076012 |
Button-Operator- Black |
2 |
Activates the Cook cycle, keeps the upper |
000 |
|
|
|
|
|
platen in the closed position, and displays the |
|
|
|
|
|
|
message STANDBY on the control. When |
|
|
|
|
|
|
pressed twice with 1-second intervals between |
|
|
|
|
|
|
presses, the upper platen will automatically |
|
|
|
|
|
|
lower into the Standby position. |
|
|
|
|
|
|
|
|
|
21 |
076011 |
Button-Operator- Red |
2 |
Cancels the Standby mode, raises the upper |
000 |
|
|
|
|
|
platen, and deactivates the Cook cycle. |
|
|
|
|
|
|
|
|
|
22 |
079150 |
Nut-10-32 Whiz Flange Lock |
2 |
Secures the spacer to the bumper. |
000 |
|
|
|
|
|
|
|
|
23 |
082957 |
Panel-Side-Left |
1 |
Provides access to internal components for |
103 |
|
|
|
|
|
service and cleaning. |
|
|
|
|
|
|
|
|
|
24 |
085447 |
Space Bumper |
1 |
Protects grill from damage. |
000 |
|
|
|
|
|
|
|
|
25 |
084613 |
Bumper |
1 |
Protects grill from damage. |
000 |
|
|
|
|
|
|
|
|
26 |
033944 |
Screw-10-32x3/4 SLTD Truss |
2 |
Secures the spacer to the bumper. |
000 |
|
|
|
|
|
|
|
|
27 |
X85465 |
Shield A.-Rear-GRS |
2 |
Prevents grease migration. |
000 |
|
|
|
|
|
|
|
9
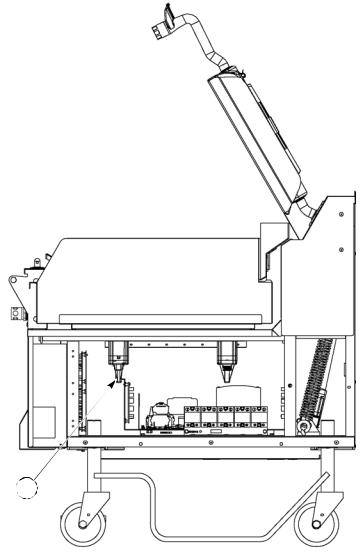
C850/C852 Right Side View
1
Figure-3 (C850 shown)
Item |
Part No. |
Description |
Qty. |
Function |
Warr. |
|
Class |
||||||
|
|
|
|
|
||
|
|
|
|
|
|
|
1 |
X84169-SER |
Kit A.-Actuator Plate |
3 (C850) |
Positions the cooking surface. |
103 |
|
|
|
|
6 (C852) |
|
|
|
|
|
|
|
|
|
10
C850/C852 Left Side View
 1
1
Figure-4 (C850 shown)
Item |
Part No. |
Description |
Qty. |
Function |
Warr. |
|
Class |
||||||
|
|
|
|
|
||
|
|
|
|
|
|
|
1 |
X85715 |
Handle A.-Align Ring |
1 (C850) |
The handle clicks in to the platen latch |
000 |
|
|
|
|
2 (C852) |
when in the down position. |
|
|
|
|
|
|
|
|
11

C854 Exploded View
|
3 |
5 |
6 |
|
2 |
|
8 |
||
|
|
|||
|
|
|
|
7 |
|
|
4 |
|
|
1 |
24 |
9 |
|
5
27
26
25 |
|
23 |
|
|
|
|
13 |
10 |
|
|
|
|
|
|
|
|
|
|
22 |
|
|
|
14 |
|
|
|
|
|
21 |
|
|
|
|
|
|
|
|
20 |
|
|
|
|
|
|
|
|
|
|
|
|
|
|
|
|
|
|
19 |
|
|
4 |
|
|
|
|
|
17 |
16 |
15 |
1 |
12 |
|
|
|
|
|
|
11 |
|
||
|
|
|
|
|
|
|
||
|
|
|
18 |
|
|
|
9 |
Figure-5
12
C854 Exploded View
Item |
Part No. |
Description |
Qty |
Function |
Warr. |
|
Class |
||||||
|
|
|
|
|
||
1 |
027408 |
Screw-10-32X1/4 SLTD Truss |
8 |
Secures the panels to the frame. |
000 |
|
|
|
|
|
|
|
|
2 |
X84971 |
Can A.-Grease-L |
1 |
Container for grease. |
103 |
|
|
|
|
|
|
|
|
3 |
X84248 |
Shroud A.-Upper*LFT |
1 |
Metal bracket that the grease can slides |
103 |
|
|
|
|
|
into, securing it next to the lower grill plate. |
|
|
|
|
|
|
|
|
|
4 |
X84323 |
Shroud A. - Lower - Side |
2 |
Left/right access panel. |
103 |
|
|
|
|
|
|
|
|
5 |
070695 |
Screw-10-32X1/2 PHIL |
4 |
Fastens bumper onto panel. |
000 |
|
|
|
|
|
|
|
|
6 |
084549 |
Bumper |
1 |
Protects grill from damage. |
000 |
|
|
|
|
|
|
|
|
7 |
X73600-SER |
Kit A.-Grease Shield |
4 |
Fastens grease shields to rear shroud. |
000 |
|
|
|
|
|
|
|
|
8 |
082959 |
Panel-Rear |
1 |
Provides access to internal components for |
103 |
|
|
|
|
|
service and cleaning. |
|
|
|
|
|
|
|
|
|
9 |
024298 |
Screw-10-32X3/8 SLTD Truss |
54 |
Secures the panel to the frame. |
000 |
|
|
|
|
|
|
|
|
10 |
084250 |
Panel-Side-Right |
1 |
Provides access to internal components for |
103 |
|
|
|
|
|
service and cleaning. |
|
|
|
|
|
|
|
|
|
11 |
X84526 |
Can A.-Grease-R |
1 |
Container for grease. |
103 |
|
|
|
|
|
|
|
|
12 |
X84246 |
Shroud A.-Upper*RT |
1 |
Metal bracket that the grease can slides |
103 |
|
|
|
|
|
into, securing it next to the lower grill plate. |
|
|
|
|
|
|
|
|
|
13 |
078377-1 |
Caster-5 7-5/8 Stem |
2 |
Allows grill mobility. |
103 |
|
|
|
|
|
|
|
|
14 |
087002 |
Pin-Cotter 1/8 x 1 in. |
8 |
Secures the outrigger to the caster. |
000 |
|
|
|
|
|
|
|
|
15 |
086984 |
Outrigger A.-Right |
1 |
Stabilizes grill. |
000 |
|
|
|
|
|
|
|
|
16 |
073240-3 |
Caster-5 7-5/8 Stem-Swivel w/ |
2 |
Prevents grill movement. |
103 |
|
|
|
Lock |
|
|
|
|
|
|
|
|
|
|
|
17 |
076989-WP |
Switch-Rocker- DPST 10A |
1 |
Activates power to the grill and the exhaust |
103 |
|
|
|
|
|
fans. |
|
|
|
|
|
|
|
|
|
18 |
086985 |
Outrigger-Left |
1 |
Stabilizes grill. |
000 |
|
|
|
|
|
|
|
|
19 |
X84523 |
Door A.-Lower |
1 |
Controls all functions of the grill. |
- - - |
|
|
|
|
|
|
|
|
20 |
X85623-SER |
Touchscreen A. |
1 |
Controls all functions of the grill. |
- - - |
|
|
|
|
|
|
|
|
21 |
068583 |
Cover A.-USB Waterproof |
2 |
Protects USB port from water damage. |
103 |
|
|
|
|
|
|
|
|
22 |
076012 |
Button-Operator- Black |
2 |
Activates the Cook cycle, keeps upper |
000 |
|
|
|
|
|
platen in the closed position, and displays |
|
|
|
|
|
|
the message STANDBY on the control. |
|
|
|
|
|
|
When pressed twice with 1-second intervals |
|
|
|
|
|
|
between presses, the upper platen will |
|
|
|
|
|
|
automatically lower into STANDBY position. |
|
|
|
|
|
|
|
|
|
23 |
076011 |
Button-Operator- Red |
2 |
Cancels the Standby mode, raises the upper |
000 |
|
|
|
|
|
platen, and deactivates the Cook cycle. |
|
|
|
|
|
|
|
|
|
24 |
X85465 |
Shield A.-Rear-GRS |
2 |
Prevents grease migration. |
000 |
|
|
|
|
|
|
|
|
25 |
084251 |
Panel-Side-Left |
1 |
Provides access to internal components for |
103 |
|
|
|
|
|
service and cleaning. |
|
|
|
|
|
|
|
|
|
26 |
085441 |
Spacer Bumper |
1 |
Protects grill from damage. |
000 |
|
|
|
|
|
|
|
|
27 |
084550 |
Bumper |
1 |
Protects grill from damage. |
000 |
|
|
|
|
|
|
|
13

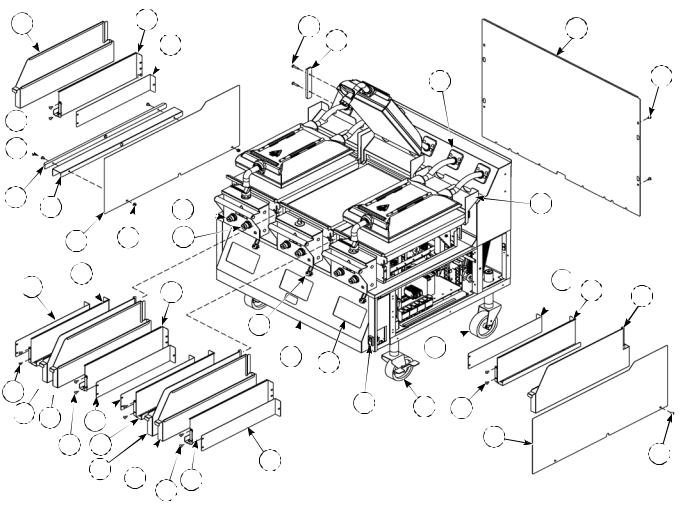
C856 Exploded View
2 |
|
|
|
9 |
3 |
|
|
7 |
|
|
|
6 |
|
|
4 |
5 |
|
10 |
|
|
|
|||
|
|
|
|
8 |
1 
26 |
|
|
|
|
|
|
|
25 |
24 |
22 |
|
|
11 |
|
|
|
|
|
||
|
|
|
|
|
|
|
|
|
23 |
21 |
|
|
4 |
|
4 |
|
20 |
|
|
12 |
|
|
|
|
|
||
|
|
|
19 |
18 |
|
1 |
|
|
|
|
|
||
|
|
|
|
|
17 |
15 |
|
|
|
|
|
|
|
1 |
16 |
|
|
|
|
|
|
|
15 |
|
|
|
16 |
|
|
2 |
|
|
|
|
1 |
|
4 |
|
3 |
|
|
|
|
|
10 |
|
|
|
14 |
|
|
|
13 |
|
|
|
|
Figure-6
14
C856 Exploded View
Item |
Part No. |
Description |
Qty |
Function |
Warr. Class |
1 |
027408 |
Screw-10-32X1/4 SLTD Truss |
16 |
Secures the panels to the frame. |
103 |
|
|
|
|
|
|
2 |
X84971 |
Can A.-Grease-L |
2 |
Container for grease. |
103 |
|
|
|
|
|
|
3 |
X84248 |
Shroud A.-Upper*L |
2 |
Metal bracket that the grease can slides |
103 |
|
|
|
|
into, securing it next to the lower grill plate. |
|
|
|
|
|
|
|
4 |
X84323 |
Shroud A. - Lower - Side |
4 |
Left/right access panel. |
103 |
|
|
|
|
|
|
5 |
084251 |
Panel-Side-Left |
1 |
Provides access to internal components for |
103 |
|
|
|
|
service and cleaning. |
|
|
|
|
|
|
|
6 |
070695 |
Screw-10-32X1/2 Phil |
4 |
Fastens bumper onto panel. |
000 |
|
|
|
|
|
|
7 |
084549 |
Bumper |
1 |
Protects grill from damage. |
000 |
|
|
|
|
|
|
8 |
X73600-SER |
Kit A.-Grease Shield |
4 |
Fastens grease shields to rear shroud. |
000 |
|
|
|
|
|
|
9 |
084215 |
Panel-Rear |
1 |
Provides access to internal components for |
103 |
|
|
|
|
service and cleaning. |
|
|
|
|
|
|
|
10 |
024298 |
Screw-10-32X3/8 SLTD Truss |
54 |
Secures the panel to the frame. |
000 |
|
|
|
|
|
|
11 |
X85465 |
Shield A.Rear GRS |
2 |
Prevents grease migration. |
|
|
|
|
|
|
|
12 |
078377 |
Caster-5 7-5/8 Stem |
2 |
Allows grill mobility. |
103 |
|
|
|
|
|
|
13 |
084250 |
Panel-Side-Right |
1 |
Provides access to internal components for |
103 |
|
|
|
|
service and cleaning. |
|
|
|
|
|
|
|
14 |
X84526 |
Can A.-Grease-R |
2 |
Container for grease. |
103 |
|
|
|
|
|
|
15 |
X84246 |
Shroud A.-Upper*R |
2 |
Metal bracket that the grease can slides |
103 |
|
|
|
|
into, securing it next to the lower grill plate. |
|
|
|
|
|
|
|
16 |
073240 |
Caster-5 7-5/8 Swivel w/Lock |
2 |
Prevents grill movement. |
103 |
|
|
|
|
|
|
17 |
076989-WP |
Switch-Rocker- DPST 10A |
1 |
Activates power to the grill and the exhaust |
103 |
|
|
|
|
fans. |
|
|
|
|
|
|
|
18 |
X85623-SER |
Touchscreen A. |
2 |
Controls all functions of the grill. |
- - - |
|
|
|
|
|
|
19 |
X84504 |
Door A.-Welded |
1 |
Houses the controls and the fan interlock |
103 |
|
|
|
|
switch. |
|
|
|
|
|
|
|
20 |
068583 |
Cover A.-USB Waterproof |
2 |
Protects USB port from water damage. |
103 |
|
|
|
|
|
|
21 |
076012 |
Button-Operator- Black |
2 |
Activates the cook cycle, keeps the upper |
000 |
|
|
|
|
platen in the closed position, and displays |
|
|
|
|
|
the message STANDBY on the control. |
|
|
|
|
|
When pressed twice with 1-second intervals |
|
|
|
|
|
between presses, the upper platen will |
|
|
|
|
|
automatically lower into the Standby |
|
|
|
|
|
position. |
|
|
|
|
|
|
|
22 |
076011 |
Button-Operator- Red |
2 |
Cancels the Standby mode, raises the upper |
000 |
|
|
|
|
platen, and deactivates the Cook cycle. |
|
|
|
|
|
|
|
23 |
079150 |
Nut-10-32 Whiz Flange Nut |
2 |
Secures the spacer to the bumper. |
000 |
|
|
|
|
|
|
24 |
085441 |
Spacer Bumper |
1 |
Protects grill from damage. |
000 |
|
|
|
|
|
|
25 |
084550 |
Bumper |
1 |
Protects grill from damage. |
000 |
|
|
|
|
|
|
26 |
033944 |
Screw-10-32x3/4 SLTD Truss |
2 |
Secures the spacer to the bumper. |
000 |
|
|
|
|
|
|
15
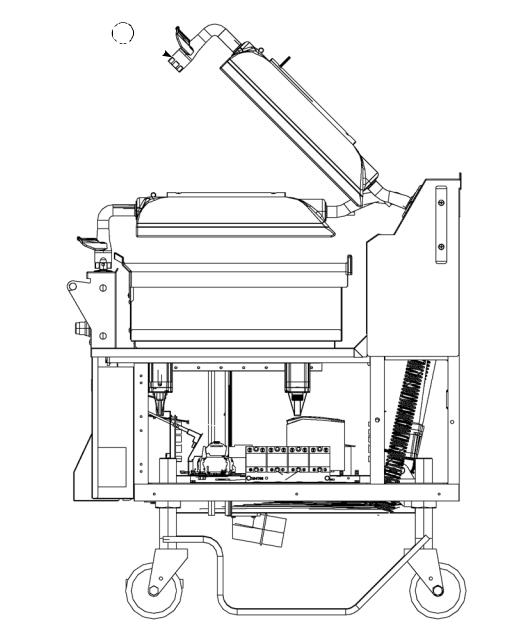
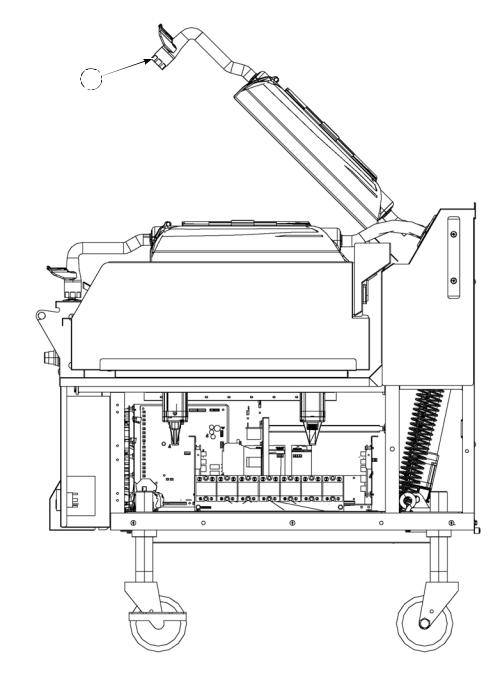
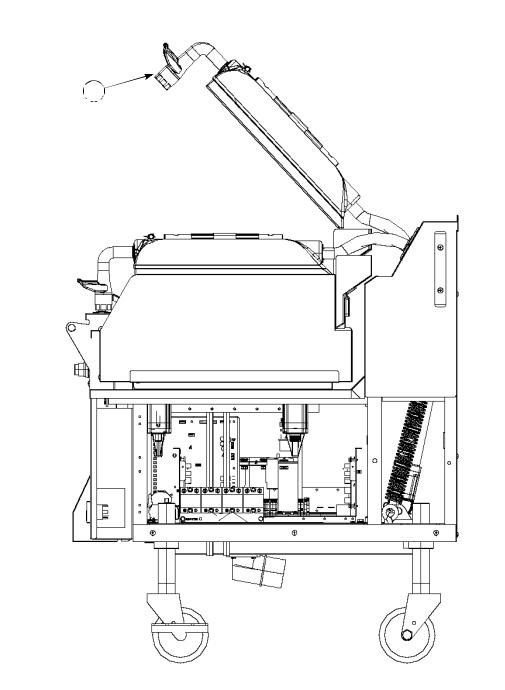
C854/C856 Right Side View
1
Figure-7 (C854 with outrigger shown)
Item |
Part No. |
Description |
Qty. |
Function |
Warr. |
|
Class |
||||||
|
|
|
|
|
||
|
|
|
|
|
|
|
1 |
X85716 |
Handle A.-Align Ring |
1 (C854) |
The handle clicks in to the platen latch |
103 |
|
|
|
|
2 (C856) |
when in the down position. |
|
|
|
|
|
|
|
|
16
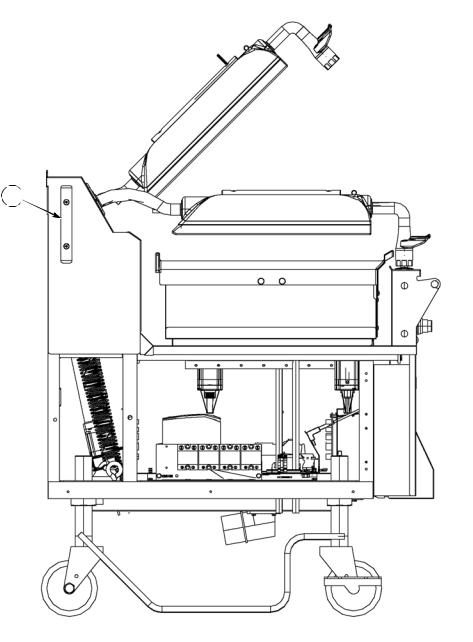
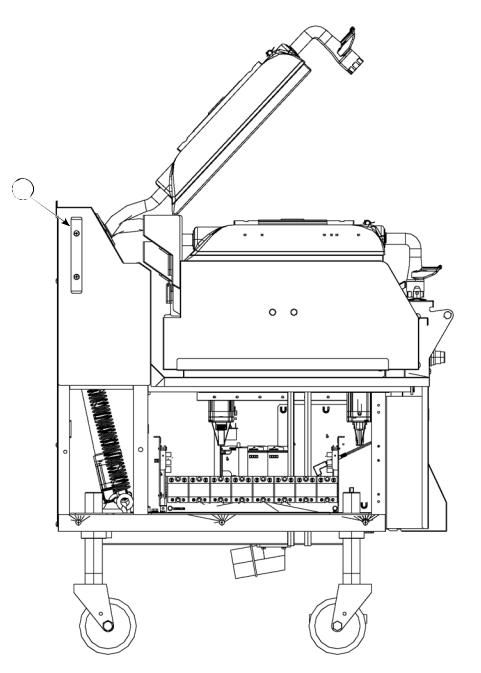
C854/C856 Left Side View
1
Figure-8 (C854 with outrigger shown)
Item |
Part No. |
Description |
Qty. |
Function |
Warr. |
|
Class |
||||||
|
|
|
|
|
||
|
|
|
|
|
|
|
1 |
084549 |
Bumper |
1 |
Protects the grill from damage. |
000 |
|
|
|
|
|
|
|
17
C858 Exploded View
2 |
3 |
4
1

 26
26 

25 |
24 |
|
21 |
|
|
||
|
23 |
22 |
20 |
|
12 |
|
|
4 |
3 |
|
1 


11 |
2 |
4 |
1 12
11 |
2 |
|
3 |
|
1 |
||
|
|
|
5 |
8 |
6 |
|
7 |
9 |
10
4  12 11
12 11
19
18 |
17 |
14 |
|
|
|
||
|
|
|
|
|
16 |
15 |
1 |
|
13 |
4 |
7 |
|
Figure-9
18
C858 Exploded View
Item |
Part No. |
Description |
Qty. |
Function |
Warr. |
|
Class |
||||||
|
|
|
|
|
||
|
|
|
|
|
|
|
1 |
027408 |
Screw-10-32X1/4 SLTD Truss |
24 |
Secures the panels to the frame. |
103 |
|
|
|
|
|
|
|
|
2 |
X84969 |
Can A.-Grease-L |
3 |
Container for grease. |
103 |
|
|
|
|
|
|
|
|
3 |
X84224 |
Shroud A.-Upper*L |
3 |
Metal bracket that the grease can slides into, |
103 |
|
|
|
|
|
securing it next to the lower grill plate. |
|
|
|
|
|
|
|
|
|
4 |
X84325 |
Shroud A. - Lower - L |
6 |
Left/right access panel. |
103 |
|
|
|
|
|
|
|
|
5 |
070695 |
Screw-10-32X1/2 Phil |
4 |
Fastens bumper onto panel. |
000 |
|
|
|
|
|
|
|
|
6 |
084549 |
Bumper |
1 |
Protects grill from damage. |
000 |
|
|
|
|
|
|
|
|
7 |
X73600-SER |
Kit A.-Grease Shield |
6 |
Fastens grease shields to rear shroud. |
000 |
|
|
|
|
|
|
|
|
8 |
085963 |
Panel-Rear |
1 |
Provides access to internal components for |
103 |
|
|
|
|
|
service and cleaning. |
|
|
|
|
|
|
|
|
|
9 |
024298 |
Screw-10-32X3/8 SLTD Truss |
54 |
Secures the panel to the frame. |
000 |
|
|
|
|
|
|
|
|
10 |
X85465 |
Shield A.-Rear GRS |
3 |
Prevents grease migration. |
|
|
|
|
|
|
|
|
|
11 |
X84608 |
Can A.-Grease-R |
3 |
Container for grease. |
103 |
|
|
|
|
|
|
|
|
12 |
X84225 |
Shroud A.-Upper*R |
3 |
Metal bracket that the grease can slides into, |
103 |
|
|
|
|
|
securing it next to the lower grill plate. |
|
|
|
|
|
|
|
|
|
13 |
082958 |
Panel-Side-Right |
1 |
Provides access to internal components for |
103 |
|
|
|
|
|
service and cleaning. |
|
|
|
|
|
|
|
|
|
14 |
078377 |
Caster-5 7-5/8 Stem |
2 |
Allows grill mobility. |
103 |
|
|
|
|
|
|
|
|
15 |
073240 |
Caster-5 7-5/8 Swivel w/Lock |
2 |
Prevents grill movement. |
103 |
|
|
|
|
|
|
|
|
16 |
076989-WP |
Switch-Rocker- DPST 10A |
1 |
Activates power to the grill and the exhaust fans. |
103 |
|
|
|
|
|
|
|
|
17 |
X85623-SER |
Touchscreen A. |
3 |
Controls all functions of the grill. |
- - - |
|
|
|
|
|
|
|
|
18 |
X85931 |
Door A.-Welded |
1 |
Houses controls and the fan interlock switch. |
103 |
|
|
|
|
|
|
|
|
19 |
068583 |
Cover A.-USB Waterproof |
3 |
Protects USB port from water damage. |
103 |
|
|
|
|
|
|
|
|
20 |
076012 |
Button-Operator- Black |
3 |
Activates the Cook cycle, keeps the upper platen |
000 |
|
|
|
|
|
in the closed position, and displays the message |
|
|
|
|
|
|
STANDBY on the control. When pressed twice |
|
|
|
|
|
|
with 1-second intervals between presses, the |
|
|
|
|
|
|
upper platen will automatically lower into the |
|
|
|
|
|
|
Standby position. |
|
|
|
|
|
|
|
|
|
21 |
076011 |
Button-Operator- Red |
3 |
Cancels the Standby mode, raises the upper |
000 |
|
|
|
|
|
platen, and deactivates the Cook cycle. |
|
|
|
|
|
|
|
|
|
22 |
079150 |
Nut-10-32 Whiz Flange Nut |
2 |
Secures the spacer to the bumper. |
000 |
|
|
|
|
|
|
|
|
23 |
082957 |
Panel-Side-Left |
1 |
Provides access to internal components for |
103 |
|
|
|
|
|
service and cleaning. |
|
|
|
|
|
|
|
|
|
24 |
085447 |
Spacer Bumper |
1 |
Protects grill from damage. |
000 |
|
|
|
|
|
|
|
|
25 |
084613 |
Bumper |
1 |
Protects grill from damage. |
000 |
|
|
|
|
|
|
|
|
26 |
033944 |
Screw-10-32x3/4 SLTD Truss |
2 |
Secures the spacer to the bumper. |
000 |
|
|
|
|
|
|
|
19

C860 Exploded View
2 |
3 |
4
1 |
|
|
|
25 |
|
|
|
24 |
23 |
|
21 |
|
|
22 |
|
|
|
20 |
|
|
|
|
|
4 |
|
13 |
3 |
|
|
1 |
|
|
|
12 |
2 |
1 |
4 |
|
|
|
13 |
12 |
2 1
5 6
9
 10 7
10 7 

8 |
|
|
11 |
|
|
10 |
4 |
13 |
|
|
12 |
19 |
|
|
|
18 |
17 |
|
14 |
|
|
16 |
|
|
3 |
1 |
|
|
|
||
|
|
|
15 |
4 |
|
|
|
Figure-10
20
C860 Exploded View
Item |
Part No. |
Description |
Qty. |
Function |
Warr. |
|
Class |
||||||
|
|
|
|
|
||
|
|
|
|
|
|
|
1 |
027408 |
Screw-10-32X1/4 SLTD Truss |
24 |
Secures the panels to the frame. |
103 |
|
|
|
|
|
|
|
|
2 |
X84971 |
Can A.-Grease-L |
3 |
Container for grease. |
103 |
|
|
|
|
|
|
|
|
3 |
X84248 |
Shroud A.-Upper*L |
3 |
Metal bracket that the grease can slides into, |
103 |
|
|
|
|
|
securing it next to the lower grill plate. |
|
|
|
|
|
|
|
|
|
4 |
X84323 |
Shroud A. - Lower - Side |
6 |
Left/right access panel. |
103 |
|
|
|
|
|
|
|
|
5 |
070695 |
Screw-10-32X1/2 Phil |
4 |
Fastens bumper onto panel. |
000 |
|
|
|
|
|
|
|
|
6 |
084549 |
Bumper |
1 |
Protects grill from damage. |
000 |
|
|
|
|
|
|
|
|
7 |
X73600-SER |
Kit A.-Grease Shield |
6 |
Fastens grease shields to rear shroud. |
000 |
|
|
|
|
|
|
|
|
8 |
X85465 |
Shield A.-Rear GRS |
3 |
Prevents grease migration. |
|
|
|
|
|
|
|
|
|
9 |
085963 |
Panel-Rear |
1 |
Provides access to internal components for |
103 |
|
|
|
|
|
service and cleaning. |
|
|
|
|
|
|
|
|
|
10 |
024298 |
Screw-10-32X3/8 SLTD Truss |
54 |
Secures the panel to the frame. |
000 |
|
|
|
|
|
|
|
|
11 |
084250 |
Panel-Side-Right |
1 |
Provides access to internal components for |
103 |
|
|
|
|
|
service and cleaning. |
|
|
|
|
|
|
|
|
|
12 |
X84526 |
Can A.-Grease-R |
3 |
Container for grease. |
103 |
|
|
|
|
|
|
|
|
13 |
X84246 |
Shroud A.-Upper*R |
3 |
Metal bracket that the grease can slides into, |
103 |
|
|
|
|
|
securing it next to the lower grill plate. |
|
|
|
|
|
|
|
|
|
14 |
078377 |
Caster-5 7-5/8 Stem |
2 |
Allows grill mobility. |
103 |
|
|
|
|
|
|
|
|
15 |
073240 |
Caster-5 7-5/8 Swivel W/Lock |
2 |
Prevents grill movement. |
103 |
|
|
|
|
|
|
|
|
16 |
076989-WP |
Switch-Rocker- DPST 10A |
1 |
Activates power to the grill and the exhaust fans. |
103 |
|
|
|
|
|
|
|
|
17 |
X85623-SER |
Touchscreen A. |
3 |
Controls all functions of the grill. |
- - - |
|
|
|
|
|
|
|
|
18 |
X85761 |
Door A.-Welded |
1 |
Houses controls and the fan interlock switch. |
103 |
|
|
|
|
|
|
|
|
19 |
068583 |
Cover A.-USB Waterproof |
3 |
Protects USB port from water damage. |
103 |
|
|
|
|
|
|
|
|
20 |
076012 |
Button-Operator- Black |
3 |
Activates the Cook cycle, keeps the upper platen |
000 |
|
|
|
|
|
in the closed position, and displays the message |
|
|
|
|
|
|
STANDBY on the control. When pressed twice |
|
|
|
|
|
|
with 1-second intervals between presses, the |
|
|
|
|
|
|
upper platen will automatically lower into the |
|
|
|
|
|
|
STANDBY position. |
|
|
|
|
|
|
|
|
|
21 |
076011 |
Button-Operator- Red |
3 |
Cancels the Standby mode, raises the upper |
000 |
|
|
|
|
|
platen, and deactivates the Cook cycle. |
|
|
|
|
|
|
|
|
|
22 |
084251 |
Panel-Side-Left |
1 |
Provides access to internal components for |
103 |
|
|
|
|
|
service and cleaning. |
|
|
|
|
|
|
|
|
|
23 |
085447 |
Spacer Bumper |
1 |
Protects grill from damage. |
000 |
|
|
|
|
|
|
|
|
24 |
084613 |
Bumper |
1 |
Protects grill from damage. |
000 |
|
|
|
|
|
|
|
|
25 |
033944 |
Screw-10-32x3/4 SLTD Truss |
2 |
Secures the spacer to the bumper. |
000 |
|
|
|
|
|
|
|
21
C858 Right Side View
1
Figure-11
Item |
Part No. |
Description |
Qty. |
Function |
Warr. |
|
Class |
||||||
|
|
|
|
|
||
|
|
|
|
|
|
|
1 |
X85715 |
Handle A.-Align Ring |
3 |
The handle clicks in to the platen latch |
103 |
|
|
|
|
|
when in the down position. |
|
|
|
|
|
|
|
|
22

C858 Left Side View
1
Figure-12
Item |
Part No. |
Description |
Qty. |
Function |
Warr. |
|
Class |
||||||
|
|
|
|
|
||
|
|
|
|
|
|
|
1 |
084549 |
Bumper |
1 |
Protects the grill from damage. |
000 |
|
|
|
|
|
|
|
23
C860 Right Side View
1
Figure-13
Item |
Part No. |
Description |
Qty. |
Function |
Warr. |
|
Class |
||||||
|
|
|
|
|
||
|
|
|
|
|
|
|
1 |
X85715 |
Handle A.-Align Ring |
3 |
The handle clicks in to the platen latch |
103 |
|
|
|
|
|
when in the down position. |
|
|
|
|
|
|
|
|
24
C860 Left Side View
1
Figure-14
Item |
Part No. |
Description |
Qty. |
Function |
Warr. |
|
Class |
||||||
|
|
|
|
|
||
|
|
|
|
|
|
|
1 |
084549 |
Bumper |
1 |
Protects the grill from damage. |
000 |
|
|
|
|
|
|
|
25
Loading...