


 Loading...
D01354020C
DR-40X
Linear PCM Recorder
REFERENCE MANUAL

Table of Contents |
|
1 – Introduction..................................................................... |
4 |
Features.................................................................................................. |
4 |
Conventions used in this manual.................................................. |
4 |
Trademarks and copyrights............................................................. |
5 |
About SD cards.................................................................................... |
5 |
Precautions for use........................................................................ |
5 |
2 – Names and Functions of Parts........................................ |
6 |
Top panel............................................................................................... |
6 |
Front panel............................................................................................ |
8 |
Left side panel...................................................................................... |
8 |
Right side panel................................................................................... |
8 |
Bottom Panel........................................................................................ |
9 |
Home Screen...................................................................................... |
10 |
Recording screen.............................................................................. |
11 |
Menu item list..................................................................................... |
13 |
Using the menu................................................................................. |
14 |
Basic operation.................................................................................. |
15 |
3 – Preparation................................................................... |
16 |
Powering the unit............................................................................. |
16 |
Using AA batteries....................................................................... |
16 |
Using an AC adapter (sold separately)................................. |
16 |
Using USB bus power................................................................. |
16 |
Turning the power on and off (standby mode)...................... |
17 |
Turning the unit on...................................................................... |
17 |
Turning the unit off (standby)................................................. |
17 |
Resume function.......................................................................... |
17 |
Setting the date and time.............................................................. |
18 |
Inserting and removing SD cards................................................ |
19 |
Inserting cards............................................................................... |
19 |
Removing the card...................................................................... |
19 |
Card write protection................................................................. |
19 |
Preparing an SD card for use......................................................... |
19 |
Using the built-in speaker.............................................................. |
20 |
Connecting monitoring equipment.......................................... |
20 |
Using the built-in microphone..................................................... |
21 |
Setting the mics to record a wide stereo sound |
|
(A-B position)................................................................................. |
21 |
Setting the mics to record a clear stereo sound |
|
(X-Y position).................................................................................. |
21 |
Swapping the left-right channels of the built-in micro- |
|
phone pair........................................................................................... |
22 |
Microphone position detection.............................................. |
22 |
Attaching the tilt foot...................................................................... |
22 |
4 – Recording...................................................................... |
23 |
Setting file format and sampling frequency |
|
(REC SETTING).................................................................................... |
23 |
Preparing the recording inputs.................................................... |
24 |
Recording with the built-in mics............................................ |
24 |
Recording with external mics (EXT MIC IN)........................ |
24 |
Recording an external device (LINE IN)................................ |
24 |
Setting the external input type............................................... |
24 |
Using phantom power............................................................... |
25 |
Adjusting the input level................................................................ |
25 |
Manually adjusting the input level........................................ |
25 |
Independent L/R channel EXT IN input level setting |
|
function........................................................................................... |
27 |
Using the LEVEL MODE function............................................ |
27 |
Overview of recording modes...................................................... |
28 |
Recording (MONO/STEREO recording)...................................... |
28 |
Make recording settings............................................................ |
28 |
Setting where files are saved................................................... |
29 |
Starting the recording................................................................ |
29 |
File names when recording in MONO/STEREO................. |
29 |
Simultaneously recording two files at different input levels |
|
(DUAL REC).......................................................................................... |
30 |
Enabling dual recording............................................................ |
30 |
Starting dual recording.............................................................. |
31 |
Dual recording file names......................................................... |
31 |
Recording 3 or 4 channels............................................................. |
31 |
Making settings for 3/4-channel recording........................ |
31 |
Starting 3/4-channel recording.............................................. |
32 |
File names when recording in 4-channel............................ |
32 |
Recording playback and input sounds together |
|
(overdubbing).................................................................................... |
33 |
Setting the overdubbing mode.............................................. |
33 |
Select the file you want to overdub...................................... |
34 |
Conducting overdubbing......................................................... |
34 |
File names when overdubbing............................................... |
34 |
Using the automatic recording function (AUTO REC).......... |
35 |
Continuing to record in a new file (track incrementing).... |
36 |
Manually incrementing files during recording.................. |
36 |
Automatically incrementing files by a set time................. |
36 |
Using the low-cut filter................................................................... |
37 |
Capturing a few seconds before starting recording |
|
(PRE REC).............................................................................................. |
37 |
Using tone output............................................................................ |
38 |
Setting the AUTO TONE function........................................... |
38 |
Setting the AUTO TONE length............................................... |
38 |
Adjusting the AUTO TONE volume........................................ |
38 |
Self-timer function............................................................................ |
39 |
Solo function...................................................................................... |
39 |
Recording duration.......................................................................... |
40 |
5 – Working with Files and Folders (BROWSE screen)..... |
41 |
Screen navigation............................................................................. |
41 |
Icons on the BROWSE screen........................................................ |
41 |
File operations.................................................................................... |
41 |
Folder operations.............................................................................. |
43 |
Creating a new folder...................................................................... |
43 |
6 – Playback........................................................................ |
44 |
Adjusting the playback volume................................................... |
44 |
Setting the playback area (AREA)................................................ |
44 |
Selecting a folder for the playback area (1)............................. |
45 |
Selecting a folder for the playback area (2)............................. |
45 |
Using the playlist............................................................................... |
46 |
Adding files to the playlist........................................................ |
46 |
Editing the playlist....................................................................... |
46 |
Selecting files for playback (skipping)....................................... |
47 |
Playing recordings............................................................................ |
47 |
Pausing............................................................................................ |
47 |
 2 TASCAM DR-40X

Stopping playback....................................................................... |
47 |
Searching backward and forward.......................................... |
47 |
Repeating playback (REPEAT)....................................................... |
48 |
Special playback control functions............................................. |
48 |
Playback Control screen............................................................ |
48 |
Loop playback of a selection................................................... |
48 |
Changing the playback speed (VSA)..................................... |
49 |
Setting the playback equalizer..................................................... |
50 |
Increasing perceived sound pressure to enhance listen- |
|
ability (LEVEL ALIGN)....................................................................... |
50 |
Using the jump function................................................................ |
51 |
Setting the jump back time...................................................... |
51 |
Setting the jump forward time............................................... |
52 |
Playback of files recorded using dual recording.................... |
52 |
OVERDUB INPUT MUTE function |
|
(during playback).............................................................................. |
52 |
Solo function...................................................................................... |
52 |
7 – Quick Operations.......................................................... |
53 |
Features of the QUICK button...................................................... |
53 |
Quick menu......................................................................................... |
55 |
Deleting files....................................................................................... |
55 |
Dividing the selected file (DIVIDE).............................................. |
55 |
Dividing the selected file automatically at marks |
|
(AUTO DIVIDE).................................................................................... |
56 |
Overwrite recording......................................................................... |
57 |
Selecting a file to overwrite record........................................ |
57 |
Activating overwrite mode....................................................... |
57 |
Conducting overwrite recording............................................ |
57 |
Checking the result of recording............................................ |
57 |
Undoing and redoing (UNDO/REDO)................................... |
57 |
Ending overwrite recording mode........................................ |
57 |
Transcribing recorded files (DICTATION PLAY)....................... |
58 |
Enabling DICTATION PLAY mode............................................ |
58 |
Adjusting playback equalization............................................ |
58 |
Changing the playback position............................................ |
58 |
Ending DICTATION PLAY mode............................................... |
58 |
Mixdown.............................................................................................. |
59 |
8 – Mark functions.............................................................. |
60 |
Adding marks manually.................................................................. |
60 |
Adding marks automatically to a recording............................ |
60 |
Moving to mark positions.............................................................. |
60 |
Clearing marks................................................................................... |
60 |
9 – Using effects.................................................................. |
61 |
Setting the effect............................................................................... |
61 |
Effects preset list............................................................................... |
61 |
10 – Mixer............................................................................ |
62 |
Making mixer settings..................................................................... |
62 |
Using the MS decoder..................................................................... |
63 |
Decoding the input sound as you record............................ |
63 |
Decoding the playback sound................................................ |
63 |
MS decoder settings................................................................... |
63 |
11 – Tuning Instruments.................................................... |
64 |
Using the tuner.................................................................................. |
64 |
Setting the tuner.......................................................................... |
64 |
Table of Contents |
|
Tuning a musical instrument................................................... |
64 |
12 – USB Connections........................................................ |
65 |
Powering the unit with USB bus power.................................... |
65 |
Using as an SD card reader............................................................ |
65 |
Disconnecting the unit from a computer................................ |
66 |
Transferring files from a computer............................................. |
66 |
Using as a USB audio interface..................................................... |
66 |
The AUDIO I/F screen will open.............................................. |
66 |
Setting the connected device type....................................... |
67 |
Connecting..................................................................................... |
67 |
13 – Settings and Information........................................... |
68 |
Viewing information (INFORMATION)....................................... |
68 |
File information page................................................................. |
68 |
Card information page (CARD)................................................ |
68 |
System information page (SYSTEM)...................................... |
68 |
System Settings................................................................................. |
69 |
Setting the automatic power saving function................... |
69 |
Setting the backlight.................................................................. |
69 |
Adjusting the display contrast................................................ |
69 |
Setting the battery type............................................................ |
69 |
Setting the phantom power voltage.................................... |
69 |
Setting the language.................................................................. |
69 |
Restoring the factory settings................................................. |
70 |
Formatting SD cards.................................................................... |
70 |
Completely formatting SD cards............................................ |
70 |
Setting the file name format......................................................... |
71 |
File name format.......................................................................... |
71 |
Setting the WORD item.............................................................. |
71 |
Resetting the number................................................................ |
71 |
14 – Using the REMOTE jack.............................................. |
72 |
Footswitch (TASCAM RC-3F)......................................................... |
72 |
Setting footswitch operation................................................... |
72 |
Using the footswitch................................................................... |
72 |
Remote control (TASCAM RC-10)................................................ |
73 |
Setting the wired remote control........................................... |
73 |
Using the wired remote control.............................................. |
73 |
15 – Messages..................................................................... |
74 |
16 – Troubleshooting......................................................... |
76 |
17 – Specifications.............................................................. |
77 |
Ratings.................................................................................................. |
77 |
Input/output ratings........................................................................ |
77 |
Analog audio input and output ratings............................... |
77 |
Control input/output ratings................................................... |
77 |
Audio performance.......................................................................... |
77 |
Other specifications......................................................................... |
77 |
Dimensional drawings.................................................................... |
79 |
TASCAM DR-40X 3

1 – Introduction
Features
ii Compact audio recorder that uses SD/SDHC/SDXC cards as recording media
ii High-performance directional stereo mics can be adjusted, enabling both A-B and X-Y recording
ii Can record with different types of stereo sound depending on the angle of the microphones
Closed (X-Y): clear stereo sound with less phase difference
Open (A-B): wide stereo sound
ii Mid-side decoding function can be used with MS mics
ii Recording of up to four channels simultaneously possible
ii 44.1/48/96 kHz, 16/24-bit, linear PCM (WAV format) recording possible
ii Compatible with BWF format
ii 32–320 kbps MP3 format recording possible (compatible with ID3 tag v2.4)
ii Dual recording allows two files to be recorded simultaneously at different levels
ii Overdubbing in mix mode allows the playback signal and the input signal to be mixed and recorded as a new file
ii Overdubbing in separate mode allows the playback signal and the input signal to be mixed and recorded as a new file, while saving the original file
ii Built-in 0.3 W monaural monitor speaker
ii Built-in effect (reverb) can be used during recording and playback
ii Auto-record function starts recording automatically when a set sound input level is detected
ii Tone output function convenient for synchronizing with video files when editing
ii A QUICK button is available for easy access to various functions
ii Track incrementing function allows a recording to be split by creating a new file when desired
ii Pre-recording (PRE REC) function allows the unit to record the 2 seconds of sound before recording is activated
ii Automatic peak reduction function automatically reduces the level suitably when the input level is too high
ii Automatic level control is available to increase or decrease the recording volume when the input sound is too low or too high, respectively.
ii Limiter function automatically reduces the level suitably in particular portions where the input level is too high
ii Low cut filter conveniently reduces low-frequency noise
ii VSA function can change playback speed in a range from 50-200% (0.5 to 2.0 in 0.1 increments) of normal without changing pitch
ii Repeat playback and IN-OUT loop playback functions
ii PB CONT button opens screen for playback speed and IN-OUT loop settings
ii Tuner function to tune musical instruments
ii Self-timer function to start recording after a set period of time.
ii Jump function that moves backward or forward a small amount during playback or when paused (DICTATION PLAY mode only)
ii Delay compensation function that eliminates time lags caused by differences in the distances of two sets of inputs from the sound source
ii Playlist function
ii MARK function convenient for moving to specific locations
ii DIVIDE function allows files to be split where desired (only for WAV files)
ii Equalizers function for playback, and level alignment function to enhance the perceived overall sound pressure
ii File name format can be set to use a user-defined word or the date
ii Resume function remembers the playback position before the unit was turned off (put in standby)
ii 3.5 mm (1/8”) line/headphones output jack ii 128×64-pixel LCD with backlight
ii Micro-B type USB 2.0 port
ii Operates on 3 AA batteries, an AC adapter (sold separately: TASCAM PS-P520E), or USB bus power
ii Tripod attachment screw-hole built into unit
ii Two balanced mic/line inputs (XLR/TRS combo jacks) ii USB audio interface functions
ii Dictation playback mode
ii Overwrite recording function
Conventions used in this manual
The following conventions are used in this manual.
ii When we refer to a button or connector or control on the DR-40X, the typeface looks like this: MENU.
ii When we show messages, for example, that appears on the unit’s display, the typeface looks like this: REPEAT.
ii SD, SDHC and SDXC memory cards are called “SD cards”.
ii Words that appear on the computer display are shown in quotation marks like this: “DR-40X”.
ii Additional information is provided as necessary in tips, notes and cautions.
TIP
We give hints and tips on using the DR-40X when you see this icon.
NOTE
Notes provide additional explanations for special situations.
CAUTION
Failure to follow these instructions could result in damage to equipment or lost recording data, for example.
VCAUTION
Failure to follow these instructions could result in injury.
 4 TASCAM DR-40X

1 – Introduction
Trademarks and copyrights
ii TASCAM is a trademark of TEAC CORPORATION, registered in the U.S. and other countries.
ii SDXC Logo is a trademark of SD-3C, LLC.
ii The MPEG Layer-3 audio coding technology is licensed from Fraunhofer IIS and Thomson.
ii Supply of this product does not convey a license nor imply any right to distribute MPEG Layer-3 compliant content created with this product in revenue-generating broadcast systems (terrestrial, satellite, cable and/or other distribution channels), streaming applications (via Internet, intranets and/or other networks), other content distribution systems (pay-audio or audio-on-demand applications and the like) or on physical media (compact discs, digital versatile discs, semiconductor chips, hard drives, memory cards and the like). An independent license for such use is required. For details, please visit http://mp3licensing. com.
ii ASIO is a trademark of Steinberg Media Technologies GmbH.
ii Other company names, product names and logos in this document are the trademarks or registered trademarks of their respective owners.
About SD cards
This unit uses SD cards for recording and playback.
A list of SD cards that have been confirmed for use with this unit can be found on the TEAC Global Site (http://teac-global. com). Check the page for this product. You can also contact TASCAM customer support service.
Precautions for use
SD cards are delicate media. In order to avoid damaging SD cards, please take the following precautions when handling them.
ii Do not leave them in extremely hot or cold places. ii Do not leave them in extremely humid places.
ii Do not let them get wet.
ii Do not put things on top of them or twist them. ii Do not hit them.
ii Do not remove or insert them during recording, playback, data transmission or other access.
ii Always put memory cards in cases when transporting them.
TASCAM DR-40X 5
2 – Names and Functions of Parts
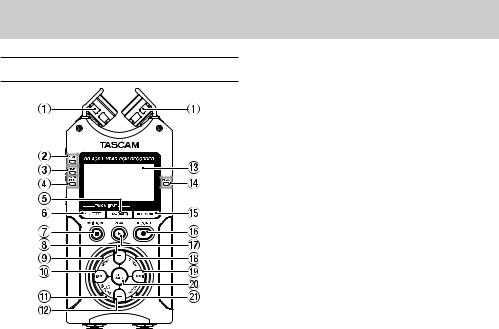
Top panel
1Built-in stereo microphone
This is a stereo pair of unidirectional electret condenser mics. You can set the microphones to open (A-B) or closed (X-Y).
2DUAL indicator
This lights orange when recording in dual recording mode.
34CH indicator
This lights orange when recording in 4-channel recording mode.
4OVER DUB indicator
This lights orange when recording in overdubbing mode.
53/4 [SOLO] button
When in 4-channel recording mode, press this to open a display pull-up that shows meters with the input level settings for 3/4.
Press when the 1/2 input level meter pull-up is displayed to switch to the 3/4 input level meter pull-up.
Press and hold when recording or playing back in DUAL or 4CH mode to use the solo function, which switches the monitored sound to sources other than channels 1 and 2. Press and hold to solo channels 3 and 4.
Press the 3/4 [SOLO] button to switch between the input sound and the 3/4 track playback sound.
61/2 [SOLO] button
Press this to open a display pull-up that shows meters with the input level settings for 1/2.
Press when the 3/4 input level meter pull-up is displayed to switch to the 1/2 input level meter pull-up.
Press and hold when recording or playing back in DUAL or 4CH mode to use the solo function, which switches the monitored sound from other sources to channels 1 and 2. Press and hold to solo channels 1 and 2.
Press when in OVERDUB (MIX) recording mode to mute the input sound.
7¤(HOME) [8] button
Press this button during playback to cause the playback to pause at the current position. Press this button during pause time to return to the beginning of the playback file.
Press this button during recording or recording standby to cause the recording to stop.
When any other screen is open, press this button to return to the Home screen. Use this button to answer “NO” to a confirmation message.
Press and hold to turn the unit on and off (put into standby).
8+ button
When the Home screen is displayed, press this button to increase the output level from the built-in speaker or
 /LINE OUT jack. During adjustment, a volume indicator will be displayed in a pull-up window.
When the Playback Control screen is open, press to increase the playback speed.
When a setting screen is open, use the button to change the setting of the selected item.
9MENU button
When the Home Screen is open, press this to open the MENU screen.
Press this button to return to the MENU screen from the various setting screens.
When the IN and OUT points are set in the file and the Playback Control screen is displayed, press this button to turn on or off loop playback.
0.button
Press this button to return to the beginning of a playback file that is playing or stopped in the middle.
When the IN and OUT points are set between the current position and the beginning of the playback file, pressing this button skips to those points.
If you press this button when a file is stopped at its beginning, the unit will skip to the beginning of the previous file.
Press and hold to search backwards.
Press this button while pressing and holding the ENTER/ MARK button to return to the previous mark.
On the setting screens, use this button to move the cursor left.
On the BROWSE screen, press this button to move up a level.
QPB CONT button
This button activates the Playback Control screen.
When the Playback Control screen is open, press to return to the Home screen.
Press during recording standby to turn off the self-timer function or change the time period.
W– button
When the Home screen is displayed, press this button to
decrease the output level from the built-in speaker or  / LINE OUT jack.
 6 TASCAM DR-40X

During adjustment, a volume indicator will be displayed in a pull-up window.
When the Playback Control screen is open, press to reduce the playback speed.
When a setting screen is open, use the button to change the setting of the selected item.
EDisplay
Shows a variety of information.
RPEAK indicator
Lights when the input volume is too high.
TREC MODE button
Press this button to open the REC MODE screen.
When the REC MODE screen is open, press this button to return to the Home screen.
YRECORD [0] button/REC indicator
When stopped, press this button to put the unit into recording standby. The REC indicator will start to blink. Press when recording to pause recording.
UPLAY [7] button
When the Home screen is displayed and playback is stopped, press this button to start playback.
During playback, press this button to start jump-back playback.
IQUICK button
When playing back, stopped, paused or in recording standby in the Home screen or when the Playback Control screen is displayed, press this button to display the Quick Menu screen. The function to be shown depends on the state of the unit when the button is pressed.
ii Stopped: delete, division, level alignment, or mixdown for the current playback file
ii Playing back/playback control screen: level alignment function
ii Recording standby: LEVEL MODE function, swap left and right built-in mics
Mixer Screen: MS decoder setting
When the BROWSE screen or PLAYLIST screen is open, press this button to open or close the pop-up menu for file/folder operations.
2 – Names and Functions of Parts
O/button
Press this button during playback or when playback is stopped to skip to the beginning of the next file.
When the IN and OUT points are set between the current position and the end of the file, pressing this button skips to those points.
Press and hold this button to search forward.
On the setting screens, use this button to move the cursor right.
Press this button while pressing and holding the ENTER/ MARK button to move to the next mark.
On the BROWSE screen, press this button to move down a level. If a file is selected, the file is loaded, the Home Screen reopens and the unit stops.
PENTER/MARK button
Use this to confirm the selection of a setting item or to answer “YES” to a confirmation message.
Use to add marks manually during recording and playback. Press when stopped at a mark location to delete that mark.
Press the .or /button while pressing and holding this button to move to the previous or next mark, respectively. When the Playback Control screen is open, use this button to set the IN (start) and OUT (end) points of the interval that you want to set for loop playback.
When the IN and OUT points are already set, press this button to cancel loop playback and clear the IN and OUT points.
AMIXER button
Press this button to open the Mixer Screen.
When the Mixer Screen is open, press this button to return to the Home screen.
TASCAM DR-40X 7
2 – Names and Functions of Parts
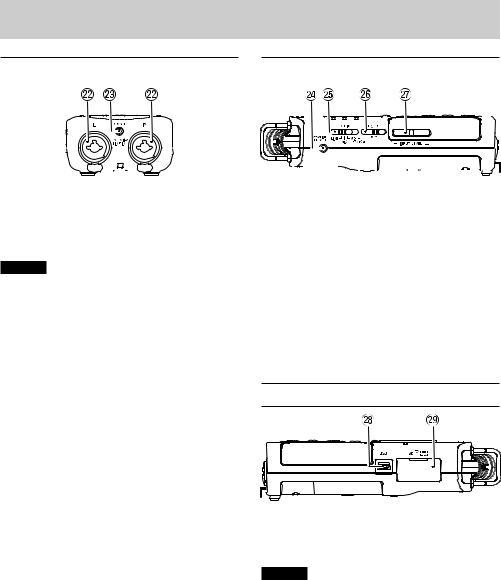
Front panel |
|
Left side panel |
||||||||||||||||||||||||||
|
|
|
|
|
|
|
|
|
|
|
|
|
|
|
|
|
|
|
|
|
|
|
|
|
|
|
|
|
|
|
|
|
|
|
|
|
|
|
|
|
|
|
|
|
|
|
|
|
|
|
|
|
|
|
|
|
|
|
|
|
|
|
|
|
|
|
|
|
|
|
|
|
|
|
|
|
|
|
|
|
|
|
|
|
|
|
|
|
|
|
|
|
|
|
|
|
|
|
|
|
|
|
|
|
|
|
|
|
|
|
|
|
|
|
|
|
|
|
|
|
|
|
|
|
|
|
|
|
|
|
|
|
|
|
|
|
|
|
|
|
|
|
|
|
|
|
|
|
|
|
|
|
|
|
|
|
|
|
|
|
|
|
|
|
|
|
|
|
|
|
|
|
|
|
|
|
|
|
|
|
|
|
|
|
|
|
|
|
|
|
|
|
|
|
|
|
|
|
|
|
|
|
SEXT MIC/LINE IN L/R jacks (XLR/TRS)
These are balanced analog XLR/TRS combo jacks for microphone and line level inputs.
XLR (1: GND, 2: HOT, 3: COLD)
TRS (Tip: HOT, Ring: COLD, Sleeve: GND)
CAUTION
ii Confirm that phantom power is OFF before connecting a line level device to a EXT MIC/LINE IN jack. If you connect a line level device while phantom power is being supplied, that device and this unit could be damaged.
ii Do not connect or disconnect mics with the EXT MIC/ LINE IN jacks when the phantom power switch is set to ON. Doing so could cause a loud noise and might damage this unit and connected equipment.
ii Set the phantom power switch to ON only when using a condenser microphone that requires phantom power.
Turning phantom power on when a dynamic mic or other mic that does not require it is connected could damage this unit and connected equipment.
ii When using condenser mics that require phantom power and dynamic mics together, be sure to use balanced dynamic mics. Unbalanced dynamic mics cannot be used when phantom power is enabled.
ii Supplying phantom power to some ribbon mics will break them. If you are unsure, do not supply phantom power to a ribbon mic.
D REMOTE jack (φ2.5mm TRS)
Connect a TASCAM RC-3F footswitch or TASCAM RC-10 wired remote control (both sold separately) here. This enables remote starting and stopping of playback and other functions.
F /LINE OUT jack
Use this to connect with headphones or the line input jack of an amp or other equipment.
GEXT IN switch
Use this to set the input type of the EXT MIC/LINE IN jacks and whether phantom power is on or off.
HHOLD switch
Shift to the left end (in the direction of the arrow) to engage the hold function.
No buttons can be used when HOLD is active.
JINPUT LEVEL (+/–) buttons
Use these to adjust the input level.
During adjustment, the input level setting status will be displayed in a pop-up window.
Right side panel
KUSB port
This is a Micro-B USB port.
Use a USB cable (A to Micro-B) to connect the unit to a computer. (See "12 – USB Connections" on page 65)
CAUTION
The unit should be connected directly to the computer, not through a USB hub.
LSD card slot
Insert an SD card into this slot.
 8 TASCAM DR-40X
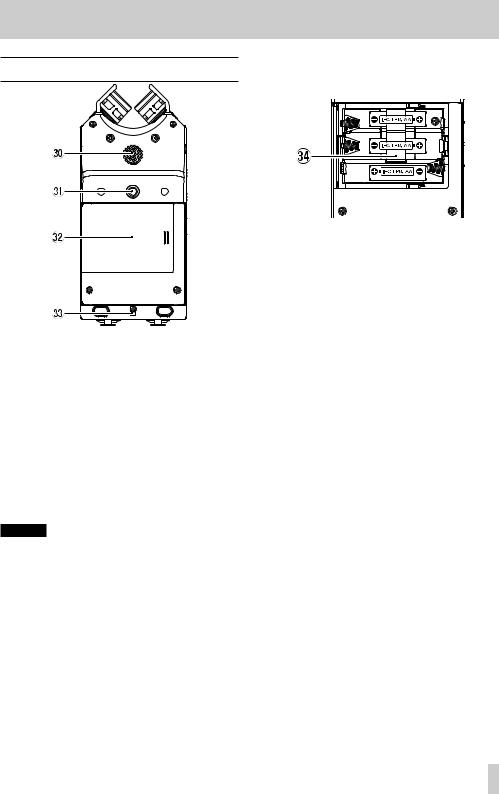
Bottom Panel
;Built-in mono speaker
Use this built-in speaker to listen to recordings.
The speaker will not produce sound in the following situations.
ii When in recording standby ii When recording
ii When in overdubbing mode
ii When headphones are connected
ii When the speaker output setting is off
ZMounting thread for tripod or tilt foot (1/4-inch)
Use this to attach a tripod or the included tilt foot to the recorder.
CAUTION
ii Ensure the tripod or microphone stand screws are securely fastened to prevent the unit from falling off.
ii When attaching this unit to a tripod or microphone stand, be sure to place it on a level surface.
XBattery compartment cover
When not using the included tilt foot, it can be stored by inserting it between the two protrusions on the inside of the battery compartment cover.
CHole for strap
Use this to attach a strap.
2 – Names and Functions of Parts
VBattery compartment
Install batteries (3 AA) in this compartment to power the unit. (See "Using AA batteries" on page 16)
TASCAM DR-40X 9

2 – Names and Functions of Parts
Home Screen
Home Screen when in ordinary operation mode
1Playback area
This shows the current playback file area.
ALL: |
All files in the MUSIC folder |
FOLDER: |
All files in the selected folder |
P.LIST: |
All files added to the playlist |
2Loop/repeat playback status
One of the following icons appears according to the playback speed setting.
 : Single playback
 : Single file repeat playback
 : All file repeat playback
  : Loop playback
3Current playback file number/total number of files
This shows the current file number and total number of files in the current playback area.
4Elapsed time
This shows the elapsed time (hours: minutes: seconds) of the current file.
5Speaker output
 : Speaker output off
 : Speaker output on
6Power supply status
A battery icon appears when power is supplied by batteries.
When batteries are being used, a battery icon shows the amount of power remaining in bars ( ,
,  ,
,  ).
).
The batteries are almost dead and the power will soon turn off (standby) if the  icon with no bars appears.
When using a TASCAM PS-P520E AC adapter (sold separately) or USB bus power,  appears.
NOTE
Sometimes a Battery Low warning appears when recording or conducting other demanding operations even when battery power remains.
7Recorder operation status
This icon shows the recorder operation status.
Indication |
Explanation |
|
|
8 |
Stopped |
|
|
9 |
Paused |
|
|
7 |
Playing back |
|
|
, |
Searching forward |
|
|
m |
Searching backward |
|
|
/ |
Skipping forward |
|
|
. |
Skipping backward |
|
|
8Playback position display
The current playback position is shown by a bar. As playback progresses, the bar extends to the right.
9Track status
The display changes according to the recording mode.
Indicators |
Meaning |
|
(examples) |
||
|
||
|
|
|
|
Playing a file recorded in MONO or |
|
|
STEREO mode |
|
|
|
|
|
Playing a file recorded in dual recording |
|
|
mode |
|
|
|
|
|
Playing a file recorded in 4-channel |
|
|
recording mode |
|
|
|
|
/ |
In OVERDUB SEPARATE mode |
|
|
||
|
|
|
/ |
During overdubbing (mix) mode |
|
|
||
|
|
NOTE
When a track is soloed, its name appears highlighted  .
.
0Level meters
The level of the input or playback sounds is shown.
During OVER DUB (MIX), this shows the mixed level of the input and playback signals.
QRemaining time
This shows the remaining time (hours: minutes: seconds) of the current file.
1Playback speed status
One of the following icons appears according to the playback speed setting.
Indication Playback speed
×1.0
×1.1 – ×1.5
×0.5 – ×0.9
Playback speed not controllable
 10 TASCAM DR-40X
EEffect status
Shows whether the effect function is ON or OFF.
 : Built-in effect off
  : Built-in effect on
RPeak value in decibels (dB)
The maximum level that occurs in a fixed period of time is displayed digitally.
TFile name
This shows the name of the file playing back or its tag information.
ID3 tag information is shown when available for an MP3 file being played.
The project name is shown when multiple files have been recorded in 4-channel recording mode, dual recording mode or OVERDUB SEPARATE mode.
NOTE
ID3 tag information contains titles and artist names, which can be stored in MP3 files.
2 – Names and Functions of Parts
Recording screen
1Recording format
This shows the file recording format.
WAV 16/WAV 24/BWF 16/BWF 24/MP3 320k/MP3 256k/MP3 192k/MP3 128k/MP3 96k/MP3 64k/MP3 32k
2Elapsed recording time
The elapsed recording time of the file appears as hours: minutes: seconds.
3Recording sampling frequency
This shows the file recording sampling frequency.
44.1K/48k/96k (Hz)
4Number of recording channels
This shows the number of recording channels in the file.
ST, MONO
5Recorder operation status
This icon shows the recorder operation status.
Indicator |
Explanation |
09 Recording standby or recording paused
Recording
Recording standby with the prerecording function on
TASCAM DR-40X 11

2 – Names and Functions of Parts
6Input source
This icon shows the input source.
Indicator Meaning examples
Input source set to built-in mics
EXT MIC/LINE IN jack set as input source
Second recording level setting (-6 – -12) when dual recording enabled
When in OVERDUB SEPARATE mode, this shows that channels 1/2 are a playback file.
When in OVERDUB MIX mode, this shows that the input source is set to a mix of the playback file and built-in mic signals
Mix of playback file and EXT MIC/LINE IN set as input source in OVERDUB MIX mode
NOTE
When a track is soloed, its name appears highlighted 
.
7Level meters
The input signal levels are shown.
During overdub recording, the level of the combined input and playback sounds is shown.
8Remaining recording time
The remaining recording time until the selected max file size is reached appears in hours: minutes: seconds. If the remaining recording time on the SD card is less, however, the remaining recording time on the card is shown.
9Level mode setting status
This icon shows the level mode function setting.
 : MANUAL
 : LIMITER
 : PEAK REDUCTION
 : AUTO LEVEL
0Low cut filter on/off status
This shows whether the low cut filter is on or off.
 Low cut filter off
 Low cut filter on (example: 220 Hz)
QTone output setting status
This icon shows whether the AUTO TONE function is on or off.
 : AUTO TONE off
  : AUTO TONE on
WFile name
The file name that will automatically be given to the recorded file is shown.
The project name is shown when multiple files have been recorded in 4-channel recording mode, dual recording mode or OVERDUB SEPARATE mode.
EPeak value in decibels (dB)
Peak input level values are shown in decibels.
 12 TASCAM DR-40X

2 – Names and Functions of Parts
Menu item list
This list provides an overview of the various menu items. The menu items are as follows.
Menu item |
|
Function |
Pages |
|
|
|
|
|
|
|
FORMAT |
Set the recording format |
see page 23 |
|
|
|
|
||
|
SAMPLE |
Set the sampling frequency |
||
|
|
|||
|
|
|
|
|
|
TRACK INC |
Set the track incrementation function |
see page 36 |
|
|
|
|
|
|
|
LOW CUT |
Set the low-cut filter |
see page 37 |
|
|
|
|
|
|
REC SETTING |
PRE REC |
Set the pre-recording function |
see page 37 |
|
|
|
|
||
MODE |
Set the auto-recording function mode |
see page 35 |
||
|
||||
|
|
|
||
|
LEVEL |
Set the auto-recording start level |
||
|
|
|||
|
|
|
|
|
|
AUTO TONE |
Set tone output |
|
|
|
|
|
see page 38 |
|
|
TONE SECS |
Set the length of the output tone |
||
|
|
|
|
|
|
TONE VOL |
Set the volume of tone output |
|
|
|
|
|
|
|
|
AREA |
Set the playback area |
see page 44 |
|
|
|
|
|
|
PLAY SETTING |
REPEAT |
Set the repeat playback function |
see page 48 |
|
|
|
|
||
JUMP BACK |
Set the jump back function |
see page 51 |
||
|
||||
|
|
|
|
|
|
JUMP FWD |
Set the jump forward function |
see page 52 |
|
|
|
|
|
|
|
LEVEL MODE |
Set the level mode function |
see page 20 |
|
|
|
|
|
|
I/O SETTING |
SPEAKER |
Turn the built-in speaker on/off |
see page 50 |
|
|
|
|
||
PLAY EQ |
Set the playback equalization |
see page 50 |
||
|
||||
|
|
|
|
|
|
LEVEL ALIGN |
Set the output level alignment function |
see page 50 |
|
|
|
|
|
|
BROWSE |
|
Work with files and folders on the SD card |
see page 41 |
|
|
|
|
|
|
USB |
SD CARD READER |
Select the SD card reader mode |
see page 65 |
|
|
|
|
||
AUDIO I/F |
Make USB audio interface settings |
see page 66 |
||
|
||||
|
|
|
|
|
|
INFORMATION |
Information about the file, SD card, and system |
see page 68 |
|
|
|
|
|
|
|
TUNER |
Use the tuner |
see page 64 |
|
|
|
|
|
|
|
EFFECT |
Make effect settings |
see page 61 |
|
|
|
|
|
|
OTHERS |
FILE NAME |
Set the recording file name |
see page 71 |
|
|
DATE/TIME |
Set the date and time used by the unit |
see page 18 |
|
|
|
|
|
|
|
|
Settings for the TASCAM RC-3F footswitch and |
|
|
|
REMOTE |
TASCAM RC-10 wired remote control (both sold |
see page 72 |
|
|
|
separately) |
|
|
|
|
|
|
|
|
AUTO PWR SAVE |
Set the automatic power saving function |
see page 69 |
|
|
|
|
|
|
|
BACKLIGHT |
Set the backlight |
see page 69 |
|
|
|
|
|
|
|
CONTRAST |
Adjust the display contrast |
see page 69 |
|
|
|
|
|
|
|
BATTERY TYPE |
Set the type of batteries. |
see page 69 |
|
|
|
|
|
|
SYSTEM |
PHANTOM VOLT |
Set the phantom power voltage. |
see page 69 |
|
|
|
|
|
|
|
LANGUAGE |
Set the language shown on the display |
see page 69 |
|
|
|
|
|
|
|
INITIALIZE |
Restoring the DR-40X to factory settings |
see page 70 |
|
|
|
|
|
|
|
QUICK FORMAT |
Format an SD card |
see page 70 |
|
|
|
|
|
|
|
ERASE FORMAT |
Completely format an SD card |
see page 70 |
|
|
|
|
|
TASCAM DR-40X 13
2 – Names and Functions of Parts
CAUTION
ii When recording or in recording standby, only the following screens and items are shown.
LOW CUT and AUTO REC setting MODE and LEVEL items on the REC SETTING screen (AUTO REC settings are shown, but cannot be changed)
EFFECT screen REVERB, PRESET, LEVEL and SOURCE items
ii When the Playback Control screen is open, pressing the MENU button will not open the MENU screen. This turns the loop playback function on/off. (See "Loop playback of a selection" on page 48)
Using the menu
We will explain this by showing how to set the playback area as an example.
1.Press the MENU button to open the MENU screen.
4.Use the ENTER/MARK or /button to move the cursor to highlight the value of the setting.
2.Use the + or – button to select a menu item (highlighted), and use the ENTER/MARK or /button to move to various settings screens.
3.Use the + or – button to select (highlight) a menu item to set.
5.Use the + or – button to change the setting.
6.Press the .button to set a different item in the same menu.
This enables selection of a different item. Use the + or − button to select another item to set.
7.Repeat step 3 to 6 as necessary to set other items.
8.Press the MENU button to return to the MENU screen. To return to the Home screen, press the ¤(HOME) [8] button.
 14 TASCAM DR-40X

Basic operation
Use the following buttons to operate the various screens.
MENU button:
This opens the MENU screen.
PB CONT button:
This opens the Playback Control screen.
¤(HOME) [8] button:
When a settings screen is open, press the ¤(HOME) [8] button to return to the Home Screen. Use this to answer “NO” to a confirmation message.
ENTER/MARK button:
Use this to confirm the selection of a setting item or to answer “YES” to a confirmation message.
/button:
Use this to move the cursor (highlighted area) right on the screen and to open folders on the BROWSE screen.
.button:
Use this to move the cursor (highlighted area) left on the screen and to close folders on the BROWSE screen.
+ button:
Use this to move the cursor (the highlighted area) upward on the screen, or increase values.
– button:
Use this to move the cursor (highlighted area) down on the screen and to decrease values.
QUICK button:
This opens the Quick menu.
The content differs according to the recorder status and operation mode.
REC MODE button
Opens the REC MODE screen.
When the REC MODE screen is open, returns to the Home screen.
MIXER button
Opens the Mixer Screen.
When the Mixer Screen is open, returns to the Home screen.
2 – Names and Functions of Parts
1/2 [SOLO] button
Opens a meter display that shows the 1/2 input level setting status.
In DUAL or 4CH mode, press and hold during recording or playback to solo the channels.
Press when in OVERDUB (MIX) recording mode to mute the input sound.
3/4 [SOLO] button
Opens a meter display that shows the 3/4 input level setting status.
In DUAL or 4CH mode, press and hold during recording or playback to solo the channels.
Press the 3/4 [SOLO] button to switch between the input sound and the 3/4 track playback sound.
TASCAM DR-40X 15
3 – Preparation
Powering the unit
This unit can operate on three AA batteries, using a TASCAM PS-P520E AC adapter (sold separately) or using a commercial- ly-available USB cable (USB bus power).
Alkaline or Ni-MH batteries can be used.
To use USB bus power, see "Powering the unit with USB bus power" on page 65.
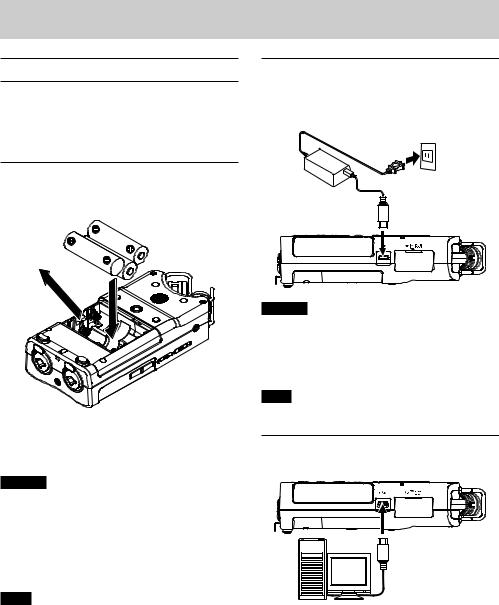
Using AA batteries
Open the battery compartment cover on the back of the unit. Fit three AA batteries to the ¥and ^marks shown in the compartment, and close the battery compartment cover.
When using AA batteries, set the type of battery in order to accurately show the amount of power remaining and allow the unit to accurately determine whether power is available for proper operation. (See "Setting the battery type" on page 69)
CAUTION
ii Do not use manganese dry cell batteries.
ii This unit cannot recharge Ni-MH batteries. Use a commercially available recharger.
ii The included alkaline batteries are for confirming operation of the unit and might not last very long.
ii Before putting the bottom battery in, put the ribbon inside the compartment first. Failure to do so could make removing the batteries difficult.
NOTE
A great amount of power is required to provide phantom power to a condenser microphone. If you use a condenser microphone while running the unit on AA batteries (Ni-MH rechargeable or alkaline), the operation time will be greatly shortened because of their low capacities.
If you need to operate the unit for a long time, use the AC adapter (TASCAM PS-P520E) or using a commercially available USB cable (USB bus power).
Using an AC adapter (sold separately)
As shown in the illustration, connect a TASCAM PS-P520E AC adapter (sold separately) to the unit's USB port and charge the unit.
TASCAM PS-P520E
AC outlet
Micro-B USB plug
CAUTION
ii Never use any adapter other than the designated PS-P520E AC adapter. Use of a different adapter could cause malfunction, fire or electric shock.
ii Noise may occur when recording with a microphone if the unit is too close to the AC adapter. In such a case, keep sufficient distance between the AC adapter and the unit.
NOTE
When both batteries are installed and the AC adapter is connected, power will be supplied from the AC adapter.
Using USB bus power
Use the commercially-available USB cable to connect the unit and the computer as illustrated below.
Computer |
Micro-B USB plug |
USB
See "Powering the unit with USB bus power" on page 65.
 16 TASCAM DR-40X
Turning the power on and off (standby mode)
VCAUTION
Do not wear connected headphones when turning the unit on or off (putting it in standby). Noise could damage the headphone driver unit or harm your hearing.
CAUTION
ii The unit enters standby mode if turned off when the unit is operating on AC power supplied through a TASCAM PS-P520E AC adapter (sold separately) or bus power provided from a connected computer USB port.
ii Turn down the volume of the monitoring system connected to the unit before turning the unit on or off (standby).
Turning the unit on
When the unit is off, press and hold the ¤(HOME) [8] button until the TASCAM DR-40X start-up screen appears.
The Home Screen appears after the unit starts up.
Start -Up screen |
Home screen |
CAUTION
The first time a new unit is turned on after purchase, the following settings must be made.
1) A menu to change the menu screen display language will open.
Press the + or − button to move the cursor and select (highlight) the language to be shown on the display.
Options:
English: use English: use Japanese Français: use French Español: use Spanish Deutsch: use German Italiano: use Italian
Português: use Portuguese Русский: use Russian: use Chinese
: use Korean
After selection, press the ENTER/MARK button to confirm.
3 – Preparation
You can also change the display language setting with the SYSTEM screen LANGUAGE item. (See "Setting the language" on page 69)
2) A screen for setting the built-in clock will open.
Press the .or /button to move the cursor (highlighted area), and use the + or − button to change values.
After completing the setting, press the ENTER/MARK button to confirm.
The start-up screen appears, followed by the Home Screen after start-up completes.
Date/time setting may be skipped by pressing the ENTER/MARK button. This setting can be made later. (See "Setting the date and time" on page 18.)
Turning the unit off (standby)
Press and hold the ¤(HOME) [8] button until LINEAR PCM RECORDER appears on the display.
The unit turns off after it completes its shutdown process.
CAUTION
Always use the ¤(HOME) [8] button to shutdown the unit.
While the unit is on, do not remove the batteries, disconnect the power cord when using a TASCAM PS-P520E AC adapter (sold separately) or disconnect the USB cable when using USB bus power. Doing so will cause all recordings, settings and other data to be lost. Lost data cannot be restored.
Resume function
The unit has resume function. When started up, the unit is located to the position (time) where it left off when shut down previously.
If the PLAY [7] button is pressed after start-up, the file the unit was playing when shut down previously starts to be played from the position (time) where the unit left off when shut down.
NOTE
The required data are stored in the SD card. The resume function does not work if the card is exchanged or formatted.
TASCAM DR-40X 17
3 – Preparation
Setting the date and time
This unit uses its internal clock to record the date and time to the recorded files.
1.Press the MENU button to open the MENU screen.
2.Use the + or – button to select the OTHERS menu item (highlighted), and press the ENTER/MARK or / button.
The OTHERS screen opens.
3.Use the + or – button to select the DATE/TIME menu item, and press the ENTER/MARK or /button.
The DATE/TIME screen opens.
4.Use the .and /buttons to move the cursor, and use the + and − buttons to change the values.
5.Press the ENTER/MARK button to confirm the change and return to the OTHERS screen.
NOTE
The unit can automatically add the date and time set here to file names. (See "Setting the file name format" on page 71)
CAUTION
The date and time setting can be retained for only a few minutes when power is not supplied from batteries, a dedicated AC adapter (TASCAM PS-P520E; sold separately) or USB bus power.
When using batteries, we recommend replacing them before they are completely dead.
 18 TASCAM DR-40X

Inserting and removing SD cards
Inserting cards
1.Open the SD slot cover on the right side.
2.Insert the SD Card into the slot as shown in the following illustration until it clicks into place.
Removing the card
1.Open the SD slot cover.
2.Press the SD card in gently and then release it to allow it to come out.
3 – Preparation
Card write protection
SD cards have protect switches that prevent writing new data to them.
|
|
|
|
|
|
|
|
|
|
|
|
|
|
|
|
|
|
|
|
|
|
|
|
|
|
|
|
|
|
|
|
|
|
|
|
|
|
|
|
|
|
|
|
|
|
|
|
|
|
|
|
|
|
|
|
|
|
|
|
|
|
|
|
|
|
|
|
|
|
|
|
|
|
|
|
|
|
|
|
|
|
|
|
Writing possible |
|
Writing not possible |
|
||||||||||
If you slide the protect switch to the “LOCK” position, file recording and editing is not possible. Move the switch to the unlocked position in order to record, erase and otherwise edit data on the card.
Preparing an SD card for use
In order to use an SD card in this unit, you must format it first.
1.Confirm that an SD card is installed and turn the power ON.
2.The following message appears when a new card or a card formatted for use with another device is installed in the unit.
CAUTION
ii Do not remove the SD card from the unit when it is connected to a computer by USB.
ii SD cards that meet SD, SDHC or SDXC standards can be used with this unit.
ii A list of SD cards that we have confirmed for use with this unit is available on the TEAC Global Site (http:// teac-global.com).
3.Press the ENTER/MARK button to start formatting.
CAUTION
Formatting an SD card erases all the data on it.
4.When formatting ends, the Home screen opens. You can also reformat the card in this unit at any time.
CAUTION
When formatting an SD card, the unit should be operating on AC power supplied through a TASCAM PS-P520E adapter (sold separately), USB bus power supplied
from a connected computer, or batteries with sufficient remaining power.
TASCAM DR-40X 19
3 – Preparation
Using the built-in speaker
To listen to the playback sound from the built-in speaker, turn on the SPEAKER item on the I/O SETTING screen.
NOTE
Even if SPEAKER is ON, the unit will not play through the speaker when the unit is recording, in recording standby or when headphones or an external speaker system is connected.
Operation from the MENU screen
1.Press the MENU button to open the MENU screen.
2.Use the + or – button to select (highlight) I/O SETTING and press the ENTER/MARK or /button.
The I/O SETTING screen will open.
3.Use the + or − button to select (highlight) the SPEAKER item and press the ENTER/MARK button.
4.Use the + or – button to select ON.
5.When finished, press the ¤(HOME) [8] button to return to the Home screen.
Operation from the Quick menu
1.During playback when the Home Screen is open, press the QUICK button to open the Quick menu.
2.Use the + or − button to select (highlight) SPEAKER and press the ENTER/MARK button.
The SPEAKER screen will open.
Options: OFF (default), ON
3.Use the + or − button to select (highlight) a function, and press the ENTER/MARK button to enable it and return to the Home Screen.
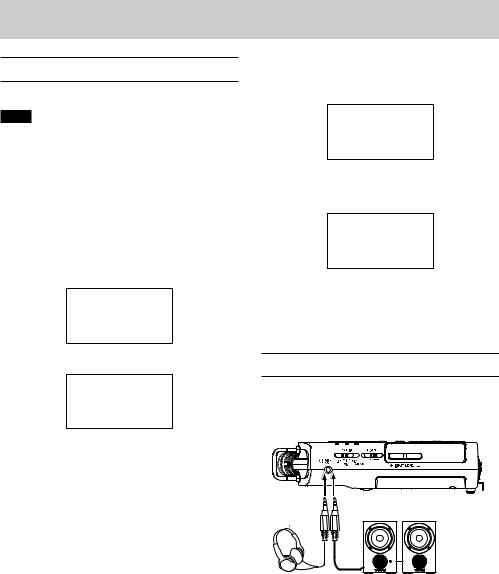
Connecting monitoring equipment
To listen with headphones, connect them to the  /LINE OUT jack.
To listen with an external monitoring system (powered monitor speakers or an amplifier and speakers), connect it to the  /LINE OUT jack.
Headphones |
Powered monitor speaker |
|
or |
|
an amplifier and speaker |
 20 TASCAM DR-40X
Using the built-in microphone
This unit’s built-in microphones can be adjusted, allowing the angles of the microphones to be changed. You can choose clear stereo sound or wide stereo sound according to considerations including the recording source and situation by opening or closing the microphone pair.
Setting the mics to record a wide stereo sound (A-B position)
Open the mics to the left and right (A-B position).
Set this way, the two microphones are spread wide to the left and right, enabling recording with a strong stereo field that is good for music, for example.
If you open or close the microphone pair while using the built-in stereo microphone and the left-right channels does not suit the angle of the microphone, a pop-up message appears to ask whether you want to swap the left-right channels of the microphone. (See "Microphone position detection" on page 22.)
CAUTION
Set the left-right channels of the built-in microphone to
L-R.
When using the built-in stereo microphone in an open state and the left-right setting is not L-R,  appears on the Home Screen. (See "Adding marks manually" on page 60)
3 – Preparation
Setting the mics to record a clear stereo sound (X-Y position)
Close the mics (X-Y position).
This setting enables recording with a clear stereo field and less phase difference.
If you open or close the microphone pair while using the built-in stereo microphone and the left-right setting does not suit the angle of the microphone, a pop-up message appears to ask whether you want to change the mic left-right setting. (See "Analog audio input and output ratings" on page 77)
CAUTION
Set the built-in stereo mic setting to R-L.
When using the built-in stereo microphone in a closed state and the left-right setting is not R-L,  appears on the Home Screen. (See "Adding marks manually" on page 60)
TASCAM DR-40X 21
3 – Preparation
Swapping the left-right channels of the built-in microphone pair
Swap the left and right mics according on the mic angle setting.
When the mic pair is open, the left mic should be set to the left channel and the right mic should be set to the right channel (L-R when in A-B position). When the mic pair is closed, the left mic should be set to the right channel and the right mic should be set to the left channel (R-L when in X-Y position).
If you are using the built-in microphone and this setting is not used, the current microphone setting icon appears as a warning on the Home screen.
1.Press the RECORD [0] button to start recording standby.
The REC indicator will blink and the recording screen will open.
2.Press the QUICK button. The Quick menu will open.
3.Use the + or − button to select (highlight) MIC LR SWAP, and press the ENTER/MARK button.
The MIC LR swap screen will appear.
4.Use the + or – button to select (highlight) L-R or R-L according to the mic opening state.
5.Press the ENTER/MARK button to fix the setting, and to return to the Home screen.
Microphone position detection
The following pop-up message appears automatically whenever the built-in stereo mic is opened or closed and the left-right channel setting does not suit the mic angle.
Press the ENTER/MARK button to fix the setting, and to return to the Home screen.
Press the ¤(HOME) [8] button to leave the setting as it is.
NOTE
This screen appears automatically when the right mic is opened or closed. This screen will not appear when the left mic is opened or closed.
When you change the microphone angle setting and the pop-up message appears, you must press the ENTER/ MARK button to change the L-R setting, press the ¤ (HOME) [8] button to keep this setting as is, or restore the previous microphone angle to close the pop-up message before you can begin recording.
The pop-up message does not appear if you change the microphone position when recording. If necessary, press the RECORD [0] button to enter recording standby. Then, press the QUICK button and change the MIC LR SWAP setting. (See "Swapping the left-right channels of the built-in microphone pair" on page 22)
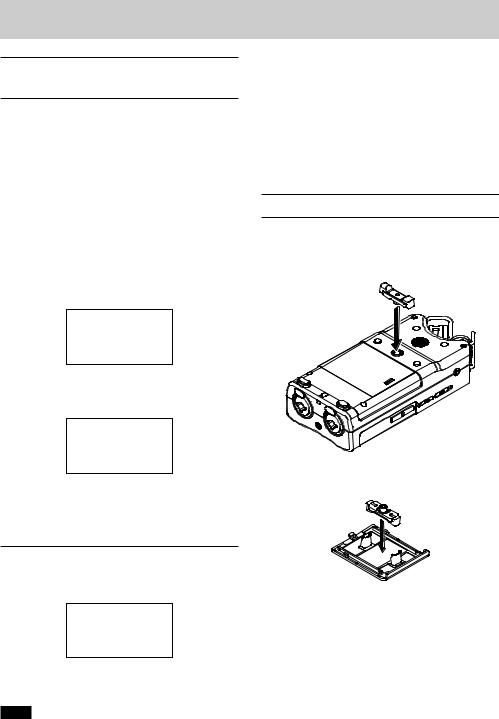
Attaching the tilt foot
When recording with the built-in mic, you can attach the included tilt foot to the tripod mounting threads to prevent the mic from being too low when placing the unit with the bottom side (battery compartment cover side) down.
Attach it as shown below.
When not using the tilt foot, you can put it between the two protrusions on the inside of the battery compartment cover for storage and transportation.
 22 TASCAM DR-40X
In addition to the built-in microphone, an external microphone or external audio device (i.e. CD player) can also be used for recording. You can select among MP3 (44.1/48 kHz, 32–320 kbps) and WAV/BWF (44.1/48/96 kHz, 16/24-bit) audio recording formats.
Marks added when recording or playing a WAV file that is BWF-compatible can be used with software that supports this format, for example.
This recorder has five recording modes. Using the overdubbing function, you can mix input signals with an audio file that is played back and record either the combined signals or just the input signal as a new file. With dual recording you can simultaneously record the same input signals at two different levels. You can also use external mics with the built-in mics for 4-channel recording.
Setting file format and sampling frequency (REC SETTING)
Select the audio file type that you want to record before you start recording.
1.Press the MENU button to open the MENU screen.
2.Use the + or − button to select REC SETTING, and press the ENTER/MARK or /button.
The REC SETTING screen will open.
3.Use the + or − button to select FORMAT, and press the
ENTER/MARK or /button.
Set the file format here.
Use the + and − buttons to set it to one of the following options.
Options: BWF 16bit, BWF 24bit, WAV 16bit (default), WAV 24bit, MP3 32k (bps), MP3 64k, MP3 96k, MP3 128k, MP3 192k, MP3 256k, MP3 320k
4 – Recording
NOTE
ii BWF is a format created for broadcasting that has the same sound quality as the standard WAV format. It also uses the same “.wav” file extension as WAV files. In this manual, we distinguish these file types by using the terms BWF and WAV.
ii WAV/BWF formats provide better recording quality than MP3 formats.
ii MP3 formats enable longer recording times than WAV/ BWF formats.
ii MP3 formats with higher values provide better recording quality.
4.Press the .button to enable selection of settings.
5.Use the + or − button to select SAMPLE, and press the
ENTER/MARK or /button.
Set the sampling frequency.
Use the + or − button to select 44.1k (default), 48k or
96k.
NOTE
96k cannot be selected if FORMAT is set to MP3.
6.When finished, press the ¤(HOME) [8] button to return to the Home screen.
TASCAM DR-40X 23
4 – Recording
Preparing the recording inputs
Recording with the built-in mics
Point the mics at the sound source and place the unit in a stable location where there is little vibration.
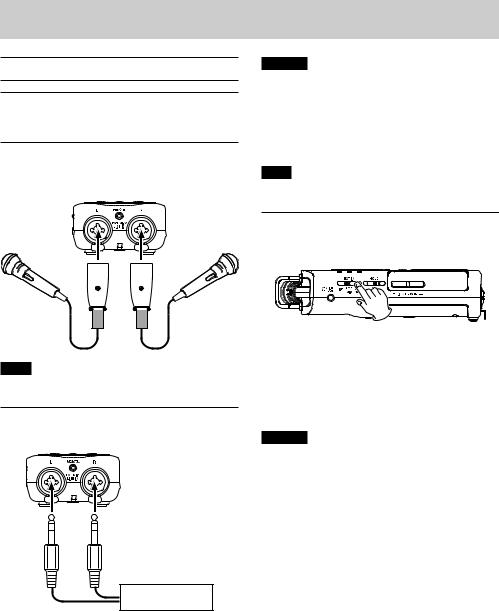
Recording with external mics (EXT MIC IN)
Connect external mics to the EXT MIC/LINE IN connectors.
Point the mics at the sound source and place the unit in a stable location where there is little vibration.
MIC
NOTE
The MIC LR SWAP setting is disabled when an external mic is being used.
Recording an external device (LINE IN)
Use stereo plug cables to connect to the output of an external audio device.
Audio device or external device
CAUTION
ii If the input sound is still distorted after adjusting the input level of the unit, reduce the playback sound of the external device.
ii If an external audio device with a fixed output line level is connected, it might not be possible to control the gain level of excessively loud input signals. In such cases, use the headphone jack or other level-controllable output for connection to the unit.
NOTE
The MIC LR SWAP setting is disabled when an external mic is being used.
Setting the external input type
When using an external input source, set the EXT IN switch on the left side panel according to the type of equipment connected.
LINE
Set to LINE when connecting line output jacks of external devices to the analog inputs of this unit.
MIC
Set to MIC when connecting mics to the unit.
MIC+PHANTOM
Set to MIC+PHANTOM when connecting condenser mics that require phantom power (+24V or +48V) to the unit.
CAUTION
Depending on this setting, the input level setting range changes. For this reason, the input level might change greatly when this setting is changed. Before changing it, you should turn the unit off (standby) or turn the output level all the way down.
 24 TASCAM DR-40X
Loading...