


» D01001200A
DP-02
DP-02CF
DIGITAL PORTASTUDIO
OWNER'S MANUAL
IMPORTANT SAFETY PRECAUTIONS
CAUTION: TO REDUCE THE RISK OF ELECTRIC SHOCK, DO NOT REMOVE
COVER (OR BACK). NO USER-SERVICEABLE PARTS INSIDE. REFER SERVICING
TO QUALIFIED SERVICE PERSONNEL.
The lightning flash with arrowhead symbol, within equilateral triangle, is intended to alert the user to the presence of uninsulated “dangerous voltage” within the product’s enclosure that may be of sufficient magnitude to constitute a risk of electric shock to persons.
The exclamation point within an equilateral triangle is intended to alert the user to the presence of important operating and maintenance (servicing) instructions in the literature accompanying the appliance.
This appliance has a serial number |
|
WARNING: TO PREVENT FIRE OR |
||
located on the rear panel. Please record |
|
|||
the model number and serial number |
|
SHOCK HAZARD, DO NOT EXPOSE THIS |
||
and retain them for your records. |
|
|||
Model number |
|
APPLIANCE TO RAIN OR MOISTURE. |
||
Serial number |
|
|
|
|
|
|
|||
|
|
|
|
|
|
|
|
|
|
|
For U.S.A. |
|
|
Declaration of Conformity |
||
|
|
|
|||
TO THE USER |
|||||
|
|
|
|||
This equipment has been tested and found to |
|
Model Number |
: DP-02/DP-02CF |
||
|
Trade Name |
: TASCAM |
|||
comply with the limits for a Class B digital device, |
|
||||
pursuant to Part 15 of the FCC Rules. These limits |
|
Responsible party : TEAC AMERICA, INC. |
|||
are designed to provide reasonable protection |
|
Address |
: 7733 Telegraph Road, Montebello, |
||
against harmful inter ference in a residential |
|
||||
|
|
California, U.S. A. |
|||
installation. This equipment generates, uses, and |
|
|
|||
|
Telephone number : 1-323-727-7663 |
||||
can radiate radio frequency energy and, if not |
|
||||
|
|
|
|||
installed and used in accordance with the instruction |
|
This device complies with Part 15 of the FCC Rules. |
|||
manual, may cause harmful interference to radio |
|
||||
|
Operation is subject to the following two conditions: |
||||
communications. |
|
||||
|
(1) this device may not cause harmful interference, and |
||||
However, there is no guarantee that interference will |
|
||||
|
(2) this device must accept any interference recieved, |
||||
not occur in a particular installation. If this equipment |
|
||||
|
including interference that may cause undesired |
||||
does cause harmful interference to radio or television |
|
||||
|
operation. |
|
|||
reception, which can be determined by turning the |
|
|
|||
|
|
|
|||
equipment off and on, the user is encouraged to |
|
|
|
||
|
|
|
|||
try to correct the interference by one or more of the |
|
|
|
||
following measures. |
|
|
|
||
a)Reorient or relocate the receiving antenna.
b)Increase the separation between the equipment and receiver.
c)Connect the equipment into an outlet on a circuit different from that to which the receiver is connected.
d)Consult the dealer or an experienced radio/TV technician for help.
CAUTION
Changes or modifications to this equipment not expressly approved by TEAC CORPORATION for compliance could void the user's authority to operate this equipment.
TASCAM DP-02/DP-02CF

IMPORTANT SAFETY INSTRUCTIONS
1Read these instructions.
2Keep these instructions.
3Heed all warnings.
4Follow all instructions.
5Do not use this apparatus near water.
6Clean only with dry cloth.
7Do not block any ventilation openings. Install in accordance with the manufacturer's instructions.
8Do not install near any heat sources such as radiators, heat registers, stoves, or other apparatus (including amplifiers) that produce heat.
9Do not defeat the safety purpose of the polarized or grounding-type plug. A polarized plug has two blades with one wider than the other. A grounding type plug has two blades and a third grounding prong. The wide blade or the third prong are provided for your safety. If the provided plug does not fit into your outlet, consult an electrician for replacement of the obsolete outlet.
10Protect the power cord from being walked on or pinched particularly at plugs, convenience receptacles, and the point where they exit from the apparatus.
11Only use attachments/accessories specified by the manufacturer.
12Use only with the cart, stand, tripod, bracket, or table specified by the manufacturer, or sold with the apparatus. When a cart is used, use caution when moving the cart/apparatus combination to avoid injury from tip-over.
13Unplug this apparatus during lightning storms or when unused for long periods of time.
14Refer all servicing to qualified service personnel. Servicing is required when the apparatus has been damaged in any way, such as power-supply cord or plug is damaged, liquid has been spilled or objects have fallen into the apparatus, the apparatus has been exposed to rain or moisture, does not operate normally, or has been dropped.
•Do not expose this apparatus to drips or splashes.
•Do not place any objects filled with liquids, such as vases, on the apparatus.
•Do not install this apparatus in a confined space such as a book case or similar unit.
•The apparatus should be located close enough to the AC outlet so that you can easily grasp the power cord plug at any time.
•An apparatus with Class I construction shall be connected to an AC outlet with a protective grounding connection.
•Batteries (battery pack or batteries installed) should not be exposed to excessive heat such as sunshine, fire or the like.
•Excessive sound pressure from earphones and headphones can cause hearing loss.
•The apparatus draws nominal non-operating power from the AC outlet with its STANDBY/ON in the Standby position.
TASCAM DP-02/DP-02CF
Safety Information
This product has been designed and manufactured according to FDA regulations "title 21, CFR, chapter
1, subchapter J, based on the Radiation Control for Health and Safety Act of 1968", and is classified as a class 1 laser product. There is no hazardous invisible laser radiation during operation because invisible laser radiation emitted inside of this product is completely confined in the protective housings.
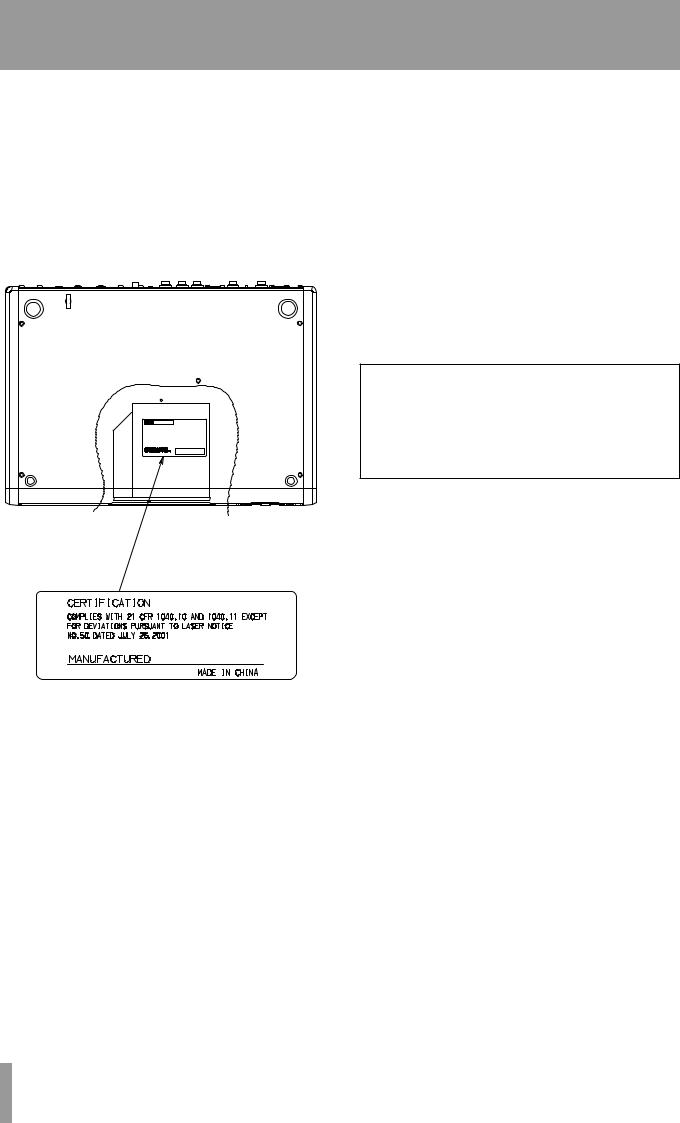
The label required in this regulation is shown at 1.
CAUTION
•DO NOT REMOVE THE PROTECTIVE HOUSING
USING A SCREWDRIVER.
•USE OF CONTROLS OR ADJUSTMENTS OR PERFORMANCE OF PROCEDURES OTHER THAN
THOSE SPECIFIED HEREIN MAY RESULT IN HAZARDOUS RADIATION EXPOSURE.
•IF THIS PRODUCT DEVELOPS TROUBLE, CONTACT YOUR NEAREST QUALIFIED SERVICE
PERSONNEL, AND DO NOT USE THE PRODUCT IN ITS DAMAGED STATE.
•CLASS 1M INVISIBLE LASER RADIATION WHEN
OPEN AND INTERLOCKS DEFEATED. DO NOT VIEW DIRECTLY WITH OPTICAL INSTRUMENTS.
Optical pickup:
Type : HOP-6201T
Manufacturer : Hitachi Media Electronics Co,Ltd. Laser output : Less than 75 mW on the objective lens
(record) Wavelength : 777 to 787 nm
1 |
For USA |
|
TASCAM DP-02/DP-02CF

1 – Starting out with your |
|
DP-02/DP-02CF....................... |
7 |
Getting started.................................. |
7 |
DP-02 Line-up................................................. |
7 |
Manual conventions...................................... |
7 |
Copyright........................................................ |
8 |
What’s in the box.......................................... |
8 |
Precautions for placement and use.............. |
8 |
Beware of condensation............................... |
8 |
Media considerations (DP-02CF only).......... |
8 |
Loading the CF card into the unit |
|
(DP-02CF only)................................... |
9 |
Starttup & shutdown......................... |
9 |
Starting up the unit....................................... |
9 |
Shutting down the unit............................... |
10 |
The ACCESS light.......................................... |
10 |
How to play back demo songs |
|
(DP-02 only)......................... |
10 |
Navigation........................................ |
11 |
The SHIFT key................................... |
11 |
Titling................................................ |
11 |
Connecting your unit to other |
|
equipment........................... |
12 |
Balanced XLR inputs.................................... |
14 |
Features of the DP-02/DP-02CF....... |
15 |
Top panel...................................................... |
15 |
Front panel................................................... |
19 |
Rear panel.................................................... |
20 |
Side panel (DP-02CF only)........................... |
20 |
Managing your songs...................... |
21 |
Creating a new song................................... |
21 |
Storing songs............................................... |
21 |
Reverting to last version............................. |
21 |
Loading a saved song.................................. |
22 |
Erasing a song(s).......................................... |
22 |
Song information......................................... |
23 |
Assigning inputs.............................. |
23 |
Clearing an assignment..................................... |
23 |
Recording......................................... |
24 |
More advanced features................. |
24 |
Using marks to locate positions................. |
24 |
Punching recording...................................... |
25 |
Bouncing....................................................... |
25 |
Track editing................................................. |
25 |
Undoing/Redoing an operation.................. |
25 |
Undoing the last action and redoing the undo |
|
action..................................................... |
25 |
Undoing/Redoing actions at once.............. |
26 |
Contents |
|
Deleting unused data.................................. |
26 |
Mixdown and matering................... |
27 |
Mixdown...................................................... |
27 |
Mastering..................................................... |
27 |
2 – Advanced techniques......... |
29 |
Location............................................ |
29 |
Direct location.............................................. |
29 |
Location marks............................................. |
29 |
To set a location mark....................................... |
29 |
To move to a location mark............................... |
29 |
To delete a location mark.................................. |
29 |
To edit a location mark...................................... |
29 |
IN and OUT marks........................................ |
30 |
Using the meters.............................. |
30 |
EQ settings....................................... |
31 |
Punching........................................... |
32 |
Rehearsal...................................................... |
32 |
Punch recording........................................... |
33 |
Pre-roll and post-roll time............... |
33 |
Bouncing........................................... |
34 |
Repeat............................................... |
34 |
Setting the repeat interval......................... |
35 |
Working in bars & beats.................. |
35 |
Tempo setting.............................................. |
35 |
Selecting the time mode............................. |
35 |
Metronome.................................................. |
36 |
When “INTERNAL” is selected at “Output” |
|
[internal metronome].............................. |
36 |
When “MIDI” is selected at “Output” |
|
[MIDI metronome].................................. |
36 |
Working With MIDI.......................... |
37 |
MIDI Clock, etc............................................. |
37 |
MIDI timecode.............................................. |
37 |
When “OFF” is selected at “Output”................. |
37 |
Disk/CF card management.............. |
38 |
Selecting the active partition..................... |
38 |
Formatting a disk/card................................ |
39 |
Formatting a partition................................. |
40 |
Formatting the FAT partition...................... |
40 |
Automatic song creation............................. |
41 |
Initializing a Compact Flash card |
|
(the DP-02 only)............................... |
41 |
Advanced song management......... |
41 |
Coping songs................................................ |
41 |
Protecting a song......................................... |
42 |
Using the USB connection............... |
42 |
System requirements................................... |
42 |
Disconnecting from Windows 2000 / XP / |
|
Vista systems.......................................... |
42 |
TASCAM DP-02/DP-02CF

Contents |
|
Disconnecting from a Macintosh system............ |
43 |
"Open" and "Close"..................................... |
43 |
Backing up and restoring songs..... |
44 |
Backing up.................................................... |
44 |
Restoring a song.......................................... |
45 |
Importing and exporting tracks..... |
45 |
Importing a track......................................... |
45 |
Exporting tracks........................................... |
46 |
Exporting the mastered stereo tracks....... |
47 |
About track editing......................... |
47 |
IN, OUT and TO................................. |
48 |
Using edit mode........................................... |
48 |
Track editing function..................... |
48 |
COPY ® PASTE............................................. |
48 |
COPY ® INSERT............................................ |
49 |
MOVE ® PASTE............................................ |
49 |
MOVE ® INSERT.......................................... |
50 |
OPEN............................................................. |
50 |
CUT................................................................ |
51 |
SILENCE......................................................... |
51 |
CLONE TRACK.............................................. |
51 |
CLEAN OUT................................................... |
52 |
Troubleshooting............................... |
53 |
Messages.......................................... |
54 |
3 – Specifications...................... |
55 |
Specifications................................... |
55 |
Analog specifications........................................ |
55 |
Digital specifications.......................................... |
55 |
Audio performance........................................... |
55 |
Physical characteristics....................................... |
55 |
Dimensional drawings..................... |
56 |
DP-02............................................................ |
56 |
DP-02CF........................................................ |
56 |
Block diagram (DP-02/DP-02CF)...... |
57 |
4 – DP-02 Appendix.................. |
58 |
Tuning a guitar................................. |
58 |
Changing the tuning.................................... |
58 |
Noise reduction................................................. |
58 |
Multi-effect...................................... |
59 |
Assigning the effect.......................................... |
59 |
Selecting the effect type................................... |
59 |
Selecting the effect........................................... |
59 |
Setting the parameter....................................... |
59 |
Setting the effect volume.................................. |
59 |
Available multi-effect settings................... |
60 |
Electric guitar settings (Elec.Guitar).................... |
58 |
Acoustic guitar settings (Aco.Guitar).................. |
58 |
Bass guitar settings (Bass Guitar)....................... |
59 |
Vocal settings (Vocal)........................................ |
59 |
Drum settings (drum)......................................... |
59 |
Reverb............................................... |
62 |
Turning the reverb on and off............................ |
62 |
Using the reverb................................................ |
62 |
Setting the reverb type...................................... |
62 |
Setting the reverb time...................................... |
62 |
About CD-R and CD-RW discs.......... |
63 |
About finalizing............................... |
63 |
Handling of compact discs.......................... |
64 |
Never use a stabilizer or printable discs.... |
64 |
Media compatibility Table.............. |
65 |
Inserting/Ejecting CDs..................... |
66 |
Audio CD performance.................... |
66 |
Playing back audio CDs............................... |
66 |
Making an audio CD.................................... |
67 |
Writing by Disk At Once (DAO)................... |
67 |
Writing by Track At Once (TAO).................. |
68 |
Finalizing CDs............................................... |
68 |
Erasing a CD-RW.......................................... |
69 |
Data CD performance...................... |
69 |
Importing and exporting tracks..... |
69 |
Importing from a CD................................... |
69 |
Exporting to CD........................................... |
70 |
Backing up and restoring songs..... |
71 |
Backing up songs to CD............................... |
71 |
Restoring songs from a CD......................... |
72 |
CD-related Error Message............... |
72 |
Pop-up Massages............................. |
73 |
5 – Commonly-used functions.. 75
How do I..?........................................ |
75 |
TASCAM DP-02/DP-02CF

1 – StartingIMPORTANTout withSAFETYyourINSTRUCTIONSDP-02/DP-02CF
Thank you for your purchase of TASCAM’s latest 8-track digital portastudio, the DP-02/DP-02CF.
The DP-02 and DP-02CF are designed to provide you with great sound in an easy-to-use compact package, allowing you to concentrate on the music, and not on the recording process.
Getting started
Read this section first. It contains important basic information about using your DP-02/DP-02CF effectively, and will help you create exciting original musical projects. When you have read this chapter (“Starting out with your DP-02/ DP-02CF” on page 7), you will be able to find your way around the DP-02/DP-02CF, and to make and play back recordings.
The DP-02/DP-02CF allows you to record many hours of music, up to two tracks at a time, to a maximum of eight tracks, and then mix them down to a pair of mastered stereo tracks using the built-in mixing facilities.
The stereo mix can then be played back into a suitablyequipped CD recorder, etc., or into a computer’s audio inputs for distribution over the Internet, etc. or transferred using a fast USB 2.0 connection to a personal computer.
In addition, individual tracks can be imported and exported between your DP-02/DP-02CF and a personal computer, and songs can be archived, backed up and restored using a PC.
DP-02 Line-up
There are two models, the DP-02 and DP-02CF. The DP-02/DP-02CF is equipped with phantom-powered XLR input jacks, and the DP-02 additionally is equipped with internal effect processors. The DP-02 contains a large hard disk and also an internal CD-R/RW drive. The DP-02CF uses a Compact Flash Card (not included with the unit) memory recorder (not provided with an internal CD-R/RW drive).
This manual refers to both models as “the unit”, as the majority of the functions are common to both models. Also, their hard disk and CF card are described as “recording media.” Any other exceptions are noted.
Chapter 4 of this manual, “DP-02 Appendix” on page 58, deals with the features found on only the DP-02. If you own a DP-02, please read the chapter.
Manual conventions
This first section gives you an idea of the basic operations of the DP-02/DP-02CF and will get you started with recording. Further features are described in “Advanced techniques” on page 29.
When we refer to features of the DP-02/DP-02CF such as keys and connections, we display them like this: MENU.
We refer to features of other equipment like this: AUX IN.
When we show messages, etc., that appear on the screen, we show them like this: SONG LOAD.
T I P : We give hints and tips on using the DP-02/DP-02CF when you see this icon.
NOTE : A note at the side of the main text provides additional explanations for special situations.
CAUTION : A caution shows that you may lose data (your recordings) if you don’t follow the instructions.
WARNING : Warnings should be taken seriously. They describe situations which can cause injury, or damage to the equipment if you do not follow the instructions,
This manual cannot begin to be a full guide to multitrack recording techniques. However, if you visit the TASCAM Web site (www.tascam.com), you can download various documents on recording which may be of interest to you.
Troubleshooting The DP-02/DP-02CF was designed to be easy to use, but sometimes you may need a little help. See the section “Troubleshooting” on page 53 for a list of questions you may have, and answers to help you. There’ s also a list of messages that may pop up, with an explanation of their meaning, and suggestions on what to do (see “Messages” on page 54).
How to do it? At the back of this manual, there is a chapter called “Commonly-used functions” on page
76. Refer to this section when you want to know how to perform a particular operation.
TASCAM DP-02/DP-02CF

1IMPORTANT– Starting outSAFETYwithPRECAUTIONSyour DP-02/DP-02CF
Copyright
Windows, Windows XP, Windows 2000, and Windows
Vista are trademarks of Microsoft Corporation.
Macintosh, MacOS, and MacOS X are trademarks of
Apple Computer.
What’s in the box
When you unpack the box, you should find (as well as this manual):
•The unit itself (DP-02, or DP-02CF)
•Power adaptor
•Power cable suitable for your region
•Warranty card
If any of these items is missing, contact your TASCAM supplier.
WARNING
When using the unit, use only the power adaptor and cable supplied with product. Do not use this power adaptor and cable with any other product.
Precautions for placement and use
The DP-02/DP-02CF may be used in most areas, but to maintain top performance, and prolong operating life, observe the following notes, precautions and environmental conditions:
•Avoid exposing it to extremes of temperature and humidity and avoid mechanical shocks and vibration.
•Keep the unit away from strong magnetic fields (TV sets, computer monitors, large electric motors, etc.).
•The nominal temperature should be between 5°C and 35°C (41°F and 95°F).
•Relative humidity should be 30 to 90 percent.
•As the unit may become hot during operation, always leave sufficient space above the unit for ventilation. Do not install this unit in a confined space such as a bookcase, and do not put anything on top of the unit.
•Avoid installing this unit on top of any heat-generating electrical device such as a power amplifier.
•Make sure that the unit is mounted in a level position for correct operation.
•The voltage supplied to the unit should match the voltage as printed on the rear panel. If you are in any doubt regarding this matter, consult an electrician.
Beware of condensation
If the unit is moved from a cold to a warm place, or used after a sudden temperature change, there is a danger of condensation; vapor in the air could condense on the internal mechanism, making correct operation impossible. To prevent this, or if this occurs, let the player sit for one or two hours at the new room temperature before using.
Media considerations (DP-02CF only)
The capacities and performance of your DP-02CF will vary based on the speed and abilities of the Compact Flash (CF) media used. Older and some cheaper Compact Flash (CF) cards use slower memory components and little internal buffering which results in poor recording performance. Newer CF cards, not only perform reading and writing faster, but also come in larger storage size.
The DP-02CF supports only Type I Compact Flash media. Type I cards are typically FLASH-ROM based and provide higher performance and durability than hard disk cards.
A current list of stated CF cards and their capacities is maintain and available for viewing on the TASCAM website at www.tascam.com
NOTE
A card more than 512 MB should be used on the DP-02CF.
TASCAM DP-02/DP-02CF
1 – StartingIMPORTANTout withSAFETYyour DPINSTRUCTIONS-02/DP-02CF
Loading the CF card into the unit (DP-02CF only)
On the DP-02CF, a CF card is used as a recording media for recording and playback. The CF card should be loaded into the unit before the power is turned on.
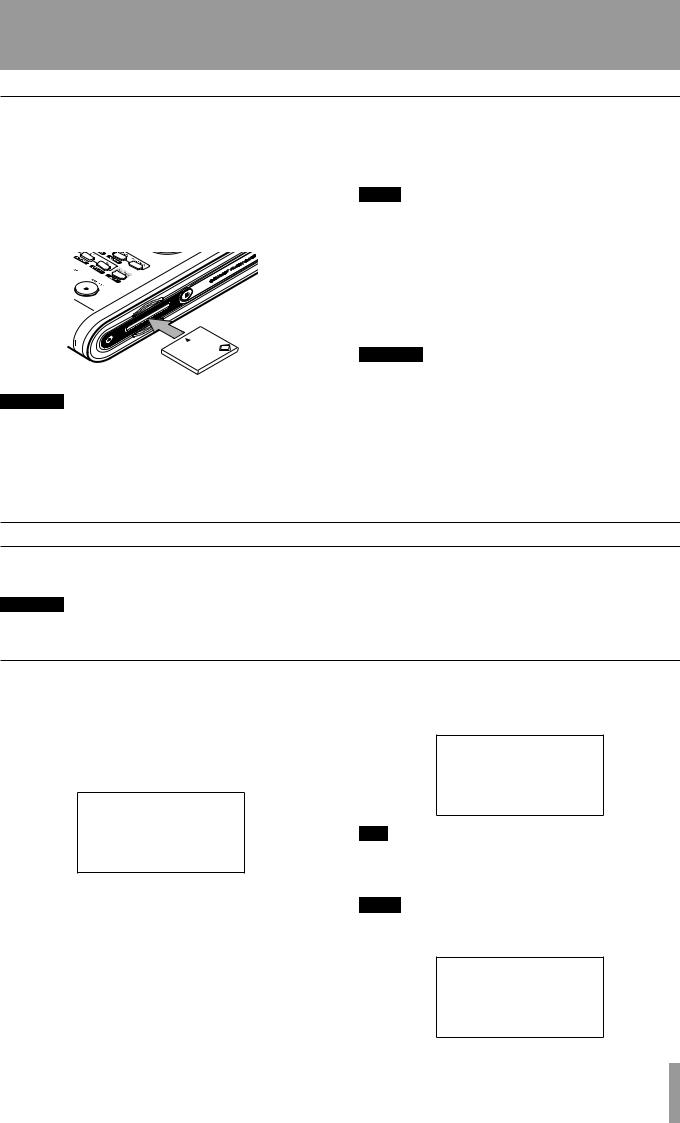
1.Slide the door to open the COMPACT FLASH CARD slot on the side panel to the right, and gently insert a card, label side up, into the unit’s slot.
CF
CAUTION
If the card is the wrong way up, or backwards, when inserted into the slot, applying excessive pressure may damage the slot or the card. Do not force the card in to avoid damage to the unit or the card, remove and re-orient the card so that it slides in easily.
2.Close the slide door. With the door opened, the DP-02CF cannot be used.
NOTE
To use a new CF card, you need to format the card first (see “Formatting a disk/card” on page 39).
Ejecting the card:
Turn off the power to the unit first, slide the door to open and remove the card by hand (there is no eject lever on the unit).
CAUTION
Do not remove the card when the unit is turned on. Always turn the power off before you take the card out from the unit.
Starttup & shutdown
Read this section to understand how to power up and power down the unit.
WARNING
When switching the unit on and off, we suggest that you turn down the volume of any speakers or ampli-
fiers connected to the unit. Also, do not wear headphones connected to the unit when switching power on or off. This will avoid damage to speakers, etc. and possible damage to your hearing.
Starting up the unit
Connect the power adaptor to the unit, the power cable to the power adaptor, and the power cable to the power supply.
Press the POWER switch on the top panel to turn on the unit. The display shows a welcome message.
When the ACCESS light goes off, the display shows the “home screen”:
The system is loaded, and the last saved song is then loaded. The ACCESS indicator flashes to show the hard disk/CF card is in use while the song is being loaded, and the display shows the current operation.
T I P
You can reach this screen from most operations by pressing HOME or repeatedly pressing the NO/EXIT key.
NOTE
When the power is turned on without a CF card loaded into the unit, the home screen shows as follow:
TASCAM DP-02/DP-02CF
1IMPORTANT– Starting outSAFETYwithPRECAUTIONSyour DP-02/DP-02CF
Shutting down the unit
Pressing the POWER switch on the top panel shuts down the unit automatically.
First, stop playback or recording, and press the POWER switch for about seconds. While the unit is shutting down (storing the song data to hard disk or CF card) you will see the display shown here.
NOTE
Once shut down starts, all key presses are ignored.
CAUTION
If you turn off the power accidently while the unit is in operation, the unit cannot shut down properly so all unsaved data will be lost. We recommend that you save the data manually often.
T I P
There is a hook on the bottom of the unit to prevent the adapter cable being pulled accidently.
The ACCESS light
This indicator shows that the hard disk, CF card, or the CD-RW drive is in use. Although the unit is not exactly a delicate piece of equipment, you should take care with it, as with all electronic equipment, especially when the hard disk or CF card is in operation or when CD-RW drive is writing to CDs.
WARNING
Do not move the DP-02/DP-02CF or turn it off or disconnect the power or open the CF card door (DP-02CF only) when the ACCESS indicator is lit, to avoid damage to the recording media and possible loss of data.
How to play back demo songs (DP-02 only)
Before the unit is shipped, demo songs are stored on its hard disk. Follow the procedure below to play back these demo songs.
1.Connect the LINE OUT connector on the unit to the amplifier or monitor system. To listen on headphones, insert the headphone plug into the PHONES jack on the left of the front panel.
2.Turn on the unit. When the unit has started up, the display shows the home screen.
3.Press the SONG key. The SONGscreen is displayed. If the LOADaction is not selected, rotate the DATA dial or use the cursor (¶/§) keys to highlight it.
4.Press the ¥ cursor or YES/ENTER key. The SONG LOADscreen is displayed.
5.Use the cursor (¶/§) or DATA dial to select DP02DEMOand press the YES/ENTER key.
A pop-up screen appears while loading.
When the demo is finished being loaded, the display returns to the SONGscreen.
6.Press the NO/EXIT key or HOME key to return to the home screen.
7.Press the PLAY key to play back the demo songs.
Eight tracks of each demo song is available. Adjust the fader, MASTER fader, PAN and other controls for each channel.
To adjust the volume of the headphones, use the PHONES knob on the top panel.
10 TASCAM DP-02/DP-02CF
1 – StartingIMPORTANTout withSAFETYyour DPINSTRUCTIONS-02/DP-02CF
Navigation
The unit uses 4 menu systems (MENU, SONG, TRACK EDIT) (and also CD on the DP-02 only) which allow you to make settings, and perform many operations. This section explains how to use the menu system and to check and make settings.
Here the TRACK EDITsystem is explained as an example.
1.Press the TRACK EDIT key to bring up the opening menu screen:
2.Use the DATA dial or the cursor (§/¶) keys to scroll up and down through the list of top-level menus.
Here the CLONE TRACKaction is highlighted.
An inverted triangle appears when the menu is highlighted.
T I P
The DATA dial icon is also shown right at the bottom which indicating the dial can be used to select items.
At the bottom right of all menu screens is a symbol showing whether there are more menus below the current list (¶), above the current list (§), or above and below the current list ( ).
).
3.Press the ¥ cursor key or YES/ENTER key to enter the selected menu. The screen shows as below:
4.Use the cursor (§/¶) keys to highlight the value of the item shown on the left.
Rotate the DATA dial to change the value.
T I P
To go up a level in the menu “tree”, press the NO/EXIT key or the ˙ key.
Some screens show a number of lists to select, or confirm the action. In these cases, you should use the cursor (§/¶ ) keys or the DATA dial to highlight and select the item, or use the YES/ENTER key to enter the action.
If you want to adjust the contrast of the display:
1.Press the MENU key and select the PREFERENCE action using the cursor (¶/§) keys or the DATA dial.
2.Press the YES/ENTER or ¥ cursor key to bring up the PREFERENCEscreen.
3.Select the value shown to the right of the CONTRAST preference using the cursor (¶/§) keys, and rotate the DATA dial to adjust the value 1 to 10. The contrast of the display changes equally as the value is changing.
4.Press NO/EXIT to go back to the MENUscreen.
The SHIFT key
The SHIFT key modifies the behavior of a number of different keys. When you press and hold it while pressing
another key, the other key takes on the function shown in the label shown below the key (black-on-orange).
Titling
You can give titles to your songs, exported tracks, etc. Here’s how you do it:
Press and hold the SHIFT key and press the TITLE key to bring up the screen like the one below:
Use the DATA dial to change the letter above the underlined cursor. You can choose from common punctuation marks, numbers, capital (UPPERCASE) letters, and small (lowercase) letters.
Use the § cursor key to insert a blank space at the cursor position, and use the ¶ cursor key to delete the character.
When you have finished entering the name, press YES/ ENTER. The song, with its new name, is stored to recording media.
TASCAM DP-02/DP-02CF 11

1IMPORTANT– Starting outSAFETYwithPRECAUTIONSyour DP-02/DP-02CF
Connecting your unit to other equipment
Before you start recording with the unit, you will need to make a few connections to other equipment. The following picture shows how you can connect the unit to your existing audio setup.
 MIDI IN
Drum machine
PHONES
Footswitch
2-track recorder
REC OUT/PLAY IN
Stereo amplifier
External effects unit
MIDI OUT |
LINE OUTPUT (L, R) |
STEREO MIX (L, R) |
SEND |
RETURN (L, R) |
Guitars and basses to
INPUT A
Microphones to INPUT Aand B
Instruments to INPUT A and B
12 TASCAM DP-02/DP-02CF
1 – StartingIMPORTANTout withSAFETYyour DPINSTRUCTIONS-02/DP-02CF
|
|
|
|
|
|
|
|
|
|
|
|
|
From submixer/MIDI tone |
Synths, pre-amps etc. |
|||||||||||||||||||||||||||||||||||||||
|
|
|
|
|
|
|
|
|
|
|
|
|
generator, etc. |
fo here |
|||||||||||||||||||||||||||||||||||||||
|
|
|
|
|
|
|
|
|
To MIDI sequencer, |
From stereo effects |
|
|
|
|
|
|
|||||||||||||||||||||||||||||||||||||
|
|
|
|
|
|
DC input drum machine, etc. |
unit outputs |
|
|
|
|
|
|
|
|
|
|
|
|
|
|
|
|
|
|
|
|
|
|
|
|
||||||||||||||||||||||
|
|
|
|
|
|
|
|
|
|
|
|
|
|
|
|
|
|
|
|
|
|
|
|
|
|
|
|
|
|
|
|
|
|
|
|
|
|
|
|
|
|
|
|
|
|
|
|
|
|
|
|
|
|
|
|
|
|
|
|
|
|
|
|
|
|
|
|
|
|
|
|
|
|
|
|
|
|
|
|
|
|
|
|
|
|
|
|
|
|
|
|
|
|
|
|
|
|
|
|
|
|
|
|
|
|
|
|
|
|
|
|
|
|
|
|
|
|
|
|
|
|
|
|
|
|
|
|
|
|
|
|
|
|
|
|
|
|
|
|
|
|
|
|
|
|
|
|
|
|
|
|
|
|
|
|
|
|
|
|
|
|
|
|
|
|
|
|
|
|
|
|
|
|
|
|
|
|
|
|
|
|
|
|
|
|
|
|
|
|
|
|
|
|
|
|
|
|
|
|
|
|
|
|
|
|
|
|
|
|
|
|
|
|
|
|
|
|
|
|
|
|
|
|
|
|
|
|
|
|
|
|
|
|
|
|
|
|
|
|
|
|
|
|
|
|
|
|
|
|
|
|
|
|
|
|
|
|
|
|
|
|
|
|
|
|
|
|
|
|
|
|
|
|
|
|
|
|
|
|
|
|
|
|
|
|
|
|
|
|
|
|
|
|
|
|
|
|
|
|
|
|
|
|
|
|
|
|
|
|
|
|
|
|
|
|
|
|
|
|
|
|
|
|
|
|
|
|
|
|
|
|
|
|
|
|
|
|
|
|
|
|
|
|
|
|
|
|
|
|
|
|
|
|
|
|
|
|
|
|
|
|
|
|
|
|
|
|
|
|
|
|
|
|
|
|
|
|
To digital |
To effects unit |
Guitars, basses etc. go here |
|
||
recorder, etc. |
|
|
|
To analog recorder, |
Microphones go here |
|
|
|
|
monitoring system, etc. |
|
Microphones are connected to the rear panel inputs. Set the GUITAR switches to MIC/LINE. Turn the input level controls so that the OL indicators light up only in the loudest part of the recording.
NOTE
The unit includes phantom-powered XLR microphone input connectors. See “Balanced XLR inputs” on page 14 for details of using these connectors.
Synthesizers, etc. including drum machines, guitar amplifier simulators, active basses, etc. as well as CD players, cassette decks, and so on can be connected to the rear panel input jacks using standard 1/4” mono plugs (unbalanced). When you are recording a stereo source, make sure the INPUT MODE key is set to STEREO (see “The INPUT MODE key” below).
Set the GUITAR switch to MIC/LINE. Adjust the input level controls and use the instrument’s output volume controls to adjust the level so that the OL indicators light up only during the very loudest passages.
WARNING
NEVER plug the speaker outputs of a guitar amplifier into the unit.
Guitars and basses (passive types) are connected to the rear panel INPUT A using a standard 1/4” mono plug (unbalanced).
Set the MIC/LINE switch to GUITAR. Turn the input level control until the OL indicators barely light on the loudest passages.
T I P
Use the built-in tuner (on the DP02 only) to tune the guitar or bass (see “Tuning a guitar” on page 58).
The INPUT MODE key You will use this key when you are recording from input A and input B at the same time.
This top panel key affects the way that you monitor the input signals, both through the headphones and/or through the LINE OUTPUT jacks. There are two positions:
NOTE
INPUT MODE does not affect the recording at all—just the monitoring process.
•MONO x 2—The signals from input A and input B are both sent to the center of the monitoring “stage”.
NOTE
In the MONO X 2 mode, the A and B input signals are added together in the center, and you may hear distortion in the monitoring system This does not affect the recording, though.
•STEREO—The signal from input A is sent to the left, and the signal from input B is sent to the right of the monitoring “stage” forming a stereo pair for use when you are recording stereo instruments such as synthesizers, etc.
Monitoring and recording Use the rear panel LINE OUTPUT RCA jacks to connect the unit to your monitoring system (that is, an amplifier/ speaker setup). When you’re ready to make your final stereo master, you can use these jacks to connect to an analog recorder.
A typical setup would connect these jacks to the AUX IN of a stereo system.
Use the stereo system’s selector switch to listen to the AUX source when tracking, bouncing or mastering on the unit.
NOTE
“Tracking” means recording tracks on the unit. “Mastering” means taking these recording tracks and mixing them down to stereo.
When you have mastered the stereo track and you want to record it, set the stereo monitoring system so that the
recorder is set to the AUX source. Now you are monitoring (or listening) through your stereo system.
Effect processor When you want to use an external effect processor with the unit, connect the rear panel
TASCAM DP-02/DP-02CF 13

1IMPORTANT– Starting outSAFETYwithPRECAUTIONSyour DP-02/DP-02CF
SEND of the unit to the mono input of the processor (1/4” unbalanced jack).
NOTE
The DP-02 owns internal reverb processors. However, you can also use an external effect processor if you prefer.
Connect the stereo output of the processor to the RETURN jacks of tthe unit (1/4” unbalanced jack).
External stereo input The unit has a 1/8” stereo mini jack on the rear panel marked STEREO MIX.
This can be used to connect an external stereo sub-mixer, synthesizer, drum machine, CD player, etc.
This stereo signal is routed to the analog LINE OUTPUT jacks. They can not be recorded on the unit, nor can you adjust the signal level using the unit.
Digital output Use a standard optical cable to connect this to a suitable digital stereo input of monitoring system, or stereo recorder.
NOTE
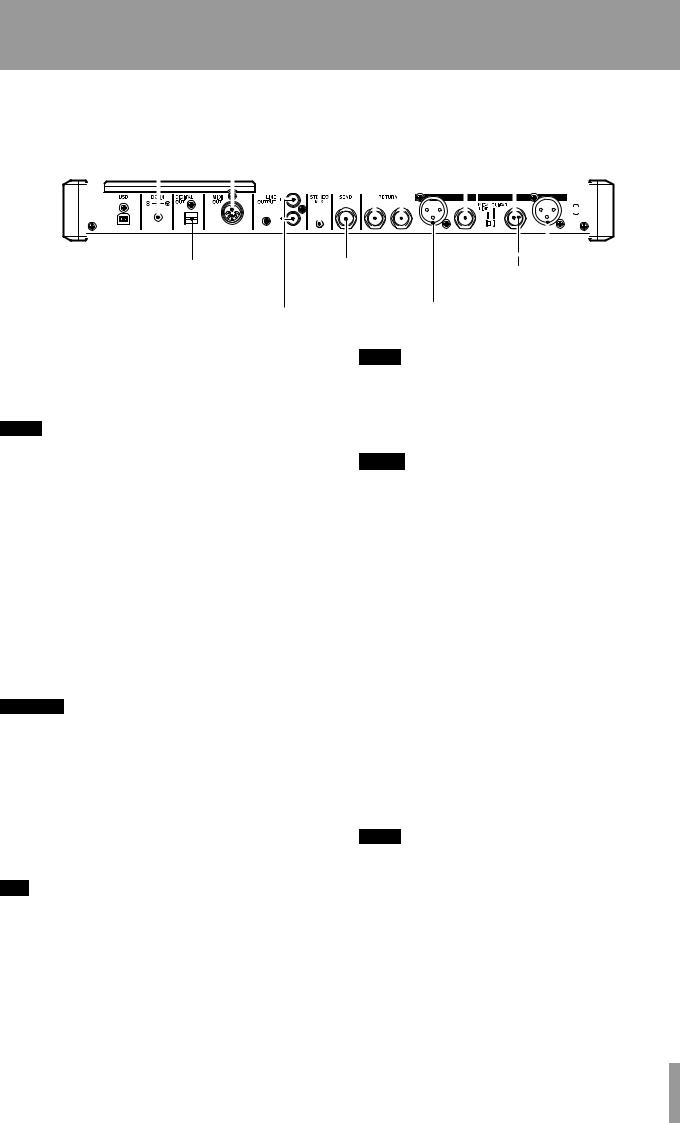
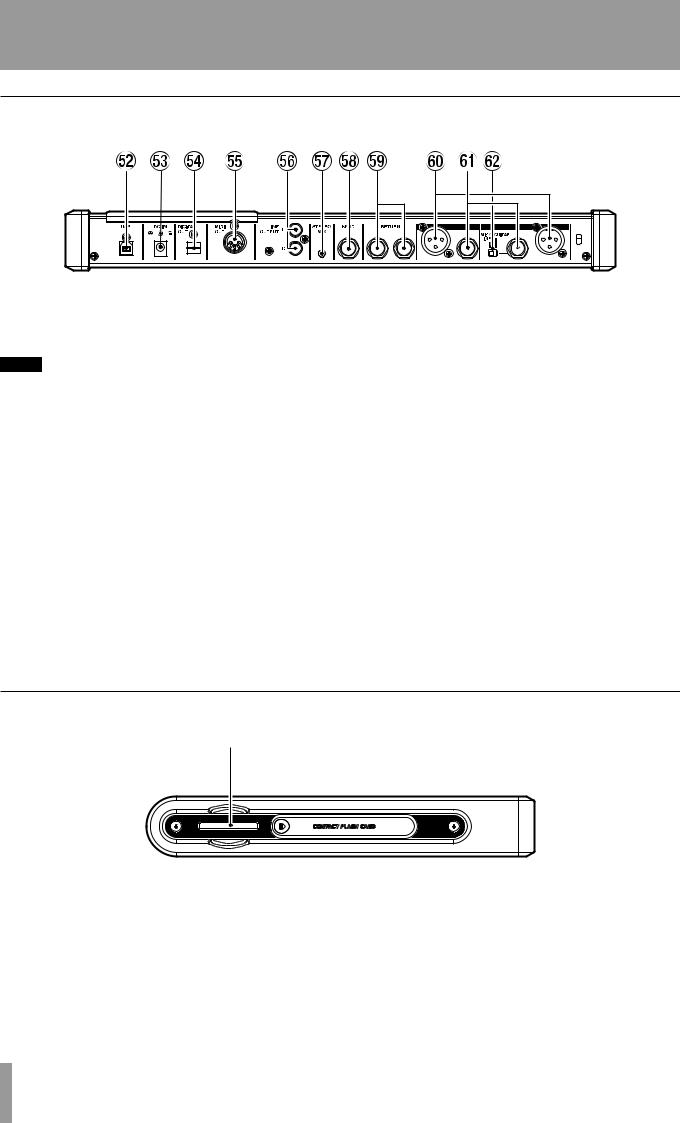
You can connect a digital recorder (CD,MD) using the digital connection, while using the LINE OUTPUT jacks for monitoring.
This signals sent from this are the same as those sent from the LINE OUTPUT jacks (although the STEREO MIX signals are not output through the digital output).
MIDI output Use this (rear panel) to connect a sequencer, drum machine, etc. which can be started, stopped and synchronized with the unit. See “Working with MIDI” on page 37 for details.
Balanced XLR inputs
These inputs enable you to connect condenser microphones (the same type as those used in professional recording studios).
NOTE
These XLR inputs are wired with these pin assignments: 1=ground, 2=hot, 3=cold.
The +48V phantom power supply allows you to power condenser microphones. Without such phantom power, many condenser microphones will not work. Some, however, use internal batteries.
WARNING
Never connect or disconnect microphones to or from the XLR connectors with the phantom power turned on to avoid a loud pop noise.
Never turn the phantom power on when unbalanced dynamic microphones are plugged into the XLR connectors to avoid any damage to the unit.
Consult any documentation that came with your microphones for full details of power requirements, etc.
Phantom power The PHANTOM switch can be turned on or off to supply +48V phantom power to the XLR connectors. Phantom power is not supplied to the 1/4” jacks.
Input level controls Use the input level controls the same way you would microphones that use 1/4” jacks.
However, some microphones are more powerful than others, and you may need to turn down the control to prevent overloading.
14 TASCAM DP-02/DP-02CF
1 – StartingIMPORTANTout withSAFETYyour DPINSTRUCTIONS-02/DP-02CF
Features of the DP-02/DP-02CF
This section explains the features of the DP-02 and DP-02CF.
Top panel
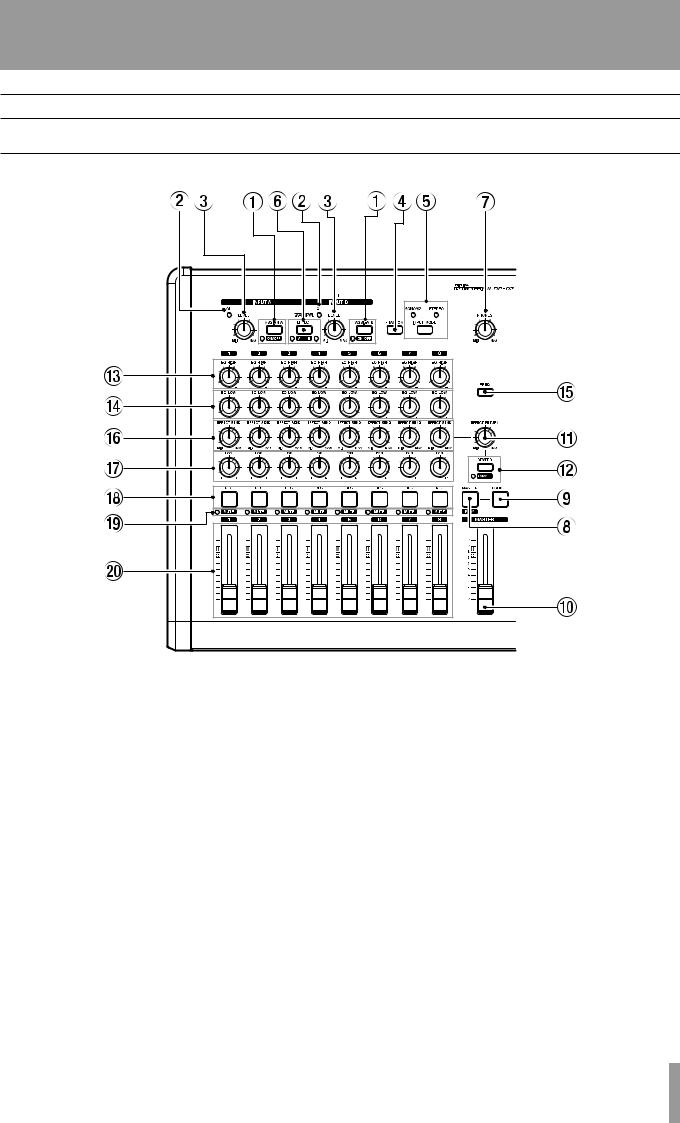
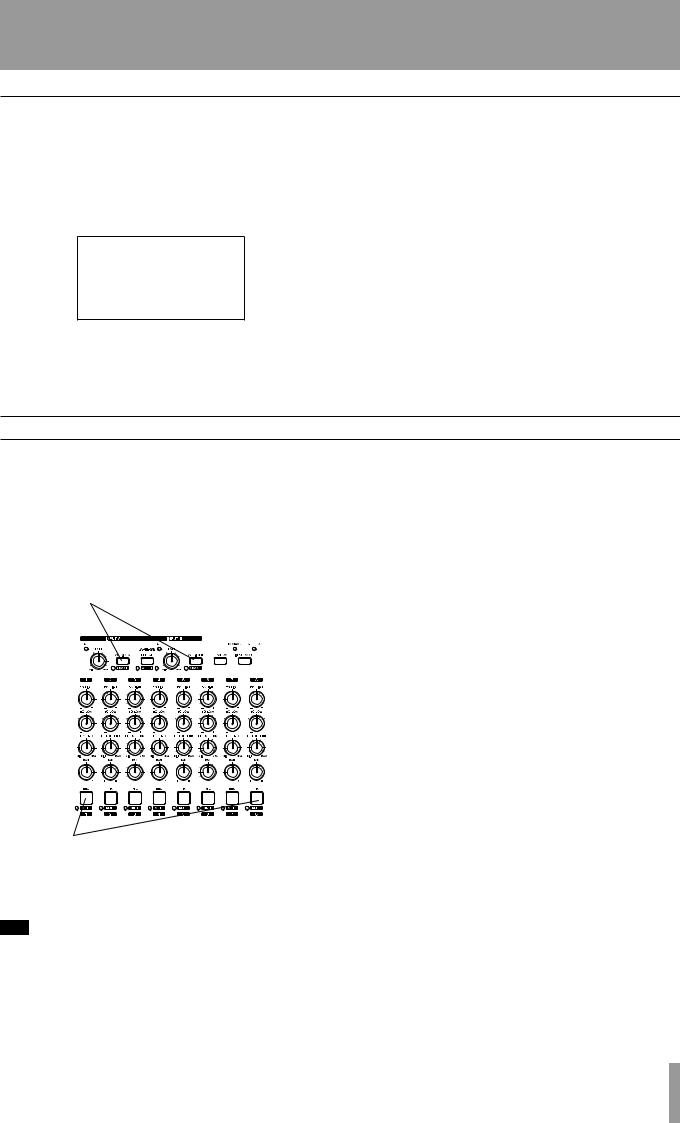
1ASSIGN (A,B) and ON/OFF keys
The ASSIGN (A,B) keys assign the input signals through the INPUT A or B to the tracks (1 to 8). (See “Assigning inputs” on page 23.)
The ON/OFF keys are used with the SHIFT key to turn the INPUT (A,B) on or off. When the input is set to on, the indicator next to the key lights up. When off, the indicator is unlit.
2OL indicators
The indicator lights when the input signal is too high.
3LEVEL controls
Use this knob to adjust the INPUT (A,B) signal.
4PHANTOM key
This key provides the phantom power (+48 V) to the XLR input jacks (INPUT A,B). The phantom power is not supplied to the 1/4 phone jacks.
5INPUT MODE key and the indicators
Use this key to select the MONO X 2 or STEREO modes (see “The INPUT MODE key” on page 13 for details).
6EFFECT key / A B key (DP-02 only)
Pressing the EFFECT key brings up the MULTI EFFECTscreen.
The A B key is used with the SHIFT key to select the input signal (INPUT A or B) which the internal multieffects is used with (see “Multi-effect” in chapter 4 “DP-02 Appendix” on page 59). When INPUT A is selected, the indicator next to A letter lights up. When INPUT B is selected, the indicator next to B letter lights up. When both indicators are unlit, neither of the inputs are not selected.
7PHONES control
Adjusts the headphone volume.
8MASTER / PLAY key
Pressing MASTER key alone turns the master recording mode on or off. When on, this key flashes.
With the SHIFT key, PLAY (MASTER) key is used to turn on or off the master playback mode. When on, this key lights up (see “Mastering” on page 27).
9BOUNCE key
Turns Bounce mode on or off. When on, this key lights up.
TASCAM DP-02/DP-02CF 15

1IMPORTANT– Starting outSAFETYwithPRECAUTIONSyour DP-02/DP-02CF
0MASTER fader
Adjusts the stereo signal level output from the LINE OUTPUT (L,R), PHONES, or DIGITAL OUT. Also, this fader adjusts the recording level when performing a track bounce or mix down.
qEFFECT RETURN control
On the DP-02, this knob adjusts the level of the internal effect return signals, or the external effect return signals. (See “Block diagram” in the chapter 3 “specifications” on page 57.)
On the DP-02CF, this knob adjusts the level of the return signals from the RETURN (L,R) jacks.
wREVERB key and ON/OFF key (DP-02 only)
The REVERB key brings up the REVERBscreen to adjust the internal reverb settings.
The ON/OFF key is used with the SHIFT key to turn the reverb on or off. When on, the indicator lights up. (See “Reverb” in chapter 4 “DP-02 Appendix” on page 62)
eEQ HIGH controls
Adjusts the level of the high frequencies for each track.
rEQ LOW controls
Adjusts the level of the low frequencies for each track.
tFREQ key
This key brings up the EQ FREQUENCYscreen to adjust the high and low frequencies (see “EQ settings on page 31).
yEFFECT SEND controls
Adjust the level of each track’s signal sent to the SEND jack.
On the DP-02, these controls also adjust the level of each track sent to the internal reverb effects.
uPAN controls
Adjust the panning of the stereo mixed signal on each track.
iREC keys
Press the REC key alone to put the track in recording standby mode (only two tracks can be in recording standby mode at a time), and the key flashes. Pressing the key again cancels recording standby mode (see “Recording” on page 24).
When used with the ASSIGN keys, the REC keys also assign the input A or B to the tracks selected (1). (See “Assigning inputs” on page 23).
oMUTE keys
These keys are used with the SHIFT key, and mute the signal on each track when the signals are output. The indicator on the left of the keys lights up (see “Mixdown” on page 27).
pTRACK faders
Adjusts the play back level of each track.
16 TASCAM DP-02/DP-02CF
1 – StartingIMPORTANTout withSAFETYyour DPINSTRUCTIONS-02/DP-02CF
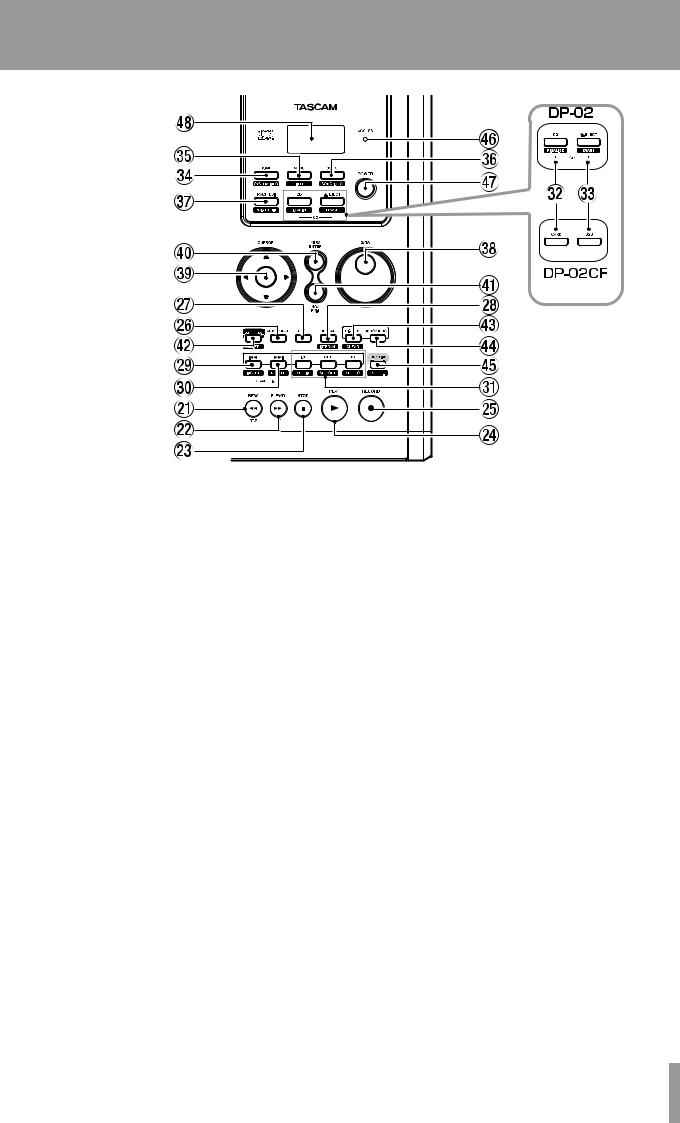
aREW (∆) / RTZ key
When stopped, press the REW (∆) key to move the playback position of the song being played back backwards. When the key is continuously held down, or repeatedly pressed, the rewind speed jumps up to 10, 50, 100, 1000 times.
While playing back a song, pressing the REW (∆) key moves the playback position backwards while the key is held down.
While playing back a CD, pressing the REW (∆) key skips the playback position of the track being played back to the beginning.
The RTZ key locates the playback position to the zero position and puts the unit in stop mode (Retrn To Zero function: RTZ). Press and hold down the STOP key and press the RTZ key.
sF FWD (˚) / LRP key
When stopped, press the F FWD (˚) key to move the playback position of the song being played back forwards. When the key is continuously held down, or repeatedly pressed, the forward speed jumps up to 10, 50, 100, 1000 times.
While playing back a song , pressing the F FWD (˚) key moves the playback position forwards while the key is held down.
While playing back a CD, pressing the F FWD (˚) key skips the playback position to the beginning of the next track.
The LRP key locates the playback position to where the last recording was ended, and puts the unit in stop mode (Last Rec Point: LRP). Press and hold down the STOP key and press the LRP key.
dSTOP (ª) key
This key stops the operation of recording, playback, forwards, backwards.
On the DP-02, this key also stops playback of a CD.
fPLAY (¥) key
When stopped, press this key to start playback.
With the RECORD key held down, press this key to start recording.
The key lights up during playback or recording.
While recording, pressing this key stops recording (punch out) and puts the unit in playback mode (see “Punching recording” on page 25).
On the DP-02, this key starts playback of the CD.
gRECORD (–) key
When stopped, and when this key and the ¥ (PLAY) key are pressed at same time, the unit starts recording and the RECORD key lights up.
While the unit is in recording standby mode (this key flashes), and when a song is being played back, pressing this key starts recording without stopping playback (punch in) and this key lights up (see “Punching recording” on page 25).
hAUTO PUNCH key
This key turns Auto Punch mode on or off. When on, the key lights up (see “Punch recording” on page 32).
jRHSL key
This key turns Rehearsal mode on or off. When on, the key lights up (see “Rehearsal” on page 32).
kREPEAT / INTERVAL key
The REPEAT key turns Repeat mode on or off. When on, the key lights up and the unit plays back between
TASCAM DP-02/DP-02CF 17

1IMPORTANT– Starting outSAFETYwithPRECAUTIONSyour DP-02/DP-02CF
IN and OUT point repeatedly (see “Repeat” on page 34).
With the SHIFT key pressed, the INTERVAL key is used to bring up the REPEATINTERVALscreen to adjust the repeat interval time from 0.5 to 9.9 seconds (see “Setting the repeat interval” on page 35).
lµ / INSERT key
Pressing the µ key skips to the previous location mark in the song being played back.
With the SHIFT key pressed, the INSERT key is used to mark a location point (see “Location marks” on page 29).
Pressing the µ and ≤ keys togather displays the
LOCATION MARKlist screen.
On the DP-02, while playing back a CD, pressing the µ key skips the playback position of the track being played back to the beginning.
;≤ / DELETE key
Pressing the ≤ key skips to the next location mark.
With the SHIFT key pressed, the DELETE key is used to delete the location mark (see “Location marks” on page 29).
Pressing the µ and ≤ key togather displays the
LOCATION MARKlist screen.
On the DP-02, while playing back a CD, pressing the ≤ key skips the playback position to the beginning of the next track.
zIN / SET IN, OUT / SET OUT, TO / SET TO key
Pressing the IN, OUT, or TO keys alone moves to IN, OUT, or TO point.
With the SHIFT key pressed, the SET IN, SET OUT, or SET TO keys are used to mark the current playback position as IN, OUT, or TO points (see “ IN and OUT marks” on page 30).
xCD / FINALIZE key on the DP-02
Press the CD key to bring up the CDscreen.
With the SHIFT key pressed, the FINALIZE key is used to bring up the FINALIZEscreen.
CARD key on the DP-02CF
Pressing the CARD key brings up the CARDscreen.
cø EJECT / ERASE key on the DP-02
This key ejects the CD loaded into the unit.
With the SHIFT key pressed, the ERASE key is used to bring up the CD-RWERASEscreen (see “Erasing CDRW” on page 69).
USB key on the DP-02CF
Press this key to bring up the USBscreen (see “Open and Close” on page 43).
vHOME / SYSTEM INFO key
Press the HOME key to display the home screen (on some screens, this key does nothing).
With the SHIFT key pressed, the SYSTEM INFO key is used to display the SYSTEMINFORMATIONscreen.
bMENU / TITLE key
Press the MENU key to bring up the MENUscreen.
With the SHIFT key pressed, the TITLE key is used to bring up the TITLEscreen (see “Titling” on page 11).
nSONG / SONG INFO key
Press the SONG key to bring up the SONGscreen.
With the SHIFT key pressed, the SONG INFO key is used to bring up the SONGINFORMATIONscreen to show the information of the song currently loaded.
mTRACK EDIT / POINT EDIT key
Press the TRACK EDIT key to bring up the TRACK EDITscreen.
With the SHIFT key pressed, the POINT EDIT key is used to bring up the POINTEDITscreen.
,DATA dial
Use this dial for selection of menu or action, or adjustment of values.
.CURSOR (˙,¥,¶,§) keys
Use these keys to select a menu or action, or to enter the selection.
The ˙ key can be used to return to the previous screen.
/YES/ENTER key
Use this key to enter the selection or confirm the action.
!NO/EXIT key
Use this key to exit from the current menu screen and go back to the previous screen, or to cancel the selection or action.
@SHIFT key
This key is always used with another key, which takes on the function shown in the label below that key (black-on-orange).
#HISTORY / CLEAR key
Pressing the HISTORY key brings up the HISTORY list screen. This screen is used to undo or redo many actions at once (see “Undoing/Redoing actions at once” on page 26).
With the SHIFT key, the CLEAR key is used to clear the unused audio parts and histories (actions). (See “Deleting unused data” on page 26.)
$UNDO/REDO key
This key is used to undo or redo the action (see “Undoing/Redoing an operation” on page 25).
%FUNCTION / SET.F key
The FUNCTION key can be used as a short cut key when assigned to an action. After assigning, pressing the key calls that action directory.
To assign the FUNCTION key, with the SHIFT key pressed, press the SET.F key to bring up the SET FUNCTIONlist screen. Select an action in the list and press YES/ENTER to assign the action to the
FUNCTION key.
18 TASCAM DP-02/DP-02CF
1 – StartingIMPORTANTout withSAFETYyour DPINSTRUCTIONS-02/DP-02CF
^ACCESS indicator
On the DP-02, this indicator lights up or flashes while the unit is writing or importing song data to the CD-R/ CD-RW drive or hard disk.
On the DP-02CF, this indicator lights or flashes while the unit is writing or importing song data to the CF card.
&POWER switch
Press the switch to turn the unit on or off. While the unit is in operation, the POWER switch lights up.
To turn off the power, press this key until DIGITAL PORTASTUDIOis shown (see “Shutting down the unit” on page 10).
*LCD display
Displays current status of the unit, as well as the current menus or settings.
Front panel
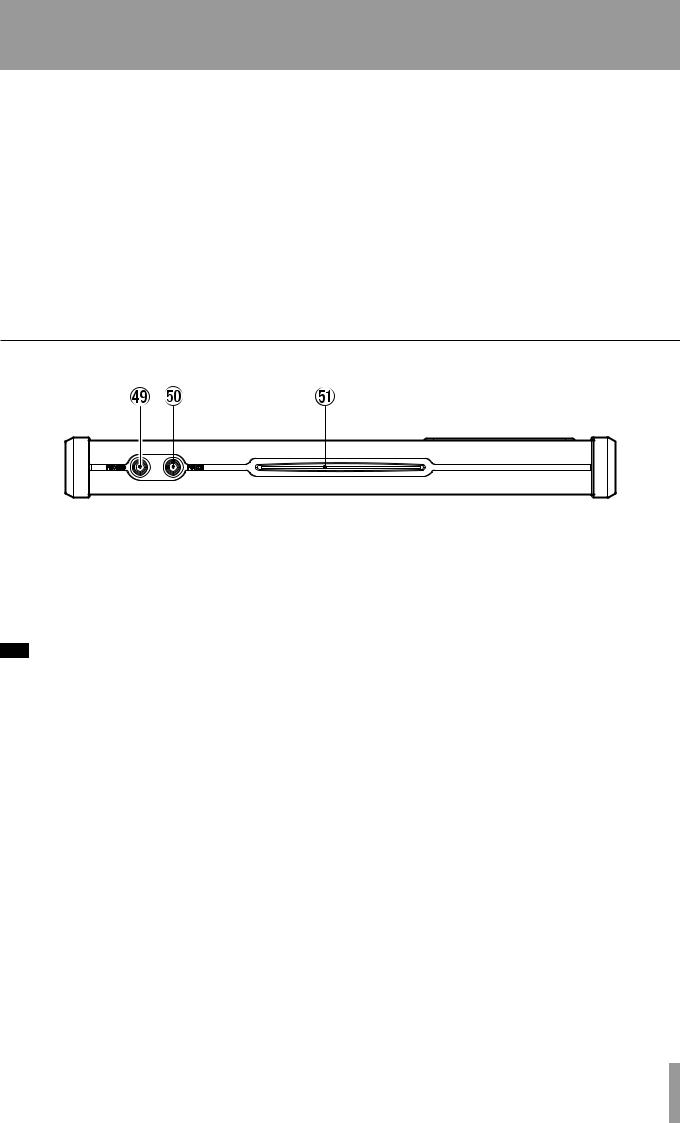
(PHONES jack (RCA)
Plug a pair of standard headphones into the 1/4” stereo jack on the front panel. Adjust the volume with the level control on the top panel.
)PUNCH jack (phone jack)
You can connect a standard “punch-in” foot pedal, such as the TASCAM RC-30P.
QDisc slot (on the DP-02)
Discs should be inserted label side upwards into this slot.
T I P
The footpedal is useful if both hands are busy playing a guitar, for example.
Use the pedal to punch in and out (that is, start and stop recording on the fly).
TASCAM DP-02/DP-02CF 19
1IMPORTANT– Starting outSAFETYwithPRECAUTIONSyour DP-02/DP-02CF
Rear panel
WUSB jack
A USB cable is connected to a computer which allows import or export of files between the unit and the computer (see “Using the USB connection” on page 42).
NOTE
When the unit is connected to a PC using this jack, the FAT partition on the recording media is the only recognizable device.
EDC IN jack
The supplied AC adapter (PS-1225L) is connected here.
RDIGITAL OUT (OPTICAL) jack
The stereo mixed signals are output in S/PDIF format.
TMIDI OUT jack
MIDI signals such as MIDI Clock, MIDI Time Code, and Song Position Pointer are output here.
YLINE OUT (L,R) (RCA) jacks
The analog signals mixed in stereo are output.
USTEREO MIX jack
The signals input through this 1/8” stereo mini jack are mixed in stereo and output from the LINE OUTPUT or
PHONES jacks.
ISEND jack (1/4 phone )
The EFFECT SEND signal is output.
ORETURN (1/4 phone) jack
The stereo signal output from the external effector is inputted through this jack.
PINPUT A / INPUT B (XLR) jack
These XLR connectors are balanced analog inputs.
When PHANTOM is on, these connectors are supplied with 48 V phantom power.
AINPUT A/INPUT B (1/4” phone) jack
These 1/4” connectors are unbalanced analog inputs.
The INPUT A jack can be connected to a guitar directory.
SGUITAR, MIC / LINE switch
Set to GUITAR or MIC / LINE to select which type of input signal is connected to the INPUT A jack.
Side panel (DP-02CF only)
D
DCompactFlash card slot (on the DP-02CF)
Insert a CF card into this slot.
After inserting the card, make sure the door is closed. With the door opened, the DP-02CF will not operate.
20 TASCAM DP-02/DP-02CF
1 – StartingIMPORTANTout withSAFETYyour DPINSTRUCTIONS-02/DP-02CF
Managing your songs
This section shows you how to create a new song, as well as basic song management, such as renaming, deleting, copying, etc. For more details on disk management, and the other song management features of the unit, see “Disk/ CF card management” on page 38 and “Advanced song management” on page 41.
NOTE
Any recording made on the unit is referred to as a “song”, even though it may only consist of instrumental tracks or spoken word.
Creating a new song
1.Press the SONG key to bring up the SONGmenu.
If the CREATEaction is not highlighted, use the DATA dial or the cursor (§/¶) keys to highlight it.
2.Press the YES/ENTER or ¥ cursor key. The display shows:
3.Enter a title as described in “Titling” on page 11.
4.Press YES/ENTER to create the song. The current song is stored even though the new song has not yet been created.
T I P
You can re-title a song by pressing the SHIFTed TITLE key to edit the title of the currently-loaded song.
When creating the song is finished, the screen returns to the SONGscreen.
Storing songs
Since the unit does not automatically save the audio you record as part of a song, you should get into the habit of performing frequent manual saves.
NOTE
A “song” is not just the audio files you record—it also includes editing, settings, etc.
1.Press the SONG key, use the DATA dial or the cursor (§/¶) keys to highlight the SAVEaction.
2.Press the YES/ENTER or ¥ cursor key. The display shows:
3.Rename the file if you want to save it as another name and press YES/ENTER, or simply press YES/ ENTER to save the file to disk or card.
The screen shows a message, Storing Songas the song is saved.
Reverting to last version
The REVERTaction (which follows the SAVEaction in the SONGmenu) allows you to undo all changes since the last save.
When you select the REVERT, the title of the song is shown. Press YES/ENTER to go back to the last saved version, or NO/EXIT to keep the current song as it is.
TASCAM DP-02/DP-02CF 21
1IMPORTANT– Starting outSAFETYwithPRECAUTIONSyour DP-02/DP-02CF
Loading a saved song
Of course, saving songs is no use unless you can load them again. This is how you do it.
1.Press the SONG key and use the DATA dial or cursor (§/¶) keys to highlight the LOADmenu item.
2.Press the YES/ENTER or ¥ cursor key.
3.Use the DATA dial or cursor (§/¶) keys to select the song to load and press YES/ENTER.
If the *symbol appears next to the song, then that song is currently loaded.
The current song is saved, and the selected song is loaded.
Erasing a song(s)
CAUTION
Erase a song only if you are certain you don’t need it any more—you can’t undo this operation! However, you can use a USB connection to back up songs to a PC before you erase them.
T I P
You can also use this method to perform other operations, such as copying.
If your disk is getting full, or you really don’t need a song any more, you can erase it.
Repeat steps 2 and 3 for multiple selection.
When you want to cancel the selection, rotate the DATA dial countercolckwise on the song highlighted.
The  mark on the box disappears.
T I P
1.From the SONGmenu, select the ERASEaction:
2.Select a song that you want to erase using the cursor (§/¶) keys or DATA dial.
3.When decided, rotate the DATA dial clockwise to
confirm the song to erase. The  mark appears on the check box.
An arrow (up or down) appears to the right of the highlighted song. A down-arrow indicates that you can rotate the DATA dial clockwise to confirm the selection. An up-arrow indicates that you can rotate the dial counterclockwise to cancel the selection.
4.Press YES/ENTER. You are asked if you want to erase the song (Are you sure?).
5.Press YES/ENTER to erase the song, or NO/EXIT to cancel the operation.
If you erase the current song, the first song in the list is automatically loaded.
You can erase all the songs shown, and a new song is automatically created. There is always at least one song on the partition (for more information about partitions, see “Disk/ CF card management” on page 38).
22 TASCAM DP-02/DP-02CF
1 – StartingIMPORTANTout withSAFETYyour DPINSTRUCTIONS-02/DP-02CF
Song information
You can view the title, working partition, and amount of time left for recording from the “home screen”.
From the home screen, press and hold the SHIFT key and press the SONG key.
The display shows:
the current partition (PARTITION), song title (SONG) and amount of time left on the partition for recording (REMAIN) in minutes.
Pressing the NO/EXIT key returns to the home screen.
Additional song operations
Further song operations are described in “Advanced song management” on page 41.
Assigning inputs
When we talk about “assigning” inputs, we are talking about routing the signals from the two inputs to the tracks.
You can record on up to two tracks at a time. This means that the same input can be assigned to two tracks at the same time (but you can’t then use the other input) or the two inputs can be assigned to different tracks. You can’t assign both inputs to the same track at the same time.
ASSIGN keys
2.While holding down the ASSIGN key, press the REC key of the track to which you are assigning the input. The REC key flashes rapidly.
If you want to assign the input to another track, you must first clear the current assignment (see below), and then re-assign the input.
Note that the REC key of the first track to which you assigned the input flashes when you hold down the
ASSIGN key.
ªClearing an assignment
Hold down the ASSIGN key to check current assignments, then while holding the ASSIGN key, clear current assignments by pressing a flashing REC key (which then stops flashing).
Eight REC keys
1.Press and hold the ASSIGN key corresponding to the input signal you are assigning (A or B).
T I P
Press and hold SHIFT and either of the ASSIGN keys (A or B) to turn the inputs on or off as shown by the indicator. You may want to turn off unused inputs to reduce noise.
TASCAM DP-02/DP-02CF 23
1IMPORTANT– Starting outSAFETYwithPRECAUTIONSyour DP-02/DP-02CF
Recording
When you have connected a source, and assigned the inputs to tracks, you are ready to start recording.
1.Press the REC key of the track(s) you’re going to record on, which start to flash slowly (this process is called “arming the track(s)”.
2.Press and hold the RECORD (–) key and press the PLAY (¥) key.
The RECORD (–) key lights red, and the PLAY (¥) lights green. The track REC keys stop flashing and light steadily.
3.Press STOP when you’ve finished recording.
4.To return to the place where you started recording, press and hold down the STOP key, and press the F FWD (LRP = Last Recording Position) key.
To return to the zero point, press and hold down the STOP key and press the REW (RTZ = Return To
Zero) key.
5.Press PLAY (¥) to start playback of the recorded tracks.
Use the track fader(s) and the red MASTER fader to adjust the level of what you hear.
The pan controls position the track in the stereo “image” you hear in the left and right speakers (or headphones). The center position is marked by a “click” when you turn the knob.
The EQ HIGH and EQ LOW equalization controls work in a similar way to the bass and treble tone controls on a stereo system. The center “click” position of the knob means there’s no cut or boost for that control.
T I P
You can change the EQ control point of the high and low equalization controls. See ”EQ settings” on page 31 for details.
You can re-record the track if you’re not happy with it by going back to the original point and repeating the process.
When you’re happy with your recording, you can un-arm the track(s) (“safe” them) and arm and record on other tracks. Remember to reassign the inputs as well as arming the tracks.
Press the REW or F FWD keys for a short while and then release them to move backwards or forwards through your recording (like a tape recorder). Press and hold these keys to increase the rewind or fast forward speed. Press STOP to stop (again, like a tape recorder).
NOTE
The faders and other mixer controls adjust the output level of the recorded when playing back recorded tracks.
More advanced features
The unit has many advanced features which you may want to use later on. Though we will not go into full detail on all of them now, you should be aware of a few of them now.
Using marks to locate positions
Although “Recording” on page 24 shows you some ways of moving around in your song, the unit provides you with ways to jump around the song using location marks, as well as locating to locate directly to a position you set.
See “Location” on page 29 for details of how to set and use these location marks.
24 TASCAM DP-02/DP-02CF
 Loading...