


 Loading...
D01303020A
DR-10L
Micro Linear PCM Recorder with Lavalier Microphone
OWNER’S MANUAL

IMPORTANT SAFETY PRECAUTIONS
For U.S.A.
INFORMATION TO THE USER
This equipment has been tested and found to comply with the limits for a Class B digital device, pursuant to Part 15 of the FCC Rules. These limits are designed to provide reasonable protection against harmful interference in a residential installation. This equipment generates, uses, and can radiate radio frequency energy and, if not installed and used in accordance with the instruction manual, may cause harmful interference to radio communications. However, there is no guarantee that interference will not occur in a particular installation. If this equipment does cause harmful interference to radio or television reception, which can be determined by turning the equipment off and on, the user is encouraged to try to correct the interference by one or more of the following measures.
a)Reorient or relocate the receiving antenna.
b)Increase the separation between the equipment and receiver.
c)Connect the equipment into an outlet on a circuit different from that to which the receiver is connected.
d)Consult the dealer or an experienced radio/TV technician for help.
CAUTION
Changes or modifications to this equipment not expressly approved by TEAC CORPORATION for compliance could void the user’s authority to operate this equipment.
For Canada
THIS CLASS B DIGITAL APPARATUS COMPLIES WITH CANADIAN ICES-003.
CET APPAREIL NUMERIQUE DE LA CLASSE B EST CONFORME A LA NORME NMB-003 DU CANADA.
2 TASCAM DR-10L
|
Declaration of Conformity |
Model Number : |
DR-10L |
Trade Name : |
TASCAMResponsible |
Responsible party : TEAC AMERICA, INC. |
|
Address : |
1834 Gage Road, Montebello, California, |
|
U.S.A. |
Telephone number : 1-323-726-0303
This device complies with Part 15 of the FCC Rules. Operation is subject to the following two conditions: (1) this device may not cause harmful interference, and (2) this device must accept any interference received, including interference that may cause undesired operation.
IMPORTANT SAFETY INSTRUCTIONS
1Read these instructions.
2Keep these instructions.
3Heed all warnings.
4Follow all instructions.
5Do not use this apparatus near water.
6Clean only with dry cloth.
7Do not block any ventilation openings. Install in accordance with the manufacturer’s instructions.
8Do not install near any heat sources such as radiators, heat registers, stoves, or other apparatus (including amplifiers) that produce heat.
9Do not defeat the safety purpose of the polarized or grounding-type plug. A polarized plug has two blades with one wider than the other. A grounding type plug has two blades and a third grounding prong. The wide blade or the third prong are provided for your safety. If the provided plug does not fit into your outlet, consult an electrician for replacement of the obsolete outlet.
10Protect the power cord from being walked on or pinched particularly at plugs, convenience receptacles, and the point where they exit from the apparatus.

11Only use attachments/accessories specified by the manufacturer.
12Use only with the cart, stand, tripod, bracket, or
table specified by the manufacturer, or sold with the apparatus. When a cart is used, use caution when moving the cart/apparatus combination to avoid injury from tip-over.
13Unplug this apparatus during lightning storms or when unused for long periods of time.
14Refer all servicing to qualified service personnel. Servicing is required when the apparatus has been damaged in any way, such as power-supply cord or plug is damaged, liquid has been spilled or objects have fallen into the apparatus, the apparatus has been exposed to rain or moisture, does not operate normally, or has been dropped.
•The apparatus draws nominal non-operating power from the AC outlet with its POWER or STANDBY/ON switch not in the ON position.
•The mains plug is used as the disconnect device, the disconnect device shall remain readily operable.
•Caution should be taken when using earphones or headphones with the product because excessive sound pressure (volume) from earphones or headphones can cause hearing loss.
•If you are experiencing problems with this product, contact TEAC for a service referral. Do not use the product until it has been repaired.
CAUTION
•Do not expose this apparatus to drips or splashes.
•Do not place any objects filled with liquids, such as vases, on the apparatus.
•Do not install this apparatus in a confined space such as a book case or similar unit.
•The apparatus should be located close enough to the AC outlet so that you can easily grasp the power cord plug at any time.
•If the product uses batteries (including a battery pack or installed batteries), they should not be exposed to sunshine, fire or excessive heat.
•CAUTION for products that use replaceable lithium batteries: there is danger of explosion if a battery is replaced with an incorrect type of battery. Replace only with the same or equivalent type.
CAUTIONS ABOUT BATTERIES
This product uses batteries. Misuse of batteries could cause a leak, rupture or other trouble. Always abide by the following precautions when using batteries.
•Never recharge non-rechargeable batteries. The batteries could rupture or leak, causing fire or injury.
•When installing batteries, pay attention to the polarity indications (plus/minus (¥/^) orientation), and install them correctly in the battery compartment as indicated. Putting them in backward could make the batteries rupture or leak, causing fire, injury or stains around them.
•When you store or dispose batteries, isolate their terminals with insulation tape or something like that to prevent them from contacting other batteries or metallic objects.
•When throwing used batteries away, follow the disposal instructions indicated on the batteries and the local disposal laws.
•Do not use batteries other than those specified. Do not mix and use new and old batteries or different types of batteries together. The batteries could rupture or leak, causing fire, injury or stains around them.
•Do not carry or store batteries together with small metal objects. The batteries could short, causing leak, rupture or other trouble.
•Do not heat or disassemble batteries. Do not put them in fire or water. Batteries could rupture or leak, causing fire, injury or stains around them.
•If the battery fluid leaks, wipe away any fluid on the battery case before inserting new batteries. If the battery fluid gets in an eye, it could cause loss of eyesight. If fluid does enter an eye, wash it out thoroughly with clean water
without rubbing the eye and then consult a doctor immediately. If the fluid gets on a person’s body or clothing, it could cause skin injuries or burns. If this should happen, wash it off with clean water and then consult a doctor immediately.
•The unit power should be off when you install and replace batteries.
•Remove the batteries if you do not plan to use the unit for a long time. Batteries could rupture or leak, causing fire, injury or stains around them. If the battery fluid leaks, wipe away any fluid on the battery compartment before inserting new batteries.
•Do not disassemble a battery. The acid inside the battery could harm skin or clothing.
TASCAM DR-10L 3

Contents |
|
IMPORTANT SAFETY PRECAUTIONS........................... |
2 |
Introduction......................................................................... |
4 |
Features.................................................................................. |
4 |
Included items..................................................................... |
5 |
Conventions used in this manual................................ |
5 |
Trademarks and copyrights........................................... |
6 |
Precautions for placement and use............................ |
6 |
Cleaning the unit................................................................ |
6 |
Beware of condensation................................................. |
6 |
Using the TEAC Global Site............................................. |
6 |
Names and functions of parts....................................... |
6 |
Front................................................................................................... |
6 |
Rear..................................................................................................... |
7 |
Sides................................................................................................... |
7 |
Top...................................................................................................... |
8 |
Preparation........................................................................... |
8 |
Power sources............................................................................. |
8 |
Using a AAA battery................................................................ |
8 |
Power supply status indicator........................................... |
9 |
Connecting a Microphone............................................. |
9 |
Turning the unit on and off............................................ |
9 |
Turning the unit on.................................................................. |
9 |
Shutting down............................................................................ |
9 |
Turning off automatically..................................................... |
9 |
Installing a microSD card............................................. |
10 |
Handling microSD cards............................................... |
10 |
Precautions when handling microSD cards.......... |
10 |
Recording durations |
|
when using microSD cards.......... |
10 |
Connecting with a computer...................................... |
11 |
Starting and stopping recording............................... |
11 |
Playback and searching backward/forward.......... |
12 |
Checking the remaining recording capacity of
4 TASCAM DR-10L
the microSD card.............................................................. |
12 |
Making menu settings................................................... |
12 |
Menu structure................................................................. |
13 |
Messages............................................................................. |
16 |
Making settings using a text file................................ |
17 |
Settings file................................................................................. |
17 |
Settings file format explanation................................... |
17 |
Specifications.................................................................... |
19 |
Ratings........................................................................................... |
19 |
Input/output ratings............................................................ |
19 |
Audio performance.............................................................. |
19 |
General.......................................................................................... |
19 |
Dimensional drawings........................................................ |
21 |
Introduction
Thank you very much for purchasing this TASCAM product.
Before using this unit, read this Owner's Manual carefully so that you will be able to use it correctly and enjoy working with it for many years. After you have finished reading this manual, please keep it in a safe place for future reference.
You can also download this Owner's Manual from the TEAC Global Site (http://teac-global.com/).
Features
•Micro sized PCM Recorder for Lavalier / Lapel (pin) microphones.
•Uses microSD and micro SDHC cards as recording
•mediaRecording linear PCM (WAV/BWF) files in 44.1/48kHz 16/24-bit, mono/poly formats possible.
•Time track incrementing function allows a recording to be split by creating a new file at regular intervals (about 15 minutes) without interrupting recording.
•Limiter function automatically reduces parts where the input level is too high to suitable levels.
•Low cut filter is useful for reducing low-frequency noise.
•Dual recording function allows two files to be recorded simultaneously at different levels. (Only when file type is set to MONO.)
•Sliding switch for recording operation protects against misoperation.
•File name format can be set to use a user-defined word or the date.
•The built-in clock time and function items can be set using the system file (text file).
•Playback functions allow recorded files to be checked immediately.
•Secondary lithium battery used to save time information.
•A 3.5mm (1/8”) headphone jack is built-in.
•The 96×16 OLED display has a wide viewing angle and is easy to read.
•Micro-B USB 2.0 port.
•Clip Attachment for Belt use.
Included items
This product includes the following items.
Keep the packing materials for transportation in the future.
Please contact TASCAM Customer Support (see back cover) if any of these items are missing or have been damaged during transportation.
• |
Main unit.................................................................................. |
× 1 |
• |
Lavalier microphone (pin microphone)................ |
x1 |
• |
With microphone clip and windscreen |
|
Belt clip...................................................................................... |
× 1 |
|
• |
Soft case.................................................................................... |
× 1 |
• |
USB cable................................................................................. |
× 1 |
• |
Owner’s Manual (this document) including |
|
|
warranty.................................................................................... |
× 1 |
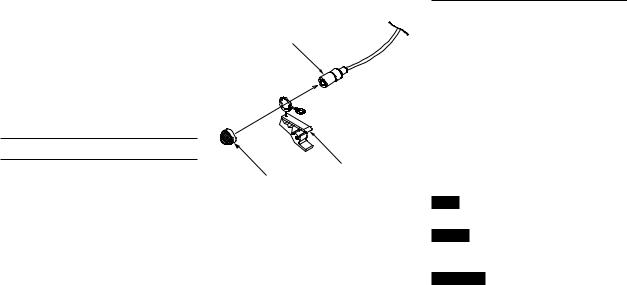
88 Lavalier microphone (pin microphone)
Lavalier microphone
clip
Windscreen
Conventions used in this manual
The following conventions are used in this manual.
•When we refer to buttons, connectors and other parts of this unit and other equipment, we use a bold font like this: MENU button.
•When we show messages, for example, that appears on the unit’s display, the typeface looks like this: ON.
•The area of the display that is shown in inverse (light on dark) is referred to as the cursor or as being highlighted.
•“microSD/microSDHC memory card” is sometimes abbreviated as “microSD card”.
•Additional information is provided as necessary as tips, notes and cautions.
TIP
These are tips about how to use the unit.
NOTE
These provide additional explanations and describe special cases.
CAUTION
Failure to follow these instructions could result in injury, damage to equipment or lost recording data, for example.
TASCAM DR-10L 5
Trademarks and copyrights
•TASCAM is a trademark of TEAC CORPORATION, registered in the U.S. and other countries.
•microSDHC Logo is a trademark of SD-3C, LLC.
Cleaning the unit
Use a dry soft cloth to wipe the unit clean. Do not wipe with chemical cleaning cloths, thinner, alcohol or other chemical agents. Doing so could damage the surface or cause discoloration.
•Other company names, product names and logos in this document are the trademarks or registered trademarks of their respective owners.
Precautions for placement and use
•The operating temperature range of this unit is 0–40 °C.
•Do not install this unit in the following types of locations. Doing so could degrade the sound quality and/or cause malfunctions.
Places with significant vibrations
Near windows or other places exposed to direct sunlight
Near heaters or other extremely hot places Extremely cold places
Places with bad ventilation or high humidity Very dusty locations
Places exposed directly to rain or other water
• Do not place this unit on top of a power amplifier or other device that generates heat.
6 TASCAM DR-10L
Beware of condensation
If the unit is moved from a cold to a warm place, or used after a sudden temperature change, there is a danger of condensation; vapor in the air could condense on the internal mechanism, making correct operation impossible. To prevent this, or if
this occurs, let the unit sit for one or two hours at the new room temperature before using it.
Using the TEAC Global Site
You can download this Owner’s Manual necessary for this unit from the TEAC Global Site (http:// teac-global.com/).
1.Open the TEAC Global Site (http://teac-global. com/).
2.In the TASCAM Downloads section, click the desired language to open the Downloads website page for that language.
NOTE
If the desired language does not appear, click Other Languages.
3.Click the product name in the “Search by Model Name” section to open the Downloads page for that product.
4.Select and download the Owner’s Manual that are needed.
Names and functions of parts
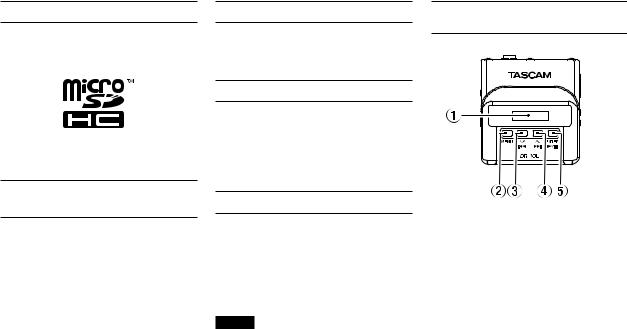
Front
1Display
Shows a variety of information.
2MENU button
ii When the Home Screen is open, press the MENU button to open the Menu Screen. When the Menu Screen is open, press the MENU button again to return to the Home Screen.
ii When a setting item is shown, press the MENU button to return to the Menu Screen.

3.[j] button
ii During playback or when stopped in the middle of a file, press the .[j] button to return to the beginning of the file.
ii Press when located at the beginning of a file to skip to the beginning of the previous file. Press and hold this button during playback to search backward.
ii When the Menu Screen is open, press the
.[j] button to select a menu item.
ii When a setting item is shown, press the . [j] button to move the cursor left.
ii When inputting a file name, use this to select characters.
4/[k] button
ii During playback or when stopped in the middle of a file, press the /[k] button to skip to the beginning of the next file. Press and hold this button during playback to search forward.
ii When the Menu Screen is open, press the /[k] button to select a menu item.
ii When a setting item is shown, press the / [k] button to move the cursor right.
ii When inputting a file name, use this to select characters.
57’9[ENTER] button
ii When the Home Screen is open, press the 7’9[ENTER] button to start file playback.
ii When the Menu Screen is open or a setting item is shown, press the 7’9[ENTER] button to confirm the selected item. Use this also to respond to a confirmation message.
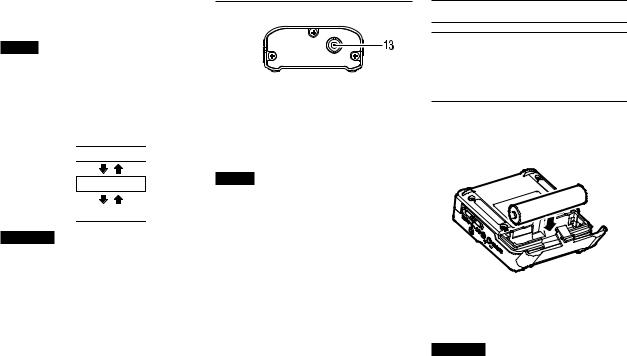
Rear
6Battery compartment and cover
Install one AAA battery in this compartment to power the unit.
Sides
7USB port
Use the included USB cable to connect this Micro-B USB port with a computer. When connected, the POWER/STORAGE screen appears to allow selection of bus power supply or data transmission by USB.
CAUTION
The unit should be connected directly to the computer, not through a USB hub.
8microSD card slot
Use this slot to insert and remove microSD cards.
Open the microSD card slot cover on the left side. (See “Installing a microSD card” on page 10.)
9Belt clip attachment points
Attach the included belt clip to these holes on the left and right.
0Headphones jack
Connect stereo headphones to this stereo mini jack.
Q¤?o—0REC switch
Slide this switch toward ¤and hold it for about one second to turn the unit on/off.
ii Slide and hold this switch toward 0REC for about one second to start recording.
TASCAM DR-10L 7
ii When recording, slide and hold this switch toward 0REC for about one second to stop recording.
NOTE
The one-second delay is intended to prevent accidental operation.
WPHONES [+]/[−] buttons
Use the + and − buttons to adjust the volume output from the headphones jack.
During adjustment, a volume indicator will appear on the display.
Large 


Small 
CAUTION
Before connecting headphones, lower the PHONES volume to the minimum level. Failure to do so might cause sudden loud noises, which could harm your hearing or result in other trouble.
Do not apply excessive force to the jack when connecting and using headphones. Be careful, because the application of unintended force, particularly when using a mini jack, could damage the equipment.
Top
E1/8” (3.5mm) mini TRS (with screw lock) IN jack
Connect the 3.5mm plug of the mic being used to this unit's IN jack.
After connecting it, lock the connector of the mic cable using the jack screw lock.
(Tip: MIC (BIAS), Ring: Open, Sleeve: GND)
NOTE
Avoid excessive force on this connector.
8 TASCAM DR-10L
Preparation
Power sources
This unit can operate on one AAA battery or USB bus power using the included USB cable.
This unit can use an alkaline, Ni-MH or lithium AAA battery.
Using a AAA battery
Open the battery compartment cover on the back of the unit. Install 1 AAA battery in the compartment with the ¥and ^marks as shown. Then, close the battery compartment cover.
@
 f
f
When using a AAA battery, set the type of battery in order to accurately show the amount of power
remaining and allow the unit to accurately determine whether power is available for proper operation. (See “Making menu settings” on page 12.)
CAUTION
••AAA manganese dry cell batteries cannot be used with this unit.
••This unit cannot recharge AAA Ni-MH batteries. Use a commercially-available recharger.
Loading...