


 Loading...
D01236020D
US-2x2
US-4x4
USB Audio/MIDI Interface
REFERENCE MANUAL
Before connecting this unit to a computer, you must download and install dedicated software on the computer.

Contents |
|
1 – Introduction............................................... |
3 |
Features........................................................................................... |
3 |
Conventions used in this manual........................................... |
3 |
Using the TEAC Global Site....................................................... |
3 |
2 – Names and functions of parts................... |
4 |
Front panel..................................................................................... |
4 |
Rear panel....................................................................................... |
5 |
3 – Installation................................................. |
6 |
System requirements................................................................. |
6 |
Windows............................................................................. |
6 |
Mac OS X............................................................................. |
6 |
Apple iOS devices............................................................ |
6 |
Supported audio drivers............................................... |
6 |
Installing the dedicated software.......................................... |
6 |
Installing the dedicated driver for Windows......... |
6 |
Installing the Mac OS X Settings Panel.................... |
7 |
Working with Gatekeeper............................................ |
8 |
Uninstalling the dedicated software.................................... |
9 |
Uninstalling the dedicated driver for Windows... 9 |
|
Installing the Mac OS X Settings Panel.................... |
9 |
4 – Preparation.............................................. |
10 |
Connecting the power............................................................. |
10 |
Changing the outlet plug (US-4x4 only)............... |
10 |
5 – Connections............................................. |
11 |
Connecting other equipment............................................... |
11 |
Computer connections............................................................ |
11 |
Audio connections.................................................................... |
11 |
Microphones................................................................... |
11 |
Guitar................................................................................. |
11 |
Electronic instruments and other audio |
|
equipment....................................................................... |
11 |
Analog record players.................................................. |
11 |
Monitor speakers........................................................... |
12 |
Headphones.................................................................... |
12 |
MIDI connections....................................................................... |
12 |
Connecting with iOS devices................................................. |
12 |
6 – Using the Settings Panel......................... |
13 |
Opening the Settings Panel................................................... |
13 |
Settings Panel screen............................................................... |
13 |
7 – Standalone Mode.................................... |
15 |
Overview....................................................................................... |
15 |
Settings in standalone mode................................................ |
15 |
Settings Panel settings................................................ |
15 |
8 – Application Guide.................................... |
16 |
DAW software............................................................................. |
16 |
SONAR LE and Cubase LE........................................... |
16 |
Other DAW software.................................................... |
16 |
Windows Media Player............................................................. |
16 |
Mac OS X and iTunes................................................................ |
17 |
9 – MIDI Implementation Chart.................... |
18 |
10 – Troubleshooting.................................... |
19 |
11 – Specifications......................................... |
21 |
Audio resolution......................................................................... |
21 |
Analog inputs................................................................. |
21 |
Analog outputs.............................................................. |
21 |
Control input/output ratings.................................... |
21 |
Audio performance...................................................... |
21 |
Computer system requirements.......................................... |
22 |
Windows........................................................................... |
22 |
Mac OS X........................................................................... |
22 |
iOS devices....................................................................... |
22 |
Supported audio drivers............................................. |
22 |
General.......................................................................................... |
22 |
Dimensional drawings............................................................. |
22 |
2 TASCAM US-2x2/US-4x4

Features
•24-bit/96kHz audio interface
•Multiple1 analog signals (L/R) can be input simultaneously and output to a computer by USB at the same time
•Multiple XLR mic inputs (balanced2) and standard phone jack inputs (balanced3/unbalanced4)
•Electric guitars and basses, for example, can be connected to the standard phone jack inputs when the MIC/LINE INST switch is set to INST (instrument input)5
•Balanced stereo line6 and headphone7 outputs
•MIDI IN and OUT connectors
•Direct monitoring function allows input monitoring with low latency
•USB port (USB-B type, USB 2.0 standard)
Use the included USB cable to connect the unit to a computer. To connect to an iOS device, use a Lightning to USB Camera Adapter made by Apple Inc.
CAUTION
When using a US-2x2 that is connected to a computer, it will operate using USB bus power.
However, the power supply will be insufficient when using the unit connected to an iOS device by USB, so you will need to purchase a separate AC adapter designed for use with this unit (TASCAM PS-P520, DC5V). (When using a US-4x4, always connect the included AC adapter.)
•A driver is included for use with Windows computers, and a Settings panel application is included for use with Macs
•DAW software included (SONAR LE, Cubase LE) SONAR LE only supports Windows computers.
Cubase LE supports both Windows and Mac computers
1US-2x2: 2 inputs, US-4x4: 4 inputs 2XLR-3-31 equivalent
US-2x2: 2 inputs, US-4x4: 4 inputs The US-2x2 has XLR/TRS combo jacks
3Standard 6.3mm (1/4") TRS stereo jack (MIC/LINE INST switch set to MIC/LINE) US-2x2: 2 inputs, US-4x4: 4 inputs
4Standard 6.3mm (1/4") TRS stereo jack (MIC/LINE INST switch set to INST) US-2x2/US-4x4: both 2 inputs
5Only IN1-IN2 on the US-4x4 6Standard 6.3mm (1/4") TRS stereo jack
US-2x2: 2 outputs, US-4x4: 4 outputs 7Standard 6.3mm (1/4") stereo jack
US-2x2: 1 output, US-4x4: 2 outputs
88 Note about computer operation
If you are unsure about anything related to the basic operation of a computer when it is mentioned in an explanation in this manual, please refer to the computer operation manual.
To use this unit with a computer, dedicated software must be installed on the computer.
For details about software installation, see “Installing the dedicated software” on page 6.
1 – Introduction
Conventions used in this manual
The following conventions are used in this manual.
•Buttons, connectors and other physical parts of this unit are written using a bold font like this: PHONES knob.
•Information shown on the computer display is written like this “OK”.
•Additional information is provided as necessary as tips, notes and cautions.
TIP
These are tips about how to use the unit.
NOTE
These provide additional explanations and describe special cases.
CAUTION
Failure to follow these instructions could result in injury, damage to equipment or lost recording data, for example.
Using the TEAC Global Site
You can download this Reference Manual and the Owner’s Manual necessary for this unit from the TEAC Global Site (http:// teac-global.com/).
1.Open the TEAC Global Site (http://teac-global.com/).
2.In the TASCAM Downloads section, click the desired language to open the Downloads website page for that language.
NOTE
If the desired language does not appear, click Other Languages.
3.Click the product name in the “Search by Model Name” section to open the Downloads page for that product.
4.Select and download the Owner’s Manual that are needed.
TASCAM US-2x2/US-4x4 3
2 – Names and functions of parts
Front panel
1 |
|
2 |
|
|
|
|
|
3 |
|
4 5 |
6 |
|
1 |
2 |
3 |
4 5 6 |
||||||||||||||
|
|
|
|
|
|
|
|
|
|
|
|
|
|
|
|
|
|
|
|
|
|
|
|
|
|
|
|
|
|
|
|
|
|
|
|
|
|
|
|
|
|
|
|
|
|
|
|
|
|
|
|
|
|
|
|
|
|
|
|
|
|
|
|
|
|
|
|
|
|
|
|
|
|
|
|
|
|
|
|
|
|
|
|
|
|
|
|
|
|
|
|
|
|
|
|
|
|
|
|
|
|
|
|
|
|
|
|
|
|
|
|
|
|
|
|
|
|
|
|
|
|
|
|
|
|
|
|
|
|
|
|
|
|
|
|
|
|
|
|
|
|
|
|
|
|
|
|
|
|
|
|
|
|
|
|
|
|
|
|
|
|
|
|
|
|
|
|
|
|
|
|
|
|
|
|
|
|
|
|
|
|
|
|
|
|
|
|
|
|
|
|
|
|
|
|
|
|
|
|
|
|
|
|
|
|
|
|
|
|
|
|
|
|
|
|
|
|
|
|
|
|
|
|
|
|
|
|
|
|
|
|
|
|
|
|
|
|
|
|
|
|
|
|
|
|
|
|
|
|
|
|
|
|
|
|
|
|
|
|
|
|
|
|
|
|
|
|
|
|
|
|
|
|
|
|
|
|
|
|
|
|
|
|
|
|
|
|
|
|
|
|
|
|
|
|
|
|
|
|
|
|
|
|
|
|
|
|
|
|
|
|
|
|
|
|
|
|
|
|
|
|
|
|
|
|
|
|
|
|
|
|
|
|
|
|
|
|
|
|
|
7 8 |
9 |
0 q |
|
US-4x4 front panel |
|
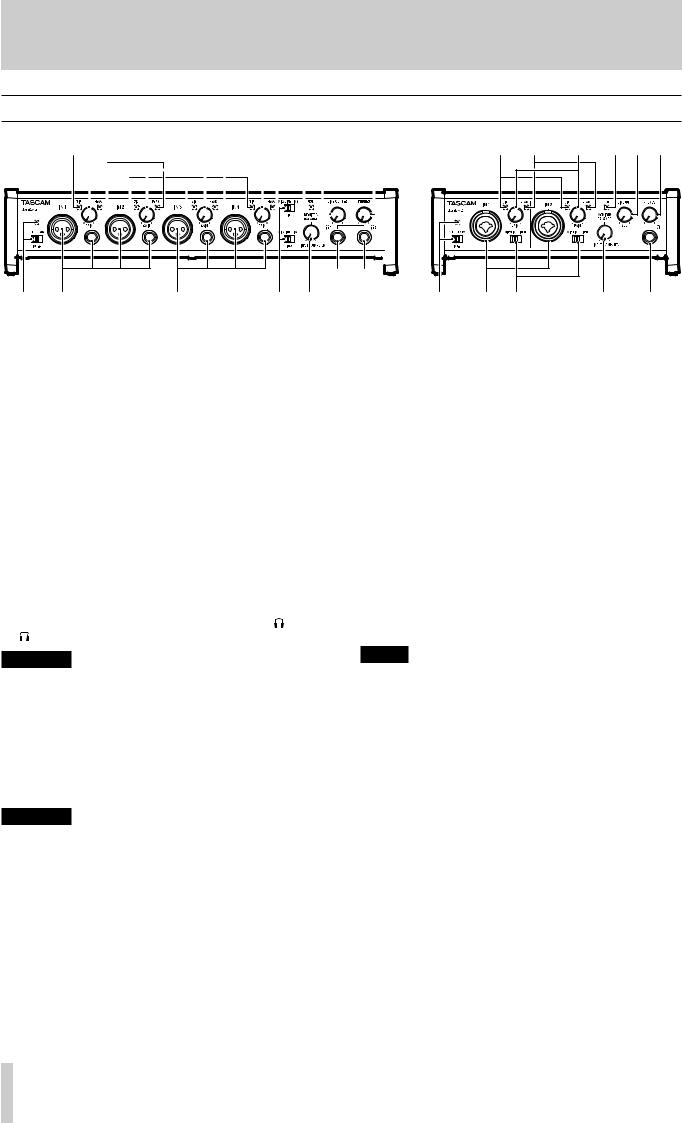
1SIG indicators
The SIG indicators light green when signals (of at least −32 dBFS) are input through the IN1/IN2 jacks (and US-4x4 IN3/ IN4 jacks).
2PEAK indicators
The PEAK indicators light red when signals that are about to distort (−1 dBFS or higher) are input through the IN1/IN2 jacks (and US-4x4 IN3/IN4 jacks).
3GAIN knobs
Use to adjust the input levels of the IN1/IN2 jacks (and US-4x4 IN3/IN4 jacks).
Adjust these so that the PEAK indicators do not light red.
4USB indicator
This lights when the USB connection is working.
5LINE OUT knob
Use to adjust the output level of the LINE OUT 1-2 jacks.
6PHONES knob |
|
to adjust the output level of the PHONES |
1 and |
2 jacks on US-4x4). |
|
CAUTION
Before connecting headphones, minimize the volume with the PHONES knob. Failure to do so might cause sudden loud noises, which could harm your hearing or result in other trouble.
7Phantom power switch/indicator
Use this switch to provide +48V phantom power to the IN1/ IN2 jacks (and US-4x4 IN3/IN4 jacks).
The indicator lights when the phantom power switch is set to +48V.
CAUTION
•Set the LINE OUT and PHONES knobs to their minimum values before changing the phantom power setting. Depending on the connected mics, sudden loud noises from monitoring equipment could occur, and this could damage the equipment or harm hearing.
•The phantom power switch changes the setting for both US-2x2 input channels (all four US-4x4 input channels) simultaneously.
•Do not connect or disconnect mics when the phantom power switch is set to +48V.
•Set the phantom power switch to +48V only when using a condenser microphone that requires phantom power. Turning phantom power +48V when a dynamic mic or other mic that does not require it is connected could damage this unit and connected equipment.
|
|
7 8 0 |
q w |
w |
|||
US-2x2 front panel
•Do not supply phantom power to an unbalanced dynamic mic.
•Supplying phantom power to some ribbon mics will break them. If you are unsure, do not supply phantom power to a ribbon mic.
•If you connect this unit to a laptop computer that is running on battery power and set the phantom power switch to +48V, the computer battery charge will be consumed more quickly.
8IN1/IN2 (BALANCED/UNBALANCED) jacks
These input jacks are XLR/TRS combo jacks on the US-2x2 and separate XLR and standard TRS jacks on the US-4x4.
Use the MIC/LINE INST switches on the front of the unit to enable balanced line (MIC/LINE) input or unbalanced (INST) input for the standard TRS jacks.
When directly connecting a guitar, bass or other instrument, set the MIC/LINE INST switch to INST.
9IN3/IN4 (BALANCED) jacks
These XLR analog mic input and standard line level TRS jacks are balanced input jacks.
NOTE
On the US-4x4, the IN1-IN4 (8, 9) inputs each have two jacks (XLR and TRS). Do not input signals through both jacks of the same input at the same time. If signals are input through both at the same time, neither signal will be received properly.
0MIC/LINE INST switches
Set according to the IN1/IN2 jack input sources.
Set to MIC/LINE when connecting electronic instruments, audio devices, mics and similar equipment.
Set to INST when connecting an electric guitar, electric bass or other equipment with high output impedance.
QMONITOR BALANCE knob
When recording input signals, use this to adjust the monitoring balance between the signals from this unit's input jacks and from the computer.
The volume of signals input through this unit's input jacks increase the more the MONITOR BALANCE knob is set to the left (INPUT) and signals output from the computer increase the more this is set to the right (COMPUTER).
This knob does not affect the recording level of input signals.
4 TASCAM US-2x2/US-4x4
2 – Names and functions of parts
WPHONES jack
Use this standard stereo phone jack to connect stereo headphones( 1 and
1 and  2 jacks on US-4x4). Each of these jacks outputs the same signal as the LINE OUT 1–2 jacks. Use an adapter to connect headphones with a mini plug.
NOTE
The same signals are output from both the 1 and 2 jacks of the US-4x4.
Rear panel
e |
r t |
y |
|
US-4x4 rear panel |
|
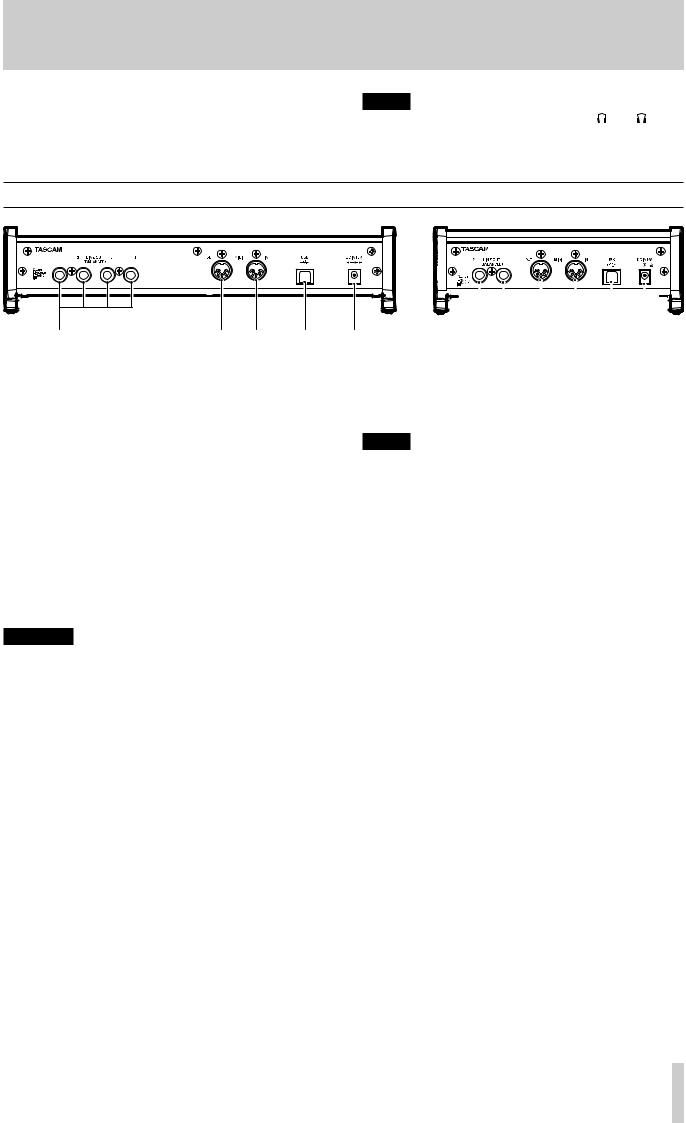
ELINE OUT (BALANCED) jacks
These standard TRS jacks are analog line outputs.
The signals output from the LINE OUT 1–2 jacks (1–4 jacks on US-4x4) can be set in the Settings Panel. For details, see “5 Line Outputs items” on page 14.
RMIDI OUT connector
This 5-pin DIN is a standard MIDI output connector. This outputs MIDI signals.
TMIDI IN connector
This 5-pin DIN is a standard MIDI input connector. Use this to input MIDI signals.
YUSB port
Use the included USB cable to connect the unit to a computer.
(Supports USB 2.0.)
CAUTION
•When using a US-2x2 that is connected to a computer, it will receive power from the computer's USB port. Depending on the computer, the USB port might not be able to supply enough power to operate the unit.
•When connected to a USB 3.0 port, it will function in High Speed mode equivalent to USB 2.0 (480 Mbps maximum).
•After waking a computer from suspend (sleep) mode, if the unit does not operate properly, turn it off and turn it on again or disconnect and reconnect the USB cable.
|
|
|
|
|
|
|
|
|
|
|
|
|
|
|
|
|
|
|
|
|
|
|
|
|
|
|
i |
|
|
|
|
|
|
|
|
|
|
|
|
|
|
|
||
e |
r t y u |
|||||||
|
|
|
|
US-2x2 rear panel |
||||
UDC IN 5V connector (US-2x2 only)
To use this unit when connected to an iOS device, connect a DC5V TASCAM PS-P520 adapter here (sold separately).
NOTE
When using a US-2x2 that is connected to a computer, it will receive power from the computer's USB port, so a dedicated AC adapter (sold separately) should not be necessary.
Depending on the computer, however, the USB port might not be able to supply enough power to operate the unit.
In this case, use a dedicated AC adapter (sold separately).
IDC IN 12V connector (US-4x4 only)
Connect the included DC12V AC adapter (GPE248-120200-Z) here.
TASCAM US-2x2/US-4x4 5

3 – Installation
System requirements
For the latest information about supported operating systems, visit the TEAC Global Site (http://teac-global.com/).
Windows
88 Supported operating systems
Windows 8 (including 8.1) 32-bit Windows 8 (including 8.1) 64-bit Windows 7 32-bit SP1 or later Windows 7 64-bit SP1 or later
(Windows Vista and Windows XP are not supported)
88 Computer hardware requirements
Windows computer with a USB 2.0 port
88 CPU/processor speed
2 GHz or faster dual core processor (x86)
88 Memory
2 GB or more
CAUTION
Operation of this unit was confirmed using standard computers that meet the above requirements. This does not guarantee operation with all computers that meet the above requirements. Even computers that meet the same system requirements might have processing capabilities that differ according to their settings and other operating conditions
Mac OS X
88 Supported operating systems
OS X Yosemite (10.10 or later) OS X Mavericks (10.9.1 or later)
OS X Mountain Lion (10.8.4 or later)
88 Computer hardware requirements
Apple Macintosh computer with a USB 2.0 port
88 CPU/processor speed
2 GHz or faster dual core processor
88 Memory
2 GB or more
Apple iOS devices
88 Supported operating systems iOS 7 or later
Supported audio drivers
Windows: ASIO2.0, WDM, MIDI
Mac: Core Audio, Core MIDI
Installing the dedicated software
To use this unit with a computer, dedicated software must be installed on the computer.
The dedicated software might be updated at any time. Download the latest software for the operating system you are using from the TEAC Global Site (http://teac-global.com/).
iiTo use this unit with a Windows computer, install the included driver. When you install the driver, a Settings Panel application will be installed at the same time.
iiTo use this unit with a Mac, install the Settings Panel application. The standard OS driver will be used.
iiWhen using this unit with an iOS device, the standard OS driver will be used, so there is no need to install dedicated software.
CAUTION
Before starting to install software, quit other applications.
Installing the dedicated driver for Windows
NOTE
•Complete installation of the driver on the computer before connecting the unit to it with the USB cable.
•If you already connected the unit to the computer using the USB cable, and the Found New Hardware Wizard launched, close the Wizard and disconnect the USB cable.
•When you install the Windows driver, the Settings Panel is also installed at the same time.
88 Driver installation procedures
1.Download the latest driver for the operating system you are using from the TEAC Global Site (http://teac-global.com/) and save it on the computer to be used with the unit.
2.Uncompress the saved driver (zip file) on the computer desktop or another location.
3.When uncompressed, separate folders are created for 32-bit and 64-bit versions. To launch the installer software, doubleclick the “US-2x2_US-4x4_ InstallerXX.exe” exe file (“XX” is the number of bits) that is suitable for the OS being used.
CAUTION
If you open a zip file without decompressing it and doubleclick the “US-2x2_US-4x4_Installer.exe” file in the folder that opens, installation will not start. Right-click the zip file and select “Extract All”, for example, to decompress it and then try again.
4.When a “Security Warning” or “User Account Control” screens appear, click the “Run” or “Yes” button.
5.Next, select the desired language and click the “OK” button.
6 TASCAM US-2x2/US-4x4
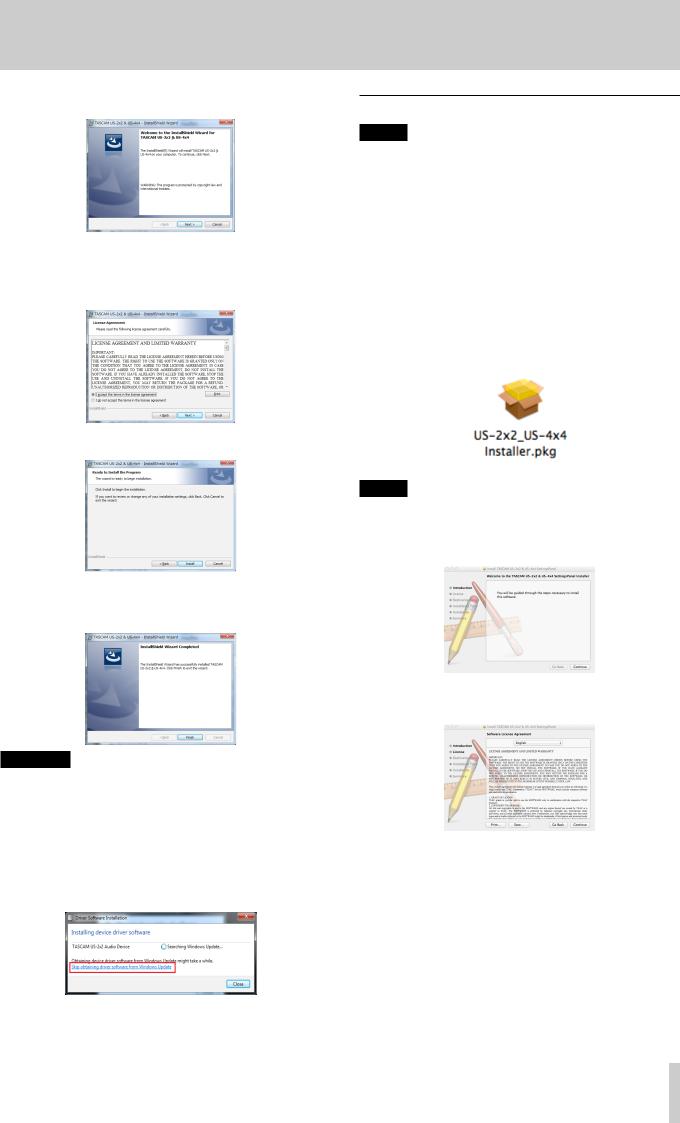
6. Click the “Next” button when the screen below appears.
7.Read the contents of the License Agreement, and select
“I accept the terms in the license agreement” if you agree to the terms.
Then, click the “Next” button.
8. Next, click the “Install” button to start installation.
9.The following screen appears when installation has completed.
Click the “Finish” button.
CAUTION
After installing the driver software, device driver installation will be completed the first time the unit is connected to the computer by USB. At this time, Windows will automatically search Windows Update, so it might take some time before the computer recognizes that the unit is connected. If the computer still does not recognize the unit after some time, open the software installer screen from the notification area at the bottom right of the computer display. Click “Skip obtaining driver software from Windows Update.” to stop the search.
3 – Installation
Installing the Mac OS X Settings Panel
NOTE
•Before starting to install the Settings Panel, quit other applications.
•During driver installation a warning message like this might appear: “US-2x2_US-4x4 Installer.dmg” can't be opened because it was not downloaded from the Mac App Store.
If a message like this appears, follow the instructions in “Working with Gatekeeper” on page 8 and then proceed with the installation.
88 Settings Panel installation procedures
1.Download the latest software for the operating system you are using from the TEAC Global Site (http://teac-global. com/) and save it on the computer to be used with the unit.
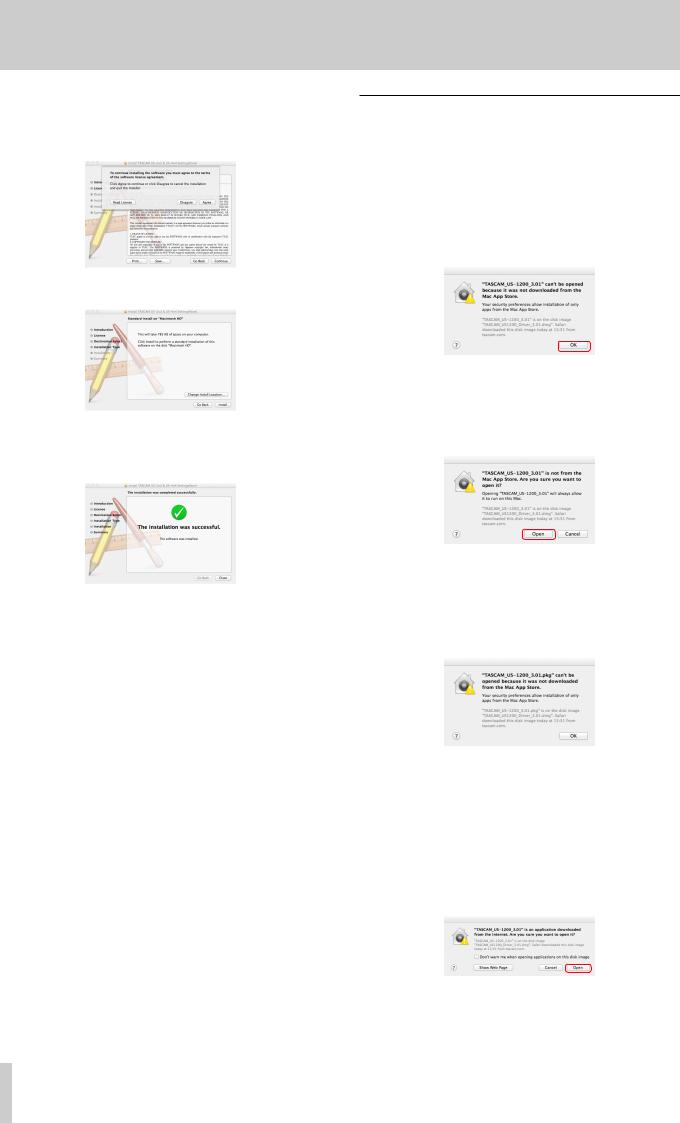
2.Double-click “US-2x2_US-4x4 Installer.dmg”, which is the saved disk image file for the Settings Panel, and double-click “US-2x2_US-4x4 Installer.pkg” inside the folder that opens.
NOTE
Depending on the computer’s settings, the downloaded zip file might not have opened automatically. In this case, open the zip file first and then double-click the disk image file.
3. When the installer starts, click the “Continue” button.
4.Next, select the desired language and click the “Continue” button.
TASCAM US-2x2/US-4x4 7
3 – Installation
5.Click the “Read License” button and check the contents of the Software License Agreement. If you agree to the contents of the license, click “Agree”.
Then, click the “Next” button.
6. Next, click the “Install” button to start installation.
7.The following screen appears when installation has completed.
Click the “Close” button.
Working with Gatekeeper
When using Mac OS X, depending on the Gatekeeper security function setting, a warning message might appear during installation.
The solution depends on the warning message shown. See the following explanations for details.
iiWhen the Gatekeeper setting is “Allow applications downloaded from: the Mac App Store”
The following security warning might be shown: “US-2x2_ US-4x4 Installer.dmg” can't be opened because it was not downloaded from the Mac App Store."
In this case, click the OK button to close the message. Then, control-click (or right-click) the file and click “Open”.
Click the “Open” button if the following security warning message appears: “US-2x2_US-4x4 Installer.dmg” can't be opened because it was not downloaded from the Mac App Store. Are you sure you want to open it?"
This warning message might also appear when the Gatekeeper setting is something other than “Allow applications downloaded from: the Mac App Store”.
The security warning message “US-2x2_US-4x4 Installer.dmg” can't be opened because it was not downloaded from the Mac App Store." could appear again, and you might not be able to open the file.
In this case, copy the file from the folder where it is to the desktop or another folder, and then open it. Alternatively, change the Gatekeeper settings to “Allow applications downloaded from: the Mac App Store and identified developers” and try opening it again.
iiWhen the Gatekeeper setting is not “Allow applications downloaded from: the Mac App Store”
‘“US-2x2_US-4x4 Installer.dmg” is an application downloaded from the Internet. Are you sure you want to open it?” might appear as a security warning message. In this case, click the “Open” button.
8 TASCAM US-2x2/US-4x4
Loading...