


XBR-55X850D
C-395-100-12(1)
To Customers and Sony Dealers
Wall-Mount Bracket
Wall-Mount Installation in Portrait Orientation
Installation du support de fixation murale dans l’orientation portrait
Instalación del soporte de montaje mural en posición vertical
GB
FR
ES
SU-WL500
© 2016 Sony Corporation
2 (GB)
Thank you for purchasing this product.
If the safety precautions are not observed or the
product is used incorrectly, it may result in serious
injury or fire.
This manual shows the correct handling of the
product and important precautions necessary to
prevent accidents. Be sure to read this manual
thoroughly and use the product correctly. Keep this
manual available for future reference.
To Sony dealers
Sufficient expertise is required for installing this
product. Be sure to read this manual thoroughly to do
the installation work safely. Sony is not liable for any
damages or injury caused by mishandling or
improper installation. Please give this manual to the
customer after installation.
Products by Sony are designed with safety in mind. If
the products are used incorrectly, however, it may
result in a serious injury through fire, electric shock,
the product toppling over, or the product dropping.
Be sure to observe the precautions for safety to
prevent such accidents.
Specified products
The following products are subject to change
without notice, may be out of stock, or
discontinued.
Some models may not be available in certain
regions.
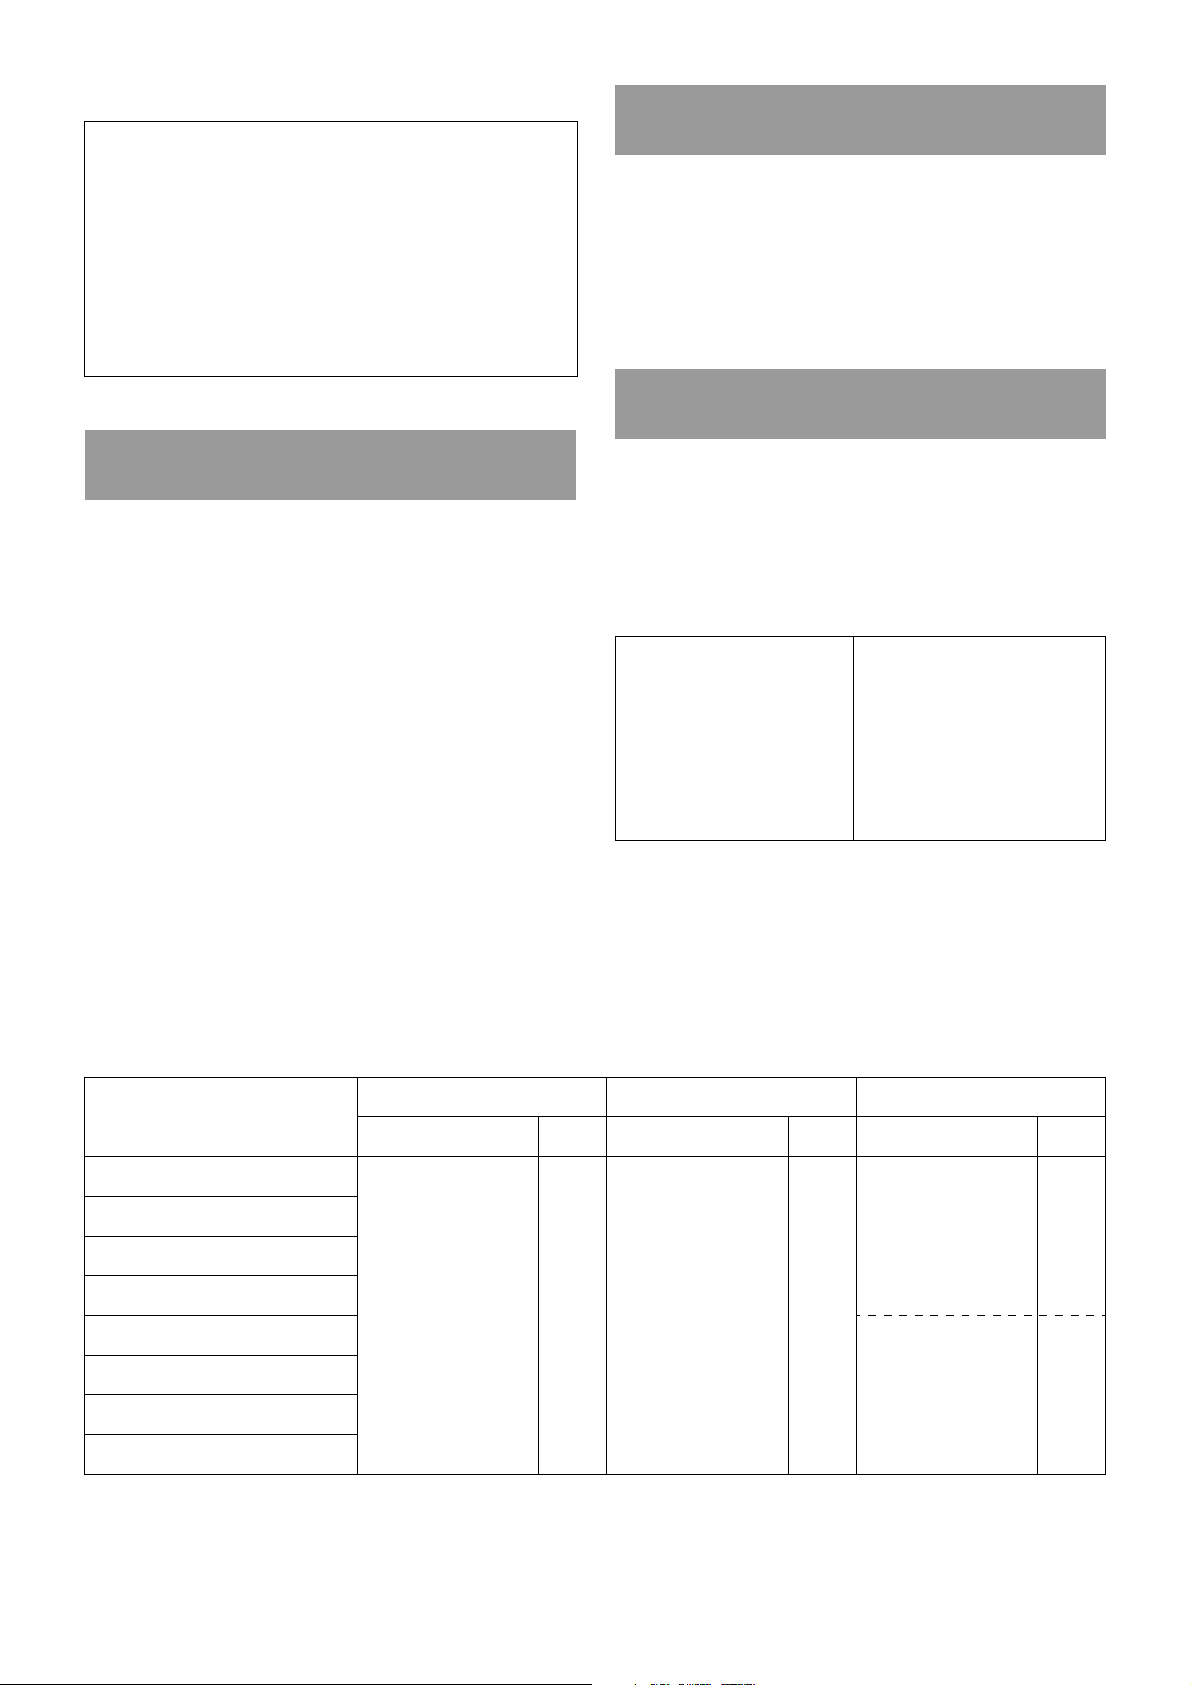
To install the TV to the wall in portrait orientation, the SU-WL500 Wall-Mount Bracket, spacers, and screws listed
below are necessary.
For further details/terms & conditions, contact the sales representative for professional use.
To Cus tomer s
Sufficient expertise is required for installing this
product. Be sure to subcontract the installation to
Sony dealers or licensed contractors and pay
special attention to safety during the installation.
Sony is not liable for any damages or injury
caused by mishandling or improper installation, or
installing any other than the specified product.
Your Statutory Rights (if any) are not affected.
WARNING
On Safety
CAUTION
LCD Color TV
XBR-65X850D
XBR-55X850D
KD-65X8500D
KD-55X8500D
XBR-49X800D
XBR-43X800D
KD-49X8000D
KD-43X8000D
TV model
Wall-Mount Bracket Spacer Screw
Model Qty Specification Qty Specification Qty
XBR-65X850D
SU-WL500 1
Washer with an
outside diameter of 18
mm, inside diameter
of 10 mm, and
thickness of 2 mm
(SONY Part Number
7-688-000-32)
20
PSW M6×25 mm 4
XBR-55X850D
KD-65X8500D
KD-55X8500D
XBR-49X800D
(SONY Part Number
4-577-326-01)
(1)
XBR-43X800D
KD-49X8000D
KD-43X8000D
3 (GB)
GB
English
Be sure to read thoroughly the all safety information
described in the instruction manual of SU-WL500.
Do NOT use SU-WL450 for installation in portrait
orientation.
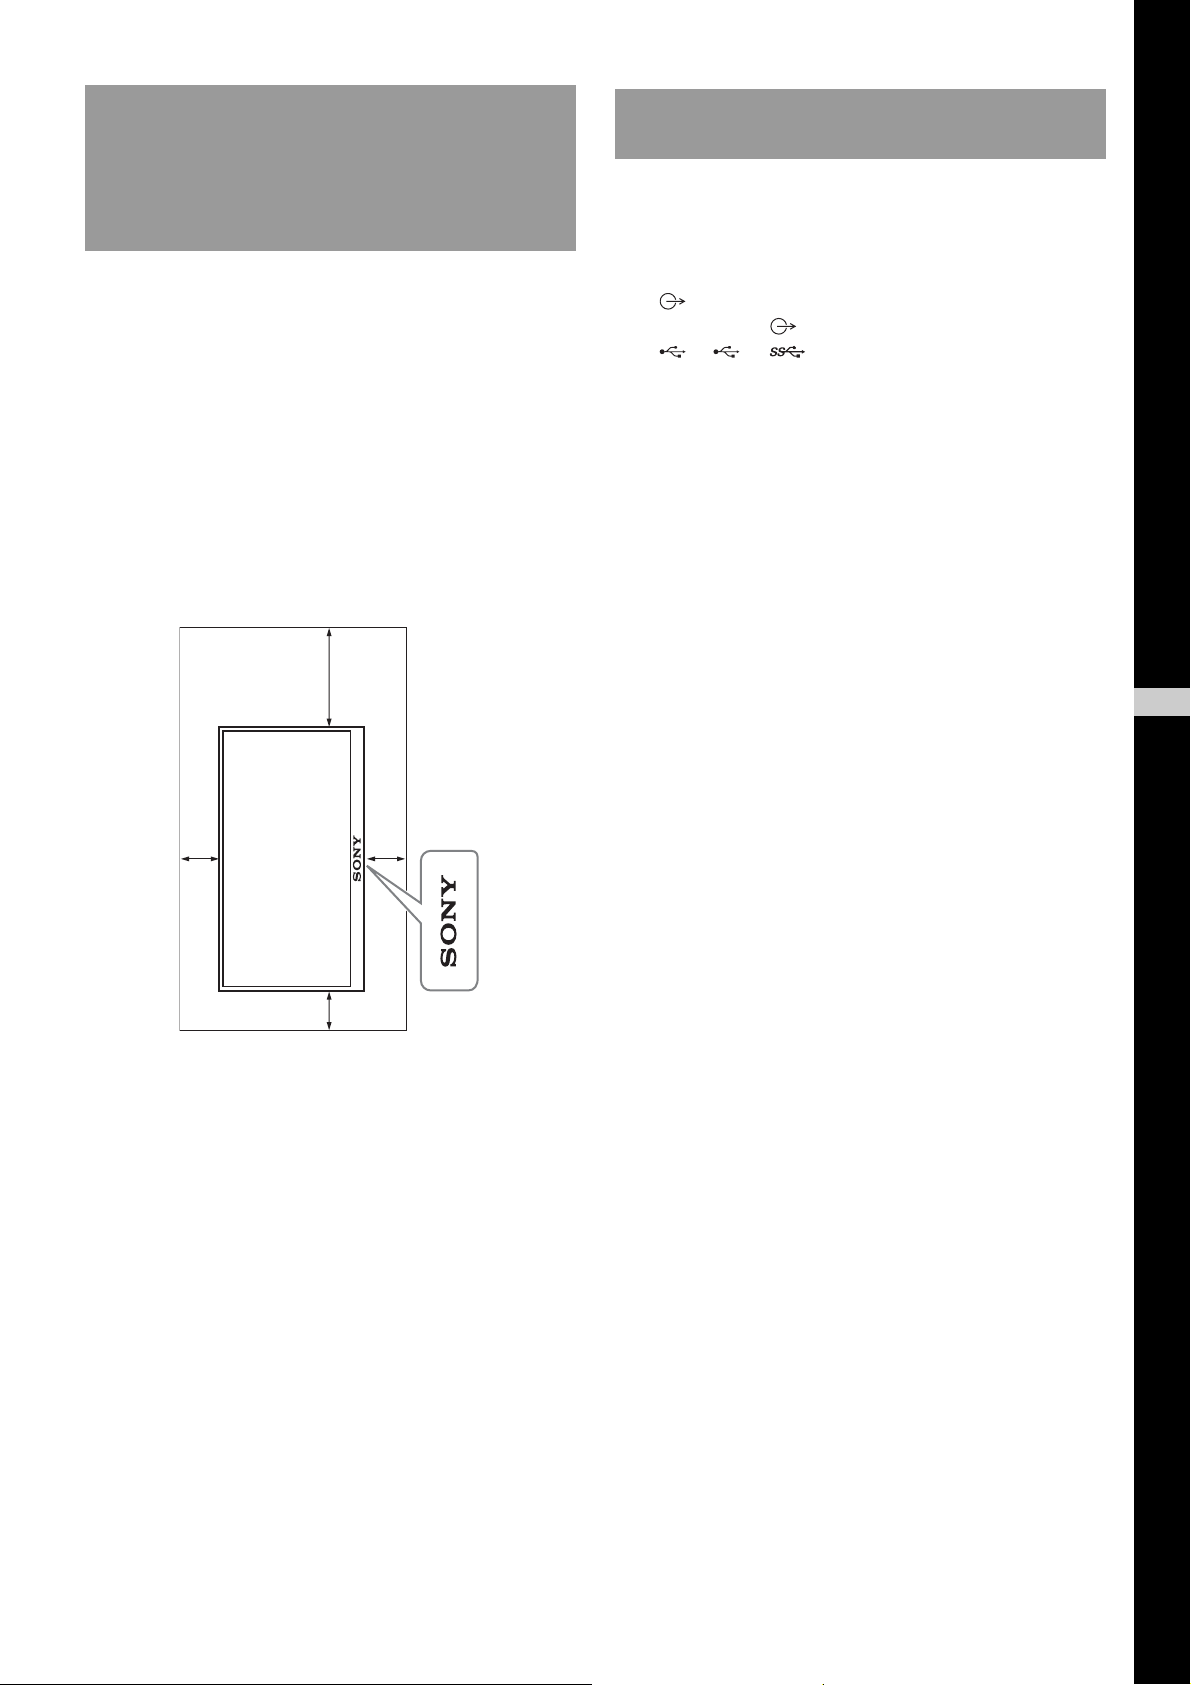
Provide adequate clearances
around the TV.
The following illustration shows how much space is
required around the TV.
Be sure to install the TV in the orientation shown in
the following illustration.
Do not block the ventilation holes of
the TV.
If you block the ventilation holes with tapes or other
objects, heat builds up inside the TV and may cause a
fire.
• When installing in portrait orientation, only the
following input/output jacks are available:
– HDMI IN 1/2/3/4 (Support 4K resolution, HDCP
2.2-compatible)
– DIGITAL AUDIO OUT (OPTICAL)
–AUDIO OUT / (Stereo mini jack)
– 1, 2, 3
– LAN
• If you cover the illumination LED and its
surroundings with tapes or other objects, the
status of the TV cannot be recognized and the
remote control may not work.
• When carrying the TV, hold it in landscape
orientation, and take care not to drop it when
installing. Do not apply excessive force to the TV;
otherwise, it may be deformed.
WARNING
If the following precautions are not observed,
serious injury or death through fire, electric
shock, the product toppling over, or the
product dropping can result.
Unit: mm (inches)
300
(11
7
/8)
100
(4)
100
(4)
100
(4)
Others

4 (GB)
Follow Step 1 in the SU-WL500 instruction manual to
check the parts.
Follow Step 2 in the SU-WL500 instruction manual to
decide on the installation location. Refer to page 8 of
this manual for the TV installation dimension table.
Follow Step 3 in the SU-WL500 instruction manual to
install the Base Bracket.
Step 1:
Checking the parts
required for the
installation
Step 2:
Deciding on the
installation location
Step 3:
Installing the Base
Bracket on the wall
Step 4:
Preparing for the
installation of the TV
1
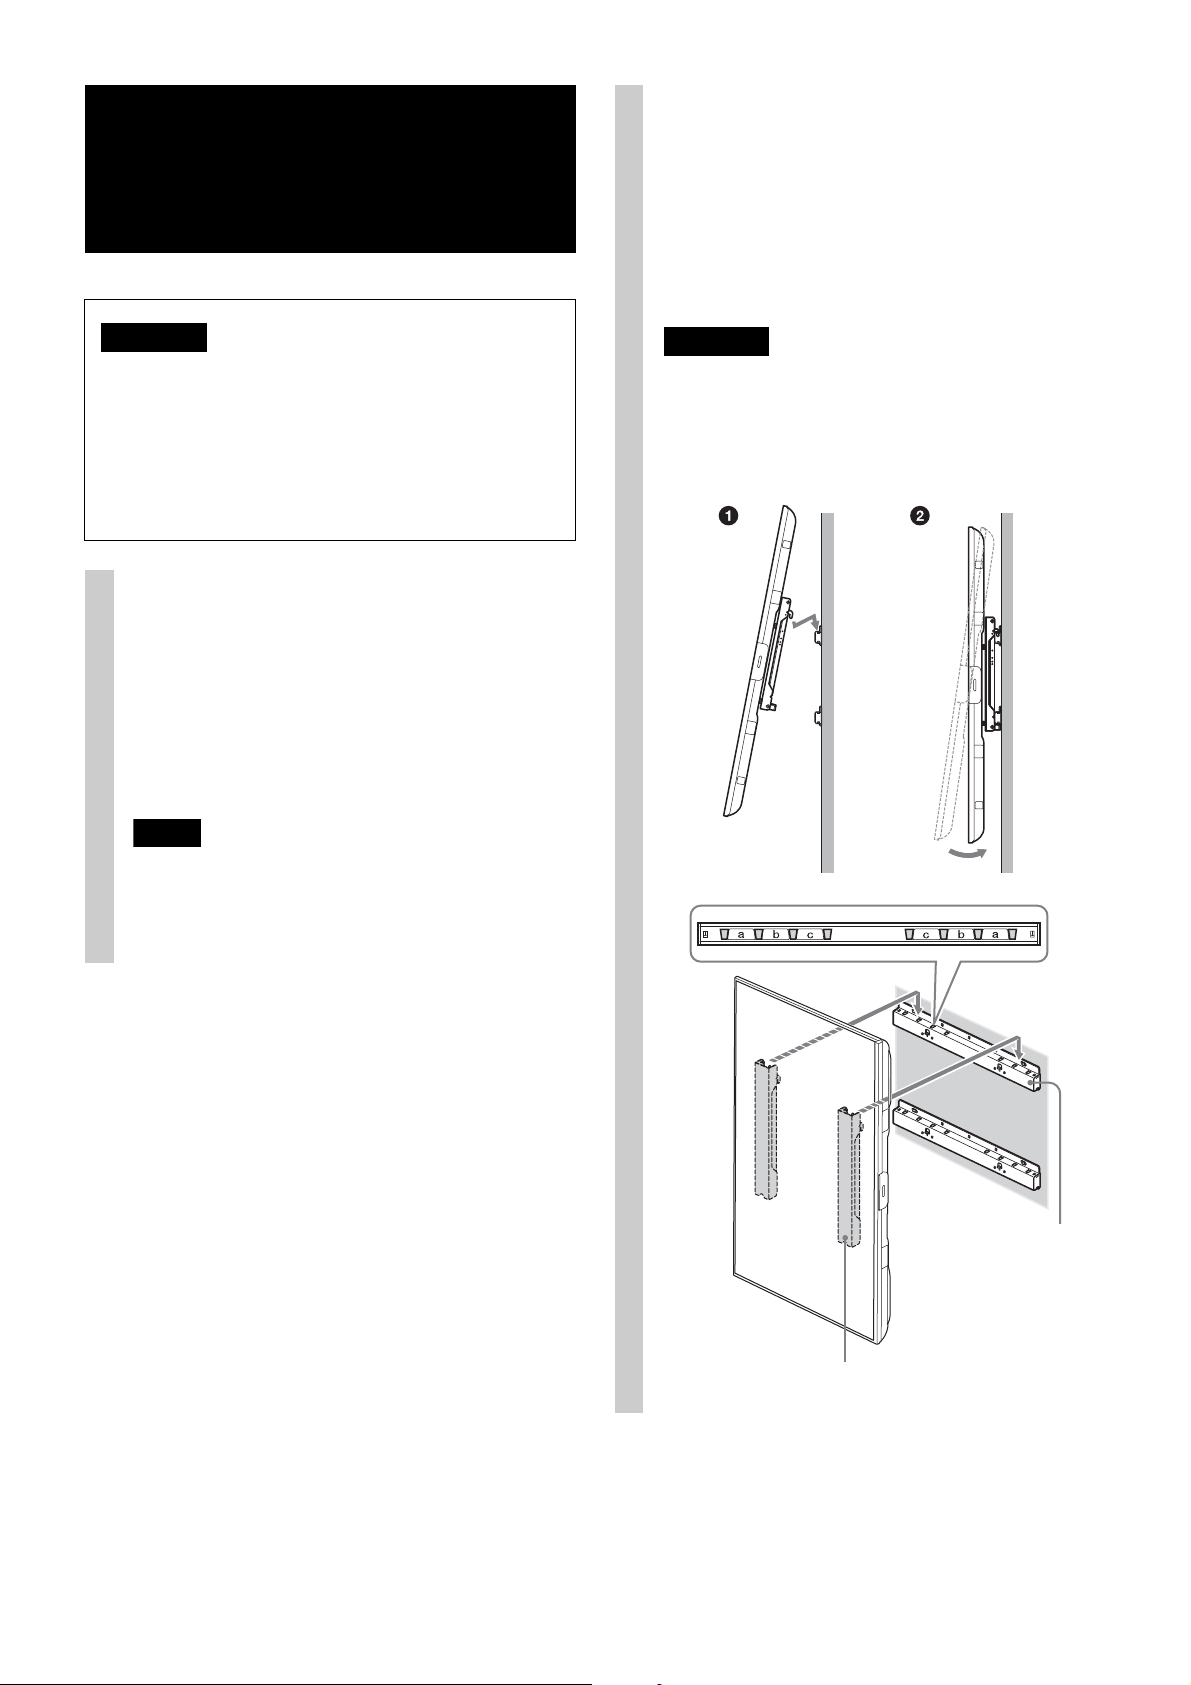
Remove the screws from the
rear of the TV.
XBR-65X850D/ KD-65X8500D
XBR-43X800D/ KD-43X8000D
XBR-55X850D/ KD-55X8500D
XBR-49X800D/ KD-49X8000D
5 (GB)
When using an electric screwdriver, set the torque
setting to approximately 2 N·m {20 kgf·cm}.
Do not lift the Mounting Hook before the screws
(two screws each for left/right) are secured. This
may distort the Mounting Hook or the TV cabinet.
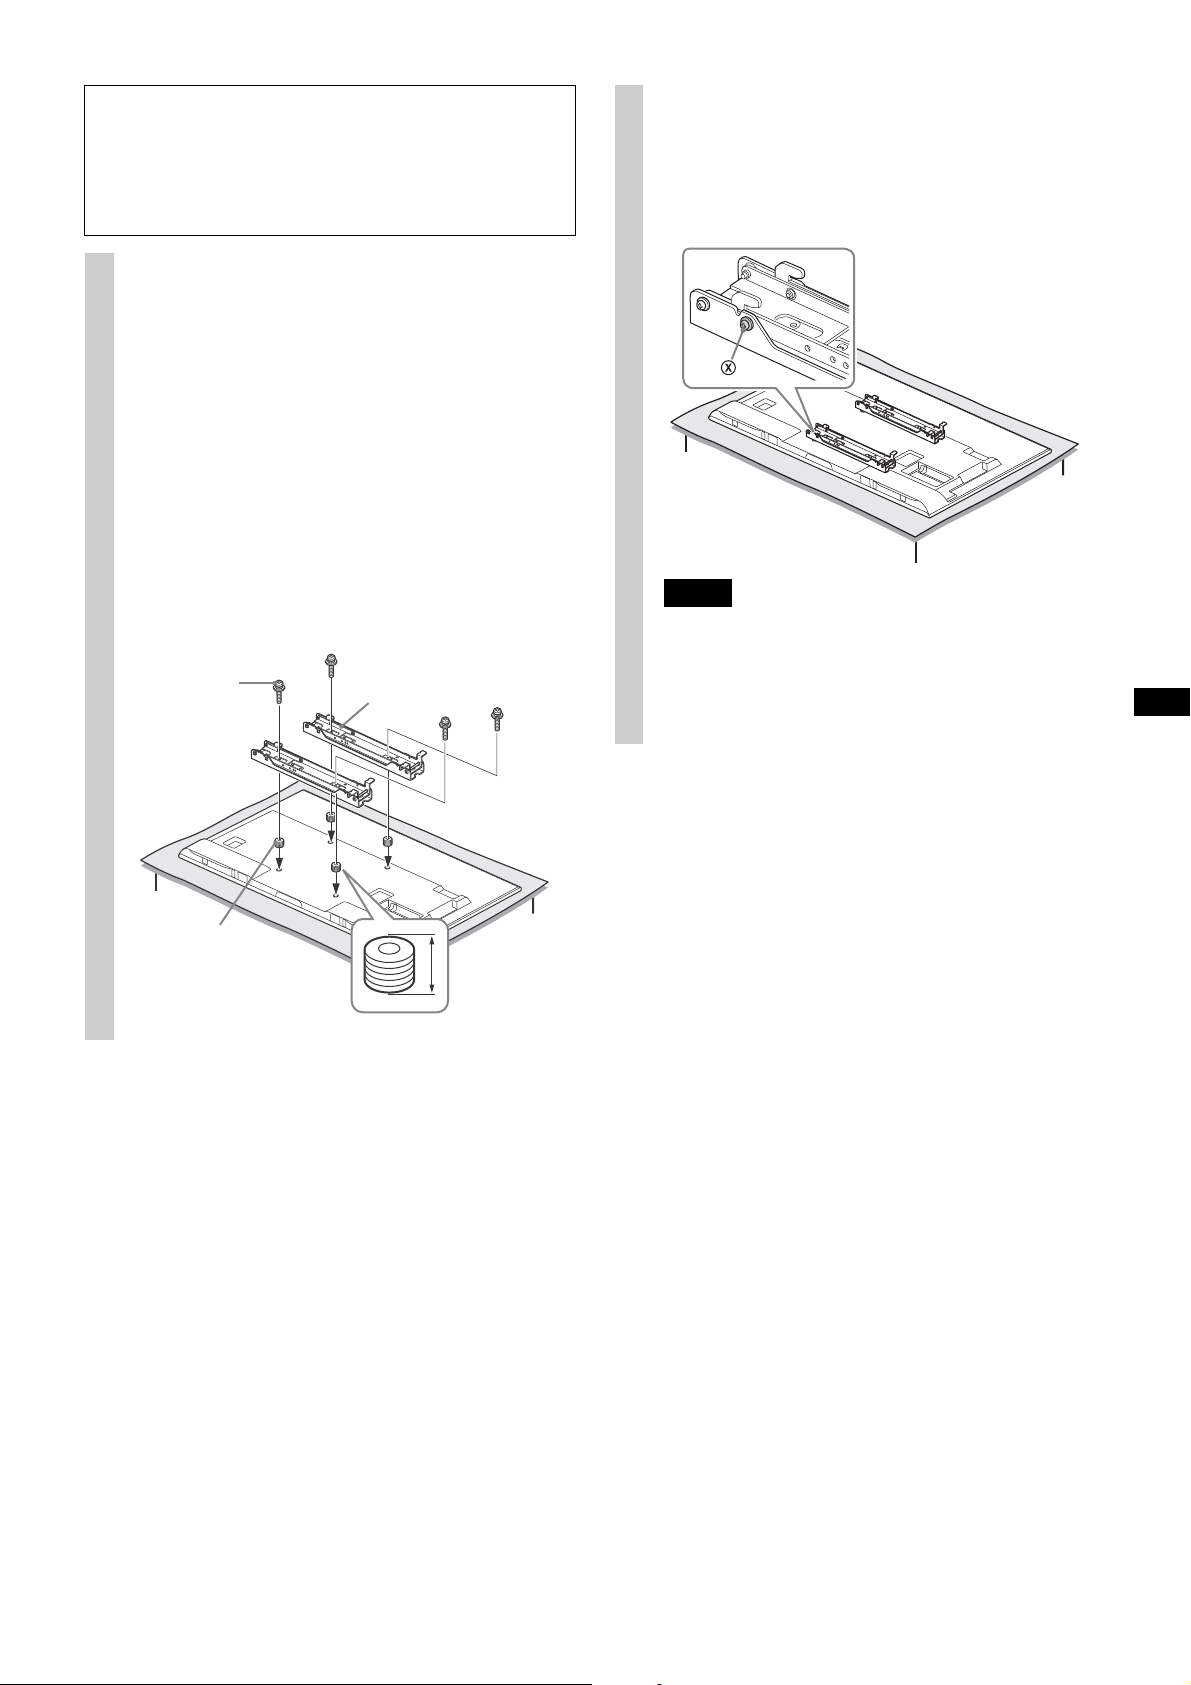
2
Referring to the Screw and Hook
locations diagram/table on
page 9, determine the screw
positions, and secure the
Mounting Hook to the rear of the
TV.
Secure the Mounting Hook to the rear of the
TV temporarily, using the four screws (+PSW6
× 25).
Be sure that both screws are securely
tightened with equal torque strength to the
rear of the TV.
Screw
(+PSW6 × 25)
(not supplied)
Mounting
Hook
Five spacers
(not supplied)
10 mm
(
13
/32 inch)
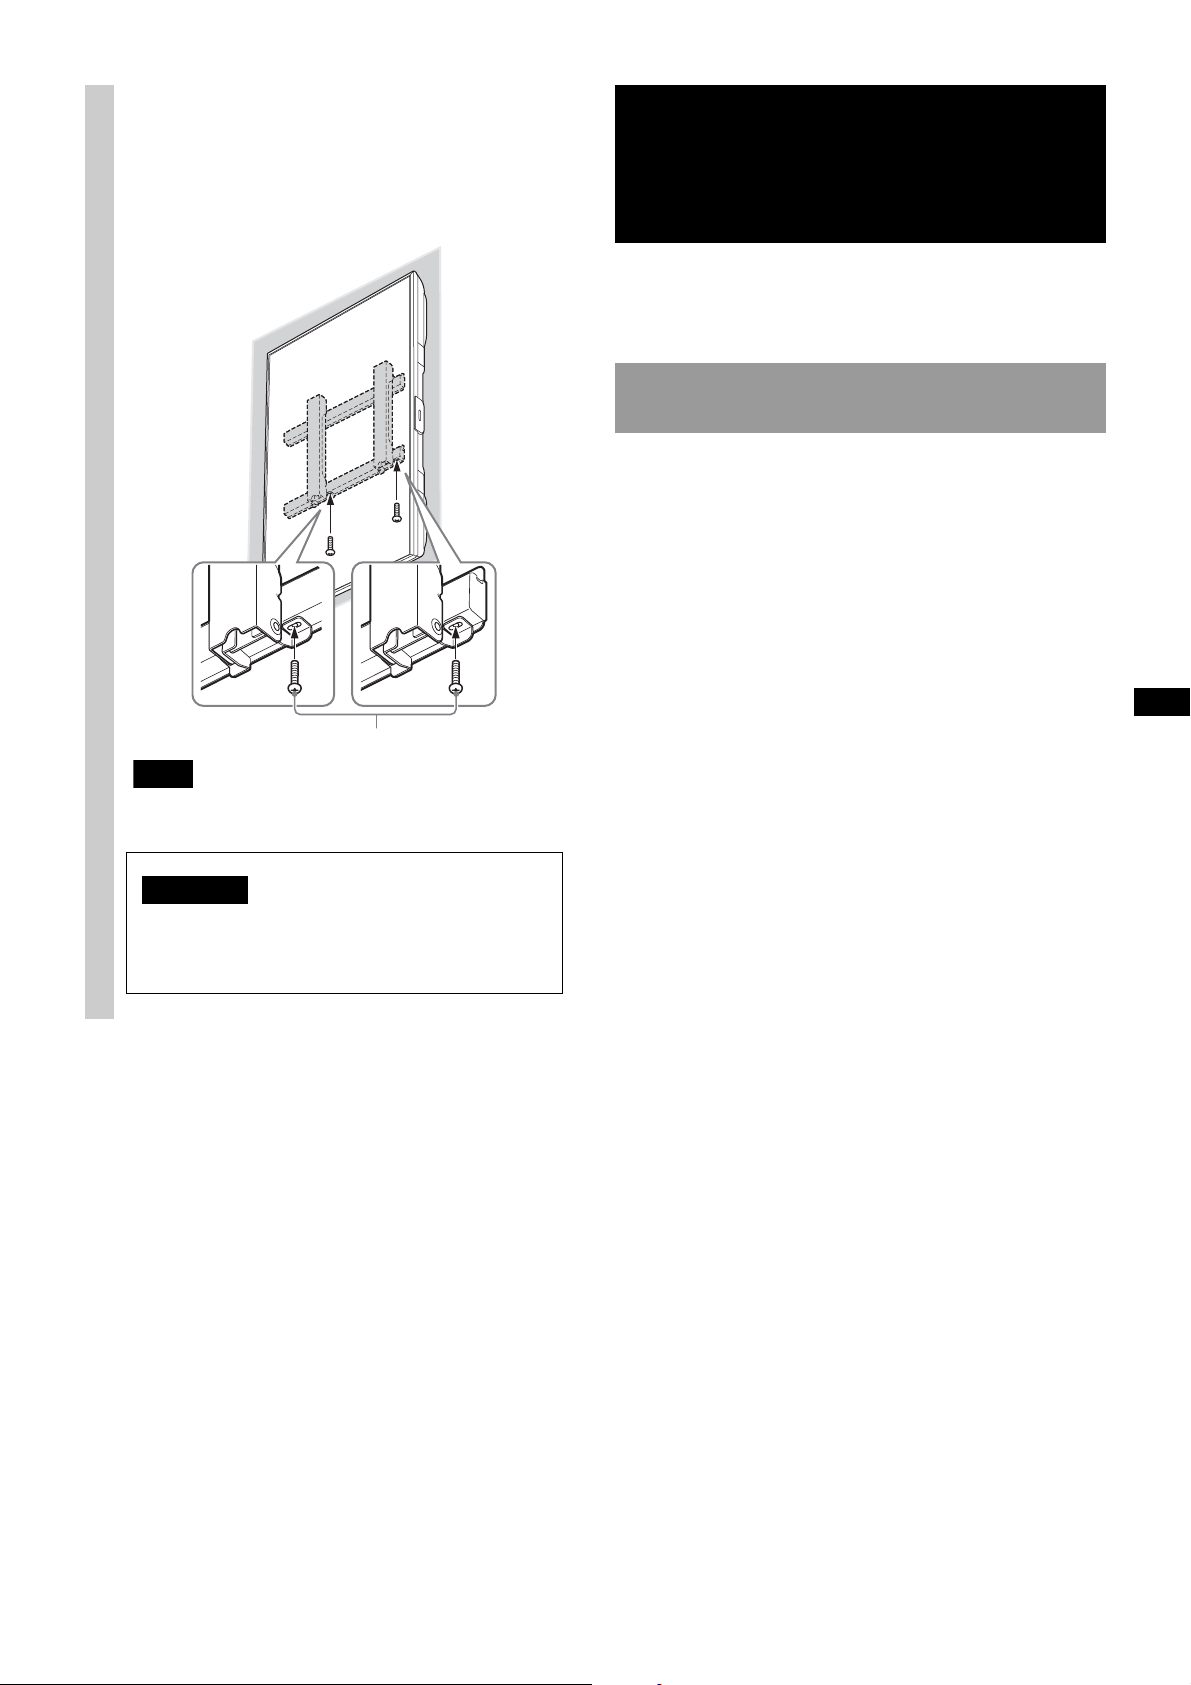
3
Make sure that the screw
firmly secures the arm base of
the Mounting Hook (both left
and right).
Notes
• When installing in portrait orientation, be sure to
keep the Mounting Hook angle to 0 degrees. Do
not use another angles.
• Make sure that the two arm bases are screwed in
securely.
6 (GB)
Step 5:
Installing the TV on the
wall
WARNING
Be sure to complete the installation before
connecting the AC power cord to the wall outlet. If
you allow the AC power cord to be pinched under
or between pieces of equipment, this may result
in a short circuit or an electric shock.
Be careful not to stumble over the AC power cord
or the TV, as you may hurt yourself.
1
Connect the AC power cord and
the connecting cable(s) supplied
with the TV to the TV.
Connect the AC power cord and the connecting
cable(s) to the connectors on the rear of the TV.
For details on connecting the AC power cord
and the connecting cable(s), refer to the
instruction manual of the TV.
Notes
• You cannot connect the cables to the TV after
installing it on the Base Bracket.
• Subcontract the cable routing in the wall to a
licensed contractor.
2
Install the TV onto the Base
Bracket.
Referring to the Screw and Hook locations
diagram/table on page 9, determine the
holes of the Base Bracket for latching the
upper hooks of the Mounting Hook.
Hold the TV securely with both hands, and
gently align it on the wall.
WARNING
• Be sure that two or more persons hold the TV when
carrying it.
• When carrying the TV, hold it in landscape
orientation, and take care not to drop it when
installing. Do not apply excessive force to the TV;
otherwise, it may be deformed.
Mounting Hook
Base Bracket
7 (GB)
Follow the instructions in the SU-WL500 instruction
manual to confirm.
Follow the instructions in the SU-WL500 instruction
manual to remove.
3
Firmly secure the TV and the
Base Bracket using the screw
supplied with SU-WL500
(+BVST4 × 12).
Note
When using an electric screwdriver, set the torque
setting to approximately 1.5 N·m {15 kgf·cm}.
Screw (+BVST4 × 12)
WARNING
Be sure to tighten the securing screw firmly.
If you fail to do so, the TV may fall when it is
pushed upward and cause injury.
Confirming the
completion of the
installation
When removing the TV
8 (GB)
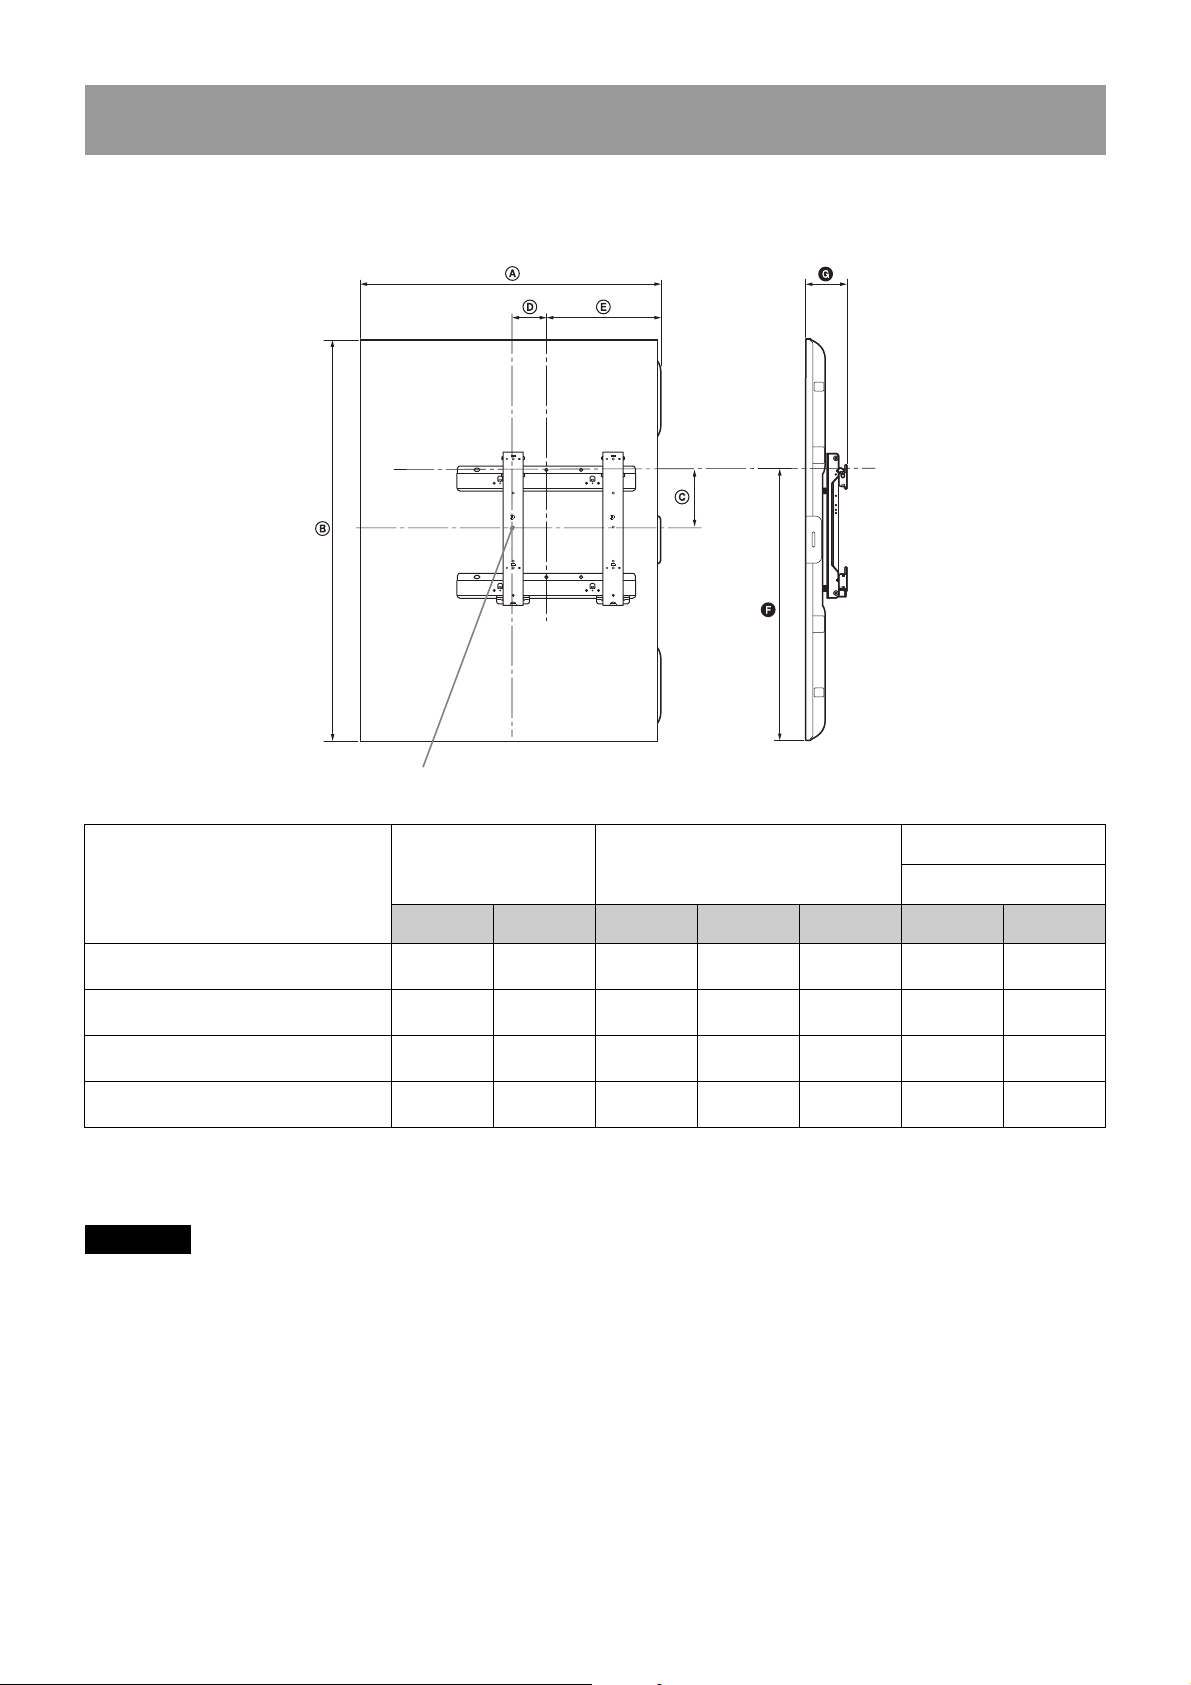
The table below shows the dimensions of the TV that is mounted on this product. Refer to this table to decide
on the installation location.
Unit: mm (inches)
Some models may not be available in certain regions.
Figures in the above table may differ slightly depending on the installation.
WARNING
The wall that the TV will be installed on should be capable of supporting a weight of at least four times that of
the TV.
Refer to your TV’s instructions for its weight.
TV installation dimensions table
Model Name
Display dimensions Screen center dimensions
Length for each
mounting angle
Angle (0º)
XBR-65X850D
KD-65X8500D
842
(33
1
/4)
1,454
(57
1
/4)
121
(4
7
/8)
95
(3
3
/4)
332
(13
1
/8)
848
(33
1
/2)
110
(4
3
/8)
XBR-55X850D
KD-55X8500D
717
(28
1
/4)
1,231
(48
1
/2)
271
(10
3
/4)
22
(
7
/8)
343
(13
5
/8)
887
(35)
110
(4
3
/8)
XBR-49X800D
KD-49X8000D
639
(25
1
/4)
1,093
(43
1
/8)
171
(6
3
/4)
20
(
13
/16)
307
(12
1
/8)
718
(28
3
/8)
110
(4
3
/8)
XBR-43X800D
KD-43X8000D
564
(22
1
/4)
960
(37
7
/8)
221
(8
3
/4)
58
(2
3
/8)
348
(13
3
/4)
701
(27
5
/8)
115
(4
5
/8)
Screen center point
Front view Side view
 Loading...