


On copyrights
The map and POI data may contain copyrighted material. Copyrighted data on a “Memory Stick Duo” should be used within the limits of the copyright law. Do not violate the previsions of the copyright law.
On trademarks
•Microsoft and Windows are registered trademarks of Microsoft Corporation.
•“Memory Stick”,  , “Memory Stick Duo”,


 , “Memory Stick PRO Duo”,


 , “Memory Stick Micro” (“M2”), “MagicGate”,


 , “nav-u” and


 are trademarks of Sony Corporation.
“MagicGate” is a generic name of a copyright protection technology, developed by Sony Corporation.
•All other trademarks are trademarks of their respective owners.
V-Trafic Information in France is provided by Mediamobile company.
Traffic Information in the UK is provided by ITIS Holdings Plc.
© 1993 – 2007 NAVTEQ. All Rights Reserved.
Austria
© Bundesamt für Eichund Vermessungswesen
Belgium
Traffic Information is provided by the Ministerie van de Vlaamse
Gemeenschap and the Ministèrie de l’Equipement et des Transports.
Croatia, Estonia, Latvia,
Lithuania, Poland, Slovenia
© EuroGeographics
France
source: Géoroute® IGN France & BD Carto® IGN France
Germany
Die Grundlagendaten wurden mit Genehmigung der zuständigen Behörden entnommen
Great Britain
Based upon Crown Copyright material.
Greece
Copyright Geomatics Ltd.
Hungary
Copyright © 2003; Top-Map Ltd.
Italy
La Banca Dati Italiana è stata prodotta usando quale riferimento anche cartografia numerica ed al tratto prodotta e fornita dalla Regione Toscana.
Norway
Copyright © 2000; Norwegian Mapping Authority
Portugal
Source: IgeoE – Portugal
Spain
Información geográfica propiedad del CNIG
Sweden
Based upon electronic data
©National Land Survey Sweden.
Switzerland
Topografische Grundlage:
©Bundesamt für Landestopographie.
Customer Support Portal
If you have any questions or for the latest support information on navigation, visit the website below:
http://www.navu.sony-europe.com/support
4-104-528-11 (1)
|
|
Operating Instructions |
GB |
|
|
Bedienungsanleitung |
DE |
Map Update Disc |
|
|
|
Operating Instructions |
Mode d’emploi |
FR |
|
|
|
||
|
|
Gebruiksaanwijzing |
NL |
|
|
Istruzioni per l’uso |
IT |
|
|
Manual de instrucciones |
ES |
NVD-U12E
NVD-U12R
Sony Corporation Printed in Japan |
©2008 Sony Corporation Printed in Japan |

Notes on use
System requirements
•OS: Windows 2000/Windows XP/Windows Vista
•DVD-ROM drive
•USB port
•Internet connection
Before you update/add the maps on the navigation unit
Update the navigation unit to the latest software
Check the latest software on the following website: http://www.navu.sony-europe.com/support
Install the PC connection software on your computer
For Windows 2000/Windows XP users:
If “ActiveSync” is not installed in your computer, install by either of the following methods:
•Insert the disc supplied with the navigation unit into your computer, select your language, then click “Install ActiveSync” to install the software.
•Download and install “ActiveSync 3.8” or later from the Microsoft support site.
For Windows Vista users:
Download “Windows Mobile Device Center 6.1” or later from the Microsoft support site, if not already installed.
Notes
•The screenshots in this manual may differ depending on the disc.
•If you replace the old maps on the navigation unit using this disc, you will not be able to recover the old maps later.
•Sony cannot be responsible for any loss of personal content, such as “Address Book” during the update process as certain aspects may not be compatible with the updated content. Please take a few moments to write down your “Address Book” for safekeeping, in case they are lost as a result of the update.
•For “Memory stick” details, refer to the Quick Start Guide supplied with the navigation unit excluding NV-U71T/U51.
•Set your computer to not enter sleep mode while transferring the map data.
2
Connecting the navigation unit to your computer
For NV-U71T/U51 users:
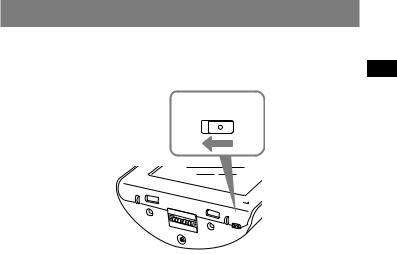
1Switch off the main power by sliding the POWER switch of the navigation unit to the OFF position.
POWER
OFF ON
G 
PO |
|
WER |
|
OFF |
ON |
2Connect the navigation unit to the power supply with the supplied AC adapter.
3Connect the navigation unit to your computer using the supplied USB cable.
4Switch on the main power by sliding the POWER switch of the navigation unit to the ON position.
Wait until your computer has detected the navigation unit.
For NV-U93T/U92T/U83/U82/U73T/U72T/U53/U52 users:
1Connect the navigation unit to your computer using the supplied USB cable, then turn the navigation unit on.
3
Setting up the PC connection software on your computer
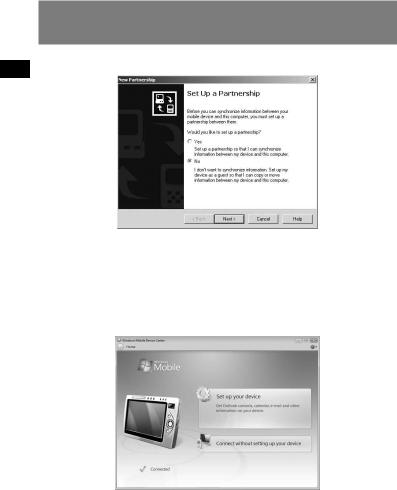
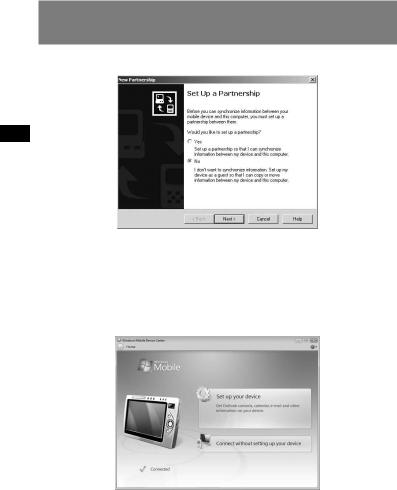
For Windows 2000/Windows XP users:
“Connecting” appears on the navigation unit display, and “Set Up a Partnership” appears on your computer display.
1 Select “No.”
2 Click “Next.”
For Windows Vista users:
“Connecting” appears on the navigation unit display, and the setup screen of the “Device” display appears on your computer.
1 Select “Connect without setting up your device.”
Note
The language on the displays in this step differs depending on your computer.
4
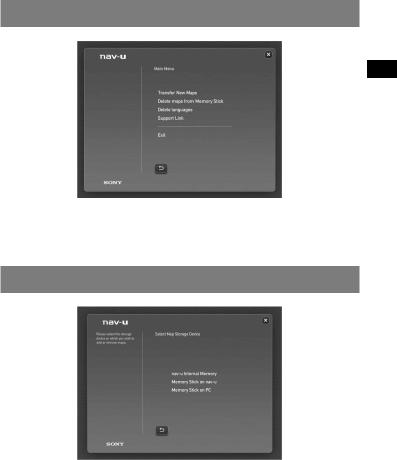
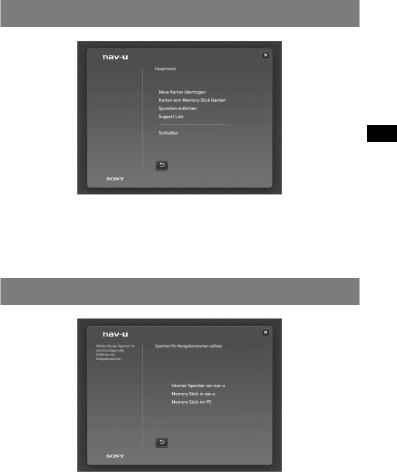
Starting the application
1 Insert the disc into your computer, then select your language. 2 Select “Transfer New Maps.”
Selecting where to place the map data
For NV-U71T/U51 users:
1 Select “nav-u Internal Memory.”
Note
The transfer destination can be set only to “nav-u Internal Memory,” and the existing map data will be replaced.
5

For NV-U93T/U92T/U83/U82/U73T/U72T/U53/U52 users:
1 Select the transfer destination of the map data.
Note
The existing map data will be replaced when you select “nav-u Internal Memory.”
 2 If the transfer destination is set as “Memory Stick on PC,” select the drive corresponding to the “Memory Stick.”
Tip
You can add the map data to a “Memory Stick” without any change to the map data in the internal memory of the navigation unit.
6

Selecting the maps to add/remove
1Check the map(s) that you want to add, and uncheck any map(s) you want to remove.
2Click  .
.
The confirmation display appears.
3Click “OK.”
Addition or removal of the map starts.
Notes
•Addition/removal time differs depending on the computer performance or map type. (For example, it takes approximately 8 hours to transfer the map of Europe A to the navigation unit.)
•Due to the nature of the updated, highly-detailed map content, the area may be different from the map data used now.
7

Completing the map addition/removal
The addition/removal of the map is completed when the above message is displayed.
1 Click “OK.”
2 Click “Exit” to quit the application.
For NV-U71T/U51 users:
Turn off the navigation unit by the POWER switch on its bottom, and disconnect the cables. Turn on the navigation unit again.
For NV-U93T/U92T/U83/U82/U73T/U72T/U53/U52 users:
Disconnect the cables to use the navigation unit.
8

Important Q & A
1Does your “Address Book” and “Home Address” data remain after the update?
In many cases this data will remain, however, some data may generate an error message as a result of the updated map data. In this case, you will need to delete the particular “Address Book” and re-register it with the revised map data installed. Prior to updating your navigation unit, please make a note of all “Address Book” for safekeeping.
2Can previous map data be restored after updating the navigation unit?
Cannot be restored to the factory default map of the navigation unit.
3I cannot set the destination registered in “Address Book.”What should I do?
You may have selected a destination out of the range of the selected map. Confirm whether the selected destination is within the range of the selected map data.
The destination may not be set even within the range of the selected map, since the map data was updated. If the selected destination is within the range of the selected map, register the destination point again.
4I cannot use a saved route.What should I do?
You may have selected a route out of the range of the selected map. Confirm whether the selected route is within the range of the selected map data.
The route may no longer be set within the range of the selected map, since the map data was updated. If the selected route is within the range of the selected map, register the route again.
5What should be done if a cable gets disconnected during the update process?
Cancel the process, reconnect the cable and start over.
9

Hinweise zur Verwendung
Systemvoraussetzungen
•Betriebssystem: Windows 2000/Windows XP/Windows Vista
•DVD-ROM-Laufwerk
•USB-Anschluss
•Internetverbindung
Vorbereitungen zum Aktualisieren/Hinzufügen von Karten auf dem Navigationsgerät
Aktualisieren des Navigationsgeräts anhand der neuesten Software
Auf der folgenden Website können Sie nachschauen, welches die neueste Softwareversion ist:
http://www.navu.sony-europe.com/support
Installieren der PC-Verbindungs-Software auf dem Computer
Für Benutzer von Windows 2000/Windows XP:
Wenn „ActiveSync“ auf dem Computer nicht installiert ist, installieren Sie es anhand einer der folgenden Methoden:
•Legen Sie die mit dem Navigationsgerät mitgelieferte Disc in den Computer ein, wählen Sie die gewünschte Sprache und klicken Sie dann auf „Install ActiveSync“, um die Software zu installieren.
•Laden Sie „ActiveSync 3.8“ oder höher von der Microsoft-Supportsite herunter und installieren Sie es.
Für Benutzer von Windows Vista:
Laden Sie „Windows Mobile Device Center 6.1“ oder höher von der Microsoft-Support- Site herunter, falls das Programm noch nicht installiert ist.
Hinweise
•Je nach Disc können die Bildschirmabbildungen in dieser Anleitung anders aussehen.
•Wenn Sie die alten Karten auf dem Navigationsgerät mithilfe dieser Disc ersetzen, lassen sich die alten Karten später nicht wiederherstellen.
•Sony übernimmt keine Haftung für den Verlust persönlicher Inhalte während der Aktualisierung, weil bestimmte Daten, wie z. B. für „Addressbuch“, möglicherweise nicht mit den aktualisierten Inhalten kompatibel sind. Nehmen Sie sich bitte die Zeit, die Daten für „Addressbuch“ für den Fall zu notieren, dass diese Daten bei der Aktualisierung verloren gehen.
•Nähere Erläuterungen zum „Memory Stick“ finden Sie in der mit dem Navigationsgerät (außer beim NV-U71T/U51) gelieferten „Anleitung zur schnellen Inbetriebnahme“.
•Stellen Sie den Computer so ein, dass er beim Übertragen der Kartendaten nicht in den Energiesparmodus schaltet.
2
Anschließen des Navigationsgeräts an den Computer
Beim NV-U71T/U51:
1Stellen Sie den Schalter POWER des Navigationsgeräts in die Position OFF, um die Hauptstromversorgung auszuschalten.
POWER
OFF ON
G 
PO |
|
WER |
|
OFF |
ON |
2Schließen Sie das Navigationsgerät über das mitgelieferte Netzteil an eine Stromquelle an.
3Schließen Sie das Navigationsgerät über das mitgelieferte USBKabel an den Computer an.
4Stellen Sie den Schalter POWER des Navigationsgeräts in die Position ON, um die Hauptstromversorgung einzuschalten.
Warten Sie, bis der Computer das Navigationsgerät erkannt hat.
Beim NV-U93T/U92T/U83/U82/U73T/U72T/U53/U52:
1Schließen Sie das Navigationsgerät über das mitgelieferte USBKabel an den Computer an und schalten Sie es ein.
3
Konfigurieren der PC-Verbindungs-Software auf dem Computer
Für Benutzer von Windows 2000/Windows XP:
Im Display des Navigationsgeräts erscheint „Connecting“ und auf dem Computermonitor erscheint „Set Up a Partnership“.
1 Wählen Sie „No“.
2 Klicken Sie auf „Next“.
Für Benutzer von Windows Vista:
Im Display des Navigationsgeräts erscheint „Connecting“ und auf dem Computer wird der Gerätekonfigurationsbildschirm „Device“ angezeigt.
1 Wählen Sie „Connect without setting up your device“.
Hinweis
In welcher Sprache die Anzeigen in diesem Schritt angezeigt werden, hängt vom Computer ab.
4
Starten der Anwendung
1Legen Sie die Disc in den Computer ein und wählen Sie Ihre Sprache.
2 Wählen Sie „Neue Karten übertragen“.
Auswählen des Speicherorts für die Kartendaten
Beim NV-U71T/U51:
1 Wählen Sie „Interner Speicher von nav-u“.
Hinweis
Als Übertragungsziel kann nur „Interner Speicher von nav-u“ eingestellt werden und die vorhandenen Kartendaten werden ersetzt.
5
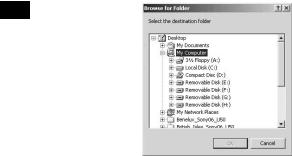
Beim NV-U93T/U92T/U83/U82/U73T/U72T/U53/U52:
1 Wählen Sie das Übertragungsziel für die Kartendaten aus.
Hinweis
Die vorhandenen Kartendaten werden ersetzt, wenn Sie „Interner Speicher von nav-u“ auswählen.
2Wenn Sie als Übertragungsziel „Memory Stick im PC“ einstellen, wählen Sie das dem „Memory Stick“ zugewiesene Laufwerk aus.
Tipp
Indem Sie die Kartendaten auf einem „Memory Stick“ speichern, können Sie vermeiden, dass die Kartendaten im internen Speicher des Navigationsgeräts geändert werden.
6
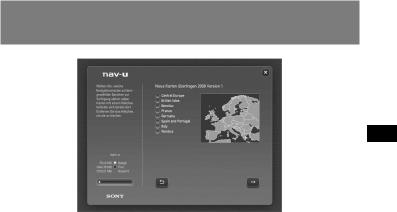
Auswählen der Karten, die hinzugefügt/gelöscht werden sollen
1Versehen Sie die Karten, die hinzugefügt werden sollen, mit einem Häkchen und löschen Sie das Häkchen bei den Karten, die gelöscht werden sollen.
2Klicken Sie auf  .
.
Eine Bestätigungsanzeige erscheint.
3Klicken Sie auf „OK“.
Das Hinzufügen bzw. Löschen der Karten beginnt.
Hinweise
•Wie lange das Hinzufügen bzw. Löschen dauert, hängt von der Computerleistung und vom Kartentyp ab. So dauert es z. B. etwa 8 Stunden, die Karte „Europe A“ auf das Navigationsgerät zu übertragen.
•Die aktualisierten Kartendaten sind sehr detailreich und deshalb kann sich das Gebiet von den jetzt verwendeten Kartendaten unterscheiden.
7
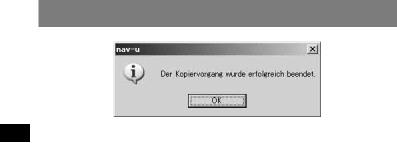
Abschließen des Hinzufügens/Löschens von Karten
Das Hinzufügen/Löschen von Karten ist abgeschlossen, wenn die oben abgebildete Meldung erscheint.
1 Klicken Sie auf „OK“.
2 Klicken Sie auf „Exit“, um die Anwendung zu beenden.
Beim NV-U71T/U51:
Schalten Sie das Navigationsgerät mit dem Schalter POWER an der Unterseite aus und lösen Sie die Kabel. Schalten Sie das Navigationsgerät wieder ein.
Beim NV-U93T/U92T/U83/U82/U73T/U72T/U53/U52:
Lösen Sie die Kabel, um das Navigationsgerät zu verwenden.
8
 Loading...