


 Loading...
Sony NWZ-S636F, NWZ-S638F, NWZ-S638FREDWM, NWZ-S639F, NWZ-S716F Operating Instruction
...of Table
Index Menu Contents
Operation Guide
NWZ-S636F / S638F / S639F / S736F / S738F / S739F
©2008 Sony Corporation |
4-122-190-12 (1) |

Browsing the Operation Guide
To use the buttons in the Operation Guide
Click the buttons located in the upper right of this manual to jump to “Table of Contents,” “Home Menu List,” or “Index.”
Jumps to the table of contents
Find what you are looking for from a list of topics in the manual.
Jumps to the home menu list
Find what you are looking for from a list of the option items in the player’s menu.
Jumps to the index
Find what you are looking for from a list of key words mentioned in the manual.
Hints
You can jump to the indicated page by clicking a page number in the table of contents, in the Home menu list, or in the index.
You can jump to the indicated page by clicking a page reference indication (e.g., page 4) on each page.
To search for a reference page by keyword, click the “Edit” menu, select the “Search” feature of the Adobe Reader to display the navigation frame, type the keyword into the Search text box, and click “Search.”
Once you jump to another page, you can jump to the previous or next page by clicking
the  or
or  button located at the bottom of the Adobe Reader screen.
Operation procedures may differ, depending on your Adobe Reader version.
Continued
of Table
Index Menu Contents

To change the page layout
The buttons at the bottom of the Adobe Reader screen enable you to select how pages are displayed.
 Single Page
Pages are displayed one at a time. When you scroll, the display changes to a previous or succeeding page.

 Continuous
Pages are displayed as a continuous roll of pages.
When you scroll, the previous or next pages scroll up or down continuously.
 Continuous - Facing
Two pages are displayed side by side with each pair part of a continuous roll of pages. When you scroll, the previous or next pairs of pages scroll up or down continuously.
 Facing
Two pages are displayed side by side. When you scroll, the display changes to previous or succeeding pairs of pages.
of Table
Index Menu Contents

Table of Contents |
|
Home Menu List.................................... |
6 |
Supplied Accessories............................. |
8 |
About the bundle software.............................. |
9 |
Parts and Controls............................... |
11 |
Player Controls and Screens................ 13 |
|
How to use the 5-way button and screen.... |
14 |
Displaying the “Now Playing” screen.......... |
21 |
Using the OPTION Button.................. |
22 |
Getting Started |
|
Preparing the Player............................ |
23 |
Charging the player........................................ |
23 |
Turning the player on and off....................... |
25 |
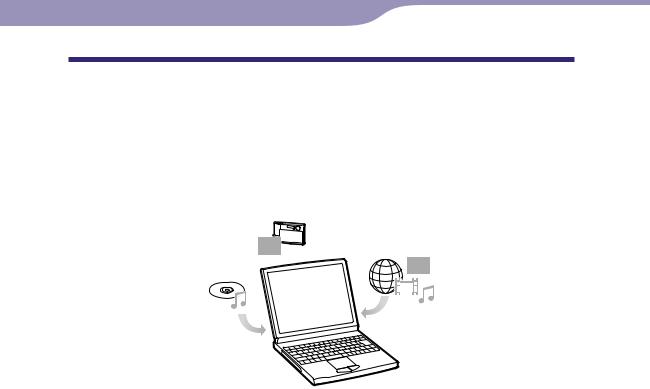
Getting Data........................................ |
26 |
Transferring Data................................ 27 |
|
Playing Music |
|
Searching for Songs (Music Library)........ |
32 |
Searching for songs by song name............... |
32 |
Searching for songs by album....................... |
33 |
Searching for songs by artist......................... |
34 |
Searching for songs by genre......................... |
35 |
Searching for songs by release year.............. |
36 |
Searching for songs by folder........................ |
37 |
Searching for songs by initial letter.............. |
38 |
Playing a playlist............................................. |
39 |
Searching for Songs Based on the |
|
Currently Playing Song..................... |
40 |
Playing Songs in Random Order |
|
(Intelligent Shuffle).................................. |
41 |
Playing songs released in the same year in |
|
random order (Time Machine Shuffle)............. |
41 |
Playing all songs in random order............... |
43 |
Playing Songs |
|
Using SensMe™ Channels................... |
44 |
What is “SensMe™ Channels”?...................... |
44 |
Playing songs using “SensMe™ Channels” |
|
........................................................................ |
44 |
Analyzing songs on the player...................... |
47 |
Deleting Songs from Music Library.... |
48 |
Displaying the Music Option Menu.... |
49 |
Setting the Music |
|
Setting the Play Mode (Play Mode)......... |
52 |
Setting the Playback Range................. |
54 |
Displaying the Now Playing Screen Each |
|
Time the Songs Switch |
|
(New Song Pop Up).................................. |
55 |
Setting the Album Display Format...... 56 |
|
Setting to Search by Folders |
|
( / Button Setting)................................ |
58 |
Setting the Sound Quality (Equalizer).... |
59 |
Changing the sound quality.......................... |
59 |
Customizing sound quality........................... |
61 |
Making the Sound More Vibrant |
|
(VPT(Surround)).................................... |
62 |
Listening with Clear Stereo Sound |
|
(Clear Stereo)......................................... |
64 |
Correcting Sound in the High Range |
|
(DSEE(Sound Enhancer)).......................... |
65 |
Adjusting the Volume Level |
|
(Dynamic Normalizer)............................. |
67 |
Playing Videos |
|
Playing a Video.................................... |
68 |
Setting the Video Orientation............. 70 |
|
Setting the Display of the Video Screen |
|
........................................................... |
72 |
Setting the Zoom Function.................. 73 |
|
Playing Videos Continuously.............. 75 |
|
Setting the Video List Display Format |
|
........................................................... |
76 |
Playing Only Video Sound.................. |
77 |
Deleting Videos from the Video Library |
|
........................................................... |
78 |
Displaying the Video Option Menu.... |
79 |
Playing Podcasts |
|
Playing Podcast Episodes.................... |
80 |
Deleting Podcast Episodes................... 81 |
|
Displaying the Podcast Option Menu |
|
........................................................... |
82 |
of Table
Index Menu Contents
Continued

Playing Photos |
|
Displaying a Photo.............................. |
84 |
Setting the Photo Orientation............. 86 |
|
Setting the Display of the Photo Screen |
|
........................................................... |
88 |
Playing a Slide Show............................ 89 |
|
Setting the Slide Show Play Mode....... |
90 |
Setting the Interval of a Slide Show..... 91 |
|
Setting the Photo List Display |
|
Format............................................... 92 |
|
Deleting Photos from Photo Library |
|
........................................................... |
93 |
Displaying the Photo Option Menu.... |
94 |
Listening to FM Radio |
|
Listening to FM Radio......................... |
95 |
1 Switching to the FM radio.......................... |
95 |
2 Presetting broadcast stations |
|
automatically (Auto Preset)............................. |
96 |
3 Selecting broadcast stations........................ |
97 |
Presetting Broadcast Stations |
|
Manually............................................ |
98 |
Deleting preset broadcast stations................ |
99 |
Setting the Reception (Scan Sensitivity) |
|
......................................................... |
100 |
Changing to Monaural/Stereo |
|
(Mono/Auto)........................................ |
101 |
Displaying the FM Radio Option |
|
Menu................................................ 102 |
|
Common Settings |
|
Reducing the Ambient Noise (Noise Canceling) |
|
(NWZ-S736F/S738F/S739F only)............... |
103 |
Using with external audio sources |
|
(External Input Mode)..................................... |
105 |
Using as earplugs (Quiet Mode)..................... |
107 |
Adjusting the Effect of the Noise |
|
Canceling Function |
|
(Set Noise Cancel level) .......................... |
108 |
Limiting the Volume |
|
(AVLS (Volume Limit))........................... |
109 |
Turning Off the Beep Sound.............. 110 |
|
Note |
|
Setting a Screensaver Type................ |
111 |
Setting a Screensaver Time................ 112 |
|
Setting the Theme.............................. 113 |
|
Setting the Wallpaper........................ |
114 |
Adjusting the Brightness of the Screen |
|
(Brightness)......................................... |
116 |
Setting the Current Time |
|
(Set Date-Time).................................... |
117 |
Setting the Date Format.................... |
119 |
Setting the Time Format.................... 120 |
|
Displaying the Player Information |
|
(Unit Information)................................ |
121 |
Resetting to Factory Settings |
|
(Reset all Settings)................................. |
122 |
Formatting Memory (Format).............. |
123 |
Selecting the Display Language......... 125 |
|
Useful Facts |
|
Maximizing Battery Life.................... |
127 |
What are Format and Bit Rate?......... |
128 |
What is audio format?................................. |
128 |
What is video format?................................. |
129 |
What is photo format?................................ |
129 |
Storing Data....................................... |
130 |
Upgrading the Player’s Firmware...... 131 |
|
Troubleshooting |
|
Troubleshooting................................ |
132 |
Messages............................................ |
146 |
Additional Information |
|
Precautions........................................ |
149 |
License and Trademark Notice.......... 157 |
|
Specifications..................................... 159 |
|
Index.................................................. 164 |
|
Depending on the country/region in which you have purchased the player, some models may not be available.
of Table
Index Menu Contents
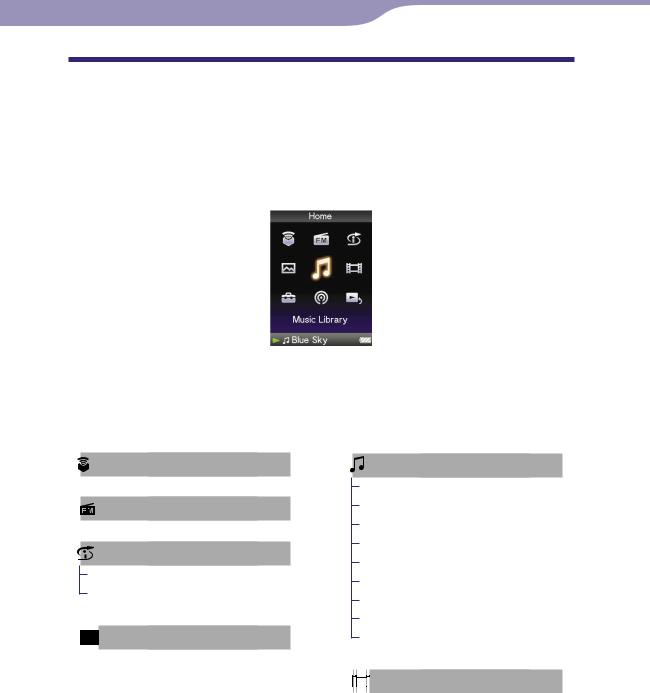
Home Menu List
You can display the Home menu by pressing and holding the BACK/HOME button of the player. The Home menu is the starting point of each function, such as playing songs, videos, photos, podcast episodes, searching for songs, using “SensMe™ Channels,” listening to FM radio and changing settings.
Hint
The screen appearance varies depending on the settings of “Wallpaper Settings” ( page 114) and “Theme Settings” ( page 113). The screen illustrations within this manual are only examples.
SensMe™ Channels..................... |
44 |
FM Radio................................. |
95 |
Intelligent Shuffle*1 |
|
Time Machine Shuffle................. |
41 |
Shuffle All..................................... |
43 |
Photo Library.......................... |
84 |
Music Library |
|
All Songs....................................... |
32 |
Album............................................ |
33 |
Artist.............................................. |
34 |
Genre............................................. |
35 |
Release Year.................................. |
36 |
Folder............................................ |
37 |
Playlists.......................................... |
39 |
Initial Search................................. |
38 |
Intelligent Shuffle......................... |
41 |
Video Library.......................... |
68 |
|
Continued |
*1 appears instead of
  (Intelligent Shuffle) if the player accesses certain online services (available only in the U.S.A.). To restore
  (Intelligent Shuffle), format the memory of the player ( page 123).
of Table
Index Menu Contents

Settings |
|
Music Settings |
|
Play Mode................................ |
52 |
Playback Range....................... |
54 |
Equalizer.................................. |
59 |
VPT(Surround)....................... |
62 |
DSEE(Sound Enhance).......... |
65 |
Clear Stereo............................. |
64 |
Dynamic Normalizer............. |
67 |
Album Display Format........... |
56 |
New Song Pop Up................... |
55 |
/ Button Setting................. |
58 |
Video Settings |
|
Zoom Settings......................... |
73 |
Video Orientation................... |
70 |
Display...................................... |
72 |
Continuous Playback............. |
75 |
Video List Format................... |
76 |
On-Hold Display.................... |
77 |
Photo Settings |
|
Photo Orientation................... |
86 |
Display...................................... |
88 |
Slide Show Repeat................... |
90 |
Slide Show Interval................. |
91 |
Photo List Format................... |
92 |
FM Radio Settings |
|
Scan Sensitivity..................... |
100 |
Mono/Auto............................ |
101 |
Common Settings |
|
Unit Information.................. |
121 |
AVLS (Volume Limit).......... |
109 |
Beep Settings......................... |
110 |
Theme Settings...................... |
113 |
Wallpaper Settings................ |
114 |
Screensaver............................ |
111 |
Brightness.............................. |
116 |
Set Date-Time....................... |
117 |
Date Display Format............ |
119 |
Time Display Format........... |
120 |
Reset all Settings................... |
122 |
Format.................................... |
123 |
Language Settings...................... |
125 |
NC Settings*1.............................. |
105 |
NC Modes.............................. |
105 |
Set Noise Can. level.............. |
108 |
.........................Podcast Library |
80 |
of Table Contents |
|
|
|
||
Now Playing |
21 |
||
|
|||
|
|
Menu |
|
|
|
Index |
*1 NWZ-S736F/S738F/S739F only

Supplied Accessories
Please check the accessories in the package.
Headphones (1)
USB cable (1)
Earbuds (Size S,L) (1)
Attachment (1)
Use when connecting the player to the optional cradle, etc.
Audio input cable*1
Plug adaptor for in-flight use (single/dual)*1
CD-ROM*2 *3 (1)
Windows Media Player 11
Media Manager for WALKMAN*4
Content Transfer
Operation Guide (PDF file)
Quick Start Guide (1)
*1 |
NWZ-S736F/S738F/S739F only |
*2 |
Do not attempt to play this CD-ROM in an audio CD player. |
*3 |
Depending on the country/region in which you have purchased the player, |
*4 |
the bundled software may be different. |
Media Manager for WALKMAN is not bundled with the packages sold in the |
|
|
U.S.A. Please download it from the following web site: |
|
http://www.sonycreativesoftware.com/download/wmm_lite |
How to install the earbuds correctly |
|
If the earbuds do not fit your ears correctly, low bass sound may |
|
not be heard. |
|
To enjoy better sound quality, change the size of the earbuds or |
|
adjust the earbud position to sit on your ears comfortably and |
L |
fit your ears snugly.
At purchase, M size earbuds are installed. If the earbuds do not fit your ears, try one of the other supplied sizes, S or L.
When you change the earbuds, turn to install them firmly on the headphones to prevent the earbud from detaching and remaining in your ear.
About the serial number
The serial number provided for this player is required for customer registration. The number is shown on the rear of the player.
of Table
Index Menu Contents
Continued

About the bundled software
Windows Media Player 11
Windows Media Player can import audio data from CDs and transfer data to the player. When you use copyright protected WMA audio files and copyright protected WMV video files, use this software. This software can convert WMV files to be playable for the player. So that please use this software when you transfer WMV video files.
Transferable files: Music (MP3, WMA), Video (WMV), Photo (JPEG)
For details on operation, refer to the Help of the software or visit the following website.
http://www.support.microsoft.com/
Hint
Some computers that already have Windows Media Player 10 installed may encounter file limitation (AAC, video files, etc.) that can be transferred by dragging and dropping. If you install Windows Media Player 11 from the supplied CD-ROM, you can solve this problem, then you can transfer by dragging and dropping again. Before installing
Windows Media Player 11 on your computer, make sure to check whether your software or service corresponds to Windows Media Player 11.
Media Manager for WALKMAN*1
Media Manager for WALKMAN can transfer music, photos or videos from the computer to the player and import audio data from CDs. Media Manager for WALKMAN can also subscribe to RSS feeds and transfer the music and video files that have been downloaded from RSS channels.
For details on operation, refer to the Help of the software. Audio files (AAC) or videos can also be transferred by dragging and dropping using Windows Explorer as well as Media Manager for WALKMAN.
Transferable files: Music (MP3, WMA, AAC*2, WAV), Photo (JPEG), Video (MPEG-4 Simple Profile, AVC (H.264/AVC) Baseline Profile), Podcast (music, video)
*1 If you purchased the package in the U.S.A., please download Media Manager for WALKMAN from the following web site: http://www.sonycreativesoftware.com/download/wmm_lite
*2 DRM files are not compatible.
Note
Copyright protected video files, such as DVD movies or recorded digital television programs, are not supported.
of Table
Index Menu Contents
Continued

10
Content Transfer
Content Transfer can transfer music, videos or photos from a computer to the player by a simple drag-and-drop operation. You can use Windows Explorer or iTunes® intuitively to drag and drop data to Content Transfer. For details on operation, refer to the Help of the software.
Transferable files: Music (MP3, WMA, AAC*1, WAV), Photo (JPEG), Video (MPEG-4 Simple Profile, AVC (H.264/AVC) Baseline Profile), Podcast (music, video)
*1 DRM files are not compatible.
Hint
ATRAC files can be transferred to the player after conversion to MP3 file format. To convert files, download MP3 Conversion Tool from the customer support website ( page 156).
of Table
Index Menu Contents
11
Parts and Controls
Front
of Table
Index Menu Contents
Rear
BACK/HOME button*1
Press to go up one list screen level, or to return to the previous menu. Press and hold the BACK/HOME button to display the Home menu ( page 13).
5-way button*2
Starts playback and enables navigation of the player’s on-screen menus ( page 14).
Headphone jack*3
For connecting the headphones. Insert the plug until it clicks into place. If the headphones are connected improperly, the sound from the headphones may not sound right.
About the Noise Canceling function (NWZ-S736F/S738F/S739F only)
The Noise Canceling function is available only when using the supplied headphones.
The supplied headphones can only be used for these models, and cannot be used for other equipment.
WM PORT jack
Use this jack to connect the supplied USB cable, or optional peripheral devices, such as supported accessories for the WM PORT.
NOISE CANCELING switch (NWZS736F/S738F/S739F only)
By sliding the NOISE CANCELING switch in the direction of the arrow, the Noise Canceling function is activated ( page 103).
Display
The display may vary, depending on functions ( page 13).
VOL +*2/– button
Adjusts the volume.
Continued

12
HOLD switch
You can protect the player against accidental operation by using the HOLD switch when carrying it. By sliding the HOLD switch in the direction of the arrow , all operation buttons are disabled. If you slide the HOLD switch to the opposite position, the HOLD function is released.
OPTION/PWR OFF button*1
Displays the option menu ( page 22, 49, 79, 82, 94, 102).
If you press and hold the OPTION/ PWR OFF button, the screen turns off and the player enters standby mode. If you press any button while the player is in standby mode, the “Now Playing” screen, etc., appears and the player is ready for operation. Furthermore, if you leave the player in standby mode for about a day, the player turns completely off automatically. If you press any button when the player is turned off, the start up screen appears first, then the “Now Playing” screen appears.
Note
The player consumes battery power very slightly even when it is in standby mode. Therefore, the player might turn completely off in a short time, depending on the power remaining in the battery.
RESET button
Resets the player when you press the RESET button with a small pin, etc. ( page 132).
*1 Functions marked with  on the player are activated if you press and hold the corresponding buttons.
*2 There are tactile dots. Use them to help with button operations.
*3 The shape of the headphone jack hole varies depending on the model.
of Table
Index Menu Contents
13
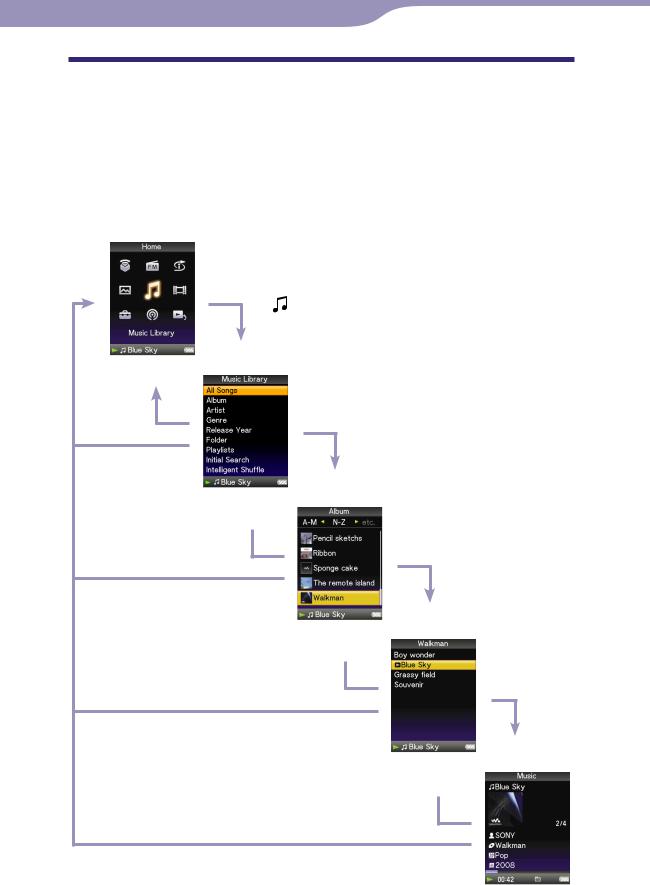
Player Controls and Screens
Use the 5-way button and the BACK/HOME button to navigate through screens, play songs, videos, podcast episodes, and FM radio, and to view photos or change the player’s settings.
The Home menu appears when you press and hold the BACK/HOME button. The diagram below shows how the screen changes when you press various operation buttons. For example, the player’s screen changes as shown below when you select “Music Library”– “Album” from the Home menu.
Home menu
Select (Music Library), and press the button.
of Table
Index Menu Contents
Music Library
Press the BACK/ HOME button.
Select “Album,” and
Press and hold the press the button. BACK/HOME button.
Album list
Press the BACK/
HOME button.
Press and hold the
BACK/HOME button.
Press the BACK/
HOME button.
Select your desired album, and press the button.
Song list
Press and hold the
BACK/HOME button.
Press the BACK/
HOME button.
Press and hold the
BACK/HOME button.
Select your desired song, and press the button. Playback begins.
Now Playing screen
Continued

14
How to use the 5-way button and screen
The 5-way button performs different functions on the list screens, on the thumbnail screens, and on the “Now Playing” screen.
*1 There are tactile dots. Use them to help with button operations.
How to use the 5-way button on the list screen
Music
(play/pause/  confirm) button*1
  / buttons
 / buttons
Index
The initials of song and album, etc., names in the list section appear.
List
Buttons Description
Confirms the item of the list.
Press and hold to play back all songs in the selected item.
/ |
Moves the cursor up or down. |
|
Press and hold to scroll up or down faster. |
/ |
Changes screens, or, when an index is displayed, moves the cursor |
|
left or right to display a list of items. |
|
Displays the previous or next screen of the list, when the index is |
|
not displayed. |
Video |
|
List
of Table
Index Menu Contents
Buttons Description
Confirms the item of the list.
/ |
Moves the cursor up or down. |
|
Press and hold to scroll up or down faster. |
/ |
Displays the previous or next screen of the list. |
Continued

15
Photo
List
Buttons Description
Confirms the item of the list.
Press and hold to play back a slide show of photos in the selected item.
/ |
Moves the cursor up or down. |
|
Press and hold to scroll up or down faster. |
/ |
Displays the previous or next screen of the list. |
How to use the 5-way button on the thumbnail*1 screen
Thumbnails
Buttons Description
Displays the song list of the selected item during music operation, or displays the selected item during photo operation. Starts playback of the selected item during video operation.
/ |
Moves the cursor up or down. |
|
Press and hold to scroll up or down faster. |
/ |
Move the cursor left or right. |
|
Press and hold to move the cursor left or right faster and then |
|
scroll up or down through the thumbnail screens. |
*1 Thumbnail refers to a reduced size image of a piece of cover art, one scene of a video, or a photo. To display thumbnails for albums, see page 56; for video files, see page 76.
of Table
Index Menu Contents
Continued
16
How to use the 5-way button on the “Now Playing” screen
Music
Song name
Artist name
Album title
Genre
Release year
Playing status
Buttons Description
Starts song playback. When playback starts, appears on the display, and if the button is pressed again, appears and
playback pauses.*1 This pause and resume feature is available only on the “Now Playing” screen.
/ |
Press the / button to display the cursor and scroll through the |
|
displayed items. When genre, album title, or other characteristic is |
|
selected by the cursor, press the button to display a list of |
|
artists matching the genre of the currently playing song, or the |
|
song lists of the album that is currently playing. |
|
When the / button is set to “Folder +/–” ( page 58) |
|
Starts play back from the first song of the next folder*2, the current |
|
folder or the previous folder. Press the button to skip to the first |
|
song of the current folder or the previous folder. Press the button |
|
to skip to the first song of the next folder. |
/ |
Moves playback to the beginning of the current, previous, or next |
|
song when pressed once or repeatedly. Press and hold to scan a |
|
playing song backwards or forwards quickly. |
*1 If there is no operation for more than 3 minutes while a song is paused, the screen turns off and the player enters standby mode.
*2 The folder units that the player skips vary according to the list before the song list. For example, if you select a song in the following order; “Artist”- album list - song list, you can search for songs by skipping albums.
Continued
of Table
Index Menu Contents

17
SensMe™ Channels
Channel
Song name
Artist name
Album title
Playing Status
Buttons Description
Starts song playback. When playback starts, appears on the display, and if the button is pressed again, appears and playback pauses.
/ |
Press the / button to scroll through the list of channels. Each |
|
time you press the button, the channel changes and song playback |
|
starts from the middle of the song. |
/ |
Moves playback to the beginning of the current, previous, or next |
|
song when pressed once or repeatedly. Press and hold to scan a |
|
playing song backwards or forwards quickly. |
|
Continued |
of Table
Index Menu Contents

18
Video
 Playing status
When you change the display orientation to horizontal, the / / / button orientation and functions will also be changed.
Buttons Description
Starts video playback. When playback starts, appears on the display, and if the button is pressed again, appears and playback pauses.*1 You can play and pause videos only from the “Now Playing” screen of the video.
/ |
Press the / button to find the beginning of the next, previous or |
|
the currently playing video.*2 |
/ |
Press the / button to scan a playing video backwards or |
|
forwards quickly. |
|
During playback, the speed of fast forward/backward changes |
|
through 3 levels by repeatedly pressing the / button ((×10), |
|
(×30), (×100)). By pressing and holding, the speed increases 1 level, |
|
and by releasing, returns to normal playback. |
|
While pausing playback, the scene moves forward or backward |
|
slightly by pressing the / button. |
*1 If there is no operation for more than 3 minutes while a video is paused, the screen turns off and the player enters standby mode.
*2 If “Continuous Playback” is set to “On,” you can find the beginning of the previous or next video from the currently playing video ( page 75).
Continued
of Table
Index Menu Contents
19
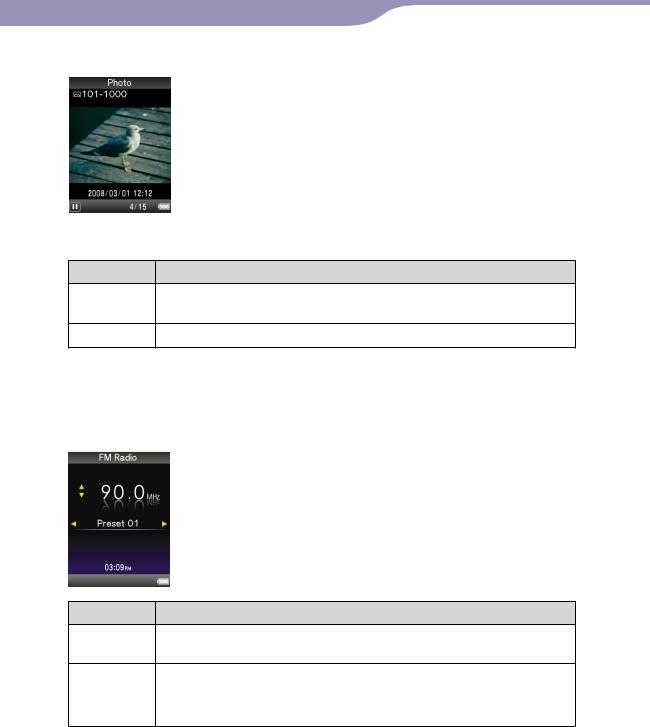
Photo
 Playing status
When you change the display orientation to horizontal, the / / / button orientation and functions will also be changed.
Buttons Description
appears on the display and a slide show starts. If the button is pressed again, appears and playback pauses.*1
/ |
Displays the previous or next photo. |
*1 When playing songs while a slide show is paused, the screen goes dark if there is no operation for the period set in “Screensaver Timing” ( page 112). When the song playback and a slide show accompanying it are paused, and there is no operation for more than 3 minutes, the screen turns off and the player enters standby mode.
FM
of Table
Index Menu Contents
Buttons Description
Plays or pauses*1 FM radio. Presets by pressing and holding the selected frequency.
/ |
Selects frequencies. Selects the next receivable broadcast station by |
|
pressing and holding. |
/ |
Selects the preset. |
*1 If there is no operation for more than 3 minutes while FM is paused, the screen turns off and the player enters the standby mode.
Continued

20
About the information area
The icons, shown in the table below, appears in the information area. The icons vary according to the playback status, settings or the screens.
For details about the icons, see each reference pages.
|
Icons |
|
|
|
|
|
|
|
|
description |
||||||||||||
|
|
|
|
|
|
|
|
|
|
|
|
|
|
|
|
|
|
|
|
|
|
The icons of the playback status |
|
, , , , |
Play back, Pause, Fast forward/backward, Move to the beginning of |
||||||||||||||||||||
, |
|
|
|
|
|
, |
|
|
|
|
|
|
|
the next, current or previous song |
||||||||
, |
|
|
|
|
|
, , |
, etc. |
Go forward /backward slightly or quickly ( page 69) |
||||||||||||||
, , |
|
|
, |
, |
The icons of the song title, the artist name, the video title , the photo |
|||||||||||||||||
|
|
title, FM radio |
||||||||||||||||||||
|
|
|
|
|
|
|
|
|
|
|
|
|
|
|
|
|
|
|
|
|
|
|
|
|
|
|
|
|
|
|
|
|
|
|
|
|
|
|
|
|
|
|
|
|
The icons of the play mode |
, |
|
|
|
|
|
|
|
|
|
|
, etc. |
|
The play mode is set to “Repeat” or “Shuffle” ( page 53). “Slide |
|||||||||
|
|
|
|
|
|
|
|
|
||||||||||||||
|
|
|
|
|
|
|
|
|
|
|
|
|
|
|
|
|
|
|
|
|
|
Show Repeat” is set to “On” ( page 90) |
|
|
|
|
|
|
|
|
|
|
|
|
|
|
|
|
|
|
|
|
|
|
The icons of the playback range |
|
|
|
|
|
|
|
|
|
|
|
|
|
|
|
|
|
|
|
|
|
|
The playback range is set to “Selected Range” ( page 54) |
|
|
|
|
|
, |
|
|
|
|
|
|
|
|
|
|
, etc. |
The icons of the sound effect setting ( page 60) or of the Noise |
|||||
|
|
|
|
|
|
|
|
|
|
|
|
|
|
|
|
|
|
|
|
|
|
Canceling function (NWZ-S736F/S738F/S739F only) ( page 103) |
|
|
|
|
|
|
|
|
|
|
|
|
|
|
|
|
|
|
|
|
|
|
The icons of the video setting |
|
|
|
|
|
|
|
|
|
|
|
|
|
|
|
|
|
|
|
|
|
|
“Continuous Playback” is set to “On” ( page 75) |
|
|
|
|
|
|
|
|
|
|
|
|
|
|
|
|
|
|
|
|
|
|
|
|
|
|
|
|
|
|
|
|
|
|
|
|
|
|
|
|
|
|
|
|
|
|
|
|
|
|
|
|
|
|
, |
|
|
|
|
|
|
|
|
|
|
|
|
“Zoom Settings” is set to “Auto” or “Full” ( page 73) |
|
|
|
|
|
|
|
|
|
|
|
|
|
|
|
|
|
|
|
|
||||
|
|
|
|
|
|
|
|
|
|
|
|
|
|
|
|
|||||||
|
|
|
|
|
|
|
|
|
|
|
|
|
|
|
|
|
|
|
|
|
|
The icon of the FM radio setting |
|
|
|
|
|
|
|
|
|
|
|
|
|
|
|
|
|
|
|
|
|
|
”Mono/Auto” setting is set to “Mono” ( page 101) |
|
|
|
|
|
|
|
|
|
|
|
|
|
|
|
|
|
|
|
|
|
|
|
|
|
|
|
|
|
|
|
|
|
|
|
|
|
|
|
|
|
|
|
|
|
The icon of the remaining of the battery ( page 23) |
|
|
|
|
|
|
|
|
|
|
|
|
|
|
|
|
|
|
|
|
|
|
|
|
|
|
|
|
|
|
|
|
|
|
|
|
|
|
|
|
|
|
|
|
|
|
|
|
|
|
|
|
|
|
|
|
|
|
|
|
|
|
|
|
|
|
|
|
Continued |
of Table
Index Menu Contents
21
Displaying the “Now Playing” screen
You can quickly display “Now Playing” screen from various screens.
BACK/HOME button
Now Playing
5-way button
Press and hold the BACK/HOME button until the Home menu appears.
Press the / / / button to select  (Now Playing), and then press the button to confirm.
Detailed information about the currently playing content file appears.
Hints
You can display the “Now Playing” screen by pressing the OPTION/PWR OFF button to select “Now Playing.”
When playing videos or photos, or listening to FM radio, you can select “Go to the song playback screen” from the option menu to display the song playback screen.
of Table
Index Menu Contents

22
Using the OPTION Button
You can change various settings of each function when you press the OPTION/ PWR OFF button. The OPTION/PWR OFF button is useful since you can display the setting screen immediately without selecting setting items from the  (Settings) menu of the Home menu.
 OPTION/PWR OFF button 5-way button
Press the OPTION/PWR OFF button.
The option menu appears.
Press the / / / button to select the item, and then press the button to confirm.
The screen of the selected setting item appears or the selected command is performed. The items of the option menu differ, depending on the screen on which you press the OPTION/PWR OFF button.
For details, see the following pages.
“Displaying the Music Option Menu” ( page 49)
“Displaying the Video Option Menu” ( page 79)
“Displaying the Podcast Option Menu” ( page 82)
“Displaying the Photo Option Menu” ( page 94)
“Displaying the FM Radio Option Menu” ( page 102)
of Table
Index Menu Contents

23 |
Getting Started |
|
|
|
Preparing the Player |
|
|
|
Charging the player |
|
|
|
The player’s battery is recharged while the player is connected to a running |
||
|
computer. |
|
|
|
When you connect the player to your computer, use |
|
|
|
the supplied USB cable. When you insert the |
|
|
|
connector of the USB cable into the player, do so with |
|
|
|
mark facing up. |
|
|
|
When the remaining battery indication of the display shows: |
, charging is |
|
|
completed (charging time is approx. 3 hours). |
|
|
|
When you use the player for the |
or if you have not used the player |
|
|
for a long time, recharge it fully |
in the remaining battery indication of |
|
|
the display). |
|
|
Recharging the player
The battery icon in the display changes as shown below. See page 162 on battery duration
As the battery power gets lower, the bar of the icon decreases. If “LOW BATTERY. Please Charge.” appears, you cannot use the player. In this case, charge the battery by connecting to your computer.
Continued
of Table
Index Menu Contents

24 |
Getting Started |
Notes
Charge the battery in an ambient temperature of between 5 to 35 ºC (41 to 95 ºF).
The number of times the battery can be recharged before it is used up is approximately 500 times. This number may vary, depending on the conditions under which you use the player.
The battery indicator on the display is only an estimate. For example, one section of black in the indicator will not always indicate exactly one-fourth of the battery’s charge.
“Do not disconnect.” appears in the display while the player accesses the computer. Do not disconnect the supplied USB cable while “Do not disconnect.” appears or data being transferred may be damaged.
The control buttons on the player are all disabled while it is connected to a computer.
Some USB devices connected to the computer may interfere with the proper operation of the player.
We do not guarantee the recharge of the battery using personally assembled computers or modified computers.
If the computer enters a power saving mode, such as the sleep or hibernation mode, while the player is connected via the USB cable, the player’s battery is not charged. Instead, the player continues to draw power from the battery, discharging it.
Do not leave the player connected for extended periods to a laptop computer that is not connected to AC power, because the player may discharge the computer’s battery.
While the player is connected to a computer, do not turn on, restart, wake up from sleep mode, or shut down the computer. These operations may cause the player to malfunction. Disconnect the player from the computer before performing these operations.
If you do not intend to use the player for over half a year, charge the battery at least once per 6 to 12 months for the battery maintenance.
Continued
of Table
Index Menu Contents

25 |
Getting Started |
Turning the player on and off
OPTION/PWR OFF button
To turn on the player
Press any button to turn the player on.
To turn off the player
If you press and hold the OPTION/PWR OFF button( page 12), the player enters the standby mode and the screen turns off to save battery power. If you press any button while in the standby mode, the “Now Playing” screen, etc., appears and the player is ready for operation.
Furthermore, if standby mode is retained for about a day, the player turns off completely automatically. If you press any button when the player is turned off, the start up screen appears first, then the “Now Playing” screen appears.
of Table
Index Menu Contents
26 |
Getting Started |
Getting Data
To enjoy music, photos, videos and podcasts on the player, you need to prepare the data on your computer. To import the data into your computer, use appropriate software.
For details about supported file formats, see “Supported file format” ( page 159).
of Table
Index Menu Contents

27 |
Getting Started |
Transferring Data
You can directly transfer data by dragging and dropping using Windows Explorer on your computer.
Playable data hierarchy has rules. To transfer data properly, see the following instructions.
For details about the bundled software that can transfer data, see page 9.
Hints
Some computers that already have Windows Media Player 10 installed may encounter file limitation (AAC, video files, etc.) that can be transferred by dragging and dropping. If you install Windows Media Player 11 (for details, see “Installing the Operation Guide and software” of “Quick Start Guide”) from the supplied CD-ROM, you can solve
this problem, then you can transfer by dragging and dropping again. Before installing Windows Media Player 11 on your computer, make sure to check whether your software or service corresponds to Windows Media Player 11.
Data hierarchy may differ, depending on your computer environment.
Some WMV files can be played back only by transferring using Windows Media Player 11.
Notes
Do not disconnect the USB cable while “Do not disconnect.” appears on the player, or the data being transferred may be damaged.
You cannot change folder names or delete the “MUSIC,” “MP_ROOT,” “VIDEO,” “PICTURES”, “PICTURE” and “PODCASTS” folders.
Do not change folder or file names directly under the “MP_ROOT” folder or “MPE_ROOT” folder. Otherwise, they will not be displayed on the player.
Connect the player to your computer using the supplied USB cable.
Insert the connector of the USB cable into the player with the  mark facing up.
Select the player on Windows Explorer, and then drag and drop files.
The player appears on Windows Explorer as [WALKMAN].
Continued
of Table
Index Menu Contents

28Getting Started
For songs
(On Windows Explorer)
Drag and drop files or folders into the “MUSIC” folder. However, beyond the 8th level, neither files nor folders will be recognized.
(On the player)
Folders are displayed in the folder name order first, then files are displayed in the file name order. In this case, upper or lower case letters are not distinguished.
 1st
1st
 7th
7th
 8th
8th
 9th
9th
Continued
of Table
Index Menu Contents

29Getting Started
For videos
(On Windows Explorer)
Drag and drop files or folders into the “VIDEO” folder.
On the 1st level, the “VIDEO” folder will recognize either a file or a folder. Files on the 2nd level will be recognized. However, folders beyond the 1st level and files beyond the 2nd level will not be recognized.
 1st
1st
 2nd
2nd  3rd
3rd
(On the player)
Video files are displayed in the order they are transferred by dragging and dropping. (The latest data is at the top.)
Hint
You can set JPEG files as a thumbnails of video files, by placing JPEG files in the corresponding video folders. When you display the video list, you can see the thumbnails (small pictures to display on the menu) for the video files on the player.
To display a thumbnail for a video file, create a JPEG file (horizontal 160 × vertical 120 dots, extension: .jpg) and name it the same as the desired video file, then store it in the video file folder.
Continued
of Table
Index Menu Contents

30Getting Started
For photos
(On Windows Explorer)
Drag and drop files or folders into the “PICTURE” folder.
On the 1st level, the “PICTURE” folder will recognize either a file or a folder. Only files on the 2nd level will be recognized by “PICTURE” folder. However, beyond the 2nd level, neither files nor folders will be recognized.
 1st
1st
 2nd
2nd
 3rd
3rd
*1 Data hierarchy of “PICTURES” is the same as the “PICTURE” folder.
(On the player)
Folders under the “PICTURE” folder is displayed in alphabetical order. Files in the 1st level of the “PICTURE” folder are stored in the <PICTURE> folder.
Continued
of Table
Index Menu Contents
Loading...