


MY INFORMATION
Use this section to store your account information for future reference. Fill out this section using the information determined during the registration of your e Villa account. (See page 10 for instructions on registering your account.)
Primary Account Username
Example: myname
This is also the first part of your email address— before the @ symbol.
Primary Account Email Address
Example: myname@eVilla.com
See page 12 for tips on selecting your email address.
Primary Account Password
If you write your password here, others may have access to it. For security reasons, you may want to write a “hint”that will help you remember it later.
Primary Local Internet Access Telephone Number
See page 10 for information on choosing this number.
e Villa Network Entertainment Center Serial Number
Located on the identification panel on the rear of the unit.
e Villa Network Entertainment Center Model Number
 NTE-D101
How to Contact Us
CUSTOMER SUPPORT
For questions about billing, service plans and product returns, information or assistance with your Internet access account or email, or for problems with your device, contact us at:
Web Site: sony.com/eVilla
Email:
sos@info.sel.sony.com
Toll Free:
1 888-344-9400
Or, write to:
Sony Customer Service Center 12451 Gateway Blvd.
Ft Myers, FL 33913

TABLE OF CONTENTS
Welcome Home . . . . . . . . . . . . . . . . . . . . . . . . . . . . . . . . . . . . . . . . . . . . . . . . . . . . . . . 1
Keeping Your Device Clean and Safe . . . . . . . . . . . . . . . . . . . . . . . . . . . . . . . . . . . . . . 2
Helpful Resources . . . . . . . . . . . . . . . . . . . . . . . . . . . . . . . . . . . . . . . . . . . . . . . . . . . . . 3
Using the Getting Started Guide
Accessing the eGuide
Using the Quick Reference Card
Taking the Tour. . . . . . . . . . . . . . . . . . . . . . . . . . . . . . . . . . . . . . . . . . . . . . . . . . . . . . . 4
On the Front
On the Back
Getting Connected . . . . . . . . . . . . . . . . . . . . . . . . . . . . . . . . . . . . . . . . . . . . . . . . . . . . |
6 |
The Keyboard |
|
The Scroll Mouse |
|
Moving In (Registration) . . . . . . . . . . . . . . . . . . . . . . . . . . . . . . . . . . . . . . . . . . . . . . . |
9 |
Registering Your e Villa Internet Access Account |
|
Choosing an Internet Access Number |
|
Entering Your Personal Information |
|
Providing Payment Information |
|
Entering a Username |
|
Entering a Password |
|
Coming Home . . . . . . . . . . . . . . . . . . . . . . . . . . . . . . . . . . . . . . . . . . . . . . . . . . . . . . . 14
Logging In
Dialing Up
Exploring the e Villa Neighborhoods . . . . . . . . . . . . . . . . . . . . . . . . . . . . . . . . . . . . . . 16
e Villa Home
The Web
Getting Familiar with the Layout . . . . . . . . . . . . . . . . . . . . . . . . . . . . . . . . . . . . . . . . |
21 |
The Toolbars The Tray
The Status Bar The Media Player The File Manager
The Hardware Icons
Leaving Home . . . . . . . . . . . . . . . . . . . . . . . . . . . . . . . . . . . . . . . . . . . . . . . . . . . . . . . 26
Saving Favorite Web Sites or Email Drafts Logging Out
Hanging up Powering Off
Where to Get More Information . . . . . . . . . . . . . . . . . . . . . . . . . . . . . . . . . . . . . . . . . 28
Review the eGuide
Visit the e Villa Web Site Learn the Language
Connecting Additional Accessories . . . . . . . . . . . . . . . . . . . . . . . . . . . . . . . . . . . . . . . 29
USB Printer
External Storage Device Speakers
Solving Problems . . . . . . . . . . . . . . . . . . . . . . . . . . . . . . . . . . . . . . . . . . . . . . . . . . . . 31 Speaking the Internet Language . . . . . . . . . . . . . . . . . . . . . . . . . . . . . . . . . . . . . . . . 32 Specifications . . . . . . . . . . . . . . . . . . . . . . . . . . . . . . . . . . . . . . . . . . . . . . . . . . . . . . . 35 The Legal Stuff . . . . . . . . . . . . . . . . . . . . . . . . . . . . . . . . . . . . . . . . . . . . . . . . . . . . . . 36 Index. . . . . . . . . . . . . . . . . . . . . . . . . . . . . . . . . . . . . . . . . . . . . . . . . . . . . . . . . . . . . . 37

WELCOME HOME
Congratulations on your purchase of the e Villa™ Network Entertainment Center— the most convenient way to communicate and enjoy multimedia entertainment through the Internet. After a simple registration process, you’ll be able to connect to the world with the touch of a button. We’re glad you chose the Sony e Villa Network Entertainment Center as your home on the Internet. We think you will be, too.
The e Villa Network Entertainment Center offers easy access to the most popular features of the Internet, including the World Wide Web, email, convenient content channels, and much more. With a high-resolution FD Trinitron display, built-in speakers and Memory Stick media slot, you’ll enjoy a rich multimedia experience. Here’s just a brief sample of how powerful the e Villa Network Entertainment Center is:
nEasy and powerful on-screen displays to get you around
nTruly private and customized online experience for up to four (4) people in your household
nEnjoy daily automatic downloads of email and Web content without tying up your telephone line
nConvenient automatic software management allows you to enjoy maintenance-free operation
And when it comes to using the Internet, you can:
nKeep up with the latest news and information from around the world
nShare photographs and movies with family and friends through electronic mail
nTune in to your favorite Internet channels for music and radio
nShop, get latest sports scores or plan your next family vacation
nProvide your kids with a powerful resource for researching their homework assignments
nWatch exciting Internet video
nAnd so much more
Because the e Villa Network Entertainment Center is so easy and fun to use, it’s a great way to feel right at home on the Internet. We’re certain it will soon become one of the most welcome additions to your home.
1

KEEPING YOUR DEVICE CLEAN AND SAFE
This section provides you with some key instructions on how to clean your e Villa Network Entertainment Center and keep it from being damaged.
nDangerously high voltages are present inside the unit. Do not open the cabinet. Refer servicing to qualified personnel only.
nThe e Villa case holes are for ventilation. Never place anything in the holes.
nAvoid spilling food or liquids on or near your e Villa device.
nUse a soft, dry cloth to clean the screen, cabinet, controls and keyboard. You can use an anti-static dusting spray (compressed air) designed for VCRs, computer monitors and television sets to clean between the keys of the keyboard.
nAvoid using an anti-static solution or similar additives as they may scratch the screen.
nAvoid cleaning the device with ammonia-based or chlorine cleaners or sprays.
nAvoid using household detergents to clean any part of the device as they may scratch or damage the unit.
nAvoid using abrasive pads, scouring powders or solvents, such as alcohol or benzene.
nKeep the device out of direct sunlight and away from heat vents, radiators and other heat sources.
nDo not rub, scratch or tap the surface of the screen with sharp or abrasive items such as ballpoint pens or screwdrivers. This type of contact may result in a scratched picture tube.
2

Online Tips
icon
HELPFUL RESOURCES
Using the Getting Started Guide
The Getting Started Guide is intended to assist you with setting up and getting familiar with your e Villa Network Entertainment Center. In this guide you’ll find information on:
ne Villa hardware and software features, pages 4-8
nConnecting the keyboard, scroll mouse, phone and power cords, page 6
nSetting up your e Villa Internet access account, pages 10-13
nUsing the e Villa keyboard, scroll mouse and other features, pages 7-8
nThe look and feel of the user interface, pages 16-27
nWhere to find answers to your questions, pages 28 and 31
nConnecting additional accessories, pages 29-30
nProblem solving, page 31
Accessing the eGuide
The complete operating instructions, called the eGuide, are available online. All your usage questions can be answered quickly and easily without having to search for the printed manual. Simply click the ONLINE TIPS icon in the upper right corner of most of the screens for information on that section.
Using the Quick Reference Card
A handy quick reference card also comes with your device. This card fits conveniently under your keyboard. Use it to remind you how to perform some of the most common Web and email tasks.
3
TAKING THE TOUR
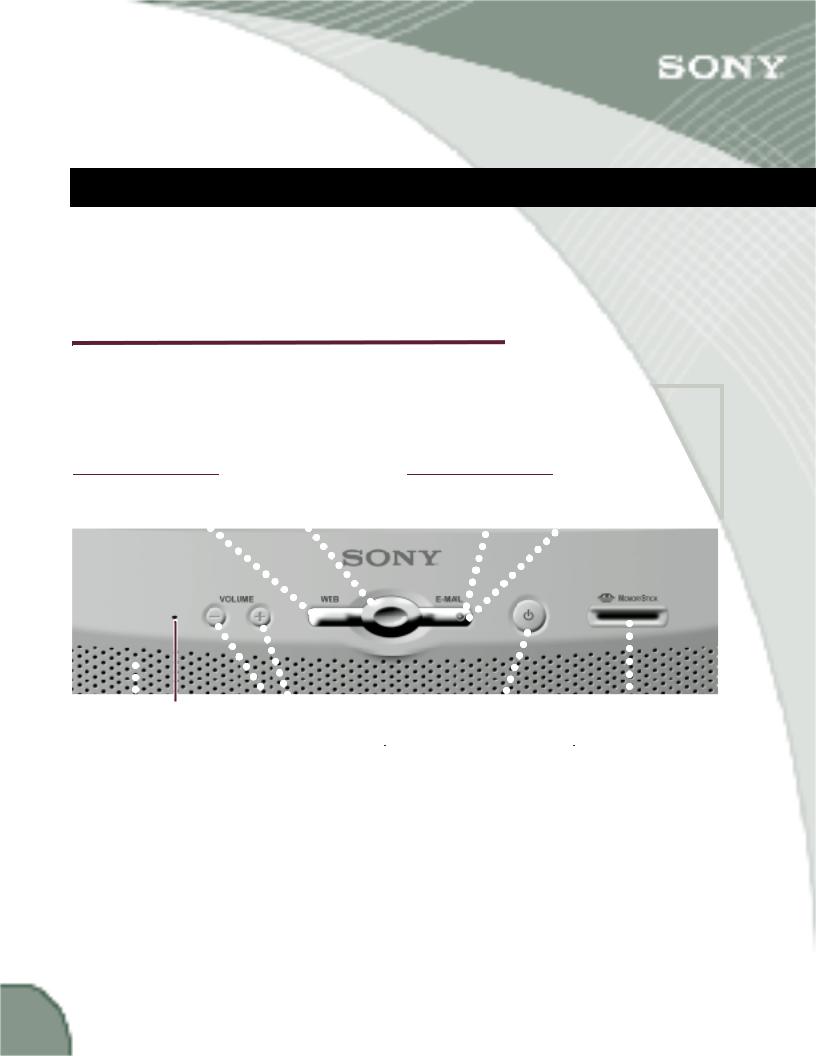
This section provides you with a quick look at the structure of the e Villa components: the front and back of the e Villa device, the keyboard and the scroll mouse.
On the Front
WEB Button |
|
|
|
|
|
e Villa Home Button |
|||||||||||
|
|
|
|
|
|
|
|||||||||||
One-touch access |
|
|
|
|
One-touch access |
||||||||||||
to the |
|
|
|
|
|
|
|
|
to the e Villa Home |
||||||||
Web neighborhood. |
|
|
|
neighborhood. |
|||||||||||||
|
. |
|
|
|
|
|
|
|
|
|
|
|
|
|
|
|
|
|
|
|
|
|
|
|
|
|
|
. |
|
|
|
|
|
||
|
. |
|
|
|
|
|
|
|
|
|
|
|
|
|
|||
|
|
|
|
|
|
|
|
|
. |
|
|
|
|
||||
|
|
. |
|
|
|
|
|
|
|
|
|
|
|
||||
|
|
|
|
|
|
|
|
|
|
. |
|
|
|
||||
|
|
|
. |
|
|
|
|
|
|
|
|
|
|
||||
|
|
|
|
|
|
|
|
|
|
. |
|
|
|||||
|
|
|
|
. |
|
|
|
|
|
|
|
. |
|
||||
|
|
|
|
|
. |
|
|
|
|
|
|
|
|
|
|
|
|
|
|
|
|
|
|
. |
|
|
|
|
|
|
. |
||||
|
|
|
|
|
|
|
. |
|
|
|
|
|
|
. |
|||
|
|
|
|
|
|
|
|
. |
|
|
|
|
|
||||
|
|
|
|
|
|
|
|
|
|
|
|
|
|
. |
|||
|
|
|
|
|
|
|
|
|
. |
|
|
|
|
|
|||
|
|
|
|
|
|
|
|
|
|
|
|
|
|
|
. |
||
|
|
|
|
|
|
|
|
|
|
. |
|
|
|
|
|
|
. |
|
|
|
|
|
|
|
|
|
|
|
. |
|
|
|
|
|
|
|
|
|
|
|
|
|
|
|
|
|
. |
|
|
|
|
|
. |
|
|
|
|
|
|
|
|
|
|
|
. |
|
|
|
|
. |
|
|
|
|
|
|
|
|
|
|
|
|
|
. |
|
|
|
||
|
|
|
|
|
|
|
|
|
|
|
|
|
|
|
. |
||
|
|
|
|
|
|
|
|
|
|
|
|
|
. |
|
|
||
|
|
|
|
|
|
|
|
|
|
|
|
|
|
|
. |
||
|
|
|
|
|
|
|
|
|
|
|
|
|
|
. |
|
||
|
|
|
|
|
|
. . |
|
|
. |
|
|||||||
|
|
|
|
|
|
|
. |
. |
|
|
|
|
|
||||
|
|
|
|
|
|
|
. |
|
|
|
|
|
|||||
. |
|
|
|
|
|
|
|
. |
|
|
|
|
|
||||
|
|
|
|
|
|
|
. |
|
|
|
|
||||||
|
|
|
|
|
|
|
|
. |
|
|
|
|
|||||
|
|
|
|
|
|
|
|
|
. . |
|
|
|
|
||||
. |
|
|
|
|
|
|
|
|
|
. . |
|
|
|
||||
. |
|
|
|
|
|
|
|
|
|
|
.. |
|
|
|
|||
. |
|
|
|
|
|
|
|
|
|
|
. |
|
|
|
|
|
|
|
System .. |
|
|
|
|||||||||||||
. |
|
|
|
|
|
|
|
|
|
|
|
.. |
|
|
|||
. |
|
Reset hole .. |
|
|
|||||||||||||
. |
|
|
|
|
|
|
|
|
|
|
|
|
.. |
|
|||
|
|
|
|
|
|
|
|
|
|
EMAIL Button |
|
|
|
Indicator |
|
||||
|
|
|
|
|
|
|
|||
One-touch access |
|
|
|
Lights |
up when |
|
|||
to the |
|
|
|
|
|
new |
|
||
email neighborhood. |
|
|
has |
arrived. |
|
||||
|
. |
|
|
|
|
|
|
|
|
|
. |
|
|
|
|
. |
|
|
|
|
|
|
|
|
. |
|
|
||
|
|
|
|
|
. |
|
|
||
|
. |
|
|
|
|
. |
|
|
|
|
. . |
|
|
||||||
|
. |
|
|
|
|
. |
|
|
|
|
|
|
. |
|
|
|
|||
|
. |
|
|
|
|
|
|||
|
|
|
. |
|
|
|
|
||
|
|
|
|
|
|
|
|
||
. |
|
. |
|
|
|
|
|||
. |
|
|
|
|
|
||||
. |
|
|
|
|
|
||||
. |
|
|
|
|
|
|
|||
. . |
|
|
|
|
|
|
|
||
. |
|
. |
|
|
|
|
|
|
|
. |
|
|
|
|
|
|
|
||
. |
|
|
|
|
|
|
|
||
. |
|
|
|
|
|
|
|
|
|
. |
|
|
|
|
. |
|
|
||
. |
. |
|
|
|
|
||||
|
|
. |
|
|
|||||
|
|
. |
|
|
|
|
|
||
|
|
. |
|
|
|
. |
|
|
|
|
|
. |
|
|
|
. |
|
|
|
|
|
. |
|
|
|
. |
|
|
|
|
. |
|
|
|
. |
|
|
||
|
. |
|
|
|
. |
|
|
||
|
. |
|
|
|
|
. |
|
|
|
|
. |
|
|
|
|
. |
|
|
|
|
. |
|
|
|
|
. |
|
|
|
Speaker Area |
|
VOLUME up/down |
|
POWER Button |
|
Memory Stick® |
|
Buttons |
|
|
Media Slot |
||
|
|
|
|
|
||
Listen to |
|
|
|
|
|
Use Sony Memory |
|
Increase or decrease |
|
Starts or shuts down |
|
Stick storage media |
|
the system sounds, |
|
|
|
|||
|
the volume. |
|
your device. |
|
to access and save |
|
audio and music. |
|
|
|
|
|
pictures, music or |
|
|
|
|
|
|
other files. |
|
|
|
|
The light indicates |
|
|
|
|
|
|
when the system is |
|
|
|
|
|
|
on (glows green), |
|
|
|
|
|
|
sleeping (glows |
|
|
|
|
|
|
amber) or |
|
|
|
|
|
|
off (no light). |
|
|
|
|
|
|
|
|
|
4

On the Back
. . . . . . . .
Reserved for future use.
. . . . . . . . . . . . . . . . . . . . .
. . . . . . . .
Connect printers and
external storage devices.
. . . . . . . . . . . . . . . . . . . . . .
. . . . . . . .
|
Connect to the |
|
|
scroll mouse. |
|
. . . . . . . . |
. . . . . . . . . . . . . . |
|
. . . . . . . . |
|
|
Phone line in |
|
|
|
|
|
|
Connect to the |
|
|
phone jack. |
|
. . . . . . Power connection
Connect to AC power.
Audio out
Connect headphones or external speakers.
Ethernet connection
Reserved for future use.
Keyboard connection
Connect to the keyboard.


 note Additional speakers, printers and external storage devices are not included. You may purchase e Villasupported products separately. Please go to the
e Villa Web site at sony.com/eVilla for a current list of compatible products.
5

GETTING CONNECTED
The connections on the back of the unit are marked according to what you plug into them. Plug the keyboard, scroll mouse, phone cord and power cord into their corresponding connections. The cords and jacks are color coded. Match the colors to assure you have plugged the keyboard and scroll mouse into the proper jacks. The cords can only be inserted one way, with the flat side of the connector aligned with the left side of the jack. Be sure the connections are solid.
note Be sure to place the device close to a power outlet and phone jack. If you do not have a phone jack near the site you have selected, you may need to purchase a longer phone cord. Do not run cords where they could be tripped on or damaged.
When you have plugged all the connections into the device, plug the phone cord and the power cord into the wall jacks.

 note Use the splitter if you have a single phone jack and want to have a phone next to your e Villa device. Plug the splitter into the telephone wall jack, then plug the e Villa device and the phone into the splitter’s jacks.
For more information. . .
on connecting other accessories, such as printers and speakers, see page 29.
6

The Keyboard
The e Villa keyboard is compact, functional and provides onetouch access to the information you’ll want most. Across the top of the keyboard is a row of buttons. These are the NET GUIDE channel buttons. Simply press a button to go instantly to the Net Guide channel of your choice.
For more information. . .
on the Net Guide, see page 17.
The e Villa keyboard includes a shortcut key which can be used to perform common tasks such as copying and pasting text.
For more information. . .
on the supported shortcuts, look up “keyboard shortcuts”in the eGuide.
Attach the palm rest by inserting the tabs into the slots on the underside of the keyboard and sliding it into the locked position.
7
The Scroll Mouse
There are three parts to the scroll mouse — the two buttons and the scroll wheel. When sitting on a flat surface, the mouse fits comfortably in the palm of your hand. Your fingers should naturally rest on the two buttons. When you move the mouse, you will see a hand move around on the screen; this is commonly known as the cursor  .
.
Point and Click
Move the cursor over an active element (for example, a hardware icon or Net Guide channel) or an Internet link. This is the “pointing”part. Press the left button one time (called “clicking”) to open or activate that feature. After you click to perform a task, the cursor changes to let you know the information is processing. Or, move the cursor within a line of text, for instance while you are editing an email message, and click the left button to place the cursor there. Within text, the cursor appears as a flashing vertical line.
You may be familiar with the computer concept of “double clicking”an icon to open it. You can use this method with the e Villa Network Entertainment Center or click once to select an item, then click the proper action icon to perform the desired function, such as: OPEN, CLOSE or DELETE.
Scrolling
Use the scroll wheel between the two mouse buttons to easily maneuver up and down through an email or a Web site that extends beyond the vertical size of the screen. Merely roll the wheel away from you to move up on the page, or roll it toward you to move down.
For more information. . .
and detailed instructions on using the click, scroll and drag features of the scroll mouse, look up “Using the Scroll Mouse”in the eGuide.
|
|
|
|
|
|
|
|
|
|
|
Left |
Scroll |
Right |
|
|
|
|
|
button |
wheel |
button |
|
|
|
|
|
|
|
|
|
|
|
|
|
|
|
|
|
|
|
|
|
|
|
|
|
|
|
|
|
|
|
|
|
|
|
|
|
|
|
|
|
|
|
|
|
|
|
|
|
|
8

MOVING IN (REGISTRATION)
Now that you’ve connected the keyboard, scroll mouse, phone cord and power cord, you’re ready to go. The POWER button is located on the front of the unit to the left of the Memory Stick media slot.
When you press the POWER button, the indicator light turns green and the e Villa Network Entertainment Center comes alive.
The first time you start the device you will see the Sony logo; then, the Welcome screen appears. You can choose to register your e Villa Internet access account or preview e Villa’s features.
nTo preview the features, click START TOUR.
nTo register, click REGISTER.
note You must register your Internet access account before you can use the e Villa Network Entertainment Center on the Internet. Please read the End User License Agreement included with your device before you register. It provides the terms and conditions for use of the e Villa device and its software.
The screens you see on your eVilla unit may not look exactly as depicted in this guide. Sony continues to update the e Villa software to bring the best and foremost to you.
9

Registering Your eVilla Internet Access Account
Registering your e Villa account to access the Internet is a snap. Use the scroll mouse to click REGISTER when the Welcome screen appears. A series of screens leads you step-by-step through the process.
note If for any reason you need to stop the process before it is complete, don’t worry. The display appears as soon as you power on again, and the account registration process automatically starts over.
|
|
|
|
tip |
For easy access when you need it, record your |
|
|
account information in the space provided on the |
|
|
|
|
|
inside front cover of this guide. |
|
|
|
Choosing an Internet Access Number
Initially, the system dials a toll-free number to register your account. After that, it uses a local telephone number to connect to the Internet. Access numbers will be suggested to you during the registration process. Be sure you choose one or more that are in your local toll-free zone so you do not have to pay additional telephone charges while you are on the Internet.
|
|
|
|
tip |
Please contact your local telephone company to |
|
||
|
|
assure the telephone number you select to access |
|
|
the Internet is free of any toll charges. Sony cannot |
|
|
be held responsible for any additional telephone |
|
|
charges incurred while using this device. |
|
|
|
10
 Loading...