


 Loading...
Sony NWZ-S544, NWZ-S544BLK, NWZ-S544PNK, NWZ-S544RED, NWZ-S544VLT Operating Instruction
...Home of Table
Index Menu Contents
Click! You can directly jump
Transferring Music
Transferring Videos/Photos
Troubleshooting
Operation Guide
NWZ-S544 / S545
©2009 Sony Corporation |
4-154-416-12(1) |

Note
Depending on the country/region in which you have purchased the player, some models may not be available.
Browsing the Operation Guide
To use the buttons in the Operation Guide
Click the buttons located in the upper right of the pages of this manual to jump to “Table of Contents,” “About the Home Menu” or “Index.”
Jumps to the table of contents
Find what you are looking for from a list of topics in the manual.
Jumps to the [Home] menu list
Find what you are looking for from a list of the option items in the player’s menu.
Jumps to the index
Find what you are looking for from a list of key words mentioned in the manual.
Hint
You can jump to the indicated page by clicking a page number in the table of contents or in the index.
You can jump to the indicated page by clicking a page reference indication (e.g., p. 5) on each page.
To search for a reference page by keyword, enter the keyword into the find text field on the Adobe Reader window.
Operation procedures may differ, depending on your Adobe Reader version.
To change the page layout
The buttons on the Adobe Reader window enable you to select how pages are displayed.
Text field to find text
 Continuous
Pages are displayed as a continuous roll of pages, fitting the page width inside the window. When you scroll, the previous or next pages scroll up or down continuously.
 Single Page
Pages are displayed one at a time, fitting the page into the window. When you scroll, the display changes to the previous or next page.
Home of Table
Index Menu Contents

Table of Contents |
|
Basic Operations and Screens |
|
Parts and Controls................................... |
5 |
Switching the output between |
|
the headphones and built-in speakers......... |
7 |
Turning the Player On and Off................ |
8 |
About the Home Menu............................ |
9 |
How to Use the Home Menu.................. |
12 |
How to Use the Option Menu................ |
15 |
About the Software................................ |
17 |
Bundled Software........................................... |
17 |
Compatible Software...................................... |
17 |
Preparing the Player |
|
Charging the Battery.............................. |
18 |
Selecting the Display Language............. |
20 |
Setting the Date and Time..................... |
21 |
Transferring Music |
|
Selecting the Way to Transfer Music...... |
22 |
Transferring Music Using Windows |
|
Media Player 11.................................... |
23 |
Importing music from CDs........................... |
23 |
Transferring Music......................................... |
25 |
Transferring Music Using Content |
|
Transfer................................................ |
27 |
Transferring Music Using Windows |
|
Explorer................................................ |
29 |
Transferring Videos/Photos |
|
Selecting the Way to Transfer |
|
Videos/Photos...................................... |
31 |
Transferring Videos/Photos Using |
|
Content Transfer.................................. |
32 |
Transferring Videos/Photos Using |
|
Windows Explorer............................... |
34 |
Playing Music |
|
Playing Music [Music].............................. |
36 |
Music playback screen................................... |
37 |
Music list screen.............................................. |
38 |
Searching for Songs................................ |
39 |
Playing a playlist............................................. |
40 |
Playing All Songs in Random Order..... |
41 |
Deleting Songs....................................... |
42 |
Using the Music Option Menu............... |
43 |
Displaying the detailed information screen |
|
[Detailed Information]........................................ |
45 |
Displaying the cover art screen |
|
[Cover Art]....................................................... |
45 |
Changing the Music Settings................. |
46 |
Setting the play mode [Play Mode].................. |
46 |
Setting the sound quality [Equalizer].............. |
47 |
Listening with Clear Stereo [Clear Stereo]....... |
48 |
Adjusting the volume level |
|
[Dynamic Normalizer]........................................ |
49 |
Optimizing the quality of the sound output |
|
from the built-in speakers |
|
[Built-in SP Optimizer]....................................... |
49 |
Watching Videos |
|
Playing a Video [Videos].......................... |
50 |
Video playback screen................................... |
51 |
Deleting Videos...................................... |
52 |
Using the Video Option Menu............... |
53 |
Changing the Video Settings................. |
54 |
Setting the zoom function [Zoom Settings]..... |
54 |
Setting the display of the video screen |
|
[Display]........................................................... |
56 |
Setting the video orientation |
|
[Video Orientation]........................................................ |
57 |
Continued
Home of Table
Index Menu Contents

Viewing Photos |
|
Viewing Photos [Photos].......................... |
58 |
Photo display screen....................................... |
59 |
Playing a Slide Show.............................. |
60 |
Deleting Photos...................................... |
61 |
Using the Photo Option Menu............... |
62 |
Changing the Photo Settings................. |
63 |
Photo orientation [Photo Orientation]............... |
63 |
Setting the display of the photo screen |
|
[Display]........................................................... |
64 |
Setting the slide show play mode |
|
[Slide Show Repeat]............................................ |
64 |
Setting the interval of a slide show |
|
[Slide Show Interval].......................................... |
65 |
Listening and Recording FM Radio |
|
Listening to FM Radio........................... |
66 |
FM Radio screen............................................. |
67 |
Presetting broadcast stations |
|
automatically [Auto Preset]............................. |
68 |
Presetting broadcast stations manually....... |
69 |
Deleting preset broadcast stations................ |
69 |
Recording FM Radio.............................. |
70 |
Playing Back Recorded FM Radio |
|
Programs.............................................. |
72 |
Deleting Recorded FM Radio |
|
Programs.............................................. |
73 |
Using the FM Radio Option Menu........ |
74 |
Changing the FM Radio Settings........... |
76 |
Setting the reception [Scan Sensitivity]............. |
76 |
Setting monaural/stereo [Mono/Auto]............ |
76 |
Recording/Listening Voice |
|
Recording Voice..................................... |
77 |
Playing Back Recorded Voice Files........ |
79 |
Deleting Recorded Voice Files............... |
80 |
Using the Voice Recording |
|
Option Menu........................................ |
81 |
Changing the Recording Settings.......... |
83 |
Selecting a level of recording quality |
|
[Bit Rate Settings]............................................... |
83 |
Using the Timer |
|
Setting the Timer................................... |
84 |
Common Settings |
|
Changing the Common Settings........... |
87 |
Displaying the player information |
|
[Unit Information]............................................. |
87 |
Limiting the volume [AVLS (Volume Limit)]..... |
88 |
Turning off the beep sound [Beep Settings]..... |
88 |
Setting a screensaver type [Screensaver].......... |
89 |
Adjusting the brightness of the screen |
|
[Brightness]....................................................... |
89 |
Setting the current time [Set Date-Time]......... |
90 |
Setting the date format |
|
[Date Display Format]........................................ |
91 |
Setting the time format |
|
[Time Display Format]........................................ |
91 |
Returning to the factory settings |
|
[Reset all Settings].............................................. |
92 |
Formatting memory [Format]......................... |
92 |
Selecting the Display Language |
|
[Language Settings].................................... |
93 |
Useful Facts |
|
About Battery Life.................................. |
94 |
What are Format and Bit Rate?............. |
95 |
What is audio format?.................................... |
95 |
What is video format?.................................... |
96 |
What is photo format?................................... |
96 |
Storing Data........................................... |
97 |
Upgrading the Player’s Firmware.......... |
98 |
Troubleshooting |
|
Troubleshooting..................................... |
99 |
Messages............................................... |
111 |
Additional Information |
|
Precautions........................................... |
113 |
License and Trademark Notice............ |
122 |
Specifications....................................... |
125 |
Index..................................................... |
132 |
Home of Table
Index Menu Contents
Setting the alarm [Alarm]................................ |
85 |
Setting the sleep timer [Sleep Timer]............... |
86 |

Basic Operations and Screens
Basic Operations and Screens
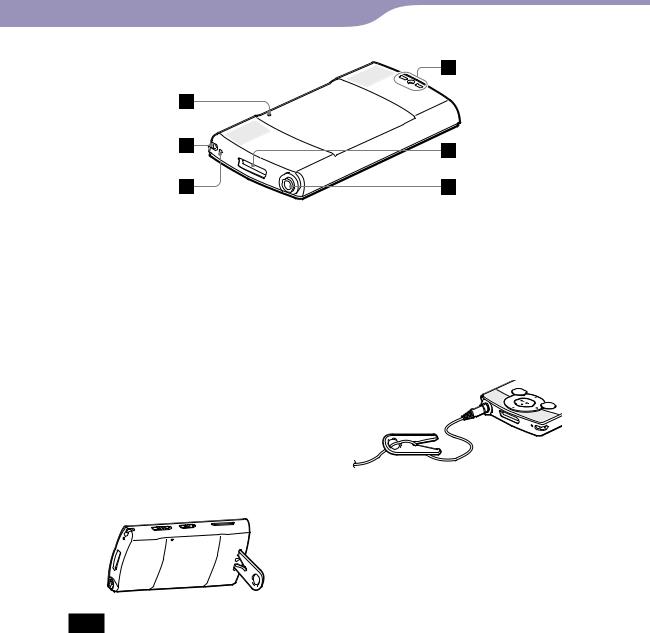
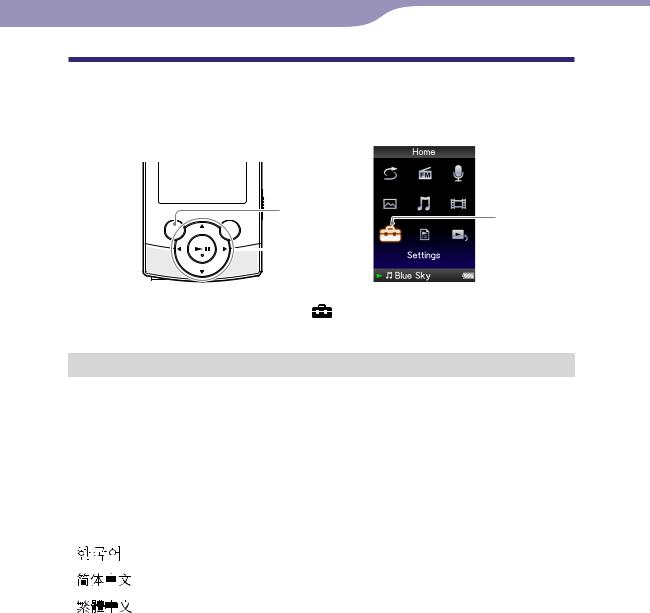
Parts and Controls
Front
Built-in speakers
See p. 7.
BACK/HOME button
Press to go up one list screen level, or to return to the previous menu. Press and hold the BACK/HOME button to display the [Home] menu ( p. 9).
5-way button*1
Starts playback and enables navigation of the player’s on-screen menus ( p. 12, 15).
Display
See p. 9.
VOL +*1/− button
Adjusts the volume.
You can adjust the volume of sound from the headphones and the builtin speakers respectively ( p. 7).
Output switch
Switches the output between the headphones and the built-in speakers of the player ( p. 7).
HOLD switch
You can protect the player against accidental operation during transportation by setting the HOLD switch. By sliding the HOLD switch in the direction of the arrow , all operation buttons except the output switch are disabled. If you slide the HOLD switch in the opposite position, the HOLD function is released.
OPTION/PWR OFF button
Press to display the option menu ( p. 15, 43, 53, 62, 74, 81).
If you press and hold the OPTION/ PWR OFF button, the screen turns off and the player enters standby mode ( p. 8).
*1 There are tactile dots. Use them to help with button operations.
Home of Table
Index Menu Contents
Continued
Basic Operations and Screens
Rear
RESET button
Press the RESET button with a small pin, etc., to reset the player (
p. 99).
Strap hole
This is used to attach a strap (sold separately).
Microphone
See p. 77.
Stand hole
This is used to attach the supplied stand.
Note
When standing the player with the stand, be careful not to press down on or knock the player.
About carrying the supplied stand
Carry so as not to lose the stand as follows.
Insert the headphone cord through the hole of the stand, and push the headphone cord into the base of the V-shaped notch to secure the stand to the headphone 
WM-PORT jack
Connect the supplied USB cable, or optional peripheral devices.
Headphone jack
Insert the headphone plug until it clicks into place. If the headphones are connected improperly, the sound from the headphones will be impaired.
Home of Table
Index Menu Contents
Basic Operations and Screens
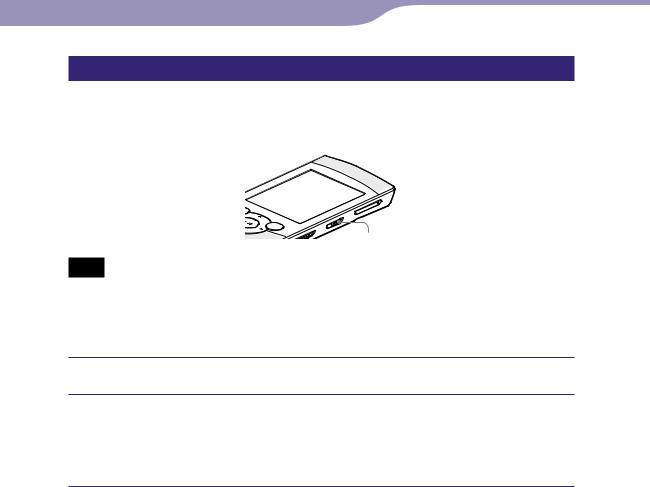
Switching the output between the headphones and built-in speakers
You can switch the output between the headphones and the built-in speakers by sliding the output switch. You can adjust the volume of sound from the headphones and the built-in speakers respectively.
Output switch
Note
When you switch the output to the built-in speakers, the output sound is not turned up at once.
Do not place credit cards or ATM cards, etc. (magnetic coded cards) near the holes of built-in speakers, as damage to the magnetic coding on the cards may result.
Set the output switch to (speaker) or (headphones).
Press the VOL +/- button to adjust the volume.
The volume indicator appears on the screen. The (headphones) or (speaker) icon (depending on the current setting) is displayed to the left of the volume indicator.
Hint
You can set [Built-in SP Optimizer] to output sound from the built-in speakers ( p. 49).
Home of Table
Index Menu Contents

Basic Operations and Screens
Turning the Player On and Off
OPTION/PWR OFF button
To turn on the player
Press any button to turn the player on.
Hint
If [On hold... Cancel HOLD function to activate controls.] appears on the screen, slide the HOLD switch on the right of the player in the opposite direction of the arrow to release the HOLD function.
To turn off the player
Press and hold the OPTION/PWR OFF button. [POWER OFF] appears, then the player enters standby mode, and the screen turns off.
Hint
Set the date and time on the player before using it ( p. 21, 90).
During pause, if there is no operation for more than 3 minutes, the player automatically enters standby mode to save battery power, and the screen turns off.
While the player is in standby mode, if there is no operation for about 4 hours, the player completely turns off automatically. The batteries are consumed a little in this status.
Note
You cannot operate the player when it is connected to a computer. Disconnect the USB cable before operating the player.
The player consumes battery power very slightly even when it is in standby mode. Therefore, the player might turn completely off unexpectedly depending on the power remaining in the battery.
Home of Table
Index Menu Contents

Basic Operations and Screens
About the Home Menu
The following table shows the items of the [Home] menu. For details on the item list of each menu, see p. 10.
For details about each menu item, refer to the specified reference page.
|
|
|
[FM Radio] |
|
|
|
|||||
|
|
|
[Shuffle All] |
|
|
|
|
|
[Voice Recording] |
||
|
|
|
|
||||||||
|
|
|
[Photos] |
|
|
|
|
[Videos] |
|||
|
|
|
|
|
|
||||||
|
|
|
[Music] |
|
|
[Now Playing] |
|||||
|
|
|
|
|
|
|
|
|
|
|
|
|
|
|
|
|
|
|
|
|
|
||
|
|
|
[Settings] |
|
|
[Playlists] |
|||||
|
|
|
|
|
|
|
|
|
|
|
Information area |
|
|
|
|
|
|||||||
|
|
|
[Shuffle All] |
Listen to all the songs stored on the player in random |
|||||||
|
|
|
|
order ( p. 41). |
|
|
|
||||
|
|
|
|
|
|||||||
|
|
|
[FM Radio] |
Listen to FM radio broadcasting, and also record the |
|||||||
|
|
|
|
currently received FM radio program ( p. 66). |
|||||||
|
|
|
[Voice Recording] |
Record voice using the player’s built-in microphone ( |
|||||||
|
|
|
|
p. 77). |
|
|
|
||||
|
|
|
[Photos] |
View photos transferred to the player ( p. 58). |
|||||||
|
|
|
|
|
|||||||
|
|
|
[Music] |
Listen to songs transferred to the player. You can also |
|||||||
|
|
|
|
listen to voice recorded on the player using [Voice |
|||||||
|
|
|
|
Recording] function, and FM radio programs recorded on |
|||||||
|
|
|
|
the player ( p. 36). |
|
|
|
||||
|
|
|
[Videos] |
Watch videos transferred to the player ( p. 50). |
|||||||
|
|
|
|
|
|||||||
|
|
|
[Settings] |
Set up the player and its applications ( p. 87). |
|||||||
|
|
|
|
|
|||||||
|
|
|
[Playlists] |
Listen to songs in the playlists ( p. 40). |
|||||||
|
|
|
|||||||||
|
|
|
|
|
|
|
|
|
|
|
|
|
|
|
[Now Playing] |
Display the playback or display screen of the currently |
|||||||
|
|
|
|
playing content. |
|
|
|
||||
|
|
|
|
|
|
|
|
|
|
|
Continued |
Home of Table
Index Menu Contents

10 |
Basic Operations and Screens |
|
|
[Shuffle All].............................. |
41 |
|
[FM Radio]................................ |
66 |
|
[Voice Recording]....................... |
77 |
|
[Photos].................................. |
58 |
|
[Music] |
|
|
[All Songs]................................... |
39 |
|
[Album]........................................ |
39 |
|
[Artist].......................................... |
39 |
|
[Genre]......................................... |
39 |
|
[Release Year].............................. |
39 |
|
[Folder]........................................ |
39 |
|
[Voice Recording]................. |
39, 79 |
|
[FM Recording].................... |
39, 72 |
|
[Videos].................................. |
50 |
[Settings] |
|
[Music Settings] |
|
[Play Mode]............................ |
46 |
[Equalizer].............................. |
47 |
[Clear Stereo]......................... |
48 |
[Dynamic Normalizer]......... |
49 |
[Built-in SP Optimizer]........ |
49 |
[Video Settings] |
|
[Zoom Settings]..................... |
54 |
[Video Orientation]............... |
57 |
[Display].................................. |
56 |
[Photo Settings] |
|
[Photo Orientation]............... |
63 |
[Display].................................. |
64 |
[Slide Show Repeat]............... |
64 |
[Slide Show Interval]............. |
65 |
[FM Radio Settings] |
|
[Scan Sensitivity]................... |
76 |
[Mono/Auto].......................... |
76 |
[Recording Settings] |
|
[Bit Rate Settings].................. |
83 |
[Common Settings] |
|
[Unit Information]................ |
87 |
[AVLS (Volume Limit)]........ |
88 |
[Beep Settings]....................... |
88 |
[Screensaver].......................... |
89 |
[Brightness]............................ |
89 |
[Set Date-Time]............... |
21, 90 |
[Date Display Format].......... |
91 |
[Time Display Format]......... |
91 |
[Reset all Settings]................. |
92 |
[Format].................................. |
92 |
[Language Settings].............. |
20, 93 |
[Playlists].................................. |
40 |
[Now Playing] |
|
Home of Table
Index Menu Contents
Continued
11Basic Operations and Screens
About the information area
The icons, shown in the table below, appear in the information area. The icons vary according to the playback status, setting or the screen.
For details about the icons, see each reference page.
|
Icons |
|
|
|
|
|
|
|
|
|
|
|
|
|
|
Description |
||||||||
|
|
|
|
|
|
|
|
|
|
|
|
|
|
|
|
|
|
|
|
|
|
|
||
|
, , , , |
|
Playback status ( p. 37, 51, 59) |
|||||||||||||||||||||
|
, , |
|
|
|||||||||||||||||||||
, |
|
|
|
|
|
|
|
|
|
, etc |
|
|
||||||||||||
, |
|
Recording status ( p. 71, 78) |
||||||||||||||||||||||
|
|
|
|
|
|
|
|
|
|
|
|
|
|
|
|
|
|
|
|
|
|
|
|
|
, |
, , , |
, |
Song name, artist name, video title, photo title, file name of |
|||||||||||||||||||||
recorded voice, or file name of recorded FM radio program |
||||||||||||||||||||||||
|
|
|
|
|
|
|
|
|
|
|
|
|
|
|
|
|
|
|
|
|
|
|
||
|
|
|
|
|
|
|
|
|
|
|
|
|
|
|
|
|
|
|
|
|
|
|
FM radio |
|
|
|
|
|
|
|
|
|
|
|
|
|
|
|
|
|
|
|
|
|
|
|
|
|
|
, |
|
|
|
|
|
|
|
|
|
|
|
|
, etc |
|
Play mode ( p. 46) |
|||||||||
|
|
|
|
|
|
|
|
|
|
|
|
|
||||||||||||
|
|
|
|
|
|
|
|
|
|
|
|
|
|
|
|
|
|
|
|
|
|
|
|
|
|
|
|
|
|
|
|
|
|
, etc |
|
Equalizer ( p. 47) |
|||||||||||||
|
|
|
|
|
|
|
|
|
|
|||||||||||||||
|
|
|
|
|
|
|
|
|
|
|
|
|
|
|
|
|
|
|
|
|
|
|
|
|
|
|
|
|
|
|
|
|
|
, |
|
|
|
|
|
|
|
|
|
|
|
|
Zoom setting ([Auto] or [Full]) ( p. 54) |
||
|
|
|
|
|
|
|
|
|
|
|
|
|
|
|
|
|
|
|
|
|
||||
|
|
|
|
|
|
|
|
|
|
|
|
|
|
|
|
|
|
|
|
|
|
|||
Sleep timer ( p. 86)
|
Remaining battery power ( p. 18) |
, *1 |
Headphones or speaker ( p. 7) |
*1 If the optional peripheral device to be able to enable volume adjustment is connected to the WMPORT jack of the player, may be displayed.
Home of Table
Index Menu Contents

12 |
Basic Operations and Screens |
How to Use the Home Menu
The [Home] menu is the starting point of each application, such as searching for songs, changing settings, etc.
You can display the [Home] menu by pressing and holding the BACK/HOME button of the player.
BACK/HOME button
 5-way button
From the [Home] menu, you can select the desired item on the screen by using the 5-way button.
Press the / / / button to select an item, and then press the *1 button to confirm.
*1 There are tactile dots. Use them to help with button operations.
/ / / button: Selects an item.button: Confirms an item.
Continued
Home of Table
Index Menu Contents

13Basic Operations and Screens
In this manual, operating instructions from the [Home] menu are described as below.
Example: From the [Home] menu, select  [Music] [Album] desired album desired song.
The actual operations for the example above are shown below.
Press and hold the BACK/HOME button.
The [Home] menu appears.
BACK/HOME button
Press the / / / button to select  [Music], and then press the button to confirm.
The search menu appears.
Press the / / / button to select [Album], and then press the button to confirm.
The album list appears.
Home of Table
Index Menu Contents
Continued

14Basic Operations and Screens
Press the / / / button to select an album, and then press the button to confirm.
The song list for the selected album appears.
You can scroll the list by pressing the / button.
Press the / / / button to select a song, and then press the button to confirm.
The music playback screen appears and playback begins.
To return to the [Home] menu during operation
Press and hold the BACK/HOME button.
To return to the previous screen during operation
Press the BACK/HOME button.
Home of Table
Index Menu Contents

15 |
Basic Operations and Screens |
How to Use the Option Menu
The option menu items vary function-to-function, allowing you to change the settings of each application.
You can display the option menu by pressing the OPTION/PWR OFF button.
 OPTION/PWR OFF
  button
 5-way button
From the option menu, you can select the desired item on the screen by using the 5-way button.
Press the / / / button to select an item, and then press the *1 button to confirm.
*1 There are tactile dots. Use them to help with button operations.
/ / / button: Selects an item.button: Confirms an item.
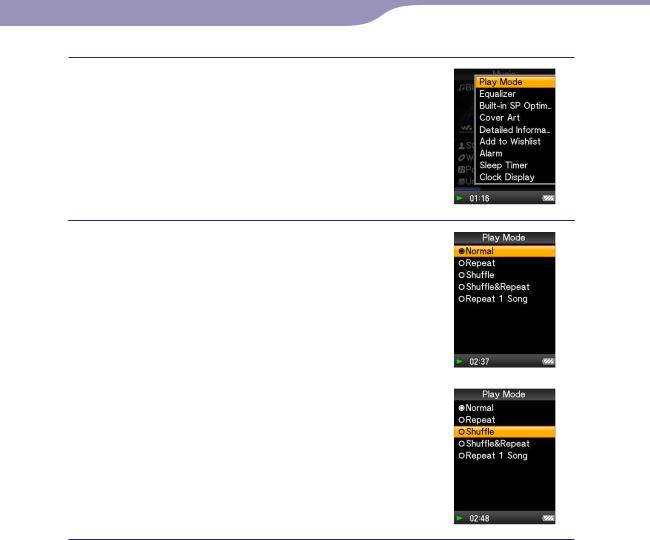
For example, the operations for setting [Play Mode] option to [Shuffle] are shown below.
From the music playback screen, press the OPTION/PWR OFF button.
The option menu appears.
Home of Table
Index Menu Contents
OPTION/PWR OFF button
Continued
16Basic Operations and Screens
Press the / / / button to select [Play Mode], and then press the button to confirm.
Press the / / / button to select [Shuffle], and then press the button to confirm.
The play mode changes to [Shuffle].
The items of the option menu differ, depending on the screen on which you press the OPTION/PWR OFF button.
For details, see the following pages.
“Using the Music Option Menu” ( p. 43)
“Using the Video Option Menu” ( p. 53)
“Using the Photo Option Menu” ( p. 62)
“Using the FM Radio Option Menu” ( p. 74)
“Using the Voice Recording Option Menu” ( p. 81)
Home of Table
Index Menu Contents

17 Basic Operations and Screens
About the Software
Bundled Software
Content Transfer
Content Transfer can transfer music, videos or photos from a computer to the player by a simple drag-and-drop operation. You can use Windows Explorer or iTunes, etc., to drag-and-drop data to Content Transfer. Content Transfer can also convert a video file of a format not supported by the player into a playable format. For details on operation, refer to the Help of the software. Transferable files: Music (MP3, WMA, AAC, WAV), Photo (JPEG), Video (MPEG-4 Simple Profile, AVC (H.264/AVC) Baseline Profile, WMV*1)
*1 Some WMV files cannot be played back after being transferred by Content Transfer. If you retransfer them using Windows Media Player 11, they may become playable.
Hint
ATRAC files managed by SonicStage can be transferred to the player after conversion to MP3 file format. To convert files, download the MP3 Conversion Tool from the customer support Web site ( p. 121).
Compatible Software
Windows Media Player 11
Windows Media Player can import audio data from CDs and transfer data to the player.
Transferable files: Music (MP3, WMA), Video (WMV), Photo (JPEG)
For details on operation, refer to the Help of the software or visit the following website.
http://www.support.microsoft.com/
Hint
Some computers that already have Windows Media Player 10 installed may encounter file limitations (AAC, video files, etc.) when transferring by drag-and-drop. If you install Windows Media Player 11 from the Windows Media Player download site, you can solve this problem, allowing you to transfer by drag-and-drop again. Before installing Windows Media Player 11 on your computer, make sure to check whether your software or service corresponds to Windows Media Player 11.
Home of Table
Index Menu Contents
18 Preparing the Player
Preparing the Player
Charging the Battery
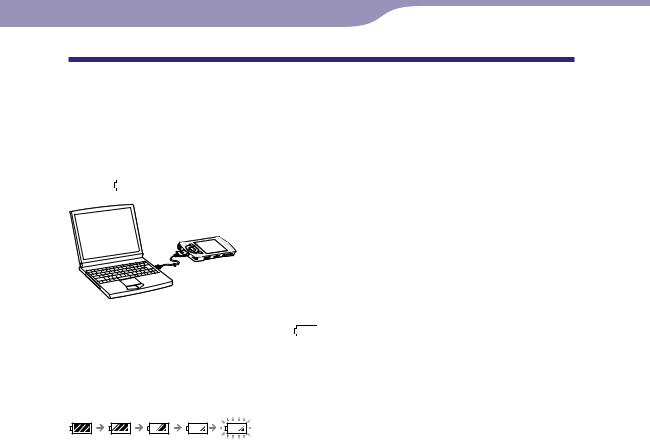
The player’s battery is recharged while the player is connected to a running computer.
When you connect the player to your computer, use the supplied USB cable. When the remaining battery indication in the lower right corner of the display shows: , charging is completed (charging time is approx. 2.5 hours).
When you use the player for the first time, or if you have not used the player for a long time, recharge it fully (to  in the remaining battery indication of the display).
About the battery indicator
The battery indicator in the information area shows remaining battery charge.
As the battery power gets lower, the bars of the icon disappear. If [LOW BATTERY. Please Charge.] appears, you cannot use the player. In this case, charge the battery by connecting to your computer. See p. 129 on battery duration.
Continued
Home of Table
Index Menu Contents

19 |
Preparing the Player |
Note
If you charge the player when it has not been used for a long period, your computer may not recognize the player or nothing may appear on the display. Charge the player for about 5 minutes, and it starts operating properly.
Charge the battery in an ambient temperature of between 5 ºC to 35 ºC (41 ºF to 95 ºF). If you try to charge the battery in an ambient temperature outside this range, the battery indicator may blink, and charging cannot be performed.
The number of times the battery can be recharged before it is used up is approximately 500 times. This number may vary, depending on the conditions under which you use the player.
The battery indicator on the display is only an estimate. For example, one section of black in the indicator will not always indicate exactly one-fourth of the battery’s charge.
[Do not disconnect.] appears in the display while the computer accesses the player. Do not disconnect the supplied USB cable while [Do not disconnect.] appears or data being transferred may be damaged.
The control buttons on the player become inoperative while it is connected to a computer.
If you do not intend to use the player for over half a year, charge the battery at least once during this time to maintain battery performance.
Some USB devices connected to the computer may interfere with proper operation of the player.
We do not guarantee battery recharging using a personally assembled/modified computer.
If the computer enters a power saving mode, such as the Sleep or Hibernation mode, while the player is connected via the USB cable, the player’s battery will not be charged. Instead, the player continues to draw power from the battery, discharging it.
Do not leave the player connected for extended periods to a laptop computer that is not connected to AC power, since the player may discharge the computer’s battery.
While the player is connected to a computer, do not turn on, restart, wake up from sleep mode, or shut down the computer. These operations may cause the player to malfunction. Disconnect the player from the computer before performing these operations.
Heat may build up in the player while charging. This is not malfunction.
Home of Table
Index Menu Contents
20 |
Preparing the Player |
Selecting the Display Language
You can select from a variety of languages for menus and messages.
|
|
|
BACK/HOME |
[Settings] |
|
|
|
||
|
|
|
button |
|
|
|
|
|
|
|
|
|
5-way button |
|
|
|
|
|
From the [Home] menu, select |
[Settings] [Language Settings] |
||
|
desired language setting. |
|
|
|
|
||
Language |
Messages and menus are displayed in |
||
|
|
|
|
[Deutsch] |
German |
|
|
|
|
|
|
[English] |
English |
|
|
|
|
|
|
[Español] |
Spanish |
|
|
|
|
|
|
[Français] |
French |
|
|
|
|
|
|
[Italiano] |
Italian |
|
|
|
|
|
|
[Português] |
Portuguese |
|
|
|
|
|
|
[Русский] |
Russian |
|
|
|
|
|
|
[ |
] |
Korean |
|
[ |
] |
Simplified Chinese |
|
|
|
|
|
[ |
] |
Traditional Chinese |
|
|
|
|
|
Home of Table
Index Menu Contents
21 |
Preparing the Player |
Setting the Date and Time
Some applications of the player do not work correctly until the date and time are set. Set the current date and time before using the player.
|
|
|
BACK/HOME |
[Settings] |
|
|
|
||
|
|
|
button |
|
|
|
|
|
|
|
|
|
5-way button |
|
|
|
|
|
From the [Home] menu, select [Settings] [Common Settings]
[Set Date-Time].
Press the / button to select a year, and then press the / button to change the value.
As in step , adjust the settings for month, date, hour, and minute.
Press the button to confirm.
To display the current time
To display the current time, press the OPTION/PWR OFF button on the [Home] menu or the playback screen, and select [Clock Display] from the option menu.
Hint
You can select the date format from among [YYYY/MM/DD], [MM/DD/YYYY], and [DD/MM/YYYY]. Furthermore, you can select the time format from either [12-hour] or
[24-hour ]. For details, see “Setting the date format [Date Display Format]” ( p. 91), or “Setting the time format [Time Display Format]” ( p. 91).
Note
If the battery power is used up because, for example, the player has not been used for a long time, your settings for date and time may be lost and “-” will be displayed instead of the current date and time.
The clock may gain or lose up to 60 seconds per month. In this case, set the clock again.
Home of Table
Index Menu Contents

22 |
Transferring Music |
|
Transferring Music |
Selecting the Way to Transfer Music
You can import music from audio CDs or from the Internet, etc. To import music into your computer, use appropriate software.
You can transfer music to the player in the following three ways.
Transferring music from CDs using Windows Media Player 11 ( p. 23)
You can import music from your CDs, etc., to your computer, and transfer them to the player using Windows Media Player 11.
Transferring music from iTunes, etc., using Content Transfer ( p. 27)
If you have already managed music with iTunes, etc., you can transfer them to the player using Content Transfer.
Transferring music by drag-and-drop using Windows Explorer ( p. 29)
You can directly transfer music stored on your computer by drag-and-drop using Windows Explorer.
Hint
For detailed information on how to import music, refer to the Help of each software.
For details about supported file formats, see “Supported file format” ( p. 125).
The player does not use SonicStage software (SonicStage software, developed by Sony, manages music on a computer or transfers music to other types of players). For this player, you can transfer music in the above three ways, not using SonicStage.
ATRAC files managed by SonicStage can be transferred to the player after conversion to MP3 file format. To convert files, download the MP3 Conversion Tool from the customer support Web site ( p. 121).
The maximum number of files per folder in the [MUSIC] folder is 4,000.
Home of Table
Index Menu Contents

23 |
Transferring Music |
Transferring Music Using Windows Media Player 11
You can import songs from your CDs, etc., to your computer, and transfer them to the player using Windows Media Player 11.
Hint
For details about usage, or support on Windows Media Player, refer to the Windows Media Player information from the following web site: http://support.microsoft.com/
Importing music from CDs
You can use Windows Media Player 11 to copy (rip) music from your CDs. Follow these instructions to rip songs from a CD to your computer.
Insert an audio CD.
Start up Windows Media Player 11, and then click the [Rip] tab at the top of the window.
When connected to the Internet, Windows Media Player 11 obtains CD information (CD title, song name or artist name, etc.) and displays it in the window.
Home of Table
Index Menu Contents
Continued

24Transferring Music
Click [Start Rip].
Windows Media Player 11 begins to import the CD.
The imported songs are indicated as [Ripped to library]. Wait until all songs have been imported.
Hint
Imported songs are stored in the [My Music] folder (Windows XP) or [Music] folder (Windows Vista) of the computer. Click the [Library] tab of the Windows Media Player 11 window to find them.
Windows Media Player 11 obtains the CD information from a database on the Internet. However, some CDs’ information may not be available in the database. If your CDs’ information is missing, you can add it after importing. For information about adding and editing CD information, refer to the Help of Windows Media Player 11.
If you want a song not to be imported, uncheck the checkbox to the left of the song title.
Note
Imported songs are limited to private use only. Use of a song beyond this limitation requires permission of the copyright holders.
Home of Table
Index Menu Contents
25 |
Transferring Music |
Transferring Music
You can use Windows Media Player 11 to transfer music from your computer to the player.
Home of Table
Index Menu Contents
Note
Do not disconnect the USB cable while [Do not disconnect.] appears on the player, as the data being transferred may be damaged.
If Content Transfer starts automatically after connecting the player to your computer using the supplied USB cable, close or ignore Content Transfer as Content Transfer need not be used. For details on setting automatic start of Content Transfer, refer to the Help of Content Transfer.
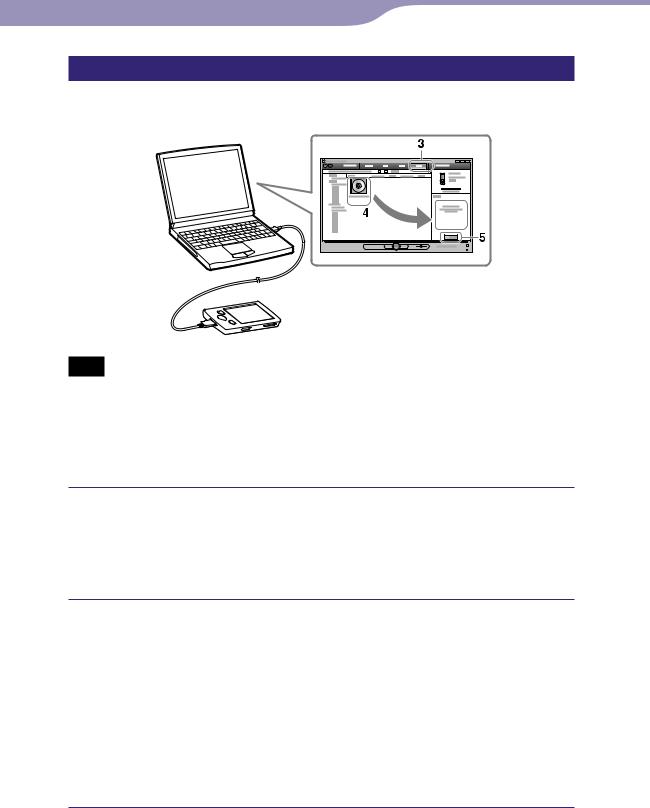
Start up Windows Media Player 11, and then connect the player to your computer using the supplied USB cable.
Insert the connector of the USB cable into the player with the  mark facing up.
The [Device Setup] window appears.
Click [Cancel].
Close the auto play window, if it appears, by clicking [Cancel] or the Close icon.
If you click [Finish] instead of [Cancel], the entire library data of Windows Media Player is automatically copied to the player. If the library data size is larger than the available storage space on the player, the copy process will not start.
You can open the [Device Setup] window at any time. To open it, rightclick [WALKMAN] on the left side of the Windows Media Player window, and then click [Set Up Sync].
Continued

26Transferring Music
Click the [Sync] tab on the Windows Media Player 11 window.
Drag-and-drop the desired songs to the Sync List on the right side of the window.
The songs are added to the Sync List.
Click [Start Sync] to start synchronization.
When synchronization is complete, a message confirming you can disconnect the player appears on the Sync List. After completion, close Windows Media Player 11, and disconnect the player from the computer.
Home of Table
Index Menu Contents
27 |
Transferring Music |
Transferring Music Using Content Transfer
If you have already managed music with iTunes, etc., you can transfer them to the player using Content Transfer. You can use iTunes, etc., to drag-and-drop music to Content Transfer.
Home of Table
Index Menu Contents
Note
Do not disconnect the USB cable while [Do not disconnect.] appears on the player, or the data being transferred may be damaged.
Content Transfer cannot be used for Windows Media Player contents.
Contents with copyright protection cannot be transferred.
Content Transfer supports data transfer from iTunes 8.1 to the player. For details on restrictions on transferring songs from iTunes, visit the customer support Web sites ( p. 121).
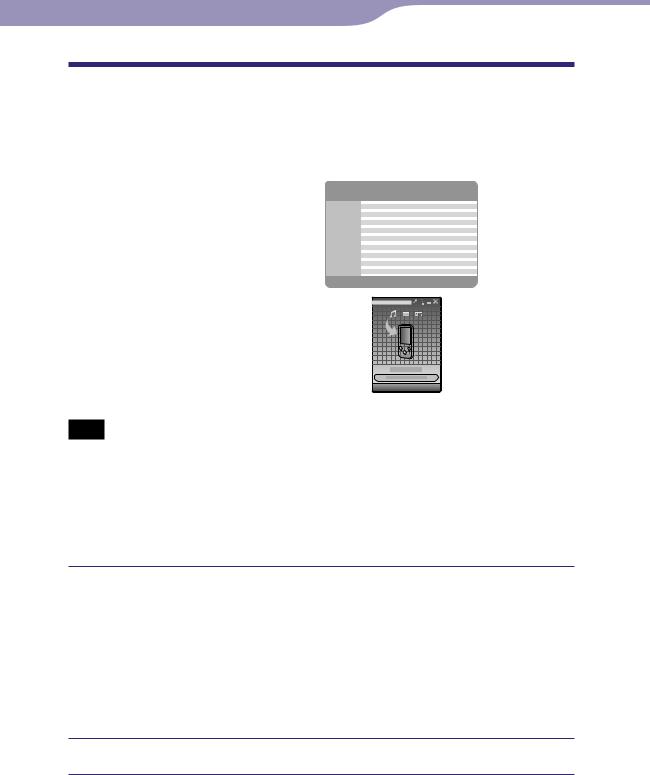
Connect the player to your computer using the supplied USB cable.
Insert the connector of the USB cable into the player with the  mark facing up.
Content Transfer starts automatically.
For details on setting automatic start and general operation of Content Transfer, refer to the Help of Content Transfer.
You can also click [All programs] in the [start] menu, and then [Content Transfer] - [Content Transfer] to start the software.
Start up iTunes, etc.
Continued

28 |
Transferring Music |
Select the desired songs from iTunes, etc., and drag-and-drop them to Content Transfer.
Content Transfer recognizes the type of data by filename extension, and sends it to the appropriate folder of the player.
iTunes, etc.
Content Transfer
Home of Table
Index Menu Contents

29 |
Transferring Music |
Transferring Music Using Windows Explorer
You can directly transfer data by drag-and-drop using Windows Explorer on your computer.
Playable data hierarchy has rules. To transfer data properly, see the following instructions.
Hint
Some computers that already have Windows Media Player 10 installed may encounter a limitation on the number of files (AAC, video files, etc.) that can be transferred by drag- and-drop. If you install Windows Media Player 11 from the Windows Media Player download site, you can solve this problem, allowing you to transfer by drag-and-drop again. Before installing Windows Media Player 11 on your computer, make sure to check whether your software or service corresponds to Windows Media Player 11.
Continued
Home of Table
Index Menu Contents

30 |
Transferring Music |
Note
Data hierarchy may differ, depending on your computer environment.
Do not disconnect the USB cable while [Do not disconnect.] appears on the player, as the data being transferred may be damaged. If the player is disconnected while files are being transferred, unnecessary files may be left in the player. In this case, transfer usable files back to the computer and format the player ( p. 92).
Do not change folder names or delete the [MUSIC], [MP_ROOT], [MPE_ROOT], [VIDEO], [PICTURE], [PICTURES], [Record], [Voice] and [FM] folders.
Do not change folder or file names directly under the [MP_ROOT] ,[MPE_ROOT] and [Record] folders. Otherwise, they will not be displayed on the player.
Some files may not be played back on the player due to copyright protection. Although you can transfer more files or folders to the player, the player cannot display or play any files, folders, or levels that exceed this limit.
If Content Transfer starts automatically after connecting the player to your computer using the supplied USB cable, close or ignore Content Transfer as Content Transfer need not be used. For details on setting automatic start of Content Transfer, refer to the Help of Content Transfer.
Connect the player to your computer using the supplied USB cable.
Insert the connector of the USB cable into the player with the  mark facing up.
Click [start] – [My Computer] or [Computer] – [WALKMAN] – [Storage Media], and then select the [MUSIC] folder.
Data hierarchy may differ, depending on your computer environment.
Drag-and-drop files or folders into the [MUSIC] folder, or one of its subfolders.
Accessibility to files and folders beyond the 8th level is not guaranteed.
Music files or folders in your computer
[MUSIC] folder in your player
Home of Table
Index Menu Contents
Loading...