Sony NEX-EA50UH, NEX-EA50EH, NEX-EA50H, NEX-EA50UK, NEX-EA50EK Manual
...
Interchangeable Lens Digital HD
Video Camera Recorder
Operating Guide
E-mount
4-438-981-11(1)
Table of Contents
Getting Started
Recording
Playback
Editing
Using the Menu
Connecting with another device
Troubleshooting
Additional Information
NEX-EA50UH/EA50EH/EA50H/EA50UK/EA50EK/EA50K

Read this first
Before operating this unit, please read this manual thoroughly, and retain it for future reference.
Notes on use
Using the camcorder
•Do not hold the camcorder by the following parts, and also do not hold the camcorder by the jack covers.
Lens |
LCD screen |
Microphone* or |
Large LCD |
Microphone holder |
viewfinder |
* NEX-EA50UH/EA50EH/EA50H only
b Notes
•The camcorder is not dustproof, dripproof or waterproof. See “About handling of your camcorder” (p. 125).
•When connecting the camcorder to another device with communication cables, be sure to insert the connector plug in the correct way. Pushing the plug forcibly into the terminal will damage the terminal and may result in a malfunction of the camcorder.
•Use GPS in accordance with the regulations of the situation, the countries/regions of use.
On the LCD screen and lens
•A menu item that is grayed out is not available under the current recording or playback conditions.
•The LCD screen is manufactured using extremely high-precision technology, so over 99.99% of the pixels are operational for effective use. However, there may be some tiny black points and/or bright points (white, red, blue, or green in color) that appear constantly on the LCD screen. These points are normal results of the manufacturing process and do not affect the recording in any way.
White, red, blue or green point
Black point
On sunlight
•Do not record the sun or leave the camcorder under the sun for a long time. The internal parts of the camcorder may be damaged. If sunlight is focused on a nearby object, it may cause a fire. When you must place the camcorder under direct sunlight, attach the front lens cap.
•Do not expose your camcorder’s viewfinder, lens, or LCD screen to the sun or strong light source for extended periods. Doing so may cause a malfunction of the camcorder.
•Do not attempt to record the sun directly. Doing so may cause a malfunction of the camcorder.
•Do not look at the sun or a strong light through a removed lens. This may cause irrecoverable damage to your eyes. Also, this may cause a malfunction.
2
On the temperature of your camcorder and battery pack
Your camcorder has a protective function that disables recording or playback if the temperature of your camcorder or battery pack is beyond the safely operable range. In this case, a message appears on the LCD screen (p. 115).
On recording
•In order to stabilize memory card operation, it is recommended that you format the memory card when you use it with your camcorder for the first time. All data recorded on the memory card will be erased by formatting, and cannot be recovered. Save important data on the memory card on other media such as a computer, before formatting the memory card.
•Before starting to record, test the recording function to make sure the picture and sound are recorded without any problems.
•Compensation for the loss of the content of recordings or the loss of recording opportunities cannot be provided, even if recording or playback is not possible due to a malfunction of the camcorder, storage media, etc., or even if images or sounds are distorted due to the limits of the capabilities of the camcorder.
•TV color systems differ depending on the countries/regions. To view your recordings on a TV, you need to set [60i/ 50i SEL] in accordance with the country/ region.
•Television programs, films, video tapes, and other materials may be copyrighted. Unauthorized recording of such materials may be contrary to the copyright laws.
•Because of the way that the image device (CMOS sensor) reads out image signals, the following phenomena may occur.
–The subjects passing by the frame rapidly might appear crooked depending on the recording conditions. (This phenomenon may
be notable in displays having high motion resolution.)
–Horizontal lines appear on the LCD screen during recording under fluorescent lights, sodium lamps or mercury lamps. The phenomena can be reduced by adjusting the shutter speed (p. 47).
DVD media recorded with high definition image quality (HD)
DVD media recorded with high definition image quality (HD) can be played back with devices that are compatible with the AVCHD format. You cannot play discs recorded with high definition image quality (HD) with DVD players/recorders as they are not compatible with the AVCHD format. If you insert a disc recorded with the AVCHD format (high definition image quality (HD)) into a DVD player/recorder, you may not be able to eject the disc.
Save all your recorded image data
•To prevent your image data from being lost, save all your recorded images on external media periodically. To save images on an external device, see page 104.
•Movies recorded with the recording mode
set to PS or FX on [ REC FORMAT] can be saved on an external media device and Blu-ray disc only (p. 104).
To handle the recorded images on your computer
Refer to the Installation guide and “Help” on the supplied CD-ROM “Content Browser.”
Format the recording media using [MEDIA FORMAT] if images are not recorded or played back properly
If you continue recording and deleting images on recording media for a long time, the files on that recording media may be fragmented. As a result, you may not be able to record and save images properly. If
Continued , 3
Read this first (Continued)
this happens, save images on a separate recordable media, such as a disc or computer, then format the recording media (p. 78).
About the operation of the camcorder
You can operate the camcorder using the SEL/PUSH EXEC dial (p. 28, 80), V/v/B/ b/EXEC buttons (p. 80), and the touch panel. However, you cannot use the touch panel* to make some settings such as the MENU items.
*Some operations are possible only with the touch panel.
About this manual
•Operations in the manual are described using the E 18-200mm F3.5-6.3 OSS lens supplied with the NEX-EA50UK/ EA50EK/EA50K. When the operation differs depending on the lens used, you will find the relevant information in “Notes” or “Tips.”
•The value you can set in [ REC FORMAT], etc., depends on the [60i/50i SEL] setting. In this manual, the values for both [60i] and [50i] settings are described.
•Memory cards and a flash memory unit are both referred to as recording media in this manual.
•The images of the LCD screen used in this manual for illustration purposes are captured using a digital still camera, and therefore may appear different.
•The on-screen displays in each local language are used for illustrating the operating procedures. Change the screen language before using your camcorder if necessary (p. 28).
•Design and specifications of recording media and other accessories are subject to change without notice.
4

Identifying parts and controls
Body
The numbers in ( ) are reference pages.
AIRIS button* (45)
BIris ring (45)
CIRIS PUSH AUTO button (45)
DGAIN/ISO button (46)
EGain switch (46)
FWhite balance memory switch (49)
GPICTURE PROFILE button (53)
HSTATUS CHECK button (69)
IFOCUS switch (39)
JFOCUS HOLD/PUSH AUTO button (40)
KSHUTTER SPEED button (47)
LWHT BAL button* (49)
M (one push) button (49)
NMENU button** (28, 80)
OASSIGN 1/2*/3/4/5*/6 button (61)
PAUTO/MANUAL switch (45)
QSEL/PUSH EXEC dial (28, 80)
RDISPLAY button (68)
*IRIS button, WHT BAL button, ASSIGN 2 (HISTOGRAM) button, and ASSIGN 5 (MARKER) button have raised tactile dots for your convenience in locating the buttons.
**MENU button has a raised tactile bar for your convenience in locating the buttons.
Continued , 5
Identifying parts and controls (Continued)
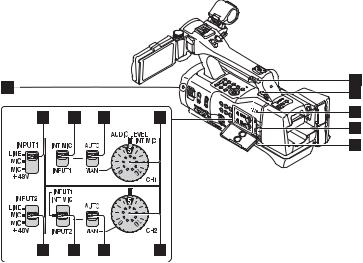
AImage sensor position index (40)
BINPUT 1 switch (51)
CCH1 (INT MIC/INPUT 1) switch (51)
DCH1 (AUTO/MAN) switch (51)
EAUDIO LEVEL (CH1) dial (51)
FINPUT 2 switch (51)
GCH2 (INT MIC/INPUT 1/INPUT 2) switch (51)
HCH2 (AUTO/MAN) switch (51)
IAUDIO LEVEL (CH2) dial (51)
JHook for shoulder strap
Ki (headphones) jack
For connecting stereo mini-jack headphones.
LSpeaker
MAccess lamp
NMemory card slot (31)
6
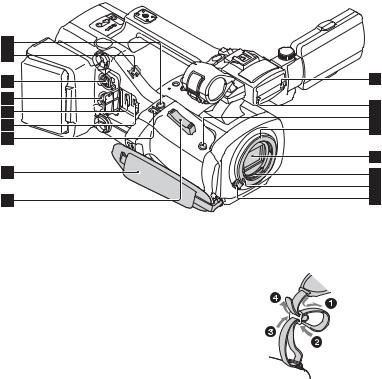
APHOTO button (33)
BCable clamp
CINPUT 1 jack (26)
DINPUT 2 jack
EHDMI OUT jack (70)
F (USB) jack (104)
GEXPANDED FOCUS button
HGrip belt
IZoom lever
JRemote sensor (102)
KFront recording lamp (102)
The recording lamp flashes if the remaining capacity of recording media or battery is low.
LIRIS PUSH AUTO button
MLens mount (22)
NImage sensor
OLens contacts
Do not touch or dirty the lens contacts.
PLens lock pin
QLens release button (23)
To attach a shoulder strap
Attach a shoulder strap (sold separately) to the hooks for a shoulder strap.
Continued , 7

Identifying parts and controls (Continued)
ALCD screen/touch panel (29)
BMulti-interface shoe
A flash (sold separately) that is compatible with the multi-interface shoe can be used. For details of compatible accessories, check the dedicated support web site or consult your local authorized Sony service facility.
CZoom lever
DSTART/STOP button (33)
When the lever is set to the HOLD position, the START/STOP button is not operable.
EAccessory shoe receptacles (26)
FRear recording lamp (102)
The recording lamp flashes if the remaining capacity of recording media or battery is low.
GBATT RELEASE button (20)
HPOWER switch, START/STOP button (27)
ILCD TILT HOLD dial (29)
JBuilt-in microphone
KMicrophone holder
LHook for cable stopper/shoulder strap
MTripod receptacles
For 1/4-20UNC screws
For attaching a tripod with a screw shorter than 5.5 mm (sold separately).
NShoulder mount lock lever
Accessory sockets on top of the shoulder mount
A counterbalance or accessories up to 1 kg can be attached to the sockets.
8

AHEADPHONE MONITOR switch (53)
BMODE button (33)
CVOLUME buttons* (63)
DREMOTE jack
The REMOTE jack is used for controlling playback, etc. on the video device and peripherals connected to it.
EBattery pack (19)
FVIDEO OUT/AUDIO OUT jacks (70, 106)
GCOMPONENT OUT jack (70)
HFlash memory unit RELEASE lever (32)
IFlash memory unit mount (32)
JFlash memory unit jack
KPlayback control buttons (STOP/ PAUSE/PREV/PLAY*/NEXT/SCAN/ SLOW) (63)
LTC/U-BIT button
Switches between time code and user bit to display on the LCD screen.
MDATA CODE button (68)
NVISUAL INDEX button (63)
ORESET button
If you press the RESET button, all settings including the clock setting (except the picture profile settings) return to the default.
PMENU button (28, 80)
QV/v/B/b/EXEC buttons (80)
*The right side of the VOLUME+ button, and PLAY button have raised tactile dots for easy button location.
Continued , 9
Identifying parts and controls (Continued)
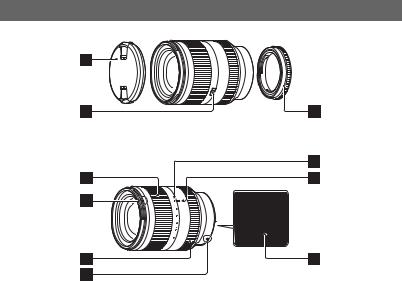
Lens E 18-200mm F3.5-6.3 OSS (NEX-EA50UK/EA50EK/EA50K only)
AFront lens cap
BZoom lock switch
CRear lens cap
DZooming ring (37)
EHood index
FFocusing ring (39)
GMounting index (22)
HFocal-length scale
IFocal-length index
JLens contacts
Do not touch or dirty the lens contacts.
For NEX-EA50UH/EA50EH/EA50H users
For details of the high-magnification power zoom lens (E PZ 18-200mm F3.5-6.3 OSS), refer to the accompanying instruction manuals.
10
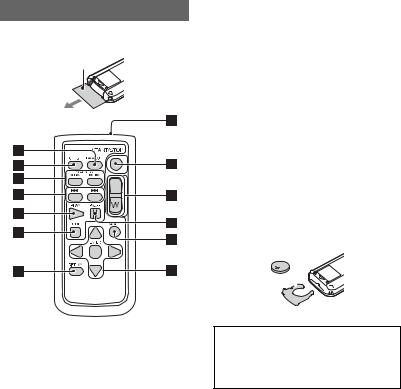
Wireless Remote Commander
Remove the insulation sheet before using the Wireless Remote Commander.
Insulation sheet
ADATA CODE button (68)
BTC RESET button (60)
CSCAN/SLOW buttons (63)
D. > (PREV/NEXT) buttons (63)
EPLAY button (63)
FSTOP button (63)
GDISPLAY button (68)
HTransmitter
ISTART/STOP button (33)
JZoom lever
KPAUSE button (63)
LMODE button
Mb/B/v/V/ENTER buttons
b Notes
•Aim the Wireless Remote Commander towards the remote sensor to operate your camcorder.
•Point the remote sensor away from strong light sources such as direct sunlight or overhead lighting. Otherwise, the Wireless Remote Commander may not function properly.
•When you are operating with the Wireless Remote Commander supplied with your camcorder, your video device may also operate. In that case, select a commander mode other than DVD2 for your video device, or cover the sensor of your video device with black paper.
To change the battery of the Wireless Remote Commander
1While pressing on the tab, inset your fingernail into the slit to pull out the battery case.
2Place a new battery with the + side facing up.
3Insert the battery case back into the Wireless Remote Commander until it clicks.
Tab 


WARNING
Battery may explode if mistreated. Do not recharge, disassemble or dispose of in fire.
•When the lithium battery becomes weak, the operating distance of the Wireless Remote Commander may shorten, or the Wireless Remote Commander may not function properly. In this case, replace the battery with a Sony CR2025 lithium battery. Use of another battery may present a risk of fire or explosion.
11
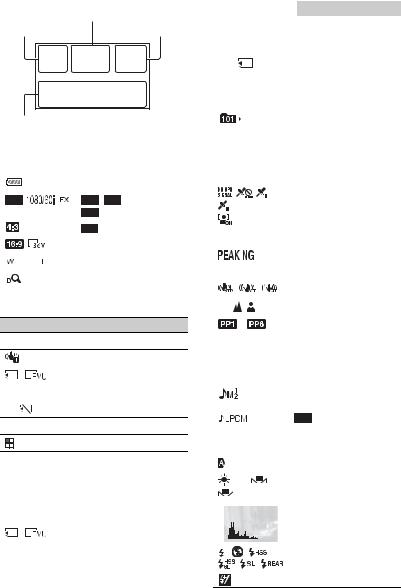
Screen indicators
|
Center |
Upper left |
Upper right |
Bottom
Upper left
Indicator |
|
Meaning |
|||||
100% |
|
Remaining battery |
|||||
|
|
|
|
|
|
|
|
|
|
|
|
|
|
|
/ SET (45), |
|
|
|
|
|
|
|
|
|
|
|
|
|
|
|
REC FORMAT (44) |
|
|
|
|
|
|
|
|
|
|
|
|
|
|
|
WIDE REC (90) |
|
|
|
|
|
|
|
|
|
|
|
|
|
|
|
Image size |
|
|
|
|
|
|
|
|
|
|
|
|
|
|
|
Optical zoom |
|
|
|
|
|
|
|
|
|
|
|
|
|
|
|
|
×1.5 |
|
Digital zoom |
|||||
|
|
|
|
|
|
|
|
Center
Indicator Meaning
zAE/AF lock
|
Vibration warning |
|
|
|
Recording media |
|
|
REC STBY |
Recording status (33) |
|
|
E |
Warning (115) |
NPlayback indicator (63)
Processing
Upper right
Indicator |
Meaning |
0min |
Estimated remaining |
|
recording time |
|
|
|
Recording/playback |
|
media |
|
|
Indicator |
Meaning |
||||
00:00:00:00 |
Time code |
||||
|
|
|
|
|
(hour:minute:second: |
|
|
|
|
|
frame) |
|
|
|
|
|
|
|
|
|
|
|
Movie still image |
|
|
|
|
|
|
|
|
|
|
|
capture display |
|
|
|
|
|
|
>9999 |
Number of recordable |
||||
|
|
|
|
|
still images |
|
|
|
|
|
|
|
|
|
|
|
Playback folder of |
|
|
|
|
|
memory card |
|
|
|
|
|
|
Bottom
Indicator |
|
Meaning |
|||
|
|
|
|
|
GPS triangulating status |
|
|
|
|
|
|
|
|
|
|
|
(59) |
|
|
|
|
|
|
|
|
|
|
|
|
|
|
|
|
|
Face detection [ON] |
|
|
|
|
|
|
ISO800 |
|
ISO |
|||
|
|
|
|
|
|
|
|
|
|
|
PEAKING (94) |
|
|
|
|
|
|
|
|
|
|
|
|
|
|
|
|
|
ZEBRA (94) |
|
|
|
|
|
|
|
|
|
|
|
STEADYSHOT (88) |
|
|
|
|
|
|
9 |
|
|
|
|
Manual focus (39) |
|
|
|
|
|
|
~ |
|
|
Picture profile (53) |
||
|
|
|
|
|
|
F3.5 |
|
Iris (45) |
|||
|
|
|
|
|
|
9dB |
|
Gain (46) |
|||
|
|
|
|
|
|
100 180° |
|
Shutter speed (47) |
|||
|
|
|
|
|
|
|
|
|
|
|
Manual volume control |
|
|
|
|
|
(53) |
|
|
|
|
|
|
|
|
|
|
|
AUDIO FORMAT |
|
|
|
|
|
(92) |
|
|
|
|
|
|
-2.0EV |
|
AE SHIFT (87) |
|||
|
|
|
|
|
|
|
|
|
|
|
Auto setting (96) |
|
|
|
|
|
|
|
n |
A |
White balance (49) |
||
|
B |
|
|
||
|
|
|
|
|
|
|
|
|
|
|
HISTOGRAM (94) |
|
|
|
|
|
|
|
|
|
|
|
|
|
|
|
|
|
Flash (88) |
|
|
|
|
|
|
|
|
|
|
|
|
|
|
|
|
|
|
|
|
|
|
|
Flash Level (89) |
12

Indicator Meaning
Red Eye Reduction (89)
z Tips
•Indicators may look different or appear at different positions.
Data code during recording
The recording date, time and condition are recorded automatically on the recording media. They are not displayed while recording. However, you can check them by pressing the DATA CODE button
(p. 68).
13

Table of Contents |
|
Read this first ........................................................................................... |
2 |
Identifying parts and controls ................................................................... |
5 |
Body ...................................................................................................... |
5 |
Lens E 18-200mm F3.5-6.3 OSS (NEX-EA50UK/EA50EK/ |
|
EA50K only)......................................................................................... |
10 |
Wireless Remote Commander............................................................. |
11 |
Screen indicators ................................................................................... |
12 |
Getting Started |
|
Step 1: Checking supplied items ............................................................ |
18 |
All models............................................................................................ |
18 |
NEX-EA50UK/EA50EK/EA50K only ..................................................... |
19 |
NEX-EA50UH/EA50EH/EA50H only .................................................... |
19 |
Step 2: Charging the battery pack ......................................................... |
19 |
Step 3: Attaching the lens ...................................................................... |
22 |
Step 4: Attaching the microphone .......................................................... |
26 |
Step 5: Turning on the camcorder and setting the date and time .......... |
27 |
Changing the language setting........................................................... |
28 |
Setting [60i/50i SEL] ............................................................................ |
29 |
Step 6: Adjusting the LCD screen .......................................................... |
29 |
Step 7: Preparing the recording media .................................................. |
31 |
Recording |
|
Recording ............................................................................................... |
33 |
Recording movies ............................................................................... |
33 |
Recording still images......................................................................... |
35 |
Recording using the shoulder mount .................................................. |
36 |
Adjusting the zoom by the zoom ring.................................................. |
37 |
Adjusting the zoom with the zoom lever.............................................. |
38 |
Adjusting the focus ................................................................................. |
39 |
Using automatic focus/fixed focus temporarily (Push auto focus/Focus |
|
hold) .................................................................................................... |
40 |
Using the expanded focus (Expanded focus) .................................... |
40 |
Focusing by touching the LCD screen (Spot focus) ........................... |
41 |
Focusing on a detected face (Face detection) ................................... |
41 |
Using focus transition.......................................................................... |
42 |
Changing the recording setting/image size ............................................ |
44 |
Selecting the recording format for high definition image |
|
quality (HD) ......................................................................................... |
44 |
Selecting high definition image quality (HD) or standard definition |
|
image quality (SD)............................................................................... |
45 |
Selecting the image size for still images ............................................. |
45 |
14

Adjusting the brightness ......................................................................... |
45 |
Adjusting the iris ................................................................................. |
45 |
Adjusting the gain/ISO sensitivity ....................................................... |
46 |
Adjusting the shutter speed................................................................ |
47 |
Adjusting the color tone .......................................................................... |
49 |
Adjusting the white balance................................................................ |
49 |
Audio setup ............................................................................................ |
51 |
Using the internal microphone............................................................ |
51 |
Recording sound via the supplied microphone.................................. |
51 |
Recording sound from an external audio device................................ |
52 |
Adjusting the volume .......................................................................... |
53 |
Setting the headphone sound............................................................. |
53 |
Useful functions ...................................................................................... |
53 |
Customizing the picture quality (Picture profile)................................. |
53 |
Acquiring location information (GPS).................................................. |
59 |
Setting time data ................................................................................. |
60 |
Reviewing the most recently recorded scene |
|
(Last Scene Review) ........................................................................... |
61 |
Assigning the functions to the ASSIGN buttons ..................................... |
61 |
Playback |
|
Playback ................................................................................................. |
63 |
Playing back movies ........................................................................... |
63 |
Playing back still images .................................................................... |
66 |
Changing/checking the settings in your camcorder ................................ |
68 |
Changing the screen display.............................................................. |
68 |
Displaying recording data (Data code) .............................................. |
68 |
Checking the settings in your camcorder (Status check)................... |
69 |
Connecting a monitor or a TV ................................................................ |
70 |
Editing |
|
Protecting recorded movies and still images (Protect) ........................... |
73 |
Dividing a movie ..................................................................................... |
74 |
Deleting movies and still images ............................................................ |
75 |
Copying movies and still images ............................................................ |
76 |
Capturing still images from a movie ....................................................... |
77 |
Formatting the recording media ............................................................. |
78 |
Preventing data on recording media from being recovered ................... |
78 |
Repairing the image database file .......................................................... |
79 |
Contents of Table
Continued , 15

Table of Contents (Continued) |
|
Using the Menu |
|
Operating the menu ............................................................................... |
80 |
Menu items ............................................................................................ |
82 |
(CAMERA SET) menu .................................................................... |
85 |
Settings to adjust your camcorder to the recording conditions (GAIN SET/ |
|
STEADYSHOT, etc.) |
|
(REC/OUT SET) menu .................................................................... |
90 |
Recording settings, input and output settings (REC SET/VIDEO OUT, etc.)
(AUDIO SET) menu ........................................................................... |
92 |
Settings for the audio recording (  AUDIO FORMAT/XLR SET, etc.)
(DISPLAY SET) menu ..................................................................... |
94 |
Display settings (MARKER/DISPLAY OUTPUT, etc.) |
|
(TC/UB SET) menu ......................................................................... |
98 |
Time code settings (TC PRESET/UB PRESET/TC FORMAT, etc.) |
|
(OTHERS) menu .............................................................................. |
99 |
Settings while recording or other basic settings (AREA SET/GPS SETTING/ BEEP, etc.)
Connecting with another device |
|
Saving images on an external media device ....................................... |
104 |
Creating a standard definition image quality (SD) |
|
disc with a recorder, etc. .......................................................... |
106 |
Troubleshooting |
|
Troubleshooting ................................................................................... |
107 |
Warning indicators and messages ....................................................... |
115 |
Additional Information |
|
Recording time of movies and the number of recordable photos ........ |
117 |
Using your camcorder abroad .............................................................. |
119 |
File/folder structure on the memory card and the flash memory unit ... |
120 |
Maintenance and precautions .............................................................. |
121 |
About the AVCHD format .................................................................. |
121 |
About GPS......................................................................................... |
121 |
About the memory card..................................................................... |
122 |
About the “InfoLITHIUM” battery pack.............................................. |
123 |
About handling of your camcorder ................................................... |
125 |
16

Specifications ....................................................................................... |
128 |
Index ..................................................................................................... |
133 |
Contents of Table
17
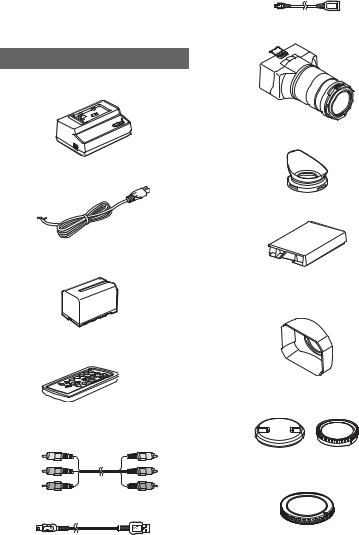
Getting Started
Step 1: Checking supplied items
Make sure that you have following items supplied with your camcorder.
The number in the parentheses indicates the number of that item supplied.
Memory cards are sold separately.
USB Adaptor Cable (1) (p. 104)
Large LCD viewfinder (1) (p. 30)
All models
AC Adaptor/Charger (AC-VL1) (1) (p. 19)
Power cord (mains lead) (2) (p. 19)
Rechargeable battery pack (NP-F770) (1) (p. 19, 123)
Wireless Remote Commander (RMT-845)
(1) (p. 11)
A button-type lithium battery is already installed.
A/V connecting cable (1) (p. 70, 106)
Large eyecup (1) (p. 30)
Flash memory unit jack cover (1) (p. 32)
Attached to camcorder, as shipped from factory.
Lens hood (1) (p. 24)
Front lens cap (1), rear lens cap (1) (attached to the lens) (p. 22)
Body cap (attached to the camcorder) (1) (p. 22)
USB cable (1) (p. 104)
18

Accessory shoe kit (Accessory shoe (1), Accessory shoe plate (1), screws (4)) (p. 26)
Connecting cord (DK-415) (1) (p. 21)
CD-ROM “Content Browser” (1)
CD-ROM “Manuals for Interchangeable Lens Digital HD Video Camera Recorder”
(1)
Operating Guide (2)
NEX-EA50UK/EA50EK/EA50K only
High-magnification zoom lens (E 18200mm F3.5-6.3 OSS) (1) (p. 22)
NEX-EA50UH/EA50EH/EA50H only
High-magnification power zoom lens (E PZ 18-200mm F3.5-6.3 OSS) (1)
For details, refer to the accompanying instruction manuals.
Wind Screen (1), Microphone (ECM-XM1)
(1) (p. 51)
Step 2: Charging the battery pack
You can charge the “InfoLITHIUM” battery pack (L series) with the supplied Charger.
b Notes
•You can use a large capacity battery pack, NPF770 (supplied) or NP-F970 (sold separately), with your camcorder. You cannot use NP-F570.
Power cord (mains lead)
To the wall outlet (wall socket)
 Charge lamp
Mode switch
AC Adaptor/Charger
1 Set the mode switch to CHARGE.
2 Connect the power cord (mains lead) to the AC Adaptor/Charger and the wall outlet (wall socket).
3 Place the battery pack in the slot of the AC Adaptor/Charger, press it down, and slide it in the direction of the arrow.
The charge lamp turns on and charging starts.
Started Getting
Continued , 19
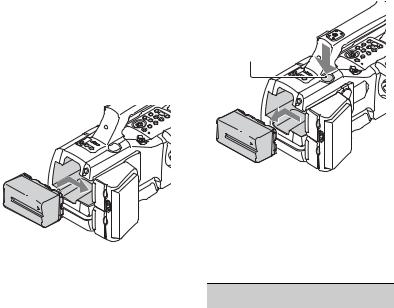
Step 2: Charging the battery pack (Continued)
After charging the battery
The charge lamp turns off (normal charge). If you continue charging 1 more hour after the charge lamp turns off, you can use the battery a little longer (full charge). Remove the battery pack from the AC Adaptor/Charger when the charge is completed.
To attach the battery pack
Press the battery pack against the back of your camcorder and slide it in the direction of the arrow.
z Tips
•You can check the remaining battery life with the status check function (p. 69).
To remove the battery pack
Slide the POWER switch to OFF. Push the BATT RELEASE (battery release) button and slide the battery pack in the direction of the arrow.
BATT RELEASE button
To store the battery pack
If the battery pack is not in use for a while, run down the battery and store it (p. 124).
Charging time
Approximate time (minute) required when you charge a fully discharged battery pack.
Battery pack |
Normal charge |
Full charge time |
|
time |
|
NP-F770 |
250 |
310 |
|
|
|
NP-F970 |
365 |
425 |
|
|
|
b Notes
•The supplied battery pack is NP-F770.
•You cannot use the NP-F570 battery pack with your camcorder.
On the battery pack
•Before changing the battery pack, slide the POWER switch to OFF.
•The Battery Info (p. 69) will not be correctly displayed under the following conditions.
–The battery pack is not attached correctly.
–The battery pack is damaged.
–The battery pack is worn-out.
20

Using an outside power source
By using the AC Adaptor/Charger and the connecting cord DK-415 (supplied), you can use the camcorder on AC power, without worrying about running out of power.
To the wall outlet (wall socket)
Power cord
Charge lamp |
Mode switch
AC Adaptor/
Charger
Connecting cord DK-415
1Connect the power cord (mains lead) to the AC Adaptor/Charger.
2Connect the power cord (mains lead) to the wall outlet (wall socket).
3Connect the connecting cord (DK-415) to the AC Adaptor/Charger.
4Set the mode switch of the AC Adaptor/ Charger to VCR/CAMERA.
5Press the connecting part of the connecting cord (DK-415) against the back of your camcorder in the battery slot and slide it in the direction of the arrow.
On the AC Adaptor/Charger
•Use the nearby wall outlet (wall socket) when using the AC Adaptor/Charger. Disconnect the AC Adaptor/Charger from the wall outlet (wall socket) immediately if any malfunction occurs while using your camcorder.
•Do not use the AC Adaptor/Charger placed in a narrow space, such as between a wall and furniture.
•Do not short-circuit the DC plug of the AC Adaptor/Charger or battery terminal with any metallic objects. This may cause a malfunction.
Started Getting
21
Step 3: Attaching the lens
This manual explains how to attach a lens using the E 18-200mm F3.5-6.3 OSS lens that comes with NEX-EA50UK/EA50EK/ EA50K.
When using a different lens, refer to the instruction manual of that lens.
Hold the camcorder body with the front end downward, and quickly change the lens somewhere away from dusty locations so as to keep dust or debris from getting inside the camcorder body.
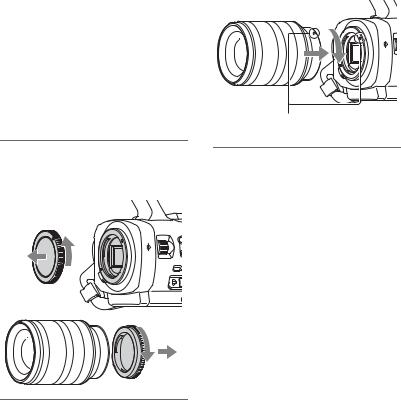
1 Remove the body cap from the camcorder body and the rear lens cap from the lens.
2 Mount the lens by aligning the mounting indexes (white) on the lens and the camcorder body. While pushing the lens lightly toward the camcorder body, turn the lens clockwise.
The lens is mounted when it clicks into the locked position.
Mounting indexes (white)
b Notes
•When attaching a lens, do not press the lens release button.
•Attach the lens to the camcorder squarely, without excessive force. Mounting the lens forcibly may result in a malfunction or damage of the lens mount.
•There may be a gap between the lens and the lens mount, depending on the lens attached. This is normal.
22

Removing the lens
1 While pressing the lens release button all the way in, turn the lens counterclockwise until it stops.
When you remove the lens, make sure that you hold both of the lens and the camcorder body.
Lens release button
2 Replace the rear lens cap on the lens and attach the body cap to the camcorder body.
Align the mark on the body cap to the mounting index, and turn the cap clockwise.
b Notes
•When changing the lens, if dust or debris adheres to the glass surface of the mount, it may appear on the image, depending on the shooting conditions. The glass surface of the mount has an anti-dust coating, to prevent dust from adhering to the image sensor. However, attach or remove the lens quickly somewhere away from dusty locations.
•Do not leave the camcorder body with the lens and body cap removed.
If dust or debris adheres on the glass surface of the mount
Turn off the camcorder and detach the lens. Clean the glass surface of the mount and the surrounding area using a blower (sold separately), and then reattach the lens.
b Notes
•Do not use a spray blower because it may scatter water droplets inside the camcorder body.
•Hold the camcorder’s face downward to prevent the dust from resettling in the camcorder.
•If you cannot clean the glass surface of the mount by the above procedure, consult your Sony dealer or local authorized Sony service facility.
Started Getting
Align the marks.
Before you attach caps, remove dust from them.
Continued , 23

Step 3: Attaching the lens (Continued)
To attach the lens hood
Align the red line of the lens hood to that of the lens and mount the lens hood on the lens. Turn the lens hood clockwise until the red dot of the lens hood and the red line of the lens align with a click.
The lens hood cannot be attached to the lens backwards.
Mount adaptor
Using a mount adaptor (sold separately), you can attach an A-mount lens (sold separately) to your camcorder. For details, refer to the operating instructions supplied with the mount adaptor.
The available functions differ depending on the mount adaptor type.
LA-EA1
Functions
Autofocus |
Available in photo mode with |
|
SAM/SSM lens only* |
|
|
AF system |
Contrast AF |
AF/MF Select Switchable on the lens
24

LA-EA2
Functions
Autofocus |
Movie: Continuous |
|
Photo: Single |
|
|
AF system |
Phase-detection AF |
AF/MF Select SAM: switchable on the lens SSM: must be switched on the lens and with the FOCUS switch of the camcorder Other lenses: switchable with the FOCUS switch of the camcorder
*With LA-EA1, autofocus speed with an A- mount lens attached will be slower compared to an E-mount lens. (When an A-mount lens is attached, the autofocus speed will be about 2 seconds to 7 seconds, when shooting under Sony measurement condition. The speed may vary depending on the subject, ambient light, etc.)
Operations when using LA-EA2
•Aperture is set to F3.5 when you record movies with autofocusing. When you are using a lens with an F3.5 or smaller F- stop, aperture is set to the maximum F- stop of the lens. When you want to set your own value for aperture, select manual focusing. Adjusting the aperture during recording may cause the noise or turn the LCD screen brighter.
•The iris will not adjust automatically in movie mode.
b Notes
•Some lenses may not be usable or may have limited functionality. Check the dedicated support web site or consult your local authorized Sony service facility on compatible lenses.
•The sound of the lens and the camcorder in operation may be recorded during movie recording. You can avoid this by recording without the microphone, or by setting the CH1 (AUTO/MAN) switch or CH2 (AUTO/MAN) switch to MAN and the AUDIO LEVEL dial to 0 (p. 51).
•It may take a long time or may be difficult for the camcorder to focus, depending on the lens used or the subject.
AF area display
When using an A-mount lens with a mount adaptor, the camcorder displays in-focus frames.
Autofocusing: The frame of the area that is in focus turns green.
Manual focusing: The frame of the area that is in focus turns green. This can assist focusing.
When using the LA-EA1 (only in photo mode)
Displays only when autofocusing
When using the LA-EA2
Autofocusing
Manual focusing/Using reflex lens
Started Getting
25

Step 4: Attaching the microphone
Attaching the microphone (NEXEA50UH/EA50EH/EA50H only)
Attach the microphone to the handle.
1 Attach the wind screen D to the supplied microphone C.
2 Place the microphone C in the microphone holder E with the model name facing upward, close the cover, and shut the clamp.
3 Connect the plug of the
microphone to the INPUT 1 jack
B.
Put the microphone cable into the cable clamp A.
Using the accessory shoe
When attaching an accessory other than the handle, attach the accessory shoe plate to the accessory shoe.
To mount the accessory shoe
Mount the accessory shoe on the accessory shoe mount as illustrated.
Accessory shoe plate
Accessory shoe
Accessory shoe plate


 Accessory
shoe
1Lift the edge of the accessory shoe plate and pull it in the direction opposite to that of the arrow on the accessory shoe plate and remove it from the accessory shoe.
2Place the accessory shoe as its protrusions matches recesses of the accessory shoe mount, then fix it to the mount with four screws.
3Insert the accessory shoe plate in the direction of the arrow on the plate surface until the end of the plate engages the end of the shoe.
26

To remove the accessory shoe
Remove the shoe plate in the same way as step 1 of “To mount the accessory shoe.” Loosen the 4 screws and remove the accessory shoe from the accessory shoe mount.
Step 5: Turning on the camcorder and setting the date and time
Turning on the camcorder
Slide the POWER switch to ON while pressing the green button.
When you use your camcorder for the first time, the [CLOCK SET] screen appears.
Started Getting
Press and hold the green button.
To turn off the power
Slide the POWER switch to OFF.
b Notes
•If warning messages appear on the LCD screen, follow the instructions.
Continued , 27
Step 5: Turning on the camcorder and setting the date and time (Continued)
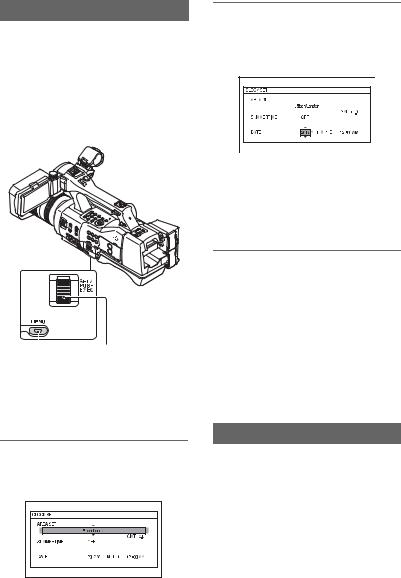
Setting the date and time
Set the date and time when you use your camcorder for the first time.
z Tips
•If you do not use your camcorder for about 3 months, the built-in rechargeable battery gets discharged and the date and time settings may be cleared from the memory. In that case, charge the rechargeable battery and then set the date and time again (p. 127).
|
|
SEL/PUSH EXEC |
|
|
|
dial |
|
MENU button |
|||
|
|||
When you set the date and time again, press the MENU button, and select
 (OTHERS) t [CLOCK SET].
1 Select your area by turning the SEL/PUSH EXEC dial, then press the dial.
2 Set [SUMMERTIME], [Y] (year), [M] (month), [D] (day), hour and minute, by turning the SEL/PUSH EXEC dial, then press the dial.
The clock starts.
•Set [SUMMERTIME] to [ON] to move the time forward 1 hour.
•You can set any year up to the year 2037.
•Midnight is indicated as 12:00 AM, and noon as 12:00 PM.
z Tips
•The date and time are automatically recorded on the selected recording media, and can be displayed during playback (DATA CODE button, p. 68).
•Once the clock is set, the clock time is automatically adjusted with [AUTO CLOCK ADJ] (p. 101) and [AUTO AREA ADJ] (p. 101) set to [ON]. The clock may not be adjusted to the correct time automatically, depending on the country/region selected for your camcorder. In this case, set [AUTO CLOCK ADJ] and [AUTO AREA ADJ] to [OFF].
Changing the language setting
You can change the on-screen displays to show messages in a specified language. Press the MENU button and select
 (OTHERS) with the SEL/PUSH EXEC dial. Select the screen language in [LANGUAGE] (p. 100).
28
Setting [60i/50i SEL]
In the default setting, [60i/50i SEL] is set as follows:
NEX-EA50UK/EA50UH: [60i] NEX-EA50EK/EA50EH/EA50K/EA50H: [50i]
To change the setting, press the MENU button and select  (OTHERS) t [60i/ 50i SEL] with the SEL/PUSH EXEC dial (p. 102).
Step 6: Adjusting the LCD screen
Using the LCD screen
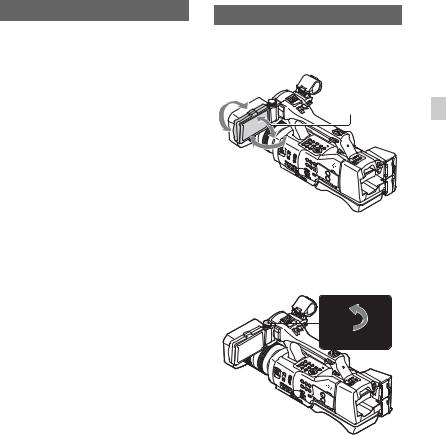
The LCD screen can be rotated in the range as illustrated below, allowing a person other than the camera operator to see the image.
180 degrees
90 degrees
90 degrees
To set and hold the LCD screen angle
Turn the LCD TILT HOLD dial, and set. Turn the LCD TILT HOLD dial in the opposite direction to loosen when you change the angle.
Started Getting
Continued , 29
Step 6: Adjusting the LCD screen (Continued)
Using the LCD screen with the large LCD viewfinder attached
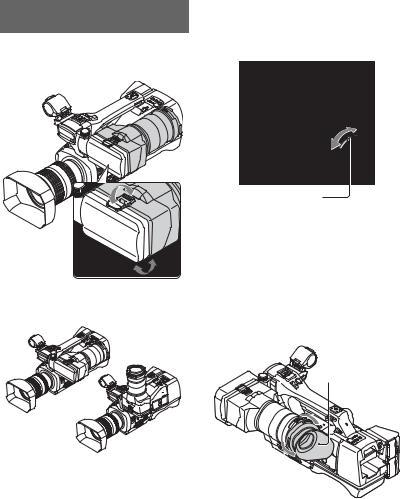
You can use the LCD screen as a viewfinder by attaching the large LCD viewfinder to the LCD screen.
Using the viewfinder with different recording styles
Adjusting the viewfinder lens
Turn the viewfinder lens adjustment ring so that you can see the image in the viewfinder clearly.
Viewfinder lens adjustment ring
When the picture in the viewfinder is hard to see
If you cannot see the picture in the viewfinder clearly under bright circumstances, use the supplied large eyecup. To attach the large eyecup, stretch it slightly and align it with the groove in the large LCD viewfinder. You can attach the large eyecup facing either the right or left side.
Large eyecup (supplied)
z Tips
•If you are farsighted and have a trouble seeing images in the viewfinder, you can attach a
52 mm close-up lens (sold separately) to the viewfinder lens adjustment ring.
30
 Loading...