


System Navigation Personal
Personal Navigation System
NV-U70T
NV-U50T
NV-U50
2-676-680-12 (1)
Quick Start Guide |
|
GB |
|
|
|
Anleitung zur schnellen |
|
|
|
DE |
|
Inbetriebnahme |
|
|
|
|
|
Guide de démarrage |
|
|
|
FR |
|
rapide |
|
|
|
|
|
|
|
|
Guida rapida all’uso |
|
IT |
|
|
|
|
|
|
Beknopte handleiding |
|
NL |
|
|
|
|
|
|
Guía de inicio rápido |
|
ES |
|
|
|
|
|
|
Snabbstartguide |
|
SE |
|
|
|
|
|
|
Guia de iniciação rápida |
|
PT |
|
|
|
Skrócona instrukcja |
|
|
|
PL |
|
obsługi |
|
|
|
|
|
Oδηγ ς σύντo ης |
|
|
|
GR |
|
εκκίνησης |
|
|
|
|
|
♥ 2005 Sony Corporation
About this manual
•This Quick Start Guide contains instructions for installation, connections and basic operations. For more information, see the PDF manual on the supplied Application Disc.
•Contents of this manual are written for users with knowledge of using the Microsoft® Windows® operating system. For details about computer operation, see the manual for your computer.
•Illustrations in this manual may differ from the actual device.
•Retain this manual in a place where you can refer to at any future time.
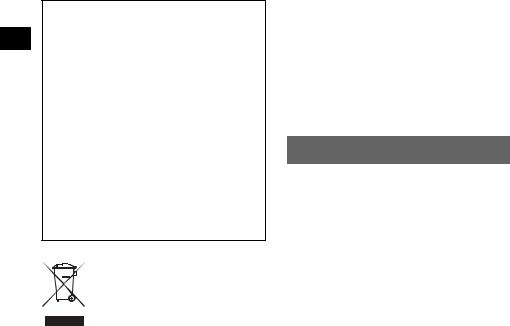
Disposal of Old Electrical & Electronic Equipment (Applicable in the European Union and other European countries with separate collection systems)
This symbol on the product or on its packaging indicates that this product shall not be treated as household waste. Instead it shall be handed over to the applicable collection point for the recycling of electrical and electronic equipment. By ensuring this product is disposed of correctly, you will help prevent potential negative consequences for the environment and human health, which could otherwise be caused by inappropriate waste handling of this product. The recycling of materials will help to conserve natural resources. For more detailed information about recycling of this product, please contact your local Civic Office, your household waste disposal service or the shop where you purchased the product.
Applicable accessories: Car battery adapter/AC power adapter
No guarantee for lost data or damaged data
Sony does not provide any guarantee for lost or damaged data.
Caution
IN NO EVENT SHALL SONY BE LIABLE FOR ANY INCIDENTAL, INDIRECT OR CONSEQUENTIAL DAMAGES OR OTHER DAMAGES INCLUDING WITHOUT LIMITATION LOSS OF PROFITS, LOSS OF REVENUE, LOSS OF DATA, LOSS OF USE OF THE PRODUCT OR ANY ASSOCIATED EQUIPMENT, DOWNTIME, AND PURCHASER’S TIME RELATED TO OR ARISING OUT OF THE USE OF THIS PRODUCT, ITS HARDWARE AND/OR ITS SOFTWARE.
Welcome !
Thank you for purchasing this Sony Personal Navigation System. Before operating this system, read this manual thoroughly and retain it for future reference.
FEATURING:
•Plug & Play capability
•Pre-installed European map (NV-U70T)
•Pre-installed regional map (NV-U50T/U50)
•15 languages selectable for voice guidance and on-screen display
•3.5-inch high quality display with touch screen
•Advanced 12ch parallel GPS receiver
•High-quality speaker
•RDS-TMC (Traffic Message Channel) compatible (NV-U70T/U50T)
•Battery operation
•Auto dimmer function
2

Table of Contents
Important notice. . . . . . . . . . . . . . . . . . . . . . . . . 4
Getting Started |
6 |
Checking the contents . . . . . . . . . . . . . . . . . . . . 6 Installing the unit. . . . . . . . . . . . . . . . . . . . . . . . 7
Installing the TMC aerial
(NV-U70T/U50T only). . . . . . . . . . . . . . . . . 9 Location of controls. . . . . . . . . . . . . . . . . . . . . 10 Turning the unit on . . . . . . . . . . . . . . . . . . . . . 11 Starting up the navigation . . . . . . . . . . . . . . . . 11 Receiving GPS signals . . . . . . . . . . . . . . . . . . 11
Basic Operations |
12 |
Menu operations . . . . . . . . . . . . . . . . . . . . . . |
. 12 |
Keyboard operations . . . . . . . . . . . . . . . . . . . . |
12 |
Route Searching |
13 |
Setting the destination and
starting guidance . . . . . . . . . . . . . . . . . . . . . 13 Setting the destination in other ways. . . . . . . . 14 Guidance displays . . . . . . . . . . . . . . . . . . . . . . 15
System Settings |
16 |
Using the Supplied Software |
17 |
Connecting to your computer. . . . . . . . . . . |
17 |
Software features . . . . . . . . . . . . . . . . . . . . |
18 |
Additional Information |
18 |
Precautions . . . . . . . . . . . . . . . . . . . . . . . . . . . 18 Note on LCD panel . . . . . . . . . . . . . . . . . . . . . 18 Maintenance . . . . . . . . . . . . . . . . . . . . . . . . . . 18 Notes on unit disposal. . . . . . . . . . . . . . . . . . . 18 Specifications . . . . . . . . . . . . . . . . . . . . . . . . . 19 Troubleshooting . . . . . . . . . . . . . . . . . . . . . . . 20
Resetting the unit . . . . . . . . . . . . . . . . . . . . 20
3
Important notice
To avoid the risk of accident or injury, read the following warning before installing and operating the unit.
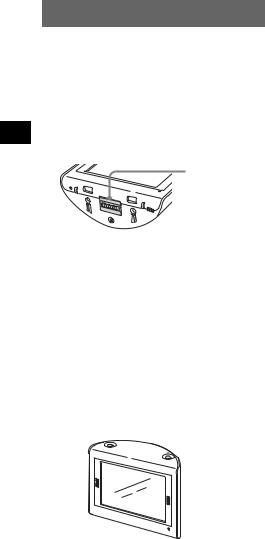
On handling
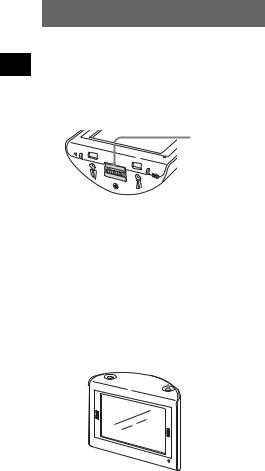
•Do not let foreign objects get inside the cradle connector of the unit, as it may cause malfunction.
Cradle connector
RESET
CHG
POWER |
|
OFF |
ON |
•Turn the unit off by pressing ?/1, take it out of the cradle, then disconnect the car battery adapter, otherwise car battery drain may occur. Note the following.
–Turning the ignition off does not turn off the unit, which continues to draw power from the lithium-ion rechargeable battery (built-in).
–If your car’s cigarette lighter socket is not connected to the ignition switch ACC position, power continues to be supplied to the built-in battery, even if you turn the ignition off.
–Check the CHG indicator at the bottom right of the unit which lights up during charging.
 ?/1
?/1
•Do not expose the unit to fire, as it may cause malfunction.
•Do not let water or rain get into the unit, as it may cause malfunction.
•If you leave the unit in direct sunlight, the LCD may darken and not display clearly. This is not a malfunction, and it will return to normal as temperature decreases.
•Note that the built-in battery cannot be charged at temperatures outside 5 – 45 ºC (41 – 113 ºF).
•Do not leave the unit in high ambient temperature as the built-in battery capacity will deteriorate, or
it will become unchargeable.
On safety
General
•Do not apply excessive force to the unit or cradle as it may fall under the brake pedal, etc., and cause an accident.
•Observe actual traffic regulations, such as oneway streets, while driving with the route guidance.
•Do not watch the unit while driving. It is dangerous and may cause a traffic accident.
•If you need to operate the unit while driving, be sure to stop the car in a safe place before operating.
•Be sure to take the unit out of the car when leaving your car to prevent theft or high temperature damage inside the car.
•When the car battery adapter is not in use, disconnect it from the cigarette lighter socket, as car battery drain may still occur even with ignition OFF.
•Do not allow any liquid or foreign objects to enter the unit.
•Do not place anything other than the specified unit in the cradle.
•Do not connect any accessory (car battery adapter, AC power adapter, etc.) other than those supplied or optional.
•Do not modify the unit.
•Do not disassemble the unit except when disposing of it.
•Connect the AC power adapter to an easily accessible outlet. Should you notice an abnormality in the AC power adapter, disconnect it from the outlet immediately.
Installation
•Before installing the unit, check your local traffic laws and regulations.
•Make sure you install the unit properly according to the installation instructions. Improper installation may result in fire or electric shock.
•Before installation, be sure to turn the ignition switch to the OFF position or take out the key. Installing the unit with the ignition on may cause the car battery to drain or short circuit.
•Be sure to:
–attach the unit to the cradle properly.
–clean the surface of the suction cup and windscreen before attaching. Also, confirm that the suction cup is securely attached to the windscreen after installation.
–warm up the car interior and then install the cradle and unit if ambient temperature is low. The cup suction is affected at high/low temperatures or sudden changes in temperature.
–wipe the windscreen before installation if there is condensation inside the car.
Otherwise, the unit or cradle may fall under the brake pedal, etc., and cause an accident.
•Be sure to place the cables where it does not obstruct driving.
•Do not use the unit in a car with the USB cable connected.
•Connect the car battery adapter only to the cradle.
4
•Do not damage any pipes, tubes, the fuel tank or electric wiring when installing the unit, as fire or accident may result. If you drill a hole in a car panel, make sure that any hidden car parts will not be damaged.
•Do not use or modify any nuts or bolts of critical devices such as steering linkage, fuel supply or braking systems. This can cause fire or an accident.
•Take care to prevent cords or wires from getting tangled or crimped in the moving portion of a seat rail.
•For information about the polarity, battery voltage and location of the airbag of your car, please consult your car dealer.
Installing location
•Please install the unit in a safe place where:
–it does not obstruct the driver’s view.
–it does not obstruct the operation of the airbag system.
–it does not obstruct the operation of the car, especially the steering wheel, shift lever, or brake pedal.
–it is not subjected to heat/high temperature.
•Please consult a qualified technician or service personnel if you cannot attach the cradle to the car securely.
On GPS
GPS (Global Positioning System) satellites continuously emit signals for positioning anywhere on the earth. As a GPS aerial receives these signals, users can be informed of their location (latitude, longitude and altitude). Information must be received from 3 satellites in order to obtain twodimensional fixes (latitude and longitude), and 4 satellites are required for three-dimensional positioning (latitude, longitude and altitude). As GPS satellites are controlled by the U.S. Department of Defense, a deliberate margin of error between a few metres (a few feet) and 10 metres (32.8 feet) exists. As a result, the GPS navigation system may include an error of between 10 metres (32.8 feet) and about 200 metres (656.2 feet), depending on the circumstances.
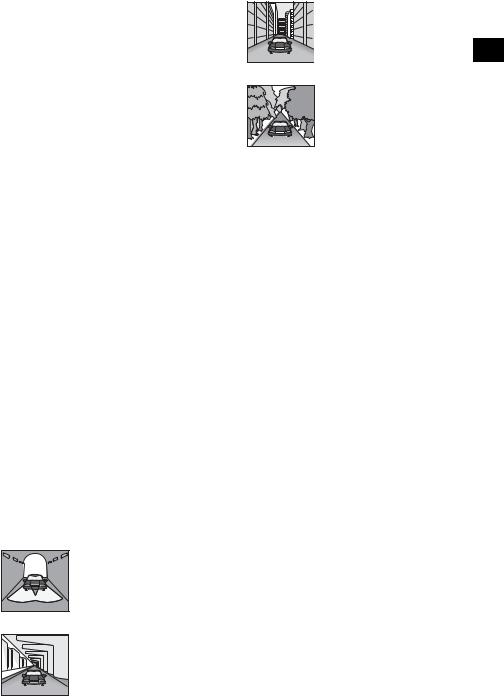
As GPS information is obtained using signal from satellites, it may be impossible or difficult to obtain the information in the following locations:
• Tunnel or underground
• Under a highway
• Between high buildings
• Between tall trees with dense foliage
After the initial installation, park your car in a safe, open place (no high buildings, etc.) for up to 20 minutes to allow for GPS signals to be received before using the navigation system. The system requires signals from a minimum of 3 GPS satellites to calculate the current car position properly.
Note
It takes time to receive a GPS signal when switching the unit ON after switching OFF the main power, after the built-in battery is fully discharged, or after resetting the unit.
On the software
Read the following conditions carefully before use.
•Copyright laws prohibit reproducing the software or the software manual in whole or in part or renting the software without the permission of the copyright holder.
•In the event a problem occurs with this software as a result of defective manufacturing, Sony will replace it at Sony’s option or issue a refund. However, Sony bears no other responsibility.
•The software provided with this product cannot be used with equipment other than that which it is designated for use with.
•Please note that, due to continued efforts to improve quality, the software specifications may be changed without notice.
•Roads and names on the map may differ from actual roads and names.
•The warranty does not extend to an exchange or refund due to some typographical errors and omissions, or any other discrepancy in layout found in the software.
•In no way may the map data be copied and used, in whole or in part, without permission of the copyright holder.
•Contents are subject to change without notice. By using the unit, you are agreeing to be bound by the above.
5
Getting Started
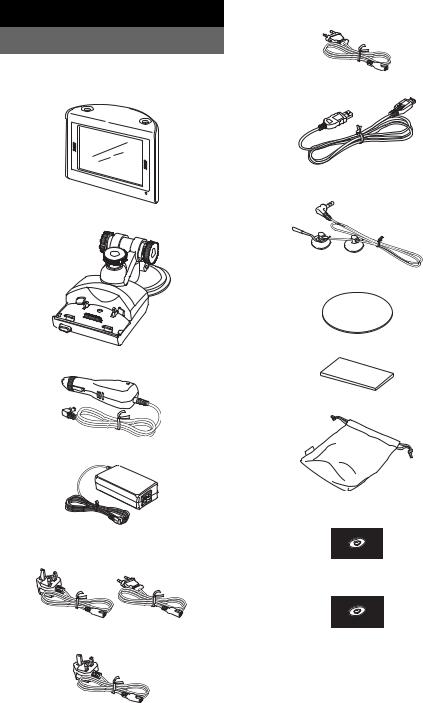
Checking the contents
–For NV-U50F/U50D/U50I/U50A/U50B/U50S/ U50N/U50TD/U50TI/U50TB*2 (1)
|
Check the package contents. |
|
|
• Main unit (1) |
• USB cable (1) |
|
||
|
|
• Cradle*1 (1)
• Car battery adapter (1)
•AC power adapter (1)
•AC power cable(s)
– For NV-U70TW/U70TC*2 (2)
– For NV-U50TG/U50G*2 (1)
6
•TMC antenna (aerial) (1)/suction cups (2) (For NV-U70T/U50T)
•Adhesive tape (1)
•Pad (1)
•Carrying pouch (1)
•Application Disc (CD-ROM) (1) (For NV-U50T/U50)
•Application Disc (DVD-ROM) (1) (For NV-U70T)
•Quick Start Guide (1)
•Warranty card (1)
•User registration card (1)
•END-USER LICENSE AGREEMENT (1)
*1 NV-U70T/U50T have a TMC aerial jack on the left side.
*2 The model names are written on the label on the bottom of the main unit.

|
1 Attach the cradle on the windscreen. |
|
Installing the unit |
||
Figure example of completed cradle |
||
|
installation |
|
|
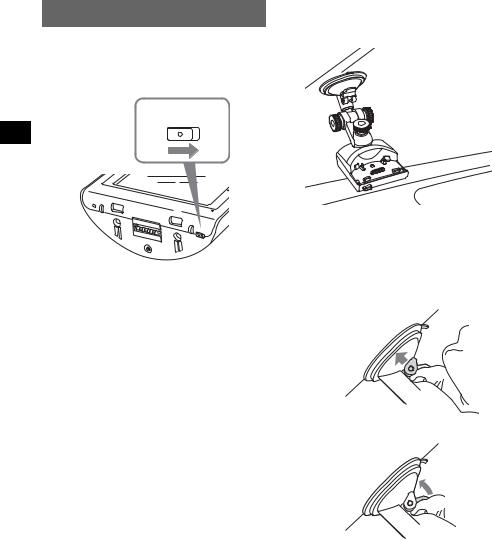
About the main power switch
Before installation, switch on the main power by sliding the POWER switch to the ON position.
POWER
OFF ON
RESET
CHG
POWER |
|
OFF |
ON |
Thereafter, you can turn the unit on/off by pressing ?/1 on the top right of the unit.
Notes
•Keep main power on unless the unit is not to be used for more than 3 months.
•If you switch off the main power, it may take time to receive GPS signals when switching on again.
About the suction mount
Before you start, choose a position on the windscreen that is clearly visible to the driver without obstructing the road view, and make sure all surfaces are clean and dry.
The optional cradles NVA-CU3T/CU3 can also be installed following the steps below.
Notes
•Install the unit in a safe place where it does not interrupt the GPS signal.
•Detach and reattach the cradle regularly as cup suction is affected by high/low temperature, extended use, etc.
•Be sure to keep a distance between the cradle and
dashboard when installing.
Follow steps 1 - 3 to complete.
1Clean and dry the surface of the suction cup.
2Press the centre of suction cup firmly against the windscreen to remove the remaining air inside it, then press the lever.
x
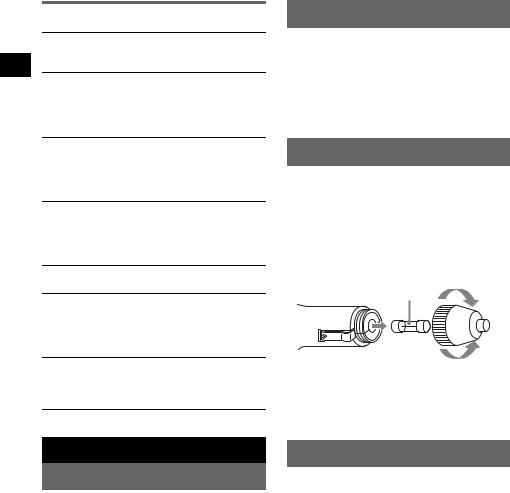
3Holding the left knob*, loosen the right knob and set the approximate vertical
angle, then retighten.
*The left knob does not turn.
To tighten
 To loosen
continue to next page t 7

If you want to fix the cradle on the windscreen permanently
The suction cup is affected in high/low temperatures and may come off. If you want to fix the cradle on the windscreen permanently, use the supplied adhesive tape on the suction cup.
If the bottom of the cradle touches the dashboard
Attach the supplied pad for protection. Cut the pad to the appropriate size before attaching.
Note
The adhesive tape is difficult to remove once applied.
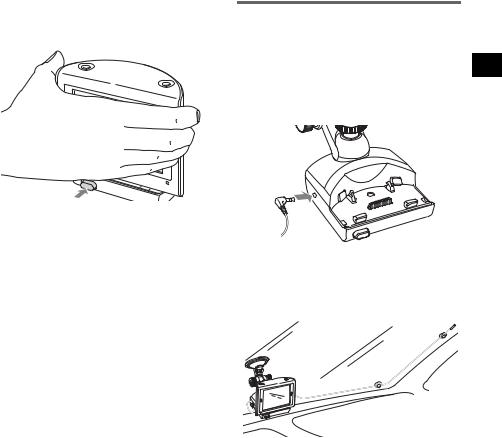
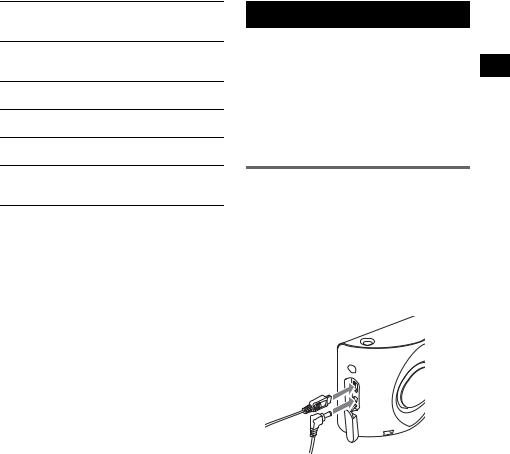
2Connect the cradle to the car cigarette lighter socket.
1Plug the car battery adapter into the DC IN 5.2V jack at the rear of the cradle.
|
IN |
5.2 |
V |
DC |
|
|
|
|
|
|
2Insert the other end of the car battery adapter fully into the car cigarette lighter socket.
LED*
*Lights up when you turn the ignition on after installation.
Note
Depending on the size or shape of the cigarette lighter socket, connection may not be possible.
3Align the 2 slots on the underside of the unit with the tabs on the cradle, then push to snap the unit into place.
Be sure the unit is securely locked in the cradle (2 clicks).
2nd click
1st click
4Loosen the centre knob, fine adjust the angle so you can view the monitor properly, then retighten.
To loosen
To tighten
Tip
You can also connect the unit to an outlet using the supplied AC power adapter.
8
To detach the unit from the cradle
1Holding the unit, press the RELEASE button of the cradle.
Installing the TMC aerial (NV-U70T/U50T only)
Install the TMC aerial to obtain traffic information from RDS-TMC (Traffic Message Channel).
1Plug the TMC aerial cord into the TMC aerial jack on the left side of the cradle.
RELEASE
The unit pops out of the cradle.
2 Take the unit out of the cradle.
2 Attach the end suction cup to the windscreen, then attach the other suction cup so as the cord forms 2 straight lines.
9
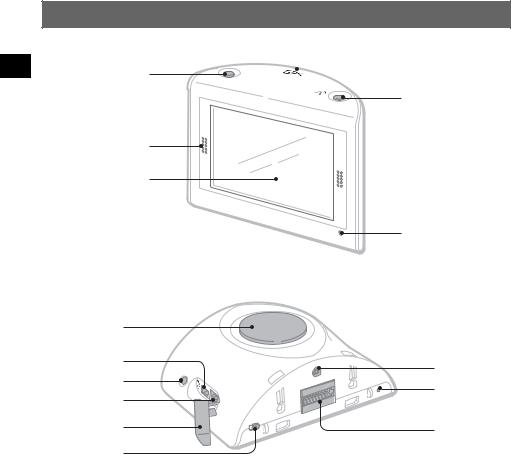
Location of controls
Front:
1
2
3
 Built-in GPS aerial
VOICE/
POSITION
4
CHG |
5 |
Rear:
2 |
|
6 |
|
7 |
V |
|
5 |
|
IN |
8 |
C |
|
D |
Jack cover
9
Refer to the pages listed for details.
aVOICE/POSITION button
During route guidance:
To hear the next voice guidance. In map scrolling mode:
To show your current car position.
bSpeaker
Outputs guidance and warnings.
c Display window/touch screen
d?/1 (on/standby) button 11
To turn the unit on/off.
eCHG (battery charge) indicator
Lights up in red while charging.
OFF
ONPOW ER
|
|
0 |
TESE |
R |
qa |
qs
fUSB jack 17
To connect to a computer with the USB cable.
gAuto dimmer sensor
For details on auto dimmer function, see the supplied PDF manual.
hDC IN 5V jack
To connect to the AC power adapter.
iPOWER switch 7, 20
To turn the main power on/off.
j External GPS antenna (aerial)* jack k RESET button 20
l Cradle connector
* Not supplied
10
Turning the unit on
Check that the POWER switch on the bottom right of the unit is in the ON position beforehand (page 7).
1 Press ?/1.
To turn the unit off
Press ?/1.
The unit enters standby mode for minimum power consumption.
Note
Be sure to take the unit out of the cradle and disconnect the car battery adapter when the unit is not in use to prevent car battery drain.
Starting up the navigation
1After turning the unit on, touch the desired language.
The warning display appears.
2Read the warning display, then touch “Agree.”
The tutorial displays appear.
3Touch V to proceed.
The top menu appears.
Receiving GPS signals
After the initial installation, park your car in a safe, open place (no high buildings, etc.) for up to 20 minutes to allow for GPS signals to be received before using the navigation system. The system requires signals from a minimum of 3 GPS satellites to calculate the current car position properly.
You can check the GPS status on displays.
GPS status indicator*
*Lights up in bright green when signal reception is sufficient for navigation.
Lights up in dark green when signal has been lost.
11

Basic Operations
Common procedures to operate the system are explained.
General operations can be performed on the touch screen. Touch the displayed icons with your finger gently.
Note
Do not press the display with excessive force, or use any sharp article, such as a pen, etc., to tap on the display.
Menu operations
You can set items in the menu by the following procedures.
1Show the top menu.
In the map display, touch the map.
In the menu display, touch  to show the map, then touch the map.
2Touch “Settings,” then touch a desired item.
3Touch v/V to scroll the list, then touch a desired setting item.
E.g.: Volume setting display
4Make the desired setting.
Touch and select the desired setting.
During menu operation:
To return to the previous display, touch  . To cancel the menu selection, touch
  (the current car position display appears).
Note
The items on the menu and setting operations differ depending on the selected menu item.
Keyboard operations
The keyboard display appears when you need to enter text.
You need only enter characters in upper case, as the system automatically converts them to appropriate characters. You can enter special characters when necessary (e.g. when naming a saved destination, etc.).
Mobile phone keyboard display
Candidates
To |
Touch |
enter an alphabetical |
the relevant key (e.g. |
character |
“ABC”) repeatedly until |
|
the desired character is |
|
highlighted in the line |
|
above the keyboard. |
|
|
enter a number |
“NUM” to switch to the |
|
number keyboard, then |
|
the desired number key; |
|
and “ABC” to switch |
|
back. |
|
|
enter a space |
“_” |
|
|
delete a character |
“T” |
|
|
select a candidate |
v/V to scroll the list, |
|
then the desired |
|
candidate to confirm. |
|
|
see the list of all |
“List” |
candidates |
|
|
|
12
You can select either a mobile phone keyboard or a character keyboard (alphabetical) for the keyboard display.
Touch  to switch to character keyboard. The character keyboard is used in the same way as the mobile phone keyboard, except when:
–entering a character (touch the desired character key).
–entering a special character (touch “SYM” to switch to the special character keyboard; touch “ABC” to switch back).
Touch  to switch back to the mobile phone keyboard.
Route Searching
The system searches for routes automatically after setting the destination.
Before starting, check that GPS signals are sufficient for navigation (page 11).
Setting the destination and starting guidance
The procedure for searching for the route and starting route guidance is explained.
As an example, setting the destination by the address is introduced here.
For details on setting the destination in other ways, see “Setting the destination in other ways” on page 14.
For your safety, park your car in a safe place, then enter the destination information before starting a journey.
1Show the top menu.
In the map display, touch the map.
In the menu display, touch  to show the map, then touch the map.
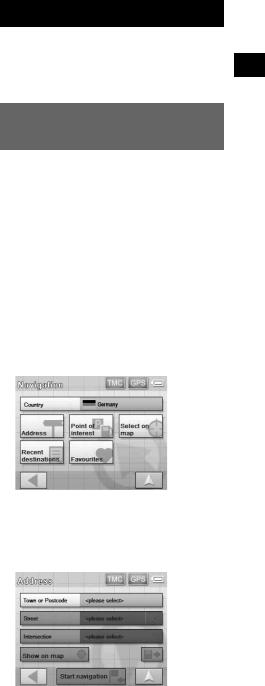
2Select “New Destination” c
“Navigation.”
3Select the desired country by touching the “Country” entry field.
Only countries included in the current map data are selectable.
4Select “Address.”
continue to next page t
13

5Input the address details.
For details on how to input characters, see “Keyboard operations” on page 12.
Touch the respective entry field to input the items below.
“Town or Postcode”
Input the town name or postcode.
“Street”/“–”
Input the street name, and house number (if known).
If no house number is available, the “–” field is deactivated.
“Intersection”
Input the crossroad name if you want it as the destination point.
6Select “Start navigation.”
The route option selection display appears. For details on selecting route options, see the supplied PDF manual.
7Select “Start navigation” again.
The map display appears, the route is calculated, and route guidance starts.
Setting the destination in other ways
You can also set the destination and search for routes by the following methods.
From the top menu, select the items in the following order, then “Start navigation” (if necessary).
For details, see the supplied PDF manual.
Search nearby
Searches for routes to a POI, such as restaurant, hotel, etc., near the current car position.
Home
Searches for routes to your home when it is registered.
“New Destination” c “Home”
Point of interest
Searches for routes to a POI, such as restaurant, hotel, etc., by selecting the category(ies) and correct destination from the list.
Select “New Destination” c “Navigation” c “Point of interest,” then the following options which allow you to specify the search area.
“---nearby”
Searches within the specified radius of the centre of the map.
“---nationwide”
Searches within the specified country.
“---in a town”
Searches within the specified town.
Select on map
Searches for routes by setting the destination directly from the map display.
“New Destination” c “Navigation” c “Select on map”
Recent destinations
Searches for routes to recently searched destinations.
“New Destination” c “Navigation” c “Recent destinations”
Favourites
Searches for routes to a saved destination point. “New Destination” c “Navigation” c “Favourites”
14

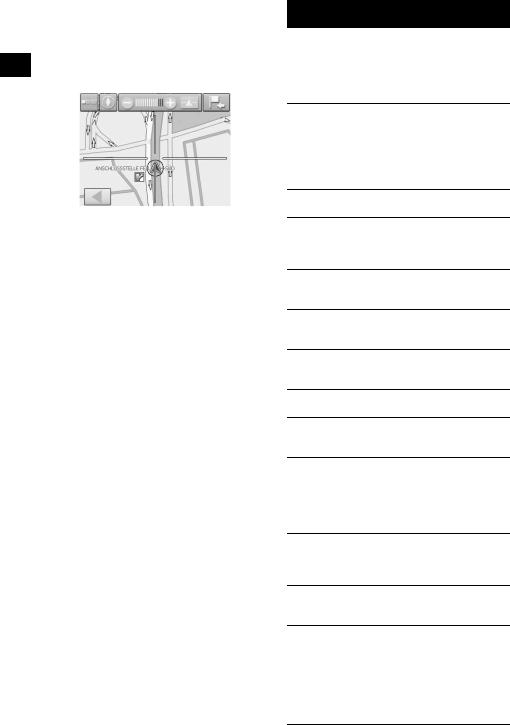
Guidance displays
Once a route has been calculated, visual guidance navigates you to the destination along with audio guidance.
Information on map tool menu
1 2 3 |
4 |
5 6 |
||||||
|
|
|
|
|
|
|
|
|
|
|
|
|
|
|
|
|
|
1 To show/hide tool menu.
2To switch the map direction (north up/ heading up) of the 2D map.
3 To switch to map scrolling mode.
4 To view TMC information.*
5 To view detailed GPS information.
6 Indicates battery condition.
*NV-U70T/U50T only.
Lights up in bright orange during reception. Lights up in dark orange during no reception.
2D map display
Straight-ahead driving
A
B C D E F
Approaching an intersection
G
Approaching an intersection (closer)
H
Next guidance immediately after intersection
I
A Current position
B Distance to next turn C Next direction
D Current street name E Next street name
F ETA (Estimated Time of Arrival)/Distance to destination
G Next turn instruction
H Bar indication of distance to next turn I Instruction after next
3D map display
You can set the 3D map display in the setting menu (page 16).
View route display
You can view the entire route to the destination. To display, from the top menu, select “Route” c “View route.”
continue to next page t
15
Map scrolling mode
You can switch to map scrolling mode from map display by touching  , whether during route guidance or not.
In map scrolling mode, the cross-hair is displayed on the map, and you can drag the screen to scroll the map.
Touch –/+ to adjust map scale.
Place the intersection of the cross-hair on a desired point, then touch  to show the map scrolling mode menu, where you can set the point as a destination, etc.
Touch  to return to the current car position display.
16
System Settings
Various settings related to the system and memory are configurable.
From the top menu, select “Settings,” then the desired item below to make each setting.
For details, see the supplied PDF manual.
Volume
To adjust the voice guidance volume.
Note
When the unit is powered by the built-in battery, maximum available volume is 70 %, even if set higher (80 %, etc). When it is powered using the car battery adapter or AC power adapter, this does not apply.
Select map
To select a map stored in the unit.
Map information
To show/hide the information bar (displayed at the bottom of the map), POI icons, and street names on the map.
Route information
To show/hide ETA (Estimated Time of Arrival) and distance to final destination on the map.
Signpost information
To show/hide signposts indicating motorway/ highway exits*1 on the map.
Light sensor
To adjust the sensitivity of the auto dimmer sensor.
Graphical look
To set the brightness and map colour.
Touch screen calibration
To calibrate the contact position of the touch screen.
Auto mode
To select the default map display (2D or 3D); automatically change the map scale depending on the driving speed (configurable for 2D and 3D respectively); select the default map direction for 2D map display (north up or heading up).
Routing options
To select the route search preference (timeoptimized or distance-optimized); permit/avoid motorways, ferries and toll roads on route.
Itinerary
To automatically proceed to the next destination after reaching the previous destination.
Time zone
To select the time zone of the current region; switch between daylight saving time and standard time.
Although the current time is automatically set by GPS, the time zone needs to be set for ETA (Estimated Time of Arrival) to be displayed accurately.
Format
To select 12/24-hour clock indication; select the distance unit (kilometres/miles).
Select language
To select the desired language for on-screen display and voice guidance.
Home address
To register your home address.
Radio muting*2
To attenuate the radio sound.
Demo mode
To start the demonstration.
Product information
To display unit information, such as name, version, etc., and tutorials.
*1 Displayed only if contained in the map information. *2 Only if the optional Car Install Kit XA-49FM is
connected to the “Radio muting” jack of your car audio.
Note
Warnings given according to map information may not always be correct due to road works, etc. Traffic situations and road regulations take absolute precedence over information given by the navigation system.
Using the Supplied Software
Significant functions using the supplied software are introduced here.
For details, see the supplied PDF manual.
Operating system requirements
•OS: Windows 98SE/2000/ME/XP
•CD-ROM/DVD-ROM drive
•USB port
•150 MHz CPU speed minimum (recommended)
Connecting to your computer
1Connect the unit to an outlet using the AC power adapter and the AC power cable.
2Connect the unit to your computer with the USB cable.
Connect the small connector of the USB cable to the USB jack on the unit, then the large connector to a USB port on your computer.
Notes when transferring data
During transfer, do not
–disconnect the USB cable or the AC power adapter.
–turn off the main power of the unit, enter unit standby mode, or reset the unit.
–shut down the computer, enter computer standby mode, or restart the computer.
If you want to cancel transferring mid-way, click the cancel button on the computer screen.
continue to next page t
17
Software features
Install PC connection software
PC connection software (ActiveSync) can be installed.
Backup and Restore pre-installed map (NV-U50T/U50 only)
The map data pre-installed in the unit can be backed up on your computer and restored to the unit, in case of accidental deletion, etc.
Map Manager
Map data can be added to the unit from the supplied or optional DVD-ROM. When adding, you may need to delete unnecessary map data from the unit to free up memory space.
Language Manager
Language data for on-screen display and voice guidance can be added to the unit from the supplied CD-ROM/DVD-ROM, and unnecessary language data can be deleted from the unit.
Read the manual
You can read the manual in PDF format.
Support link
Easy access to the Sony navigation support site is available.
Visit this site for technical support, such as software and firmware updates, FAQs, etc.
Re-install application
The navigation software pre-installed in the unit can be re-installed from the supplied CD-ROM/ DVD-ROM, in case of accidental deletion, etc.
Note on LCD panel
Some stationary blue, red or green dots may appear on the monitor. These are called “bright spots,” and can happen with any LCD. The LCD panel is precision-manufactured with more than 99.99 % of its segments functional. However, it is possible that a small percentage (typically 0.01 %) of the segments may not light up properly. This will not, however, interfere with your viewing.
Maintenance
Fuse replacement
When replacing the fuse in the car battery adapter, be sure to use one matching the amperage rating stated on the original fuse. If the fuse blows, check the power connection and replace the fuse. If the fuse blows again after replacement, there may be an internal malfunction. In such a case, consult your nearest Sony dealer.
To tighten
Fuse (2.5A)
To remove
Warning
Never use a fuse with an amperage rating exceeding the one supplied with the unit as this could damage the unit.
Additional Information
Precautions
If your car has been parked in direct sunlight, allow the unit to cool off before operating it.
Moisture condensation
On a rainy day or in a very damp area, moisture condensation may occur inside the display of the unit. Should this occur, the unit will not operate properly. In such a case, slide the POWER switch on the bottom right of the unit to OFF position, then wait for about an hour until the moisture has evaporated.
Notes on unit disposal
Remove the built-in lithium-ion battery when disposing of the unit, and return the battery to a recycling location.
The procedure for removing the battery is explained below.
Note
Never disassemble the unit except when disposing of it.
1Switch off the main power by sliding the POWER switch to the OFF position.
2Remove the jack cover (page 10).
18
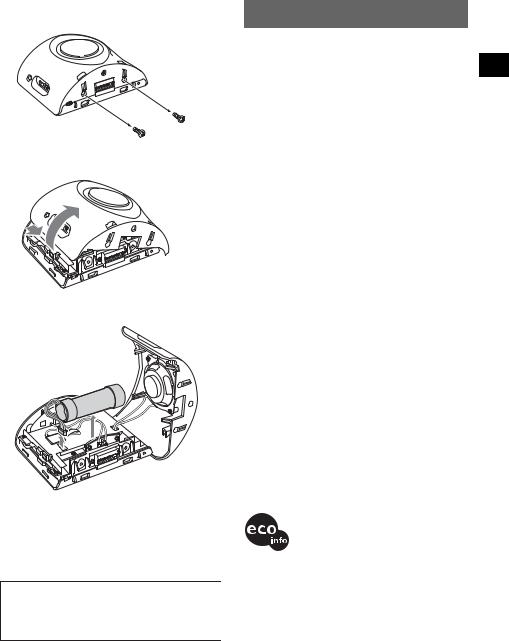
3Remove the 2 screws on the underside of the unit using a screwdriver.
4 Slide the rear cover, then lift to open.
1
2
5 Remove the battery.
6Insulate the connector terminal by wrapping with a tape.
Notes on the lithium-ion battery
•Keep the battery out of the reach of children.
•Do not hold the battery with metallic tweezers, otherwise a short-circuit may occur.
WARNING
Battery may explode if mistreated.
Do not recharge, disassemble, or dispose of in fire.
Specifications
Main unit
Operating temperature: 5 – 45 ºC (41 – 113 ºF) Power requirements: DC 5 V
(from supplied AC power adapter)
Connection terminals:
Cradle connector DC IN 5V jack USB jack
External GPS antenna (aerial) jack Speaker: 2-way speaker
Consumption current: Approx. 0.5 A
Dimensions: Approx. 104.7 × 87.5 × 42.9 mm (4.1 × 3.5 × 1.8 in) (w × h × d)
Mass: Approx. 310 g (11 oz)
Monitor
System: Transmissive liquid crystal display Drive system: a-Si TFT active matrix system
Dimensions: 3.5 in (4:3)
70.1 × 52.6, 87.6 mm (2.8 × 2.1, 3.5 in) (h × v, d) Segment: 230,400 (960 × 240) dots
Cradle
Operating temperature: 5 – 45 ºC (41 – 113 ºF) Power requirements: DC 5.2 V
(from supplied 12 V car battery adapter (negative earth))
Connection terminals:
Unit connector DC IN 5.2V jack
TMC aerial jack (NV-U70T/U50T only)
Reception frequency: 87.5 – 108.0 MHz (NV-U70T/U50T only)
Optional accessories
External GPS Antenna: VCA-41
TMC Car Cradle Kit: NVA-CU3T Car Cradle Kit: NVA-CU3
Car Install Kit: XA-49FM
European Map Package: NVD-DU3
(for NV-U50T/U50)
Design and specifications are subject to change without notice.
•Lead-free solder is used for soldering.
•Halogenated flame retardants are not used in the certain printed wiring boards.
•Use of rechargeable lithium ion batteries.
•Corrugated cardboard is used for the packaging cushions.
•VOC (Volatile Organic Compound)-free vegetable oil based ink is used for printing the carton.
19

Troubleshooting
The following checklist will help you remedy problems you may encounter with your unit. Before going through the checklist below, check the connection and operating procedures.
The operation icons on the display do not function.
An operation may take time while a map is displayed.
The unit does not turn on.
tCheck that the POWER switch on the bottom right of the unit is in the ON position.
tCharge the built-in battery.
tCheck that the unit is securely attached to the cradle (page 8).
The built-in battery cannot be charged.
tCheck that the POWER switch on the bottom right of the unit is in the ON position.
tIf the AC power adapter is being used, disconnect it from the outlet, then reconnect.
tThe built-in lithium-ion battery can be charged at temperatures between 5 – 45 ºC (41 – 113 ºF). The battery may not be charged if the temperature inside the unit increases because of direct sunlight exposure, etc. This is not a malfunction.
GPS signal cannot be received.
•The system cannot receive GPS signals due to an obstruction.
t Move your car to a place where signals can be received clearly.
•GPS signal reception is low.
tCheck the GPS information.
tThe optional External GPS Antenna VCA-41 may be required for a heated or heat reflective windscreen.
•There is an obstacle in front of the GPS aerial.
tInstall the unit where the signal is not interrupted by the body of the car, etc. For details on the unit installation, see “Installing location” on page 5.
•Signal may not be received if a window film is attached. In that case, use the optional External GPS Antenna VCA-41.
The car position on the map does not match the current road.
The error margin of the signal from the GPS satellites is too large. A maximum error margin of a few hundred metres can exist.
Voice guidance cannot be heard.
The volume is set too low.
tRaise the volume in the setting menu (page 16). When the unit is powered by the built-in battery, maximum available volume is 70 %, even if set higher (80 %, etc).
The LCD is not displayed normally.
•In high temperatures, the LCD may darken and not display clearly. In low temperatures, afterimage may occur on the LCD. These are not malfunctions, and the LCD will return to normal when the temperature returns to within the specified operating range.
•The LCD is dark, or the map colour has changed. t The auto dimmer function may be activated
because its sensor (page 10) is covered by a hand, etc.
Resetting the unit
If the navigation software freezes, try resetting the unit.
Press the RESET button with a pointed object, such as a ballpoint pen.
If the problem persists, switch off the main power by sliding the POWER switch to the OFF position, then switch on again after approximately 10 seconds.
POWER
OFF ON
RESET button
RESET
CHG
POWER |
|
OFF |
ON |
Note
After you switch off the main power, it may take time to receive GPS signals when switching on again.
20
Wichtig!
Bitte nehmen Sie sich etwas Zeit, um den Geräte-Pass vollständig auszufüllen. Dieser befindet sich auf der hinteren Umschlagseite dieser Bedienungsanleitung.
Hinweise zu dieser Anleitung
•In dieser Anleitung zur schnellen Inbetriebnahme finden Sie Anweisungen zur Installation, zum Anschließen und zu den Grundfunktionen des Systems. Nähere Erläuterungen finden Sie im Handbuch (PDF-Format) auf der mitgelieferten Anwendungs-Disc.
•In diesem Handbuch wird davon ausgegangen, dass der Anwender mit dem Betriebssystem Microsoft® Windows® vertraut ist. Einzelheiten zum Betrieb des Computers finden Sie im Handbuch zum Computer.
•Die Abbildungen in dieser Anleitung können sich von dem eigentlichen Gerät unterscheiden.
•Bewahren Sie diese Anleitung zum späteren Nachschlagen gut auf.
Entsorgung von gebrauchten elektrischen und elektronischen Geräten (anzuwenden in den Ländern der Europäischen Union und anderen europäischen Ländern mit einem separaten Sammelsystem für diese Geräte)
Das Symbol auf dem Produkt oder seiner Verpackung weist darauf hin, dass dieses Produkt nicht als normaler Haushaltsabfall zu behandeln ist, sondern an einer Annahmestelle für das Recycling von elektrischen und elektronischen Geräten abgegeben werden muss. Durch Ihren Beitrag zum korrekten Entsorgen dieses Produkts schützen Sie die Umwelt und die Gesundheit Ihrer Mitmenschen. Umwelt und Gesundheit werden durch falsches Entsorgen gefährdet. Materialrecycling hilft, den Verbrauch von Rohstoffen zu verringern. Weitere Informationen über das Recycling dieses Produkts erhalten Sie von Ihrer Gemeinde, den kommunalen Entsorgungsbetrieben oder dem Geschäft, in dem Sie das Produkt gekauft haben.
Geeignetes Zubehör: Autobatterieadapter/Netzteil
Keine Garantie für Datenverluste und beschädigte Daten
Sony übernimmt keine Garantie für Datenverluste und beschädigte Daten.
Achtung
UNTER KEINEN UMSTÄNDEN ÜBERNIMMT SONY DIE HAFTUNG FÜR NEBEN-, INDIREKTE ODER FOLGESCHÄDEN ODER FÜR IRGENDWELCHE ANDEREN SCHÄDEN, EINSCHLIESSLICH UND OHNE JEDE EINSCHRÄNKUNG JEGLICHER HAFTUNG FÜR ENTGANGENEN GEWINN, ENTGANGENES EINKOMMEN, DATENVERLUST, NUTZUNGSAUSFALL DES PRODUKTS ODER ZUGEHÖRIGER GERÄTE, AUSFALLZEITEN ODER ZEITAUFWAND DES BENUTZERS, DIE AUF DIE VERWENDUNG DIESES PRODUKTS, DER ZUGEHÖRIGEN HARDWARE UND/ ODER SOFTWARE ZURÜCKGEHEN ODER IN VERBINDUNG DAMIT AUFTRETEN.
Willkommen!
Danke, dass Sie sich für dieses Bordnavigationssystem von Sony entschieden haben. Lesen Sie diese Anleitung vor Inbetriebnahme des Systems bitte genau durch und bewahren Sie sie zum späteren Nachschlagen sorgfältig auf.
FUNKTIONEN UND MERKMALE:
•Plug & Play-Unterstützung
•Vorinstallierte Europakarte (NV-U70T)
•Vorinstallierte Regionalkarte (NV-U50T/U50)
•Auswahl aus 15 Sprachen für die Sprachführung und die Bildschirmanzeigen
•Hochwertiges 3,5-Zoll-Display mit Touchscreen
•Hoch entwickelter GPS-Empfänger mit 12 parallelen Kanälen
•Lautsprecher hoher Qualität
•RDS-TMC-kompatibel (Traffic Message Channel) (NV-U70T/U50T)
•Akkubetrieb
•Automatischer Dimmer
2

Inhalt
Wichtiger Hinweis. . . . . . . . . . . . . . . . . . . . . . . 4
Vorbereitungen |
7 |
Überprüfen des Lieferumfangs . . . . . . . . . . . . . 7 Installieren des Geräts . . . . . . . . . . . . . . . . . . . . 8
Installieren der TMC-Antenne
(nur NV-U70T/U50T). . . . . . . . . . . . . . . . . 10 Lage und Funktion der Teile
und Bedienelemente . . . . . . . . . . . . . . . . . . . . 11 Einschalten des Geräts. . . . . . . . . . . . . . . . . . . 12 Starten der Navigation . . . . . . . . . . . . . . . . . . . 12 Empfangen von GPS-Signalen . . . . . . . . . . . . 12
Grundfunktionen |
13 |
Arbeiten mit dem Menü. . . . . . . . . . . . . . . . . |
. 13 |
Arbeiten mit der Tastatur. . . . . . . . . . . . . . . . . |
13 |
Routensuche |
14 |
Festlegen des Ziels und Starten der Routenführung . . . . . . . . . . . . . . . . . . . . . . 14
Festlegen des Ziels auf andere Weise . . . . . . . 15 Anzeigen für die Routenführung . . . . . . . . . . . 16
Systemeinstellungen |
17 |
Arbeiten mit der mitgelieferten |
|
Software |
18 |
Anschließen an einen Computer . . . . . . . . |
18 |
Funktionen der Software . . . . . . . . . . . . . . |
19 |
Weitere Informationen |
19 |
Sicherheitsmaßnahmen . . . . . . . . . . . . . . . . . . 19 Hinweis zum LCD-Bildschirm . . . . . . . . . . . . 19 Wartung . . . . . . . . . . . . . . . . . . . . . . . . . . . . . 19 Hinweise zur Entsorgung des Geräts . . . . . . . 20 Technische Daten . . . . . . . . . . . . . . . . . . . . . . 21 Störungsbehebung. . . . . . . . . . . . . . . . . . . . . . 21
Zurücksetzen des Geräts . . . . . . . . . . . . . . 22
3
Wichtiger Hinweis
Um das Risiko von Unfällen und Verletzungen zu vermeiden, lesen Sie vor dem Installieren und vor der Inbetriebnahme des Geräts bitte die folgenden Warnhinweise.
Umgang mit dem System
•Achten Sie darauf, dass keine Fremdkörper in den Anschluss für die Anschlussstation des Geräts gelangen. Andernfalls kann es zu Fehlfunktionen kommen.
Anschluss für
Anschlussstation
RESET
CHG
POWER |
|
OFF |
ON |
•Drücken Sie ?/1, um das Gerät auszuschalten, nehmen Sie es von der Anschlussstation und trennen Sie den Autobatterieadapter von der Zigarettenanzünderbuchse. Andernfalls wird der Autobatterie möglicherweise Strom entzogen. Beachten Sie Folgendes:
–Durch Ausschalten der Zündung wird das Gerät nicht ausgeschaltet und es entzieht dem Lithium- Ionen-Akku (eingebaut) weiterhin Strom.
–Wenn die Zigarettenanzünderbuchse nicht mit der Position ACC oder I des Zündschlosses verbunden ist, wird der eingebaute Akku auch bei ausgeschalteter Zündung mit Strom versorgt.
–Achten Sie auf die Anzeige CHG unten rechts am Gerät. Diese Anzeige leuchtet während des Ladevorgangs.
 ?/1
?/1
•Schützen Sie das Gerät vor Feuer. Andernfalls kann es zu einer Fehlfunktion kommen.
•Lassen Sie kein Wasser, keinen Regen und keine sonstigen Flüssigkeiten in das Gerät gelangen. Andernfalls kann es zu einer Fehlfunktion kommen.
•Wenn das Gerät direktem Sonnenlicht ausgesetzt wird, verdunkelt sich möglicherweise das LCDDisplay und die Anzeige ist nicht mehr deutlich erkennbar. Dies ist keine Fehlfunktion. Das Phänomen verschwindet, sobald die Temperatur sinkt.
•Beachten Sie, dass der eingebaute Akku nur bei
Temperaturen von 5 – 45 ºC geladen werden kann.
•Schützen Sie das Gerät vor hohen Temperaturen. Andernfalls verringert sich die Kapazität des eingebauten Akkus oder er lässt sich gar nicht mehr aufladen.
Sicherheit
Allgemeines
•Drücken Sie nicht zu fest auf das Gerät und die Anschlussstation. Andernfalls können sie herunterfallen, unter das Bremspedal usw. geraten und einen Unfall auslösen.
•Beachten Sie beim Fahren mit der Routenführung die Verkehrsvorschriften vor Ort, wie z. B. Einbahnstraßen.
•Schauen Sie während der Fahrt nicht auf das Gerät. Dies ist gefährlich, denn Sie könnten abgelenkt werden und einen Verkehrsunfall verursachen.
•Wenn Sie das Gerät während der Fahrt bedienen müssen, halten Sie zuvor unbedingt an einer sicheren Stelle an.
•Wenn Sie das Fahrzeug abstellen, lassen Sie das Gerät nicht im Fahrzeug, um zu verhindern, dass das Gerät gestohlen oder durch hohe Temperaturen im Wageninneren beschädigt wird.
•Wenn Sie den Autobatterieadapter nicht verwenden, trennen Sie ihn von der Zigarettenanzünderbuchse. Andernfalls wird die Batterie möglicherweise entladen, auch wenn sich der Zündschlüssel in der Position OFF befindet.
•Achten Sie darauf, dass keine Flüssigkeiten oder Fremdkörper in das Gerät gelangen.
•Setzen Sie ausschließlich das angegebene Gerät auf die Anschlussstation.
•Schließen Sie ausschließlich mitgelieferte oder gesondert erhältliche Zubehörteile (Autobatterieadapter, Netzteil usw.) an.
•Modifizieren Sie das Gerät nicht.
•Zerlegen Sie das Gerät nur, wenn Sie es entsorgen wollen.
•Schließen Sie das Netzteil an eine leicht zugängliche Netzsteckdose an. Sollten an dem Netzteil irgendwelche Störungen auftreten, lösen Sie es sofort von der Steckdose.
Installation
•Informieren Sie sich über die örtlichen Verkehrsregeln und Vorschriften, bevor Sie das Gerät installieren.
•Installieren Sie das Gerät ordnungsgemäß wie in den Installationsanweisungen erläutert. Bei unsachgemäßer Installation besteht Feuergefahr oder die Gefahr eines elektrischen Schlags.
•Stellen Sie vor der Installation unbedingt den Zündschlüssel in die Position OFF oder ziehen Sie ihn ab. Wenn Sie das Gerät bei eingeschalteter Zündung installieren, wird die Autobatterie möglicherweise entladen oder es kann zu einem Kurzschluss kommen.
4

•Beachten Sie unbedingt Folgendes:
–Setzen Sie das Gerät ordnungsgemäß auf die Anschlussstation.
–Reinigen Sie die Oberfläche des Saugnapfs und die Windschutzscheibe, bevor Sie die Anschlussstation anbringen. Vergewissern Sie sich, dass der Saugnapf gut an der Windschutzscheibe haftet.
–Bei niedrigen Temperaturen muss der Innenraum des Fahrzeugs vor der Installation der Anschlussstation und des Geräts aufgeheizt werden. Hohe bzw. niedrige Temperaturen sowie plötzliche Temperaturwechsel beeinflussen die Haftfähigkeit des Saugnapfs.
–Wischen Sie die Windschutzscheibe trocken, wenn sich im Fahrzeug Feuchtigkeit
niedergeschlagen hat.
Wenn Sie diese Hinweise nicht beachten, können das Gerät und die Anschlussstation herunterfallen, unter das Bremspedal usw. geraten und einen Unfall auslösen.
•Verlegen Sie die Kabel unbedingt so, dass sie beim Fahren nicht hinderlich sind.
•Verwenden Sie das Gerät nicht in einem Fahrzeug, wenn das USB-Kabel angeschlossen ist.
•Schließen Sie den Autobatterieadapter ausschließlich an die Anschlussstation an.
•Achten Sie bei der Installation dieses Geräts darauf, keine elektrischen oder sonstigen Leitungen oder Kabel irgendwelcher Art oder den Treibstofftank zu beschädigen. Andernfalls besteht Feueroder Unfallgefahr. Wenn Sie an Fahrzeugteilen Bohrungen anbringen, vergewissern Sie sich, dass keine verdeckten Fahrzeugteile beschädigt werden.
•Bringen Sie keine Schrauben, Bolzen oder Muttern an sicherheitsrelevanten Teilen wie Lenksäule, Benzinleitung oder Bremssystem an und modifizieren Sie solche Teile nicht. Andernfalls besteht Feueroder Unfallgefahr.
•Achten Sie darauf, dass keine Kabel zwischen den beweglichen Teilen einer Sitzschiene eingeklemmt werden können.
•Informationen über Polarität, Batteriespannung und Position der Airbags bei Ihrem Fahrzeug erhalten Sie bei Ihrem Autohändler.
Montageposition
•Installieren Sie das Gerät an einer sicheren Stelle, an der es:
–die Sicht des Fahrers nicht behindert,
–die Funktionstüchtigkeit der Airbags nicht beeinträchtigt,
–beim Fahren nicht hinderlich ist. Achten Sie besonders darauf, dass das Lenkrad, der Schalthebel und das Bremspedal nicht blockiert werden,
–keiner Hitze und keinen hohen Temperaturen ausgesetzt ist.
•Wenden Sie sich bitte an qualifiziertes Fachpersonal, wenn Sie die Anschlussstation nicht sicher am Fahrzeug anbringen können.
Das GPS-System
GPS-Satelliten (Global Positioning System) strahlen kontinuierlich Signale aus, mit denen sich weltweit eine relativ genaue Positionsbestimmung vornehmen lässt. Mithilfe einer GPS-Antenne können diese Signale empfangen und die Position des Empfängers (Längengrad, Breitengrad und Höhe) ermittelt werden. Für eine zweidimensionale Positionsbestimmung (Längengrad und Breitengrad) sind Informationen von 3 Satelliten erforderlich. Für eine dreidimensionale Positionsbestimmung (Längengrad, Breitengrad und Höhe) werden die Signale von 4 Satelliten benötigt. Da GPS-Satelliten vom US-amerikanischen Verteidigungsministerium kontrolliert werden, gibt es eine gewollte Fehlerspanne von bis zu 10 Metern. Dadurch kann beim GPS-Navigationssystem die ermittelte Position zwischen 10 und 200 Metern von der tatsächlichen Position abweichen.
Die GPS-Signale werden von Satelliten ausgestrahlt und sind deshalb an den folgenden Orten möglicherweise gar nicht oder nicht einwandfrei zu empfangen:
• In Tunneln oder Unterführungen
• Unter Autobahnen
• Zwischen hohen Gebäuden
• Zwischen hohen Bäumen mit dichtem Laubwerk
Stellen Sie das Fahrzeug nach der Anfangsinstallation bis zu 20 Minuten an einer sicheren, offenen Stelle (keine hohen Gebäude usw.) ab, damit die GPS-Signale empfangen werden können, bevor Sie das Navigationssystem in Betrieb nehmen. Für eine korrekte Bestimmung der aktuellen Fahrzeugposition werden die Signale von mindestens 3 GPS-Satelliten benötigt.
Fortsetzung auf der nächsten Seite t
5

Hinweis
Wenn Sie das Gerät einschalten (ON), nachdem die Hauptstromversorgung ausgeschaltet (OFF), der eingebaute Akku vollständig entladen oder das Gerät zurückgesetzt wurde, dauert es einige Zeit, bis GPSSignale empfangen werden.
Die Software
Lesen Sie die folgenden Nutzungsbedingungen vor der Verwendung bitte sorgfältig durch.
•Die Software und das Softwarehandbuch sind urheberrechtlich geschützt. Ohne die Zustimmung des Urheberrechtsinhabers dürfen sie weder ganz noch auszugsweise reproduziert werden. Auch ein Verleih der Software ist untersagt.
•Wenn bei dieser Software aufgrund eines Herstellungsfehlers ein Problem auftritt, wird das Produkt nach Sonys Ermessen von Sony ersetzt oder erstattet. Weiter gehende Haftungsansprüche gegenüber Sony bestehen jedoch nicht.
•Die mit diesem Produkt gelieferte Software kann nur mit ausdrücklich dafür geeigneten Geräten eingesetzt werden.
•Wir sind um eine stetige Verbesserung unserer Produkte bemüht. Beachten Sie deshalb bitte, dass sich die Softwarespezifikationen ohne Ankündigung ändern können.
•Straßen und Namen auf der Karte können von den tatsächlichen Straßen und Namen abweichen.
•Die Gewährleistung schließt das Recht auf Umtausch oder Erstattung des Kaufpreises aufgrund von typografischen Fehlern und Unvollständigkeiten oder anderen Darstellungsfehlern aus.
•Auf keinen Fall dürfen die Kartendaten ohne Zustimmung des Urheberrechtsinhabers ganz oder auszugsweise kopiert oder verwendet werden.
•Die Inhalte unterliegen unangekündigten Änderungen.
Durch Verwendung des Geräts erklären Sie sich mit den oben genannten Bedingungen einverstanden.
6

Vorbereitungen
Überprüfen des Lieferumfangs
Überprüfen Sie den Lieferumfang.
• Hauptgerät (1)
• Anschlussstation*1 (1)
• Autobatterieadapter (1)
•Netzteil (1)
•Netzkabel
– Beim NV-U70TW/U70TC*2 (2)
– Beim NV-U50TG/U50G*2 (1)
–Beim NV-U50F/U50D/U50I/U50A/U50B/ U50S/U50N/U50TD/U50TI/U50TB*2 (1)
•USB-Kabel (1)
•TMC-Antenne (1)/Saugnäpfe (2) (beim NV-U70T/U50T)
•Beidseitiges Klebeband (1)
•Unterlage (1)
•Tragebeutel (1)
•Anwendungs-Disc (CD-ROM) (1) (beim NV-U50T/U50)
•Anwendungs-Disc (DVD-ROM) (1) (beim NV-U70T)
•Anleitung zur schnellen Inbetriebnahme (1)
•Garantiekarte (1)
•Benutzerregistrierungskarte (1)
•ENDBENUTZERLIZENZVERTRAG (1)
*1 Die Modelle NV-U70T/U50T weisen an der linken Seite eine TMC-Antennenbuchse auf.
*2 Die Modellbezeichnung finden Sie auf dem
Aufkleber an der Unterseite des Hauptgeräts. |
7 |
|
Installieren des Geräts
Der Hauptnetzschalter
Schalten Sie vor der Installation die Hauptstromversorgung ein, indem Sie den Schalter POWER in die Position ON stellen.
POWER
OFF ON
1 Bringen Sie die Anschlussstation an der Windschutzscheibe an.
Abbildung einer installierten Anschlussstation (Beispiel)
RESET
CHG
POWER |
|
OFF |
ON |
Danach können Sie das Gerät einbzw. ausschalten, indem Sie ?/1 oben rechts am Hauptgerät drücken.
Hinweise
•Lassen Sie die Hauptstromversorgung eingeschaltet, es sei denn, Sie wollen das Gerät mehr als 3 Monate lang nicht verwenden.
•Wenn Sie die Hauptstromversorgung ausund dann wieder einschalten, kann es einige Zeit dauern, bis wieder GPS-Signale empfangen werden.
Die Montage mit Saugnapf
Wählen Sie zunächst an der Windschutzscheibe die Montageposition aus. Das Gerät muss für den Fahrer gut sichtbar sein, ohne die Sicht auf die Straße zu blockieren. Achten Sie darauf, dass alle Montageflächen sauber und trocken sind.
Die gesondert erhältlichen Anschlussstationen NVA-CU3T/CU3 werden ebenfalls wie in den Schritten unten erläutert installiert.
Hinweise
•Installieren Sie das Gerät an einer sicheren Stelle, an der es das GPS-Signal nicht blockiert.
•Bei längerem Gebrauch beeinflussen hohe bzw. niedrige Temperaturen und Temperaturwechsel die Haftfähigkeit des Saugnapfs. Nehmen Sie die Anschlussstation deshalb regelmäßig ab und bringen Sie sie wieder an.
•Achten Sie bei der Installation auf einen ausreichenden Abstand zwischen der Anschlussstation und dem Armaturenbrett.
Führen Sie Schritt 1 - 3 aus.
1Reinigen und trocknen Sie die Oberfläche des Saugnapfs.
2Drücken Sie die Mitte des Saugnapfs fest gegen die Windschutzscheibe, um die restliche Luft herauszudrücken, und betätigen Sie dann den Hebel.
x
8

3Halten Sie den linken Knopf* fest, lösen Sie den rechten Knopf, richten Sie die Anschlussstation ungefähr vertikal aus und
ziehen Sie den rechten Knopf wieder an.
*Der linke Knopf lässt sich nicht drehen.
Anziehen
 Lösen
Lösen
Wenn Sie die Anschlussstation dauerhaft an der Windschutzscheibe befestigen wollen
Hohe bzw. niedrige Temperaturen beeinflussen die Haftfähigkeit des Saugnapfs und er kann sich von der Windschutzscheibe lösen. Wenn Sie die Anschlussstation dauerhaft an der Windschutzscheibe befestigen wollen, bringen Sie das mitgelieferte beidseitige Klebeband am Saugnapf an.
Wenn die Unterkante der Anschlussstation das Armaturenbrett berührt
Bringen Sie zum Schutz die mitgelieferte Unterlage an.
Schneiden Sie die Unterlage auf die richtige Größe zu, bevor Sie sie anbringen.
Hinweis
Das beidseitige Klebeband lässt sich nur schwer wieder entfernen, nachdem es einmal angebracht wurde.
2Schließen Sie die Anschlussstation an die Zigarettenanzünderbuchse an.
1Schließen Sie den Autobatterieadapter an die Buchse DC IN 5.2V an der Rückseite der Anschlussstation an.
|
IN |
5.2 |
V |
DC |
|
||
|
|
|
2Stecken Sie das andere Ende des Autobatterieadapters bis zum Anschlag in die Zigarettenanzünderbuchse.
LED*
*Leuchtet auf, wenn Sie nach der Installation die Zündung einschalten.
Hinweis
Je nach Größe und Form der Zigarettenanzünderbuchse ist der Anschluss unter Umständen nicht möglich.
3Richten Sie die 2 Aussparungen an der Unterseite des Geräts an den Laschen an der Anschlussstation aus und drücken Sie das Gerät in die Halterung, bis es einrastet.
Achten Sie darauf, dass das Gerät fest in der Anschlussstation einrastet (2 Klicks).
2. Klick
1. Klick
Fortsetzung auf der nächsten Seite t
9

4Lösen Sie den mittleren Knopf, stellen Sie den Winkel so ein, dass der Monitor gut ablesbar ist, und ziehen Sie den Knopf wieder an.
Lösen
Anziehen
Tipp
Über das mitgelieferte Netzteil können Sie das Gerät auch an eine Netzsteckdose anschließen.
So nehmen Sie das Gerät von der Anschlussstation ab
1Halten Sie das Gerät fest und drücken Sie die Taste RELEASE an der Anschlussstation.
Installieren der TMC-Antenne (nur NV-U70T/U50T)
Installieren Sie die TMC-Antenne. So können Sie Verkehrsinformationen über RDS-TMC (Traffic Message Channel) empfangen.
1Verbinden Sie das TMCAntennenkabel mit der TMCAntennenbuchse an der linken Seite der Anschlussstation.
2Bringen Sie den Saugnapf am Ende der Antenne und den zweiten Saugnapf so an der Windschutzscheibe an, dass das Antennenkabel 2 gerade Linien bildet.
RELEASE
Das Gerät löst sich von der Anschlussstation.
2Nehmen Sie das Gerät von der Anschlussstation.
10
 Loading...