


 Loading...
Sony KDL-65HX925, KDL-65HX923, KDL- 60NX723, KDL- 60NX720, KDL- 55HX925 Operating Manual
...LCD
Digital Colour TV
Operating Instructions
4-268-267-17(1)
Getting Started
Using Your BRAVIA TV
Network Setup
Additional Information
KDL-65HX925 / 65HX923 / 60NX723 / 60NX720 / 55HX925 / 55HX923 / 55HX820 / 55NX723 KDL-55NX720 / 46HX925 / 46HX923 / 46HX820 / 46NX723 / 46NX720 / 40NX723 / 40NX720
Introduction
Thank you for choosing this Sony product. Before operating the TV, please read this manual thoroughly and retain it for future reference.
~
•The “x” that appears in the model name corresponds to a numeric digit, related to design, colour or TV system.
•Instructions about “Installing Wall Mount Bracket” are included within this TV’s instructions manual.
•The illustrations used in this manual are of the KDL-46NX720 series unless otherwise state.
•The illustrations of the remote control used in this manual are of the RM-GD017 unless otherwise stated.
•Before operating the TV, please read “Safety Information” (page 32). Retain this manual for future reference.
Trademark information
 is a registered trademark of the DVB Project.
HDMI, the HDMI Logo, and HighDefinition Multimedia Interface are trademarks or registered trademarks of HDMI Licensing LLC in the United States and other countries.
DLNA® and DLNA CERTIFIED® are trademarks and/or service marks of Digital Living Network Alliance.
DivX® is a video file compression technology, developed by DivX, Inc.
DivX®, DivX Certified®, and associated logos are trademarks of DivX, Inc. and are used under license.
ABOUT DIVX VIDEO: DivX® is a digital video format created by DivX,Inc. This is an official DivX Certified device that plays DivX video. Visit www.divx.com for more information and software tools to convert your files into DivX video.
ABOUT DIVX VIDEO-ON-DEMAND: This DivX Certified® device must be registered in order to play DivX Video-on- Demand (VOD) content. To generate the registration code, locate the DivX VOD section in the device setup menu. Go to vod.divx.com with this code to complete the registration process and learn more about DivX VOD.
Manufactured under license from Dolby Laboratories. Dolby and the double-D symbol are trademarks of Dolby Laboratories.
“BRAVIA” and 


 are trademarks of Sony Corporation.
“FACE DETECTION” logo is trademark of Sony Corporation.
TrackID is a trademark or registered trademark of Sony Ericsson Mobile Communications AB.
Music and video recognition technology and related data are provided by Gracenote®. Gracenote is the industry standard in music recognition technology and related content delivery. For more information, please visit www.gracenote.com.
CD, DVD, Blu-ray Disc, and music and video-related data from Gracenote, Inc., copyright © 2000-present Gracenote.
Gracenote Software, copyright © 2000present Gracenote. One or more patents owned by Gracenote apply to this product and service. See the Gracenote website for a nonexhaustive list of applicable Gracenote patents. Gracenote, CDDB, MusicID, MediaVOCS, the Gracenote logo and logotype, and the “Powered by Gracenote” logo are either registered trademarks or trademarks of Gracenote in the United States and/or other countries.
Opera® Browser from Opera Software ASA. Copyright 1995-2010 Opera Software ASA. All rights reserved.
Wi-Fi Protected Setup and WPA are marks of the Wi-Fi Alliance.
Notes for Australia and New Zealand model
This product is ENERGY RATING qualified in the “Home” mode. ENERGY RATING is a program designed to promote energy efficient products and practices.
•When the TV is initially set up, it is designed to meet ENERGY RATING requirements while maintaining optimum picture quality.
•Changes to certain features, settings, and functionalities of this TV (e.g. TV Guide, Picture/Sound, Eco-Setting) can slightly change the power consumption.
Depending upon such changed settings (e.g. “Shop” mode), the power consumption may vary which possibly could exceed the stated energy rating.
To reset the TV to ENERGY RATING qualified settings, select “Home” mode from the initial set-up procedure in “Factory Settings” under the “Set-up” menu.
IMPORTANT
INFORMATION
If a television is not positioned in a sufficiently stable location, it can be potentially hazardous due to falling. Many injuries, particularly to children, can be avoided by taking simple precautions such as:
•Using cabinets or stands recommended by the manufacturer of the television.
•Only using furniture that can safely support the television.
•Ensuring the television is not overhanging the edge of the supporting furniture.
•Not placing the television on tall furniture (for example, cupboards or bookcases) without anchoring both the furniture and the television to a suitable support.
•Not standing the televisions on cloth or other materials placed between the television and supporting furniture.
•Educating children about the dangers of climbing on furniture to reach the television or its controls.
2 GB

Notice for customers in the South Africa
The Euro/South Africa converter plug should be fitted as follows.
1 Insert the power supply or CEE7 plug
in to the converter plug.
2 Use an appropriate screwdriver to attach
the screw tightly without damaging the
screw head.
3 TEST: Grip the
converter plug, and pull the VDE cord set/ transformer to ensure
it is fully secure, if not
then increase the torque setting and further tighten.
Re-test.
The converter plug is now ready for use.
Notice for customers in Thailand
This telecommunication equipment conforms to NTC technical requirement.
Notice for customers in Singapore
Complies with IDA
Standards
DB00353
Notice for customers in India
Attach the supplied plug adaptor.
Notice for customers in Jordan
All models covered by this Instruction Manual contains wireless module DWM-W046 with approval number TRC/SS/2010/135.
Location of the identification label
Labels for Model No. and Power Supply rating (in accordance with applicable safety regulation) are located on the rear of the TV.
Precautions
Viewing the TV
•Some people may experience discomfort (such as eye strain, fatigue, or nausea) while watching 3D video images or playing 3D video games. Sony recommends that all viewers take regular breaks while watching 3D video images or playing 3D video games. The length and frequency of necessary breaks will vary from person to person. You must decide what works best. If you experience any discomfort, you should stop watching the 3D video images or playing 3D video games until the discomfort ends; consult a doctor if you believe necessary. You should also review (i) the instruction manual of any other device or media used with this television and (ii) our website (http://www.sony-asia.com/support) for the latest information. The vision of young children (especially those under six years old) is still under development. Consult your doctor (such as a pediatrician or eye doctor) before allowing young children to watch 3D video images or play 3D video games. Adults should supervise young children to ensure they follow the recommendations listed above.
•When using the simulated 3D function, please note that the displayed image is modified from the original due to the conversion done by this television.
•View the TV in moderate light, as viewing the TV in poor light or during long period of time, strains your eyes.
•When using headphones, adjust the volume so as to avoid excessive levels, as hearing damage may result.
LCD Screen
•Although the LCD screen is made with high-precision technology and 99.99% or more of the pixels are effective, black dots may appear or bright points of light (red, blue, or green) may appear constantly on the LCD screen. This is a structural property of the LCD screen and is not a malfunction.
•Do not push or scratch the front filter, or place objects on top of this TV set. The image may be uneven or the LCD screen may be damaged.
•If this TV set is used in a cold place, a smear may occur in the picture or the picture may become dark. This does not indicate a failure. These phenomena disappear as the temperature rises.
•Ghosting may occur when still pictures are displayed continuously. It may disappear after a few moments.
•The screen and cabinet get warm when this TV set is in use. This is not a malfunction.
•The LCD screen contains a small amount of liquid crystal. Some fluorescent tubes used in this TV set also contain mercury (except LED backlight LCD TV). Follow your local ordinances and regulations for disposal.
•Do not subject the LCD screen to any strong impact or shock. The screen glass may crack or shatter and cause injury.
Handling and cleaning the screen surface/cabinet of the TV set
Be sure to unplug the AC power cord connected to the TV set from AC power outlet before cleaning.
To avoid material degradation or screen coating degradation, observe the following precautions.
•To remove dust from the screen surface/ cabinet, wipe gently with a soft cloth. If dust is persistent, wipe with a soft cloth slightly moistened with a diluted mild detergent solution.
•Never spray water or detergent directly on the TV set. It may drip to the bottom of the screen or exterior parts and enter the TV set, and may cause damage to the TV set.
•Never use any type of abrasive pad, alkaline/acid cleaner, scouring powder, or volatile solvent, such as alcohol, benzene, thinner or insecticide. Using such materials or maintaining prolonged contact with rubber or vinyl materials may result in damage to the screen surface and cabinet material.
•Periodic vacuuming of the ventilation openings is recommended to ensure to proper ventilation.
•When adjusting the angle of the TV set, move it slowly so as to prevent the TV set from moving or slipping off from its table stand.
Optional Equipment
Keep optional components or any equipment emitting electromagnetic radiation away from the TV set. Otherwise picture distortion and/or noisy sound may occur.
Wireless Function of the unit
•Do not operate this unit near medical equipment (pacemaker, etc.), as malfunction of the medical equipment may result.
•Although this unit transmits/receives scrambled signals, be careful of unauthorised interception. We cannot be responsible for any trouble as a result.
(Caution about handling the remote control)
Notes
•Observe the correct polarity when inserting batteries.
•Do not use different types of batteries together or mix old and new batteries.
•Dispose of batteries in an environmentally friendly way. Certain regions may regulate the disposal of batteries. Please consult your local authority.
•Handle the remote with care. Do not drop or step on it, or spill liquid of any kind onto it.
•Do not place the remote in a location near a heat source, a place subject to direct sunlight, or a damp room.
(Continued) 3 GB

Disposal of the TV set
Disposal of Old Electrical & Electronic Equipment
(Applicable in the European Union and other
European countries with separate collection systems)
This symbol is on the remote control.
Disposal of the TV set
Disposal of Old Electrical & Electronic Equipment
India only (Applicable in
Republic of India)
This symbol indicates that this product shall not be treated as household waste and may not be dropped in garbage bins. Product owners are advised to deposit their product at the nearest collection point for the recycling of electrical and electronic equipment. Your co-operation shall facilitate proper disposal & help prevent potential negative consequences/hazards to the environment and human health, which could otherwise be caused by inappropriate waste disposal including improper handling, accidental breakage, damage and/ or improper recycling of e-waste. The recycling of materials will help to conserve natural resources. For more detailed information about recycling of this product, please contact your local civic office, your household waste disposal service provider or the store where you made the purchase. You may contact our company’s toll free number in India for assistance.
4 GB
5 GB

Table of Contents |
|
Getting Started |
|
Checking the accessories ........................................................................................................ |
8 |
Inserting batteries into the remote............................................................................................ |
8 |
1: Attaching the Table-Top Stand (except KDL-65HX92x) ...................................................... |
8 |
2: Adjusting the viewing angle of the TV ................................................................................ |
10 |
3: Connecting an antenna/cable/VCR.................................................................................... |
10 |
4: Connecting audio/video devices ........................................................................................ |
11 |
5: Preventing the TV from toppling over................................................................................. |
12 |
6: Bundling the cables............................................................................................................ |
13 |
7: Performing the initial set-up ............................................................................................... |
13 |
Using Your BRAVIA TV |
|
Watching the TV..................................................................................................................... |
14 |
Selecting various functions and settings (Home Menu) ......................................................... |
16 |
Displaying Operating Instructions (i-Manual) ......................................................................... |
18 |
Network Setup |
|
Preparing a wired network ..................................................................................................... |
20 |
Preparing a wireless LAN....................................................................................................... |
20 |
Setting up the Internet connection ......................................................................................... |
21 |
If you cannot connect to the Internet...................................................................................... |
22 |
Adjusting the server display settings...................................................................................... |
22 |
Additional Information |
|
Troubleshooting ..................................................................................................................... |
24 |
Specifications ......................................................................................................................... |
25 |
Installing the Accessories (Wall-Mount/Wall-Hanging Bracket) ............................................. |
27 |
Safety Information .................................................................................................................. |
32 |
6 GB

After setting up your BRAVIA TV and learning basic operations with this manual, see the built-in manual (i-Manual) for further explanation of the features of your TV.
This TV has a built-in manual (i-Manual).
To access the i-Manual, press i-MANUAL on the remote, and select an item. For details, see page 18 of this manual. Contents of the i-Manual may differ depending on the model/region/area.
Contents of the i-Manual
* Some models do not have this feature.
How to Use i-Manual
i-Manual Digital Set-up*
“BRAVIA” TV Features
3D Feature
Intelligent Presence Sensor “BRAVIA” Internet Video Internet Widgets
Wireless LAN
“BRAVIA” Sync with “Control for HDMI” Skype Ready*
TrackID™/Music Search/Video Search
Watching TV
3D Feature
Digital Electronic Programme Guide* Programme Guide for Digital Text* Favourites
Wide Mode
Picture Mode Text
Photos/Music/Videos Twin Picture (PIP) Twin Picture (P&P)
Analogue Set-up*
External Inputs
Network
Product Support
Using Other Equipment/Internet
VCR/DVD Player
Audio System
USB Device (e.g. Digital Camera)
Picture Frame
HDMI Equipment
Internet/Wireless LAN
Home Network
Media Remote
PC
Programming the Remote*
Parts Description
Remote
TV Controls and Indicators
Terminals
Settings/Home Menu |
Troubleshooting |
About the Home Menu |
Index |
Settings |
|
Display
Sound
System Settings
 Bookmarks
7 GB

Getting Started
Checking the accessories
Remote (1)
Size AAA batteries (R03 type) (2) Table-Top Stand (1)*1
(except KDL-65HX92x)
Fixing screws for Table-Top Stand (M5 × 16) (3) (except KDL-65HX92x, KDL-60NX72x)
Assembling screws for Table-Top Stand (M6 × 14) (4) (for KDL-60/55/46NX72x, KDL-55/46HX92x, KDL-55/46HX820)
Assembling screws for Table-Top Stand (M6 × 14) (3) (for KDL-40NX72x)
Hexagon wrench (1) Video/Component adapter (1)
(except KDL-65HX92x)
3D Glasses (battery included) (2)
(for KDL-65/55/46HX92x)
Pouch for 3D Glasses (2)
(for KDL-65/55/46HX92x)
Camera and Microphone Unit
(for KDL-65/55/46HX925)
Operating Instructions (this manual) and other documents
*1 Assemble the Table-Top Stand with the supplied assembling screws. Refer to the supplied Table-Top Stand leaflet to assemble the stand.
Inserting batteries into the remote
1 Remove the protection sheet.
2 Push and slide the cover upward.
1:Attaching the Table-Top Stand (except KDL-65HX92x)
Except KDL-60NX72x
1 Refer to the supplied Table-Top Stand leaflet for proper attachment for some TV models.
2 Place the TV set on the Table-Top Stand.
Guide pins
~
•Align the TV from the top, slide it in until the guide pins cannot be seen.
8 GB

3 Fix the TV to the Table-Top Stand according to the arrow marks  that guide the screw holes using the supplied screws.
~
•If using an electric screwdriver, set the torque at approximately 1.5 N·m {15 kgf·cm}.
For KDL-60NX72x
1 Align with the two dowels of the TableTop Stand, and gently place the TV, checking the f mark is facing the front.
Neck
2 Attach the TV and Table-Top Stand with the supplied screw and hexagon wrench.
*
Head
* 3 N·m {30 kgf·cm}
~
•Set the torque setting to approximately 3 N·m {30 kgf·cm}.
Detaching the Table-Top Stand from the TV
To detach the Table-Top Stand from the TV, remove the screws  fixed in step 3. For KDL-60NX72x, be sure to remove the screws
  for detaching the head when the Table-Top Stand is not attached to the TV.
For KDL-65HX92x, be sure to remove the screws  at the head of the Table-Top Stand.
Head
Soft cloth
Started Getting
(Continued) 9 GB
~
•Do not remove the Table-Top Stand for any reason other than to install corresponding accessories on the TV.
•When removing the Table-Top Stand from the TV, lay the display face down on a stable work surface that is larger than the TV.
•To prevent damaging the surface of the LCD display, make sure to place a soft cloth on the work surface.
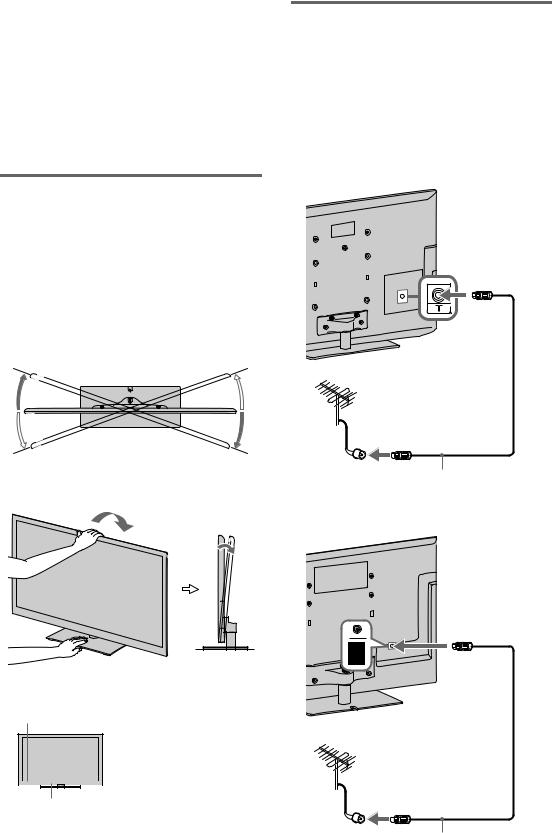
2:Adjusting the viewing angle of the TV
This TV can be adjusted within the angles as illustrated.
Angle adjustment (Swivel)
(except KDL-65HX92x, KDL-60NX72x)
~
•When adjusting the angle, hold the stand with one hand to avoid having the stand slip or TV tip over.
20° |
20° |
20° |
20° |
Angle adjustment (Tilt)
(except KDL-65HX92x, KDL-60NX72x)
0° - 6°
~
• Ensure that there are no objects in front of the TV.
IR Sensor

 3D Sync Transmitter
Intelligent Presence Sensor
•Do not expose the Intelligent Presence Sensor to direct sunlight or other strong light, as malfunction may occur.
3:Connecting an antenna/ cable/VCR
~
•Use an antenna cable connector no greater than 14 mm in thickness.
•Use an HDMI cable connector within 12 mm (thickness) x 21 mm (width).
Connecting an antenna/cable
B For KDL-65HX92x
Antenna cable (not supplied)
B Except KDL-65HX92x
Antenna cable (not supplied)
10 GB

Connecting a Set Top Box/recorder (e.g. DVD recorder) with HDMI
B For KDL-65HX92x
Set Top Box/recorder (e.g. DVD recorder)
B Except KDL-65HX92x
Set Top Box/recorder (e.g. DVD recorder)
4:Connecting audio/video devices
B For KDL-65HX92x
Antenna cable (not supplied)
AV cable (not supplied)
Antenna cable (not supplied) 
DVD player
Started Getting
(Continued) 11 GB
Loading...