


 Loading...
4-411-997-11(1)
LCD TV
Operating Instructions
KDL-55HX85x / 46HX85x / 40HX85x

NOTICE FOR CUSTOMERS IN THE UNITED KINGDOM
A moulded plug complying with BS1363 is fitted to this equipment for your safety and convenience.
Should the fuse in the plug supplied need to be replaced with the same rating of fuse approved by ASTA or BSI to BS 1362 (i.e., marked with  or
or  ) must be used.
If the plug supplied with this equipment has a detachable fuse cover, be sure to attach the fuse cover after you change the fuse. Never use the plug without the fuse cover. If you should lose the fuse cover, please contact your nearest Sony service station.
FUSE
FUSE
How to replace the fuse
Open the fuse compartment with a blade screwdriver, and replace the fuse.
Please refer to the illustration that actually equipped with the product.
Introduction
Thank you for choosing this Sony product. Before operating the TV, please read this manual thoroughly and retain it for future reference.
The manufacturer of this product is Sony Corporation, 1-7-1 Konan Minato-ku Tokyo, 1080075 Japan. The Authorized Representative for EMC and product safety is Sony Deutschland GmbH, Hedelfinger Strasse 61, 70327 Stuttgart, Germany. For any service or guarantee matters please refer to the addresses given in separate service or guarantee documents.
Notes on Digital TV function
•Any functions related to Digital TV
( ) will only work in countries or areas where DVB-T/DVB-T2*¹ (MPEG-2 and H.264/MPEG-4 AVC) digital terrestrial signals are broadcast or where you have access to a compatible DVB-C (MPEG-2 and H.264/MPEG-4 AVC) cable service. Please confirm with
your local dealer if you can receive a DVB-T/DVB-T2*¹ signal where you live or ask your cable provider if their DVB-C cable service is suitable for integrated operation with this TV.
•Your cable provider may charge a fee for their services, or require you to agree to its terms and conditions of business.
•This TV set complies with DVB-T/ DVB-T2*¹ and DVB-C specifications,
but compatibility with future DVB-T/ DVB-T2*¹ digital terrestrial and DVB-C digital cable broadcasts are not guaranteed.
•Some Digital TV functions may not be available in some countries/areas and DVB-C cable may not operate correctly with some providers.
~
•Not all the HX TV model series have 2nd generation T2*¹ Digital Video Broadcast technology.
*¹ DVB-T2 is not available for TV model series HX850.
DVB-T2 is available for TV model series HX853.
~
•The “x” that appears in the model name corresponds to a numeric digit, related to design, colour or TV system.
•Instructions about “Installing Wall Mount Bracket” are included within this TV’s instructions manual.
•The illustrations used in this manual may differ depending on your TV model.
•The illustrations of the remote used in this manual are of the RM-ED047 unless otherwise stated.
•Before operating the TV, please read page 28 (Safety Information). Retain this manual for future reference.
Trademark information
 is a registered trademark of the DVB Project.
HDMI, the HDMI Logo, and HighDefinition Multimedia Interface are trademarks or registered trademarks of HDMI Licensing LLC in the United States and other countries.
DLNA®, the DLNA Logo and DLNA CERTIFIED® are trademarks, service marks, or certification marks of the Digital Living Network Alliance.
DivX®, DivX Certified® and associated logos are trademarks of Rovi Corporation or its subsidiaries and are used under license.
ABOUT DIVX VIDEO: DivX® is a digital video format created by DivX, LLC, a subsidiary of Rovi Corporation. This is an official DivX Certified® device that plays DivX video. Visit divx.com for more information and software tools to convert your files into DivX videos.
ABOUT DIVX VIDEO-ON-DEMAND: This DivX Certified® device must be registered in order to play purchased DivX Video-on-Demand (VOD) movies. To obtain your registration code, locate the DivX VOD section in your device setup menu. Go to vod.divx.com for more information on how to complete your registration.
Manufactured under license from Dolby Laboratories. Dolby and the double-D symbol are trademarks of Dolby Laboratories.
“BRAVIA” and 

 are trademarks of Sony Corporation.
TrackID is a trademark or registered trademark of Sony Ericsson Mobile Communications AB.
2 GB

Music and video recognition technology and related data are provided by Gracenote®. Gracenote is the industry standard in music recognition technology and related content delivery. For more information, please visit www.gracenote.com. CD, DVD, Blu-ray Disc, and music and video-related data from Gracenote, Inc., copyright © 2000-present Gracenote. Gracenote Software, copyright © 2000-present Gracenote. One or more patents owned by Gracenote apply to this product and service. See the Gracenote website for a nonexhaustive list of applicable Gracenote patents. Gracenote, CDDB, MusicID, MediaVOCS, the Gracenote logo and logotype, and the “Powered by Gracenote” logo are either registered trademarks or trademarks of Gracenote in the United States and/or other countries.
Opera® Browser from Opera Software ASA. Copyright 1995-2012 Opera Software ASA. All rights reserved.
Wi-Fi Direct is a mark of the Wi-Fi Alliance.
“Blu-ray Disc”, “Blu-ray” and “Blu-ray Disc” logo are trademarks of Blu-ray Disc Association.
“Sony Entertainment Network logo” and “Sony Entertainment Network” are trademarks of Sony Corporation.
Notice for Wireless Signal
1. Hereby, Sony Corporation declares that this unit is in compliance with the essential requirements and other relevant provisions of Directive 1999/5/EC.
For details, please access the following URL:
http://www.compliance.sony.de/
2. Notice for customers: the following information is only applicable to equipment sold in countries applying EU directives.
TV wireless system may be operated in following countries:
Austria, Belgium, Bulgaria, Cyprus,
Czech Republic, Denmark, Estonia,
Finland, France, Germany, Greece,
Hungary, Iceland, Ireland, Italy,
Latvia, Liechtenstein, Lithuania,
Luxembourg, Malta, The Netherlands,
Norway, Poland, Portugal, Slovak
Republic, Romania, Slovenia, Spain,
Sweden, Switzerland, Turkey, and The
United Kingdom.
This equipment can be operated in other non-European countries.
TV Wireless System -
Regulation Information
For Customers in Italy
Use of the RLAN network is governed: -
swith respect to private use, by the Legislative Decree of 1.8.2003, no. 259 (“Code of Electronic Communications”). In particular Article 104 indicates when the prior obtainment of a general authorization is required and Art. 105 indicates when free use is permitted;
swith respect to the supply to the public of the RLAN access to telecom networks and services, by the Ministerial Decree 28.5.2003, as amended, and Art. 25 (general authorization for electronic communications networks and services) of the Code of electronic communications
For Customers in Norway
Use of this radio equipment is not allowed in the geographical area within a radius of 20 km from the centre of Ny-Ålesund, Svalbard.
For Customers in Cyprus
The end user must register the RLAN (or WAS or WiFi) devices in the Department of Electronic Communications (P.I. 365/2008 and P.I. 267/2007).
P.I. 365/2008 is the Radiocommunications (Categories of Stations Subject to General Authorization and Registration) Order of 2008.
P.I. 267/2007 is the General Authorization for the use of Radiofrequencies by Radio Local area Networks and by Wireless Access Systems, including Radio Local Area Networks (WAS/RLAN).
For Customers in France
The WLAN (WiFi) feature of this LCD TV shall exclusively be used inside buildings. Any use of the WLAN (WiFi) feature of this LCD TV outside of the buildings is prohibited on the French territory. Please make sure that the WLAN (WiFi) feature of this LCD TV is disabled before any use outside of the buildings. (ART Decision 2002-1009 as amended by ART Decision 03-908, relating to radio-frequencies use restrictions).
Location of the identification label
Labels for Model No., Production Date (month/year) and Power Supply rating (in accordance with applicable safety regulation) are located on the rear of the TV or package.
3 GB
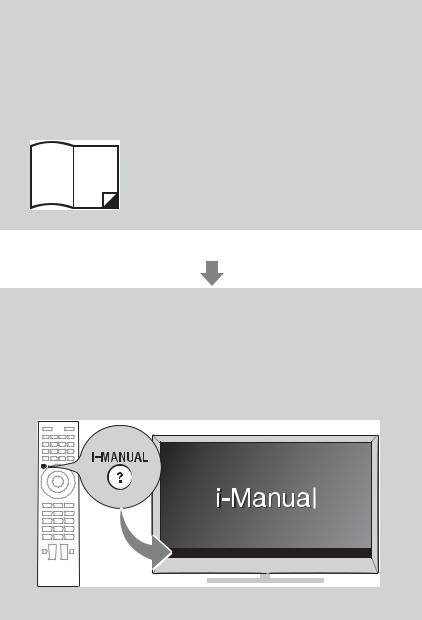
About this manual
(Operating Instructions)
This manual explains how to set up your TV. For more information on how to use BRAVIA TV, refer to the “Electronic manual”.
Operating Instructions
Explains how to set up your TV such as connections, initial set-up, and basic operations.
For more information, press the i-MANUAL button
Electronic manual
(i-Manual)
Explains how to use all the features. See page 19 on how to use the i-Manual.
Images and illustrations used in this manual may differ from the actual screen.
4 GB

Table of Contents
Getting Started
GB
Checking the accessories.................................................................... |
|
6 |
Inserting batteries into the remote........................................................ |
|
6 |
1: Attaching the TV Stand..................................................................... |
|
7 |
2: Connections ..................................................................................... |
|
9 |
3: Preventing the TV from toppling over............................................. |
|
11 |
4: Bundling the cables ....................................................................... |
|
11 |
5: Connecting the TV to the Internet................................................... |
|
12 |
6: Performing the initial set-up............................................................ |
|
13 |
Using Your BRAVIA TV |
|
|
Watching TV B ............................. |
qf |
|
Selecting various functions and settings (Home Menu)..................... |
16 |
|
Watching Internet Video ..................................................................... |
|
18 |
Looking for Instructions |
|
|
Looking for instructions in the |
|
|
electronic manual |
|
|
(i-Manual) B.................................. |
ql |
|
Additional Information |
|
|
Troubleshooting.................................................................................. |
|
21 |
Specifications ..................................................................................... |
|
22 |
Installing the Accessories (Wall-Mount Bracket)................................ |
24 |
|
Safety Information............................................................................... |
|
28 |
Precautions......................................................................................... |
|
30 |
5 GB
Checking the |
Inserting |
accessories |
batteries into the |
|
remote |
|
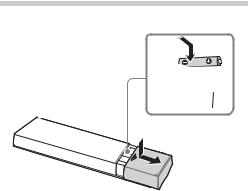
Remote (1)
Size AAA batteries (R03 type) (2)
TV Stand (1)
Joint (1)
Neck (1)
TV Stand Neck Attachment Screw (M5 × 16) (3)
Joint Screw (M5 × 16) (3)
Neck Screw (M5 × 16) (4)
Operating Instructions (this manual) and other documents
1 Remove the protection sheet.
2 Push and slide the cover to open.
6 GB

1:Attaching the TV Stand
~
•Be sure to have a Phillips screwdriver that fits the screws prior to the assembly.
12 cm ~
• If using an electric screwdriver, set the torque at approximately 1.5 N·m
{15 kgf·cm}.
1 Attach the Neck to the TV Stand.
Neck Screw (M5 × 16)
Neck 
2 Prepare the TV.
3 Attach the supplied Joint to the rear of the TV.
Slide the supplied Joint up to attach.
Guide pins
Soft cloth |
Getting |
|
|
Joint Screw |
Started |
(M5 × 16) |
|
Soft cloth |
Joint |
|
~
•Lay the display face down on a stable work surface that is larger than the display.
•To prevent damaging the surface of the LCD display, make sure to place a soft cloth on the work surface.
4 Install the TV onto the TV Stand.
~
• When moving the TV, be sure that two or
more persons install the TV on the TV Stand
as shown in the illustration. If one person  Arrow direction shows front of the TV Stand does the installation work alone, this may
result in an accident or injury.
(Continued) |
7 GB |

~
•When installing the TV on the TV Stand, hold the TV as shown in the illustration and install it on the two brackets of the TV Stand.
•Be careful not to pinch your hands or the AC power cord (mains lead) when you install the TV to the TV Stand.
5 Secure the TV and the TV Stand.
Joint Screw (M5 × 16)
Soft cloth |
Joint |
TV Stand Neck Attachment
~
Screw (M5 × 16) • Ensure that there are no objects in front of the TV.
Detaching the TV Stand from the TV
|
|
|
|
|
|
|
|
|
|
|
|
|
3D Sync Transmitter |
To detach the TV Stand from the TV, remove |
|
|
|
|
|
|
|
|
|
|
|
|
|
|
|
|
|
|
|
|
|
|
|
|
|||
the screws fixed in step 3 & 5. IR Sensor
~
•Do not remove the TV Stand for any reason other than to install corresponding accessories on the TV.
•When removing the TV Stand from the TV, lay the display face down on a stable work surface that is larger than the TV.
•To prevent damaging the surface of the LCD display, make sure to place a soft cloth on the work surface.
•Be sure the TV is on the vertical position before switching on. TV set must not powered on with LCD panel face down to avoid uneven picture uniformity.
TV Stand Neck Attachment
Screw (M5 × 16)
8 GB

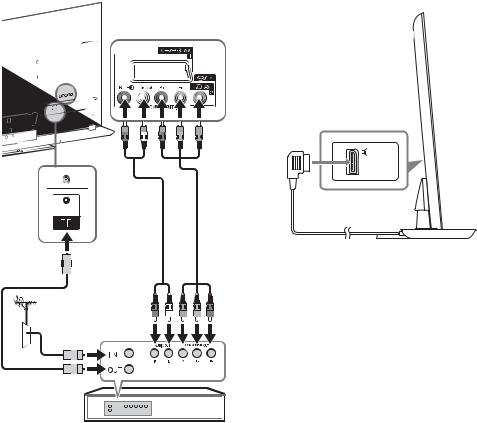
2: Connections
xTo connect a Set Top Box/recorder (e.g. DVD recorder) with HDMI
~
•Use an antenna cable connector no greater than 14 mm in thickness.
•Use an HDMI cable connector within 12 mm (thickness) × 21 mm (width).
Connecting an antenna (aerial)/Set Top Box/ recorder (e.g. DVD recorder)
xTo connect a Set Top Box/recorder (e.g. DVD recorder) with SCART
Set Top Box/recorder (e.g. DVD recorder)
~
•Right Angle Type Universal SCART Lead is recommended for this connection.
Started Getting
Set Top Box/recorder (e.g. DVD recorder)
(Continued) |
9 GB |
|
|
Connecting audio/video |
|
Connecting the TV with a |
||||||||||||||
|
|
devices |
|
Speaker Integrated Stand |
||||||||||||||
|
|
|
|
|
|
|
|
|
|
|
|
|
|
|
|
|
|
to the TV Stand |
|
|
|
|
|
|
|
|
|
|
|
|
|
|
|
|
|
||
|
|
|
|
|
|
|
|
|
|
|
|
|
|
|
|
|
|
|
|
|
|
|
|
|
|
|
|
|
|
|
|
|
|
|
|
|
|
|
|
|
|
|
|
|
|
|
|
|
|
|
|
|
|
|
|
|
|
|
|
|
|
|
|
|
|
|
|
|
|
|
|
|
|
|
|
|
|
|
|
|
|
|
|
|
|
|
|
|
|
|
|
|
|
|
|
|
|
|
|
|
|
|
|
|
|
|
|
|
|
|
|
|
|
|
|
|
|
|
|
|
|
|
|
|
|
|
|
|
|
|
|
|
|
|
|
|
|
|
|
|
|
|
|
|
|
|
|
|
|
|
|
|
|
|
|
|
|
|
|
|
|
|
|
|
|
|
|
|
|
|
|
|
|
|
|
|
|
|
|
|
|
|
|
|
|
|
|
|
|
|
|
|
|
|
|
|
|
|
|
|
|
|
|
|
|
|
|
|
Speaker
Integrated
Stand
1 Connect the cable of the TV Stand to the Speaker Integrated Stand jack on the rear of the TV.
2 Set to “Speaker Integrated Stand” in “TV Position” menu. Press HOME, then select “Settings” t “Sound” t “TV Position” t “Speaker Integrated Stand”.
Audio/video device
10 GB
3:Preventing the TV from toppling over
1 Install a wood screw (4 mm in diameter, not supplied) in the TV stand.
2 Install a machine screw (M4, not supplied) into the screw hole of the TV.
3 Tie the wood screw and the machine screw with a strong cord (not supplied).
The length of the M4 machine screw differs depending on the cord diameter. Please see below illustration.
|
Screw M4 |
|
Cord |
6-8 mm |
TV Stand |
4:Bundling the cables
Before bundling the cables, remove the cable holder from the AC cover. Reuse the cable holder to bundle the other cables.
~ |
|
Getting |
|
|
|
||
• Do not bundle the AC power cord (mains lead) |
|
||
together with other cables. |
Started |
||
1 |
2 |
||
|
|||
3 * |
4 |
11 GB
Loading...