


KDL-52Z5100
KDL-46Z5100
KDL-40Z5100
Copyright © 2009 Sony Electronics Inc. All rights reserved.
Welcome to the Sony Online Reference Book
This manual is a part of Sony’s eco-friendly initiatives to help reduce the consumption of natural resources. Use the printed Operating Instructions, the Quick Setup Guide, and this online Reference Book to fully enjoy your TV.
For the best online experience, use the latest version of Firefox or Internet Explorer.
This Online Reference Book will be updated periodically.
Copyright © 2009 Sony Electronics Inc. All rights reserved.
Getting Started |
Operating the TV |
Exploring Fun Features |
TV Home Menu |
Other Information |
Specifications |
Getting Started
Installing the TV
Locating Inputs and Outputs
Connecting the TV
Setting Up the Channel List-Initial Setup
Network Setup
Home | Getting Started | Operating the TV | Exploring Fun Features | TV Home Menu | Other Information | Specifications Tell us your opinion about this online reference book.
Copyright © 2009 Sony Electronics Inc. All rights reserved.

Getting Started |
Operating the TV |
Exploring Fun Features |
TV Home Menu |
Other Information |
Specifications |
Getting Started > Installing the TV
Installing the TV
This TV can be mounted on a wall using a Wall-Mount Bracket or placed on a TV stand (each sold separately). This section explains:
How to carry the TV
Preparation for a Table-Top stand
Using a Wall-Mount Bracket
Installing the Wall-Mount Bracket
Installation against a wall or enclosed area
Bundling the connecting cables
Securing the TV
Back to Getting Started |
Next to How to carry the TV |
Home | Getting Started | Operating the TV | Exploring Fun Features | TV Home Menu | Other Information | Specifications Tell us your opinion about this online reference book.
Copyright © 2009 Sony Electronics Inc. All rights reserved.
Getting Started |
Operating the TV |
Exploring Fun Features |
TV Home Menu |
Other Information |
Specifications |
Getting Started > Installing the TV > How to Carry the TV
How to Carry the TV
Some TV models are packaged with a detached Table-Top Stand so you can mount your TV to a wall right away. If you are not mounting the TV to a wall, you will need to attach the Table-Top Stand. You will need a Phillips screwdriver and the supplied screws to complete the task. Look for the attachment instructions provided with the TV.
Be sure to consider the following while setting up your TV:
Disconnect all cables when carrying the TV.
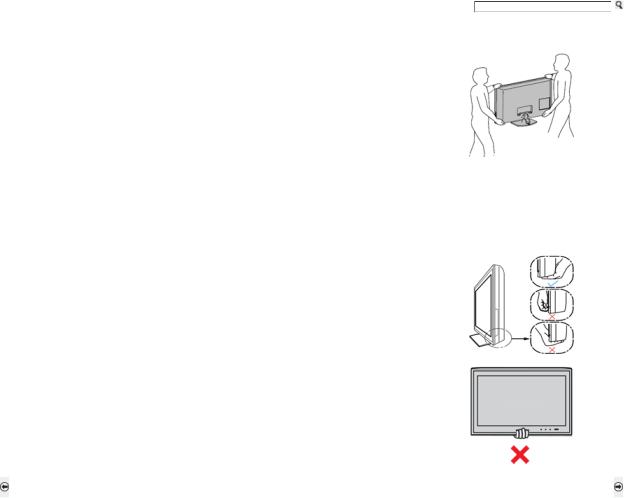
Carry the TV with the adequate number of people; larger size TVs require two or more people.
Correct hand placement while carrying the TV is very important for safety and to avoid damage.
Ensure your TV has adequate ventilation.
For best picture quality, do not expose the screen to direct illumination or sunlight.
Avoid installing the TV in a room with reflective wall and floor materials.
Avoid moving the TV from a cold area to a warm area. Sudden room temperature changes may cause moisture condensation. This may cause the TV to show poor picture and/or poor color. Should this occur, allow moisture to evaporate completely before powering the TV on.
Be sure to hold the bottom of the panel, and not the transparent part, speaker, or speaker grill area. Do not compress the panel's speaker grill area.
Do not lift the TV from the bottom center.
Back to Installing the TV |
Next to Preparation for Table-Top Stand |
Home | Getting Started | Operating the TV | Exploring Fun Features | TV Home Menu | Other Information | Specifications
Tell us your opinion about this online reference book.
Copyright © 2009 Sony Electronics Inc. All rights reserved.

Getting Started |
Operating the TV |
Exploring Fun Features |
TV Home Menu |
Other Information |
Specifications |
Getting Started > Installing the TV > Preparation for a Table-Top Stand
Preparation for a Table-Top Stand
Follow the assembling steps required to place on a TV stand.
1)Remove the Table-Top Stand. For product protection and safety reasons, Sony strongly recommends that you use the screws provided with the TV.
2)Place the Table-Top Stand on a level and stable surface. The screws are attached to the Table-Top Stand.
3)Gently slide the TV unit onto the neck of the Table-Top Stand and align the screw holes.
Do not put stress on the LCD panel or the frame around the screen.
Be careful to not pinch your hands or the AC power cord when you install the TV unit to the TableTop Stand.
4)Use the supplied screws to attach the TV unit to the Table-Top Stand (refer to the “Attaching the TableTop Stand” flyer found inside the carton). If an electric screwdriver is used, set the torque to tighten at approximately 1.5 N·m, 15 Kgf·cm.
Back to How to Carry the TV |
Next to Using a Wall-Mount Bracket |
Home | Getting Started | Operating the TV | Exploring Fun Features | TV Home Menu | Other Information | Specifications
Tell us your opinion about this online reference book.
Copyright © 2009 Sony Electronics Inc. All rights reserved.
Getting Started |
Operating the TV |
Exploring Fun Features |
TV Home Menu |
Other Information |
Specifications |
Getting Started > Installing the TV > Using a Wall-Mount Bracket
Using a Wall-Mount Bracket
Your TV can be mounted to a wall using the Wall-Mount Bracket (not supplied) out of the box as packaged.
Prepare the TV for the Wall-Mount Bracket before making cable connections.
Sony strongly recommends that you use the Wall-Mount Bracket model designed for your TV and that wall-mounting of your TV should be performed by a Sony dealer or licensed contractor.
Follow the instruction guide provided with the Wall-Mount Bracket for your model. Sufficient expertise is required in installing this TV, especially to determine the strength of the wall for withstanding the TV’s weight.
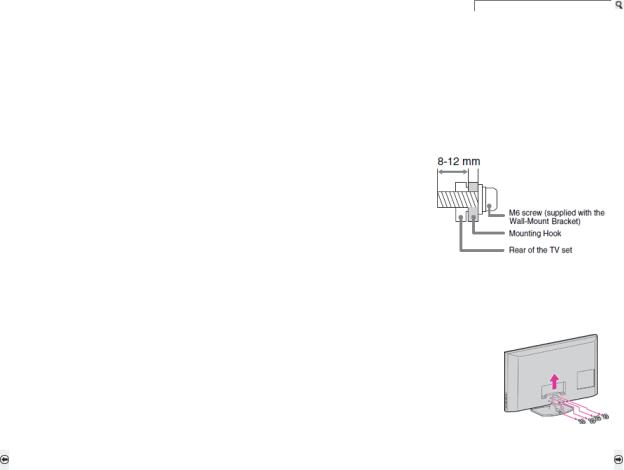
Be sure to use the screws supplied with the Wall-Mount Bracket when attaching the mounting hooks to the TV set. (Do not use the screws that are intended for the Table-Top Stand attachment.) The supplied M6 screws are designed so that they are 8 mm to 12 mm in length when measured from the attaching surface of the mounting hook. Use of screws other than those supplied with the bracket may result in internal damage to the TV set or cause it to fall, etc.
Be sure to store the unused screws and Table-Top Stand in a safe place until you are ready to attach the Table-Top Stand. Keep the screws away from small children.
For details on how to use the Wall-Mount Bracket compatible with your model, visit www.sony.com/accessories or call 1-800-488-7669 (United States) 1-877-899-7669 (Canada)
Follow the simple steps below to remove the Table-Top Stand:
1)Unplug the AC power cord and disconnect all the cables from the TV.
2)Secure the Mounting Hook to the rear of the TV.
3)Adjust the angle of the Mounting Hook.
4)Remove the screws on the rear of the TV (see illustration in the next column). Do not remove any other screws from the TV.
5)When screws are removed, lift the TV off the stand. Make sure that you carry out this task with at least two or three people. Do not attempt to lift the TV by yourself.
Back to Preparation for a Table-Top Stand |
Next to Installing the Wall-Mount Bracket |
Home | Getting Started | Operating the TV | Exploring Fun Features | TV Home Menu | Other Information | Specifications Tell us your opinion about this online reference book.
Copyright © 2009 Sony Electronics Inc. All rights reserved.

Getting Started |
Operating the TV |
Exploring Fun Features |
TV Home Menu |
Other Information |
Specifications |
Getting Started > Installing the TV >Installing the Wall-Mount Bracket |
|
|
|
||
Installing the Wall-Mount Bracket (Page 1 of 3)
To Customers
Your TV can be wall-mounted using a Wall-Mount Bracket (sold separately).
Use your TV with the Sony Wall-Mount Bracket Model number: SU-WL500
For product protection and safety, Sony strongly recommends that you use the Wall-Mount Bracket designed for your TV (SU-WL500) and wall-mounting is performed by a Sony dealer or a licensed contractor. Do not attempt to install it yourself. Sony is not liable for any damage or injury caused by mishandling or improper installation.
Please provide your licensed contractor with this installation information section as well as instructions supplied with the Wall-Mount Bracket.
To Sony Dealers and Licensed Contractors
To avoid injury and property damage, read these instructions carefully. Periodic inspection and maintenance is highly recommended to ensure that the TV is securely mounted.
Back to Using a Wall-Mount Bracket |
Next to Installing the Wall-Mount Bracket (Page 2 fo 3) |
Home | Getting Started | Operating the TV | Exploring Fun Features | TV Home Menu | Other Information | Specifications
Tell us your opinion about this online reference book.
Copyright © 2009 Sony Electronics Inc. All rights reserved.
Getting Started |
Operating the TV |
Exploring Fun Features |
TV Home Menu |
Other Information |
Specifications |
Getting Started > Installing the TV > Installing the Wall-Mount Bracket
Installing the Wall-Mount Bracket (Page 2 of 3)
Installing the Wall-Mount Bracket and Mounting Hooks
1)Open the Wall-Mount Bracket package and check for all the required parts along with the Instructions.
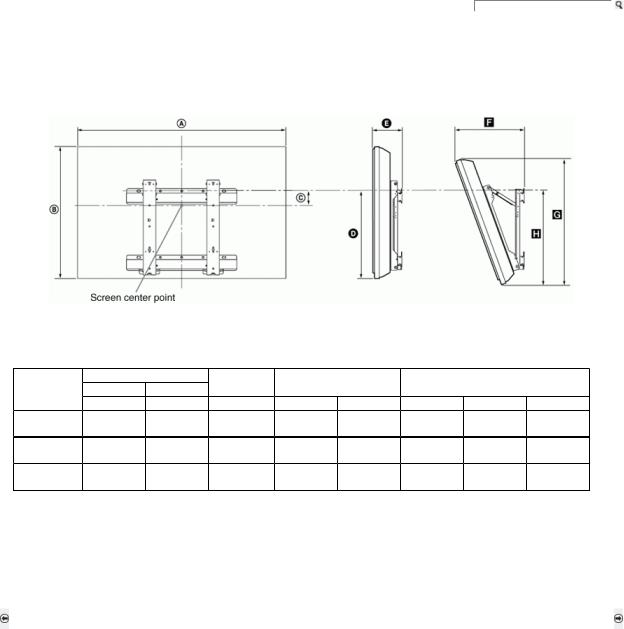
2)Decide where you want to install your TV. Refer to the TV installation dimensions table.
Dimensions Table
Unit: inches (mm) |
|
|
|
|
|
|
|
|
|
|
Display Dimension |
Screen |
Length of Mounting |
Length of Mounting |
|
||||
Model Name |
width |
height |
center |
at 0 degree |
|
at 20 degree angle |
|
||
|
A |
B |
C |
D |
E |
F |
G |
H |
|
KDL-40Z5100 |
37 3/8 |
24 1/4 |
5 |
17 7/8 |
5 3/8 |
12 3/8 |
22 3/4 |
19 |
|
(961) |
(614) |
(126) |
(454) |
(134) |
(313) |
(577) |
(480) |
||
|
|||||||||
KDL-46Z5100 |
43 1/8 |
27 3/8 |
3 1/2 |
18 1/8 |
5 3/8 |
13 3/8 |
25 3/4 |
19 1/8 |
|
(1,094) |
(695) |
(87) |
(459) |
(134) |
(339) |
(653) |
(484) |
||
|
|||||||||
KDL-52Z5100 |
49 |
30 7/8 |
1 13/16 |
18 1/8 |
5 3/8 |
14 5/8 |
29 1/8 |
19 1/8 |
|
(1,243) |
(783) |
(46) |
(459) |
(134) |
(369) |
(739) |
(484) |
||
|
|||||||||
Figures in the above table may differ slightly depending on the installation.
The wall that the TV will be installed on should be capable of supporting a weight of at least four times that of the TV. Refer to your TV’s operating instructions or the Specifications section of this online Reference Book for its weight.
Back to Installing the Wall-Mount Bracket (Page 1 of 3) |
Next to Installing the Wall-Mount Bracket (Page 3 of 3) |
Home | Getting Started | Operating the TV | Exploring Fun Features | TV Home Menu | Other Information | Specifications Tell us your opinion about this online reference book.
Copyright © 2009 Sony Electronics Inc. All rights reserved.
Getting Started |
Operating the TV |
Exploring Fun Features |
TV Home Menu |
Other Information |
Specifications |
Getting Started > Installing the TV > Installing the Wall-Mount Bracket
Installing the Wall-Mount Bracket (Page 3 of 3)
Installing the Wall-Mount Bracket and Mounting Hooks (continued)
4)Disconnect all cables and remove the Table-Top Stand.
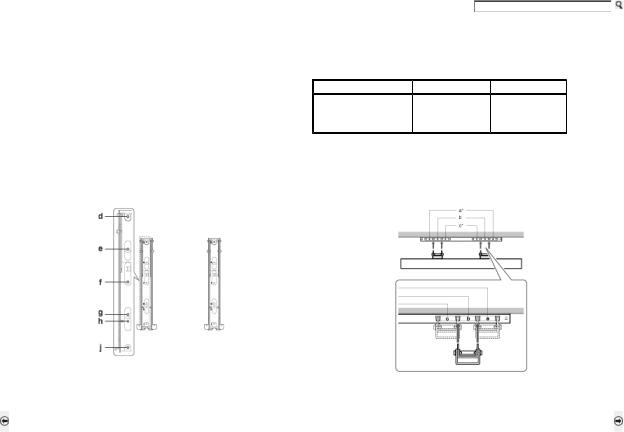
5)Secure the Mounting Hook to the rear of the TV.
Determine the screw locations and secure the Mounting Hooks to the rear of the TV. Refer to the “Screw and Hook Locations Diagram/Table” shown here.
Model Name |
Screw Locations |
Hook Location |
KDL-40Z5100 |
|
|
KDL-46Z5100 |
d, g |
b |
KDL-52Z5100 |
|
|
Screw Location |
Hook Location |
When installing the Mounting Hooks on the TV |
When installing the TV onto Base Bracket. |
|
* Hook position “a” and “c” cannot be used for the models for Z5100 series. |
Back to Installing the Wall-Mount Bracket (Page 2 of 3) |
Next to When Installing the TV Against a Wall or Enclosed Area |
Home | Getting Started | Operating the TV | Exploring Fun Features | TV Home Menu | Other Information | Specifications
Tell us your opinion about this online reference book.
Copyright © 2009 Sony Electronics Inc. All rights reserved.
Getting Started |
Operating the TV |
Exploring Fun Features |
TV Home Menu |
Other Information |
Specifications |
Getting Started > Installing the TV > When Installing the TV Against a Wall or Enclosed Area
When Installing the TV Against a Wall or Enclosed Area
Make sure that your TV has adequate air circulation. Allow enough space around the TV as shown below.
Avoid operating the TV at temperatures below 41 °F (5 °C).
Installed with stand |
Installed on the wall |
Never install the TV set as follows: |
|
|
|
Circulation is blocked. |
Circulation is blocked. |
Inadequate air circulation can lead to overheating of the TV and may cause damage to your TV or cause a fire.
Consider the following for best picture quality
Do not expose the screen to direct illumination or sunlight.
Use spot lighting directed down from the ceiling or cover the windows that face the screen with opaque drapery.
Install the TV in a room where the floor and walls are not of a reflective material.
When moving the TV from a cold area to a warm area, sudden change in room temperature may cause the TV’s picture to blur or show poor color due to moisture condensation. Should this occur, please wait a few hours to allow the moisture to evaporate before powering on the TV.
Back to Installing the Wall-Mount Bracket |
Next to Bundling the Connection Cables |
Home | Getting Started | Operating the TV | Exploring Fun Features | TV Home Menu | Other Information | Specifications Tell us your opinion about this online reference book.
Copyright © 2009 Sony Electronics Inc. All rights reserved.
Getting Started |
Operating the TV |
Exploring Fun Features |
TV Home Menu |
Other Information |
Specifications |
Getting Started > Installing the TV > Bundling the Connecting Cables
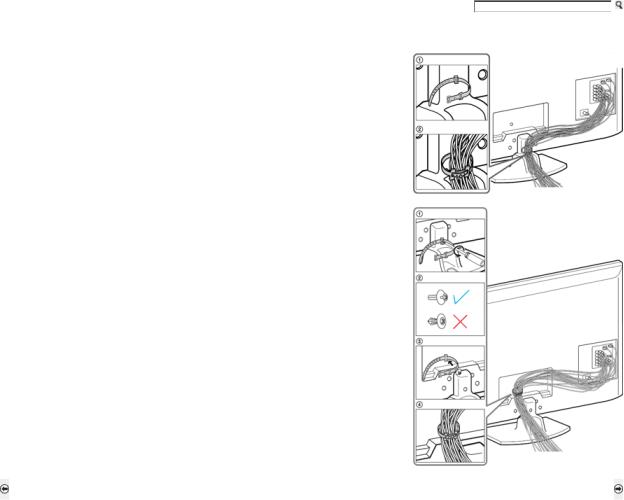
Bundling the Connecting Cables
Use the attached cable clamper to bundle the connecting cables. The cable clamper is located on the
Table-Top Stand as illustrated.
Do not bundle the AC power cord with other connecting cables. This can affect the picture quality.
When using a Wall-Mount Bracket, your connected cables can be clamped to an alternate location. Follow the steps below.
1)Remove the cable clamper from the Table-Top Stand using a Phillips screwdriver (not supplied).
2)Make sure that the tip of the plastic fastener you removed is closed as shown in (2).
3)Locate the alternate hole to attach the cable clamper on the TV rear cover as shown in (3). Push the fastener into the hole.
4)Bundle the cables and close the clamper.
Back to When Installing the TV Against a Wall or Enclosed Area |
Next to Securing the TV (Page 1 of 3) |
Home | Getting Started | Operating the TV | Exploring Fun Features | TV Home Menu | Other Information | Specifications
Tell us your opinion about this online reference book.
Copyright © 2009 Sony Electronics Inc. All rights reserved.
Getting Started Operating the TV Exploring Fun Features TV Home Menu Other Information Specifications
Getting Started > Installing the TV > Securing the TV
Securing the TV (Page 1 of 3)
Sony strongly recommends taking measures to prevent the TV from toppling over. Unsecured TVs may topple and result in property damage, serious bodily injury or even death.
Prevent the TV from Toppling Over
Secure the TV to a wall and/or stand.
Do not allow children to play or climb on furniture and TV sets.
Avoid placing or hanging items on the TV.
Never install the TV on:
slippery, unstable and/or uneven surfaces.
furniture that can easily be used as steps, such as a chest of drawers.
Install the TV where it cannot be pulled, pushed, or knocked over.
Route all AC power cords and connecting cables so that they are not accessible to curious children.
Back to Bundling the Connecting Cables |
Next to Securing the TV (Page 2 of 3) |
Home | Getting Started | Operating the TV | Exploring Fun Features | TV Home Menu | Other Information | Specifications
Tell us your opinion about this online reference book.
Copyright © 2009 Sony Electronics Inc. All rights reserved.
Getting Started |
Operating the TV |
Exploring Fun Features |
TV Home Menu |
Other Information |
Specifications |
Getting Started > Installing the TV > Securing the TV
Securing the TV (Page 2 of 3)
Use a Sony TV Stand
Use a Sony specified TV stand and follow the instruction manual provided with the Sony TV stand.
If a Sony specified TV stand is not used, consider the following recommended measures.
Recommended Measures to Secure the TV
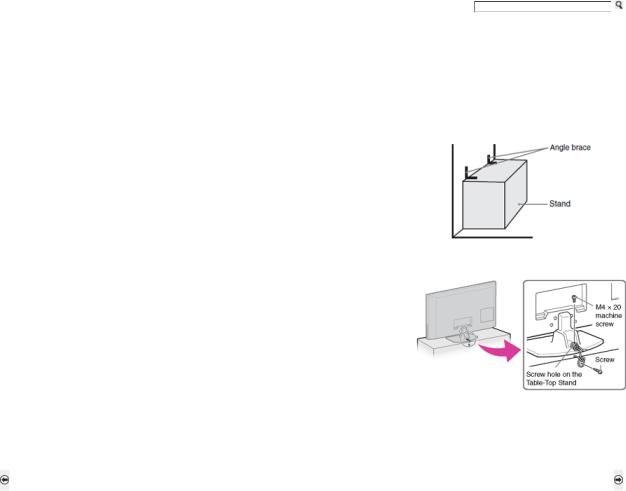
Secure the Stand for the TV
Make sure the TV stand can adequately support the weight of the TV. Use two angle braces (not supplied) to secure the stand. For each angle brace use the appropriate hardware to:
Attach one side of the angle brace to the wall stud.
Attach the other side to the TV stand.
Secure the TV to the Stand
Use the optional hardware listed below (not supplied):
M4 × 20 machine screw (screwed into the TV’s Table-Top Stand)
A screw or similar (attach it to the TV stand)
Rope or chain (strong enough to support the weight of the TV). Make sure that there is no excess slack in the rope or chain.
An alternative way to secure the TV is with an optional Sony Support Belt Kit.
Contact Sony Customer Support to purchase the optional Support Belt Kit by providing your TV model name.
For United States call: 1-800-488-7669 or visit: www.sony.com/accessories
For Canada call: 1-877-899-7669
Back to Securing the TV (Page 1 of 3) |
Next to Securing the TV (Page 3 of 3) |
Home | Getting Started | Operating the TV | Exploring Fun Features | TV Home Menu | Other Information | Specifications
Tell us your opinion about this online reference book.
Copyright © 2009 Sony Electronics Inc. All rights reserved.
Getting Started |
Operating the TV |
Exploring Fun Features |
TV Home Menu |
Other Information |
Specifications |
Getting Started > Installing the TV > Securing the TV
Securing the TV (Page 3 of 3)
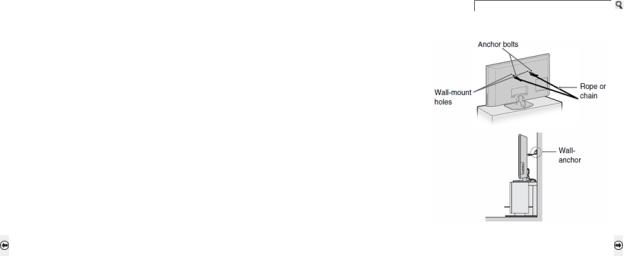
Anchor the TV to the Wall
Use the hardware listed below (not supplied):
Two M6 ×14 mm anchor bolts (screw into the top-most wall-mount holes located on the rear of the TV)
Rope or chain (attach to one M6 anchor bolt)
Wall-anchor (attach to the wall stud) strong enough to support the weight of the TV (pass the rope through the wall-anchor, then attach to the other M6 anchor bolt)
Securing the TV to the stand without securing the TV and the stand to the wall provides minimum protection against the TV toppling over. For further protection, be sure to follow the three measures recommended.
Back to Securing the TV (Page 2 of 3) |
Next to Locating Inputs and Outputs |
Home | Getting Started | Operating the TV | Exploring Fun Features | TV Home Menu | Other Information | Specifications
Tell us your opinion about this online reference book.
Copyright © 2009 Sony Electronics Inc. All rights reserved.
Getting Started |
Operating the TV |
Exploring Fun Features |
TV Home Menu |
Other Information |
Specifications |
Getting Started > Locating Inputs and Outputs
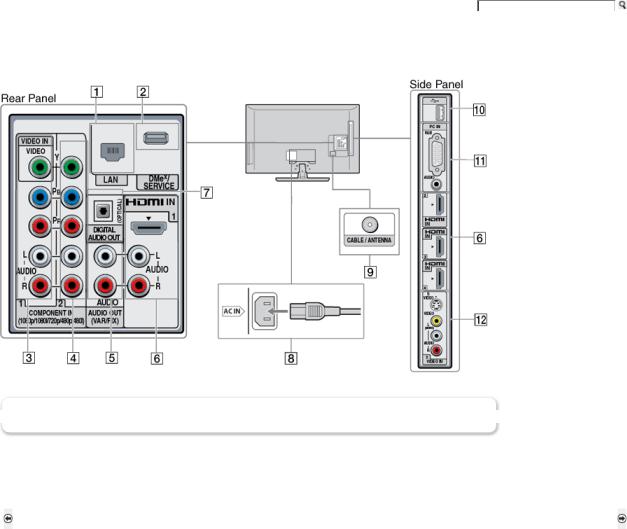
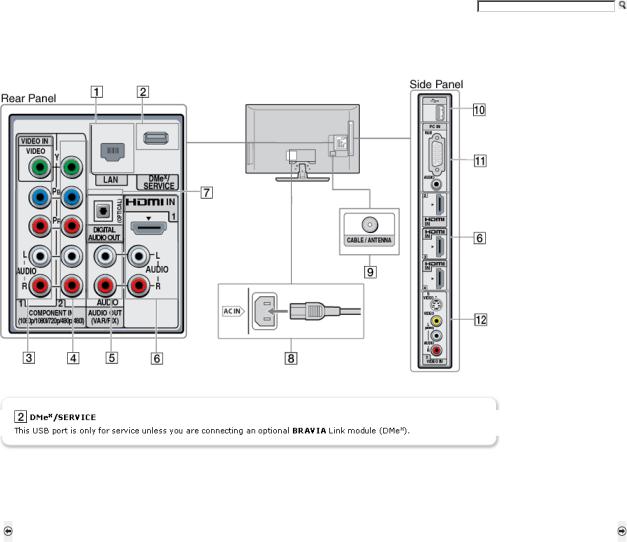
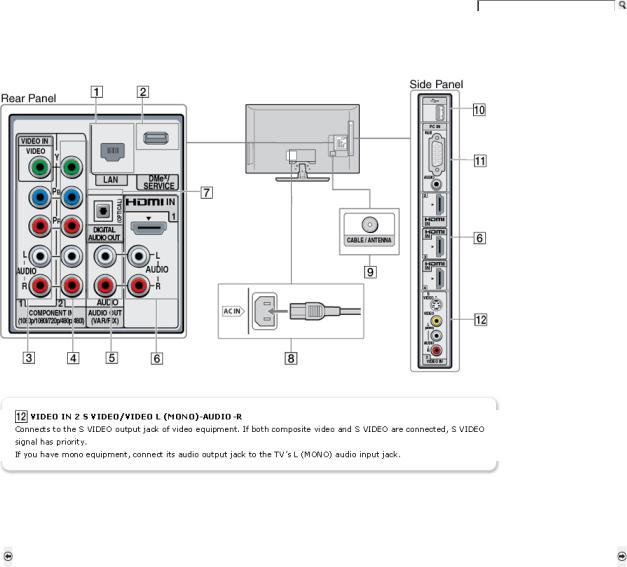
Locating Inputs and Outputs
Click on a number to view that feature's description.
Click a number on the diagram for more information.
An HDMI or Component video (YPBPR) connection is required to view 480i, 480p, 720p, 1080i and 1080p video formats. The 1080/24p video format is available only with HDMI connection. This TV displays all video input signals in a resolution of 1,920 dots × 1,080 lines.
Back to Securing the TV (Page 3) |
Next to Connecting the TV |
Home | Getting Started | Operating the TV | Exploring Fun Features | TV Home Menu | Other Information | Specifications Tell us your opinion about this online reference book.
Copyright © 2009 Sony Electronics Inc. All rights reserved.
Getting Started |
Operating the TV |
Exploring Fun Features |
TV Home Menu |
Other Information |
Specifications |
Getting Started > Locating Inputs and Outputs
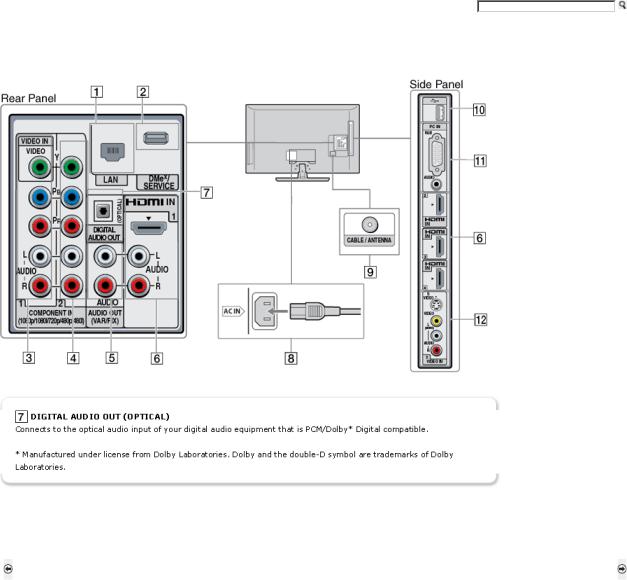
Locating Inputs and Outputs
Click on a number to view that feature's description.
An HDMI or Component video (YPBPR) connection is required to view 480i, 480p, 720p, 1080i and 1080p video formats. The 1080/24p video format is available only with HDMI connection. This TV displays all video input signals in a resolution of 1,920 dots × 1,080 lines.
Back to Securing the TV (Page 3) |
Next to Connecting the TV |
Home | Getting Started | Operating the TV | Exploring Fun Features | TV Home Menu | Other Information | Specifications Tell us your opinion about this online reference book.
Copyright © 2009 Sony Electronics Inc. All rights reserved.
Getting Started |
Operating the TV |
Exploring Fun Features |
TV Home Menu |
Other Information |
Specifications |
Getting Started > Locating Inputs and Outputs
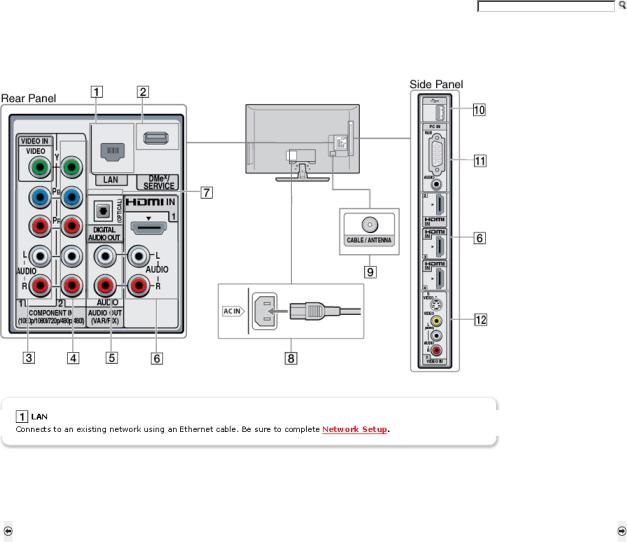
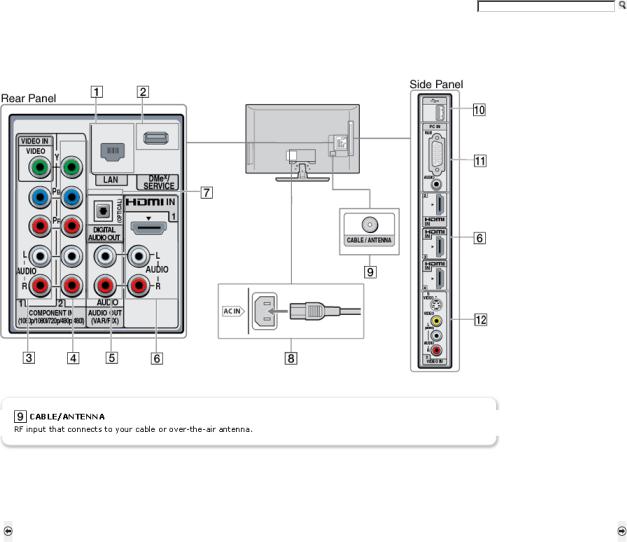
Locating Inputs and Outputs
Click on a number to view that feature's description.
An HDMI or Component video (YPBPR) connection is required to view 480i, 480p, 720p, 1080i and 1080p video formats. The 1080/24p video format is available only with HDMI connection. This TV displays all video input signals in a resolution of 1,920 dots × 1,080 lines.
Back to Securing the TV (Page 3) |
Next to Connecting the TV |
Home | Getting Started | Operating the TV | Exploring Fun Features | TV Home Menu | Other Information | Specifications Tell us your opinion about this online reference book.
Copyright © 2009 Sony Electronics Inc. All rights reserved.

Getting Started |
Operating the TV |
Exploring Fun Features |
TV Home Menu |
Other Information |
Specifications |
Getting Started > Locating Inputs and Outputs
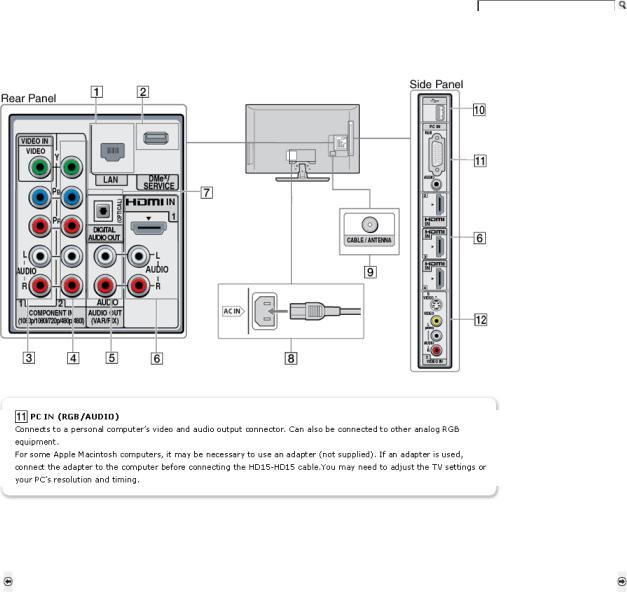
Locating Inputs and Outputs
Click on a number to view that feature's description.
An HDMI or Component video (YPBPR) connection is required to view 480i, 480p, 720p, 1080i and 1080p video formats. The 1080/24p video format is available only with HDMI connection. This TV displays all video input signals in a resolution of 1,920 dots × 1,080 lines.
Back to Securing the TV (Page 3) |
Next to Connecting the TV |
Home | Getting Started | Operating the TV | Exploring Fun Features | TV Home Menu | Other Information | Specifications Tell us your opinion about this online reference book.
Copyright © 2009 Sony Electronics Inc. All rights reserved.

Getting Started |
Operating the TV |
Exploring Fun Features |
TV Home Menu |
Other Information |
Specifications |
Getting Started > Connecting the TV
Connecting the TV
Input Signal Reference Chart
Cable System or/and VHF/UHF Antenna System
HD Cable Box/HD Satellite Box
PC
Connecting Internet & DLNA Certified™ Networks
Other Equipment
Home | Getting Started | Operating the TV | Exploring Fun Features | TV Home Menu | Other Information | Specifications Tell us your opinion about this online reference book.
Copyright © 2009 Sony Electronics Inc. All rights reserved.
Getting Started |
Operating the TV |
Exploring Fun Features |
TV Home Menu |
Other Information |
Specifications |
Getting Started > Connecting the TV > Input Signal Reference Chart
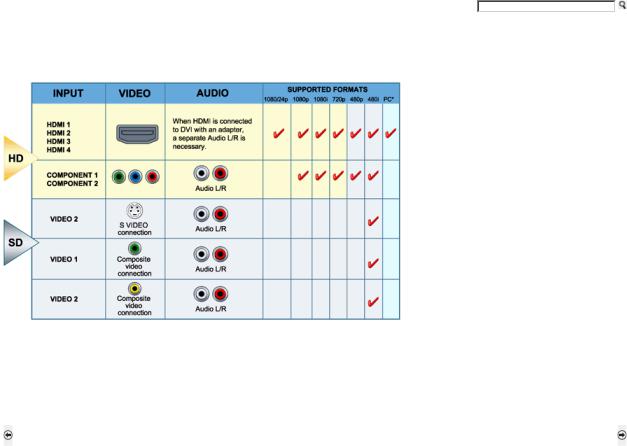
Input Signal Reference Chart
The following chart shows the high-definition (HD) and standard-definition (SD) video formats supported by your BRAVIA TV inputs.
* For supported PC formats see the PC Input Signal Reference Chart.
Back to Connecting the TV |
Next to Cable System or VHF/UHF Antenna System |
Home | Getting Started | Operating the TV | Exploring Fun Features | TV Home Menu | Other Information | Specifications Tell us your opinion about this online reference book.
Copyright © 2009 Sony Electronics Inc. All rights reserved.
 Loading...