


 Loading...
Sony KDL-55HX750, KDL-55HX753, KDL-46HX753, KDL-32HX750, KDL-32EX653 User Manual
...4-411-951-13(1)
LCD TV
Operating Instructions
KDL-55HX750 / 55HX753 / 46HX750 / 46HX753 / 46EX650 / 46EX653 / 46EX65A / 40HX750 KDL-40HX753 / 40EX650 / 40EX653 / 40EX65A / 32HX750 / 32HX753 / 32EX650 / 32EX653 KDL-32EX550 / 26EX550

Introduction
Thank you for choosing this Sony product. Before operating the TV, please read this manual thoroughly and retain it for future reference.
~
•The “x” that appears in the model name corresponds to a numeric digit, related to design, colour or TV system.
•Instructions about “Installing Wall Mount Bracket” are included within this TV’s instructions manual.
•The illustrations used in this manual are of the KDL-40HX750 series unless otherwise state.
•The illustrations of the remote used in this manual are of the RM-GD022 unless otherwise stated.
•Before operating the TV, please read page 35 (Safety Information). Retain this manual for future reference.
Trademark information
 is a registered trademark of the DVB Project.
HDMI, the HDMI Logo, and HighDefinition Multimedia Interface are trademarks or registered trademarks of HDMI Licensing LLC in the United States and other countries.
DLNA®, the DLNA Logo and DLNA CERTIFIED® are trademarks, service marks, or certification marks of the Digital Living Network Alliance.
DivX®, DivX Certified® and associated logos are trademarks of Rovi Corporation or its subsidiaries and are used under license.
ABOUT DIVX VIDEO: DivX® is a digital video format created by DivX, LLC, a subsidiary of Rovi Corporation. This is an official DivX Certified® device that plays DivX video. Visit divx.com for more information and software tools to convert your files into DivX videos.
ABOUT DIVX VIDEO-ON-DEMAND: This DivX Certified® device must be registered in order to play purchased DivX Video-on-Demand (VOD) movies. To obtain your registration code, locate the DivX VOD section in your device setup menu. Go to vod.divx.com for more information on how to complete your registration.
Manufactured under license from Dolby Laboratories. Dolby and the double-D symbol are trademarks of Dolby Laboratories.
“BRAVIA” and 


 are trademarks of Sony Corporation.
TrackID is a trademark or registered trademark of Sony Ericsson Mobile Communications AB.
Music and video recognition technology and related data are provided by Gracenote®. Gracenote is the industry standard in music recognition technology and related content delivery. For more information, please visit www.gracenote.com.
CD, DVD, Blu-ray Disc, and music and video-related data from Gracenote, Inc., copyright © 2000-present Gracenote.
Gracenote Software, copyright © 2000present Gracenote. One or more patents owned by Gracenote apply to this product and service. See the Gracenote website for a nonexhaustive list of applicable Gracenote patents. Gracenote, CDDB, MusicID, MediaVOCS, the Gracenote logo and logotype, and the “Powered by Gracenote” logo are either registered trademarks or trademarks of Gracenote in the United States and/or other countries.
Opera® Browser from Opera Software ASA. Copyright 1995-2012 Opera Software ASA. All rights reserved.
Wi-Fi Direct is a mark of the Wi-Fi Alliance.
“Blu-ray Disc”, “Blu-ray” and “Blu-ray Disc” logo are trademarks of Blu-ray Disc Association.
2 GB
Notes for Australia and New Zealand model
This product is ENERGY RATING qualified in the “Home” mode. ENERGY RATING is a program designed to promote energy efficient products and practices.
•When the TV is initially set up, it is designed to meet ENERGY RATING requirements while maintaining optimum picture quality.
•Changes to certain features, settings, and functionalities of this TV (e.g. TV Guide, Picture/Sound, Eco-Setting) can slightly change the power consumption.
Depending upon such changed settings (e.g. “Shop” mode), the power consumption may vary which possibly could exceed the stated energy rating.
To reset the TV to ENERGY RATING qualified settings, select “Home” mode from the initial set-up procedure in “Factory Settings” under the “Set-up” menu.
IMPORTANT
INFORMATION
If a television is not positioned in a sufficiently stable location, it can be potentially hazardous due to falling. Many injuries, particularly to children, can be avoided by taking simple precautions such as:
•Using cabinets or stands recommended by the manufacturer of the television.
•Only using furniture that can safely support the television.
•Ensuring the television is not overhanging the edge of the supporting furniture.
•Not placing the television on tall furniture (for example, cupboards or bookcases) without anchoring both the furniture and the television to a suitable support.
•Not standing the televisions on cloth or other materials placed between the television and supporting furniture.
•Educating children about the dangers of climbing on furniture to reach the television or its controls.
Notice for customers in the South Africa
The Euro/South Africa converter plug should be fitted as follows.
1 Insert the power supply or CEE7
plug in to the converter plug.
2 Use an appropriate screwdriver to
attach the screw tightly without damaging the screw
head.
3 TEST: Grip the converter plug, and pull the VDE cord set/transformer to
ensure it is fully secure, if not then increase the torque setting and further tighten.
Re-test.
The converter plug is now ready for use.
Notice for customers in Thailand
This telecommunication equipment conforms to NTC technical requirement.
Notice for customers in Singapore (KDL-55/46/40/ 32HX75x)
Complies with IDA
Standards
DB00353
Notice for customers in India
Attach the supplied plug adapter.
Notice for customers in Jordan (KDL-55/46/40/ 32HX75x)
All models covered by this Instruction Manual contains wireless module DWM-W046 with approval number TRC/SS/2010/135.
Location of the identification label
Labels for Model No. and Power Supply rating (in accordance with applicable safety regulation) are located on the rear of the TV.
3 GB
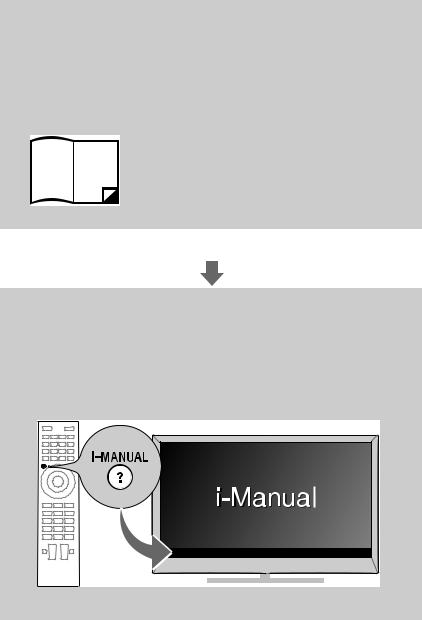
About this manual
(Operating Instructions)
This manual explains how to set up your TV. For more information on how to use BRAVIA TV, refer to the “Electronic manual”.
Operating Instructions
Explains how to set up your TV such as connections, initial set-up, and basic operations.
For more information, press the i-MANUAL button
Electronic manual
(i-Manual)
Explains how to use all the features. See page 23 on how to use the i-Manual.
Images and illustrations used in this manual may differ from the actual screen.
4 GB

Table of Contents |
|
|
Getting Started |
|
|
Checking the accessories......................................................................... |
|
6 |
Inserting batteries into the remote............................................................. |
|
6 |
1: Attaching the Table-Top Stand ............................................................. |
|
7 |
2: Adjusting the viewing angle of the TV ................................................... |
|
8 |
3: Connections .......................................................................................... |
|
8 |
4: Preventing the TV from toppling over.................................................. |
|
12 |
5: Bundling the cables ............................................................................ |
|
13 |
6: Connecting the TV to the Internet........................................................ |
|
14 |
7: Performing the initial set-up................................................................. |
|
15 |
Using Your BRAVIA TV |
|
|
Watching TV B ............................. |
qk |
|
Selecting various functions and settings (Home Menu).......................... |
20 |
|
Watching Internet Video .......................................................................... |
|
22 |
Looking for Instructions |
|
|
Looking for instructions in the |
|
|
electronic manual |
|
|
(i-Manual) B.................................. |
wd |
|
Additional Information |
|
|
Troubleshooting....................................................................................... |
|
25 |
Specifications .......................................................................................... |
|
26 |
Installing the Accessories (Wall-Mount Bracket)..................................... |
28 |
|
Safety Information.................................................................................... |
|
35 |
Precautions.............................................................................................. |
|
37 |
5 GB
Checking the accessories
Remote (1)
Size AAA batteries (R03 type) (2)
Table-Top Stand (1)*1
Fixing screws for Table-Top Stand (M5 × 16) (3)
(Except KDL-26EX550)
Fixing screws for Table-Top Stand (M5 × 16) (2)
(KDL-26EX550 only)
Assembling screws for Table-Top Stand (M5 x 16) (4)
(KDL-55/46/40/32HX75x, KDL-46/40/32EX65x,
KDL-32EX550 only)
HDMI cable (1)
(KDL-46/40EX65A only)
Operating Instructions (this manual) and other
documents
*1 Refer to the supplied Table-Top Stand leaflet to assemble the Table-Top Stand.
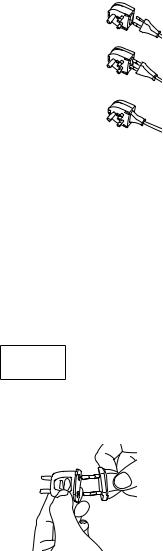
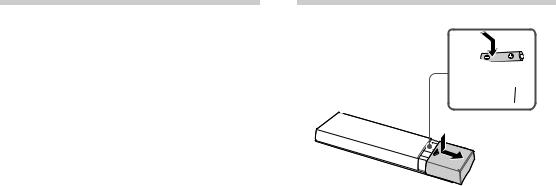
Inserting batteries into the remote
1 Remove the protection sheet.
2 Push and slide the cover to open.
6 GB
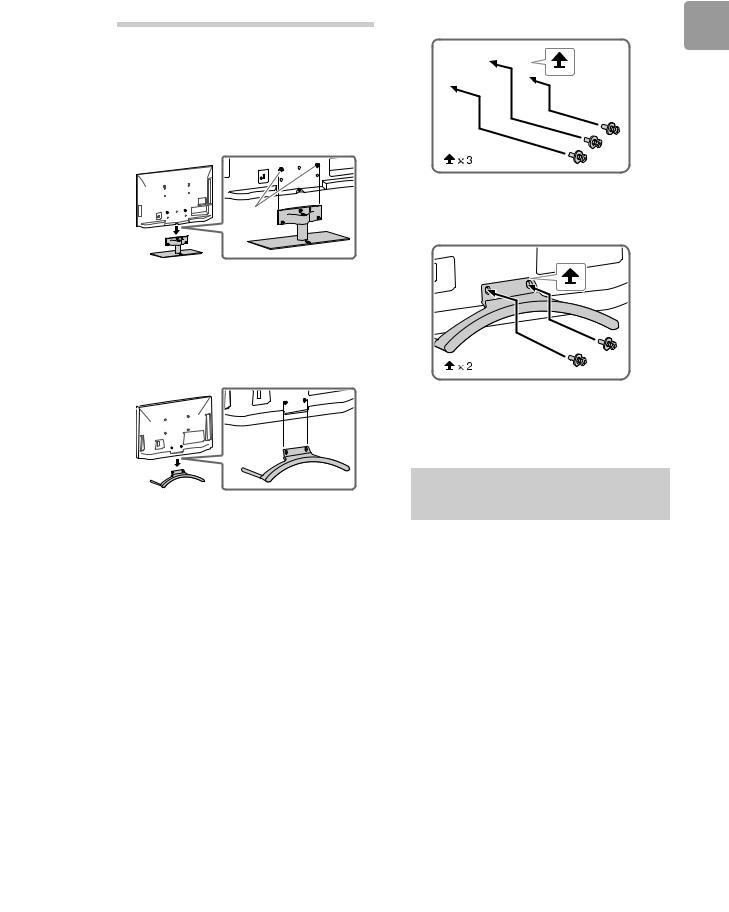
1:Attaching the Table-Top Stand
Refer to the supplied Table-Top Stand leaflet for proper attachment.
1 Place the TV set on the Table-Top Stand.
KDL-55/46/40/32HX75x,
KDL-46/40/32EX65x, KDL-32EX550
Guide pins
~
•Align the TV from the top, slide it in until the guide pins cannot be seen.
KDL-26EX550
2 Fix the TV to the Table-Top Stand using the supplied screws. The arrow marks  indicate the location of the screw holes used for securing the Table-Top Stand.
KDL-55/46/40/32HX75x,
KDL-46/40/32EX65x, KDL-32EX550
Started Getting
KDL-26EX550
~
•If using an electric screwdriver, set the torque at approximately 1.5 N·m
{15 kgf·cm}.
Detaching the Table-Top
Stand from the TV
To detach the Table-Top Stand from the TV, remove the screws  fixed in step 2.
~
•Do not remove the Table-Top Stand for any reason other than to install corresponding accessories on the TV.
•When removing the Table-Top Stand from the TV, lay the display face down on a stable work surface that is larger than the TV.
•To prevent damaging the surface of the LCD display, make sure to place a soft cloth on the work surface.
7 GB
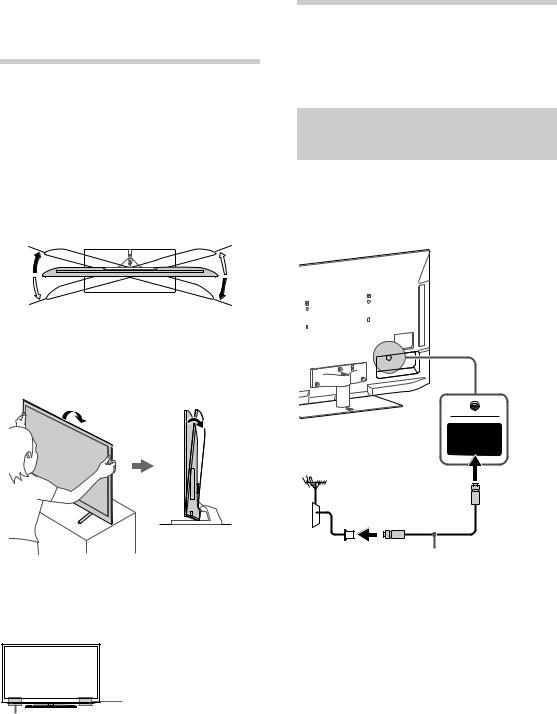
2:Adjusting the viewing angle of the TV
This TV can be adjusted within the angles as illustrated.
x Angle adjustment (Swivel)
(Except KDL-26EX550)
~
•When adjusting the angle, hold the stand with one hand to avoid having the stand slip or TV tip over.
*15° |
*15° |
*15° |
*15° |
x Angle adjustment (Tilt)
(KDL-26EX550 only)
*6°
3: Connections
~
•Use an antenna cable connector no greater than 14 mm in thickness.
•Use an HDMI cable connector within 12 mm (thickness) × 21 mm (width).
Connecting an antenna/ cable/VCR
x To connect an antenna/cable
KDL-55/46/40/32HX75x,
KDL-46/40/32EX65x, KDL-32EX550
* The angle is approximate value.
~
• Ensure that there are no objects in front of the TV.
3D Sync Transmitter |
(KDL-55/46/40/32HX75x |
only) |
IR Sensor
Antenna cable (not supplied)
8 GB
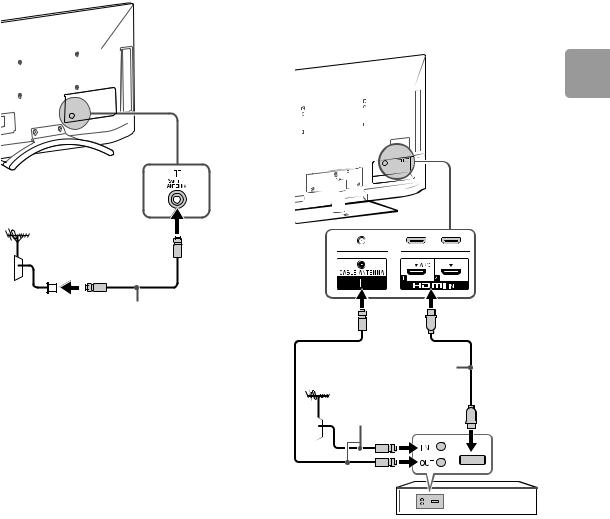
KDL-26EX550 |
x To connect a Set Top Box/recorder |
|
(e.g. DVD recorder) with HDMI |
|
KDL-55/46/40/32HX75x, |
|
KDL-46/40/32EX65x, KDL-32EX550 |
Started Getting
Antenna cable (not supplied)
*HDMI cable
 Antenna cable (not supplied)
Set Top Box/recorder (e.g. DVD recorder)
* HDMI cable is supplied for KDL-46/40EX65A only.
(Continued) |
9 GB |

KDL-26EX550 |
|
x Connecting an antenna/cable and VCR |
||||||||
|
|
|
|
|
|
KDL-55/46/40/32HX75x, |
||||
|
|
|
|
|
|
KDL-46/40/32EX65x, KDL-32EX550 |
||||
|
|
|
|
|
|
|
|
|
|
|
|
|
|
|
|
|
|
|
|
|
|
|
|
|
|
|
|
|
|
|
|
|
|
|
|
|
|
|
|
|
|
|
|
|
|
|
|
|
|
|
|
|
|
|
|
|
|
|
|
|
|
|
|
|
|
|
|
|
|
|
|
|
|
|
|
|
|
|
|
|
|
|
|
|
|
|
|
HDMI cable (not supplied)
Antenna cable (not supplied)
Set Top Box/recorder (e.g. DVD recorder)
Antenna cable (not supplied)
AV cable (not supplied)
Antenna cable (not supplied)
VCR
10 GB

KDL-26EX550
|
|
|
|
|
|
|
|
|
|
|
|
|
|
|
|
|
|
|
|
|
|
|
|
|
|
|
|
|
|
|
|
|
|
|
|
|
|
|
|
|
|
|
|
|
|
|
|
|
|
|
Antenna cable |
||||
|
|
|
|
|
|
|
|
|
|||||
|
|
|
|
|
|
|
|
|
|||||
|
|
|
|
|
|
|
|
|
|||||
|
|
|
|
|
|
|
|
|
|||||
|
|
|
|
|
|
|
|
|
|||||
|
|
|
|
|
|
|
|
|
|||||
AV cable |
|||||||||||||
(not supplied) |
(not supplied) |
||||||||||||
|
|
|
|
|
|
|
|
|
|
|
|
|
|
|
|
|
|
|
|
|
|
|
|
|
|
|
|
|
|
|
|
|
|
|
|
|
|
|
|
|
|
|
|
|
|
|
|
|
|
|
|
|
|
|
|
|
|
|
|
|
|
|
|
|
|
|
|
|
|
Antenna cable (not supplied)
VCR
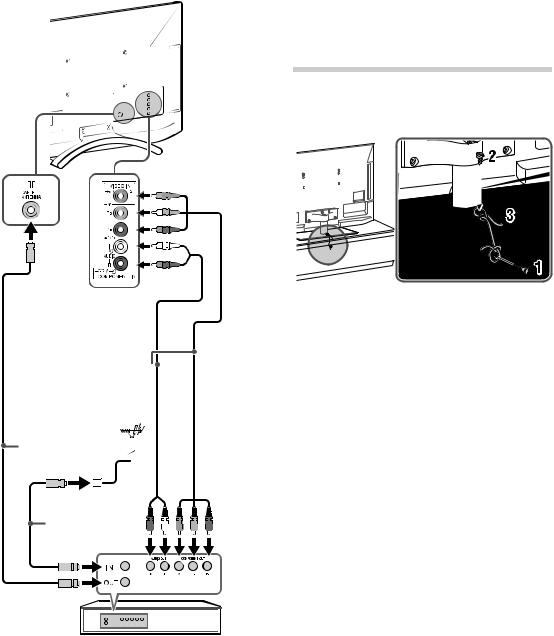
Connecting audio/video devices
KDL-55/46/40/32HX75x,
KDL-46/40/32EX65x, KDL-32EX550
Started Getting
AV cable  (not supplied)
Antenna cable
 (not supplied)
Antenna cable (not supplied)
DVD Player
(Continued) 11 GB
KDL-26EX550
4:Preventing the TV from toppling over
KDL-55/46/40/32HX75x,
KDL-46/40/32EX65x, KDL-32EX550
|
|
|
|
|
|
|
|
|
|
|
|
|
|
|
|
|
|
|
|
|
|
|
|
|
|
|
|
|
|
|
|
|
|
|
|
|
|
|
|
|
|
|
|
|
|
|
|
|
|
|
|
|
|
|
|
|
|
|
|
|
|
|
|
|
|
|
|
|
|
|
|
|
|
|
|
|
|
|
|
|
|
|
|
|
|
|
|
|
|
|
|
|
|
|
|
|
|
|
|
|
|
|
|
|
|
|
|
|
|
|
|
|
|
|
|
|
|
|
|
|
|
|
|
|
|
|
|
|
|
|
|
|
|
|
|
|
|
|
|
|
|
|
|
|
|
|
|
|
|
|
|
|
|
|
|
|
|
|
|
|
|
|
|
|
|
|
|
|
|
|
|
|
|
|
|
|
|
|
|
|
|
|
|
|
|
|
|
|
|
|
|
|
|
|
|
|
|
|
|
|
|
|
|
|
|
|
|
|
|
|
|
|
|
|
|
|
|
|
|
|
|
|
|
|
|
|
|
|
|
|
|
1 |
Install a wood screw (4 mm in diameter, not |
||||||
|
|
|
|
|
|
|
|
|
|
supplied) in the TV stand. |
|||||
|
|
|
AV cable |
2 |
Install a machine screw (M4, not supplied) |
||||||||||
|
|
|
(not supplied) |
|
|
|
into the screw hole of the TV. |
||||||||
|
|
|
|||||||||||||
|
3 |
||||||||||||||
|
|
|
|
|
|
|
|
Tie the wood screw and the machine screw |
|||||||
|
|
|
|
|
|
|
|
|
|
with a strong cord (not supplied). |
|||||
Antenna cable |
|
|
|
|
|
|
|
|
|
|
|
||||
|
|
|
|
|
|
|
|
|
|||||||
(not supplied) |
|
|
|
|
|
|
|
|
|
|
|
||||
|
|
|
|
|
|
|
|
|
|
|
|
|
|
|
|
|
|
|
|
|
|
|
|
|
|
|
|
|
|
|
|
Antenna cable (not supplied)
DVD Player
12 GB
Loading...