


|
|
|
Contents |
|
|
|
|
|
|
|
|
1 |
Instructions |
7 |
|
||
|
|
1.1 |
General safety instructions |
7 |
|
|
|
1.2 |
Manufacturer liability |
8 |
|
|
|
1.3 |
Appliance purpose |
8 |
|
|
|
1.4 |
Disposal |
8 |
|
|
|
1.5 |
Identification plate |
9 |
|
|
|
1.6 |
This user manual |
9 |
|
|
|
1.7 |
How to read the user manual |
9 |
|
|
2 Description |
10 |
|
||
|
|
2.1 |
General description |
10 |
|
|
|
2.2 |
Cooking hob |
10 |
|
|
|
2.3 |
Control panel |
11 |
|
|
|
2.4 |
Other parts |
12 |
|
|
|
2.5 |
Available accessories |
12 |
|
|
3 Use |
|
14 |
|
|
|
|
3.1 |
Instructions |
14 |
|
|
|
3.2 |
First use |
15 |
|
|
|
3.3 |
Using the accessories |
15 |
|
|
|
3.4 |
Using the hob |
17 |
|
|
|
3.5 |
Using the electric hotplates |
18 |
|
|
|
3.6 |
Using the storage compartment |
19 |
|
|
|
3.7 |
Using the oven |
19 |
|
|
|
3.8 |
Cooking advice |
20 |
|
|
4 Cleaning and maintenance |
23 |
|
||
|
|
4.1 |
Instructions |
23 |
|
|
|
4.2 |
Cleaning the appliance |
23 |
|
|
|
4.3 |
Removing the door |
24 |
|
|
|
4.4 |
Cleaning the door glazing |
25 |
|
|
|
4.5 |
Cleaning the inside of the oven |
25 |
|
|
|
4.6 |
Extraordinary maintenance |
25 |
|
5 |
Installation |
26 |
|
||
|
|
5.1 |
Gas connection |
26 |
|
|
|
5.2 |
Adaptation to different types of gas |
29 |
|
|
|
5.3 |
Electrical connection |
31 |
|
|
|
5.4 |
Positioning |
32 |
|
We advise you to read this manual carefully, which contains all the instructions for maintaining the appliance's aesthetic and functional qualities.
For further information on the product: www.smeg.com
EN
3

Instructions
READ BEFORE USE
IMPORTANT INSTRUCTIONS
GAS/ELECTRIC COOKERS
Gas/Gas Cookers:
•To avoid over heating when the oven or grill is being used the glass cover must always be up.
•The glass cover may not be cooked on, or closed when the burners are in use and while they are still warm.
•The gas oven and gas grill can not be used simultaneously.
All Cookers:
•Never place aluminum or foil at the bottom of the oven and do not place oven trays as this may damage the enamel coating by over heating.
•The manufacturer declines all responsibility for improper use.
•Never attempt to repair or install the appliance yourself as the guarantee will fall away.
•Installation must be done by a qualified gas installer and qualified electrician.
•Retain your proof of purchase for guarantee.
4

Instructions
Additional installation information for SMEG gas hobs and stoves supplied to
South Africa
All Smeg appliances comply with SANS 1539 and have been issued with Permit numbers by the Liquefied Petroleum Gas Safety Association of Southern Africa.
Gas Type: LPG (Note: This appliance may have been supplied ex factory with setting and jets for Natural Gas. Your installer must make the necessary changes and adjustments before handing over the installed appliances for use).
Operating Pressure: 2.8 kPa Note that this appliance may only be used with a LPG regulator of 2.8 kPa outlet pressure and that complies with requirements of SABS 1237.
•This appliance may only be installed by a qualified Gas Fitter that is registered with the LPGSASA. All registered Gas fitters are issued with an identity card and this also carries their registration number. Make a note of this. The Gas Fitter should also provide you with a written certificate after completing the work. Before the installer hands over the installed appliance ensure that you are advised the location of the isolation or shut off valve in the gas supply line to the appliance and how to operate it.
•Do not modify the appliance in any way as this may make it unsafe.
•Note carefully that ventilation requirements indicated in the specific model instruction booklet. This information is vital for the safety of the occupants of the area in which the appliance is installed and used.
•Never check for gas leaks with a naked flame. Always use a soapy water solution applied with a brush to the areas where you suspect there may be a gas leak. Do not use the appliance if you suspect a gas leak.
•There are no preset service intervals for this appliance. Refer to the section on maintenance and cleaning in the instruction booklet for details on how to care for your SMEG appliance.
•After removing burner caps or burner heads to clean them or the hob surface around the burners, always take care that the burner heads are properly located in position and that the igniter post and flame failure thermocouple are not damaged in any way. It is important that these devices fit correctly into the location holes provided in the burner heads. They will not function correctly if not properly located. The burner caps locate by means of the ridge on the underside. Note that burners will not work efficiently if the burner caps are not properly located. There are drawings of a typical burner assembly in your instruction booklet.
Supplied in South Africa by: S.B.S. Household Appliances, 89 Impala Road, Kelvin view, Eastgate Ext.8 (off Marlboro) tel: (011) 656 0025 - National Call Center: 0860 102 984 e- mail: service@smegsa.co.za
EN
5

Instructions
FOR YOUR SAFETY
IF YOU SMELL GAS:
•Turn off gas supply at bottle
•Extinguish all naked flames;
•Do not operate any electrical appliances
•Ventilate the area
•Check for leaks as detailed in this manual
If odour persists, contact your dealer or gas supplier immediately
Do not temper with the appliance.
BURN-BACK (FIRE IN BURNER TUBE OR
CHAMBER)
In the event of a burn-back, where the flame burns back to the jet, immediately turn off the gas supply at the control valve on the panel. After ensuring the flame is extinguished, wait for I minute and re-light the appliance in the normal manner. Should the appliance again burn back, close the control valve and call a service technician. Do not use the appliance again until the service technician has declared that it is safe to do so.
GAS-PRESSURE REGULATOR
This appliance requires an operating pressure of 2,8 kPa at the appliance. A suitable LPG regulator that complies with the requirements of SANS 1237 must be installed.
IMPORTANT INFORMATION FOR THE USER
This appliance may only be installed by a registered LP Gas installer. All registered installers are issued with a card carrying their registration number. Ask to be shown the card before allowing the installation work to commence and make a note of the Installer QCC number. Upon completion of the installation, the installer is required to explain the operational details of the appliance together with the safety instructions. You will be asked to sign acceptance of the installation and be provided with a completion certificate. You should only sign for acceptance of the installation when the installation is completed to your satisfaction.
Note that your invoice is required in the event that you wish make a guarantee claim.
IMPORTANT INFORMATION FOR THE INSTALLER.
This appliance may only be installed by a LP gas installer registered with the Liquefied Petroleum Gas
Association of Southern Africa. The appliance must be installed in accordance with the requirements of
SANS 10087-1 and any fire department regulations and/or local bylaws applicable to the area. If in doubt check with the relevant authority before undertaking the installation. Upon completion of the installation you are required to fully explain and demonstrate to the user the operational details and safety practices applicable to the appliance and the installation.
6

Instructions
1 Instructions
1.1 General safety instructions
Risk of personal injury
•During use the appliance and its accessible parts become very hot.
•Never touch the heating elements during use.
•Keep children under eight years of age at a safe distance if they are not constantly supervised.
•Children must never play with the appliance.
•Never rest metallic objects such as knives, forks, spoons and lids on the appliance during use.
•Switch the appliance off immediately after use.
•Never try to put out a fire or flames with water: turn off the appliance and smother the flames with a fire blanket or other appropriate cover.
•The appliance must never be cleaned by unsupervised children.
•Have qualified personnel carry out installation and assistance interventions according to the standards in force.
•Do not modify this appliance.
•Do not insert pointed metal objects (cutlery or utensils) into the slots in the appliance.
•Do not try to repair the appliance yourself or without the intervention of a qualified technician.
•If the power supply cable is damaged, contact technical support immediately and they will replace it.
Risk of damaging the appliance
•Do not use abrasive or corrosive detergents on glass parts (e.g. powder products, stain removers and metallic sponges).
•Use wooden or plastic utensils.
•Do not seat on the appliance.
•Do not use steam jets for cleaning the appliance.
•Do not obstruct ventilation openings and heat dispersal slots.
•Never leave the appliance unattended during cooking operations where fats or oils could be released.
•Never leave objects on the cooking surface.
•Do not use the appliance to heat rooms for any reason.
EN
7

Instructions
For this appliance
•Ensure that the appliance is switched off before replacing the bulb.
•Do not rest any weight or sit on the open door of the appliance.
•Take care that no objects are stuck in the doors.
1.2 Manufacturer liability
The manufacturer declines all liability for damage to persons or property caused by:
•use of the appliance other than the one envisaged;
•non-observance of the user manual provisions;
•tampering with any part of the appliance;
•use of non-original spare parts.
1.3 Appliance purpose
•This appliance is intended for cooking food in the home environment. Every other use is considered improper.
•This appliance may be used by children aged at least 8 and by people of reduced physical and mental capacity, or lacking in experience in the use of electrical appliances, as long they are supervised or instructed by adults who are responsible for their safety.
•The appliance is not designed to operate with external timers or with remote-control systems.
1.4 Disposal
This appliance must be disposed of separately from other waste
(Directives 2002/95/EC, 2002/ 96/EC, 2003/108/EC). The appliance does not contain substances in quantities sufficient to be considered hazardous to health and the environment, in accordance with current European directives.
To dispose of the appliance:
•Cut the power supply cable and remove it along with the plug.
Power voltage
Danger of electrocution
•Disconnect the main power supply.
•Disconnect the power cable from the electrical system.
•Consign the appliance to the appropriate selective collection centres for electrical and electronic equipment waste, or deliver it back to the retailer when purchasing an equivalent product, on a one for one basis.
8

Instructions
Our appliances are packed in nonpolluting and recyclable materials.
• Consign the packing materials to the appropriate selective collection centres.
Plastic packaging
Danger of suffocation
•Do not leave the packaging or any part of it unattended.
•Do not let children play with the packaging plastic bags.
1.5 Identification plate
The identification plate bears the technical data, serial number and brand name of the appliance. Do not remove the identification plate for any reason.
1.6 This user manual
This user manual is an integral part of the appliance and must therefore be kept in its entirety and in an accessible place for the whole working life of the appliance.
Read this user manual carefully before using the appliance.
1.7 How to read the user manual
This user manual uses the following reading |
EN |
|||||
conventions: |
|
|||||
|
|
|
|
|
Instructions |
|
|
|
|
|
|
General information on this user |
|
|
|
|
|
|
manual, on safety and final |
|
|
|
|
|
|
disposal. |
|
|
|
|
|
|
Description |
|
|
|
|
|
|
Description of the appliance and its |
|
|
|
|
|
|
||
|
|
|
|
|
accessories. |
|
|
|
|
|
|
Use |
|
|
|
|
|
|
Information on the use of the |
|
|
|
|
|
|
||
|
|
|
|
|
appliance and its accessories, |
|
|
|
|
|
|
cooking advice. |
|
|
|
|
|
|
||
|
|
|
|
|
Cleaning and maintenance |
|
|
|
|
|
|
Information for proper cleaning and |
|
|
|
|
|
|
|
|
|
|
|
|
|
maintenance of the appliance. |
|
|
|
|
|
|
Installation |
|
|
|
|
|
|
Information for the qualified |
|
|
|
|
|
|
|
|
|
|
|
|
|
technician: installation, operation |
|
|
|
|
|
|
and inspection. |
|
|
|
|
|
|
|
|
|
|
|
|
|
|
|
|
|
|
|
|
Safety instructions |
|
|
|
|
|
|
|
|
|
|
|
|
|
|
|
|
|
|
|
|
Information |
|
|
|
|
|
|
|
|
|
|
|
|
|
|
|
|
|
|
|
|
Advice |
|
|
|
|
|
|
|
|
|
|
|
|
|
|
|
1. Use instruction sequence. |
|
|||||
• Single use instruction. |
|
|||||
9

Description
2 Description
2.1 General description
1 Cooking hob |
5 Door |
||
2 |
Control panel |
6 |
Fan |
3 |
Oven light |
7 |
Storage compartment |
4 |
Seal |
|
Shelf for racks/trays support |
|
|
frames |
|
2.2 Cooking hob
AUX = Auxiliary |
1 |
= Small electric hotplate (1000W) |
SR = Semi-rapid |
2 |
= Large electric hotplate (1500W) |
UR = Ultra rapid |
|
|
10 |
|
|

Description
2.3 Control panel
EN
Temperature knob (1)
This knob allows you to select the cooking temperature. Turn the knob clockwise to the required value, between the minimum and maximum settings.
Indicator light (2)
The indicator light comes on to indicate that the oven is heating up. It turns off as soon as it reaches the set temperature. It flashes regularly to indicate that the temperature set inside the oven is kept constant.
Function knob (3)
The oven's various functions are suitable for different cooking modes. After selecting the required function, set the cooking temperature using the temperature knob.
Programming clock (4)
Useful for displaying the current time, set programmed cooking operations and program the timer.
Hob burner knobs (5)
Useful for lighting and adjust the hob burners. Press and turn the knobs anticlockwise to the value  to light the
relative burners. Turn the knobs to the zone between the maximum  and minimum
 setting to adjust the flame.
Return the knobs to the  position to turn off the burners.
Electric hotplate knobs (6)
Useful for lighting and adjust the electric hotplates. Turn the knobs clockwise to adjust the operating power of the hot plate from minimum 1 to maximum 6.
Electric hotplate indicator light (7)
The electric hotplate indicator light comes on to indicate that the electric hotplate is heating up.
11
Description
2.4 Other parts
Oven shelves
The oven features shelves for positioning trays and racks at different heights. The insertion heights are indicated from the bottom upwards (see 2.1 General description).
Cooling fan
The fan cools the ovens and comes into operation during cooking. The fan causes a steady outflow of air that exits from the rear of the appliance and which may continue for a brief period of time even after the appliance has been turned off.
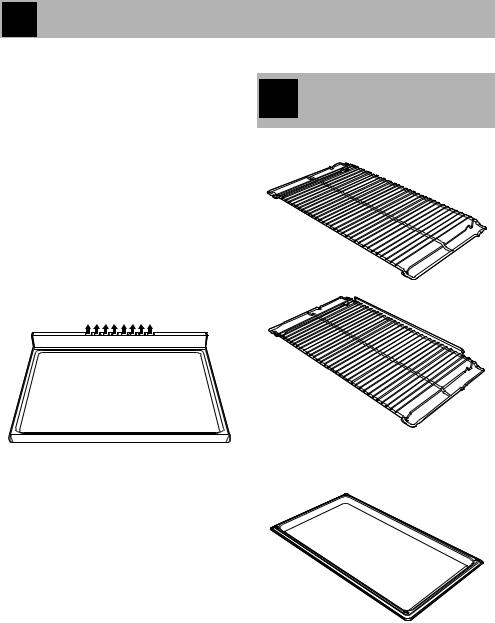
2.5 Available accessories
Some models are not provided with all accessories.
Rack
Internal light
The internal light of the ovens comes on when any function is selected.
Useful for holding cooking containers.
Tray
Useful for collecting fat from foods placed on the rack above and for cooking pies, pizzas and baked desserts.
12
 Loading...