


Contents
1.Safety and operating instructions __________________________ 4
2.Installation and hook-up _________________________________ 7
3.Description of the controls________________________________ 9
4.Operating instructions ___________________________________16
5.Cleaning and maintenance _______________________________26
6.Troubleshooting _______________________________________30
Thank you for choosing this product.
We advise you to carefully read all the instructions contained in this manual, in order to understand how to operate your dishwasher safely and correctly.
The manual is divided into paragraphs, which provide a step by step description of the dishwasher functions, with clear instructions accompanied by detailed illustrations.
Recommendations are given for the correct use of the baskets, spray arms, containers, filters, washing programs, and for operating the controls.
Follow the recommended cleaning procedures to ensure that your dishwasher always remains in perfect working order.
This manual provides a quick and easy reference for answering all your questions concerning the use of your new dishwasher.
INSTALLATION INSTRUCTIONS: these are intended for the qualified technician who must carry out the installation, hook-up and testing of the appliance.
USER INSTRUCTIONS: these consist of recommendations for using the appliance, a description of its controls and of the correct cleaning and maintenance procedures.
3

Safety instructions
1. Safety and operating instructions
THIS MANUAL FORMS AN INTEGRAL PART OF THE APPLIANCE: IT MUST ALWAYS BE KEPT INTACT TOGETHER WITH THE DISHWASHER. BEFORE USING THE APPLIANCE, CAREFULLY READ ALL THE INSTRUCTIONS CONTAINED IN THIS MANUAL.
INSTALLATION MUST BE PERFORMED BY A QUALIFIED TECHNICIAN, IN COMPLIANCE WITH THE REGULATIONS IN FORCE. THIS APPLIANCE IS INTENDED FOR DOMESTIC USE, AND COMPLIES WITH THE EEC DIRECTIVES 72/23, 89/336 (INCLUDING 92/31) CURRENTLY IN FORCE, INCLUDING THE PREVENTION AND ELIMINATION OF RADIO FREQUENCY INTERFERENCE.
THE APPLIANCE IS DESIGNED FOR THE FOLLOWING PURPOSE: WASHING AND DRYING OF DISHES; ANY OTHER USE SHALL BE CONSIDERED IMPROPER. THE MANUFACTURER DECLINES ALL RESPONSIBILITY FOR
USES OTHER THAN THOSE DESCRIBED ABOVE.
THE NAME PLATE FEATURING THE TECHNICAL DATA, SERIAL NUMBER AND MARKINGS IS VISIBLY POSITIONED ON THE INNER EDGE OF THE DOOR. THE NAME PLATE ON THE INNER EDGE OF THE DOOR MUST
NEVER BE REMOVED.
DO NOT LEAVE THE DISCARDED PACKAGING MATERIALS UNSUPERVISED WITHIN THE HOME. SEPARATE THE VARIOUS MATERIALS WHICH MAKE UP THE PACKAGING AND TAKE THEM TO THE NEAREST SORTED WASTE COLLECTION CENTRE.
THE APPLIANCE MUST BE PROVIDED WITH AN EARTH CONNECTION IN ACCORDANCE WITH THE ELECTRICAL SAFETY REGULATIONS IN FORCE.
THE MANUFACTURER DECLINES ALL RESPONSIBILITY FOR DAMAGE TO PERSONS OR PROPERTY RESULTING FROM THE FAILURE TO EARTH THE APPLIANCE OR FROM A DEFECTIVE EARTH CONNECTION.
IF THE APPLIANCE IS INSTALLED ON A CARPETED OR COVERED FLOOR, ENSURE THAT THE OPENINGS ON ITS UNDERSIDE ARE NOT OBSTRUCTED.
ALWAYS SWITCH OFF THE DISHWASHER AFTER EACH USE TO AVOID WASTING ELECTRICITY.
OBSOLETE APPLIANCES MUST BE RENDERED UNUSABLE. CUT OFF THE MAINS POWER CORD AFTER UNPLUGGING IT FROM THE WALL OUTLET, AND MAKE SAFE ANY COMPONENTS WHICH MIGHT BE DANGEROUS FOR CHILDREN (LOCKS, DOORS, ETC.).
4
Safety instructions
THIS APPLIANCE IS MARKED ACCORDING TO THE EUROPEAN DIRECTIVE 2002/96/EC ON WASTE ELECTRICAL AND ELECTRONIC EQUIPMENT (WEEE). BY ENSURING THIS PRODUCT IS DISPOSED OF CORRECTLY, YOU WILL HELP PREVENT POTENTIAL NEGATIVE CONSEQUENCES FOR THE ENVIRONMENT AND HUMAN HEALTH, WHICH COULD OTHERWISE BE CAUSED BY INAPPROPRIATE WASTE HANDLING OF THIS PRODUCT.
THE SYMBOL  ON THE PRODUCT, OR ON THE DOCUMENTS ACCOMPANYING THE PRODUCT, INDICATES THAT THIS APPLIANCE MAY NOT BE TREATED AS HOUSEHOLD WASTE. INSTEAD IT SHALL BE HANDED OVER TO THE APPLICABLE COLLECTION POINT FOR THE RECYCLING OF ELECTRICAL AND ELECTRONIC EQUIPMENT.
DISPOSAL MUST BE CARRIED OUT IN ACCORDANCE WITH LOCAL ENVIRONMENTAL REGULATIONS FOR WASTE DISPOSAL. FOR MORE DETAILED INFORMATION ABOUT TREATMENT, RECOVERY AND RECYCLING OF THIS PRODUCT, PLEASE CONTACT YOUR LOCAL CITY OFFICE, YOUR HOUSEHOLD WASTE DISPOSAL SERVICE OR THE SHOP WHERE YOU PURCHASED THE PRODUCT.
IN THE EVENT OF A FAULT, DISCONNECT THE DISHWASHER FROM THE ELECTRICAL POWER SUPPLY AND SHUT OFF THE WATER TAP.
DO NOT USE APPLIANCES WHICH HAVE BEEN DAMAGED DURING TRANSIT! IF IN DOUBT, CONSULT YOUR DEALER.
THE APPLIANCE MUST BE INSTALLED AND CONNECTED IN ACCORDANCE WITH THE INSTRUCTIONS PROVIDED BY THE MANUFACTURER OR BY A QUALIFIED TECHNICIAN.
THE APPLIANCE IS INTENDED FOR USE BY ADULTS. DO NOT ALLOW CHILDREN TO COME NEAR OR PLAY WITH THE DISHWASHER. KEEP CHILDREN AWAY FROM DETERGENTS AND FROM THE OPEN DISHWASHER DOOR. THE PACKAGING MATERIALS (PLASTIC BAGS, POLYSTYRENE, METAL BARS, ETC.) MUST NOT BE LEFT WITHIN THE REACH OF CHILDREN.
KEEP CHILDREN AWAY FROM THE OPEN DISHWASHER. THE APPLIANCE MAY CONTAIN RESIDUES OF DETERGENT WHICH CAN CAUSE IRREVERSIBLE DAMAGE TO THE EYES, MOUTH, AND THROAT, AS WELL AS POSSIBLE DEATH BY SUFFOCATION.
DO NOT INTRODUCE SOLVENTS SUCH AS ALCOHOL OR TURPENTINE WHICH MAY CAUSE AN EXPLOSION.
DO NOT LOAD DISHES THAT ARE SOILED WITH ASH, WAX OR PAINTS.
LEANING OR SITTING ON THE DISHWASHER DOOR WHEN OPEN MAY CAUSE THE APPLIANCE TO OVERTURN, PUTING PEOPLE AT RISK. NEVER LEAVE THE DISHWASHER DOOR OPEN; PEOPLE MIGHT TRIP OVER IT.
5

Safety instructions
DO NOT DRINK THE WATER RESIDUES WHICH MAY BE PRESENT INSIDE THE DISHES OR DISHWASHER AT THE END OF THE WASHING PROGRAM AND BEFORE THE DRYING CYCLE.
KNIVES OR OTHER SHARP-ENDED COOKING UTENSILS MUST BE PLACED IN THE CUTLERY BASKET BLADE-DOWN, OR LAID HORIZONTAL IN THE TOP BASKET. TAKE CARE NOT TO CUT YOURSELF AND ENSURE THAT THEY DO NOT PROJECT FROM THE BASKET.
AQUASTOP MODELS
THE AQUASTOP DEVICE PREVENTS FLOODING IN THE EVENT OF A WATER LEAK. WHEN THE AQUASTOP DEVICE IS TRIPPED, CALL IN A QUALIFIED TECHNICIAN TO IDENTIFY AND REPAIR THE FAULT.
IN MODELS EQUIPPED WITH THE AQUSTOP DEVICE, THERE IS A SOLENOID VALVE INSIDE THE WATER INTAKE HOSE. DO NOT CUT THE
HOSE AND DO NOT ALLOW THE SOLENOID VALVE TO DROP INTO WATER. IN THE EVENT OF DAMAGE TO THE WATER INTAKE HOSE, DISCONNECT THE APPLIANCE FROM THE ELECTRICAL POWER SUPPLY AND FROM THE WATER SUPPLY.
IMMEDIATELY AFTER INSTALLING THE DISHWASHER, PERFORM A QUICK TEST OF THE APPLIANCE FOLLOWING THE INSTRUCTIONS BELOW. IF THE DISHWASHER FAILS TO OPERATE CORRECTLY, DISCONNECT IT FROM THE ELECTRICAL POWER SUPPLY AND CALL THE NEAREST TECHNICAL SERVICE CENTRE. DO NOT ATTEMPT TO REPAIR THE
APPLIANCE.
THE DISHWASHER MEETS ALL THE REQUIREMENTS SET OUT BY THE REGULATIONS IN FORCE CONCERNING SAFETY AND ELECTRICAL EQUIPMENT. ANY TECHNICAL CHECKS SHOULD BE CONDUCTED EXCLUSIVELY BY A TRAINED AND AUTHORISED TECHNICIAN: REPAIRS
CARRIED OUT BY UNAUTHORISED PERSONS WILL INVALIDATE THE WARRANTY, AS WELL AS POSING A POTENTIAL HAZARD TO THE USER.
The manufacturer declines all responsibility for damage to persons or property resulting from failure to observe the above precautions, from tampering with even a single component of the appliance, or from the use of non original spare parts.
6
Installation instructions
2. Installation and hook-up
Remove the polystyrene basket retainers. Position the appliance in the desired place of installation. The back or sides of the dishwasher may be placed up against walls or other furniture units. If the dishwasher is installed near a heat source, fit the special insulating panel to prevent overheating and malfunction of the appliance. To ensure stability, install integrated or built-under dishwashers only under continuous worktops, and screw them to the adjacent units. To facilitate the installation procedure, the intake and drain hoses can be positioned in any direction; make sure that the hoses are not kinked, crushed or pulled too tightly. Make sure to tighten the locking ring-nut once the pipes have been placed in the direction required. A hole at least 8 cm in diameter is required to allow the power supply cable and pipes to pass.
Level the appliance on the floor using its adjustable feet. This operation is essential for ensuring correct operation of the dishwasher.
IMPORTANT:
the dishwasher is predisposed only for a built.-in installation.
2.1 Water supply connection
Preventing the risk of clogging or damage: if the water pipe is new or has not been used for a long time, before connecting to the water supply check that the water is clear and free of impurities, to prevent damage to the appliance.
The dishwasher must always be connected to the water system with new hoses; old or used hoses must never be reused.
CONNECTING TO THE WATER SUPPLY
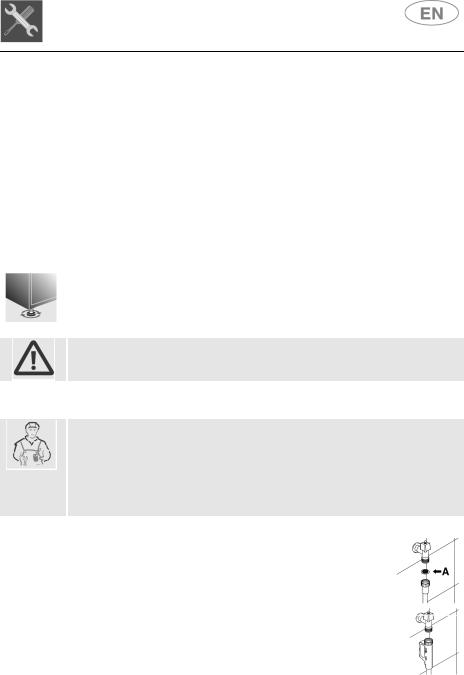
Connect the intake hose to a cold water supply with ¾” gas thread, inserting the filter A supplied with the dishwasher. Take care to screw the hose firmly into place with your hands and then complete by tightening about ¼ of a turn with pliers.
In dishwashers equipped with the ACQUASTOP device, the filters is already fitted inside the threaded ring.

Installation instructions
The dishwasher can also be connected to a hot water supply not exceeding 60°C. Supplying the appliance with hot water cuts down the washing time by approximately 20 minutes, but slightly reduces its effectiveness. Make the connection to the domestic hot water supply using the same procedure described for connecting to the cold water supply.
DRAIN CONNECTION
Insert the dishwasher’s drain hose into a drain pipe having a diameter of at least 4 cm, or alternatively, place it inside the kitchen sink using the plastic support provided, taking care not to crush or excessively bend the hose. It is important to prevent the hose from coming loose and falling. For this purpose, the plastic support is equipped with a hole for tying it to the wall or water tap.
The free end should be positioned at a height of between 30 and 100 cm, and should never be submerged in water. If a horizontal drain extension hose is used (for a maximum of 3 m) the drain hose can be placed at a maximum height of 85 cm from the ground.
2.2 Electrical connection
Plug the power cord into a suitable electrical outlet, according to the instructions given in chapter "1. Safety and operating instructions".
User instructions
3. Description of the controls
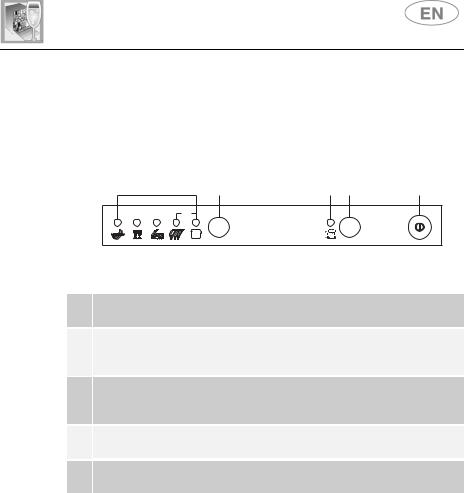
3.1 Upper panel
All the dishwasher controls are grouped on the upper panel. Switch-on, programming, switch-off etc. procedures are only possible when the door is open.
2 |
3 |
5 |
4 |
1 |
end
1/2 

1
ON/OFF BUTTON
Pressing this button energises the appliance.
SELECTED PROGRAM INDICATOR LIGHTS
2Illumination of this light denotes the program selected and the occurrence of a fault (troubleshooting).
PROGRAM SELECTION BUTTON
3By pressing this button in sequence it is possible to select the desired program.
4HALF LOAD BUTTON
Pressing this button selects the HALF-LOAD function.
HALF LOAD INDICATOR LIGHT
5Illumination of the light indicates selection of the HALF-LOAD function.
SETTING THE WASHING PROGRAM AND SWITCHING ON
To select the most suitable program for the dishes to be washed refer to the table below, which indicates the most appropriate program according to dish type and degree of soiling.
User instructions
After using the table to identify the most appropriate washing program:
•press the ON/OFF button (1) and wait for the PROGRAM INDICATOR LIGHT (2) to illuminate;
•keep pressing the PROGRAM SELECTION button (3) until the indicator light corresponding to the desired program illuminates;
•close the door; after about 2" the program will start. While it is in progress, the relative LIGHT will flash (indicating that the program is being executed).
PROGRAMME,
NUMBER & SYMBOL
1 SOAK
2 |
|
|
|
NORMAL |
|
|
|
||
|
|
|
ECO (*) |
|
|
|
|
|
|
3 ECO
4 NORMAL
5 INTENSIVE
LOAD CROCKERY |
|
PROGRAM |
AND CUTLERY |
|
PROGRESS |
|
|
|
|
|
|
Pans and dishes |
|
Cold prewash |
awaiting |
|
|
a further wash |
|
|
|
|
Cold prewash |
Wash immediately |
|
|
|
Wash at 45°C |
|
after use for dishes |
|
Rinse at 45°C |
with light dirt |
|
|
|
Dry |
|
|
|
|
|
|
|
|
|
|
Wash immediately |
|
Wash at 55°C |
|
Cold rinse |
|
after use for dishes |
|
|
|
Rinse at 68°C |
|
with normal dirt |
|
|
|
Dry |
|
|
|
|
|
|
|
|
|
Cold prewash |
Dishes |
|
Wash at 65°C |
|
Cold rinse |
|
with normal dirt |
|
|
|
Rinse at 68°C |
|
|
|
|
|
|
Dry |
|
|
|
|
|
Prewash at 45°C |
Very dirty pans and |
|
Wash at 70°C |
dishes (except |
|
2 cold rinses |
delicate items) |
|
Rinse at 70°C |
|
|
Dry |
DURATION |
|
CONSUMPTION |
||
|
|
|
|
|
MINUTES |
|
WATER |
|
POWER |
(2) |
|
LITRES (1) |
|
KWh (2) |
|
|
|
|
|
12' |
|
7 |
_ |
|
|
|
|
||
|
|
|
|
|
|
|
|
||
157' |
|
13,6 |
|
0,74 |
|
|
|
|
|
|
|
|
||
150' |
|
18 |
|
1,20 |
|
|
|
|
|
|
|
|
||
95' |
|
20 |
|
1,40 |
|
|
|
|
|
|
|
|
||
115' |
|
22 |
|
1,80 |
|
|
|
|
|
Only run the soak program with half loads.
The HALF LOAD option (6) is available for all programs except the soak program.
(*) Reference program as AS/NZS 2007 (ECO).
(–) Not present.
(1)Average power consumption with the softener set on level 2.
(2)The cycle duration and power consumption may vary according to the water and room temperatures, and the type and amount of dishes.
The washing cycle will not take place if the dishwasher door is left open or not properly closed.

|
User instructions |
||
|
|
|
|
TABLE FOR CERTIFICATION BODIES |
|||
|
|
|
|
Reference standard |
|
AS/NZS 2007 |
|
|
|
|
|
Reference program |
|
|
(*) ECO |
|
|
|
|
Load |
|
|
14 place-settings |
|
|
|
|
Type of detergent |
|
|
in accordance with AS/NZS 2007 |
|
|
|
|
Amount of detergent |
|
|
pour 10g of cleaner on to the appliance door |
|
|
and 20g into the dispenser |
|
|
|
|
|
|
|
|
|
Rinse aid setting |
|
4/6 |
|
At the end of the cycle, you MUST open the door approximately 50 mm to improve the drying performance.
AS/NZS 2007 cycle test conditions:
The upper basket must be set in the low position.
Lower basket: the grid "A" ("lower basket" section) must not be raised. Upper basket: on the left, there are two saucers underneath the cups.
AS/NZS 2007
11
 Loading...