


|
|
|
|
|
|
User manual |
Manuale di istruzioni |
Instrukcja obsługi |
Benutzerhandbuch |
Manual de instrucciones |
Gebruikershandleiding |
Manuel d'utilisation |
Manual do utilizador |
|
|
|
|
models: | modelle: | modèles: | modelli: | modelos: | modelos: | modele: | modellen:
LC-32CFE6452E
LC-40CFE6452E
LC-43CFE6452E
LC-49CFE6452E
LC-55CFE6452E

1
4
7
10
11
14
17
16
20
24
23
28
27
31
|
|
|
2 |
ON/OFF |
|
MUTE |
|
1 |
2 |
3 |
3 |
4 5 6
7 8
TV 0
GUIDE
PICTURE
SOUND
VOL
SOURCE
 MENU
MENU
OK
BACK |
|
|
INFO |
TEXT |
SUBTITLE |
|
||
|
MEDIA |
|
|
PVR/MEDIA |
|
REC LIST |
|
|
GOTO |
A-B |
3D |
|
||
9
|
5 |
|
6 |
CH |
8 |
|
|
|
9 |
EXIT |
12 |
|
13
FAV |
15 |
|
|
|
18 |
TV |
19 |
|
|
|
21 |
NET+ |
22 |
|
|
|
25 |
|
26 |
|
29 |
|
30 |
REPEAT |
|

EN
Important safety instructions
CAUTION
RISK OF ELECTRIC SHOCK
DO NOT OPEN
Please, read these safety instructions and respect the following warnings before the appliance is operated:
In order to prevent fire always keep candles and other open flames away from this product.
•TV’s with the weight of more than 20 kg must be lifted and carried by at least two people.
•This TV does not contain any parts which could be repaired by the user. In case of a fault, contact the manufacturer or the authorised service agent. Contact with certain parts inside the TV might endanger your life. The guarantee does not extend to faults caused by repairs carried out by unauthorized third parties.
•Do not remove the rear part of the appliance.
•This appliance is designed for the receiving and reproduction of video and sound signals. Any other use is strictly forbidden.
•Do not expose the TV to dripping or splashing liquid.
•To disconnect the TV from mains please unplug the mains plug from the mains socket.
•If the supply cord is damaged, it must be replaced by the manufacturer, a service agent or similarly qualified persons in order to avoid a hazard.
•The ideal distance to watch TV is approximately five times longer than the diagonal of the screen. Reflections on the screen from other light sources can make the quality of the picture worse.
•Ensure the TV has sufficient ventilation and is not close to other appliances and other pieces of furniture.
•Install the product at least 5 cm from the wall for ventilation.
•Ensure that the ventilation openings are clear of items such as newspapers, table-cloths, curtains, etc.
•The TV set is designed to be used in a moderate climate.
•The TV set is designed exclusively for operation in a dry place. When using the TV outside, please, make sure it is protected against moisture (rain, splashing water). Never expose to moisture.
•Do not place any objects, containers filled with liquids, such as vases, etc. on the TV. These containers might get pushed over, which would endanger electric safety. Place the TV exclusively on flat and stable surfaces. Do not place any objects such as newspaper or blankets, etc. on or under the TV.
•Make sure the appliance does not stand on any power cables as they might get damaged. Mobile phones and other devices such as WLAN adapters, monitoring cameras with wireless signal transmission, etc. might cause electromagnetic interference and they should not be placed near the appliance.
•Do not place the appliance near heating elements or in a place with direct sunlight as it has a negative effect on cooling of the appliance. Heat storage is dangerous and it can seriously reduce the lifetime of the appliance. In order to ensure the safety, ask a qualified person to remove the dirt from the appliance.
•Try to prevent damage to the mains cable or mains adapter. The appliance can only be connected with the supplied mains cable/ adapter.
•Storms are dangerous for all electric appliances. If the mains or aerial wiring is struck by lightening the appliance might get damaged, even if it is turned off. You should disconnect all the cables and connectors of the appliance before a storm.
•To clean the screen of the appliance use only a damp and soft cloth. Use only clean water, never detergents and in no case use solvents.
•Position the TV close to the wall to avoid the possibility of it falling when pushed.
•WARNING - Never place a television set in an unstable location. A television set may fall, causing serious personal injury or death. Many injuries, particularly to children, can be avoided by taking simple precautions such as:
•Use cabinets or stands recommended by the manufacturer of the television set.
•Only use furniture that can safely support the television set.
•Ensure the television set is not overhanging the edge of the supporting furniture.
•Not place the television set on tall furniture (for example, cupboards or bookcases) without anchoring both the furniture and the television set to a suitable support.
•Not place the television set on cloth or other materials that may be located between the television set and supporting furniture.
•Educate children about the dangers of climbing on furniture to reach the television set or its controls.
•Ensure that children do not climb or hang onto the TV.
•If your existing television set is being retained and relocated, the same considerations as above should be applied.
•The instructions shown below are a safer way to set up the TV, by fixing it to the wall and will avoid the possibility of it falling forwards and causing injury and damage.
•This method is also useful the TV is placed on a glass surface or you do not wish to screw anything into your furniture.
•For this type of installation you will need a fastening cord
A)Using one/both of the top wall-mounting holes and screws (the screws are already supplied in the wall mounting holes) fasten one end of the fastening chord/s to the TV.
B)Secure the other end of the fastening chord/s to your wall.
•The software on your TV and the OSD layout can be changed without notice.
Warning:
•Never connect any external devices to a live appliance. Switch off not only the TV but also the devices which are being connected! Plug the TV plug into the wall socket after connecting any external devices and the aerial!
•Always make sure there is free access to the TV mains plug.
•The appliance is not designed for a use in a workplace fitted with monitors.
•The systematic use of headphones at high volume might lead to irreversible hearing damage.
•Ensure environmental disposal of this appliance and any components including batteries. When in doubt, please, contact your local authority for details of recycling.
•While installing the appliance, do not forget that furniture surfaces are treated with various varnishes, plastics, etc. or they might be polished. The chemicals contained in these products might have a reaction with the TV stand. This could result in bits of the material sticking to the furniture surface, which are difficult to remove, if not impossible.
•The screen of your TV has been produced under top quality conditions and was checked in detail for faulty pixels several times. Due to the technological properties of the manufacturing process, it is not possible to eliminate the existence of a small number of faulty points on the screen (even with maximum care while in production). These faulty pixels are not considered faults in terms of guarantee conditions, if their extent is not greater than the boundaries defined by DIN norm.

5
•The manufacturer cannot be held responsible, or be liable, for customer service-related issues related to the third party content or services. Any questions, comments or service-related inquiries relating to the third party content or service should be made directly to the applicable content or service provider.
•There are a variety of reasons you may be unable to access content or services from the device unrelated to the device itself, including, but not limited to, power failure, the Internet connection, or failure to configure your device correctly. Universal Media Corporation, its directors, officers, employees, agents, contractors and affiliates shall not be liable to you or any third party with respect to such failures or maintenance outages, regardless of cause or whether or not it could have been avoided.
•All third party content or services accessible via this device is provided to you on an “as-is” and “as available” basis and Universal Media Corporation and its affiliates make no warranty or representation of any kind to you, either express or implied, including, without limitation, any warranties of merchantability, non-infringement, fitness for a particular purpose
or any warranties of suitability, availability, accuracy, completeness, security, title, usefulness, lack of negligence or error-free or uninterrupted operation or use of the content or services provided to you or that the content or services will meet your requirements or expectations.
•‘Universal Media Corporation’ is not an agent of and assumes no responsibility for the acts or omissions of third party content or service providers, nor any aspect of the content or service related to such third party providers.
•In no event will ‘Universal Media Corporation’ and/or its affiliates be liable to you or any third party for any direct, indirect, special, incidental, punitive, consequential or other damages, whether the theory of liability is based on contract, tort, negligence, breach of warranty, strict liability or otherwise and whether or not Universal Media Corporation and/or its affiliates have been advised of the possibility of such damages.
Important information regarding use of video games, computers, captions and other fixed image displays.
•The extended use of fixed image program material can cause a permanent “shadow image “ on the LCD screen (this is sometimes incorrectly referred to as “burnout to the screen“). This shadow image is then permanently visible on the screen in the background. It is irreversible damage. You can avoid such a damage by following instructions below:
•Reduce the brightness/contrast setting to a minimum viewing level.
•Do not display the fixed image for a long period of time. Avoid displaying of:
»Teletext time and charts,
»TV/DVD menu, e.g. DVD contents,
»In the„Pause“ mode (hold): Do not use this mode for a long time, e.g. while watching a DVD or a video.
»Turn off the appliance if you are not using it.
Batteries
•Observe the correct polarity when inserting the batteries.
•Do not expose batteries to high temperatures and
do not place them on locations where the temperature might increase quickly, e.g. near the fire or on the direct sunshine.
• Do not expose batteries to excessive radiant heat, do not throw them into the fire, do not disassemble
them and do not try to recharge un-rechargeable
Cd
batteries. They could leak or explode.
»Never use different batteries together or mix new and old ones.
»Dispose of batteries in an environmentally friendly way.
»Most of the EU countries regulate the disposal of batteries by law.
Disposal
• Do not dispose of this TV as unsorted municipal waste. Return it to a designated collection point for the recycling of WEEE. By doing so, you will help to conserve resources and protect the environment. Contact your retailer or local authorities for more information.
CE Statement:
•Hereby, Universal Media Corporation s.r.o. declares that this LED TV is in compliance with the essential requirements and other relevant provisions of R&TTE Directive 1999/5/EC. http://www.sharp.eu/av/ documents-of-conformity
Trademarks
•The terms HDMI and HDMI High-Definition Multimedia Interface, and the HDMI Logo are trademarks or registered trademarks of HDMI Licensing, LLC in the United States and other countries.
•The “HD TV” Logo is a trademark of DIGITALEUROPE.
•The “HD TV 1080p” Logo is a trademark of DIGITALEUROPE.
•The DVB logo is the registered trademark of the Digital Video Broadcasting - DVB - project.
•Manufactured under license from Dolby Laboratories. Dolby, Dolby Audio and the double-D symbol are trademarks of Dolby Laboratories.
•For DTS patents, see http://patents.dts.com. Manufactured under license from DTS Licensing Limited. DTS, the Symbol, & DTS and the Symbol together are registered trademarks, DTS TruSurround and DTS 2.0+Digital Out are trademarks of DTS, Inc. © DTS, Inc. All Rights Reserved.
•YouTube and the YouTube logo are trademarks of Google Inc
•The Wi-Fi CERTIFIED Logo is a certification mark of the Wi-Fi Alliance.
•Wi-Fi CERTIFIED Miracast and Miracast are trademarks of Wi-Fi Alliance
•DLNA, the DLNA Logo and DLNA CERTIFIED are trademarks, service marks, or certification marks of the Digital Living Network Alliance.
•MHL and the MHL logo are a trademark, registered trademark or service mark of MHL, LLC in the United States and /or other countries.
•The Bluetooth word mark and logos are registered trademarks owned by Bluetooth SIG,. Inc.

EN
What is included in the box
Supply of this TV includes following parts:
• |
1x TV |
• |
1x RF cable |
• |
1x Remote control |
• 1x TV stand installation packet |
|
|
|
|
|
• |
2x AAA batteries |
• |
1x User guide |
|
|
||
• 1x Mini Component adapter |
• 1x Mini Composite adapter |
||
|
cable |
|
cable |
|
|
|
|
Attaching the Stand
Please follow the instructions on last page of this user manual.
Getting started - initial set up
1.Insert the batteries supplied into the Remote control.
2.Using the RF cable supplied, connect the TV to the TV Aerial wall socket.
3.For connecting to the Internet with a wired connection, connect a Cat 5/Ethernet cable (not included) from the TV to your broadband modem/router.
4.Connect the power cable to the Electrical outlet and switch the TV on by using the standby button on the TV.
5.You will be now welcomed with the First Time Installation screen. If it does not appear, press the standby button on the TV set once, this
will prompt the ‘pairing menu’ to appear. Scroll through and highlight ‘Pair your remote’ by pressing the CH+/CHTV button (scroll up/ down function in the menu) then press the TV set’s standby button (OK function in the menu) to confirm your selection. Please press and hold the yellow and green buttons for a few seconds on the remote control, until white LED on TV front blinked five times.
Press [MENU] then 8-8-8-8 and the First Time Installation screen will appear.
If you wish to make changes to any of the default settings, use the scroll ▲/▼/◄/►buttons. To exit this menu at anytime, press [EXIT] button.
6.Please set desired settings in FIRST TIME INSTALLATION screen. DVB Antenna - You can choose between Terrestrial (DVB-T), Cable (DVB-C) or Satellite (DVB-S)*.
Language - Set the TV Menu language. Country - Set the desired country.
Tunning Mode - Choose if you want to tune only Digital (DTV) Analogue (ATV) or both Digital and Analogue (DTV + ATV) Operator - Select Cable provider. If your cable operator is not listed select Others. (Avaliable only if DVB Antenna is set to CABLE) Environment - Select the location of TV.
For home use, please select Home Mode.
For shop demonstration mode, set Store Mode.
Sorting by LCN - Set LCN to ON if you want to arrange channels by provider preferences (only applies to DVB-T and DVB-C channels).
7.Press [Auto Tuning] button to start the tuning process.
8.Optional channel presets DVB-C:
Keep all default settings as recommended.
If DVB-C channels are not found, contact your network provider for the valid "Network ID". Then perform a new search. Press the [MENU], select "Network ID" and enter the network ID.
9.Optional channel presets DVB-S2: Select "Satellite" in the "DVB Antenna" in the menu for the optional channel presets. Here you can
choose between the various satellites. Since selection completed, then the channel list of the exact satellite will be available to be imported into your TV system.
Confirm with [OK] button on the remote control, to start scanning.
TIP: If you are missing channels, the reason for this is likely to be signal strength, you should consider connecting signal booster and re-tuning the TV.
Remote control
Radio controlled remote control - No more aiming in the TV direction! Refer to remote control picture on the second page of this user manual.
1.STANDBY – Switch on TV when in standby or vice versa.
2.MUTE – Mute the sound or vice versa.
3.0 – 9 – to select a TV channel directly.
4.TV GUIDE – Opens the 7 Day TV Guide (Digital mode).
5. – To return to the previous channel viewed.
6.PICTURE – Scrolls through picture mode options.
7.VOL ▲/▼– To increase / decrease the sound level.
8.CH ▲/▼– To increase or decrease the channel being watched.
9.SOUND – Scrolls through sound mode options.
10.SOURCE – To display the input/source menu.
11.MENU – To display OSD menu.
12.EXIT – To exit all menus.
13.(▲/▼/◄/►/ OK) – Allows you to navigate the on-screen menus and adjust the system settings to your preference.
14.BACK – Back to previous menu.
15.FAV – To display favourites menu.
16.INFO – Press once for now/next channel information. Press twice for programme information about current programme.
17.TEXT – Teletext mode - To enter Teletext
18.SUBTITLE – To switch the dialogue at the bottom of the screen (on/ off ).
19.TV – Switch to digital TV source.
20.YouTube – Displays YouTube application
21.MEDIA – Switch to USB source.
22.NET+ – Displays AQUOS NET+ menu.
23.Rec1 – PVR Record
24.– To restart the current chapter
25.– To advance forward to the next chapter
26.– To stop the playback
27.Rec List1– Opens the list of recordings.
28.– To play in fast rewind mode.
29.– To play in fast forward mode.
30.– To play/pause
31.COLOUR BUTTONS – Additional teletext and OSD functions
1 - available only with PVR function

7
TV buttons & Source menu
Vol+ Volume up and menu right
Vol- Volume down and menu left
CH+ Programme/Channel up and menu up
CH- Programme/Channel down and menu down
MENU Displays Menu/OSD
SOURCE Displays the input source menu
STANDBY Standby Power On/Off
Choosing Mode Input/Source
To switch between the different input/connections. a) Using the buttons on the remote control:
1.Press [SOURCE/ AV] - The source menu will appear.
2.Press [▼] or [▲] to select the input you require.
3.Press [OK].
b) Using the buttons on the Television:
1.Press [SOURCE].
2.Scroll up / down using CH+/ CHbuttons to the input/source you require.
3.Press Vol+ to change input/source to the one selected.
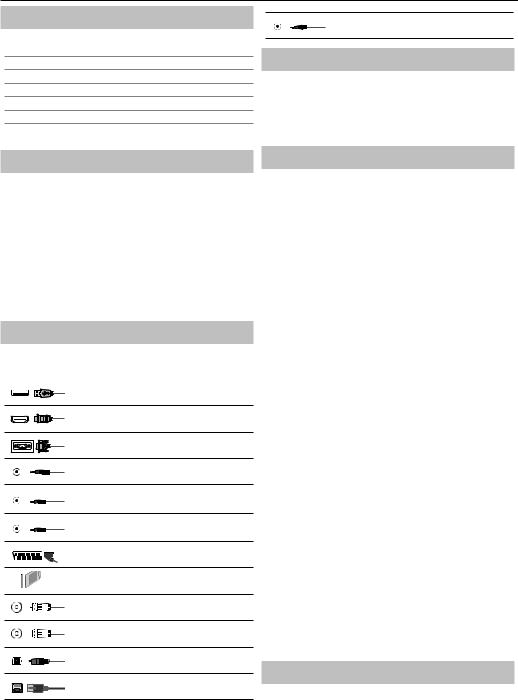
Connections
Please see the table for connector types for different models available on the page 1268.
USB
USB-Input 1, 2
HDMI 1, 2, 3(MHL) in
HDMI-Input 1, 2, 3
VGA (PC)
VGA PC-Input
VGA (PC) Audio In
3.5mm PC audio input
Mini AV
Video Input & Component / Video audio input
Mini YPbPr
Mini Component HD Input
SCART
SCART-Input
CI Card IN
CI input
RF In
RF / TV Aerial Input
Sat In
Satellite Input
Digital Optical Audio Out
Digital optical output
RJ 45
Ethernet
HEADPHONES
3.5mm Headphone output
TV Menu navigation
To access this menu, press [MENU] button on the remote control. To enter a menu press [OK]. If you wish to make changes to any of the default settings, use the scroll (▲/▼/◄/►) buttons. To confirm any settings press [OK] button. To exit this menu at anytime, press [EXIT] button.
Picture
Picture Mode - Choose from the following presets.
–Standard - Default settings
–Dynamic - Recommended settings for fast moving pictures
–Mild - Set to be lighter in colour and less bright
–Personal - Lets you manually alter all the settings
–Eco - Consume 15% less energy.
Contrast - Switch the balance between black and white. Brightness - Increase or decrease the brightness of the picture. Tint - Lets you increase or decrease the level of tint
within the picture (for NTSC signal only)
Colour - Increases the colour from black and white. Sharpness - Increase or decrease the sharpness of the picture. Backlight adjusting - Adjust the screen's brightness by increasing/decreasing the panel's backlighting.
Colour Temperature - Choose from the following presets.
–Normal - Default settings
–Warm - Increases red within the picture
–Cold - Increases blue within the picture Red - Adjust red tone of the picture Green - Adjust green tone of the picture Blue - Adjust blue tone of the picture
Gamma - Adjust the tones between the bright and dark parts of the picture.
Aspect Ratio - Picture format varies depending on the channel/broadcast. There are a number of different options to best meet your needs.
–Auto-Automatically displays the best picture format. So the picture is in the correct position. May have black lines at the top/bottom and/or sides.
–4:3 - Displays the 4:3 picture in its original size. Side bars are shown to fill the 16:9 screen.
–16:9 - Fills the screen with a regular 16:9 signal.
–Zoom 1/2 - The picture is the correct proportion but zoomed in to fill the screen.
–Dot by Dot (HDMI) - Will display the picture in its original resolution without any change.
–Full Screen - Stretch signal to fill the screen.
Noise Reduction - Filters and reduces the noise (interference) of the picture
MPEG Noise Reduction - Allows you to reduce visible interference caused by MPEG compression.
Active Contrast - Automatically optimises the ‘backlight’ and ‘contrast’ of the picture according to the brightness of the screen.
Sound
Sound Mode - Choose from the following presets
–Standard - Default settings
–Music - Emphasises music over voices
–Movie - Provides live and full sound for movies
–Personal - Selects your personal sound settings
–Sports - Emphasises sound for sports
Tip: Treble and bass levels can only be adjusted when the sound mode ‘Personal’ is selected.

EN
Equalizer - Adjusts the volume of different sound frequencies. The equalizer sound levels can only be adjusted when the sound mode ‘Personal’ is selected.
Balance - To switch the sound between the left and right speakers. Auto Volume Level (AVL) - When ‘on’ is selected, the volume
will stay at a constant level regardless of input/source.
DTS TruSurround - Allows you to turn surround sound effect ON or OFF. Digital Output - This is the digital Audio output.
Choose from the following options:
–Off - Off
–Auto - Selects the best settings automatically
–PCM - Select this option if you are connecting to a Stereo Hi-fi via digital cable (Pulse-code modulation (PCM) is
a digital representation of an analogue signal)
Audio Description - Additional sound track for visually impaired. Available only on selected DTV shows.
AD Volume - to adjust volume of Audio Description sound track Audio Delay (ms) - Enables the user to adjust sound
setting to sync picture and audio for TV speakers.
SPDIF Delay (ms) - Enables the user to adjust sound setting to sync picture and audio for external speakers connected via digital audio output.
PC
Auto Adjust - Lets you automatically configure the television to be used as a computer monitor.
H Offset - Changes the horizontal position of the picture. V Offset - Changes the vertical position of the picture. Size - increase picture size.
Phase - To adjust delay time of phase in order to reduce the noise of picture
TIP: If the computer is left in-active for a period of time, the television will switch into a ‘sleep’ state (the screen will power off to save power). To switch back on press the standby button. TIP: If you do not press any buttons for 10 seconds, the menu will automatically exit. You can change the length of time before the menu exits automatically - see ‘OSD Timer’ section.
Channel
DVB Antenna - Set the type of DTV signal
–Terrestrial - Terrestrial (DVB-T)
–Cable - Cable (DVB-C)
Auto Tuning - Allows you to retune the television for all digital channels, digital radio stations and analogue channels.
Analogue Manual Tuning - Allows you to manually tune your analogue signal.
Digital Manual Tuning - Allows you to manually tune your digital signal. Channel Edit - Allows you to delete, skip and add favourite channels. Signal Information - Information about DVB signal.
CI Information - Pay per view services require a “smartcard” to be inserted into the TV. If you subscribe to a pay per view service the provider will issue you with a ‘CAM’ and a “smartcard”. The CAM can then be inserted into the COMMON INTERFACE PORT (CI Card In). Recorded list - List of recorded TV shows.
Schedule List - Lists your programme reminders.
Dish Setup - This menu is only available in DVB-S2 mode. You can select the type of satellite, your transponder and your LNB type, etc.
Lock
System Lock - Allows you to lock or unlock the menu. You will be asked to enter a 4 digit password. Use the ◄ button to quit the password input. Use the ►button to clear. Default password is 0000. Set Password - Change the default password.
Channel lock - Lock specific TV channels.
Parental Guidance - Lock TV channels based on age restriction. Key Lock - Lock the TV buttons.
–Off - All TV buttons are unlocked
–Partial - Only Standby button is unlocked
–Full - All TV buttons are locked
Time
Clock - Set the date and time. Date and time is set up automatically in DVB mode.
Off Time - Allows you to set a specific time for your TV to turn off. On Time - Allows you to set a specific time for your TV to turn on, the
channel it will then display, the source it will be on and also the volume. This function can then be toggled to repeat every day or a certain day. Sleep Timer - Lets you set the sleep timer so the television automatically switches off after a set amount of time. Off -> 10min -> 20min ->
30min -> 60min -> 90min -> 120min -> 180min -> 240min. OSD Timer - Lets you adjust the amount of time the On Screen Menu stays on the screen before disappearing. Auto standby - Adjustment for the auto standby in hourly increments: Off -> 3h -> 4h -> 5h.
Time Zone - Change your current time zone.
Network
Network Configuration - First you will need to select your connection type. You can choose between either a Wi-Fi or Wire (cable) connection.
NOTE: For connecting to the Internet with a wired connection, connect a Cat 5/Ethernet cable (not included) from the TV to your broadband modem/router.
IP Configuration - LAN network connection settings
–Auto - Will automatically connect the TV to your home network (this is the default setting and is highly recommended)
–Manual - Allows you to manually change the IP, Netmask, Gateway and DNS information.
Wi–Fi Configuration - Wireless network connection settings
–Wi–Fi Auto Search - Automatically searches for available wireless networks. Select the desired Wi–Fi network and then enter the network password (if network is password protected). Once
the password is accepted, you will not be asked for it again.
NOTE: The connection process may take a few minutes, please be patient. Every time the TV is then powered on it will automatically connect to the network, this may also take some time.
Network Info - Information about the network settings Network Test - A network connection test
Settings
Language - Allows you to change the language of the menu. Audio Languages - Allows you to change audio
language on selected DVB channels.
Subtitle Language - Allows you to change subtitles language on selected DVB channels.
Hearing Impaired - If signal provides support for the hearing impaired, the subtitles can be played by pressing the “Subtitle”. If

9
you set Hearing Impaired ON and switch to a channel with supports for hearing impaired subtitles will be activated automatically.
Blue Screen - Changes the background when there is no input between transparent and a blue background (Only available on some sources). PVR File System - PVR Recording options*
–Select disk - Select USB port and disk partition
–TimeShift Size - Set size time of shift buffer.
–Format Start - You can format connected USB storage device to FAT 32 file system.
WARNING: ALL DATA ON THE USB DEVICE WILL BE DELETED
–Speed check - Tests write speed of connected USB storage devices.
* - only for devices with built in PVR function
First Time Installation - Starts the first time installation. Software Update (USB) - From time to time we may release new firmware to improve the operation of the television (available to
download). This menu lets you install the new software/firmware onto the television. Further details of how to do this will be issued with the firmware. Contact the helpline or refer to the ‘www.sharp.eu’ website.
Software Upgrade (NET) - Allows for the TV software to be updated over the Internet. This function will search for new software and update it when necessary. For this function the TV needs to be connected to the internet and USB storage device with at least 200MB of free space connected to it.
NOTE: The TV will automatically search for new releases of software every time it is turned on. If new software is found, it will ask you if you would like to download and install it. If you select "Yes" the TV will upgrade
to the latest software. It is necessary to connect a USB storage device to the TV with at least 200 MB of free space, before upgrade starts.
WARNING: Do not turn off the TV’s power until the upgrade is complete!
Reset TV - This resets the menus to factory settings. HDMI CEC* - Allows you to operate devices connected via HDMI with TV remote control.
–Auto standby* - Automatically turn on/ off connected devices via HDMI CEC
–Device list* - Allows you to access devices menu and operate the menu using TV remote control.
–HDMI ARC* - Sends audio signal from terrestrial/satellite broadcast via HDMI to the AV receiver without using any additional audio cables, this functions is available only on HDMI 2 output.
* - HDMI CEC must be supported by connected device.
LED Status - Allows the user to switch the LED Power indicator light ON or OFF, when the TV is being operated. (When this option is set to OFF the LED Power indicator light will flash when the remote control is used) Version Info - shows version of TV software
Store Mode* - switch ON/OFF shop demonstration mode
* - available only if store mode was selected during first time installation
APPLICATIONS
AQUOS NET+ - Opens the Sharp SMART portal.
USB Media - Multimedia mode offers the playback of various content saved on a USB Memory Stick. The content will be divided into various file types: Photo, Music and Movie. The ‘File Option’ will show and allow you to play all types of supported content.
1.You can navigate through the menu using the scroll ▲/▼/◄/► buttons. To confirm the item you wish to play/view press [OK] button.
2.Select the drive you require. (If your drive only has 1 partition you will only see 1 item).
3.You can now access the item. Press OK to view.
4.While viewing content you can control the playback modes using the remote control buttons or by bringing up the playback navigation menu and selecting on-screen buttons ▲/▼/◄/►and [OK]
NOTE: USB extension cables are not recommended as they can cause a reduction in picture/audio quality and stoppages during play back of USB content.
Media Server - Automatically searches for digital media servers (DMS) connected to your home network and enables the playback and rendering of content from media servers
NOTE: ‘Media Server’ is not provided by the TV manufacturer, you can download third party software and install it on your computer or NAS.
Wireless Connection - Allows you to view content from your smart phone or notebook on the TV screen via Miracast or Intel Wireless Display.
Miracast connections are formed using Wi-Fi Direct, so access to a Wi-Fi network is not needed. You can share content from your smartphone or tablet based on Android 4.4 and newer system.
Wireless Display (WiDi) lets you easily stream movies, videos, photos and music directly to your TV screen. You’ll need a laptop, smartphone, or tablet with Intel® WiDi technology.
NOTE: This function is only available on selected smart phones and notebooks.
AQUOS NET+
To access the AQUOS NET+ Menu at any time press the NET+ button on the remote control or select it from TV Multimedia menu.
NOTE: Please wait while the TV connects to the Wi-Fi network. It may take a few minutes after you switch on the TV.
Navigate the menu using the scroll ▲/▼/◄/►buttons. To confirm the item you wish to play/view press [OK] button. For ‘one-step’ back press [Menu] button, and to access additional functions use the coloured buttons. To leave AQUOS NET+ press [EXIT] button.
Home - Home screen with recommended movies and recently opened applications
Browser - Opens the default web browser.
–Red Button - Zoom in
–Green Button - Zoom out
–Yellow Button - Refresh page
–Blue Button - Return to browser home screen. Movies - Opens a list of available movies
TV Shows - Opens a list of available TV shows
Music - Opens a list of available Music and Music videos Watchlist - Opens a list of movies you can select to watch later. Apps - Opens a list of available applications
Login - Create an account or login to existing account to personalize your AQUOS NET+.
Settings - Filter application based on selected languages.
RESET OF USER SETTINGS: If you wish to completely reset all user settings on AQUOS NET+, you must first enter the Settings menu
of the portal and press the YELLOW button on the remote control. In the next screen, please select YES with cursor and then press OK on the remote control to confirm the reset of the settings.
NOTE: To meet our customers’ demands, we are improving our products. As a result of our ongoing efforts new applications will be added continuously to the AQUOS NET+. Applications and content in AQUOS NET+ can be changed without notice. Some of the functions and content may not be available in your country.
7 Day TV Guide
TV Guide is available in Digital TV mode. It provides information about forthcoming programmes (where supported by the Digital channel). You can view the start and end time of all programmes and on all channels for the next 7 days and set reminders.
1.Press [TV GUIDE]. The following 7 Day TV Guide will appear.
2.Navigate through the menu using ▲/▼/◄/►.
You can now:
Record selected TV channel and TV show by pressing the RED button.* Set a reminder by pressing GREEN.
View a previous day by pressing YELLOW.

EN
View the next day by pressing BLUE. [INFO] shows detailed information about the selected post
3.Press [EXIT] to exit the 7 day TV Guide.
* - only for models with recording function
USB Record - Digital mode*
Built into this television is a USB record facility. This function is available in Digital mode when used in conjunction with a compatible USB memory stick or USB Hard drive. The benefits of this are as follows:
•Pause live TV and then playback, fast forward and rewind (up to live TV).
•One button record, if you decide you want to record the current programme.
•Easy programmable recording from the 7 day TV Guide
Due to the nature of the product, it is necessary to use a high speed USB memory stick (as the TV reads from and writes to the memory stick at the same time, some memory sticks may not be suitable).
Minimum Specification - USB Memory Stick
–Read Speed - 20 MB/s (Mega Byte Per Second)
–Write Speed - 6 MB/s (Mega Byte Per Second)
Pause Live TV (Time Shift)*
Pausing Live TV is very simple.
–Press the play/pause button and the television will pause and the live content will be recorded. To resume watching press play/pause again.
–Press fast forward to go forward in a recording (i.e. to skip adverts).
–Press fast rewind to go back in a recording (i.e. if you fast forwarded too far).
TIP: When you switch the TV to standby or change channel the Time Shift memory is wiped. To restart time shift you must press play/pause button.
One Button Record
At any point in time you may decide to record the current channel that you are watching. To do this you need to press the [REC] button.
TIP: This television contains one TV tuner, therefore it can only record the channel you are watching or record one channel while the television is in standby mode.
NOTE: USB record function is only available in Digital TV mode. Due to copyright laws and illegal copying/recording it is not possible to record to/from any other input/output source.
* - only for devices with built in PVR function
MHL
MHL Port (HDMI 3) - MHL is a wired solution that allows you to access the media from your phone or tablet onto the big screen in the highest quality. By connecting an MHL cable (sold separately) from your mobile device and into your TV you can playback all your videos, games and photographs directly onto your TV. MHL simply mirrors the screen of your mobile device so will work with all applications, whilst connected it will also charge your device too.
11
Product fiche
Trademark |
|
|
SHARP |
|
|
|
|
|
|
|
|
Model |
LC-32CFE6452E |
LC-40CFE6452E |
LC-43CFE6452E |
LC-49CFE6452E |
LC-55CFE6452E |
|
|
|
|
|
|
Energy efficiency class |
A+ |
A+ |
A+ |
A+ |
A+ |
|
|
|
|
|
|
Visible screen size (diagonal) |
32" / 81cm |
40" / 100cm |
43" / 109cm |
49" / 123cm |
55" / 139cm |
|
|
|
|
|
|
On-mode power consumption |
31,0 W |
45,0 W |
41,0 W |
67,0 W |
85,0 W |
|
|
|
|
|
|
Annual energy consumption * |
45 kWh |
66 kWh |
60 kWh |
98 kWh |
124 kWh |
|
|
|
|
|
|
Standby power consumption ** |
<0,50 W |
<0,50 W |
<0,50 W |
<0,50 W |
<0,50 W |
|
|
|
|
|
|
Off mode power consumption |
|
|
N/A |
|
|
|
|
|
|
|
|
Screen resolution |
1920 (H) x 1080 (V) |
1920 (H) x 1080 (V) |
1920 (H) x 1080 (V) |
1920 (H) x 1080 (V) |
1920 (H) x 1080 (V) |
|
|
|
|
|
|
* - Energy consumption XYZ kWh per year, based on the power consumption of the television operating 4 hours per day for 365 days. The actual energy consumption will depend on how the television is used.
** - when the TV is turned off with the remote control and no function is active
Compatible files in USB Mode
Media |
File Ext. |
Codec |
|
Remark |
|
Video |
Audio |
||||
|
|
|
|||
|
|
|
|
|
|
|
.mpg |
MPEG-1, MPEG-2 |
|
Max Resolution: 1920x1080 |
|
|
.avi |
Xvid, MJPEG, MPEG-4 |
|
Max Data rate: 40 Mbps |
|
|
SP/ASP, H.264 |
|
|
||
|
|
|
|
||
|
|
|
|
|
|
|
.ts |
MPEG-2, H.264 |
|
|
|
Movie |
".mov/ |
MPEG-4 SP/ASP, H.264 |
MP3, WMA, AAC, |
Max Resolution: 1920x1080 |
|
.mkv" |
AC3, H-AC3, DTS |
Max Data rate: 20 Mbps |
|||
|
|
||||
|
.dat |
MPEG-1 |
|
|
|
|
.mp4 |
MPEG-4 SP/ASP, H.264 |
|
|
|
|
|
|
|
||
|
MPEG-1, MPEG-2 |
|
Max Resolution: 720x576 Max |
||
|
|
|
|||
|
.vob |
MPEG-2 |
|
Data rate: 40 Mbps |
|
|
|
|
|
|
|
|
.mp3 |
- |
MP3 |
Sample Rate 8K-48KHz Bit rate: 32K - |
|
Music |
.wma |
- |
WMA |
320Kbps Channel: Mono/Stereo |
|
|
|
|
|
||
".m4a/ |
- |
AAC |
Sample Rate 16K-48KHz Bit rate: 32K |
||
|
|||||
|
.aac" |
~ 442Kbps Channel: Mono/Stereo |
|||
|
|
|
|||
|
".jpg/ |
Progressive JPEG |
|
Max Resolution: 1024x768 |
|
|
.jpeg" |
Baseline JPEG |
|
Max Resolution: 8192x8192 |
|
Photo |
.bmp |
BMP |
|
Max Resolution: 6500x6500 Pixel |
|
|
Depth 1/4/8/16/24/32 bpp |
||||
|
|
|
|
||
|
|
|
|
|
|
|
.png |
Non-Interlaced |
|
Max Resolution: 3000x3000 |
|
|
Interlaced |
|
Max Resolution: 1500x1500 |
||
|
|
|
|||
|
|
|
|
|

DE
Wichtige Sicherheitsanweisungen
VORSICHT
GEFAHR AUF STROMSCHLAG
NICHT ÖFFNEN
Bitte lesen Sie sich diese Sicherheitsanweisungen durch und beachten Sie, bevor Sie das Gerät in Betrieb nehmen, auf die folgenden
Halten Sie Kerzen und offenes Feuer von diesem Produkt fern, um einen Brand zu vermeiden.
•Fernsehgeräte mit einem Gewicht von mehr als 20 Kg müssen von mindestens zwei Personen angehoben und getragen werden.
•Dieses Fernsehgerät enthält keine Teile, die vom Benutzer repariert werden könnten. Setzen Sie sich im Fall eines Defekts mit dem Hersteller oder dem autorisierten Kundendienst in Verbindung. Das Berühren bestimmter Teile im Fernsehgerät könnte Ihr Leben gefährden. Die Garantie gilt nicht für Defekte, die durch von nicht autorisierte Dritten durchgeführte Reparaturen entstehen.
•Entfernen Sie nicht die rückseitige Abdeckung des Geräts.
•Diese Gerät wurde für den Empfang und die Wiedergabe von Bildund Tonsignalen konstruiert. Eine andere Verwendung ist strengstens verboten.
•Setzen Sie das Fernsehgerät keinen tropfenden oder spritzenden Flüssigkeiten aus.
•Das TV Gerät abstecken bedeutet: den Stecker aus der Steckdose ziehen.
•Wenn das Stromversorgungskabel beschädigt ist, muss es vom Hersteller, einem Servicetechniker oder ähnlich qualifizierten Person ausgetauscht werden, um Gefährdungen zu vermeiden.
•Die ideale Entfernung zum Fernsehen ist ungefähr die fünffache Länger der Bildschirmdiagonale. Reflektionen von anderen Lichtquellen auf dem Bildschirm können die Bildqualität verschlechtern.
•Sorgen Sie dafür, dass das Fernsehgerät ausreichend belüftet wird und sich nicht zu nahe an anderen Geräten oder Möbelstücken befindet.
•Stellen Sie das Produkt mindesten 5 cm von der Wand zur Belüftung auf.
•Sorgen Sie dafür, dass die Belüftungsöffnungen nicht durch Gegenstände, z. B. Zeitungen, Tischdecken, Gardinen usw. verdeckt sind.
•Das Fernsehgerät ist für die Verwendung in einem moderaten Klima konstruiert.
•Das Fernsehgerät ist ausschließlich für den Betrieb an einem trockenen Ort konstruiert. Wenn Sie das Fernsehgerät im Freien benutzen, sorgen Sie dafür, dass es vor Feuchtigkeit (Regen, Spritzwasser) gesichert ist.
Niemals der Feuchtigkeit aussetzen.
•Stellen Sie keine mit Wasser gefüllte Behälter, wie Vasen usw. auf das Fernsehgerät. Diese Behälter könnten umgestoßen werden und die elektrische Sicherheit gefährden. Stellen Sie das Fernsehgerät nur auf flachen und stabilen Oberflächen. Legen Sie keine Objekte wie Zeitungen oder
Decken usw. auf oder unter das Fernsehgerät.
•Sorgen Sie dafür, dass das Gerät nicht auf Stromkabeln steht, da diese hierdurch beschädigt werden könnten. Mobiltelefone und andere Geräte, wie WLAN-Adapter, Überwachungskameras mit drahtloser Signalübertragung usw. könnten elektromagnetische Störungen verursachen und sollten daher nicht in der Nähe des Geräts aufgestellt werden.
•Stellen Sie das Gerät nicht neben Heizkörpern oder an einem Ort mit direkter Sonneneinstrahlung auf, da dies negative Auswirkung auf die Kühlung des Gerätes haben kann. Ein HItzestau ist gefährlich und die Lebensdauer des Geräts erheblich verkürzen. Um für Sicherheit zu
sorgen, bitten Sie eine qualifizierte Person, den Staub aus dem Gerät zu entfernen.
•Vermeiden Sie die Beschädigung an Stromkabeln oder Stromsteckern. Das Gerät darf nur mit dem mitgelieferten Stromkabel/Stecker angeschlossen werden.
•Gewitter sind für alle elektrischen Geräte gefährlich. Wenn das Stromoder Antennenkabel vom Blitz getroffen wird, kann das Gerät, auch wenn es ausgeschaltet ist, beschädigt werden. Bei einem heran nahenden Gewitter sollten Sie alle Kabel und Stecker des Gerätes ausstecken.
•Verwenden Sie zur Reinigung des Bildschirms des Geräts nur ein feuchtes und weiches Tuch. Verwenden Sie nur sauberes Wasser, niemals Reinigungsmittel und in keinem Fall Lösungsmittel.
•Stellen Sie das Fernsehgerät nah an die Wand, damit die Möglichkeit vermieden wird, dass es beim Drücken der Knöpfe umfällt.
•WARNUNG – Stellen Sie den Fernseher niemals an eine unsichere Stelle. Das Gerät könnte fallen und ernsthafte Verletzungen bis hin zum Tod verursachen. Viele Verletzungen, speziell bei Kindern, können durch folgende Vorsichtsmaßnahmen verhindert werden:
•Benutzen Sie ausschließlich Standfüße und Halterungen, die vom Hersteller für das Gerät empfohlen werden
•Benutzen Sie nur Möbel, die den TV sicher tragen können
•Versichern Sie sich, dass das Gerät nicht übersteht
•Stellen Sie Ihr Gerät nicht auf hohe Möbel (z.B. Schränke oder Bücherregale), ohne das Gerät und die Möbel entsprechend zu sichern
•Stellen Sie das Gerät nicht auf Kleidung oder andere Materialen (Tischdecken etc.), die auf den Möbeln liegen.
•Erklären Sie Kindern die Gefahren, die bestehen, wenn sie auf Möbel klettern, um an den TV oder die Fernbedienung zu gelangen.
•Stellen Sie sicher, das Kindern nicht auf den TV klettern.
•Wenn Sie ihr bereits vorhandenes Gerät woanders aufstellen möchten, gelten dieselben Vorsichtsmaßnahmen wie oben.
•Stellen Sie keine anderen Objekte bzw. mit Flüssigkeiten gefüllte Vasen oder Gläser auf den TV.
•Die unten genannten Anleitungen sind ein sicherer Weg, das Fernsehgerät aufzustellen, indem man es an der Wand befestigt, was die Möglichkeit, dass es nach vorne Fällt und Verletzungen und Schäden verhindert.
•Diese Methode ist auch nützlich, wenn das Gerät auf einer Glasoberfläche aufgestellt wird und Sie nicht möchten, dass etwas in Ihre Möbel geschraubt wird.
•Für diese Art der Befestigung benötigen Sie eine Befestigungskordel.
•A)Wenn Sie eines/beide der oberen Wandmontagelöcher und die Schrauben verwenden (die Schrauben befinden sich schon in den Wandmontagelöchern), dann befestigen Sie das eine Ende der Befestigungskordel(n) am Fernsehgerät.
•B)Sichern Sie das andere Ende der Befestigungskordel(n) an Ihrer Wand.
•Die Software Ihres Fernsehgeräts und das OSD-Layout können ohne Vorankündigung geändert werden.
Warnung:
•Verbinden Sie niemals externe Geräte mit mit einem laufenden Fernsehapparat. Schalten Sie nicht nur das Fernsehgerät sondern auch die zu verbindenden Geräte aus. Stecken Sie den Fernsehgerätestecker erst in die Wandsteckdose, wenn Sie die externen Geräte und die Antenne verbunden haben.
•Sie müssen immer dafür Sorge tragen, dass der Fernsehgerätestromstecker frei zugänglich ist.
•Das Gerät ist nicht dafür gebaut, um an einem mit Monitoren ausgestatteten Arbeitsplatz verwendet werden zu können.
•Die ständige Verwendung von Kopfhörer mit hoher Lautstärke kann zu dauernden Hörschäden führen.
•Sorgen Sie für eine umweltverträgliche Entsorgung dieses Geräts und Komponenten, die Batterien enthalten. Wenn Sie Zweifel haben, setzen Sie sich mit Ihrer zuständigen Behörde in Verbindung, um Einzelheiten zum Recycling zu erfahren.
•Vergessen Sie bei der Aufstellung nicht, dass Möbeloberflächen mit verschiedenen Lacken, Kunststoffen usw. behandelt wurden oder dass sie poliert sein können. Die in diesen Produkten enthaltenen Chemikalien könnten mit dem Ständer des Fernsehgeräts reagieren. Dies könnte dazu

13
führen, das Stücke des Materials auf der Oberfläche kleben, die nur sehr schwer oder gar nicht zu entfernen sind.
•Der Bildschirm Ihres Fernsehgeräts wurde unter besten Qualitätsbedingungen hergestellt und wurde mehrmals auf beschädigte Pixel geprüft. Wegen der technischen Eigenschaften des Herstellungsprozess ist es nicht möglich, das Auftreten einer geringe Anzahl von schadhaften Punkten auf dem Bildschirm zu vermeiden (dies auch bei höchster Sorgfalt während der Herstellung). Diese schadhaften Pixel gelten nicht als Schaden im Rahmen der Garantiebedingungen, wenn ihr Vorkommen nicht höher als in den Grenzwerten, die in der DIN-Norm vorgegeben sind, ist.
•Der Hersteller kann nicht für für servicebezogene Kundenprobleme
in Bezug auf Inhalte oder Dienstleistungen Dritter haftbar gemacht werden. Alle Fragen, Kommentare oder servicebezogene Anfragen zu dem Inhalt oder dem Service Dritter müssen unmittelbar an den für den Inhalt oder Service zuständigen Dienstleister gerichtet werden.
•Es gibt eine Reihe von Gründen, warum Sie mit dem Gerät nicht auf Inhalte oder Services zugreifen können, wie z. B. insbesondere Stromausfall, der Internetverbindung oder Fehler bei der richtigen Konfiguration Ihres Geräts. Universal Media Corporation, sein Vorstand, die leitenden Angestellten, die Mitarbeiter, Vertreter, Auftragnehmer und Partner sind Ihnen und Dritten gegenüber nicht für Fehler oder Versorgungsunterbrechungen ungeachtet der Ursache oder ob sie hätten vermieden werden können, haftbar.
•Jeder Inhalt oder Service von Drittanbietern wird Ihnen über diese Gerät auf einer„wie vorhanden“ und„wie geliefert“ Basis zur Verfügung gestellt und die Universal Media Corporation und seine Partnerfirmen geben Ihnen gegenüber keine ausdrückliche oder vermeintliche Garantie
oder Zusage, einschließlich, aber nicht erschöpfend keine Garantien für die wirtschaftliche Verwertbarkeit, nicht Verletzung, oder Eignung für einen bestimmten Zweck oder Garantien für die Eignung, Verfügbarkeit, Genauigkeit, Vollständigkeit, Sicherheit, Anspruch, Verwendbarkeit, Fehlen von Fahrlässigkeit oder fehlerfreien, ununterbrochenen Betrieb oder Verwendung des Inhalts oder der Ihnen angebotenen Services oder das der Inhalt oder die Services ihren Wünschen und Erwartungen entsprechen.
•Die 'Universal Media Corporation' ist kein Vertreter und übernimmt keine Verantwortung für die Handlungen und Unterlassung von Inhaltoder Service-Drittanbietern noch Aspekten des Inhalts oder Service im Hinblick auf solche Drittanbieter.
•Auf keinem Fall ist die 'Universal Media Corporation' und/oder seine Partner Ihnen oder Dritten gegenüber für unmittelbare, mittelbare, besondere, zufällige, strafrechtlich, nachfolgende oder weitere Schäden haftbar, gleichgültig ob sich der Schadenersatzanspruch aus dem Vertrag, unerlaubter Handlung, Fahrlässigkeit, Garantieverletzung, verschuldensunabhängige Haftung oder sonstigen Gründen ergibt und ob die Universal Media Corporation und/oder ihre Partner auf die Möglichkeit solcher Ansprüche hingewiesen wurden.
Wichtige Informationen zur Verwendung von Videospielen, Computern, Untertiteln und sonstigen Standbildanzeigen.
•Die übermäßige Verwendung von feststehenden Bildern kann ein ein permanentes„Schattenbild“ (das manchmal fälschlicher Weise als„in den Bildschirm eingebrannt“ bezeichnet wird) verursachen. Dieses Schattenbild ist im Hintergrund auf dem Bildschirm ständig sichtbar. Dies ist ein nicht mehr behebbarer Schaden. Sie können einen solchen Schaden vermeiden, in dem Sie die nachfolgenden Anleitungen befolgen:
•Reduzieren Sie die Helligkeit-/Kontrasteinstellung auf ein Minimum.
•Lassen Sie keine Standbilder für einen längeren Zeitraum anzeigen. Vermeiden Sie die Anzeige von:
»Teletext Zeit und Grafiken,
»TV/DVD Menü, z. B. DVD Inhaltsverzeichnis.
»Den„Pause“ Modus (festhalten): Wenn Sie sich eine DVD oder ein Video ansehen, sollten Sie diesen Modus nicht für längere Zeit verwenden.
»Schalten Sie das Gerät, wenn Sie es nicht verwenden, aus.
Batterien
• Beachten Sie beim Einlegen der Batterien auf die |
|
richtige Polarität. |
|
• Setzen Sie Batterien keinen hohen Temperaturen |
|
aus und legen Sie sie nicht an Stellen ab, wo sich |
|
die Temperatur schnell erhöht, z. B. neben ein Feuer |
|
oder in die direkte Sonneneinstrahlung. |
|
• Setzten Sie Batterien keiner übermäßigen Strahl- |
Cd |
ungswärme aus, werfen Sie sie nicht ins Feuer oder |
|
bauen sie auseinander und versuchen Sie nicht, |
|
nicht aufladbare Batterien aufzuladen. Sie könnten undicht werden oder explodieren.
»Verwenden Sie niemals unterschiedliche Batterien oder vermischen neue mit alten.
»Entsorgen Sie die Batterien umweltfreundlich.
»In den meisten EU-Ländern gelten für die Entsorgung von Batterien besondere Gesetze und Vorschriften.
Entsorgung
• Entsorgen Sie Ihr Fernsehgerät niemals über den normalen Hausmüll. Geben Sie es bei dem für das Recycling von WEEE vorgesehenen Sammelpunkt ab. Damit helfen Sie, Ressourcen einzusparen und die Umwelt zu schützen. Weitere Informationen erhalten Sie von Ihrem Händler oder den örtlichen Behörden.
CE-Konformitätserklärung
•Die Universal Media Corporation s.r.o erklärt hiermit, dass dieses LED Fernsehgerät die wesentlichen Anforderungen und weitere entsprechende Vorschriften der R&TTE Verordnung 1999/5/EG einhält. http://www. sharp.eu/av/documents-of-conformity
Markenzeichen
•Die Begriffe HDMI und HDMI High-Definition Multimedia Interface sowie das HDMI Logo sind Warenzeichen oder in den Vereinigten Staaten und weiteren Ländern eingetragene Warenzeichen der HDMI Licensing, LLC.
•Das„HD TV“ Logo ist eine Markenzeichen von DIGITALEUROPE:
•Das„HD TV 1080p“ Logo ist eine Markenzeichen von DIGITALEUROPE:
•Das DVB Logo ist ein eingetragenes Markenzeichen des Digital Video Broadcasting -DVB- Projekts.
•In Lizenz von Dolby Laboratories gefertigt. Dolby, Dolby Audio und das Doppel-D-Symbol sind Warenzeichen von Dolby Laboratories.
•Für die DTS-Patente gehen sie bitte auf: http://patents.dts.com. In Lizenz für DTS Licensing Limited hergestellt. DTS, the Symbol, & DTS und the Symbol zusammen sind eingetragene Warenzeichen, DTS TruSurround und DTS 2.0+Digital Out sind Marken von DTS, Inc. © DTS, Inc. Alle Rechte vorbehalten.
•YouTube und das YouTube Logo sind Markenzeichen der Google Inc.
•Das WI-FI CERTIFIED Logo ist ein Prüfzeichen der Wi-Fi Alliance.
•Das WI-FI CERTIFIED Logo ist ein Prüfzeichen der Wi-Fi Alliance.
•DLNA , das DLNA Logo und DLNA CERTIFIED sind Warenzeichen, Dienstleistungszeichen oder Prüfzeichen der Digital Living Network Alliance
•MHL und das MHL Logo sind Warenzeichen, eingetragene Warenzeichen oder Schutzmarken von MHL, LLC in den USA und/oder anderen Staaten.
•Die Bluetooth® Wortmarke und Logos sind geschützte Marken der Bluetooth SIG Inc.

DE
Was befindet sich im Karton
Der Lieferumfang dieses Fernsehgerät umfasst folgende Teile:
• |
1x Fernsehgerät |
• |
1x RF Kabel |
• |
1x Fernbedienung |
• |
1x Fernsehständer Installationspack |
|
|
|
|
• |
2x AAA Batterien |
• |
1x Benutzerhandbuch |
|
|
|
|
• |
1x Mini Komposit |
• 1x Mini Komponenten Adapterkabel |
|
|
Adapterkabel |
|
|
|
|
|
|
Montage des Ständers
Bitte befolgen Sie hierzu die Anleitungen auf der letzten Seite dieses Benutzerhandbuchs.
Erste Schritte - Ersteinrichtung
1.Legen Sie die mitgelieferten Batterien in die Fernbedienung ein.
2.Schließen Sie das mitgelieferte Antennenkabel an Ihrem TV und der Antennenbuchse an.
3.Um sich per Kabel mit dem Internet zu verbinden, schließen Sie ein Cat5-Ethernetkabel (nicht mitgeliefert) an Ihrem TV und Ihrem Internetmodem/Router an.
4.Stecken Sie das Stromkabel in eine Steckdose und schalten Sie den TV mit dem Standby-Knopf am TV ein.
5.Sie werden nun den Erstinstallationsbildschirm sehen. Wenn dieser nicht erscheint, drücken Sie die Standby-Taste auf dem Fernseher einmal, was das "Verbindungsmenü" aufrufen wird. Scrollen Sie durch und wählen sie "Wiederverbinden" , indem Sie die CH+/CHTV -Taste drücken (Hochund Runterscrollen im Menü), drücken Sie dann die Standby-Taste (OK-Funktion im Menü), um ihre Auswahl zu bestätigen. Drücken und halten Sie die gelbe und grüne Taste auf der Fernbedienung für einige Sekunden, bis die weiße LED an der TV Vorderseite 5x blinkt. Drücken Sie die Taste [MENÜ] und dann
8-8-8-8 und der Erstinstallationsbildschirm erscheint. Verwenden Sie bitte die ▲/▼/◄/►Richtungstasten, wenn Sie
Standardeinstellungen verändern möchten. Drücken Sie auf den [EXIT] Knopf um das Menü zu verlassen.
6.Bitte nehmen Sie im ERSTEINRICHTUNG Bildschirm die gewünschten Änderungen vor.
DVB Antenne - Sie können zwischen Antenne (DVB-T), Kabel (DVB-C) oder Satellit (DVB-S)* auswählen.
OSD Sprache - Zur Einstellung der TV Menüsprache. Land - Zur Einstellung des gewünschten Landes.
Sendersuche - Wählen Sie aus, ob Sie nur digitalen (DTV), analogen (ATV) oder beides (DTV + ATV) Empfang haben möchten
Anbieter - Auswahl des Kabelanbieters. Wenn Ihr Kabelanbieter nicht aufgeführt ist, wählen Sie bitte 'Anderer' (Nur
verfügbar, wenn DVB Antenne auf KABEL gesetzt ist) Umgebung - Auswahl des Gerätestandorts
Wählen Sie bitte den Ecohome, wenn Sie das Gerät Zuhause verwenden. Für den Ladenvorführmodus müssen den Ladenmodus einstellen.
LCN - Setzen Sie LCN auf AN, wenn Sie die Kanäle nach den Anwenderpräferenzen anordnen möchten (gilt nur für DVB-T und DVB-C Kanäle).
7.Drücken Sie den [Automatische Sendersuche] Knopf, um den Tuningprozess zu starten.
Optionale Kanalvoreinstellungen DVB-C:
Belassen Sie alle empfohlenen Einstellungen.
Wenn DVB-C Kanäle nicht gefunden werden, setzen Sie sich mit Ihrem Kabelanbieter in Verbindung und fragen nach der gültigen „Netzwerk ID“. Dann führen Sie eine neue Suche durch. Drücken Sie auf [MENÜ], wählen „Netzwerk ID“ aus und geben die „Netzwerk ID“ ein.
8.Optionale Kanalvoreinstellungen DVB-S2:
Wählen Sie im Menü für die optionalen Kanalvoreinstellungen unter „Digitaltyp“ den Punkt„Satellit“ aus. Hier können Sie unter mehreren Satelliten wählen. Wenn Sie die Auswahl getroffen haben, dann wird die Kanalliste des ausgewählten Satelliten in Ihr Fernsehgerät importiert.
Bestätigen Sie mit dem [OK] Knopf auf der Fernbedienung, um den Scan einzuleiten.
TIPP: Wenn Kanäle fehlen, liegt dies wahrscheinlich an der Signalstärke. Sie sollten in Erwägung ziehen, einen Signalverstärker anzuschließen und das Fernsehgerät neu einzustellen.
Fernbedienung
Funkgesteuerte Fernbedienung - Nie mehr in Richtung des Fernsehers zielen! Siehe Abbildung der Fernbedienung auf der zweiten Seite dieses Handbuchs.
1.STANDBY – Schaltet das Gerät aus Standby an, oder umgekehrt.
2.MUTE – Schaltet den Ton stumm oder umgekehrt.
3.0 – 9 – Zur Direktauswahl eines Kanals.
4.TV GUIDE – Öffnet die 7-Tage Fernsehzeitschrift (Digitalmodus).
5. – Um zum vorher angesehen Kanal zurück zu schalten.
6.PICTURE – Durchsucht die Bildmodusoptionen.
7.VOL ▲/▼– Zur Lautstärkeeinstellung.
8.CH ▲/▼– Zur Kanalauswahl.
9.SOUND – Durchsucht die Tonmodusoptionen.
10.SOURCE – Zur Anzeige des Eingans-/Quellenmenüs.
11.MENU – Zum Aufruf des OSD-Menü.
12.EXIT – Um alle Menüs zu verlassen.
13.(▲/▼/◄/►/ OK) – Ermöglicht Ihnen, durch die On-Screen Menüs zu navigieren und die Systemeinstellungen nach Ihren Wünschen zu verändern.
14.BACK – Zurück zum vorherigen Menü.
15.FAV – Zur Anzeige des Favoritenmenüs.
16.INFO – Für aktuelle/nächste Kanalinformationen: Ein Mal drücken. Drücken Sie zwei Mal für die Programminformation über laufende Sendungen.
17.TEXT – Teletext Modus - Um Teletext aufzurufen.
18.SUBTITLE – Um Untertitel am unteren Bildschirmrand einoder auszuschalten.
19.TV – Schaltet zur digitalen TV-Quelle um.
20.YouTube – Zum Aufruf von YouTube.
21.MEDIA – Schaltet zur USB-Quelle.
22.NET+ – Zeigt das AQUOS NET+ Menü an.
23.Rec1 – PVR Aufnahme.
24.–Um das aktuelle Kapitel neu zu starten.
25.–Um auf das nächste Kapitel zu gehen.
26.– Um die Wiedergabe anzuhalten.
27.Rec List1– Öffnet die Aufnahmeliste.
28.–Schneller Rücklauf.
29.– Schneller Vorlauf.
30.–Abspielen/Pause.
31.Farbknöpfe – Zusätzliche Teletextund OSD-Funktionen.
1 - nur mit PVR-Funktion verfügbar
15
TV-Knöpfe
Vol+ Lautstärke auf und Menü rechts
Vol- Lautstärke ab und Menü rechts
CH+ Programm/Kanal auf und Menü auf
CH- Programm/Kanal ab und Menü ab
MENU Zeigt das Menü/OSD-Menü an
SOURCE Zeigt das Eingangsquellenmenü an
STANDBY Standby Strom Ein/Aus
HEADPHONES
3,5 mm Kopfhöreranschluss
TV Menünavigation
Drücken Sie auf der Fernbedienung den [MENU] Knopf, um dieses Menü aufzurufen. Um ein Menü zu öffnen, drücken Sie [OK], Verwenden Sie bitte die ▲/▼/◄/►Richtungstasten, wenn Sie Standardeinstellungen verändern möchten. Drücken Sie den [OK] Knopf, um Einstellungen zu bestätigen. Drücken Sie auf den [EXIT] Knopf um das Menü zu verlassen.
Eingang/Quellen Modus auswählen
Um zwischen den verschiedenen Eingängen/Buchsen umzuschalten.
a.Verwendung der Knöpfe auf der Fernbedienung:
4.Druck auf [SOURCE/AV] - Das Quellenmenü erscheint.
5.Drücken Sie auf [▼] oder [▲], um den gewünschten Eingang auszuwählen
6.Drücken Sie auf [OK].
b.Verwendung der Knöpfe an Ihrem Fernsehgerät:
1.Drücken Sie auf [SOURCE]:
2.Scrollen Sie mit den CH+/ CHKnöpfen aufund abwärts zur gewünschten Quelle/Eingang
3.Drücken Sie auf Vol+, um den/die ausgewählte/n Eingang/Quelle zu verändern.
Buchsen
Bitte sehen Sie sich die Tabelle der Buchsenarten für die unterschiedlichen Modelle auf der Seite XX68 an.
USB
USB Eingang 1, 2
HDMI 1, 2, 3(MHL) in
HDMI Eingang 1, 2, 3
VGA (PC)
VGA PC Eingang
VGA (PC) Audio In
3,5 mm PC Audioeingang
Mini AV
Videoeingang & Komponente / Video Audioeingang
Mini YPbPr
Ministecker HD Eingang
SCART
SCART Eingang
CI Card IN
CI Eingang
RF In
RF / TV Antenneneingang
Sat In
Satelliteneingang
Digital Optical Audio Out
Digitaler optischer Ausgang
RJ 45
Ethernet
Bild
Bildeinstellung - Wählen Sie aus den folgenden Voreinstellungen:
–Standard - Standardeinstellung
–Dynamisch - Empfohlene Einstellung für sich schnell bewegende Bilder
–Mild - Hellere Farben und weniger Helligkeit
–Persönlich - Hier können Sie alle Einstellungen ändern
–Eco - Verbraucht 15 % weniger Strom
Kontrast - Verändert die Balance zwischen Schwarz und Weiß. Helligkeit - Erhöht oder vermindert die Bildhelligkeit Farbton - Hier mit können Sie die Stärke des Farbtons des Bildes erhöhen oder verringern (nur für NTSC Signal)
Farbe - Verändert die Farbintensität.
Schärfe - Erhöht oder vermindert die Bildschärfe.
Anpassung Hintergrundbeleuchtung - Sie können die Helligkeit des Bildschirms durch die Erhöhung/Verminderung der Hintergrundbeleuchtung des Schirms anpassen. Farbtemperatur - Wählen Sie eine der Voreinstellungen aus.
–Normal - Standardeinstellung
–Warm - Erhöht im Bild den Rotanteil
–Kalt - Erhöht im Bild den Blauanteil
Rot - Zur Verstellung des Rottons des Bilds. Grün - Zur Verstellung des Grüntons des Bilds. Blau - Zur Verstellung des Blautons des Bilds.
Gamma - Zur Verstellung der Farbtöne zwischen den hellen und dunklen Bestandteilen des Bildes. Bildformat - Je nach Kanal/Sender kann das Bildformat unterschiedlich sein. Es gibt eine Anzahl verschiedener Optionen, die ihre Bedürfnisse am besten erfüllen.
–Auto - Zeigt automatisch das beste Bildformat an. Damit ist das Bild in der richtigen Position. Es kann oben und unten und/oder an den Seiten schwarze Balken haben.
–4:3 - Zeigt das 4:3 Bild in seiner Originalgröße an. Es werden Seitenbalken angezeigt, um den 16:9 Bildschirm zu füllen.
–16:9 - Füllt den Bildschirm mit dem regulären 16:9 Signal..
–Zoom 1/2 - Das Bild hat die richtige Position, ist aber vergrößert, um den Bildschirm auszufüllen.
–Dot by Dot (HDMI) - Zeigt das Bild in seiner originalen, unveränderten, Auflösung an.
–Vollbild - Streckt das Signal, um den Bildschirm zu füllen, Rauschunterdrückung - Filtert und verringert
das Bildrauschen/Bildstörungen
MPEG–Rauschunterdrückung - Zur Verringerung der sichtbaren, von der MPEG-Kompression verursachten, Störungen.
Aktiver Kontrast - Optimiert automatisch die 'Hintergrundbeleuchtung" und den 'Bildkontrast' anhand der Bildschirmhelligkeit.
Sound
Soundmodus - Wählen Sie eine der folgenden Voreinstellungen aus
– Standard - Standardeinstellungen

DE
–Musik - Hebt Musik gegenüber Sprache hervor
–Film - Stellt live und vollen Sound für Filme zur Verfügung
–Persönlich - Wählt Ihre eigenen Soundeinstellungen aus
–Sport - Hebt Sportgeräusche hervor
TIPP: Höhenund Basseinstellungen können nur verstellt werden, wenn der Soundmodus 'Eigene' ausgewählt ist.
Equalizer - Zur Anpassung der Lautstärke verschiedener Tonfrequenzen. Höhenund Basseinstellungen können nur verstellt werden, wenn der Soundmodus 'Eigene' ausgewählt ist.
Balance - Zur Anpassung der Lautstärke des linken und rechten Lautsprechers. Autom. Lautstärke - Wenn 'AN' ausgewählt ist, bleibt die
Lautstärke ungeachtet des Eingang und der Quelle gleich. DTS TruSurround - Hier können Sie den Surround Sound Effekt EIN oder AUS schalten.
Digitalausgang - Dies ist der digitale Audioausgang. Sie können folgende Einstellung auswählen
–AUS - AUS
–Auto - Wählt automatisch die besten Einstellungen
–PCM - Wählen Sie diese Option, wenn Sie ein Hi-Fi Stereogerät verbinden möchten. Pulse Code Modulation (PCM) ist
die digitale Wiedergabe eines analogen Signals. Audiobeschreibung - Zusätzliche Tonspur für Sehbehinderte. Steht nur bei ausgewählten DTV-Sendungen zur Verfügung.
AB Lautstärke - Zur Lautstärkeeinstellungen der Audiobeschreibung Tonspur
Audioverzögerung (ms) - Hiermit können Sie die Soundeinstellungen verändern, um das Bild mit der Tonwiedergabe über die Fernsehlautsprecher zu synchronisieren.
SPDIF-Verzögerung (ms) - Hiermit können Sie die Soundeinstellungen verändern, um die Tonwiedergabe von über den digitalen Audioausgang verbundenen externen Lautsprechern mit der Bildwiedergabe zu synchronisieren..
PC
Auto-Einstellung - Hiermit können Sie das Fernsehgerät automatisch konfigurieren, damit es als Computermonitor verwendet werden kann. H. Position - Verändert die horizontale Position des Bildes.
V. Position - Verändert die vertikale Position des Bild. Größe - Erhöht die Bildgröße
Phase - Um die Verzögerungszeit der Phase zu verändern, um das Bildrauschen zu verringern
TIPP: Wenn der Computer für einige Zeit nicht betätigt wird, schaltet das Fernsehgerät in den 'Schlafstatur' (der Bildschirm wird ausgeschaltet, um Strom zu sparen). Um ihn wieder anzuschalten, müssen Sie auf den Standby-Knopf drücken.
TIPP: Wenn Sie innerhalb von 10 Sekunden nicht einen beliebigen Knopf drücken, wird das Menü automatisch beendet. Sie können die Länge der Zeit, bevor das Menü automatisch geschlossen wird, einstellen - siehe 'OSD-Timer' Abschnitt.
Sendersuche / Kanal
DVB Antenne - Auswahl der Art des DTV Signals
–Terrestrisch - Antenne (DVB-T)
–Kabel - Kabel (DVB-C)
Automatische Sendersuche - Hiermit können Sie das Fernsehgerät erneut nach allen verfügbaren digitalen Kanälen, digitalen Radiosendern und analogen Kanälen suchen lassen.
Manuelle Analog Suche - Hiermit können Sie das Analogsignal manuell einstellen. Manuelle DTV Suche - Hiermit können Sie das Digitalsignal manuell einstellen.
Programme bearbeiten - Hiermit können Sie Kanäle löschen, überspringen oder den Favoriten hinzufügen.
Signalinformation - Information über das DVB Signal. CI-Informationen - Für Bezahlfernsehen benötigen Sie eine „Smartcard“, die Sie in das Fernsehgerät einstecken müssen. Wenn Sie Bezahlfernsehen abonnieren, dann erhalten Sie vom Anbieter eine 'CAM' und eine„Smartcard“. Die„Smartcard“ müssen Sie in den ALLGEMEINEN SCHNITTSTELLEN PORT (CI Card In) einstecken. Timerliste - Liste Ihrer Programmerinnerungen
Satellit Konfiguration - Dieses Menü ist nur im DVB-S2 Modus verfügbar. Hier können die Satellitenart, Ihren Transponder und Ihren LNB-Type usw. auswählen.
Sperre
System sperren - Hiermit können Sie das Menü sperren und entsperren. Sie werden gebeten, ein 4-stelliges Passwort einzugeben. Verwenden Sie den ◄Knopf, um die Passworteingabe zu beenden. Verwenden
Sie den ►Knopf zum Löschen. Das Standardpasswort ist 0000. Kennwort setzen - Änderung des Standardpassworts. Sender Sperren - Sperrt einzelne Fernsehkanäle
Jugendschutz - Sperrt Fernsehkanäle anhand von Altersbeschränkungen. Tastensperre - Sperrt die Fernsehknöpfe
–Aus - Alle Fernsehknöpfe sind entsperrt.
–Partiell - Nur der Standby Knopf ist entsperrt.
–Voll - Alle Fernsehknöpfe sind gesperrt.
Uhrzeit
Uhr - Zur Einstellung von Datum und Uhrzeit. Im DVB-Modus werden Datum und Zeit automatisch eingestellt. Ausschaltzeit - Zur Auswahl einer vorgegebenen Zeit,
zu der das Fernsehgerät sich ausschalten soll.
Einschaltzeit - Zur Auswahl einer vorgegebenen Zeit, zu der das Fernsehgerät sich ausschalten, welcher Kanal gezeigt, welche Quelle an sein und auch welche Lautstärke eingestellt sein soll. Diese Funktion kann so eingestellt werden, das sie sich täglich oder an einem bestimmten Tag wiederholt. Einschlaf-Timer - Zur Einstellungen des Sleep Timer, damit sich das Fernsehgerät nach dem eingestellten Zeitraum von selbst ausschaltet. Aus -> 10 Min -> 20 Min -> 30 Min -> 60 Min -> 90 Min -> 120 Min -> 180 Min -> 240 Min.
OSD Timer - Hiermit können Sie die Zeit einstellen, die das On-Screen Menü auf dem Bildschirm bleibt, bis es wieder verschwindet.
Auto Standby - Einstellung für das Auto Standby in Stundenabständen: Aus -> 3 Std. -> 4 Std. -> 5 Std.. Zeitzone - Zur Änderung Ihrer aktuellen Zeitzone.
Netzwerk
Netzwerkkonfiguration - Zunächst müssen Sie Ihre Verbindungsart auswählen. Sie können zwischen Wi-Fi oder Kabel (LAN)
auswählen. HINWEIS Zum Anschluss Ihres Fernsehgeräts über Ihr/en Breitband Router oder Modem an das Internet mit einem Netzwerkkabel verwenden Sie bitte ein Cat5-Ethernetkabel.
IP Konfiguration - Einstellung der LAN Netzwerkverbindung
–Auto - Verbindet Ihr Fernsehgerät automatisch mit Ihrem Heimnetzwerk (das ist die Standardeinstellung und sie ist sehr empfehlenswert)
–Manual - Ermöglicht Ihnen, IP, Netmask, Gateway
und DNS Angaben manuell zu verändern.
Wi–Fi Konfiguration - Einstellungen für die drahtlose Netzwerkverbindung
–Wi–Fi Auto Suche - Sucht automatisch nach vorhandenen drahtlosen Netzwerken. Wählen Sie das gewünschte Wi-Fi Netzwerk aus und

17
geben dann das Netzwerk-Passwort ein (wenn das Netzwerk mit einem Passwort geschützt ist). Nachdem das Passwort akzeptiert wurde, werden Sie nicht mehr danach gefragt werden.
HINWEIS: Haben Sie bitte etwas Geduld. Der Verbindungsprozess kann einige Minuten dauern. Jedes Mal, wenn das Fernsehgerät eingeschaltet wird, wird es sich automatisch mit dem Netzwerk verbinden, aber das kann ebenfalls einige Zeit dauern.
Netzwerk–Info - Anzeige der Netzwerkeinstellungen Netzwerktest - Test der Netzwerkverbindung
Einstellungen
OSD Sprache - Hiermit können Sie die Menüsprache verändern. Audiosprachen - Hier können Sie für einzelne DVB-
Kanäle die Audiosprache verändern. Untertitelsprache - Hier können Sie für einzelne DVBKanäle die Sprache der Untertitel verändern.
Gehörlosenhilfe - Wenn das Signal Hörgeschädigt unterstützt, können die Untertitel durch drücken auf„Untertitel“ eingeblendet werden. Wenn Sie Hörgeschädigt auf AN setzen,und auf einen Kanal schalten, der
Hörgeschädigt unterstützt, werden die Untertitel automatisch eingeblendet. Blauer Bildschirm - Verändert den Hintergrund von
durchsichtig in einen blauen Hintergrund, wenn kein Signal angezeigt wird (Nur bei einigen Quellen verfügbar). Erstinstallation - Ruft die Ersteinrichtung auf
Software Update (USB) - In gewissen Zeitabständen bringen wir neue Firmware (als Download verfügbar) heraus, um den Betrieb des
Fernsehgeräts zu verbessern. Mit diesem Menü können Sie neue Software/ Firmware in Ihr Fernsehgerät installieren. Weitere Einzelheiten, wie man dies macht, werden mit der Firmware mitgeliefert. Setzen Sie sich mit der Helpline in Verbindung oder sehen Sie auf der ‘www.sharp.eu’Internetseite nach.
Software Update (NET) - Ermöglicht, die TV-Software über das Internet zu aktualisieren. Diese Funktion sucht nach neuer Software und aktualisiert sie, wenn erforderlich. Für diese Funktion muss das Fernsehgerät mit dem Internet und eine m USB-Speichergerät mit mindestens 200 MB freiem Speicherplatz verbunden sein.
HINWEIS: Jedes Mal, wenn das Fernsehgerät eingeschaltet wird, sucht es nach neuen Softwareversionen. Wenn eine neue Version gefunden wird, werden
Sie gefragt, ob Sie sie herunterladen und installieren möchten. Wenn Sie 'Yes' auswählen, wird das Fernsehgerät mit der neusten Software aktualisiert. Sie müssen ein USB Speichergerät mit mindestens 200 MB freiem Speicherplatz an Ihr Fernsehgerät anschließen, damit die Aktualisierung startet.
ACHTUNG: Schalten Sie das Fernsehgerät nicht vor der Beendigung der Aktualisierung aus!
Werkseinstellungen - Dies setzt die Menüs auf die Werkseinstellungen zurück.
HDMI CEC* - Hiermit können Sie über HDMI angeschlossene Geräte mit der TV-Fernbedienung steuern.
–Auto Standby* - Schaltet über HDMI CEC Geräte automatisch an/aus.
–Geräteliste* - Hiermit können Sie auf die Gerätemenüs zugreifen und das Menü über die TV-Fernbedienung steuern.
–HDMI ARC* - Sendet das Audiosignal einer terrestrischen oder Satellitenübertragung kabellos via HDMI an den AV-Receiver. Es sind keine zusätzlichen Audiokabel erforderlich. Diese Funktion steht nur beim HDMI 2 Ausgang zur Verfügung.
* - Das angeschlossene Gerät muss HDMI CEC unterstützen.
LED Status - Hiermit können Sie die LED Betriebsanzeige EIN oder AUS schalten, wenn das Fernsehgerät läuft. (Wenn diese Option auf AUS eingestellt ist, dann blinkt die LED Betriebsanzeige, wenn die Fernbedienung verwendet wird). Versionsinfo - Zeigt die TV-Softwareversion an Ladenmodus* - Schaltet den Ladenvorführmodus AN/AUS
* - nur verfügbar, wenn der Ladenmodus während der Ersteinrichtung ausgewählt wurde.
ANWENDUNGEN
AQUOS NET+ - Öffnet das Sharp SMART Portal.
USB Media - Der Multimediamodus ermöglicht das Abspielen verschiedener, auf einem USB-Speicherstick gespeicherter Inhalte. Der Inhalt ist in verschiedene Dateiarten unterteilt: Foto, Musik und Film.Die 'File Option' zeigt alle Arten an unterstütztem Inhalt an und Sie können diese Abspielen.
1.Sie können mit den Richtungsknöpfen ▲/▼/◄/►durch das Menü navigieren. Drücken Sie auf den [OK] Knopf, wenn Sie einen Eintrag bestätigen möchten, den Sie abspielen oder ansehen möchten.
2.Wählen Sie das gewünschte Laufwerk. (Wenn Ihr Laufwerk nur eine Partition hat, dann sehen Sie auch nur einen Eintrag).
3.Sie können jetzt das Medium aufrufen. Zum Ansehen müssen Sie auf OK drücken.
4.Während des Ansehens können Sie die Medienabspielmodi mit der Fernbedienung oder durch Einblenden des Abspielnavigationsmenüs und Auswahl der On-Screen Knöpfe
▲/▼/◄/►und [OK] steuern.
HINWEIS: USB Verlängerungskabel sind nicht empfehlenswert, da sie eine Verringerung der Bild-/Tonqualität und Unterbrechungen beim Abspielen von USB Inhalt verursachen können.
Media Server -Sucht automatisch nach mit Ihrem Heimnetzwerk verbundenen Digitale Medien Server (DMS) und ermöglicht das Abspielen und Darstellen von Inhalten aus Medienservern.
HINWEIS: Der 'Media Server' wird nicht vom Hersteller des Fernsehgeräts mitgeliefert. Sie können Drittanbieter Software herunterladen und diese auf Ihrem Computer oder NAS installieren.
Wireless Connection - Hiermit können Sie sich Inhalte auf Ihrem Smartphone oder Notebook über Miracast oder Intel Wireless Display auf Ihrem Bildschirm ansehen.
Miracast Verbindungen nutzen Wi-Fi Direct, ein Zugang zu einem Wi-Fi Netzwerk ist nicht nötig. Sie können Inhalte von Ihrem Smartphone oder Tablet, basierend auf Android 4.4 oder höher, teilen.
Wireless Display (WiDi) lässt Sie einfach Filme, Videos, Fotos oder Musik auf Ihren TV übertragen. Sie benötigen dafür einen Laptop, ein Smartphone oder Tablet mit Intel® WiDi technology
HINWEIS: Diese Funktion ist nur bei einigen Smartphones und Notebooks verfügbar.
AQUOS NET+
Um das AQUOS NET+ Menü aufzurufen, müssen Sie auf den NET+ Knopf auf der Fernbedienung drücken oder es im TV Multimediamenü auswählen.
HINWEIS: Bitte warten Sie, bis sich das Fernsehgerät mit dem Wi-Fi Netzwerk verbunden hat. Dies kann nach Einschalten Ihres Fernsehgeräts einige Minuten dauern.
Sie können mit den Richtungsknöpfen ▲/▼/◄/►durch das Menü navigieren. Drücken Sie auf den [OK] Knopf, wenn Sie einen Eintrag bestätigen möchten, den Sie abspielen oder ansehen möchten. Für 'einen Schritt zurück' drücken Sie auf den [Menu] Knopf drücken und zum Aufruf der zusätzlichen Funktionen können Sie die Farbknöpfe verwenden.
Um AQUOS NET+ zu beenden, drücken Sie auf den [EXIT] Knopf. Home - Startbildschirm mit den empfohlenen Filmen
und kürzlich geöffneten Anwendungen Browser - Öffnet den Standardinternetbrowser.
–Roter Knopf - Heranzoomen
–Grüner Knopf - Heraus zoomen
–Gelber Knopf - Seite neu aufrufen
–Blauer Knopf - Rückkehr zum Browser Startbildschirm. Movies - Öffnet eine Liste der vorhandenen Filme
TV Shows - Öffnet eine Liste der vorhandenen Fernsehsendungen Music - Öffnet eine Liste der vorhandenen Musikstücke und Musikvideos
Watchlist - Öffnet eine Liste mit Filmen, die Sie sich später ansehen können

DE
Apps - Öffnet eine Liste der vorhandenen Anwendungen
Login - Erstellen Sie ein Konto oder ein Login für ein vorhandenes Konto, um Ihr AQUOS NET+. zu personalisieren.
Settings - Filterung der Anwendung auf der Basis der gewählten Sprachen.
RÜCKSTELLUNG DER BENUTZEREINSTELLUNGEN: Wenn Sie alle Ihre Benutzereinstellungen auf AQUOS NET+ vollständig zurück setzen möchten, müssen Sie zunächst das Settings Menü des Portals aufrufen und dann
auf den GELBEN Knopf auf Ihrer Fernbedienung drücken. Wählen Sie im nächsten Bildschirm YES mit dem Cursor aus und drücken dann auf Ihrer Fernbedienung auf OK, um das Rücksetzen der Einstellungen zu bestätigen. HINWEIS: Wir verbessern ständig unsere Produkte, um den Kundenwünschen gerecht zu werden. Daher wird das AQUOS NET+ laufend von uns mit
neuen Inhalten ergänzt. Die Anwendungen und Inhalte des AQUOS NET+ können ohne Vorankündigung geändert werden. Einige der Funktionen und Inhalte können in Ihrem Land nicht verfügbar sein.
7 Tage Fernsehführer
Der Fernsehführer ist im TV-Digitalmodus vorhanden. Er bietet Informationen über zukünftige Sendungen (wenn vom Digitalkanal unterstützt). Sie können die Beginnund Endzeiten aller Programme und allen Kanälen für die nächsten 7 Tage sehen und Erinnerungen setzen.
1.Drücken Sie auf [TV FÜHRER]. Der folgende 7 Tage TV Führer erscheint.
2.Sie können mit ▲/▼/◄/►.durch das Menü navigieren.
Jetzt können Sie:
Durch Drücken des GRÜNEN Knopfs eine Erinnerung setzen. Sich den Vortag durch Druck auf den GELBEN Knopf ansehen.
Sich den nächsten Tag durch Druck auf den BLAUEN Knopf ansehen. [INFO] zeigt detaillierte Informationen über die gewählte Sendung an
3.Drücken Sie auf [EXIT] , um den 7 Tage TV Führer zu schließen.
MHL
MHL Port (HDMI 3) - MHL ist eine kabelgebundene Lösung, die es Ihnen erlaubt, Inhalte von Ihrem Telefon oder Tablet in höchster Qualität auf Ihren TV zu übertragen. Bei der Verbindung mit einem MHL Kabel (gesondert zu erwerben) zwischen Ihrem Mobilgerät und TV können Sie alle Videos, Spiele und Fotogra en direkt auf Ihr TV überspielen. MHL spiegelt lediglich den Bildschirm Ihres Mobilteils und so bleiben alle Anwendungen funktionsfähig, zudem wird Ihr Mobilteil während der Verbindung aufgeladen.
USB Aufzeichnung - Digitalmodus
Die PVR Funktion ist in Deutschland, Österreich und der Schweiz nicht verfügbar.

19
Typenschild
Markenzeichen: |
|
|
SHARP |
|
|
|
|
|
|
|
|
Modell: |
LC-32CFE6452E |
LC-40CFE6452E |
LC-43CFE6452E |
LC-49CFE6452E |
LC-55CFE6452E |
|
|
|
|
|
|
Energieeffizienzklasse: |
A+ |
A+ |
A+ |
A+ |
A+ |
|
|
|
|
|
|
Sichtbare Bildschirmgröße (diagonal): |
32" / 81cm |
40" / 100cm |
43" / 109cm |
49" / 123cm |
55" / 139cm |
|
|
|
|
|
|
Stromverbrauch im eingeschalteten Zustand: |
31,0 W |
45,0 W |
41,0 W |
67,0 W |
85,0 W |
|
|
|
|
|
|
Jährlicher Stromverbrauch*: |
45 kWh |
66 kWh |
60 kWh |
98 kWh |
124 kWh |
|
|
|
|
|
|
Standby Stromverbrauch**: |
<0,50 W |
<0,50 W |
<0,50 W |
<0,50 W |
<0,50 W |
|
|
|
|
|
|
Stromverbrauch ausgeschaltet: |
|
|
N/A |
|
|
|
|
|
|
|
|
Bildschirmauflösung: |
1920 (H) x 1080 (V) |
1920 (H) x 1080 (V) |
1920 (H) x 1080 (V) |
1920 (H) x 1080 (V) |
1920 (H) x 1080 (V) |
|
|
|
|
|
|
*- Stromverbrauch von XYZ kWh je Jahr auf der Grundlage des Stromverbrauchs eines Fernsehgeräts, dass an 365 Tagen für 4 Stunden am Tag eingeschaltet ist. Der tatsächliche Stromverbrauch hängt davon ab, wie das Fernsehgerät verwendet wird.
** - wenn das Gerät mit der Fernbedienung ausgeschaltet wurde und keine Funktion aktiv ist
Für den USB Modus geeignete Dateiformate
Medium |
Dateierw. |
Codec |
|
Bemerkung |
|
|
|
||||
Video |
Audio |
||||
|
|
|
|||
|
.mpg |
MPEG-1, MPEG-2 |
|
Max. Auflösung: 1920x1080 |
|
|
|
|
|
Max Data rate: 40 Mbps |
|
|
.avi |
Xvid, MJPEG, MPEG-4 |
|
||
|
|
|
|||
|
SP/ASP, H.264 |
|
|
||
|
|
|
|
||
|
.ts |
MPEG-2, H.264 |
|
|
|
|
|
|
|
Max. Auflösung: 1920x1080 |
|
Film |
".mov/ |
MPEG-4 SP/ASP, H.264 |
MP3, WMA, AAC, |
||
.mkv" |
AC3, H-AC3, DTS |
Max Data rate: 20 Mbps |
|||
|
|
||||
|
.dat |
MPEG-1 |
|
|
|
|
|
|
|
|
|
|
.mp4 |
MPEG-4 SP/ASP, H.264 |
|
|
|
|
MPEG-1, MPEG-2 |
|
Max. Auflösung: 720x576 Max |
||
|
|
|
|||
|
.vob |
MPEG-2 |
|
Data rate: 40 Mbps |
|
|
.mp3 |
- |
MP3 |
Samplerate: 8K-48KHz Bit rate: 32K |
|
Musik |
.wma |
- |
WMA |
- 320Kbps Kanal: Mono/Stereo |
|
".m4a/ |
- |
AAC |
Sample Rate 16K-48KHz Bit rate: 32K |
||
|
|||||
|
.aac" |
~ 442Kbps Kanal: Mono/Stereo |
|||
|
|
|
|||
|
|
|
|
|
|
|
".jpg/ |
Progressive JPEG |
|
Max. Auflösung: 1024x768 |
|
|
.jpeg" |
Baseline JPEG |
|
Max. Auflösung: 8192x8192 |
|
|
|
|
|
|
|
Foto |
.bmp |
BMP |
|
Max. Auflösung: 6500x6500 |
|
|
Pixeltiefe 1/4/8/16/24/32 bpp |
||||
|
|
|
|
||
|
.png |
Non-Interlaced |
|
Max. Auflösung: 3000x3000 |
|
|
|
|
|
||
|
Interlaced |
|
Max. Auflösung: 1500x1500 |
||
|
|
|

FR
Importantes consignes de sécurité
ATTENTION
RISQUE D’ÉLECTROCUTION
NE PAS OUVRIR
Svp, lire ces consignes de sécurité et respecter les avertissements suivants avant que l'appareil ne soit actionné:
Afin d’éviter un incendie, maintenir toujours les bougies et autres flammes nues éloignées de ce produit.
•La TV d'un poids de plus de 20 kg doit être soulevée et portée par au moins deux personnes.
•Cette TV ne contient aucune pièce qui pourrait être réparée par l'utilisateur. En cas de défaut, contacter le fabricant ou l'agent autorisé qui assure le service après-vente. Le contact avec certaines parties situées à l'intérieur de la TV pourrait mettre votre vie en danger. La garantie ne couvre pas les défauts provoqués par des réparations effectuées par des tiers non autorisés.
•Ne pas enlever la partie arrière de l'appareil.
•Cet appareil est conçu pour la réception et la reproduction des signaux vidéos et sonores. Toute autre utilisation est interdite.
•Ne pas exposer la TV aux égouttures ou éclaboussures de liquides.
•Pour déconnecter la télévision de l’alimentation électrique, veuillez débrancher la fiche de la prise d’alimentation.
•Si le cordon d'alimentation est endommagé, il doit être remplacé par le fabricant, un agent du service après-vente ou des personnes de qualifications similaires afin d'éviter un risque.
•La distance idéale pour regarder une TV est approximativement équivalente à cinq fois la diagonale de l'écran. Les réflexions d'autres sources lumineuses sur l'écran peuvent altérer la qualité de l'image.
•S'assurer que la TV dispose d'une ventilation suffisante et qu'elle n'est pas à proximité d'autres appareils et d'autres meubles.
•Pour la ventilation, installer le produit à 5 cm du mur au minimum.
•S'assurer que les ouvertures de ventilation sont dégagées des articles tels que des journaux, des nappes de table, des rideaux, etc…
•La TV est conçue pour être employée sous un climat modéré.
•La TV est conçue exclusivement pour une utilisation dans un endroit sec. Quand on utilise la TV à l'extérieur, s'assurer qu'elle est protégée contre l'humidité (pluie, éclaboussures d'eau). Ne jamais exposer la TV à l'humidité.
•Ne placez pas d’objets, de récipients remplis de liquide, comme des vases, etc..., sur la télévision. Ces récipients pourraient être renversés, ce qui mettrait en danger la sécurité électrique. Placer la TV exclusivement sur des surfaces plates et stables. Ne placer aucun objet tel qu'un journal ou une couverture, etc. sur ou sous la TV.
•S'assurer que l'appareil n'est posé sur aucun câble électrique qui pourrait ainsi être endommagé. Les téléphones mobiles et autres dispositifs
tels que les adaptateurs WLAN (Réseau local sans fil), les caméras de surveillance avec transmission sans fil du signal, etc. peuvent causer de l'interférence électromagnétique et ne devraient pas être placés près de l'appareil.
•Ne pas placer l'appareil près d'éléments chauffants ou dans un endroit exposé à la lumière directe du soleil cela ayant un effet négatif sur le refroidissement de l'appareil. La chaleur accumulée est dangereuse et peut sérieusement réduire la vie de l'appareil. Afin d'assurer la sécurité, demander à une personne qualifiée d'enlever la poussière de l'appareil.
•Essayer d'empêcher l'endommagement des câbles ou adaptateurs du secteur. L'appareil ne peut être connecté qu'aux câbles ou adaptateurs du secteur.
•Les orages sont dangereux pour tous les appareils électriques. Si le secteur ou le câblage aérien est frappé par la foudre, l'appareil peut être endommagé, même s'il était éteint. Il faudrait débrancher tous les câbles et connecteurs de l'appareil avant un orage.
•Pour nettoyer l'écran de l'appareil, utiliser seulement un tissu humide et doux. Employer seulement de l'eau propre, jamais de détergents et en aucun cas des dissolvants.
•Placer la TV près du mur pour éviter la possibilité de la faire tomber en la poussant.
•AVERTISSEMENT - Ne placez jamais une télévision dans un emplacement instable. Une télévision peut tomber, causant de graves blessures corporelles, voire la mort. De nombreuses blessures, particulièrement chez les enfants, peuvent être évitées en prenant de simple précautions telles que:
•Utiliser des meubles de télévision recommandés par le fabricant.
•N’utiliser que des meubles pouvant supporter la télévision de manière sûre.
•S’assurer que la télévision ne dépasse pas du bord du meuble la supportant.
•Ne pas placer la télévision sur un haut meuble (par exemple, armoire ou étagères) sans ancrer le meuble et la télévision à un support adapté.
•Ne pas placer la télévision sur un tissu ou autre matériau pouvant être entre la télévision et le meuble de support.
•Éduquer les enfants sur les dangers de grimper sur les meubles pour atteindre la télévision ou ses commandes.
•S’assurer que les enfants ne puissent pas grimper ou attraper la télévision.
•Si votre télévision existante est conservée et changée d’emplacement, les considérations ci-dessus s’appliquent aussi.
•Les instructions exposées ci-dessous sont une manière plus sûre d'installer la TV par fixation murale, supprimant ainsi la possibilité qu'elle tombe vers l'avant et provoque des blessures et des dégâts.
•Cette méthode est également utile si la TV est à placer sur une surface de verre ou si l'on ne souhaite pas visser quoi que ce soit dans les meubles.
•Pour ce type d'installation une corde d'attache est nécessaire
A)En utilisant un ou deux trous pour la fixation murale et les vis (les vis sont déjà fournies dans les trous pour la fixation murale), attacher une extrémité de la corde d'attache à la TV.
B)Fixer l'autre extrémité de la corde d'attache au mur.
•Le logiciel sur votre TV et la disposition du menu à l'écran (OSD) peuvent être changés sans communication préalable.
Avertissement:
•Ne jamais relier un dispositif externe à un appareil sous tension. Éteindre non seulement la TV mais également les dispositifs qui lui sont reliés! Relier la fiche de la TV à la prise murale après avoir relié tous les dispositifs externes et l'antenne!
•Assurer toujours le libre accès à la fiche secteur de la TV.
•L'appareil n'est pas conçu pour un usage dans un lieu de travail équipé de moniteurs.
•L'utilisation systématique des écouteurs à un niveau de volume élevé peut conduire à des dommages irréversibles de l'audition.
•Assurer l'élimination de cet appareil et de tous les composants y compris les batteries, en conformité avec les normes environnementales. Dans le doute, entrer en contact avec l'autorité locale pour les détails concernant le recyclage.
•Tout en installant l'appareil, se souvenir que les surfaces des meubles sont traitées avec divers vernis, plastiques, etc. ou qu'elles peuvent être cirées. Les produits chimiques contenus dans ces produits peuvent avoir une réaction avec le support de la TV. Ceci pourrait faire que des morceaux de matériaux collent à la surface des meubles, qu'il sera difficile d'enlever, voire impossible.
•L'écran de la TV a été fabriqué selon des conditions de qualité supérieure et a été examiné en détail plusieurs fois, pour déceler les pixels défectueux. En raison des propriétés technologiques du processus de fabrica-
21
tion, il n'est pas possible d'éliminer l'existence d'un nombre restreint de points défectueux sur l'écran (même avec soin extrême, au cours de la production). Ces pixels défectueux ne constituent pas un défaut en termes de condition de garantie si leur ampleur n'est pas plus grande que les limites définies par la norme DIN.
•Le fabricant ne saurait être tenu responsable de tout problème lié au service client relatif au contenu ou aux services d'une tierce partie. Tout commentaire, question ou service relatif aux blessures résultant d'un contenu ou service tiers doit être dirigé au fournisseur du contenu ou service approprié.
•Il existe de nombreuses raisons pouvant vous empêcher d'accéder au contenu ou aux services de l'appareil non directement liées à l'appareil, y compris, mais non limitées à, une panne de courant, un problème de connexion internet ou de configuration de votre appareil. Universal Media Corporation, ses directeurs, employés, agents, prestataires et affiliés ne sauraient être tenus responsables de vous ou de tout autre tierce partie quant à de telles pannes ou problèmes de maintenance, quelle que soit la cause ou que le problème n'ait pu ou non être évité.
•Tous les contenus et services tiers accessibles via cet appareil vous sont fournis « tel quel » et « tel que disponible » et Universal Media Corporation et ses affiliés ne sauraient formuler aucune garantie ou représentation de quelque nature que ce soit, expresse ou tacite, y compris, mais sans s'y limiter, d'absence de contrefaçon, d'adéquation à un usage particulier, de disponibilité, de précision, de complétude, de sécurité, de titre, d'utilité, de manque de négligence ou d'erreur, de fonctionnement ininterrompu ou d'utilisation du contenu ou des services fournis ou du contenu ou que le contenu ou les services répondront à vos exigences et attentes.
•« Universal Media Corporation » n'est pas un agent de tels fournisseurs tiers et n'assume aucune responsabilité des actes et omissions de tels fournisseurs tiers de contenu ou de services, ou de tout aspect du contenu ou des services liés à de tels fournisseurs.
•En aucun cas « Universal Media Corporation » et/ou ses affiliés ne pourront être tenus responsables envers vous ou un tiers de tout dommage direct, indirect, accidentel, punitif, consécutif ou tout autre type de dommage, que la responsabilité soit faites sur la base d'un contrat, de la responsabilité civile, d'une violation de garantie, d'une responsabilité stricte ou autre et que Universal Media Corporation et/ou ses affiliés n'aient été ou non avisés de la possibilité de telles dommages.
Information importante concernant l'utilisation des jeux vidéos, des ordinateurs, des légendes et d'autres affichages d'image fixe.
•L'utilisation prolongée du matériel d'émission d'image fixe peut causer une “image fantôme “ permanente sur l'écran LCD (ceci étant désigné parfois inexactement “brûlure d'écran“). Cette image fantôme est alors visible de manière permanente sur l'écran d'arrière-plan. C'est un dommage irréversible. Il est possible d'éviter de tels dommages en suivant les instructions suivantes ci-dessous:
•Ramener le réglage de la luminosité ou du contraste à un niveau minimum de visibilité.
•Ne pas afficher l'image fixe pendant une longue période. Éviter l'affichage de:
»l'horaire du télétexte et les diagrammes,
»le menu de la TV ou du DVD, par exemple le contenu du DVD,
»En mode„Pause“ (maintien): Ne pas employer ce mode longtemps, par exemple tout en observant un DVD ou une vidéo.
»Arrêter s'il n'est pas utilisé.
Batteries
•Observer la polarité correcte en insérant les batteries.
• Ne pas exposer les batteries aux températures élevées et ne pas les placer dans des endroits où la température pourrait augmenter rapidement, par
exemple près d'un feu, ou directement à la lumière
solaire.  Cd
Cd
•Ne pas exposer les batteries à la chaleur rayonnante excessive, ne pas les jeter au feu, ne pas les démonter et ne pas essayer de
•recharger les batteries non-rechargeables. Elles peuvent fuir ou exploser.
»Ne jamais utiliser ensemble des batteries différentes ou mélanger les neuves et les usagées.
»Se débarrasser des batteries d'une manière respectueuse de l'environnement.
»La plupart des pays de l'Union Européenne règlent par la loi la mise au rebut des batteries.
Mise au rebut
• Ne pas se débarrasser de la TV avec les déchets ménagers non triés. La renvoyer à un point de ramassage indiqué pour le recyclage WEEE (déchets d'équipements électriques et électroniques). Agir ainsi, aide à conserver les ressources et à
• protéger l'environnement. Entrer en contact avec le détaillant ou les autorités locales pour plus d'information.
Déclaration CE:
•Par la présente, Universal Media Corporation déclare que cette TV LED est conforme aux principales exigences et autres clauses pertinentes de la directive européenne 1999/5/EC. http://www.sharp.eu/av/documents- of-conformity
Marques déposées
•Les termes HDMI et HDMI High-Definition Multimedia Interface et logo HDMI sont protégés par le droit d'auteur et sont la propriété de HDMI Licensing, LLC aux États-Unis et dans d'autres pays.
•Le logo “HD TV” est une marque commerciale de DIGITALEUROPE.
•Le logo “HD TV 1080p” est une marque commerciale de DIGITALEUROPE.
•Le logo DVB est la marque déposée de Digital Video Broadcasting - DVB - Project.
•Fabriqué sous licence de Dolby Laboratories. Dolby, Dolby Audio et le symbole double-D sont des marques déposées de Dolby Laboratories.
•Pour les brevets DTS, référez-vous à http://patents.dts.com. Fabriqué sous licence de DTS Licensing Limited. DTS, le sigle et l'association de DTS et du sigle sont des marques déposées et DTS TruSurround et les DTS 2.0+Digital Out sont des marques de commerce de DTS Inc. © DTS, Inc. Tous droits réservés.
•YouTube et le logo YouTube sont des marques déposées de Google Inc
•Le logo Wi-Fi CERTIFIED est une marque de certification de la Wi-Fi Alliance.
•Wi-Fi CERTIFIED Miracast et Miracast sont des marques déposées Wi-Fi Alliance.
•DLNA, le logo DLNA et DLNA CERTIFIED sont des marques déposées, marques de service ou des marques de certification de la Digital Living Network Alliance.
•MHL et le logo MHL sont des marques de commerce, marques de services ou marques déposées de MHL, LLC aux États-Unis et/ou dans d’autres pays.
•La marque et les logos Bluetooth® sont des marques déposées de Bluetooth SIG., Inc.

FR
Ce qui est inclus dans la boîte
La fourniture de cette TV inclut les pièces suivantes:
• |
1x TV |
• 1x un câble RF |
|
• |
1x Télécommande |
• 1x Paquet d'installation de support TV |
|
|
|
|
|
• |
2x batterie AAA |
• |
1x Manuel d'utilisation |
|
|
|
|
• |
1x Mini cordon |
• |
1x Mini cordon adaptateur composate |
|
adaptateur composite |
|
|
|
|
|
|
Fixation du support
Suivre les instructions à la dernière page de ce manuel d'utilisation.
Pour commencer - mise en place initiale
1.Insérer les batteries fournies dans la télécommande.
8.Préréglages optionnels des canaux DVB-C:
Maintenir comme recommandé, tous les réglages par défaut.
Si les canaux DVB-C ne sont pas trouvés, entrer en contact avec le fournisseur de réseau pour connaître la "Identification du réseau" valide. Exécuter alors une nouvelle recherche. Presser [MENU], sélectionner " Identification du réseau " et entrer l'identification du réseau.
9.Préréglages optionnels des canaux DVB-S2:
Sélectionner "Satellite" dans "Antenne DVB" dans le menu pour les préréglages optionnels des canaux. A cet emplacement, il est possible de choisir entre les divers satellites. Une fois le choix accompli, la liste des canaux du satellite défini sera disponible pour être importée dans le système de TV.
Confirmer avec le bouton [OK] de la télécommande pour lancer le balayage.
CONSEIL: Si des canaux sont manquants, cela provient vraisemblablement de la puissance du signal, il faudrait alors envisager de relier à
un amplificateur de signal et syntoniser à nouveau la TV.
Télécommande
Télécommande contrôlée par radio - Ne plus viser en direction de la
2.En utilisant le câble RF fourni, reliez la TV à la prise murale de l'antenne TV ! Se référer à l'image de la télécommande à la deuxième page de ce
TV.
3.Pour raccorder à internet avec une connexion filaire, connectez un câble Ethernet/Cat 5 (non compris) entre votre TV et votre modem/ routeur haut débit.
4.Connectez le câble d’alimentation à la prise électrique et activez la TV en utilisant le bouton de veille de la TV.
5.Vous serez alors accueilli par l’écran de première d’installation. Si celuici n'apparait pas, pressez la touche de veille du téléviseur une fois, ceci forcera le 'menu d'appariement' à apparaitre. Faites défiler le menu
et surlignez 'Pair again' (apparier à nouveau) en pressant les touches CH+/CHdu téléviseur (fonction défilage vers le haut et vers le bas sur le menu) puis pressez la touche de veille du téléviseur (fonction OK dans le menu) pour confirmer votre sélection. Pressez et gardez pressées les touches jaune et vert pendant quelques secondes sur la télécommande, jusqu'à ce que la LED blanche sur la partie avant de la TV clignote cinq fois. Pressez [MENU] puis 8-8-8-8 et l'écran de première d'installation apparaitra.
Pour modifier l'un de ces réglages par défaut, utiliser les boutons de défilement ▲/▼/◄/►. Pour quitter le menu à tout moment, presser
le bouton [EXIT].
6.Mettre en place les réglages souhaités dans la vue Première installation.
Antenne DVB - Il est possible de choisir entre Terrestre (DVB-T), Câble (DVB-C) ou Satellite (DVB-S)*.
Langue - Installer la langue du menu de la TV. Pays - Installer le pays recherché.
Mode de syntonisation - Choisir d'accorder uniquement la TV numérique (DTV), analogique (ATV) ou à la fois,
la numérique et l'analogique (DTV + ATV)
Opérateur - Sélectionner le fournisseur du Câble. Si le distributeur du câble ne figure pas dans la liste, sélectionner Others (Autres). (Disponible seulement si l'Antenne DVB est placée sur CÂBLE) Environnement - Sélectionner l'emplacement de la TV. Pour
le domicile, sélectionner Mode Domicile. Pour le mode de démonstration de la boutique , installer Mode Magasin. Tri par LCN - Placer LCN sur ON (Marche) pour disposer les canaux par préférences de fournisseurs (s'applique seulement aux canaux DVB-T et DVB-C).
7.Presser le bouton [Réglage auto] pour lancer le processus de syntonisation.
manuel d'utilisation.
1.STANDBY (Veille) – Allumer la TV quand elle se trouve en Veille ou vice versa.
2.MUTE (Sourdine) – Mettre le son en sourdine ou vice versa.
3.0 – 9 – pour sélectionner directement les canaux TV.
4.TV GUIDE (Guide TV) – Ouvre le guide hebdomadaire de la TV (Mode numérique).
5. – Pour retourner au canal précédemment regardé.
6.PICTURE – Parcourir les options du mode Image.
7.VOL ▲/▼ – Pour augmenter/ diminuer le volume du son.
8.CH ▲/▼– Pour monter ou descendre dans la liste des canaux à obser.
9.SOUND – Parcourir les options du mode Son.
10.SOURCE – Pour afficher le menu d'une entrée/source.
11.MENU – affiche le menu sur l'écran (Option OSD).
12.EXIT (Sortie) – Sortir de tous les menus.
13.(▲/▼/◄/►/ OK) – Permet de naviguer sur les menus de l'écran et d'ajuster les réglages du système selon l'option recherchée.
14.BACK – Retour au menu précédent.
15.FAV – Pour afficher les favoris du menu.
16.INFO – Presser une fois pour l'information actuelle/suivante du canal. Presser deux fois pour les informations de programme à propos du programme en cours.
17.TEXT – Mode télétexte - Pour afficher le télétexte.
18.SUBTITLE (Sous-titre) – Pour commuter le dialogue au bas de l'écran (marche/arrêt).
19.TV – Commuter vers la source numérique de la TV.
20.YouTube – Affiche l'application Youtube.
21.MEDIA – Commuter vers la source USB.
22.NET+ – Affiche le menu AQUOS NET+.
23.Rec1 – Enregistrement d'une vidéo personnelle (PVR).
24.– Pour relancer le chapitre en cours.
25.– Pour avancer au prochain chapitre.
26.– Pour arrêter la lecture.
27.Rec List1 –Ouvre la liste des enregistrements.
28.– Pour actionner le mode de rebobinage rapide.
29.– Pour actionner le mode d'avance rapide.
30.– Lecture/pause
31.BOUTONS DE COULEURS – Télétexte additionnel et fonctions OSD.
1 - disponible uniquement avec la fonction PVR
 Loading...