


 Loading...
SAMSUNG
Galaxy A51  IA715G
Usermanual

Contents
Features
Mobile continuity | Bixby | Biometric security | Dark mode
Gettingstarted
Device layout: Galaxy A51 5G | Galaxy A71 5G
Set up your device: Charge the battery
Start using your device: Turn on your device | Use the Setup Wizard | Transfer data from an old device | Lock or unlock your device | Side key settings | Accounts | Set up voicemail | Navigation | Navigation bar | Customize your home screen | Samsung Daily | Bixby | Digital wellbeing and parental controls | Always On Display | Biometric security | Mobile continuity | Multi window | Edge screen | Enter text | Emergency mode
Customize your home screen: App icons | Wallpaper | Themes | Icons | Widgets | Home screen settings | Easy mode | Status bar | Notification panel
CameraandGallery
Camera: Navigate the camera screen | Configure shooting mode | Live focus | Scene optimizer | Record videos | Super Slow-mo | Super steady | Camera settings
Gallery: View pictures | Edit pictures | Play video | Edit video | Share pictures and videos | Delete pictures and videos | Group similar images | Create a movie | Take a screenshot | Screen recorder
Mobilecontinuity
Link to Windows | Call and text on other devices
2 UNL_A516U1_A716U1_EN_UM_TN_TE4_062520_FINAL

Contents
Samsungapps
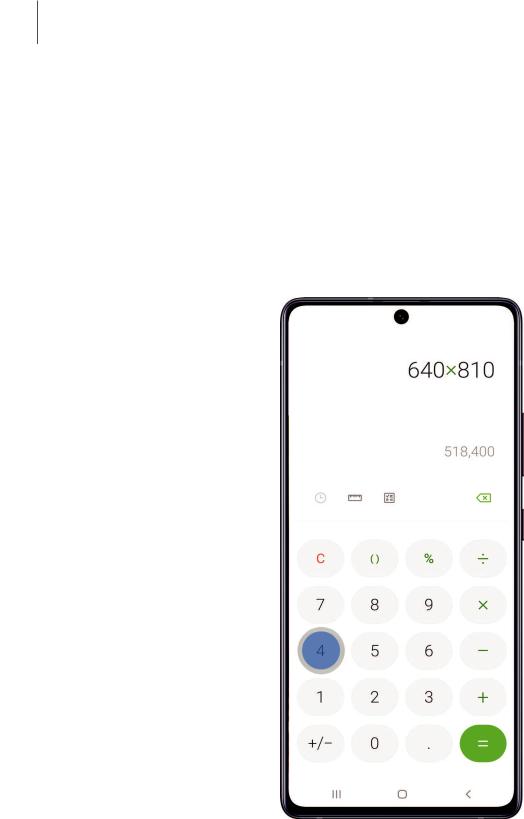
Galaxy Essentials | AR Zone | Bixby | Galaxy Store | Galaxy Wearable | Game Launcher | Samsung Global Goals | Samsung Members | SmartThings | Tips | Calculator | Calendar | Clock | Contacts | Internet | Messages | My Files | Phone | Samsung Health | Samsung Notes | Samsung Pay
Googleapps
Chrome | Drive | Duo | Gmail | Google | Maps | Photos | Play Movies & TV | Play Store | YouTube | YT Music
Microsoftapps
Outlook | LinkedIn | Office | OneDrive
Settings
Connections: Wi-Fi | Bluetooth | NFC and payment | Airplane mode | Data usage | Mobile hotspot | Tethering | Nearby device scanning | Connect to a printer | Virtual Private Networks | Private DNS | Ethernet
Customization: Display | Notifications | Sounds and vibration
Security: Lock screen and security | Face recognition | Fingerprint scanner
Accounts: Samsung Cloud | Add an account | Account settings | Remove an account | Backup and restore | Google settings
Backup: Samsung account | Google Account | External storage transfer
Accessibility: Screen Reader | Visibility enhancements | Hearing enhancements | Interaction and dexterity | Advanced settings | Installed services | About Accessibility
Other: Tips and help | Dual Messenger | About phone
Learn more
Legal information
3

Getting started
GalaxyA515G
Microphone
Flash
Rear cameras
SIM/microSD card tray Front camera
Volume keys
Side key
Headphone jack |
|
|
|
|
|
Speaker |
|
|
|||||
USB charger/Accessory port |
|
|
|
|
|
Microphone |
|
|
|
|
|
Devicesandsoftwareareconstantlyevolving— theillustrationsyouseeherearefor referenceonly.
5

Getting started
GalaxyA715G
Microphone
Flash
Rear cameras
SIM/microSD card tray
Front camera
Volume keys
Side key
Headphone jack |
|
|
|
|
|
Speaker |
|
|
|||||
USB charger/Accessory port |
|
|
|
|
|
Microphone |
|
|
|
|
|
Devicesandsoftwareareconstantlyevolving— theillustrationsyouseeherearefor referenceonly.
6
Getting started
Setupyourdevice
Charge the battery
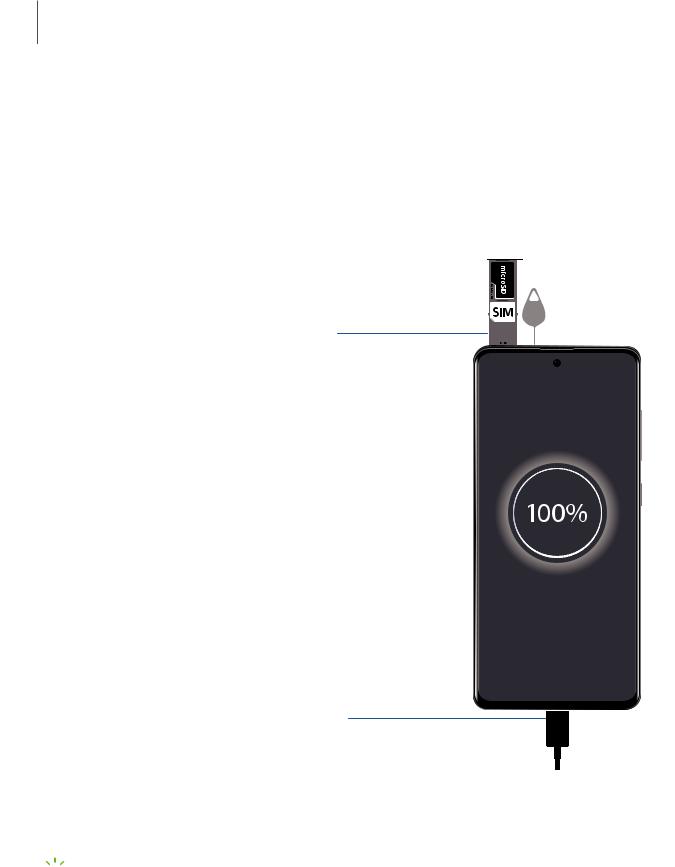
Your device usesa nano-SIM card. A SIM cardmay be preinstalled, or youmay be able to use your previousSIM card. Contact your carrier for more details.
Install SIM/microSD cards
Place the SIM card and optional microSD card (sold separately) into the tray with the gold contacts facing down.
Charge yourdevice
Before turning on your device, charge it fully.

 NOTE Use only charging devicesandbatteries(if applicable) that are approved by Samsung. Samsung charging devicesandbatteriesare designedfor your device to maximize battery life. Using other charging devicesandbatteriesmay voidyour warranty andmay cause damage.
Devicesandsoftwareareconstantlyevolving— theillustrationsyouseeherearefor referenceonly.
7

Getting started
Charge the battery
Your device ispoweredby a rechargeable battery. A charger (charging headandUSB Type-C cable) isincludedwith the device for charging the battery from a power outlet.

 TIP Whilecharging,thedeviceandthechargermaybecomehotandstop charging.This usuallydoesnotaffectthedevice’slifespanorperformanceandis inthedevice’snormalrangeofoperation.Disconnectthechargerfromthedevice andwaitforthedevicetocooldown.For moreinformation,visit samsung.com/us/support/answer/ANS00076952.
Startusingyourdevice
Turn on your device | Use the Setup Wizard | Transfer data from an old device | Lock or unlock your device | Side key settings | Accounts | Set up voicemail | Navigation | Navigation bar | Customize your home screen | Samsung Daily | Bixby | Digital wellbeing and parental controls | Always On Display | Biometric security | Mobile continuity | Multi window | Edge screen | Enter text | Emergency mode
Turn on yourdevice
Use the Side key to turn your device on. Do not use the device if the body iscrackedor broken. Use the device only after it hasbeen repaired.
◌ Pressandholdthe Side key to turn the device on.
• To turn the device off, open the Notification panel, andtap Power >
 Power off. Confirm when prompted.
• To restart your device, open the Notification panel, andtap Power >
 Restart. Confirm when prompted.
-'IJ- TIP Youcan also turn your device off by pressing the Side and Volume down keys at the same time. To learn more about powering off your device from Settings, tap Advanced features > Side key > How to power off your phone.
8

Getting started

 NOTE Best 5G performance requiresoptimal 5G connection andunobstructed antennas(rear of device); see carrier for network availability; 5G performance may be impactedby a case or cover.
Use the Setup Wizard
The first time youturn your device on, the SetupWizardguidesyouthrough the basics of setting upyour device.
Follow the promptsto choose a default language, connect to a Wi-Fi® network, set up accounts, choose location services, learn about your device’sfeatures, andmore.
Transferdata from an old device
Use Smart Switch™ to transfer contacts, photos, music, videos, messages, notes, calendars, andmore from your olddevice. Smart Switch can transfer your data via USB cable, Wi-Fi, or computer.
Visit samsung.com/us/support/owners/app/smart-switch to learn more.
1.From Settings, tap Accountsand backup > Smart Switch.
2.Follow the promptsandselect the content to transfer.
Visit samsung.com/smartswitch for more information.
9

Getting started
Side keysettings
Youcan customize the shortcutsassignedto the Side key.
Double press
Choose which feature islaunchedwhen the Side key ispressedtwice.
1.From Settings, tap Advanced features > Side key.
2.Tap Double press to enable thisfeature, andtapan option: • Quick launch camera (default)
• Open Bixby • Open app
Press andhold
Choose which feature islaunchedwhen youpressandholdthe Side key.
1.From Settings, tap Advanced features > Side key.
2.Under the Pressandholdheading, tapan option:
•Wake Bixby (default)
•Power off menu
Accounts
Set upandmanage your accounts.

 TIP Accountsmay support email, calendars, contacts, andother features. See your carrier for more information.
AddaGoogle Account
Sign in to your Google Account to accessyour Google CloudStorage, appsinstalled from your account, andmake full use of your device’sAndroid™ features.
1.From Settings, tap Accountsand backup > Accounts.
2.Tap+Add account > Google.
11

Getting started

 NOTE When yousign in to a Google Account, Factory Reset Protection (FRP) is activated. FRP requiresyour Google Account information when resetting to factory settings. For more information, see Factory Reset Protection.
AddaSamsungaccount
Sign in to your Samsung account to accessexclusive Samsung content andmake full use of Samsung apps.
1.From Settings, tap Accountsand backup > Accounts.
2.Tap+Add account > Samsung account.
-'A'- |
TIP To quickly accessyour Samsung account, from Settingstape Samsung |
,tf, |
|
|
account profile. |
AddanOutlook account
Sign in to your Outlook® account to view andmanage email messages.
1.From Settings, tap Accountsand backup > Accounts.
2.Tap+Add account > Outlook.
Set up voicemail
Youcan set upyour voicemail service when youaccessit for the first time. Youcan accessvoicemail through the Phone app.
1. From 8 Phone, touch andholdthe ao1 1 key.
2.Follow the tutorial to create a password, recorda greeting, andrecordyour name.
12
Getting started
Draganddrop
Touch andholdan item, andthen move it to a new location.
•Drag an appshortcut to addit to a Home screen.
•Drag a widget to place it in a new location.
Devicesandsoftwareareconstantlyevolving— theillustrationsyouseeherearefor referenceonly.
15
Getting started
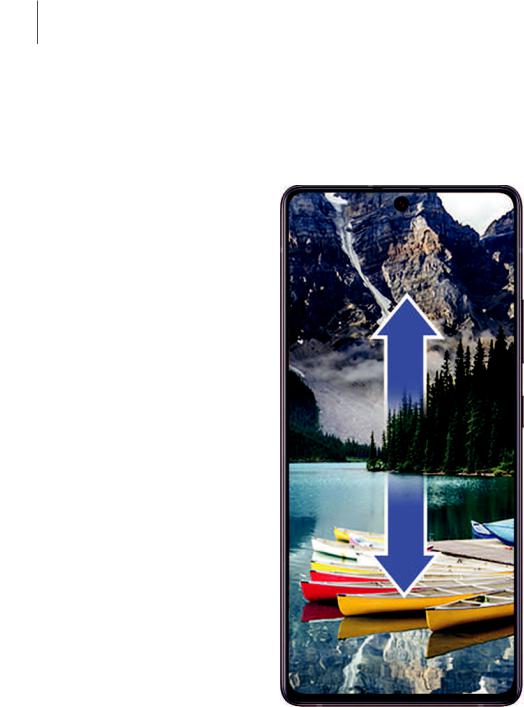
Zoominandout
Bring your thumbandforefinger together or apart on the screen to zoom in andout.
•Move your thumbandforefinger together on the screen to zoom out.
•Move your thumbandforefinger apart on the screen to zoom in.
Devicesandsoftwareareconstantlyevolving— theillustrationsyouseeherearefor referenceonly.
16


Getting started
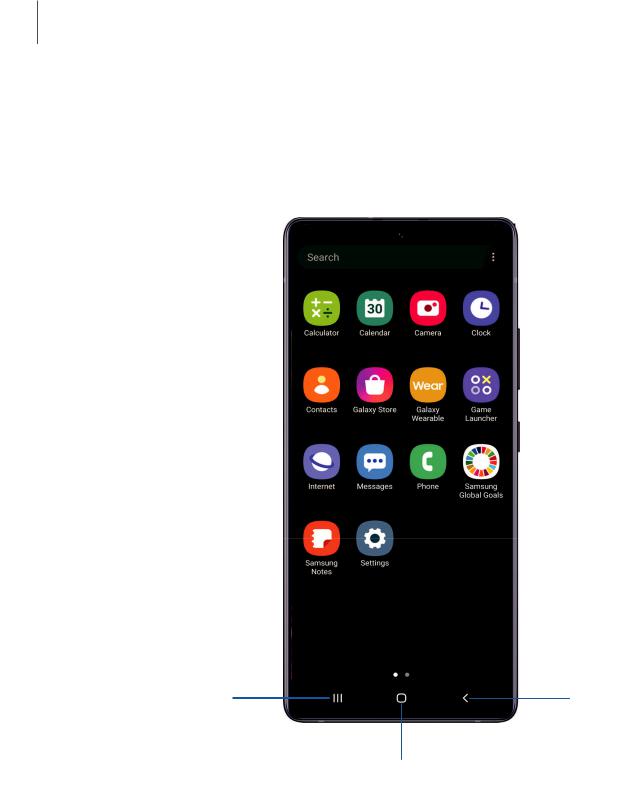
 Navigationbuttons
Use buttonsalong the bottom of the screen for quick navigation. Thisisthe default setting.
1.From Settings, tap
 Display > Navigation bar > Navigation buttons.
2.Tapan option under Button order to choose which side of the screen the Back andRecent appsiconsdisplay.
Full screengestures
Hide the navigation buttonsat the bottom of the screen for an unobstructedscreen experience. Insteadswipe to navigate your device.
1.From Settings, tap
 Display > Navigation bar > Full screen gestures to enable the feature.
2.Tapan option to customize:
•More options: Choose a gesture type andsensitivity.
•Gesture hints: Display linesat the bottom of the screen where each screen gesture islocated.
•Show button to hide keyboard: Show an icon on the bottom right corner of the screen to hide the keyboardwhen the phone isin portrait mode.
19

Getting started
Customize yourhome screen
The Home screen isthe starting point for navigating your device. Youcan place your favorite appsandwidgetshere, in addition to setting upadditional Home screens, removing screens, changing the order of screens, andchoosing a main Home screen.
App icons | Wallpaper | Themes | Icons | Widgets | Home screen settings | Easy mode | Status bar | Notification panel
Appicons
Use appiconsto launch an appfrom any Home screen.
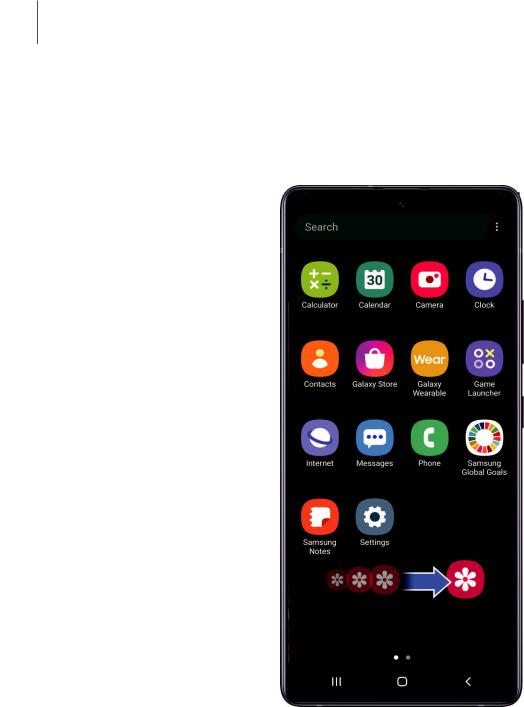
◌From Apps, touch andholdan appicon, andtap Add to Home. To remove an icon:
◌From a Home screen, touch andholdan appicon, andthen tap Remove from Home.

 NOTE Removing an icon doesnot delete the app, it just removesthe icon from a Home screen.
Wallpaper
Change the look of the Home andLock screensby choosing a favorite picture, video, or preloadedwallpaper.
1.From a Home screen, touch andholdthe screen, andthen tap Wallpaper.
2.Tapone of the following menusfor available wallpapers:
•Mywallpapers: Choose from featuredanddownloadedwallpapers.
•Gallery: Choose picturesandvideossavedin the Gallery app.
•Wallpaper services: Enable additional featuresincluding guide page and Dynamic Lock screen.
•ApplyDark mode to Wallpaper: Enable to apply Dark mode to your wallpaper.
•Explore more wallpapers: Findanddownloadmore wallpapersfrom Galaxy Themes.
20
Getting started
3.Tapa picture or video to choose it.
•If choosing a single picture, choose which screen or screensyouwant to apply the wallpaper to.
•Videosandmultiple picturescan only be appliedto the Lock screen.
•If choosing videosor picturesfrom the Gallery, tapon one or more items, and then tap Done.
4.Tap Set on Home screen, Set on Lock screen, or Set on Home and Lock screens
(depending on which screensare applicable).
•If applying a wallpaper to both the Home andLock screens, enable Sync my edits if youwant any editsmade to that wallpaper to be appliedto both screens.
Themes
Set a theme to be appliedto your Home andLock screens, wallpapers, andappicons.
1.From...a Home screen, touch andholdthe screen.
2.Tap T Themes to customize.
3.Tapa theme to preview anddownloadit to My themes.
4.Tap- Navigation drawer > Mystuff > Themes to see downloadedthemes.
5.Tapa theme, andthen tap Apply to apply the selectedtheme.
Icons
Apply different icon setsto replace the default icons.
1.From...a Home screen, touch andholdthe screen.
2.Tap T Themes > Icons to customize.
3.Tapan icon set to preview anddownloadit to My icons.
4.Tap- Navigation drawer > Mystuff > Icons to see downloadedicons.
5.Tapan icon, andthen tap Apply to apply the selectedicon set.
21

Getting started
 Widgets
Addwidgetsto your home screensfor quick accessto info or apps.
1.From-a Home screen, touch andholdthe screen.
2.Tap •• Widgets, andthen touch andholda widget, drag it to a Home screen, and release it.
Customize Widgets
Once youhave addeda widget, youcan customize where it'slocatedandhow it functions.
◌From a Home screen, touch andholda widget, andtapan option:
•-ar Remove from Home: Delete a widget from your screen.
•(I Widget settings: Customize the function or appearance of the widget.
•0 App info: Review the widget usage, permissions, andmore.
Home screensettings
Customize your Home andAppsscreens.
1.From a Home screen, touch andholdthe screen.
2.Tap(I Home screen settings to customize:
•Home screen layout: Set your device to have separate Home andApps screens, or only a Home screen where all appsare located.
•Home screen grid: Choose a layout to determine how iconsare arrangedon the Home screen.
•Appsscreen grid: Choose a layout to determine how iconsare arrangedon the Appsscreen.
•Appsbutton: Adda button to the Home screen for easy accessto the Apps screen.
•App icon badges: Enable to show badgeson appswith active notifications. Youcan also choose the badge style.
•Lock Home screen layout: Prevent itemson the Home screen from being removedor repositioned.
22

Getting started
•Add appsto Home screen: Automatically addnewly-downloadedappsto the Home screen.
•Swipe down for notification panel: Enable thisfeature to open the Notification panel by swiping down anywhere on the Home screen.
•Rotate to landscape mode: Rotate the Home screen automatically when your device’sorientation ischangedfrom portrait to landscape.
•Hide apps: Choose appsto hide from the Home andAppscreens. Return to thisscreen to restore hidden apps. Hidden appsare still installedandcan appear asresultsin Finder searches.
•About Home screen: View version information.
23
Getting started
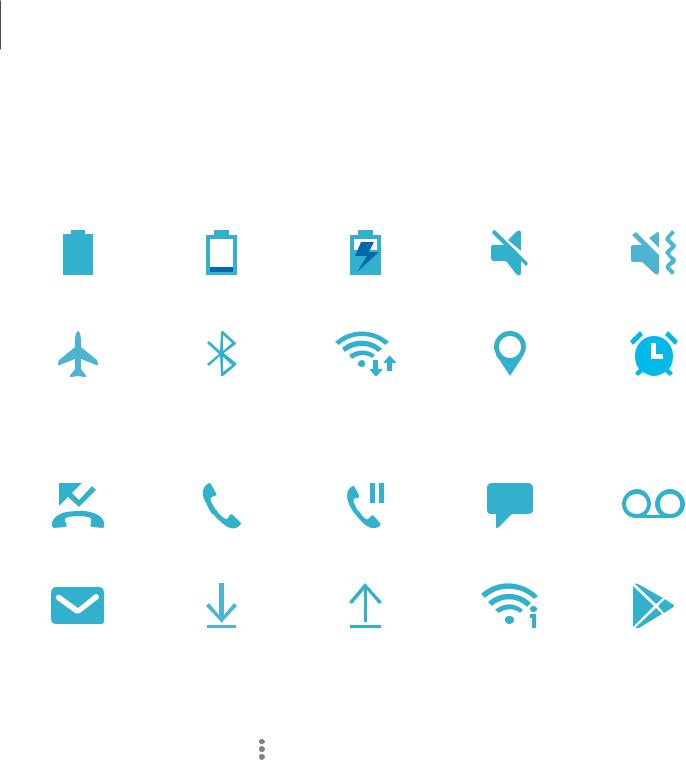
 Statusbar
The Statusbar providesdevice information on the right side andnotification alertson the left.
Status icons
Battery full |
Battery low |
Charging |
Mute |
Vibrate |
Airplane mode Bluetooth active Wi-Fi active |
Location active |
Alarm |
Notificationicons
ao
Missedcalls Call in progress Call on hold |
New message |
Voicemail |
- 1'
New email |
Download |
Upload |
Wi-Fi available |
Appupdate |
Configure display optionsfor the Statusbar.
◌ From Quick settings, tap ••• More options > Statusbar for the following options:
•Show notification icons: Choose how to display notification iconson the Statusbar.
•Show batterypercentage: Display the battery charge percentage next to the battery icon on the Status bar.
25
Getting started
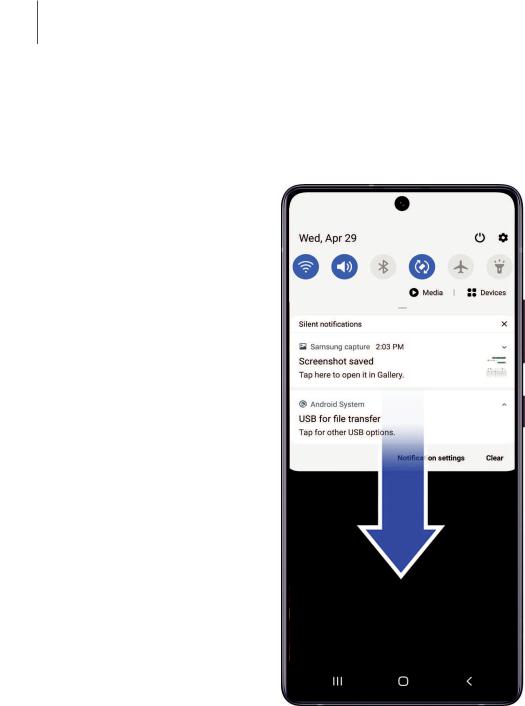
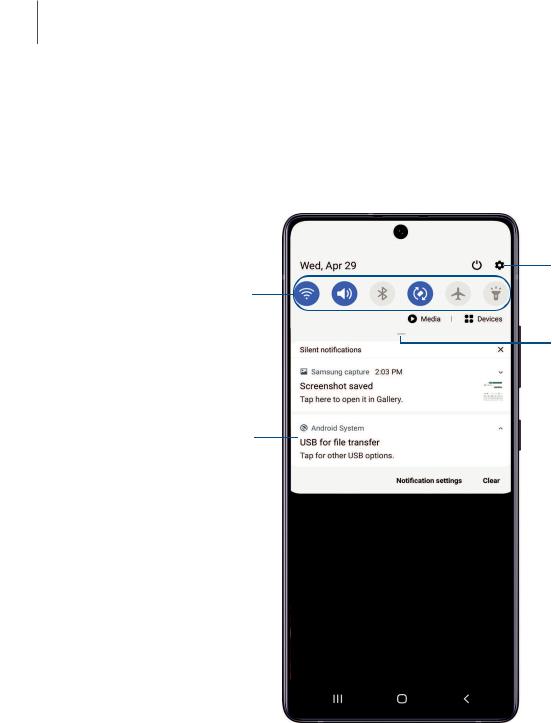
 Viewthe Notificationpanel
Youcan accessthe Notification panel from any screen.
1.Drag the Statusbar down to display the Notification panel.
2.Swipe down the list to see notification details.
•To open an item, tapit.
•To clear a single notification, drag the notification left or right.
•To clear all notifications, tap Clear.
•To customize notifications, tap Notification settings.
3.Drag upwardfrom the bottom of the screen or tap<Back to close the Notification panel.
Quicksettings
The Notification panel providesquick accessto device functionsusing Quick settings.
1. |
Drag the Statusbar down to display the Notification panel. |
||
2. |
Drag |
View all downward. |
|
|
• |
Tapa quick setting icon to turn it on or off. |
|
|
• |
Touch andholda quick setting icon to open the setting. |
|
|
• |
Tap Q Finder search to search the device. |
|
|
• |
Tap C) Power off for Power off, Restart, andEmergency mode options. |
|
|
• |
Tap 0 Open settings to quickly accessthe device'ssettingsmenu. |
|
|
• |
• |
More options to reorder Quick settingsor to change the button layout. |
|
Tap • |
||
|
• |
• |
|
|
Drag the Brightnessslider to adjust the screen brightness. |
||
3. |
Drag |
View all upwardto close Quick settings. |
|
Samsung Daily
The Samsung Daily page displayscustomizedcontent basedon your interactions.
◌ From a Home screen, swipe right.

 TIP Youcan adda Samsung Daily icon to your Appslist. Tap
Settings > Add Samsung Dailyicon.
• • •
More options >
27

Getting started
 Customize SamsungDaily
Use the More optionsmenuto addandreorder cards, customize settings, andlearn how to use Samsung Daily.
1. From a Home screen, swipe right.
2. Tap ••• More options for the following options:
•Cards: Tapcardsto addthem to your Samsung Daily page.
•Settings: View the privacy policy, termsandconditions, andopen source licensing andadda Samsung Daily icon to your Appslist.
•Notices: View Samsung Daily notices.
•Tips: Learn how to navigate Samsung Daily.
•Help: View FAQ andemail customer service.
Bixby
Bixby isa virtual assistant that learns, evolves, andadaptsto you. It learnsyour routines, helpsyouset upremindersbasedon time andlocation, andisbuilt in to your favorite apps. Visit samsung.com/us/support/owners/app/Bixby for more information.
◌ From a Home screen, pressandholdthe Side key.

 TIP Youcan also accessBixby from the Appslist.
BixbyRoutines
Youcan use Bixby to show youinformation or change device settingsbasedon where youare andwhat youare doing.
◌ From Settings, tap Advanced features > BixbyRoutines.
BixbyVision
Bixby isintegratedwith your Camera, Gallery, andInternet appsto give youa deeper understanding of what yousee. It providescontextual iconsfor translation, QR code detection, landmark recognition, or shopping.
28

Getting started
 Camera
Bixby Vision isavailable on the Camera viewfinder to helpunderstandwhat yousee.
◌ From Camera, tap More > BixbyVision andfollow the prompts.
Gallery
Bixby Vision can be usedon picturesandimagessavedin the Gallery app.
1.From Gallery, tapa picture to view it.
2.Tap BixbyVision andfollow the prompts.
Internet
Bixby Vision can helpyoufindout more about an image youfindin the Internet app.
1.From Q Internet, touch andholdan image until a pop-upmenuisdisplayed.
2.Tap BixbyVision andfollow the prompts.
Digital wellbeing and parental controls
Youcan monitor andmanage your digital habitsby getting a daily view of how frequently youuse apps, how many notificationsyoureceive, andhow often youcheck your device. Youcan also set your device to helpyouwinddown before going to bed.
◌From Settings, tap Digital wellbeing and parental controls for the following features:
•Screen time: Tapthe time value in the dashboardfor detailson how long each apphasbeen openedandusedtoday.
•Notifications: Tapto see how many notificationshave been receivedfrom each apptoday.
•Unlocks: Tapto see how many timeseach apphasbeen openedtoday.
•Your goals: Set upscreen time andunlock goalsandview your daily averages.
•App timers: Set a daily limit for how long youuse each app.
•Focusmode: Configure timesandactivitiesto avoiddistractionsfrom your phone.
29

Getting started
•Wind down: Enable to turn the screen to grayscale andlimit notifications before going to bed.
•Parental controls: Supervise your children’sdigital life with Google’sFamily Link app. Youcan choose apps, set content filters, keepan eye on screen time, andset screen time limits.
Always On Display
View missedcallsandmessage alerts, check the time anddate, andview other customizedinformation without unlocking your device using AlwaysOn Display (AOD).
1.From Settings, tap Lock screen > AlwaysOn Display.
2.Tap to enable the feature, andthen set the following options:
•Choose when to show a clock andnotificationson the screen when your device isnot in use: Tap to show, Show always, or Show asscheduled.
•Clock style: Change the style andcolor optionsfor the clock on the Lock screen andAlwayson Display.
•Show music information: Show music detailswhen the FaceWidgetsmusic controller isin use.
•Rotate screen to: Display the AOD in portrait or landscape mode.
•Auto brightness: Automatically adjust the brightnessof AlwaysOn Display.
•About AlwaysOn Display: View the current software version andlicense information.
-'A'-
,tf,
1.
2.
NOTE Some display settingscan appear on both the Lock screen andAlwaysOn Display. For more information, see Clock and information.
....
From a Home screen, touch andholdthe screen, andtap T Themes > AODs.
• Tapan AOD to preview anddownloadit to My AlwaysOn Displays. Tap- Navigation drawer > Mystuff > AODs to see downloadedthemes.
3. Tapan AOD, andthen tap Apply.
30
Loading...