


|
|
|
|
ENGLISH |
|
|
ESPAÑOL |
|
Video Camcorder |
Videocámara |
|
|
8mm |
8mm |
|
|
COLOR LCD |
PANTALLA LCD DE COLOR |
|
|
|
|
|
SCL610/L630/L650 |
SCL610/L630/L650 |
Hi SCL610/L630/L650 |
Hi SCL610/L630/L650 |
Owner’s Instruction Book |
|
Manual de instrucciones del usuario |
Before operating the unit, please read |
|
Antes de utilizar la videocámara, lea |
this instruction book thoroughly, and retain it |
|
completamente el presente manual de |
for future reference. |
ELECTRONICS |
instrucciones, y consérvelo para futuras |
|
consultas. |
AD68-00334D

ENGLISH |
|
|
|
|
ESPAÑOL |
|
|
Contents |
|
|
Tabla de Contenido |
|
|
||
|
|
|
|
|
|
||
Notices and Safety Instructions |
|
|
Avisos e instrucciones de seguridad |
|
|
||
|
|
|
|
|
|
|
|
Getting to Know Your Camcorder |
|
|
Conozca su videocámara |
|
|
||
Features........................................................................................................... |
8 |
|
Características................................................................................................. |
8 |
|
||
Descriptions |
|
|
Descripciones |
|
|
||
■ Front View/Side View/Rear View................................................. |
9, 10, 11 |
|
■ Vista Frontal/Vista lateral/Vista trasera....................................... |
9, 10, 11 |
|
||
■ OSD (On Screen Display) ................................................................... |
12 |
|
■ OSD (Visualizador en pantalla) ........................................................... |
12 |
|
||
Accessories Supplied with the Camcorder.................................................... |
14 |
|
Accesorios suministrados con la videocámara ............................................. |
14 |
|
||
Remote Control ............................................................................................. |
15 |
|
Mando a distáncia ........................................................................................ |
15 |
|
||
■ Self Timer Recording ............................................................................ |
15 |
|
■ Filmación automática utilizando el mando a distancia ......................... |
15 |
|
||
|
|
|
|
|
|
||
Preparing |
|
|
Configuración de la videocámara |
|
|
||
Adjusting the Hand Strap and Shoulder Strap .............................................. |
16 |
|
Ajuste de la correa de mano y de hombro .................................................... |
16 |
|
||
Lithium Battery Installation ............................................................................ |
17 |
|
Instalación de la batería de litio..................................................................... |
17 |
|
||
Connecting the Power Source ....................................................................... |
18 |
|
Conexión a la fuente de energía ................................................................... |
18 |
|
||
■ To use the AC Power Adapter .............................................................. |
18 |
|
■ Uso del Adaptador de corriente AC ..................................................... |
18 |
|
||
■ To use the Battery Pack........................................................................ |
19 |
|
■ Para el uso de la batería ...................................................................... |
19 |
|
||
Using the Battery Pack .................................................................................. |
20 |
|
Uso de la batería ........................................................................................... |
20 |
|
||
■ Continuous Recording time table ......................................................... |
20 |
|
■ Tabla de tiempo de grabación contínuo................................................ |
20 |
|
||
■ Battery Level Display ............................................................................ |
21 |
|
■ Visualizador del nivel de batería........................................................... |
21 |
|
||
Inserting and Ejecting a Cassette ................................................................ |
22 |
|
Introducir y extraer un videocasete .............................................................. |
22 |
|
||
|
|
|
|
|
|
||
Basic Recording |
|
|
Filmación básica |
|
|
||
Making your First Recording.......................................................................... |
23 |
|
Filmando por primera vez.............................................................................. |
23 |
|
||
Hints for Stable Image Recording ................................................................ |
25 |
|
Consejos para la filmación con imágenes estables ...................................... |
25 |
|
||
■ Recording with LCD Monitor ................................................................ |
25 |
|
■ Filmar utilizando el monitor LCD .......................................................... |
25 |
|
||
■ Recording with Viewfinder .................................................................... |
25 |
|
■ Filmar utilizando el visor....................................................................... |
25 |
|
||
Adjusting the LCD.......................................................................................... |
26 |
|
Ajustar la pantalla LCD.................................................................................. |
26 |
|
||
Adjusting Focus of the VIEWFINDER ........................................................... |
27 |
|
Ajustar el enfoque y del VISOR..................................................................... |
27 |
|
||
Playing back a tape on the LCD.................................................................... |
28 |
|
Reproducción de la cinta en LCD ................................................................. |
28 |
|
||
■ Adjusting the LCD during PLAY ........................................................... |
29 |
|
■ Ajustar la pantalla LCD durante la reproducción.................................. |
29 |
|
||
■ Controlling a Sound from the Speaker ................................................. |
29 |
|
■ Controlar el sonido del altavoz ............................................................. |
29 |
|
||
■ Viewing a Still Picture ........................................................................... |
29 |
|
■ Ver una imagen fija ............................................................................... |
29 |
|
||
■ Picture Search ...................................................................................... |
29 |
|
■ Búsqueda de imágenes........................................................................ |
29 |
|
||
|
|
|
|
|
|
||
Advanced Recording |
|
|
Filmación avanzada |
|
|
||
Zooming In and Out....................................................................................... |
30 |
|
Lejos y Cerca................................................................................................. |
30 |
|
||
Digital Zoom .................................................................................................. |
31 |
|
Zoom Digital .................................................................................................. |
31 |
|
||
EASY mode (for beginners)........................................................................... |
33 |
|
modo EASY (para principiantes).................................................................... |
33 |
|
||
CUSTOM-Creating your own customized recording settings ........................ |
34 |
|
CUSTOM-Creacion de sus ajustes de grabación personalizados................. |
34 |
|
||
2

|
|
|
|
|
|
|
|
|
|
|
ENGLISH |
|
|
|
|
|
|
ESPAÑOL |
|
|
Contents (continued) |
|
|
Tabla de Contenido (continuación) |
|
||||
|
DIS (Digital Image Stabilizer, SCL630/L650 only) |
.........................................35 |
|
DIS (Estabilizador digital de imagen, sólo en SCL630/L650) ....................... |
35 |
|
|||
|
MF/AF (Manual Focus/Auto Focus)............................................................... |
36 |
|
Enfoque Manual/automático .......................................................................... |
36 |
|
|||
|
BLC................................................................................................................ |
37 |
|
BLC................................................................................................................ |
37 |
|
|||
|
Program AE (Automatic Exposure) ............................................................... |
38 |
|
PROGRAMA AE (Exposición automática) .................................................... |
38 |
|
|||
|
DSE (Digital Special Effects) in CAMERA mode .......................................... |
40 |
|
DSE (Efecto Digital Especial) en modo CAMERA ........................................ |
40 |
|
|||
|
Setting and Recording DATE/TIME ............................................................... |
42 |
|
Configurar y grabar una FECHA/HORA ........................................................ |
42 |
|
|||
|
Selecting and Recording a Title..................................................................... |
44 |
|
Selección y grabación de un título ................................................................ |
44 |
|
|||
|
Fade In and Out............................................................................................. |
46 |
|
Entrada y salida gradual................................................................................ |
46 |
|
|||
|
PIP ................................................................................................................. |
47 |
|
PIP ................................................................................................................. |
47 |
|
|||
|
Snap Shot...................................................................................................... |
48 |
|
Filmación Instantánea ................................................................................... |
48 |
|
|||
|
White Balance ............................................................................................... |
49 |
|
Balance de blanco ......................................................................................... |
49 |
|
|||
|
Demonstration ............................................................................................... |
50 |
|
Demostración................................................................................................. |
50 |
|
|||
|
Lighting Techniques ....................................................................................... |
51 |
|
Técnicas de iluminación ................................................................................ |
51 |
|
|||
|
|
|
|
|
|
|
|
||
|
Playing back a Tape |
|
|
|
Reproducir una cinta |
|
|
||
To watch with LCD ........................................................................................ |
52 |
|
Para ver con LCD ......................................................................................... |
52 |
|
||||
To watch with TV monitor .............................................................................. |
52 |
|
Para ver con el monitor de TV....................................................................... |
52 |
|
||||
Various Functions in PLAYER mode ............................................................. |
54 |
|
Funciones varias en el modo PLAYER ......................................................... |
54 |
|
||||
Adjusting the LCD.......................................................................................... |
55 |
|
Ajuste del LCD............................................................................................... |
55 |
|
||||
Setting the Speaker ON/OFF ........................................................................ |
55 |
|
Configuración del altavoz ON/OFF................................................................ |
55 |
|
||||
DSE in PLAYER mode .................................................................................. |
55 |
|
DSE en modo PLAYER ................................................................................. |
55 |
|
||||
Multi Playback (Using a PAL60 System) ....................................................... |
56 |
|
Multi reproducción (usando un sistema PAL60) ............................................ |
56 |
|
||||
|
|
|
|
|
|
|
|
||
|
Maintenance |
|
|
|
Mantenimiento |
|
|
||
Cleaning and Taking care of the Camcorder ................................................. |
57 |
|
Limpieza y cuidados de la videocámara ....................................................... |
57 |
|
||||
|
■ Cleaning the Viewfinder ....................................................................... |
57 |
|
|
■ Limpieza del Visor................................................................................. |
57 |
|
||
|
■ Cleaning the LCD Panel ....................................................................... |
57 |
|
|
■ Limpieza del panel LCD ....................................................................... |
57 |
|
||
|
■ Cleaning the Video Heads ................................................................... |
57 |
|
|
■ Limpieza de los cabezales del vídeo ................................................... |
57 |
|
||
|
■ Storing the Camcorder.......................................................................... |
57 |
|
|
■ Guardar la videocámara ....................................................................... |
57 |
|
||
|
|
|
|
|
|
|
|
||
|
Using Your Camcorder Abroad ...................................... |
58 |
|
|
Utilizar la videocámara en el extranjero |
..................58 |
|
||
|
|
|
|
|
|
|
|
|
|
|
Troubleshooting |
|
|
|
Resolución de problemas |
|
|
||
|
Self Diagnosis Display .................................................................................. |
59 |
|
|
Pantalla de autodiagnóstico........................................................................... |
59 |
|
||
|
Checking........................................................................................................ |
60 |
|
|
Resolución de problemas .............................................................................. |
60 |
|
||
|
Moisture Condensation.................................................................................. |
62 |
|
|
Condensación de la humedad....................................................................... |
62 |
|
||
|
|
|
|
|
|
|
|
||
|
Specifications ........................................................................... |
63 |
|
|
......................................................................Especificaciones |
63 |
|
||
|
|
|
|
|
|
|
|
|
|
|
.............................................................................................Index |
64 |
|
|
Índice............................................................................................ |
64 |
|
||
|
|
|
|
|
|
|
|
3 |
|
|
|
|
|
|
|
|
|
|
|
ENGLISH |
|
|
|
ESPAÑOL |
|
|
Notices |
and Safety Instructions |
|
Avisos e instrucciones de seguridad |
|
|
|
|
|
|
|
|
|
|
|
|
|
|
|
|
|
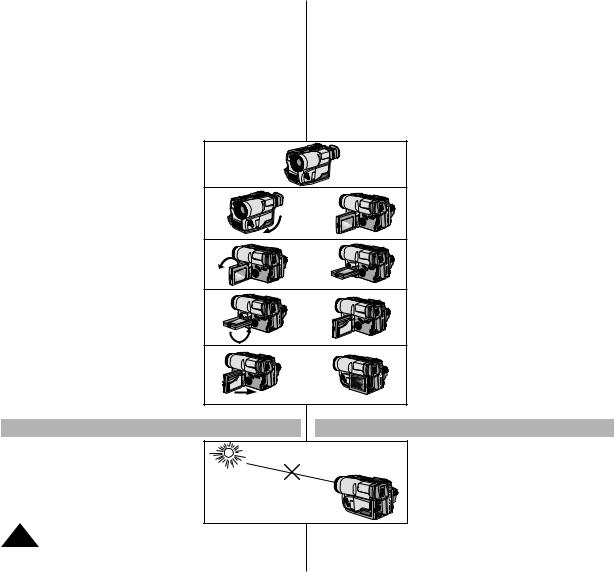
Notices regarding rotation of LCD screen |
|
Avisos relativos al giro de la pantalla LCD |
|
|||
Please rotate the LCD screen carefully as illustrated. Unintended rota- |
|
Por favor, gire la pantalla LCD con cuidado como lo muestra en la ilus- |
||||
tion may cause damage to the inside of the hinge that connects the LCD |
|
tración. Un giro no intencionado puede ocasionar daños en la parte inte- |
||||
screen to the Camcorder. |
|
rior de la bisagra que une la pantalla LCD con la videocámara. |
||||
1) |
LCD screen closed. |
1) |
|
1) |
Pantalla LCD cerrada. |
2) |
Standard recording by using the LCD |
2) |
|
2) |
Filmación estándar usando la pantalla LCD. |
|
screen. |
|
|
|
|
|
|
|
|
|
|
|
|
|
90° |
|
|
3) |
Making a recording by looking at the LCD |
3) |
|
3) |
Efectuar una filmación mirando la pantalla |
|
screen from the top. |
|
|
LCD desde arriba. |
|
|
|
90° |
|
|
|
4) |
Making a recording by looking at the LCD |
4) |
|
4) |
Efectuar una filmación mirando la pantalla |
|
screen from the front. |
|
|
|
LCD de filmación desde la parte frontal. |
|
(In this case, the CVF of only SCL650 isn’t |
|
|
(En este caso, el visor a color solo del |
|
|
turned on.) |
|
90° |
|
modelo SCL650 no esta encendido.) |
|
|
|
|
|
|
5) |
Making a recording with the LCD screen |
5) |
|
5) |
Efectuar una filmación con la pantalla |
|
closed. |
|
|
||
|
(In this case, the CVF of only SCL650 isn’t |
|
|
LCD cerrada. |
|
|
turned on.) |
|
90° |
|
(En este caso, el visor a color solo del |
|
|
|
|
modelo SCL650 no esta encendido.) |
|
|
|
|
|
|
|
Notices regarding the LENS |
|
Precauciones con los LENTES |
|||
|
Do not let the LENS point toward the sun. |
|
|
No deje los LENTES orientados hacia el |
|
|
Direct sunlight can damage the CCD |
|
|
|
sol. La luz solar directa puede dañar el |
|
(Charge Coupled Device). |
|
|
|
CCD. (Dispositivo unido de recarga) |
4

ENGLISH |
|
|
|
ESPAÑOL |
|
Notices and Safety Instructions |
|
Avisos e instrucciones de seguridad |
|||
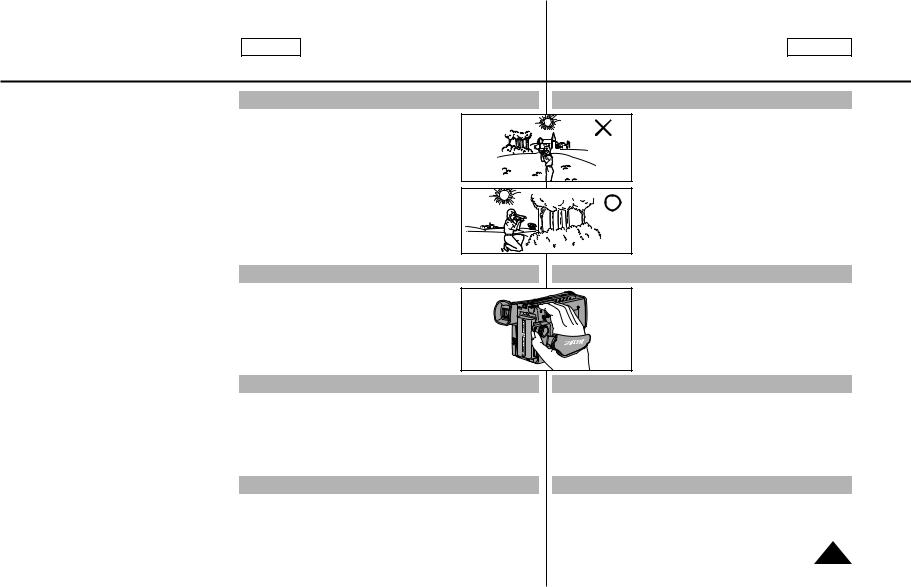
Notices regarding electronic viewfinder |
|
Precauciones con el VISOR |
|||
1) |
Do not place the camcorder so that |
1 |
2 |
3 |
1) No coloque la videocámara de modo |
|
the viewfinder is pointing towards the |
que el visor quede orientado hacia el |
|||
|
|
|
|
||
|
sun. Direct sunlight can damage the |
|
|
|
sol. La luz solar directa puede dañar |
|
inside of the viewfinder. Be careful |
|
|
|
el interior del visor. Tenga cuidado |
|
when placing the camcorder under |
|
|
|
cuando coloque la videocámara |
|
sunlight or by a window. |
|
|
|
expuesta a la luz solar o junto a una |
2) |
Do not pick up the camcorder by the |
|
|
|
ventana. |
|
viewfinder. |
|
|
|
2) No sujete la videocámara por el visor. |
3) |
Unintended rotation may cause damage |
|
|
|
3) Un giro no intencionado puede dañar |
|
to the viewfinder. |
|
|
|
el visor. |
Notices regarding moisture |
|
|
Avisos relativos a la condensación de la humedad |
||
1) |
A sudden rise in atmospheric temperature |
|
1) |
Un aumento repentino de la temperatura atmos- |
|
|
cause condensation to form inside the |
|
|
|
férica puede causar condensación en el interior |
for example: |
|
|
|
de la videocámara. |
|
■ |
When you take the camcorder from cold |
|
|
Por ejemplo: |
|
|
ture outside to warm temperature inside |
|
|
■ |
Cuando pase la videocámara desde el exterior |
|
winter. |
|
|
|
frío a un interior caliente en invierno. |
■ |
When you take the camcorder from cool |
|
|
■ |
Cuando pase la videocámara de un interior fresco |
|
ture inside to hot temperature outside |
|
|
|
a un exterior caliente en verano. |
2) |
If the “DEW” protection feature is activated, |
|
2) |
Si la función de protección “DEW” está activada, |
|
|
leave the camcorder in a dry, warm room |
|
|
|
deje reposar la videocámara en un lugar seco y |
|
the cassette compartment opened and |
|
|
|
caliente con el compartimento de cassette abierto |
|
removed. |
|
|
|
y la batería extraída. |
3) |
If the “DEW” protection feature is activated |
|
|
|
|
|
unexpectedly, and you want to override |
|
|
3) |
Si la función de protección “DEW” se ha activado |
|
then reinstall the battery pack and lithium |
|
|
|
inadvertidamente, y usted la quiere desactivar, |
|
Please make sure that the condensation |
|
|
DEW |
vuelva a instalar la batería y la batería de litio |
|
disappeared completely. (see page 62) |
|
|
|
después de haber retirado tanto la batería como la |
|
|
|
|
|
batería de litio. Asegúrese de que la condensación |
|
|
|
|
|
haya desaparecido por completo. (Consulte la pági- |
|
|
|
|
|
na 62) |
|
|
|
|
|
5 |

ENGLISH |
|
|
|
|
|
|
|
|
ESPAÑOL |
|
Notices and Safety Instructions |
|
Avisos e instrucciones de seguridad |
|
|||||||
|
|
|
|
|
|
|
|
|
|
|
Notices regarding the battery pack |
|
Avisos relativos a la batería |
|
|
|
|
||||
Make sure that the battery pack is charged before recording out- |
|
Asegúrese de que la batería está cargada antes de filmar en el |
||||||||
doors. |
|
|
|
exterior. |
|
|
|
|
||
To preserve battery power, keep your camcorder turned off when |
|
Para conservar la energía de la batería, mantenga su videocámara |
||||||||
you are not operating it. |
|
|
|
apagada cuando no la utilice. |
|
|
|
|
||
|
|
|
Cuando su videocámara esté en modo CAMERA, se apagará |
|||||||
When your camcorder is in CAMERA mode, if it is left in STANDBY |
|
|||||||||
|
automáticamente si se deja en STANDBY más de 5 minutos sin |
|||||||||
for more than 5 minutes without operation, it will automatically turn |
|
|||||||||
|
funcionar, para evitar una descarga inesperada de la batería. |
|||||||||
off to protect against unexpected battery discharge. |
|
|||||||||
|
Al grabar durante un largo período de tiempo, es recomendable |
|||||||||
It is a good idea to use the viewfinder instead of the LCD when |
|
|||||||||
|
utilizar el visor en lugar de la pantalla LCD, ya que ésta consume |
|||||||||
recording for a long time because the LCD uses more battery |
|
más energía de la batería. |
|
|
|
|
||||
power. |
|
|
|
Asegúrese de que la batería está firmemente colocada en su lugar. |
||||||
Make sure that the battery pack is fitted firmly into place. |
|
La batería se puede dañar al caer al suelo. |
||||||||
Dropping the battery pack might damage it. |
|
Cuando la batería llegue al final de su vida útil, póngase en contac- |
||||||||
When the battery reaches the end of its life, please contact your |
|
to con su distribuidor local. Las baterías deben tratarse como si |
||||||||
|
fueran residuos químicos. |
|
|
|
|
|||||
local dealer. The batteries have to be dealt with as chemical waste. |
|
|
|
|
|
|||||
|
|
|
|
|
|
|
||||
|
|
|
|
|
|
|
|
|
||
Notices regarding the Lithium battery |
|
Avisos relativos a la batería de litio |
|
|||||||
Warning: Keep the LITHIUM BATTERY out of the reach of children. |
|
Precaución : Mantenga la BATERÍA DE LITIO fuera del alcance de |
||||||||
Should the battery be swallowed, consult a doctor imme- |
|
|
los niños. En el caso de que fuera tragada, consulte un |
|||||||
diately. |
|
|
|
|
médico de inmediato. |
|
|
|
|
|
The lithium battery maintains the clock function, TITLE, CUSTOM |
|
La batería de litio mantiene las funciones CLOCK, TITLE, CUSTOM |
||||||||
function and preset contents memory; even if the battery pack or |
|
y los ajustes de memoria; incluso sin la batería o el alimentador AC |
||||||||
AC power adapter is removed. |
|
|
|
desconectado. |
|
|
|
|
||
The lithium battery for the camcorder lasts about 8~10 months |
|
La batería de litio para la videocámara dura de 8 a 10 meses bajo |
||||||||
under normal operation from time of installation. |
|
funcionamiento normal desde su instalación. |
||||||||
When the lithium battery becomes weak or dead, the date/time |
|
Cuando la batería de litio se debilita o se agota, el indicador de |
||||||||
indicator flashes about 5 seconds when you set the power switch to |
|
fecha/ hora centellea aproximádamente 5 segundos cuando el inter- |
||||||||
CAMERA. In this case, replace the lithium battery with type |
|
ruptor pasa a CAMERA. En este caso, cambie la batería de litio con |
||||||||
CR2025. (see page 17) |
|
|
|
una de tipo CR2025. (Consulte la página 17) |
||||||
|
|
|
|
|
|
|
|
|
||
WARNING: |
|
*When the lithium battery |
|
PRECAUCIÓN: |
|
*Cuando la batería de litio se |
|
|||
|
|
|
becomes weak or dead please |
|
LA BATERÍA DE LITIO SE |
|
debilite o se agote, póngase en |
|
||
LITHIUM BATTERY MUST BE |
|
contact your local dealer. The |
|
|
contacto con su distribuidor local. |
|
||||
RECYCLED OR DISPOSED |
|
batteries have to be dealt with |
|
DEBE RECICLAR O ELIMINAR |
|
Las baterías deben tratarse como |
|
|||
OF PROPERLY. |
|
as chemical waste. |
|
ADECUADAMENTE. |
|
si fueran residuos químicos. |
|
|||
|
|
|
|
|
|
|
|
|
|
|
6
ENGLISH |
|
|
ESPAÑOL |
|
Notices and Safety Instructions |
Avisos e instrucciones de seguridad |
|||
Notices with Recording or Playback by using LCD |
Avisos relativos a la filmación y reproducción utilizando la LCD |
|||
1) |
The LCD monitor is manufactured by using high |
1) |
La pantalla LCD se fabrica utilizando tec- |
|
|
precision technology. However, there may be |
|
nología de alta precisión. Sin embargo, |
|
|
some tiny specks (red, blue or green in color) |
|
pueden aparecer constantemente pequeños |
|
|
|
puntos oscuros (de color rojo, azul o verde) en |
||
|
that appear on the LCD monitor. |
These |
|
|
|
|
la pantalla LCD. Dichos puntos son normales |
||
|
specks are normal and do not affect |
the |
|
|
|
|
y no afectan en ningún modo a la imagen |
||
|
recorded picture in any way. |
|
|
|
|
|
|
grabada. |
|
2) |
When using the LCD monitor outdoors in direct |
|
||
2) |
Cuando utilice la pantalla LCD en el exterior |
|||
|
sunlight, it may be difficult to view. If this |
|
bajo la luz del sol, tendrá dificultades para ver |
|
|
occurs, use the viewfinder. |
|
|
el contenido. En este caso, le recomendamos |
3) |
The LCD monitor's OSD is turned off when |
|
que utilice el visor. |
|
|
the LCD is placed in the forward direction. |
3) |
El OSD de la pantalla LCD se desactiva cuan- |
|
|
|
|
|
do la LCD se coloca en la posición de direc- |
|
|
|
|
ción hacia delante. |
Notices regarding the hand strap |
Avisos relativos a la correa para mano |
|||
|
It is very important to adjust the hand strap for |
|
Es muy importante ajustar la correa para mano |
|
|
better recording. (see page 16) |
|
|
para filmar mejor. (Consulte la página 16) |
|
Do not insert your hand in the hand strap |
|
No inserte la mano en la correa forzándola, |
|
|
forcibly, the buckle may be damaged. |
|
|
podría dañar la hebilla. |
Notices regarding video head cleaning
To ensure normal recording and clear picture, clean the video heads. When playing back the pictures, if they are noisy or hardly visible, the video heads may be dirty. If this happens, clean the video heads with a dry type cassette cleaner.
Do not use a wet type cassette cleaner. It may damage the video heads. (see page 57)
5 minutes off timer in STANDBY mode
To protect against tape and head-drum wear, your camcorder will automatically turn off if it is left in STANDBY mode without operation for more than 5 minutes.
relativos a la limpieza del cabezal del vídeo
Para asegurar filmaciones normales e imágenes claras, limpie los cabezales del vídeo. Si las imágenes reproducidas tienen ruido o se ven con dificultad, puede que los cabezales del vídeo estén sucios. En este caso, limpie los cabezales del vídeo con un cassette de limpieza de tipo seco.
No utilice un cassette de limpieza de tipo húmedo. Podría dañar los cabezales del vídeo. (Consulte la página 57)
Apagado automático del modo STANDBY (ESPERA)
Con el fin de evitar un mayor desgaste de la cinta y del cabezal, su videocámara se apagará automáticamente si se deja en modo STANDBY (ESPERA) sin funcionar más de 5 minutos.
7

|
|
|
|
|
|
|
|
|
|
|
|
|
|
|
|
|
|
|
|
|
|
|
|
ENGLISH |
|
|
|
|
|
|
|
|
|
|
|
|
|
|
|
|
|
ESPAÑOL |
|
||||
Getting to Know Your Camcorder |
|
Conozca su videocámara |
|
|
|||||||||||||||||||
|
|
|
|
|
|
|
|
|
|
|
|
|
|
|
|
||||||||
Features |
|
|
Características |
|
|||||||||||||||||||
Your camcorder has many features for recording and playing back. |
|
Su videocámara incluye una gran variedad de características para la |
|||||||||||||||||||||
|
|
|
|
|
|
|
|
|
|
|
|
grabación y la reproducción. |
|||||||||||
Snap Shot (SCL630/L650 only) |
|
|
|
||||||||||||||||||||
|
|
|
|
|
|
|
|
|
|
|
|
|
|
||||||||||
The Snap Shot function lets you record an object at a standstill for a limited |
|
Filmación instantánea (sólo SCL630/L650) |
|
|
|
||||||||||||||||||
time in Camera mode. (see page 48) |
|
La función de filmación instantánea le permite filmar un objeto en un imagen |
|||||||||||||||||||||
|
|
|
|
|
|
|
|
|
|
|
|
fija durante un tiempo limitado en el modo Cámara. (Consulte la página 48) |
|||||||||||
PIP (SCL630/L650 only) |
|
|
|
|
|
|
|
||||||||||||||||
|
|
|
|
|
|
|
|
|
|
|
|
|
|
|
|||||||||
The PIP function shows where the center of the image is while recording in |
|
PIP (sólo SCL630/L650) |
|
|
|
|
|
|
|
|
|||||||||||||
|
La función PIP muestra dónde se encuentra el centro de la imagen mientras |
||||||||||||||||||||||
Digital Zoom of the Camera mode. (see page 47) |
|
||||||||||||||||||||||
|
|
|
|
|
|
|
|
|
|
|
|
se filma en Zoom Digital del modo Cámara. (Consulte la página 47) |
|||||||||||
BLC |
|
|
|
|
|
|
|
|
|
|
|
|
|
|
|
||||||||
BLC |
|
|
|
|
|
|
|
|
|
|
|
||||||||||||
When you record a subject with the light source behind the subject or a |
|
|
|
|
|
|
|
|
|
|
|
|
|||||||||||
|
Cuando filme con la fuente de luz detrás del motivo o un motivo con luz de |
||||||||||||||||||||||
subject with a light background, use the BLC function. (see page 37) |
|
||||||||||||||||||||||
|
fondo, utilice la función BLC. (Consulte la página 37) |
||||||||||||||||||||||
|
|
|
|
|
|
|
|
|
|
|
|
||||||||||||
DSE (Digital Special Effects) |
|
|
|
|
|
|
|
|
|
|
|
|
|
|
|
||||||||
DSE (Efectos especiales digitales) |
|
|
|
|
|
|
|||||||||||||||||
The DSE enables you to give a creative look to your films by adding various |
|
|
|
|
|
|
|
||||||||||||||||
|
La función DSE permite añadir efectos especiales a sus grabaciones |
||||||||||||||||||||||
special effects. (see page 40) |
|
||||||||||||||||||||||
|
consiguiendo así una apariencia más creativa. (Consulte la página 40) |
||||||||||||||||||||||
|
|
|
|
|
|
|
|
|
|
|
|
||||||||||||
Program AE (Auto Exposure) |
|
|
|
|
|
|
|
|
|
|
|
|
|
|
|
||||||||
Program AE (Exposición automática) |
|
|
|
|
|
||||||||||||||||||
The Program AE enables you to adapt the shutter speed and aperture to the |
|
|
|
|
|
|
|||||||||||||||||
|
El Programa AE permite adaptar la velocidad y abertura del obturador al |
||||||||||||||||||||||
type of scene to be filmed. |
|
||||||||||||||||||||||
|
tipo de escena que se va a filmar. (Consulte la página 38) |
||||||||||||||||||||||
(see page 38) |
|
||||||||||||||||||||||
|
|
|
|
|
|
|
|
|
|
|
|
|
|||||||||||
|
|
|
|
|
|
|
|
|
|
|
|
DIS (sólo SCL630/L650) |
|
|
|
|
|
||||||
DIS (SCL630/L650 only) |
|
|
|
|
|
|
|
|
|
|
|
|
|
|
|||||||||
|
|
|
|
|
Esta función permite compensar la inestabilidad de las imágenes ocasiona- |
||||||||||||||||||
The DIS compensates for unstable images caused by hand shake, |
|
||||||||||||||||||||||
|
da por el movimiento de la mano, especialmente en caso de gran aumento. |
||||||||||||||||||||||
particularly at high magnification. |
|
||||||||||||||||||||||
|
(Consulte la página 35) |
||||||||||||||||||||||
(see page 35) |
|
||||||||||||||||||||||
|
|
|
|
|
|
|
|
|
|
|
|
|
|||||||||||
|
|
|
|
|
|
|
|
|
|
|
|
Lente de Zoom de alta proporción 22x |
|
|
|
||||||||
22x High ratio zoom lens |
|
|
|
|
|
|
|
|
|
|
|||||||||||||
|
|
|
|
|
El zoom es una técnica de filmación que permite cambiar el tamaño del |
||||||||||||||||||
Zooming is a recording technique that lets you change the size of the subject |
|
||||||||||||||||||||||
|
motivo en la escena. |
||||||||||||||||||||||
in the picture. |
|
||||||||||||||||||||||
|
Para grabaciones de tipo más profesional utilice la función zoom. |
||||||||||||||||||||||
For more professional recordings, use the zoom function. (see page 30) |
|
||||||||||||||||||||||
|
(Consulte la página 30) |
||||||||||||||||||||||
|
|
|
|
|
|
|
|
|
|
|
|
||||||||||||
Digital Zoom |
|
|
|
|
|
|
|
|
|
|
|
|
|
|
|
|
|
|
|
||||
Zoom digital |
|
|
|
|
|
|
|
|
|
||||||||||||||
Zooms more than 22x are performed digitally. (see page 31) |
|
|
|
|
|
|
|
|
|
|
|||||||||||||
|
El zoom mayor de 22x se consigue digitalmente. (Consulte la página 31) |
||||||||||||||||||||||
|
|
|
|
|
|
|
|
|
|
|
|
||||||||||||
Macro |
|
|
|
|
|
|
|
|
|
|
|
|
|
|
|
|
|
|
|
|
|||
Macro |
|
|
|
|
|
|
|
|
|
|
|||||||||||||
The macro function allows you to record your subject at close range. |
|
|
|
|
|
|
|
|
|
|
|
||||||||||||
|
La función macro permite filmar un objeto a corta distancia. Es necesario |
||||||||||||||||||||||
You have to adjust the zoom fully wide for macro recording. (see page 30) |
|
||||||||||||||||||||||
|
utilizar el zoom de amplitud máxima para poder grabar con macro. |
||||||||||||||||||||||
|
|
|
|
|
|
|
|
|
|
|
|
||||||||||||
|
|
|
|
|
|
|
|
|
|
|
|
(Consulte la página 30) |
|||||||||||
8 |
|
|
|
|
|
|
|
|
|
|
|
|
|
|
|
|
|
|
|
|
|
|
|
|
|
|
|
|
|
|
|
|
|
|
|
|
|
|
|
|
|
|
|
|
|
|
|

|
|
|
|
|
|
|
|
|
|
|
ENGLISH |
|
|
|
|
|
|
ESPAÑOL |
|
|
Getting to Know Your Camcorder |
|
|
Conozca su videocámara |
|||||
|
|
|
|
|
|
|
|
|
|
|
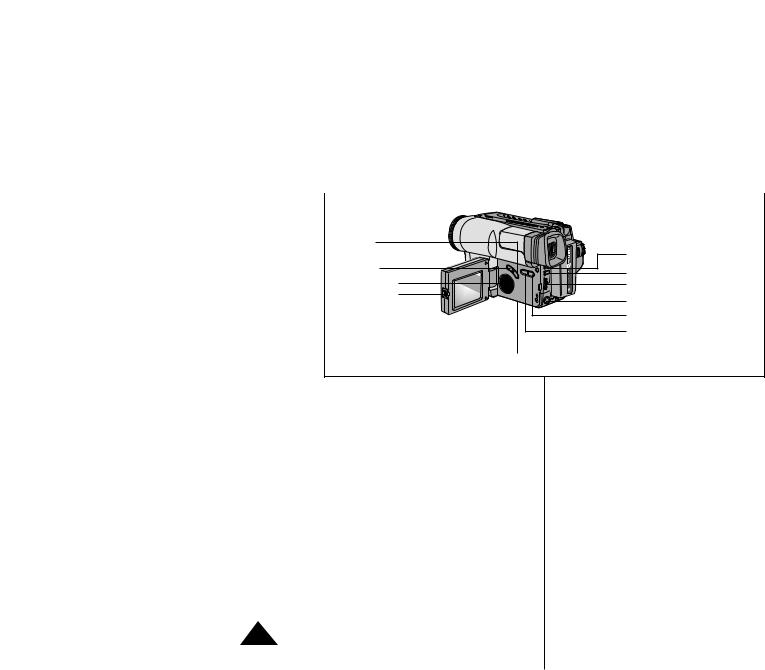
Front View |
|
|
Vista Frontal |
|
||||
|
|
|
|
|
|
|
|
|
|
3. PLAY/STILL (LIGHT)
2. EDIT  (REW)
(REW)
6. TAPE EJECT
13. VIDEO LIGHT
1. LENS
9. Remote Sensor
8. MIC
4.EDIT  (FF)
(FF)
5.DATE/TIME (STOP)
7.EVF (CVF for SCL650)
10.LCD
11.CUSTOM
12.EASY
1.Lens (see page 63)
2.EDIT  (REW)
(REW)
EDIT  works in STANDBY mode. (see page 24)
REW works in PLAYER mode. (see page 54)
3.PLAY/STILL (LIGHT) (see page 53)
PLAY/STILL works in PLAYER mode.
LIGHT works in CAMERA mode.
4.EDIT  (FF)
(FF)
EDIT  works in STANDBY mode. (see page 24)
FF works in PLAYER mode. (see page 54)
5.DATE/TIME (STOP)
DATE/TIME works in CAMERA mode. (see page 42)
STOP works in PLAYER mode. (see page 53)
6.TAPE EJECT (see page 22)
Use when ejecting the tape.
7.EVF (Electronic Viewfinder) (CVF for SCL650)
8.MIC
MIC works in CAMERA mode.
9.Remote Sensor (SCL650 only)
10.LCD (see page 26)
11.CUSTOM
CUSTOM works in CAMERA mode.
12.EASY
EASY works in CAMERA mode.
13.VIDEO LIGHT
1.Lente (Consulte la página 63)
2.EDIT  (REW)
(REW)
EDIT  funciona en el módo STANDBY.
(Consulte la página 24) REW funciona en el modo
PLAYER. (Consulte la página 54)
3.PLAY/STILL (LIGHT) (Consulte la página 53)
PLAY/STILL funciona en el modo PLAYER.
LIGHT funciona en el modo CAMERA.
4.EDIT  (FF)
(FF)
EDIT  funciona en el modo STANDBY. (Consulte la página 24) FF funciona en el modo PLAYER. (Consulte la página 54)
5.DATE/TIME (STOP)
DATE/TIME funciona en el modo CAMERA. (Consulte la página 42) STOP funciona en el modo PLAYER. (Consulte la página 53)
6.TAPE EJECT (Consulte la página 22)
Utilice esta función para extraer la cinta.
7.EVF (Visor Electrónico, CVF: SCL650)
8.MIC
MIC funciona en el modo CAMERA.
9.Sensor de mando a distancia (sólo SCL650)
10.LCD (Consulte la página 26)
11.CUSTOM
CUSTOM funciona en el modo CAMERA.
12.EASY
EASY funciona en el modo CAMERA.
13.VÍDEO LIGHT
9
|
|
|
|
|
|
|
|
|
ENGLISH |
|
|
|
|
|
|
ESPAÑOL |
|
Getting |
to Know Your Camcorder |
|
Conozca su videocámara |
|
|
|||
|
|
|
|
|
|
|
||
|
|
|
|
|
|
|||
Side View |
|
|
Vista lateral |
|
||||
|
|
|
|
|
|
|
|
|
24.BLC
23.FADE
20.SPEAKER
22.LCD Open
14. MENU ON/OFF |
15. ENTER (MF) |
16. UP/DOWN Dial (VOLUME) |
17. S-VIDEO out |
18. P.AE |
19. DSE |
21. Lithium Battery
14.MENU ON/OFF (see page 26)
MENU ON/OFF works in CAMERA and PLAYER mode.
15.ENTER (MF) (see page 26)
ENTER works in MENU mode. MF works in CAMERA mode.
16.UP/DOWN dial (VOLUME)
UP/DOWN dial works in MENU mode. (see page 26)
VOLUME works in PLAYER mode. (see page 55)
17.S-VIDEO out
18.PROGRAM AE (see page 38)
PROGRAM AE (Auto Exposure) works in CAMERA mode.
10
19.DSE (see page 40)
DSE works in CAMERA and PLAYER mode.
20.SPEAKER (see page 55)
Speaker works in PLAYER mode.
21.Lithium Battery (see page 17)
22.LCD open
23.FADE (see page 46)
FADE works in CAMERA mode.
24.BLC (see page 37)
BLC works in CAMERA mode
14.MENU ON/OFF (Consulte la página 26)
MENU ON/OFF funciona sólo en los modos CAMERA y PLAYER.
15.ENTER (MF) (Consulte la página 26)
ENTER funciona en el modo MENU. MF funciona en el modo CAMERA.
16.UP/DOWN Disco selector/ VOLUME
El disco selector UP/DOWN funciona en el modo MENU. (Consulte la página 26)
VOLUME funciona en el modo PLAYER. (Consulte la página 55)
17.Salida a S-VÍDEO (Consulte la página 53)
18.PROGRAMA AE (Consulte la página 38)
PROGRAMA AE (Exposición Automática) funciona en el modo CAMERA.
19.DSE (Consulte la página 40)
DSE funciona en el modo CAMERA y PLAYER.
20.Altavoz (Consulte la página 55)
Speaker funciona en el modo PLAYER.
21.Batería de litio (Consulte la página 17)
22.LCD abierta
23.FADE
FADE funciona en el modo CAMERA. (Consulte la página 46)
24.BLC (Consulte la página 37)
BLC funciona en el modo CAMERA.
ENGLISH |
ESPAÑOL |
|
Getting to Know Your Camcorder |
Conozca su videocámara |
|
Rear View |
Vista trasera |
|
25. ZOOM |
|
|
36. BATTERY EJECT |
26. CASSETTE |
|
|
Compartment |
|
27. Hooks for shoulder strap |
|
|
28. AUDIO/VIDEO Out |
37. SNAP SHOT/D.ZOOM |
|
|
||
32. START/STOP |
33. External MIC |
|
(SCL630/L650) |
||
35. Battery Pack Compartment |
||
|
||
38. Recharging Indicator |
29. LENS Cap |
|
34. DC Jack |
30. Hand Strap |
|
31. POWER Switch |
||
25.ZOOM (see page 30)
26.Cassette Compartment
27.Hooks for Shoulder Strap (see page 17)
28.AUDIO/VIDEO out (see page 52)
29.LENS Cap
30.Hand Strap (see page 16)
31.POWER Switch (see page 18)
-CAMERA : Select to record.
-OFF : Select to turn off the camcorder.
-PLAYER : Select to playback.
32.START/STOP (see page 23)
START/STOP works in CAMERA mode.
33.External MIC (see page 63)
34.DC Jack (see page 18)
35.Battery Pack Compartment (see page 19)
36.BATTERY EJECT
37.SNAP SHOT/D.ZOOM
SNAP SHOT works in CAMERA mode. (SCL630/L650 only,
see page 48)
D.ZOOM works in CAMERA mode. (SCL610 only, see page 32)
38.Recharging Indicator (see page 19)
25.ZOOM (Consulte la página 30)
26.Soporte del videocasete
27.Gancho para la correa del hombro (Consulte la página 17)
28.Salida de AUDIO/VÍDEO (Consulte la página 52)
29.Tapa de LENS
30.Correa para mano (Consulte la página 16)
31.Interruptor POWER (Consulte la página 18)
- CAMERA: Seleccionar para
filmar.
-OFF: Seleccionar para apagar la videocámarma.
-PLAYER: Seleccionar para
reproducir.
32.START/STOP (Consulte la página 23)
START/STOP funciona en el modo CAMERA.
33.MIC externo (Consulte la página 63)
34.Salida de DC (Consulte la página 18)
35.Compartimiento de la batería (Consulte la página 19)
36.BATTERY EJECT
37.SNAP SHOT/D.ZOOM
SNAP SHOT funciona en el modo CAMERA. (sólo SCL630/ L650, Consulte la página 48) D.ZOOM funciona en el modo CAMERA. (sólo SCL610, Consulte la página 32)
38.Indicador de la carga (Consulte la página 19)
11
|
|
|
|
|
|
|
ENGLISH |
|
|
|
|
ESPAÑOL |
|
Getting |
to Know Your Camcorder |
|
|
Conozca su videocámara |
|
|
|
|
|
|
|
|
|
|
|
|
|
|
|
|
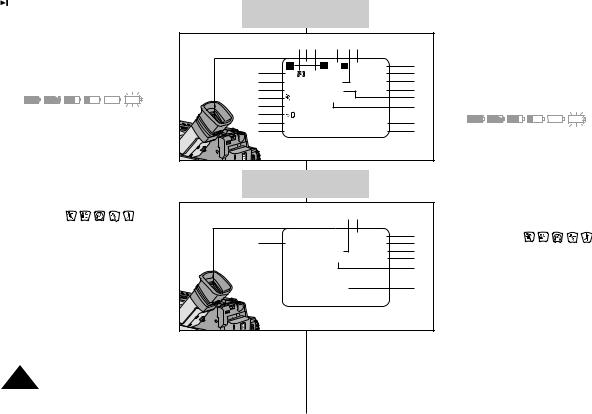
OSD (On Screen Display) |
|
|
OSD (Visualizador en pantalla) |
|
||
You can turn the OSD on/off by setting the Display menu on/off. |
|
|
Usted puede activar/desactivar el OSD en el menu Display on/off. |
|||
The TITLE, DATE/TIME, EASY and CUSTOM functions can be |
|
|
Las funciones TITLE, DATE/TIME, EASY y CUSTOM pueden ser |
|||
operated even after the OSD is turned off. |
|
|
usadas incluso con el OSD desactivado. |
|||
The OSD is displayed in the viewfinder and the LCD monitor. |
|
|
El OSD aparece tanto en el visor como en el monitor LCD. |
|||
|
|
|
|
|
|
|
a. |
Zoom position (see page 30) |
OSD in CAMERA mode |
|
|
a. |
Posición del zoom |
|
|
|
|
||||||||||
|
Indicates zoom position. |
|
|
|
|
|
(Consulte la página 30) |
|
|
|
||||||||||
b. |
DIS (SCL630/L650 only) |
|
|
|
|
|
|
|
|
|
Indica la posición del zoom. |
|
|
|||||||
|
|
b a |
t |
s |
r q |
|
|
b. |
DIS (sólo SCL630/L650) |
|
|
|
||||||||
|
(see page 35) |
|
|
|
|
|
|
|
|
|
|
|||||||||
|
|
|
|
|
|
|
|
|
(Consulte la página 35) |
|
|
|
||||||||
|
Indicates DIS is activated. |
|
|
|
|
|
|
|
|
|
|
|
|
|||||||
|
|
|
W |
TT |
500 x |
|
|
p |
|
Indica que se está activando el DIS. |
||||||||||
|
|
|
|
|
|
|
|
Hi8 |
REC |
|
||||||||||
|
|
|
|
|
|
|
|
|
|
|
|
|
|
|
||||||
c. |
Battery level (see page 21) |
|
c |
M.FOCUS |
XX |
DEW |
|
0:00:00 |
o |
c. |
Nivel de batería. |
|
|
|
|
|
||||
|
Indicates the power left in the battery. |
d |
|
|
EASY |
x |
|
(Consulte la página 21) |
|
|
|
|||||||||
|
e |
BLC |
|
TAPE |
|
CINEMA |
m |
|
|
|
|
|||||||||
|
( |
|
|
|
|
) |
f |
|
|
PICNIC |
|
|
l |
|
Indica la energía sobrante de la |
|
||||
|
|
|
|
|
|
|
n |
INDOOR |
|
|
|
|
k |
|
batería. |
|
|
|
|
|
d. |
Manual Focus (see page 36) |
y |
|
|
|
|
|
j |
|
( |
|
|
|
|
) |
|||||
g |
WAIT-10S |
|
|
|
12:00 AM |
|
|
|
|
|
||||||||||
|
Indicates manual focus is on. |
h |
SELF-30S |
|
|
AUG. 29, 2001 |
i |
d. |
Enfoque manual |
|
|
|
|
|
||||||
|
Auto Focus is not displayed. |
|
|
|
|
|
|
|
|
|
|
|
|
|
||||||
|
|
|
|
|
|
|
|
|
|
(Consulte la página 36) |
|
|
|
|||||||
e. |
BLC (see page 37) |
|
|
|
|
|
|
|
|
|
|
|
Indica que el enfoque manual está en |
|||||||
|
|
|
|
|
|
|
|
|
|
|
funcionamiento. |
|
|
|
|
|
||||
|
Indicates BLC is activated. |
|
|
|
|
|
|
|
|
|
|
|
|
|
|
|||||
|
|
|
in PLAYER mode |
|
|
|
No muestra el enfoque automático. |
|||||||||||||
f. |
Program AE (see page 38) |
|
|
|
|
e. |
BLC (Consulte la página 37) |
|
|
|||||||||||
|
|
|
|
|
|
|
|
|
|
|||||||||||
|
Indicates Program AE mode is |
|
|
|
|
|
|
|
|
Indica que está funcionando el BLC. |
||||||||||
|
activated. ( |
, |
, |
, |
, |
) |
|
|
|
|
r q |
|
|
f. |
Programa AE (Consulte la página 38) |
|||||
g. |
Self record waiting timer. |
|
|
|
|
|
|
|
p |
|
Indica que está activado el modo |
|||||||||
|
|
|
|
|
Hi8 |
PLAY |
|
Programa AE. ( |
, |
, |
, |
, |
) |
|||||||
|
(SCL650 only) (see page 15) |
c |
|
|
DEW |
|
0:00:25 |
o |
g. |
Temporizador de espera automático. |
||||||||||
|
Indicates 10 second timer. |
|
|
|
|
|
Z.RTN |
u |
||||||||||||
|
|
|
|
|
TAPE |
|
CINEMA |
v |
|
(sólo SCL650) (Consulte la página 15) |
||||||||||
|
|
|
|
|
|
|
|
|
|
|
|
|||||||||
h. |
Self record recording timer. |
|
|
|
|
|
|
l |
|
Temporizador configurado en 10 |
||||||||||
|
|
|
|
|
|
|
|
|||||||||||||
|
|
|
|
|
|
w |
|
segundos. |
|
|
|
|
|
|||||||
|
(SCL650 only) (see page 15) |
|
|
VOLUME |
|
h. |
Temporizador de filmación |
|
|
|||||||||||
|
(30 seconds or END). |
|
|
|
|
|
|
|
|
|
|
|
||||||||
|
|
|
|
|
|
|
|
|
|
|
automático. (sólo SCL650) |
|
|
|||||||
|
|
|
|
|
|
|
|
|
|
|
|
|
|
|
|
|
||||
i. |
Date (see page 42) |
|
|
|
|
|
|
|
|
|
|
|
(Consulte la página 15) |
|
|
|
||||
|
|
|
|
|
|
|
|
|
|
|
(30 segundos o END). |
|
|
|
||||||
|
Indicates the date of the recording. |
|
|
|
|
|
|
|
|
|
|
|
||||||||
|
|
|
|
|
|
|
|
|
|
|
|
|
|
|
||||||
|
|
|
|
|
|
|
|
|
|
|
|
|
|
i. |
Fecha (Consulte la página 42) |
|
||||
|
|
|
|
|
|
|
|
|
|
|
|
|
|
|
Indica la fecha de la filmación. |
|
||||
12

|
|
|
|
|
|
|
|
|
|
|
|
ENGLISH |
|
|
|
|
|
ESPAÑOL |
|
||
|
Getting to Know Your Camcorder |
|
|
Conozca su videocámara |
|
|
||||
|
|
|
|
|
|
|
|
|
||
|
OSD (On Screen Display) |
|
|
OSD (Visualizador en pantalla) |
|
|
||||
|
j. |
Time (see page 42) |
|
|
j. |
Hora (Consulte la página 42) |
|
|
||
|
|
Indicates the time you are recording. |
|
|
|
Indica la hora de la filmación. |
|
|
||
|
k. |
Title (see page 44) |
|
|
k. |
Título (Consulte la página 44) |
|
|
||
|
|
Indicates the recorded title you have set. |
|
|
|
Indica el título de la grabación. |
|
|
||
|
|
It is superimposed on the scene. |
|
|
|
Aparece sobre impreso en la escena. |
|
|
||
|
l. |
Self diagnosis (see page 59) |
|
|
l. |
Auto diagnóstico (Consulte la página 59) |
|
|
||
|
|
(TAPE, TAPE END) Checks the operation of the Camcorder. |
|
|
|
(TAPE, TAPE END) Controla la operación de la videocámara. |
|
|
||
|
m. DSE (Digital Special Effect) (see page 40) |
|
|
m. DSE (Efectos especiales digitales) (Consulte la página 40) |
|
|
||||
|
|
Indicates the DSE mode is activated. |
|
|
|
Indica que el modo DSE está activado. |
|
|
||
|
|
The operation modes are GHOST, STROBE, SEPIA, B/W, NEG., |
|
|
|
Los modos de funcionamiento son GHOST, STROBE, SEPIA, B/W, |
||||
|
|
MIRROR, ART, MOSAIC, WIDE (16:9) and CINEMA. |
|
|
|
NEG., MIRROR, ART, MOSAIC, WIDE (16:9) y CINEMA. |
|
|
||
|
n. |
White Balance mode (see page 49) |
|
|
n. |
Modo de balance de blanco (Consulte la página 49) |
|
|
||
|
|
Indicates the White Balance mode is activated. |
|
|
|
Indica que está activado el modo de balance de blancos. |
|
|
||
|
|
The White Balance modes are AUTO, INDOOR and OUTDOOR. |
|
|
|
Los modos de balance de blanco son AUTO, INDOOR y OUTDOOR. |
||||
|
o. |
Tape counter |
|
|
o. |
Contador de cinta |
|
|
||
|
|
Indicates amount of the tape used. |
|
|
|
Indica la cantidad de cinta utilizada. |
|
|
||
|
p. |
Operation mode |
|
|
p. |
Modo de funcionamiento |
|
|
||
|
|
Indicates the operation mode is activated. |
|
|
|
Indica el modo de funcionamiento activado. |
|
|
||
|
|
The operation modes are STBY, REC, STOP, PLAY, FF, REW, |
|
|
|
Los modos de funcionamiento son STBY, REC, STOP, PLAY, FF, |
|
|
||
|
|
EJECT. |
|
|
|
REW, EJECT. |
|
|
||
|
q. |
Hi8 (see page 53) |
|
|
q. |
Hi8 (Consulte la página 53) |
|
|
||
|
|
Indicates you are using Hi8 tape when recording or playing back. |
|
|
|
Indica que se está utilizando una cinta Hi8 en la filmación o |
|
|
||
|
r. |
DEW condensation (see page 62) |
|
|
|
reproducción. |
|
|
||
|
|
Monitors the moisture condensation. |
|
|
r. |
Condensación DEW (Consulte la página 62) |
|
|
||
|
s. |
Digital zoom (see page 31) |
|
|
|
Controla la condensación de humedad. |
|
|
||
|
|
Indicates digital zoom is activated. |
|
|
s. |
Zoom digital (Consulte la página 31) |
|
|
||
|
t. |
Snap Shot (see page 48) |
|
|
|
Indica que el zoom digital está funcionando. |
|
|
||
|
|
Indicates the time left during Snap Shot Recording. |
|
|
t. |
Filmación instantánea (Consulte la página 48) |
|
|
||
|
u. |
Zero return (SCL650 only) (see page 54) |
|
|
|
Indica el tiempo que queda de filmación instantánea. |
|
|
||
|
|
Indicates that the zero return is activated. |
|
|
u. |
Retorno a cero (sólo SCL650) (Consulte la página 54) |
|
|
||
|
v. |
PB DSE (see page 55) |
|
|
|
Indica que está activado el retorno a cero. |
|
|
||
|
|
Shows that the PB DSE mode is active. |
|
|
v. |
PB DSE (ver pag. 55) |
|
|
||
|
w. VOLUME (see page 55) |
|
|
|
Muestra que el modo PB DSE esta activo. |
|
|
|||
|
x. |
EASY & CUSTOM |
|
|
w. VOLUME (Consulte la página 55) |
|
|
|||
|
|
Shows when the easy or custom mode is active. |
|
|
x. |
EASY & CUSTOM |
|
|
||
|
y. |
LIGHT |
|
|
|
Muestra que los modos EASY o CUSTOM estan activos. |
|
|
||
|
|
Shows when the Light is switched on. |
|
|
y. |
LIGHT |
|
|
||
|
|
|
|
|
|
|
Muestra que el modo LIGHT esta activo. |
13 |
|
|
|
|
|
|
|
|
|
|
|
|
|
|
|
|
|
|
|
|
|
|
|
|
ENGLISH |
|
|
|
ESPAÑOL |
|
|
Getting |
to Know Your Camcorder |
|
Conozca su videocámara |
|
|
|
|
|
|
|
|
|
|
|
|
|
|
|
|
|
Accessories Supplied with Camcorder |
|
Accesorios suministrados con la videocámara |
|
|||
Make sure that the following basic accessories are supplied with your |
|
Asegúrese de que recibe con su videocámara los siguientes accesorios. |
||||
camcorder. |
|
|
|
|
|
|
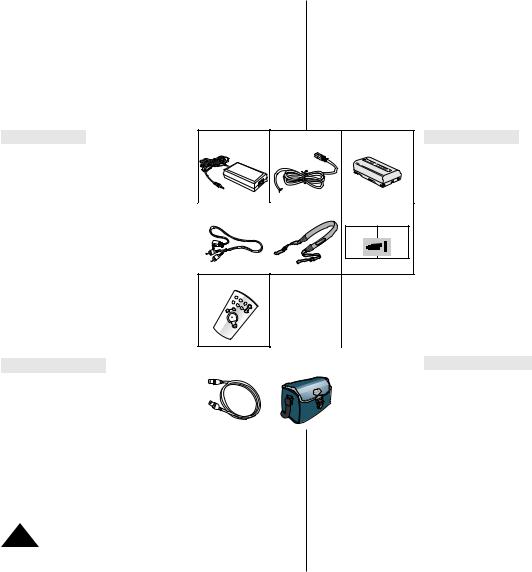
Basic Accessories |
1. AC Power Adapter |
2. AC cord |
3. Battery Pack |
Accesorios básicos |
|||
1. |
AC Power Adapter. (see page 18) |
|
|
|
|
1. |
Adaptador de corriente AC. |
2. |
AC cord. (see page 18) |
|
|
|
|
|
(Consulte la página 18) |
3. |
Battery Pack. (see page 19) |
|
|
|
|
2. |
Cable DC. (Consulte la página 18) |
4. |
Audio/Video Cable. (see page 52) |
|
|
|
|
3. |
Batería. (Consulte la página 19) |
5. |
Shoulder strap. (see page 17) |
|
|
|
|
4. |
Cable Audio/Vídeo. |
6. |
Instruction Book. |
4. AUDIO/VIDEO Cable |
5. Shoulder Strap |
6. Instruction Book |
|
(Consulte la página 52) |
|
7. |
Remote Control. (see page 15) |
|
|
Video Camcorder |
Videocámara |
5. |
Correa de hombro. |
|
(SCL650 only) |
|
|
8mm |
8mm |
|
(Consulte la página 17) |
|
|
|
COLOR LCD |
PANTALLA LCD DE COLOR |
|
||
8. |
Lithium Battery for Remote Control. |
|
|
|
|
6. |
Manual de instrucciones. |
|
(see page 15) (SCL650 only) |
|
|
|
|
7. |
Mando a distancia. |
|
Lithium Battery for Clock. |
|
|
|
|
|
(Consulte la página 15) (SCL650) |
|
(TYPE: CR2025, see page 17) |
7. Remote Control |
8. Lithium Batteries |
|
|
8. |
Batería Lithium para el Control Remoto. |
|
|
|
|
|
|||
|
|
|
|
|
|
|
(Consulte la página 15) (SCL650) |
|
|
|
|
|
|
|
Batería de litio para el reloj. |
|
|
|
|
|
|
|
(TYPE: CR2025, Consulte la página 17) |
Optional Accessories
9.S-VIDEO cable. (see page 53)
10.Carrying Case.
|
|
|
9. S-VIDEO cable |
10. Carrying Case |
|
|
|
|
Accesorios opcionales
9.Cable S-VÍDEO. (Consulte la página 53)
10.Estuche.
Note: Optional accessories may be included with the camcorder, depending on the country in which it is purchased.
Nota: Los accesorios opcionales pueden ir incluídos con la videocámara dependiendo del país donde se compre.
14
|
ENGLISH |
|
|
|
ESPAÑOL |
|
|
Getting to Know Your Camcorder |
|
Conozca su videocámara |
|||
|
|
|
|
|
|
|
|
Remote Control (SCL650 only) |
|
Mando a distancia (SCL650) |
|
||
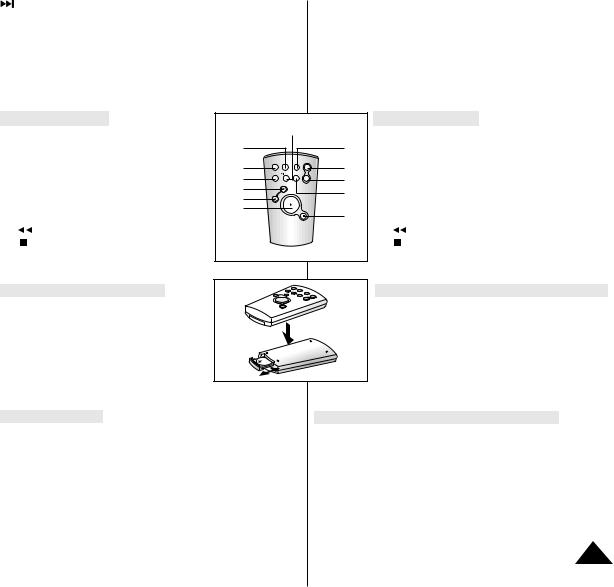
Description of Buttons |
|
|
|
3 |
|
|
Descripción de partas |
||
1. |
Start/Stop (see page 23) |
|
|
|
|
|
1. |
Iniciar/Parar (Consulte la página 23) |
|
|
|
|
|
|
|
||||
2. |
Self Timer |
6 |
|
|
|
|
11 |
2. |
Temporizador Automático |
3. |
Still (see page 54) |
|
STOP |
DISPLAY |
RESET |
WIDE |
|
3. |
Imagen Fija (Consulte la página 54) |
|
|
|
START/ |
|
COUNTER |
|
|
|
|
4. |
WIDE (see page 30) |
1 |
TIMER |
STILL RETURN |
|
4 |
4. |
ÁNGULO GRANDE (Consulte la página 30) |
|
|
|
SELF |
|
ZERO |
|
|
|
||
5. |
TELE (see page 30) |
2 |
|
|
|
TELE |
5 |
5. |
TELE (Consulte la página 30) |
6. |
Display (see page 12) |
8 |
|
|
|
|
12 |
6. |
Visualizador (Consulte la página 12) |
7. |
(Play) (see page 53) |
9 |
|
|
|
|
|
7. |
(Reproducir) (Consulte la página 53) |
7 |
|
|
|
|
10 |
||||
8. |
(FF) (see page 54) |
|
|
|
|
|
8. |
FF (Avance rápido) (Consulte la página 54) |
|
9. |
(REW) (see page 54) |
|
|
|
|
|
|
9. |
REW (Rebobinado) (Consulte la página 54) |
10. |
(Stop) (see page 53) |
|
|
|
|
|
|
10. |
(Parar) (Consulte la página 53) |
11. |
Counter Reset (see page 54) |
|
|
|
|
|
|
11. |
Counter Reset (Consulte la página 54) |
12. |
Zero Return (see page 54) |
|
|
|
|
|
|
12. |
Zero Return (Consulte la página 54) |
Remote Control Battery Installation
You must insert or replace this battery when:
-You purchase the camcorder.
-The remote control doesn’t work.
Insert Lithium Battery, following the +
and - markings.
Be careful not to reverse the polarity of the battery.
Self Timer Recording
The Self Timer function on the remote control allows you to start and stop recording automatically.
Example: recording yourself
Two options are available
-WAIT-10S/SELF-30S: wait 10 seconds, followed by 30 seconds of recording.
-WAIT-10S/SELF-END: wait 10 seconds, followed by recording until you press the START/STOP button again.
Instalación de las baterías para el mando a distancia
Deberá introducir o cambiar estas baterías cuando:
-Compre su videocámara.
-El mando a distancia no funcione.
Insertar la batería de Litio segun las marcas + y -.
Tenga cuidado de no confundir la polaridad de la batería.
Filmación automática utilizando el mando a distancia
La función Temporizador automático con el mando a distancia le permite comenzar y terminar la grabación automáticamente.
Ejemplo: Escena con todos los miembros de su familia
Existen dos opciones
-WAIT-10S/SELF-30S: esperar 10 segundos y después filmar durante 30 segundos.
-WAIT-10S/SELF-END: esperar 10 segundos y después grabar hasta que vuelva a pulsar el botón START/STOP.
15
ENGLISH |
|
ESPAÑOL |
Preparing |
|
Configuración de la videocámara |
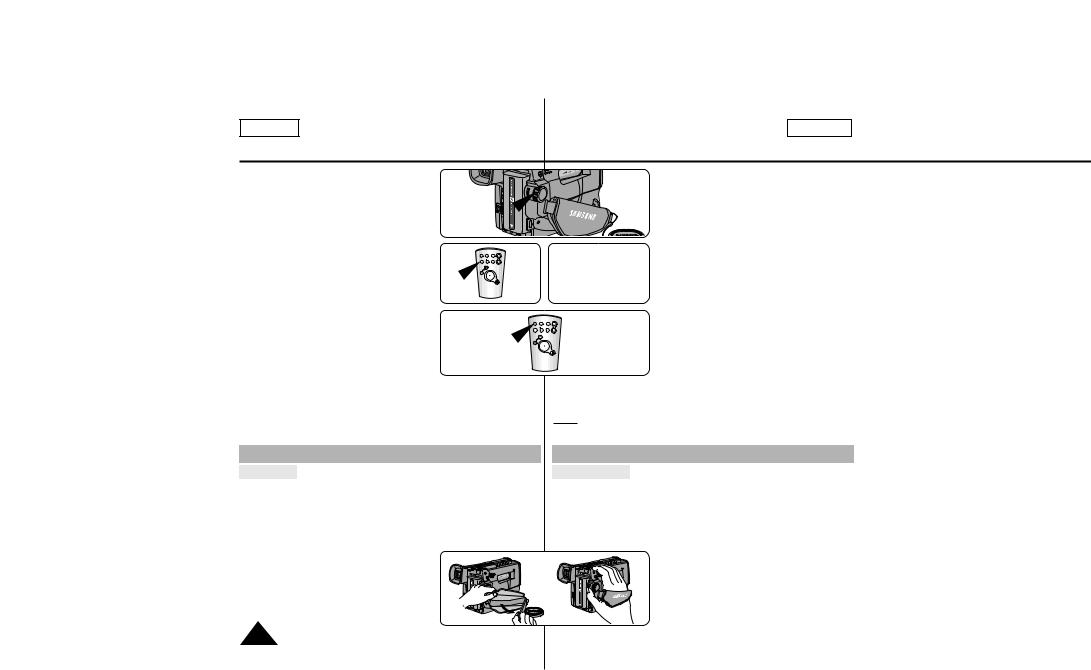
1. Set power switch to CAMERA mode. |
1 |
en |
|
|
|
|
CAMERA |
|
2.Press Self Timer button until the appropriate indicator is displayed on the LCD:
■WAIT-10S/SELF-30S
■WAIT-10S/SELF-END
3.Press START/STOP button to start the timer.
: After waiting for 10 seconds, recording starts.
: If you have selected SELF-30S, recording stops automatically after 30 seconds.
: If you have selected SELF-END, press you wish to stop recording.
Note: When recording with the timer, you can button again to cancel the function.
Adjusting the Hand Strap and Shoulder
Hand Strap
It is very important to adjust the hand
The hand strap enables you to:
-Hold the camcorder in a stable,
-Press the Zoom and the red Record to change the position of your hand.
1.Pull open the Hand Strap cover and release the Hand Strap, adjust its length and stick it back onto the Hand Strap cover.
2.Close the Hand Strap cover back up again.
Automático hasta que el indicador aparezca en la pantalla LCD:
■ WAIT-10S/SELF-30S
■ WAIT-10S/SELF-END
3. Pulse el botón START/STOP para que se ponga en funcionamiento el temporizador. : Tras 10 segundos de espera, comienza
la filmación
: Si ha seleccionado SELF-30S, la filmación se detendrá automáticamente después de 30 segundos.
SELF-END, pulse de nuevo el botón START/ desée terminar la filmación.
utilizando el temporizador, puede pulsar el botón segunda vez para cancelar la función.
de mano y de hombro
ajustar correctamente esta correa para resultados de filmación.
sujeción de mano le permite:
cámara en una postura cómoda y estable. Zoom y el botón de Grabación sin cambiar la
la mano.
1. Tire de la cubierta de la correa para abrirla y despegue la correa. Ajuste la longitud y vuelva a pegarla en la cubierta.
2. Cierre de nuevo la cubierta de la correa.
16
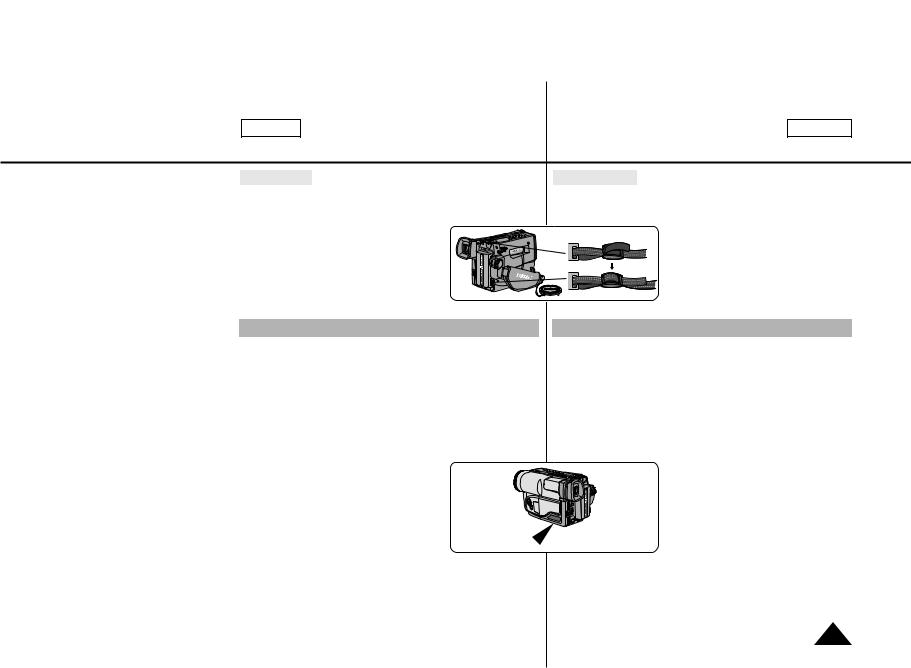
ENGLISH |
ESPAÑOL |
Preparing |
Configuración de la videocámara |
Shoulder Strap |
|
The Shoulder Strap allows you to carry your |
le permite llevar la cámara con total |
complete safety. |
|
1. Insert each end of the strap into the hooks |
en los |
on the camcorder. |
situados en la |
2. Put the end of each strap through the buckle, |
|
adjust the length of the strap, then pull it tight |
las hebillas, |
in the buckle . |
correa y tire |
|
hebilla. |
Lithium Battery Installation
The lithium battery maintains the clock function, title and preset contents of the memory; even if the battery pack or AC power adapter is removed.
The lithium battery for the camcorder lasts about 8~10 months under normal operation from the time of installation.
When the lithium battery becomes weak or dead, the date/time indicator flashes for about 5 seconds when you set the power switch to CAMERA.
When this occurs, replace the lithium battery with type CR2025.
1.Take out the holder from the lithium battery compartment.
2. Insert the  side of the lithium battery toward the bottom of the holder.
3.Reinsert the holder into the lithium battery compartment.
Note: If the holder is inserted in the wrong direction, it will not fit correctly.
Warning: Keep the LITHIUM BATTERY out of the reach of the children. Should the battery be swallowed, consult a doctor immediately.
Instalación de la batería de litio
La batería del litio mantiene la función del reloj y la memoria de contenidos de título y preconfiguración; incluso si se retiran la batería o el adaptador de corriente AC.
La batería de litio tiene una duración de 8 a 10 meses a partir del momento de su instalación con un funcionamiento normal.
Cuando la batería de litio se debilita o se descarga por completo, el indicador fecha/hora parpadea durante unos 5 segundos al colocar el interruptor de encendido en la posición CAMERA.
En ese caso, reemplace la batería de litio por otra del tipo CR2025.
1.Sacar el soporte del compartimiento de
la batería de litio.
2. Insertar el lado  de la batería de litio hacia el fondo del soporte.
3. Reinsertar el soporte en el compar timiento de la batería de litio.
Nota: Si el soporte se coloca en una posición incorrecta, no se ajustará correctamente.
Precaución: Mantenga la BATERÍA DE LITIO fuera del alcance de los niños. Si alguien traga la batería, consulte inmediatamente a un médico.
17

ENGLISH |
|
ESPAÑOL |
Preparing |
|
Configuración de la videocámara |
Connecting the Power Source |
|
Conexión a la fuente de energía |
There are two ways to connect power source. |
|
Existen dos formas diferentes de conectar la videocámara a la |
- Using the AC Power Adapter : used for indoor recording. |
fuente de energía. |
|
- Using the Battery Pack: used for outdoor recording. |
- Utilizando el Adaptador de corriente AC : para filmación en interiores. |
|
|
|
- Utilizando la Batería: para filmación en exteriores. |
To use the AC Power Adapter |
|
Uso del Adaptador de corriente AC |
1. Connect the AC Power Adapter to the AC cord. |
1 |
1. Conecte el adaptador de corriente AC |
|
|
al cable AC. |
2. Connect the AC cord to a wall socket. |
2 |
2. Enchufe el cable AC a la red eléctrica. |
Note: The plug and wall socket type may be |
|
Nota: El enchufe y la red eléctrica pueden ser |
different depending on regional conditions. |
|
diferentes dependiendo de la zona |
|
|
donde se encuentre. |
3.Connect the other end of the DC cable to DC jack of the camcorder.
3 |
3.Conecte el otro extremo del Cable DC o la salida de DC a la videocámara.
4. To set the camcorder to the CAMERA mode. |
4-a |
4. Para ajustar la videocámara en el modo |
|
a. Hold down the tab of the power switch and |
|
CAMERA. |
|
|
push the switch to CAMERA mode. |
CAMERA |
a. Mantenga pulsada la pestaña del interrup- |
b. |
Make sure that the Lens Cap is open. |
|
tor y empuje el interruptor a la posición |
c. Open the LCD monitor and make sure that |
|
CAMERA . |
|
|
b. Asegúrese de que la tapa del lente está |
||
|
the image appears in the LCD monitor. |
|
|
|
|
abierta. |
|
|
- The LCD monitor is turned on automatically when it’s |
||
|
c. Abra el monitor LCD y asegúrese de que |
||
|
opened more than 30 degrees. |
|
la imagen aparece en el monitor. |
|
|
|
- El monitor LCD se enciende automáti- |
Note: |
If the adapter is used next to a TV or the camcorder, it may |
camente cuando se abre más de 30 |
|
|
cause the TV or camcorder to emit noise. Move the adapter away |
grados. |
|
|
|
||
|
from the TV, camcorder or the antenna cable. |
|
Nota: Si el adaptador se utiliza junto a un televisor o a una videocámara, |
|
|
|
puede provocar que estos aparatos emitan un ruido. Aleje el adap- |
|
|
|
tador del televisor, la videocámara o el cable de la antena. |
18
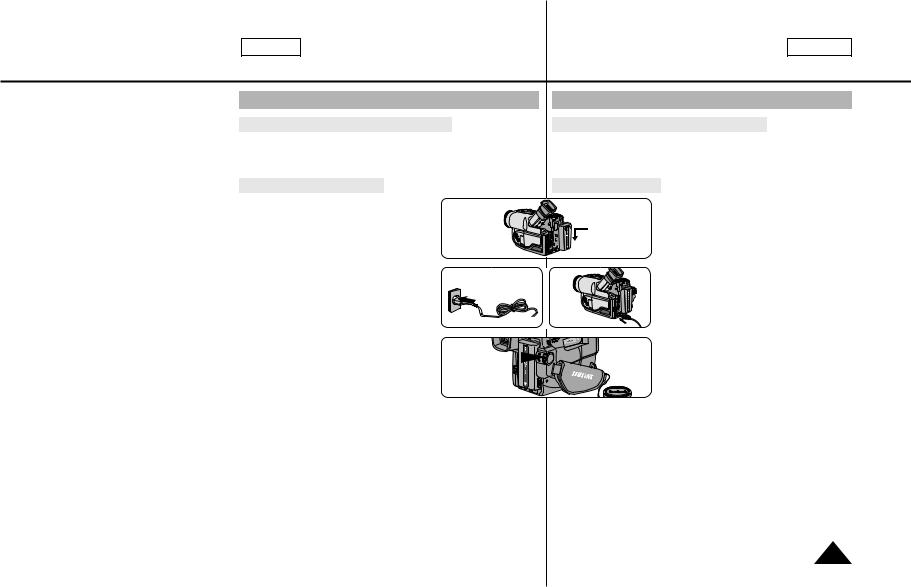
ENGLISH |
ESPAÑOL |
Preparing |
Configuración de la videocámara |
To use the Battery Pack |
|
How long will the battery last for recording? |
batería para filmar? |
Depends on how often you are likely to use |
se usan las lentes de zoom. |
recording. |
como sea posible. |
Recharging the Battery Pack |
|
1. Attach the battery pack to the camcorder. |
. |
1 |
|
2. Connect the AC Power Adapter to the AC |
2 |
3 |
2. Conecte el adaptador de corriente AC a un |
|
cord and connect the AC cord to a wall |
cable AC y conecte el cable a una toma de |
|||
|
|
|||
socket. |
|
|
pared. |
|
3. Connect the DC cable to the DC jack of |
|
|
3. Conecte el cable DC a un jack DC de la |
|
the camcorder. |
|
|
||
|
|
videocámara. |
||
|
|
|
||
4. Turn off the camcorder power, and the |
|
|
4. Apague la videocámara y el indicador de |
|
recharging indicator will start blinking and |
OFF |
|
recarga comenzará a parpadear y |
|
begin recharging. |
|
comenzará la carga. |
||
- Blinking once a second : Indicates |
|
|
- Parpadeo una vez por segundo: Indica |
|
|
|
que se ha cargado menos del 50%. |
||
less than 50% has been charged. |
|
|
||
|
|
- Parpadeo dos veces por segundo: |
||
- Blinking twice a second : Indicates |
|
|
||
|
|
Indica que se ha cargado el 50% ~ 75%. |
||
50% ~ 75% has been recharged. |
|
|
||
|
|
- Parpadeo tres veces por segundo: Indica que se ha cargado el |
||
- Blinking three times a second : Indicates 75% ~ 100% |
|
|||
|
75% ~ 100%. |
|||
has been recharged. |
|
|
- Se detiene el parpadeo y la luz es contínua: Se ha completado la |
|
- Blinking stops and stays on : Recharging has been completed. |
|
recarga. |
||
- On for a second and off for a second: Indicates there is an error. |
|
- Encendido y apagado cada segundo: Indica algún error. Vuelva a |
||
Reset the battery pack and DC cable. |
|
|
colocar la batería y el cable DC. |
|
5. If recharging is completed, separate the camcorder, AC power |
5. Si se ha completado la recarga, separe la videocámara, el adaptador |
|||
|
de corriente y la batería. |
|||
adapter, and battery pack. |
|
|
||
|
|
■ Incluso si se ha apagado la cámara, se descargará la batería. |
||
■ Even if the power is turned off, battery will be discharged. |
|
|||
|
|
|||
Note: Battery pack may be charged a little at the time of purchase. |
Nota: La batería puede estar parcialmente cargada en el momento de la |
|||
|
compra. |
|||
|
|
|
||
19
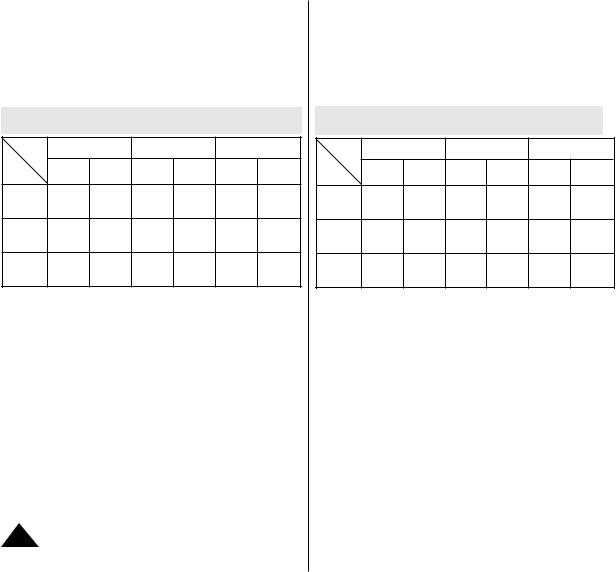
ENGLISH |
|
|
|
ESPAÑOL |
|
Preparing |
|
Configuración de la videocámara |
|||
|
|
|
|
||
Using the Battery Pack |
|
Uso de la batería |
|
||
Continuous recording time table based on model and |
Tabla de tiempo de grabación contínuo basada en el modelo |
|||||||||||||
|
|
|
battery type. |
|
|
y tipo de batería. |
|
|
|
|
|
|||
Model |
SCL610 |
SCL630 |
SCL650 |
Modelo |
SCL610 |
SCL630 |
SCL650 |
|||||||
Battery |
LCD ON, |
LCD OFF, |
LCD ON, |
LCD OFF, |
LCD ON, |
LCD OFF, |
Tipo de |
LCD ON, |
LCD OFF, |
LCD ON, |
LCD OFF, |
LCD ON, |
LCD OFF, |
|
Type |
EVF OFF |
EVF ON |
EVF OFF |
EVF ON |
EVF OFF |
EVF ON |
EVF OFF |
EVF ON |
EVF OFF |
EVF ON |
EVF OFF |
EVF ON |
||
batería |
||||||||||||||
|
|
|
|
|
|
|
|
|
|
|
|
|
||
|
Approx- |
Approx- |
Approx- |
Approx- |
Approx- |
Approx- |
|
Aproximada |
Aproximada |
Aproximada |
Aproximada |
Aproximada |
Aproximada |
|
SB-L110A |
imately |
imately |
imately |
imately |
imately |
imately |
SB-L110A |
mente 90 |
mente 130 |
mente 80 |
mente 120 |
mente 80 |
mente 110 |
|
|
90 minutes |
130 minutes |
80 minutes |
120 minutes |
80 minutes |
110 minutes |
|
minutos |
minutos |
minutos |
minutos |
minutos |
minutos |
|
|
Approx- |
Approx- |
Approx- |
Approx- |
Approx- |
Approx- |
|
Aproximada |
Aproximada |
Aproximada |
Aproximada |
Aproximada |
Aproximada |
|
SB-L160 |
imately |
imately |
imately |
imately |
imately |
imately |
SB-L160 |
mente 130 |
mente 190 |
mente 120 |
mente 170 |
mente 110 |
mente 160 |
|
|
130 minutes |
190 minutes |
120 minutes |
170 minutes |
110 minutes |
160 minutes |
|
minutos |
minutos |
minutos |
minutos |
minutos |
minutos |
|
|
Approx- |
Approx- |
Approx- |
Approx- |
Approx- |
Approx- |
|
Aproximada |
Aproximada |
Aproximada |
Aproximada |
Aproximada |
Aproximada |
|
SB-L320 |
imately |
imately |
imately |
imately |
imately |
imately |
SB-L320 |
mente 260 |
mente 390 |
mente 240 |
mente 340 |
mente 230 |
mente 320 |
|
|
260 minutes |
390 minutes |
240 minutes |
340 minutes |
230 minutes |
320 minutes |
|
minutos |
minutos |
minutos |
minutos |
minutos |
minutos |
|
The continuous recording times given in the table are approximate. |
Los tiempos de grabación contínuo incluídos en la tabla son |
Actual recording time depends on usage. |
aproximados. El tiempo real de grabación depende del uso. |
Notes: |
Notas: |
The battery pack should be recharged in a room temperature that is |
La batería debe recargarse a temperatura ambiente entre |
between 0°C(32°F) and 40°C(104°F). It should never be charged in |
0°C(32°F) y 40°C(104°F). Nunca la recargue a temperaturas por |
a room temperature that is below 0°C(32°F). |
debajo de 0°C(32°F). |
The life and capacity of the battery pack will be reduced if it is used |
Incluso si se ha recargado completamente, si la batería se usa con |
in temperatures below 0°C, even when it is fully recharged. |
temperaturas inferiores a de 0°C, se reducirá su vida útil. |
The life and capacity of the battery pack will be reduced if the bat- |
La vida útil y capacidad de la batería se reducirán si la batería se |
tery pack is left in temperatures above 40°C(104°F) for a long peri- |
deja a temperaturas por encima de 40°C(104°F) durante un perío- |
od, even when it is fully recharged. |
do prolongado de tiempo, incluso si se ha recargado completa- |
Do not put the battery pack near any heat source (fire or flames, for |
mente. |
example). |
No ponga la batería cerca de una fuente de calor (por ejemplo, |
Do not connect +/- of the battery pack. |
fuego o llamas). |
|
No conecte +/- de la batería. |
20
 Loading...