


Verizon Wireless
Network Extender for Business
User Manual
Please read this manual before operating your device, and keep it for future reference.
Intellectual Property
All Intellectual Property, as defined below, owned by or which is otherwise the property of Samsung or its respective suppliers relating to the SAMSUNG Device, including but not limited to, accessories, parts, or software relating there to (the “Network Extender for Business”), is proprietary to Samsung and protected under federal laws, state laws, and international treaty provisions. Intellectual Property includes, but is not limited to, inventions (patentable or unpatentable), patents, trade secrets, copyrights, software, computer programs, and related documentation and other works of authorship. You may not infringe or otherwise violate the rights secured by the Intellectual Property. Moreover, you agree that you will not (and will not attempt to) modify, prepare derivative works of, reverse engineer, decompile, disassemble, or otherwise attempt to create source code from the software. No title to or ownership in the Intellectual Property is transferred to you. All applicable rights of the Intellectual Property shall remain with SAMSUNG and its suppliers.
Samsung Telecommunications America (STA), LLC
Headquarters: |
Customer Care Center: |
1301 E. Lookout Drive |
1000 Klein Rd. |
Richardson, TX 75082 |
Plano, TX 75074 |
Toll Free Tel: |
1.888.987.HELP (4357) |
Internet Address: http://www.samsungusa.com
©
2011 Samsung Telecommunications America, Samsung LLC. Do you have questions about your Samsung Device?
For 24 hour information and assistance, we offer a new FAQ/ARS System (Automated Response System) at:
www.samsungtelecom.com/support
Disclaimer of Warranties; Exclusion of Liability
For more information, refer to "Warranty Information" on page 27.
Verizon Network Extender for Business_WB_110311_Final 7

Table of Contents
Section 1: Getting Started .............................................................................................................................................................................................................................................. |
2 |
Introduction . . . . . . . . . . . . . . . . . . . . . . . . . . . . . . . . . . . . . . . . . . . . . . . . . . . . . . . . . . . . . . . . . . . . . . . . . . . . . . . . . . . . . . . . . . . . . . . . . . . . . . . . . . . . . . . . . . . . . . . . . . . . . . . . . . . . . . . . . . . . . . . . . . . . . 2 Features . . . . . . . . . . . . . . . . . . . . . . . . . . . . . . . . . . . . . . . . . . . . . . . . . . . . . . . . . . . . . . . . . . . . . . . . . . . . . . . . . . . . . . . . . . . . . . . . . . . . . . . . . . . . . . . . . . . . . . . . . . . . . . . . . . . . . . . . . . . . . . . . . . . . . . . 2 What’s In the Box? . . . . . . . . . . . . . . . . . . . . . . . . . . . . . . . . . . . . . . . . . . . . . . . . . . . . . . . . . . . . . . . . . . . . . . . . . . . . . . . . . . . . . . . . . . . . . . . . . . . . . . . . . . . . . . . . . . . . . . . . . . . . . . . . . . . . . . . . . . . . . . . . 2 Optional Accessories . . . . . . . . . . . . . . . . . . . . . . . . . . . . . . . . . . . . . . . . . . . . . . . . . . . . . . . . . . . . . . . . . . . . . . . . . . . . . . . . . . . . . . . . . . . . . . . . . . . . . . . . . . . . . . . . . . . . . . . . . . . . . . . . . . . . . . . . . . . . . . 2 System Requirements . . . . . . . . . . . . . . . . . . . . . . . . . . . . . . . . . . . . . . . . . . . . . . . . . . . . . . . . . . . . . . . . . . . . . . . . . . . . . . . . . . . . . . . . . . . . . . . . . . . . . . . . . . . . . . . . . . . . . . . . . . . . . . . . . . . . . . . . . . . . . 2 Components - Front View . . . . . . . . . . . . . . . . . . . . . . . . . . . . . . . . . . . . . . . . . . . . . . . . . . . . . . . . . . . . . . . . . . . . . . . . . . . . . . . . . . . . . . . . . . . . . . . . . . . . . . . . . . . . . . . . . . . . . . . . . . . . . . . . . . . . . . . . . . . 2 Components - Rear View . . . . . . . . . . . . . . . . . . . . . . . . . . . . . . . . . . . . . . . . . . . . . . . . . . . . . . . . . . . . . . . . . . . . . . . . . . . . . . . . . . . . . . . . . . . . . . . . . . . . . . . . . . . . . . . . . . . . . . . . . . . . . . . . . . . . . . . . . . . 2 Network Extender for Business Setup . . . . . . . . . . . . . . . . . . . . . . . . . . . . . . . . . . . . . . . . . . . . . . . . . . . . . . . . . . . . . . . . . . . . . . . . . . . . . . . . . . . . . . . . . . . . . . . . . . . . . . . . . . . . . . . . . . . . . . . . . . . . . . . . . . 3
Section 2: Using Your Device ......................................................................................................................................................................................................................................... |
5 |
Additional Setup Information . . . . . . . . . . . . . . . . . . . . . . . . . . . . . . . . . . . . . . . . . . . . . . . . . . . . . . . . . . . . . . . . . . . . . . . . . . . . . . . . . . . . . . . . . . . . . . . . . . . . . . . . . . . . . . . . . . . . . . . . . . . . . . . . . . . . . . . |
. 5 |
Firewall Rules for the Network Extender for Business . . . . . . . . . . . . . . . . . . . . . . . . . . . . . . . . . . . . . . . . . . . . . . . . . . . . . . . . . . . . . . . . . . . . . . . . . . . . . . . . . . . . . . . . . . . . . . . . . . . . . . . . . . . . . . . . . . . . . |
. 5 |
Clustering Guidelines . . . . . . . . . . . . . . . . . . . . . . . . . . . . . . . . . . . . . . . . . . . . . . . . . . . . . . . . . . . . . . . . . . . . . . . . . . . . . . . . . . . . . . . . . . . . . . . . . . . . . . . . . . . . . . . . . . . . . . . . . . . . . . . . . . . . . . . . . . . . . |
. 6 |
Clustering Setup . . . . . . . . . . . . . . . . . . . . . . . . . . . . . . . . . . . . . . . . . . . . . . . . . . . . . . . . . . . . . . . . . . . . . . . . . . . . . . . . . . . . . . . . . . . . . . . . . . . . . . . . . . . . . . . . . . . . . . . . . . . . . . . . . . . . . . . . . . . . . . . . |
. 7 |
Web Server and IP Configuration . . . . . . . . . . . . . . . . . . . . . . . . . . . . . . . . . . . . . . . . . . . . . . . . . . . . . . . . . . . . . . . . . . . . . . . . . . . . . . . . . . . . . . . . . . . . . . . . . . . . . . . . . . . . . . . . . . . . . . . . . . . . . . . . . . . . |
. 7 |
Accessing the Web Server with the well known IP Address . . . . . . . . . . . . . . . . . . . . . . . . . . . . . . . . . . . . . . . . . . . . . . . . . . . . . . . . . . . . . . . . . . . . . . . . . . . . . . . . . . . . . . . . . . . . . . . . . . . . . . . . . . . . . . . . |
. 7 |
Accessing the Web Server Interface with the Default IP Address . . . . . . . . . . . . . . . . . . . . . . . . . . . . . . . . . . . . . . . . . . . . . . . . . . . . . . . . . . . . . . . . . . . . . . . . . . . . . . . . . . . . . . . . . . . . . . . . . . . . . . . . . . . . |
. 8 |
Web Server Configuration Guide . . . . . . . . . . . . . . . . . . . . . . . . . . . . . . . . . . . . . . . . . . . . . . . . . . . . . . . . . . . . . . . . . . . . . . . . . . . . . . . . . . . . . . . . . . . . . . . . . . . . . . . . . . . . . . . . . . . . . . . . . . . . . . . . . . . . . |
. 8 |
Changing the User Name and Password . . . . . . . . . . . . . . . . . . . . . . . . . . . . . . . . . . . . . . . . . . . . . . . . . . . . . . . . . . . . . . . . . . . . . . . . . . . . . . . . . . . . . . . . . . . . . . . . . . . . . . . . . . . . . . . . . . . . . . . . . . . . . . . |
. 9 |
DHCP Configuration . . . . . . . . . . . . . . . . . . . . . . . . . . . . . . . . . . . . . . . . . . . . . . . . . . . . . . . . . . . . . . . . . . . . . . . . . . . . . . . . . . . . . . . . . . . . . . . . . . . . . . . . . . . . . . . . . . . . . . . . . . . . . . . . . . . . . . . . . . . . . . |
. 9 |
DHCP Lease Display . . . . . . . . . . . . . . . . . . . . . . . . . . . . . . . . . . . . . . . . . . . . . . . . . . . . . . . . . . . . . . . . . . . . . . . . . . . . . . . . . . . . . . . . . . . . . . . . . . . . . . . . . . . . . . . . . . . . . . . . . . . . . . . . . . . . . . . . . . . . . . |
. 9 |
IP Parameters . . . . . . . . . . . . . . . . . . . . . . . . . . . . . . . . . . . . . . . . . . . . . . . . . . . . . . . . . . . . . . . . . . . . . . . . . . . . . . . . . . . . . . . . . . . . . . . . . . . . . . . . . . . . . . . . . . . . . . . . . . . . . . . . . . . . . . . . . . . . . . . . . . |
10 |
IP Address . . . . . . . . . . . . . . . . . . . . . . . . . . . . . . . . . . . . . . . . . . . . . . . . . . . . . . . . . . . . . . . . . . . . . . . . . . . . . . . . . . . . . . . . . . . . . . . . . . . . . . . . . . . . . . . . . . . . . . . . . . . . . . . . . . . . . . . . . . . . . . . . . . . . . |
10 |
. . . . . . . . . . . . . . . . . . . . . . . . . . . . . . . . . . . . . . . . . . . . . . . . . . . . . . . . . . . . . . . . . . . . . . . . . . . . . . . . . . . . . . . . . . . . . . . . . . . . . . . . . . . . . . . . . . . . . . . . . . . . . . . . . . . . . . . . . . . . . . . . . . . . . . . . . . . . . |
10 |
Subnet Mask . . . . . . . . . . . . . . . . . . . . . . . . . . . . . . . . . . . . . . . . . . . . . . . . . . . . . . . . . . . . . . . . . . . . . . . . . . . . . . . . . . . . . . . . . . . . . . . . . . . . . . . . . . . . . . . . . . . . . . . . . . . . . . . . . . . . . . . . . . . . . . . . . . . |
10 |
Default Gateway . . . . . . . . . . . . . . . . . . . . . . . . . . . . . . . . . . . . . . . . . . . . . . . . . . . . . . . . . . . . . . . . . . . . . . . . . . . . . . . . . . . . . . . . . . . . . . . . . . . . . . . . . . . . . . . . . . . . . . . . . . . . . . . . . . . . . . . . . . . . . . . . . |
11 |
DNS 1, DNS 2, DNS3 . . . . . . . . . . . . . . . . . . . . . . . . . . . . . . . . . . . . . . . . . . . . . . . . . . . . . . . . . . . . . . . . . . . . . . . . . . . . . . . . . . . . . . . . . . . . . . . . . . . . . . . . . . . . . . . . . . . . . . . . . . . . . . . . . . . . . . . . . . . . . |
11 |
DSCP Use . . . . . . . . . . . . . . . . . . . . . . . . . . . . . . . . . . . . . . . . . . . . . . . . . . . . . . . . . . . . . . . . . . . . . . . . . . . . . . . . . . . . . . . . . . . . . . . . . . . . . . . . . . . . . . . . . . . . . . . . . . . . . . . . . . . . . . . . . . . . . . . . . . . . . |
12 |
DSCP . . . . . . . . . . . . . . . . . . . . . . . . . . . . . . . . . . . . . . . . . . . . . . . . . . . . . . . . . . . . . . . . . . . . . . . . . . . . . . . . . . . . . . . . . . . . . . . . . . . . . . . . . . . . . . . . . . . . . . . . . . . . . . . . . . . . . . . . . . . . . . . . . . . . . . . . . |
12 |
Throttling Page . . . . . . . . . . . . . . . . . . . . . . . . . . . . . . . . . . . . . . . . . . . . . . . . . . . . . . . . . . . . . . . . . . . . . . . . . . . . . . . . . . . . . . . . . . . . . . . . . . . . . . . . . . . . . . . . . . . . . . . . . . . . . . . . . . . . . . . . . . . . . . . . . |
12 |
Accessing Cluster Configuration Pages . . . . . . . . . . . . . . . . . . . . . . . . . . . . . . . . . . . . . . . . . . . . . . . . . . . . . . . . . . . . . . . . . . . . . . . . . . . . . . . . . . . . . . . . . . . . . . . . . . . . . . . . . . . . . . . . . . . . . . . . . . . . . . . . |
12 |
Cluster Mode Page . . . . . . . . . . . . . . . . . . . . . . . . . . . . . . . . . . . . . . . . . . . . . . . . . . . . . . . . . . . . . . . . . . . . . . . . . . . . . . . . . . . . . . . . . . . . . . . . . . . . . . . . . . . . . . . . . . . . . . . . . . . . . . . . . . . . . . . . . . . . . . . |
13 |
Changing the Ingress Member of the Cluster . . . . . . . . . . . . . . . . . . . . . . . . . . . . . . . . . . . . . . . . . . . . . . . . . . . . . . . . . . . . . . . . . . . . . . . . . . . . . . . . . . . . . . . . . . . . . . . . . . . . . . . . . . . . . . . . . . . . . . . . . . . |
14 |
Cluster Members Page . . . . . . . . . . . . . . . . . . . . . . . . . . . . . . . . . . . . . . . . . . . . . . . . . . . . . . . . . . . . . . . . . . . . . . . . . . . . . . . . . . . . . . . . . . . . . . . . . . . . . . . . . . . . . . . . . . . . . . . . . . . . . . . . . . . . . . . . . . . . |
14 |
Power Cycle . . . . . . . . . . . . . . . . . . . . . . . . . . . . . . . . . . . . . . . . . . . . . . . . . . . . . . . . . . . . . . . . . . . . . . . . . . . . . . . . . . . . . . . . . . . . . . . . . . . . . . . . . . . . . . . . . . . . . . . . . . . . . . . . . . . . . . . . . . . . . . . . . . . . |
14 |
Reset Tool . . . . . . . . . . . . . . . . . . . . . . . . . . . . . . . . . . . . . . . . . . . . . . . . . . . . . . . . . . . . . . . . . . . . . . . . . . . . . . . . . . . . . . . . . . . . . . . . . . . . . . . . . . . . . . . . . . . . . . . . . . . . . . . . . . . . . . . . . . . . . . . . . . . . . |
16 |
Downloading and Launching the Tool . . . . . . . . . . . . . . . . . . . . . . . . . . . . . . . . . . . . . . . . . . . . . . . . . . . . . . . . . . . . . . . . . . . . . . . . . . . . . . . . . . . . . . . . . . . . . . . . . . . . . . . . . . . . . . . . . . . . . . . . . . . . . . . . . |
16 |
Resetting a Network Extender for Business . . . . . . . . . . . . . . . . . . . . . . . . . . . . . . . . . . . . . . . . . . . . . . . . . . . . . . . . . . . . . . . . . . . . . . . . . . . . . . . . . . . . . . . . . . . . . . . . . . . . . . . . . . . . . . . . . . . . . . . . . . . . |
16 |
Factory Default Values . . . . . . . . . . . . . . . . . . . . . . . . . . . . . . . . . . . . . . . . . . . . . . . . . . . . . . . . . . . . . . . . . . . . . . . . . . . . . . . . . . . . . . . . . . . . . . . . . . . . . . . . . . . . . . . . . . . . . . . . . . . . . . . . . . . . . . . . . . . . |
16 |
Section 3: External GPS Antenna ................................................................................................................................................................................................................................. |
18 |
Antenna Installation . . . . . . . . . . . . . . . . . . . . . . . . . . . . . . . . . . . . . . . . . . . . . . . . . . . . . . . . . . . . . . . . . . . . . . . . . . . . . . . . . . . . . . . . . . . . . . . . . . . . . . . . . . . . . . . . . . . . . . . . . . . . . . . . . . . . . . . . . . . . . . |
18 |
Section 4: Troubleshooting .......................................................................................................................................................................................................................................... |
19 |
Section 5: LED Guide .................................................................................................................................................................................................................................................... |
21 |
Purpose of Each LED . . . . . . . . . . . . . . . . . . . . . . . . . . . . . . . . . . . . . . . . . . . . . . . . . . . . . . . . . . . . . . . . . . . . . . . . . . . . . . . . . . . . . . . . . . . . . . . . . . . . . . . . . . . . . . . . . . . . . . . . . . . . . . . . . . . . . . . . . . . . . |
21 |
LED Status Indicators . . . . . . . . . . . . . . . . . . . . . . . . . . . . . . . . . . . . . . . . . . . . . . . . . . . . . . . . . . . . . . . . . . . . . . . . . . . . . . . . . . . . . . . . . . . . . . . . . . . . . . . . . . . . . . . . . . . . . . . . . . . . . . . . . . . . . . . . . . . . . |
21 |
LED Combinations - Possible Failure Reason - Recommended Action . . . . . . . . . . . . . . . . . . . . . . . . . . . . . . . . . . . . . . . . . . . . . . . . . . . . . . . . . . . . . . . . . . . . . . . . . . . . . . . . . . . . . . . . . . . . . . . . . . . . . . . . . |
22 |
Section 6: Network Extender for Business Acronym Table ........................................................................................................................................................................................ |
24 |
Acronym Table for Verizon Wireless Network Extender for Business . . . . . . . . . . . . . . . . . . . . . . . . . . . . . . . . . . . . . . . . . . . . . . . . . . . . . . . . . . . . . . . . . . . . . . . . . . . . . . . . . . . . . . . . . . . . . . . . . . . . . . . . . . |
24 |
Section 7: Important Safety Information ..................................................................................................................................................................................................................... |
25 |
General Precautions . . . . . . . . . . . . . . . . . . . . . . . . . . . . . . . . . . . . . . . . . . . . . . . . . . . . . . . . . . . . . . . . . . . . . . . . . . . . . . . . . . . . . . . . . . . . . . . . . . . . . . . . . . . . . . . . . . . . . . . . . . . . . . . . . . . . . . . . . . . . . . 25 Using Your Network Extender for Business Near Other Electronic Devices . . . . . . . . . . . . . . . . . . . . . . . . . . . . . . . . . . . . . . . . . . . . . . . . . . . . . . . . . . . . . . . . . . . . . . . . . . . . . . . . . . . . . . . . . . . . . . . . . . . . . 25 Radio Frequency (RF) Energy . . . . . . . . . . . . . . . . . . . . . . . . . . . . . . . . . . . . . . . . . . . . . . . . . . . . . . . . . . . . . . . . . . . . . . . . . . . . . . . . . . . . . . . . . . . . . . . . . . . . . . . . . . . . . . . . . . . . . . . . . . . . . . . . . . . . . . . 25 Knowing Radio Frequency Safety . . . . . . . . . . . . . . . . . . . . . . . . . . . . . . . . . . . . . . . . . . . . . . . . . . . . . . . . . . . . . . . . . . . . . . . . . . . . . . . . . . . . . . . . . . . . . . . . . . . . . . . . . . . . . . . . . . . . . . . . . . . . . . . . . . . . 25 FCC Radio Frequency Emission . . . . . . . . . . . . . . . . . . . . . . . . . . . . . . . . . . . . . . . . . . . . . . . . . . . . . . . . . . . . . . . . . . . . . . . . . . . . . . . . . . . . . . . . . . . . . . . . . . . . . . . . . . . . . . . . . . . . . . . . . . . . . . . . . . . . . 25
Section 8: Warranty Information ................................................................................................................................................................................................................................. |
27 |
Standard Limited Warranty . . . . . . . . . . . . . . . . . . . . . . . . . . . . . . . . . . . . . . . . . . . . . . . . . . . . . . . . . . . . . . . . . . . . . . . . . . . . . . . . . . . . . . . . . . . . . . . . . . . . . . . . . . . . . . . . . . . . . . . . . . . . . . . . . . . . . . . . . |
27 |
End User License Agreement for Software . . . . . . . . . . . . . . . . . . . . . . . . . . . . . . . . . . . . . . . . . . . . . . . . . . . . . . . . . . . . . . . . . . . . . . . . . . . . . . . . . . . . . . . . . . . . . . . . . . . . . . . . . . . . . . . . . . . . . . . . . . . . . |
27 |
Open Source Announcement . . . . . . . . . . . . . . . . . . . . . . . . . . . . . . . . . . . . . . . . . . . . . . . . . . . . . . . . . . . . . . . . . . . . . . . . . . . . . . . . . . . . . . . . . . . . . . . . . . . . . . . . . . . . . . . . . . . . . . . . . . . . . . . . . . . . . . . |
28 |
GNU LESSER GENERAL PUBLIC LICENSE . . . . . . . . . . . . . . . . . . . . . . . . . . . . . . . . . . . . . . . . . . . . . . . . . . . . . . . . . . . . . . . . . . . . . . . . . . . . . . . . . . . . . . . . . . . . . . . . . . . . . . . . . . . . . . . . . . . . . . . . . . . . . . |
30 |
NO WARRANTY . . . . . . . . . . . . . . . . . . . . . . . . . . . . . . . . . . . . . . . . . . . . . . . . . . . . . . . . . . . . . . . . . . . . . . . . . . . . . . . . . . . . . . . . . . . . . . . . . . . . . . . . . . . . . . . . . . . . . . . . . . . . . . . . . . . . . . . . . . . . . . . . . |
31 |
GNU LESSER GENERAL PUBLIC LICENSE ("LGPL") . . . . . . . . . . . . . . . . . . . . . . . . . . . . . . . . . . . . . . . . . . . . . . . . . . . . . . . . . . . . . . . . . . . . . . . . . . . . . . . . . . . . . . . . . . . . . . . . . . . . . . . . . . . . . . . . . . . . . . . |
32 |
TERMS AND CONDITIONS FOR COPYING, DISTRIBUTION AND MODIFICATION . . . . . . . . . . . . . . . . . . . . . . . . . . . . . . . . . . . . . . . . . . . . . . . . . . . . . . . . . . . . . . . . . . . . . . . . . . . . . . . . . . . . . . . . . . . . . . . . . . . |
32 |
NO WARRANTY . . . . . . . . . . . . . . . . . . . . . . . . . . . . . . . . . . . . . . . . . . . . . . . . . . . . . . . . . . . . . . . . . . . . . . . . . . . . . . . . . . . . . . . . . . . . . . . . . . . . . . . . . . . . . . . . . . . . . . . . . . . . . . . . . . . . . . . . . . . . . . . . . |
34 |
Apache License . . . . . . . . . . . . . . . . . . . . . . . . . . . . . . . . . . . . . . . . . . . . . . . . . . . . . . . . . . . . . . . . . . . . . . . . . . . . . . . . . . . . . . . . . . . . . . . . . . . . . . . . . . . . . . . . . . . . . . . . . . . . . . . . . . . . . . . . . . . . . . . . . |
34 |
BSD 2.0 License . . . . . . . . . . . . . . . . . . . . . . . . . . . . . . . . . . . . . . . . . . . . . . . . . . . . . . . . . . . . . . . . . . . . . . . . . . . . . . . . . . . . . . . . . . . . . . . . . . . . . . . . . . . . . . . . . . . . . . . . . . . . . . . . . . . . . . . . . . . . . . . . |
35 |
APPLE PUBLIC SOURCE LICENSE . . . . . . . . . . . . . . . . . . . . . . . . . . . . . . . . . . . . . . . . . . . . . . . . . . . . . . . . . . . . . . . . . . . . . . . . . . . . . . . . . . . . . . . . . . . . . . . . . . . . . . . . . . . . . . . . . . . . . . . . . . . . . . . . . . . . |
35 |
IBM Public License Version 1.0 . . . . . . . . . . . . . . . . . . . . . . . . . . . . . . . . . . . . . . . . . . . . . . . . . . . . . . . . . . . . . . . . . . . . . . . . . . . . . . . . . . . . . . . . . . . . . . . . . . . . . . . . . . . . . . . . . . . . . . . . . . . . . . . . . . . . . |
37 |
The MIT License . . . . . . . . . . . . . . . . . . . . . . . . . . . . . . . . . . . . . . . . . . . . . . . . . . . . . . . . . . . . . . . . . . . . . . . . . . . . . . . . . . . . . . . . . . . . . . . . . . . . . . . . . . . . . . . . . . . . . . . . . . . . . . . . . . . . . . . . . . . . . . . . . |
38 |
The Clarified Artistic License . . . . . . . . . . . . . . . . . . . . . . . . . . . . . . . . . . . . . . . . . . . . . . . . . . . . . . . . . . . . . . . . . . . . . . . . . . . . . . . . . . . . . . . . . . . . . . . . . . . . . . . . . . . . . . . . . . . . . . . . . . . . . . . . . . . . . . . |
39 |
SNMP++ License . . . . . . . . . . . . . . . . . . . . . . . . . . . . . . . . . . . . . . . . . . . . . . . . . . . . . . . . . . . . . . . . . . . . . . . . . . . . . . . . . . . . . . . . . . . . . . . . . . . . . . . . . . . . . . . . . . . . . . . . . . . . . . . . . . . . . . . . . . . . . . . . |
39 |
Eric Young Implementation License . . . . . . . . . . . . . . . . . . . . . . . . . . . . . . . . . . . . . . . . . . . . . . . . . . . . . . . . . . . . . . . . . . . . . . . . . . . . . . . . . . . . . . . . . . . . . . . . . . . . . . . . . . . . . . . . . . . . . . . . . . . . . . . . . . |
40 |
Index ............................................................................................................................................................................................................................................................................... |
41 |
1

Section 1: Getting Started
Introduction
The Network Extender for Business enhances the in-building Verizon Wireless Network experience.
This User Guide introduces the Verizon Wireless Network Extender for Business device.
The following sections are included in this guide:
•Getting Started
•Using Your Device
•External GPS Antenna
•Troubleshooting
•Important Safety Information
•Manufacturer’s Warranty
Important!: Before installing the Network Extender for Business, it is essential to read the entire manual to ensure proper operation of the system.
Features
The following list highlights some of the Network Extender for Business's features:
•The Network Extender for Business is a Plug & Play device that can be installed to automatically provide enhanced in-building wireless service in an enterprise or small office without having to change your existing mobile phone.
•The Network Extender for Business enables users to easily install and configure the system by connecting to an existing broadband network.
•The Network Extender for Business supports a clustering feature which enables seamless mobility between units within a coverage area. For more details, see “Clustering Guidelines” on page 6.
•The Network Extender for Business supports an embedded web server which enables customization of IP settings. For more information see “Web Server and IP Configuration” on page 7.
Note: For a descripton of acronyms, see “Network Extender for Business Acronym Table” on page 24.
What’s In the Box?
•Network Extender for Business
•Ethernet Cable
•Power Supply and Power Cord
•21’ GPS extension cable
•Quick Start Guide
•Product Safety and Warranty
Optional Accessories
•An Auxiliary Hanging Bracket is available to allow for the unit to be conveniently mounted on the wall or ceiling
•A 60’ optional GPS extension cable
System Requirements
• An always-on broadband Internet connection with a recommended bandwidth of 3.5 Mbps per unit is required to support optimal data connection.
Note: Wireless connections are not supported.
• An available Ethernet (LAN) port on either your broadband modem or a router connected to the modem.
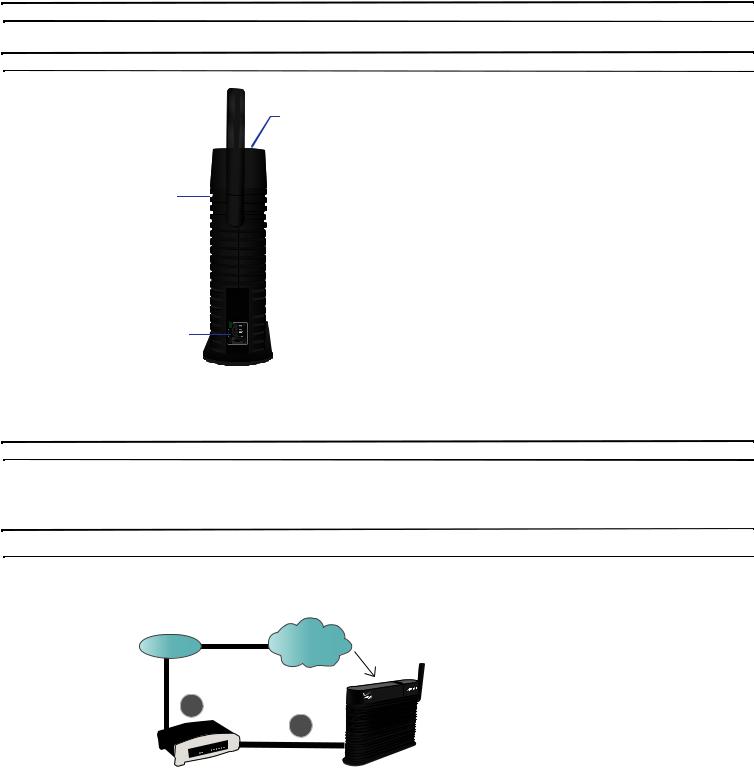
Components - Front View
In addition to a wireless antenna, the Network Extender for Business has four LED lights that are used to indicate the device connectivity status.
•Wireless Antenna provides omnidirectional transmission and reception of signals between the Network Extender for Business and communicating Verizon Wireless mobile phones. The wireless antenna rotates 360 degrees.
•Power LED (PWR) indicates the power status.
•System LED (SYS) indicates the status of Network Extender for Business connectivity to the Verizon Wireless network.
•GPS LED indicates the GPS connection status.
Note: GPS antenna receives signals from Global Positioning System satellites and uses them to obtain time and location information.
• WAN LED indicates the status of the Ethernet connection and traffic activity on the Network Extender for Business.
Wireless Antenna
Power 
LED
System
LED
GPS LED 


WAN LED 


Components - Rear View
The rear of the Network Extender for Business provides access to the WAN port, power port, and external GPS antenna.
1. GPS Antenna Port slides to provide access to the external GPS antenna for removal and relocation.
2
2. Heat Vents provide passive ventilation for the Network Extender for Business and allow for dissipation of internally generated heat.
Note: The Network Extender for Business needs to remain vertical and in a well-ventilated location. The vertical position allows proper air flow to the internal components.
3. DC 12V Power Port provides power to the Network Extender for Business when connected to the AC power supply and cord (included).
Warning!: Only use the provided power cord and supply. Using any other power source may damage the Network Extender for Business.
GPS Antenna Port
Heat
Vents

 DC 12V Power Port
WAN
Port
4. WAN Port allows you to connect the Ethernet cable provided to establish secure communication with the Verizon Wireless network.
• The WAN port provides Ethernet connectivity at 10/100 Mbps.
Network Extender for Business Setup
This section outlines the procedures needed to set up the Network Extender for Business.
Note: You may also visit www.verizonwireless.com/b2c/store/accessory?action=gotoSetup to view the online setup and usage tutorial. Follow the on screen prompts.
•Confirm your package contains all components.
•Review the "Important Safety Information" on page 25 before installing the Network Extender for Business.
•Place the unit near a window to acquire a GPS signal. If this is not convenient, See “External GPS Antenna” on page 18.
– A GPS signal is required to maintain continuous timing for proper operation and E911 service.
Note: For a single Network Extender for Business deployment refer to the following Stand Alone Setup diagram. If you are planning on deploying more than one Network Extender for Business at your site, please see “Clustering Guidelines” on page 6.
Stand Alone Setup
ISP |
Internet |
1HWZRUN ([WHQGHU IRU %XVLQHVV
1. Connect one end of the included Ethernet cable to an open LAN port on the Router (1) and connect the other end to the WAN port located at the rear of the Network Extender for Business. (2)
Getting Started |
3 |

1HWZRUN ([WHQGHU IRU %XVLQHVV

3RZHU6XSSO\


 3RZHU&RUG
|
|
|
|
|
|
|
|
|
|
|
|
|
|
|
(WKHUQHW &DEOH |
|
|||||||||
|
|
|
|
|
|
|
|
|
|
|
|
5RXWHU |
2.Plug the power supply connector into the DC 12V power port located at the rear of the Network Extender for Business (3).
3.Insert one end of the power cord into the power supply and then plug the other end into an available power outlet (4).
4.Confirm that the front LEDs are illuminated as indicated below:
Note: Allow 3 - 5 minutes for the Network Extender for Business to complete the startup sequence and detect both its connections and available communications. The Network Extender for Business may take as long as one hour for the initial GPS acquisition. If the GPS LED is still red after one hour, relocate the GPS antenna to receive a stronger signal. See “Antenna Installation” on page 18.
•Power LED: should be a continuous blue light, indicating that the Network Extender for Business is receiving power. No illumination or magenta color indicates there is an issue with the power supply or power connector.
•WAN LED: should be a steady blue light, indicating that the Network Extender for Business has detected a valid Ethernet connection. A blinking blue LED indicates data communication.
•GPS LED: should be a continuous blue light, indicating that the Network Extender for Business has locked onto a valid GPS signal. If the GPS LED is solid red, the internal antenna may not be able to detect a GPS signal and installation of the external GPS antenna might be necessary. If the GPS LED is persistent magenta while the System LED is slow-blinking red, this indicates a failure condition.
•System LED: should be a continuous blue light, indicating that the Network Extender for Business is properly communicating with the Verizon Wireless network. Blinks red while establishing an initial network connection. Persistent solid magenta indicates a failure condition. Persistent solid red or slow-or fast-blinking red indicates an abnormal condition.
Power
LED
System
LED
GPS LED
WAN LED
5. To confirm the setup was successful, verify all the LEDs are blue.
Note: For more details, see “Clustering Guidelines” on page 6.
4

Section 2: Using Your Device
Additional Setup Information
This section provides an overview of the product, activation, and how to contact Verizon Wireless for assistance with service and the Network Extender for Business.
Figure 1 : Network with NAT/PAT
The Network Extender for Business facilitates the delivery of secure cellular traffic through the Internet to the Verizon Wireless network, which then routes the signal to the desired party.
•Number of Users: A maximum of six (6) voice calls, or eight (8) data sessions (EV-DO), or a combination of seven (7) voice calls and data sessions are supported simultaneously.
–An additional channel, open to all callers, is always reserved for emergency (E911) calls.
–Additional non-E911 users who attempt to make or receive a call/session while all channels are in use may be redirected to the nearest compatible cell tower (if available).
•Verify service on Network Extender for Business: Users can verify that they are on the Verizon Wireless Network Extender for Business by dialing #48 (and receiving an audio announcement). You will also hear a short double tone on your wireless phone when making or receiving a call while on the Network Extender for Business. The tone is played at the beginning of the call.
•Connect to the Network Extender for Business: In order to establish an initial connection to the Network Extender for Business network, your Verizon Wireless mobile phone needs to move within approximately 45 feet of the Network Extender for Business unit.
•Calling on Network Extender for Business: After registering on the Network Extender for Business, the user can move within a broader perimeter while remaining under coverage.
•Ranges Will Vary: Both the coverage area required to register and use the Network Extender for Business cannot be guaranteed and may vary due to environmental factors, such as physical structures.
Warning!: You may not be able to make 911 calls in the event of an electrical power outage, broadband connection failure, or other service disruption outside of the Verizon Wireless network coverage area. 911 services may be limited in areas outside of the Verizon Wireless network coverage area. Not all public safety answering points have location-based E911 technology. Always be prepared to report your location to the 911 operator when placing an emergency call. Mobile phones operate using radio signals which cannot guarantee connection in all conditions.
Firewall Rules for the Network Extender for Business
Business networks protect their data and clients using a firewall. Depending on the firewall configuration, certain ports may need to be opened on the firewall to allow the Network Extender for Business to come into service. The Network Extender for Business communicates to the Verizon Wireless Gateway over an IPSEC (Internet Protocol Security Protocol) encrypted tunnel. The use of NAT (Network Address Translation)/PAT (Port Address Translation) within the network will determine which firewall rules need to be opened.
The Network Extender for Business will also access a DNS Server to obtain the IP Address of Verizon's Security Gateways and may access a DHCP Server for its IP Addresses. Since this communication is generally done within the same subnet/network, these settings are not included in the firewall table below. If they are required for some reason, they use the standard DNS and DHCP ports, DNS-UDP 53/ DHCP-BOOTP 67.
The table below shows the protocols/ports that may be required to be opened on a firewall.
Source |
Destination |
|
Protocol |
DST |
InbounD (I) |
Description |
|
|
|
|
Port |
Outbound (O) |
|
|
|
|
|
|
|
|
|
|
|
|
|
|
|
|
|
|
Protocols/Ports below are required for all instances. |
|
||
|
|
|
|
|
|
|
Network Extender for Business |
GPS Assistance Server |
|
UDP |
52428 |
O |
Network Extender for Business' GPS assistance data |
|
|
|
|
|
|
requests to the GPS assistance server. This server is |
|
|
|
|
|
|
located on the Internet. |
|
|
|
|
|
|
|
Network Extender for Business |
Verizon Wireless Gateway |
|
UDP |
500, |
O |
IKE and IPSec over UDP(IKE) from the Network |
|
|
|
|
4500 |
|
Extender for Business to the Verizon Wireless Gateway |
|
|
|
|
|
|
|
|
|
Protocols below are only required when NAT/PAT not present |
|
|||
|
|
|
|
|
|
|
Network Extender for Business |
Verizon Wireless Gateway |
|
NA |
ESP/50 |
O |
Native on IP Encapsulating Security Payload (Contact |
|
|
|
|
|
|
Verizon Customer Support for Verizon Wireless |
|
|
|
|
|
|
Gateway IP addresses) |
|
|
|
|
|
|
|
Verizon Wireless Gateway |
|
|
N/A |
ESP/50 |
I |
Native on IP Encapsulating Security Payload (Contact |
|
|
|
|
|
|
Verizon Customer Support for SGW IP addresses) |
|
|
|
|
|
|
|
Using Your Device |
5 |

In addition to the ports specified above, the table below details the FQDNs (Fully Qualified Domain Names) and the associated IP Address of the Domain Name. The Network Extender for Business solution requires access to each of the items listed below in order to deliver service.
IP Address |
FQDN |
|
|
209.210.15.73 |
GPS Server |
|
(gps.vzwfemto.com) |
|
|
69.78.95.193 |
Security Gateway |
66.174.71.40 |
(sg.vzwfemto.com) |
|
|
|
|
Figure 2 below shows an example of a network that performs NAT/PAT on traffic leaving the LAN. When the encrypted IPSec packets go through a NAT/PAT, the Network Extender for Business will encapsulate the packets in a UDP packet.
Figure 2: Network with NAT/PAT
Figure 3 below shows a Network Extender for Business behind a firewall without NAT/PAT. In this architecture, the Network Extender for Business is protected by a firewall that is blocking many inbound ports. Port 50 to support ESP via TCP must be opened bidirectionally.
Figure 3: Network without NAT/PAT
Figure 4, the Network Extender for Business is outside the firewall and on the DMZ. Some protection might be in place and the rules stated above must be followed. For the most reliable and secure performance, it is recommended that the Network Extender for Business be placed behind a firewall.
The Network Extender for Business enables the IT administrator to deploy the solution in almost any scenario. The embedded web server allows for flexible configurations. Sections below detail the configuration options that are supported.
Figure 4: Network with DMZ
Clustering Guidelines
The Network Extender for Business provides CDMA2000 1x and EVDO service to handsets and other user devices throughout a target coverage of 7500 square feet. When the desired coverage area exceeds that, an additional unit can be added as follows:
6

•In a typical cubicle office environment, the units need to be placed 85 feet apart.
•In a typical open warehouse, the units need to be placed 120 feet apart.
•In a heavily obstructed environment, the units need to be placed 60 feet apart.
Unit 1 |
Unit 2 |
|
|
|
|
|
|
|
Spacing
Note: The first unit powered up needs to be placed at the entrance of the building.
Clustering Setup
To set up clustering, the following steps must be taken.
Note: Follow the power-up guidelines as previously noted.
1.Determine the locations for the Network Extender for Business units to be deployed. Look for locations that are within range of a window, have an ethernet jack and a power outlet. Follow power-up guidelines as noted above.
2.Install the first unit close to the main entry way of the site. The first unit is also known as the “ingress” unit. All other units are known as “non-ingress”.
3.Once the first unit is operational, install the next unit, within the range as previously noted.
Once all units are operational, the embedded web server can be used to validate that the units are operating as a system. Follow the guidelines below to validate the cluster deployment using the web server. If the cluster is not operating as expected, where either the web server is not displaying the members correctly or calls are being dropped when users are moving within the desired coverage area, check the following:
1.When units were purchased, they must be assigned to the same account.
2.Redeploy the units closer to each other. If they are not spaced correctly, active voice and data handoff may not operate correctly.
Note: When installing the Network Extender for Business in locations where a power outlet is not conveniently located Power Over Ethernet products are available. CDW is a distributor who has Network Extender for Business compatible PoE products. All purchases, returns, and exchanges of PoE products must be handled directly with CDW. Call CDW at 888-653-2394 between 7:00AM and 7:30PM CST.
Web Server and IP Configuration
Introduction
The Network Extender for Business is designed to be plug-and-play on most networks. Should you have the need to configure specific settings for your network, the web interface allows for custom functionality:
•By default the device is set up to use DHCP (Dynamic Host Configuration Protocol) to assign its IP (Internet Protocol) address and obtain DNS (Domain Name Service) information. If DHCP is turned off you can assign static IP addressing information including: IP address, sub net mask, default gateway and DNS server.
•Mark all packets at the IP layer using a configurable DSCP marking value to allow for QoS treatment on your IP network
•User name and Password for controlled access to the web server configuration interface
•Rate limit (throttle) the data usage of foreign users on your network when the device is in managed mode.
•Assign a particular device in a cluster to be the ingress unit beacon for a cluster of Network Extenders for Business.
In addition, the web interface allows you to:
•Display the configured information
•Display the DHCP lease expiry timer when DHCP is enabled
•Reboot the device to make your changes go into effect
It may be helpful to plan for and track configuration information in a deployment of Network Extender for Business.
Accessing the Web Server with the well known IP Address
In the event that the unit is placed in a network without DHCP, DHCP fails or the device is not configured correctly, the Network Extender for Business defaults to a well known IP address of 192.168.1.10.
Browser Support
The Network Extender for Business has been tested for compatibility with the following browsers.
Note: Internet Explorer 6, 7, 8, 9, FireFox and Mosaic (Internet Explorer 6 TLS 1.0 support must be enabled).
Using Your Device |
7 |

Accessing the Web Server Interface with the Default IP Address
In the event that DHCP is not enabled, the following IP address is assigned to the Network Extender for Business. 192.168.1.10
Each Network Extender for Business is configured at the factory with the same user name and password, which are case sensitive:
User Name: administrator
Password: enterpriseFemt0 (zero at end)
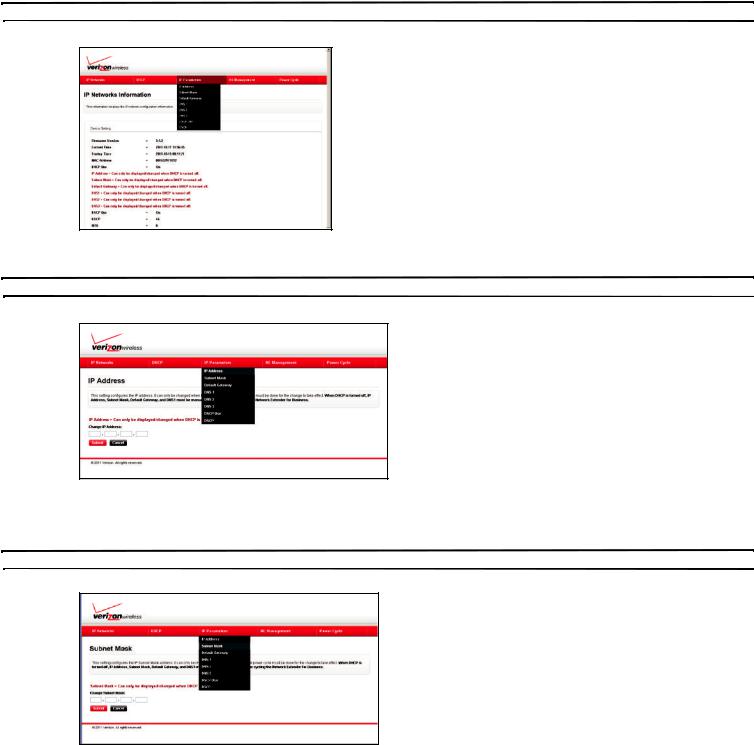
Web Server Configuration Guide
IP Networks Configuration
This screen shows the current IP configuration of the device. If DHCP is enabled, the IP information is not shown.
The screen shows the following attributes:
1.Firmware Version: The version of the software loaded onto the Network Extender for Business
2.Current time: The system GMT time.
3.Starting Time: The last time the system was started
4.MAC Address: The MAC ID of the unit - also found on the bottom of the Network Extender for Business
5.DHCP Use: Indicates if DHCP is on or off
6.IP Address: The IP Address of the unit, when assigned a static IP. When assigned a DHCP address, an address won't be displayed.
7.Subnet Mask: The Subnet Mask of the unit, when assigned a Subnet Mask. When assigned a DHCP address, a Subnet Mask won't be displayed.
8.Default Gateway: The Default Gateway of the unit, when assigned a Default Gateway. When assigned a DHCP address, a Default Gateway won't be displayed.
9.DNS1/DNS2/DNS3: This option displays the DNS server address settings. The entry must contain an IPv4 address. DNS1 is required when not operating in DHCP mode.
10.DSCP Use: This attribute displays the DSCP bit setting. When set to yes, the DSCP might have been customized. When set to No, the DSCP bits are assigned the default value of 46.
11.DSCP: This attribute displays the DSCP bit setting, when using the customer DSCP option (when DSCP Use is set to yes as noted above).
8
Changing the User Name and Password
Click on the user name/password option of “NE Management” tab to change the user name and password for access to the web server.
This default user name and password can easily be determined by anyone who can access the Internet and look at this manual. In order to prevent disruption of service you should assign a different user name and password for the devices you plan to deploy at your business site.
Note: Usage of a strong password is recommended.
DHCP Configuration
To use static IP addressing DHCP must be turned off. The DHCP menu allows the ability to turn DHCP on or off. When DHCP is turned off, the following IP Parameters MUST be configured.
•IP Address
•Netmask
•Default Gateway
•DNS1
If they are not, the Network Extender for Business will not come into service and revert to its well known default IP Address, 192.168.1.10.
DHCP Lease Display
The DHCP Lease submenu is accessible from the DHCP Menu and displays the DHCP lease period.
Using Your Device |
9 |
IP Parameters
The IP Parameters drop-down menu allows you to configure the static IP configuration as well as DSCP tagging.
Note: Before configuring your IP Parameters, you must disable DHCP.
IP Address
The IP address menu allows configuration of the IPv4 address.
Note: This parameter is REQUIRED for static IP Address assignment.
Subnet Mask
The subnet Mask Menu allows configuration of the sub net mask.
Note: This parameter is REQUIRED for static IP Address assignment.
10

Default Gateway
The Default Gateway allows configuration of the Default Gateway (router).
Note: This parameter is REQUIRED for static IP Address assignment.
DNS 1, DNS 2, DNS3
The DNS 1-3 interfaces allow the ability to statically configure up to 3 DNS servers.
Note: DNS1 is REQUIRED for static IP Address assignment.
Using Your Device |
11 |
 Loading...