


Perfect Control Solution
SALES NETWORK
•SAMSUNG TECHWIN CO.,LTD.
145-3, Sangdaewon-dong, Jungwon-gu, Seongnam-si, Gyeonggi-do, 462-120, Korea
TEL : +82-31-740-8151~8 FAX : +82-31-740-8145
• SAMSUNG TECHWIN AMERICA,LTD. |
• SAMSUNG OPTO-ELECTRONICS UK,LTD. |
1480 Charles Willard St. Carson, CA 90746, UNITED STATES |
Samsung House, 1000 Hillswood Drive, Hillswood Business Park |
TEL : +1-310-632-1234 FAX : +1-310-632-2195 |
Chertsey Surrey KT16 OPS |
|
TEL : +44-1932-45-5308 FAX : +44-1932-45-5325 |
www.samsungtechwin.com
www.samsungcctv.com
P/No. : Z6806-0757-01F
VAN 08. 11
System Controller SCC-3100A User’s Manual
Thank you for purchasing a Samsung System Controller. Before attempting to connect or operate this product,
please read these instructions carefully and save this manual for future use.
ENGLISH

Contents
Safety caution |
4 |
6. MODEL |
||
Major Functions and Features |
|
7. TRACE |
||
1. |
Overview |
6 |
|
7-1. TRACE Memory |
2. |
Features |
6 |
|
7-2. TRACE Operation |
3. |
Controller Button Layout |
7 |
8. |
AF |
Product Components |
7 |
9. OSD |
||
System Overview |
8 |
DVR Mode |
||
1. |
System Connections |
8 |
CONTROLLER Mode |
|
|
1-1. Connecting Controller and Junction Box |
8 |
1. |
Setup Mode |
|
1-2. Connecting Junction Box and External Devices |
8 |
2. |
ID Setup |
2. |
RS-485/422 Pin Layout |
9 |
3. |
SERIAL Setup |
3. |
RS-232C Pin Layout |
9 |
4. |
DATA COPY |
4. |
Junction Box DIP Switch |
9 |
5. |
RESPONSE |
5. |
General Connection |
10 |
|
5-1. SPD-3300/3000/2300 DIP Setup |
6. |
Connection Through SVR-1650/1640/950/440 |
10 |
|
5-2. SPD-2500 DIP Setup |
Names and Functions of Each Part |
|
|
5-3. SPD-2200 DIP Setup |
|
1. |
Camera Setup Section |
11 |
|
5-4. SPD-1600 DIP Setup |
2. Number Pad |
12 |
6. PASSWORD |
||
3. |
External Device Selectors |
13 |
|
6-1. PASSWORD Setup |
4. |
Universal Controller |
13 |
|
6-2. Applying Password-Setup Mode |
5. |
DVR Controller |
14 |
|
6-3. Applying Password-Power |
6. |
Camera Controller |
16 |
|
6-4. Entering Password |
7. |
Junction Box |
16 |
7. |
PRIORITY |
PTZ Control |
|
8. DEFAULT |
||
1. |
Power-On |
17 |
MATRIX Mode (SMX-25632) |
|
2. |
Initial Screen Display |
17 |
1. |
Selection of camera and monitor |
3. |
Camera ID Setup |
17 |
2. |
Joystick for Camera Controls |
4. |
Joystick/Camera Control Button |
18 |
3. |
AUTO SELECT |
5. |
Camera Movement Speed Control |
19 |
|
3-1. AUTO SELECT Setup |
6. |
Camera Zoom Control |
19 |
|
3-2. AUTO SELECT Cancellation |
7. |
Camera Focus Control |
19 |
|
3-3. AUTO SELECT Elimination |
PTZ Mode |
|
|
3-4. AUTO SELECT RUN/HOLD FUNCTION |
|
1. |
PTZ Setup Mode |
20 |
4. |
ID SET |
2. |
PRESET |
21 |
|
4-1. ID SET Setup |
|
2-1. PRESET Setup |
21 |
|
4-2. ID SET ON/OFF Setup |
|
2-2. PRESET Movement |
21 |
|
4-3. DISPLAY POSITION Setup |
3. |
SWING |
22 |
5. |
TIME/DATE SET |
|
3-1. SWING Setup |
22 |
|
5-1. TIME/DATE Setup |
|
3-2. SWING Operation |
21 |
|
5-2. ON/OFF Setup |
4. |
GROUP |
23 |
|
5-3. DISPLAY POSITION Setup |
|
4-1. GROUP Setup |
23 |
What to do when the product malfunctions |
|
|
4-2. GROUP Operation |
22 |
Appearance |
|
5. |
TOUR. |
24 |
Controller Specifications |
|
|
5-1. TOUR Setup |
24 |
|
|
|
5-2. TOUR Operation |
24 |
|
|
26
27
27
27
28
29
30
31
32
32
33
34
35
35
35
35
36
36
37
37
37
38
39
40
40
40
40
41
41
41
42
42
42
43
43
43
44
44
45
45
46
ENGLISH

Safety caution
Samsung Techwin cares for the environment at all product manufacturing stages to preserve the environment, and is taking a number of steps to provide customers with more environment-friendly products.The Eco mark represents Samsung Techwin s will to create environment-friendly products, and indicates that the product satisfies the EU RoHS Directive.
 Warning
•All work related to the installation of this appliance must be performed by qualified service personnel or system installers.
-If the product is connected or installed improperly, electric shock, fire, severe injury, and/or damage can result.
•Please install the product on a completely flat floor.
-Always check the strength and stability of the installation location.
-Do not drop the appliance on the floor. This may result in damage or injury.
Do not attempt to disassemble the appliance. To prevent electric shock, do not remove screws or covers.
-There are no user-serviceable parts inside. Contact qualified service personnel for maintenance.
•Never use the appliance in places where there are flammable materials.
-Never use the appliance in places where flammable materials such as gas are used.
•This may result in fire, explosion, and other serious accidents.
•Never touch un-insulated parts with wet hands.
-Touching un-insulated parts with wet hands may result in serious electric shock.
•Never expose the appliance to water or moisture.
-If the appliance gets wet, immediately turn the power off.
-Stop using the appliance if it gets wet. Contact the manufacturer immediately.
•Stop using the appliance if there appears to be any operational problem.
-Immediately turn the power off to the appliance if there is any abnormal condition such as smoke or unusual smells.
-Continuing to use the appliance under abnormal conditions may result in serious damage.
•Always use the recommended power.
-Using incorrect power source ratings may result in fire, electric shock, or damage.
•Always handle the connection cable with care.
-Never damage or modify the connection cable.
-Do not pull, expose to heat, or place heavy objects on the connection cable.
-Non-observance of these warnings may result in fire, electric shock or damage.
Safety caution
 Caution
•Use the appliance indoors only.
-Do not place the appliance outdoors or expose it to rain or moisture.
-If dropped in water, the appliance may be corroded and damaged.
•Do not use the appliance where there is excessive dust, smoke, or moisture.
-Using the appliance under such conditions may result in fire, electric shock or serious damage.
•Do not operate the appliance in temperatures beyond those specified.
-Excessive heat or cold may damage the appliance.
-Always operate the appliance within the recommended temperature range of 0˚C ~ 40˚C.
•Do not place the appliance in direct sunlight.
-This may discolor the appliance.
•Do not apply excessive shock to the appliance.
-Excessive shock may damage the appliance.
 Maintenance and Repair
If the controller body gets dirty, turn the power off and wipe the surface with a soft cloth.
-Do not use chemical agents such as alcohol or benzene. For detailed information on upgrading the firmware, please direct your inquiries to the installation vendor.
Refer all work related to the installation of this appliance to qualified service personnel or system installers.
For U.S.A
This equipment has been tested and found to comply with the limits for a Class A digital device, pursuant to Part 15 of the FCC Rules. These limits are designed to provide reasonable protection against harmful interference when the equipment is operated in a commercialenvironment. This equipment generates, uses, and can radiate radio frequency energy and, if not installed and used in accordance with the instruction manual, may cause harmful interference to radio communications. Operation of this equipment in a residential area is likely to cause harmful interference, in which case the user will be required to correct the interference at his own expense.
ENGLISH
SYSTEM CONTROLLER 4 User’s Manual |
SYSTEM CONTROLLER 5 User’s Manual |

Major Functions and Features
 1. Overview
This product is designed for use only with the Speed Dome camera, CCTV receiver, and Samsung Digital Video Recorder.
•Speed Dome camera : Samsung Techwin (SPD), PELCO-D, PELCO-P, PANASONIC (PANA), SAMSUNG ELECTRONICS (SEC), ELMO, BOSCH
•CCTV Receiver : SRX-100B
•DVR : Samsung Techwin
•MATRIX : Samsung Techwin
 2. Features
-It is possible to totally control the 255 Speed Dome camera, CCTV Receiver, Samsung Matrix and Samsung Digital Video Recorder.
-If the Speed Dome is set to one-way reception (RESPONSE OFF), it is possible to connect a maximum of 16 subcontrollers, including the master controller.
-If the Speed Dome is set to two-way reception (RESPONSE ON), it is possible to connect a maximum of 12 subcontrollers, including the master controller.
-Camera control with the joystick, zoom buttons, and focus buttons
-Easy camera preset location setup and movement
-Camera control without an operator through automatic operation mode
 The SPD-2500/1600 is set to two-way reception and the SPD-3300/3000/2300/2200 is set to one-way reception by factory default.
 If the Speed Dome (SPD-2500/2200/1600) DIP switch is set to one-way reception, each sub-controller can be controlled independently. If it is set to two-way reception, subcontrollers cannot be controlled independently.
 Sub-controllers cannot be controlled if the master controller is in use.
SYSTEM CONTROLLER 6 User’s Manual
Major Functions and Features
 3. Controller Button Layout
Caution |
•Different surveillance cameras may have different names for the same functions, depending on the manufacturer.Some functions may not be available for certain models.
 Product Components
SCC-3100A Controller
Junction Box
Controller Connection Cable
Power Adaptor (DC 12V)
User's Manual
SYSTEM CONTROLLER 7 User’s Manual
ENGLISH

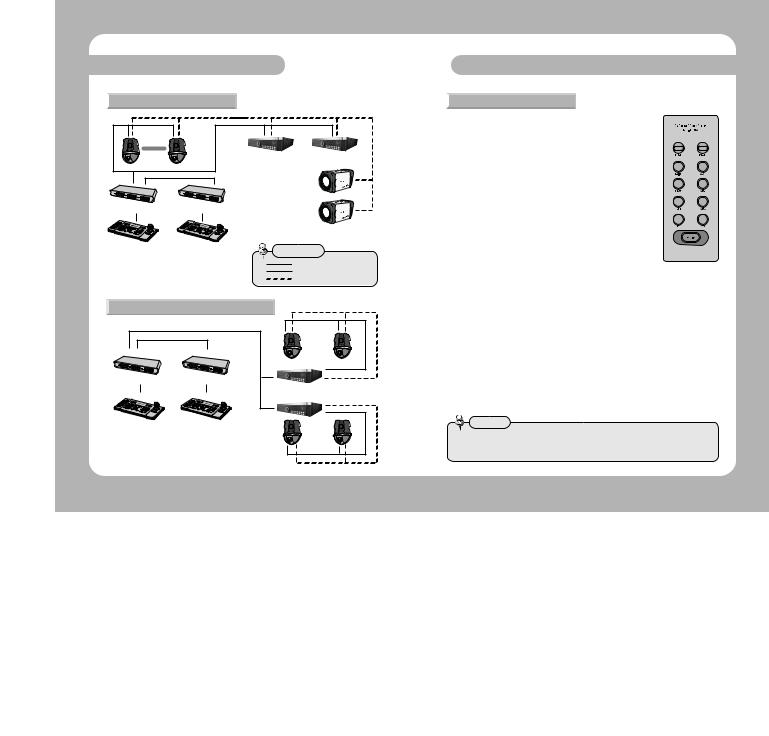
System Overview
 1. System Connections
1-1 Connecting Controller and Junction Box
1-2 Connecting Junction Box and External Devices
[SVR-1630 connection] |
[PTZ connection] |
[SVR-1650/1640/950/1630/430/440 connection] |
(SPD-3300/3000/2300, |
SPD-2500/2200/1600) |
|
* RX+ and TX+ / RXand TXmust be short- |
* RX+=DATA+ |
circuited. |
RX- =DATA |
•All supported SPEED DOME functions can be controlled when the PTZ camera is connected through the SVR-1650/1640/950.
•When connecting with an SVR-1630, only SPD series PTZ cameras can be employed.
•When controlling a PTZ camera via an SVR-1630 there is a delay, and the response may be slow.
•When controlling a PTZ camera with a sub-controller there is a delay, and the response may be slow.
System Overview
 2. RS-485/422 Pin Layout (D_SUB_FEMALE)
 3.RS-232C Pin Layout (D_SUB_MALE)
 4. Junction Box DIP Switch
• RS-485 Termination ON |
|
|
|
|
|
|
|
|
• RS-422 Termination ON |
|
|
|
|
|
|
|
|
|
|
|
|
|
|
|
|
|
|
|
|
|
|
|
|
|
|||
|
|
|
|
|
|
|
|
|
|
|
|
|
|
|
|
|
|
|
• RS-485 Termination OFF |
|
|
|
|
|
|
|
|
|
• RS-422 Termination OFF |
|
|
|
|
|
|
|
|
|
|
|
|
|
|
|
|
|
|
|
|
|
|
|
|
|
||
|
|
|
|
|
|
|
|
|
|
|
|
|
|
|
|
|
|
|
ENGLISH
SYSTEM CONTROLLER 8 User’s Manual |
SYSTEM CONTROLLER 9 User’s Manual |
System Overview
 5. General Connection
PTZ
Dome Camera
Junction Box |
Junction Box |
Master Controller |
Sub-Controller |
|
(a maximum of 15 |
|
connections allowed) |
• SVR-1630 cannot use general connection.
DVR
Dome Camera + DVR: 255 max.
CCD Camera
Remarks
:Controller Connection Cable
:RS-485/422
: Video Cable
6. Connection Through SVR-1650/1640/950/440 |
||
|
|
PTZ |
|
|
Dome Camera |
Junction Box |
Junction Box |
|
|
|
SVR-1650/1640/950/440 : 255 max. |
Master Controller |
Sub-Controller |
|
|
(a maximum of 15 |
|
|
connections allowed) |
PTZ |
|
|
|
|
|
Dome Camera |
Names and Functions of Each Part
 1.Camera Setup Section
RESET |
: Resets camera power. |
|
|
|
|
|
||||
PRESET |
: Moves camera to the preset location (see p.21). |
|
|
|||||||
SWING |
: Continuously travels between two assigned locations |
|
||||||||
|
|
|
horizontally (pan) or vertically (tilt) (see p.22). |
|
|
|||||
AUX 1 |
: Toggles the camera's external device AUX1 on and off. |
|
|
|||||||
GROUP |
: Repeats sequential surveillance of assigned preset locations |
|
||||||||
|
|
|
with preset movement rates and intervals (see p.23). |
|
|
|||||
AUX 2 |
: Toggles the camera's external device AUX2 on and off. |
|
|
|||||||
TOUR |
: Sets more than 1 group for tour and performs |
|
|
|||||||
|
|
|
continuous group action (see p.24). |
|
|
|
|
|||
AUX 3 |
: Toggles the lights around the camera on and off. |
|
|
|||||||
AF |
: Sets the focus to automatic or manual after operating |
|
||||||||
|
|
|
the camera (see p.28). |
|
|
|
|
|
||
OSD |
: Displays the camera OSD menu (see p. 29). |
|
|
|||||||
FUNCTION: Used to perform 2 functions or more at the same |
|
|||||||||
|
|
|
time (see p.12). |
|
|
|
|
|
|
|
Buttons supported by different manufacturers |
|
|
|
|
||||||
|
|
SPD |
|
PELCO-D |
PELCO-P |
PANASONIC |
SAMSUNG |
|
ELMO |
BOSCH |
|
|
|
ELECTRONICS |
|
||||||
|
|
|
|
|
|
|
|
|
|
|
RESET |
|
O |
|
O |
O |
O |
X |
|
O |
X |
PRESET |
|
O |
|
O |
O |
O |
O |
|
O |
O |
TOUR |
|
O |
|
X |
X |
X |
X |
|
X |
X |
SWING |
|
O |
|
O(AUTO-SCAN) |
O(AUTO-SCAN) |
O(AUTO-PAN) |
O(AUTO-PAN) |
|
O(AUTO-PAN) |
X |
GROUP |
|
O |
|
X |
X |
O(AUTO-SEQ) |
O(SCAN) |
|
O(AUTO-SEQ) |
X |
AF |
|
O |
|
O |
O |
O |
O |
|
O |
X |
OSD |
|
O |
|
O |
O |
O |
O |
|
O |
O |
AUX 1 |
|
|
|
Applies only to systems with AUX 1 terminals. (SRX-100B only) |
|
|||||
AUX 2 |
|
|
|
Applies only to systems with AUX 2 terminals. (SRX-100B only) |
|
|||||
AUX 3 |
|
|
Applies only to systems with housing and receivers that support the light function. (SRX-100B only) |
|||||||
Caution
•Some buttons in the camera setup section may not be supported or may be used differently depending on the camera manufacturer.
ENGLISH
SYSTEM CONTROLLER 10 User’s Manual |
SYSTEM CONTROLLER 11 User’s Manual |

Names and Functions of Each Part
 2. Number Pad
 0 ~ 9 : Used for entering camera ID, channel number, monitor number, DVR ID, etc. (see p.26).
 MONITOR : Select a monitor for matrix output
 CAMERA : Enter camera number and press the CAMERA button to set the camera ID (PTZ mode) or set the channel (DVR mode).
|
SPD |
PELCO-D |
PELCO-P |
PANASONIC |
SAMSUNG |
ELMO |
BOSCH |
|
ELECTRONICS |
||||||
|
|
|
|
|
|
|
|
F+1 |
TRACE RUN |
TRACE RUN |
TRACE RUN |
TRACE RUN |
TRACE RUN |
|
|
(PATTERN) |
(PATTERN) |
(PATTERN) |
(PATTERN 1) |
|
|
||
|
|
|
|
||||
F+2 |
TRACE MEMORY |
|
|
F2 |
TRACE RUN |
|
|
|
|
(SPECIAL 2) |
(PATTERN 2) |
|
|
||
|
|
|
|
|
|
||
F+3 |
TRACE MEMORY |
|
|
F3 |
TRACE RUN |
|
|
STOP |
|
|
(PATTERN 3) |
|
|
||
|
|
|
|
|
|
||
F+4 |
AUTO POWER |
|
|
AUTO-SORT |
|
|
|
ON |
|
|
|
|
|
||
|
|
|
|
|
|
|
|
F+5 |
AUTO POWER |
|
|
|
|
|
|
OFF |
|
|
|
|
|
|
|
|
|
|
|
|
|
|
|
F+6 |
SRX-100B |
|
|
|
|
|
|
POWER ON |
|
|
|
|
|
|
|
|
|
|
|
|
|
|
|
F+7 |
SRX-100B |
|
|
|
|
|
|
POWER OFF |
|
|
|
|
|
|
|
|
|
|
|
|
|
|
|
Caution
•When using functions that are performed by a combination of the function button and numeric keys, the setup may be different depending on the camera manufacturer.
•Use the AUTO POWER ON setting to allow the camera to resume the tasks in its memory upon power supply, even if they were previously aborted as a result of power failure, etc.
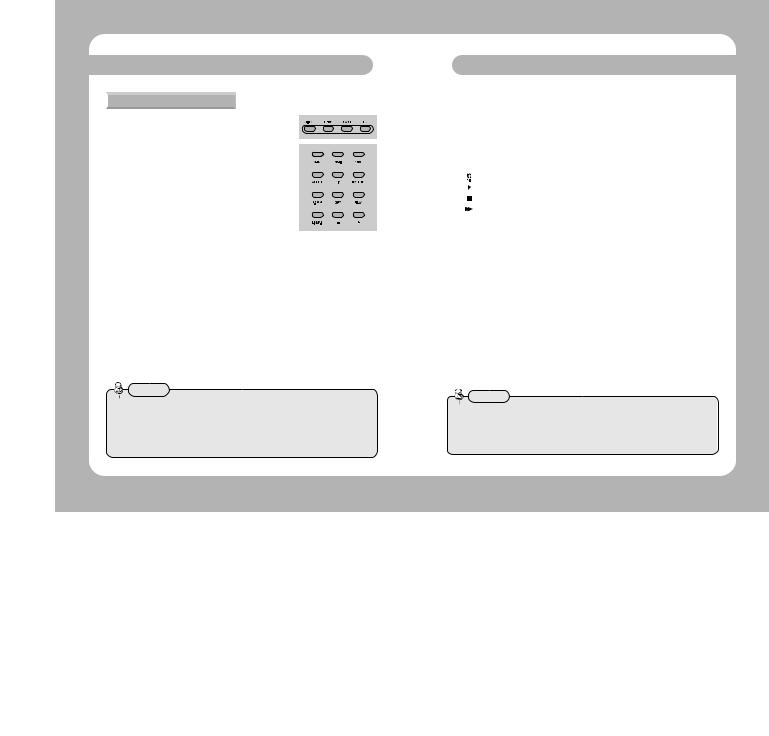
Names and Functions of Each Part
 3.External Device Selectors
|
|
|
|
|
|
|
|
PTZ |
: Selects the PTZ mode (see p.20~29). |
||
MATRIX |
: Selects the MATRIX mode(see p. 40~44) |
||
DVR |
: Selects the DVR mode(see p. 30) |
||
SETUP |
: Activates the system setup menu(see p. 27) |
||
 4. Universal Controller
ZOOM W/T : Performs camera zoom action (wide and telephoto).
FOCUS -/+ : Used for manual focus adjustment.
: Used for moving the menu cursor up (when menu is active), pausing DVR playback, or playing stills.
: Used for moving the menu cursor down (when
|
menu is active) or stopping DVR playback. |
|
: Used for moving the menu cursor left (when |
|
menu is active) or playing recorded video in the reverse direction. |
|
: Used for moving the menu cursor right (when menu is active) or Fast Playback. |
|
: Used for playing recorded video. |
ESC |
: canceling entered values, or moving to the previous stage. |
ENTER |
: Used for executing the entered values and performing setups (PTZ mode and DVR mode) |
Note
• The ESC/ENTER button is used for IRIS control of types of ELMO and BOSCH.
ENGLISH
SYSTEM CONTROLLER 12 User’s Manual |
SYSTEM CONTROLLER 13 User’s Manual |
Names and Functions of Each Part
 5. DVR Controller
 QUICK SET : The Quick Setup menu is displayed in the DVR monitor.
 STATUS : The current DVR status is displayed in the DVR monitor.
 SEARCH : Used for searching the DVR recording list.
REC : Used to start recording the surveillance
screen.
 MENU : The DVR menu is displayed in the DVR
monitor.
 MULTI : Used for switching the DVR monitor from single screen playback mode to multiple screen playback mode.
 AUTO : displays the sequence of cameras connected to the DVR on the monitor.
ALRAM RESET : Used for resetting the alarm and event display, turning the relay on and off, and closing the event notification window.
PIP |
: Used for performing the PIP (Picture In Picture) function. |
 DVR FUNCTION : Used for displaying DVR (SVR-1650/1640/950) function menu.
 DIGITAL ZOOM : Used for zooming in the monitor screen when in single screen playback mode.
COPY |
: Used for copying, backing up, or deleting saved video. |
RELAY |
: Used for manual control of replay output. (only SVR-1630) |
 LIVE / PLAY BACK : Used for toggling the surveillance screen and playback screen. (only SVR-430)
- |
: Used for decreasing menu values in detailed setup menus |
+ |
: Used for increasing menu values in detailed setup menus |
Caution
•If your DVR model is not listed on the table, please refer to the additional description of STW web site and DVR manual.
•DVR Model "S-DVR" is chosen in case of new SAMSUNG TECHWIN DVR model.
•DVR MODEL "P-DVR" is selected when you use Samsung Techwin's PC-Type DVR model.
Names and Functions of Each Part
 Buttons supported by different manufacturers
|
|
SVR-1650 |
SVR-1640 |
SVR-950 |
SVR-1630 |
SVR-430 |
SVR-5416/5116 |
SVR-440 |
|
QUICK SET |
O |
O |
O |
|
O |
|
O |
||
STATUS |
O |
O |
O |
|
O |
|
|
||
SEARCH |
O |
O |
O |
O |
O |
|
O |
||
FOCUS - |
|
|
|
|
O |
|
|
||
FOCUS + |
O |
O |
O |
|
O |
|
|
||
|
|
O |
O |
O |
O JOG |
O |
O |
O |
|
|
|
O |
O |
O |
O |
O |
O(Play back) |
O |
|
|
|
O |
O |
O |
O |
O |
O |
O |
|
|
|
O |
O |
O |
O |
O JOG |
O |
O |
|
ENTER |
O |
O |
O |
O |
O |
|
O |
||
ESC |
O |
O |
O |
O |
O |
|
O |
||
REC |
O |
O |
O |
Record function for |
Record function for |
O |
O |
||
Surveillance (LIVE) screen |
Surveillance (LIVE) screen |
||||||||
|
|
|
|
|
|
|
|||
MENU |
O |
O |
O |
O |
O |
|
O |
||
MULTI |
O |
O |
O |
O |
O |
O |
|
||
AUTO |
O |
O |
O |
O |
O |
O |
O |
||
ALARM RESET |
O |
O |
O |
O |
O |
O |
|
||
DVR FUNCTION |
O |
O |
O |
|
|
|
|
||
PIP |
O |
O |
O |
|
O |
|
|
||
DIGITAL ZOOM |
O |
O |
O |
O |
O |
|
|
||
COPY |
O |
O |
O |
O |
O |
|
O |
||
LIVE/PLAY BACK |
|
|
|
|
O |
|
|
||
RELAY |
|
|
|
O |
|
|
|
||
-/+ |
O |
O |
O |
|
O |
|
|
||
|
|
|
|
|
|
|
|
|
|
Caution
•Some DVR controller buttons may not be supported or may be used differently than as described in this manual, depending on the DVR model. Please refer to the table below for the buttons supported by major DVR model manufacturers. The DVR button with multiple functions works in the same way on the controller.
ENGLISH
SYSTEM CONTROLLER 14 User’s Manual |
SYSTEM CONTROLLER 15 User’s Manual |
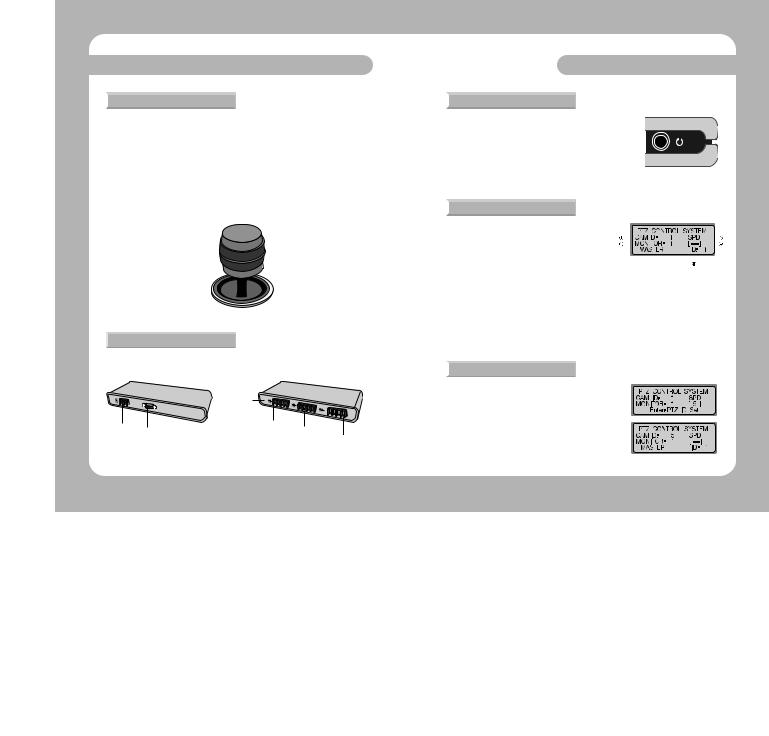
Names and Functions of Each Part
 6. Camera Controller
 Joystick : Used for moving the camera up, down, left, and right, and for zoom control (see p.18). 1) Tilt up (Up button) : Moves the camera up.
2) Tilt down (Down button) : Moves the camera down.
3) |
Tilt left (Left button) |
: Moves the camera left. |
4) |
Tilt right (Right button) |
: Moves the camera right. |
5) |
Turn stick clockwise |
: Performs telephoto-zoom. |
6) Turn stick counter-clockwise : Performs wide zoom.
 ESC(PTZ) : Same as ESC in SPEED DOM OSD MENU.
  ENTER(PTZ) : Same as ENTER in SPEED DOM OSD MENU.
|
|
[ Joystick ] |
|
7. Junction Box |
|
|
|
[Front] |
|
[Back] |
|
|
|
DIP Switch |
|
Power Input |
|
PTZ/DVR Connector |
|
Junction Box Connector |
Sub-Controller |
|
|
Connector |
|
||
|
Connector |
MATRIX Connector |
|
|
|
||
|
|
|
|
PTZ CONTROL
 1. Power-On
 Power on the connected external devices before turning the controller on.
 Press the power button at the back of the controller to power on the controller.
The [SYSTEM Controller] message and F/W version will be displayed |
|
in the LCD monitor, and the message will disappear when the |
|
controller is ready for use. |
|
• The [JOYSTICK ERROR] error will be displayed in the LCD monitor if |
[ power button ] |
the joystick is not placed in the center during power-on. |
|
 2. Initial Screen Display
 CAM ID : Shows the currently selected camera ID.
SPD |
Default is 1. |
|
|
|
|
|
|
|
|
|
|
||||||||
: Shows the currently selected camera model |
|
|
|
|
|
|
|
|
|
|
|
||||||||
|
|
|
|
|
|
|
|
||
|
name. Default is SPD. |
|
|
||||||
|
|
||||||||
MONITOR : Shows the currently selected monitor. |
|||||||||
|
Default is 1. |
||||||||
[- - -] |
: Shows the numbers (ID) entered when entering numbers with the number pad. |
||||||||
ID |
: Shows the current controller ID. If the ID is 1, it acts as the master controller. If the ID is 2 |
||||||||
|
or higher, it acts as a sub -controller. Sub-controllers cannot be used independently |
||||||||
|
without a master controller. |
||||||||
•Always assign a unique ID to ensure that the controller IDs do not conflict with each other.
•SPD : Samsung Techwin Co., Ltd.
 3. Camera ID Setup
 Enter a number using the number pad.
 The number entered will be shown in the [- - -] display.
 Press the CAMERA or ENTER button to set the camera ID with the number entered.
• Any number from 1 to 255 can be selected. If the number entered is not within the selectable range, the last entered number is taken as the first number.
ENGLISH
SYSTEM CONTROLLER 16 User’s Manual |
SYSTEM CONTROLLER 17 User’s Manual |

PTZ CONTROL
 4. Joystick/Camera Control Button
 The joystick can be used to control the camera s left and right (pan) and up and down (tilt) movements.
 The joystick can be used to control camera zoom functions.
|
|
|
|
[ Camera wide zoom ] |
[ Camera telephoto zoom ] |
||
PTZ CONTROL
 5. SPEED DOME OSD Menu Control
 This is the ENTER/ESC button for SPEED DOME OSD
MENU
ESC : ESC button for PTZ CAMERA OSD menu.
ENTER : ENTER button for PTZ CAMERA OSD menu.
Remarks
•Press the Esc (PTZ)/Enter (PTZ) button for 2 sec. or longer, then let go to adjust the movement speed of the camera manually.
•The Esc button must be pressed again after setting the movement speed.
 6. Camera Zoom Control
 Press the ZOOM W/T button to control zoom wide and zoom telephoto.
ZOOM W : Zoom Wide ZOOM T : Zoom Telephoto
[ZOOM W/T button]
 7. Camera Focus Control
 Press the FOCUS -/+ button to control camera focus.
FOCUS - : Focus gets nearer.
FOCUS + : Focus gets further.
• The FOCUS -/+ button can be used as the ESC/ENTER |
[FOCUS -/+ button] |
function in the OSD menu for older SPD series |
|
ENGLISH
SYSTEM CONTROLLER 18 User’s Manual |
SYSTEM CONTROLLER 19 User’s Manual |
PTZ Mode
 1. PTZ Setup Mode
 This menu is for setting up the PTZ camera function. It is impossible to operate Speed Dome and DVR by sub-controllers when the master controller is set to on.
 Press the SETUP button on the initial screen to display the [SETUP SYSTEM] menu.
 Press the 1 button to activate the [PTZ SETUP 1
  ] menu.
Press the |
button to activate the [ PTZ SETUP |
2] menu. |
|
Reference
The menu may be different depending on the PTZ camera model.
Menu |
Models supported |
Menu |
Models supported |
|
PRESET |
SPD series, PELCO-D/P, PANASONIC, |
MODEL |
SPD series, PELCO-D/P, PANASONIC, |
|
SAMSUNGELECTRONICS,ELMO, BOSCH |
SAMSUNGELECTRONICS,ELMO,BOSCH |
|||
|
|
|||
SWING |
SPD series |
TRACE |
SPD series, PELCO-D/P, |
|
PANASONIC |
||||
|
|
|
||
GROUP |
SPD series |
AF |
SPD series, PELCO-D, PANASONIC, |
|
SAMSUNG ELECTRONICS |
||||
|
|
|
||
TOUR |
SPD series |
- |
- |
|
|
|
|
|
• Press the ESC button to move to an upper setup mode.
PTZ Mode
 2. PRESET
 This menu is for setting the camera to move to preset locations.
2-1. PRESET Setup
 At the [PTZ SETUP 1
  ] menu, press the 1 button (see p.21).
 Use the joystick or camera control button (SCC-3100 model) to move the camera to the desired location (move up, down, left, and right, and control zoom).
 Enter a preset number.
 Press the Enter button to assign the number to the current location.
2-2. PRESET Movement
 In the initial screen, enter an assigned preset number.
 The selected number will be shown in the [- - -] display.
 Press the Preset button to move the camera to the preset location.
 If the number entered is not within the selectable range, the last entered number is taken as the first number.
 PRESET select range: 1~255
PRESET 255 may not be supported depending on the type of camera. (See the camera manual for more information.)
 Preset setup is also available in the OSD menu of the connected camera.
ENGLISH
SYSTEM CONTROLLER 20 User’s Manual |
SYSTEM CONTROLLER 21 User’s Manual |
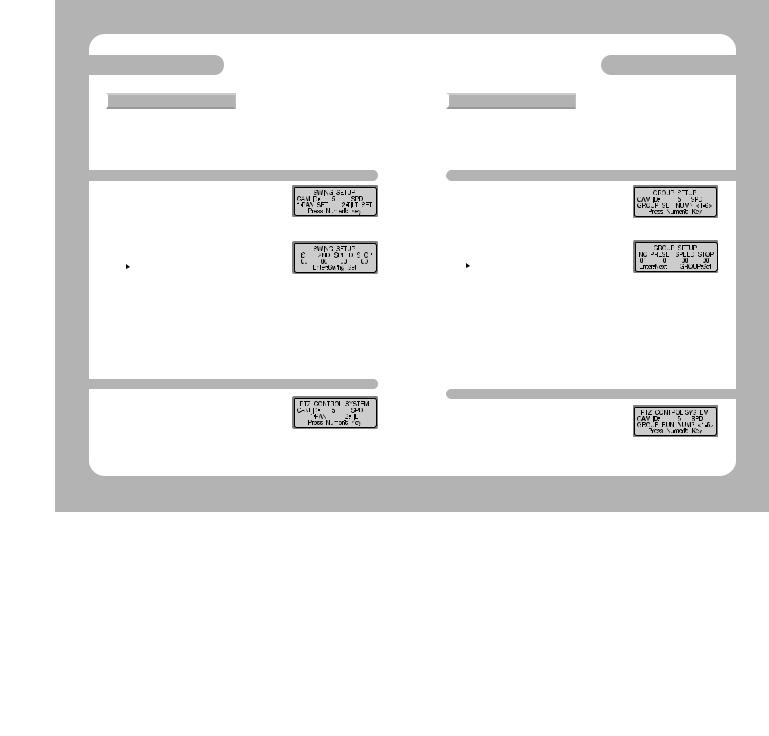
PTZ Mode
 3. SWING
 This menu is for setting the camera to alternate between two assigned locations horizontally (pan) or vertically (tilt). Setting the SWING SETUP menu by controllers is only possible in the SPD series. In case of products by other manufacturers, the setting has to be done by the OSD menu of the camera. See the camera manual for more information.
3-1. SWING Setup
 At the [PTZ SETUP 1
  ] ] menu, press the 2 button (see p.19).
 Press the 1 or 2 button to select a horizontal (pan) or vertical (tilt) cycle.
 Set starting point, ending point, movement speed, and stop time.
- |
|
/ |
button: Moves between items. |
|
|||
- 1ST |
|
: Camera Preset ID for Starting point. |
|
- 2ND |
: Camera Preset ID for Ending point. |
||
- SPEED |
: Movement speed. Can be set for 1 ~ 64. |
||
- STOP |
: Stop time at the starting point and ending point. Can be set to 1 ~ 99 (seconds). |
||
 Press the ENTER button to finish the setup (takes 2 or 3 seconds to finish).
•The Swing function cannot be set if an unassigned number or a number outside the selectable range is entered.
•Over 2 PRESET locations have to be set before setting SWING.
3-2. SWING Operation
 At the initial screen, press the Swing button.
 Press the 1 and 2 buttons to perform the Swing function. - 1 button: Performs the horizontal cycle (pan).
-2 button: Performs the vertical cycle (tilt).
•Move the joystick or press a controller button during the Swing operation to stop the operation.
PTZ Mode
 4. GROUP
 This menu is for setting repeated sequential surveillance of assigned locations with assigned speed and intervals. Setting the GROUP SETUP menu by controllers is only available for an SPD series. In case of products by other manufacturers, the setting has to be done by the OSD menu of the camera. See the camera manual for more information.
4-1. GROUP Setup
 At the [PTZ SETUP 1
  ] menu, press the 3 button (see p.20).
 Enter a Group number.
• Any number between 1 and 6 can be selected.
 Set each location's Preset ID, area movement speed, and stop time.
- |
|
/ |
button: Moves between items. |
|
|
|
|||||
- NO |
|
: Setup sequence. Up to 64 can be selected. |
|||
- PRESET |
: Camera Preset ID for assigned location. |
||||
- SPEED |
: Area movement speed. Can be set from 1 ~ 64. |
||||
- STOP |
: Stop time at the starting point and ending point. Can be set to 1 ~ 99 (seconds). |
||||
 Press the ENTER button to move to the setup page for the next location. Press the Group button to finish the Group Setup.
•The Group function cannot be set if an unassigned number or a number outside the selectable range is entered.
•Over 2 PRESET locations have to be set before setting GROUP.
4-2. GROUP Operation
 At the initial screen, press the Group button.
 Press the Group button to execute the operation.
 The Group function is performed.
ENGLISH
SYSTEM CONTROLLER 22 User’s Manual |
SYSTEM CONTROLLER 23 User’s Manual |

PTZ Mode
 5. TOUR
 This menu is for setting one or more Groups for Tour so that continuous Group operations can be carried out. The TOUR SETUP menu is only available for an SPD series.
5-1. TOUR Setup
 At the [PTZ SETUP 1
  ] menu, press the 4 button (see p.21).
 Press a Group number to add to the Tour.
• Up to 6 Groups can be added.
 Press the ENTER button to finish the setup.
5-2. TOUR Operation
 At the initial screen, press the Tour button.
 The Tour function is performed.
• The TOUR operation is only available for an SPD series.
PTZ Mode
ENGLISH
SYSTEM CONTROLLER 24 User’s Manual |
SYSTEM CONTROLLER 25 User’s Manual |

PTZ Mode
 6. MODEL
 This menu is for setting the PTZ camera ID and camera type.
 At the [PTZ SETUP 1 ] menu, press the
  button (see p.21).
 Press the 1 button to move to the Model Setup screen.
 Press a number in the number pad to set the PTZ camera ID.
The camera model type saved in EEPROM is displayed on the LCD monitor when changing camera ID.
When entering '1'
 Press the + and - buttons on the number pad to change the camera type.
 Press the ENTER button to finish the setup.
PTZ Mode
 7. TRACE
 This menu is for inputting camera movements, through joystick or camera control buttons, into the memory for a certain period of time, to allow repeating of stored movements when performing the Trace (PATTERN) function.
Setting the TRACE SETUP menu by controller is only available for an SPD series.
In case of products by other manufacturers, the setting has to be done by the OSD menu of the camera. See the camera manual for more information.
7-1. TRACE Memory
 At the [PTZ SETUP 1 ] menu, press the
  button (see p.20).
 Press the 2 button to move to the Trace Setup screen.
 Press the 1 button.
 Use the joystick or camera control buttons to perform the camera movement to input. Allowed movements are horizontal movements (pan), vertical movements (tilt), zoom, and focus controls.
 Press the ENTER button to stop camera movement input.
•Maximum length for movement memory is approximately 60 ~ 105 seconds. This may vary according to free memory space.
•Movement memory length may be shorter if the camera movement is more complicated.
•Press the FUNCTION button and the 2 button to start TRACE memory.Press the FUNCTION button and the 3 button to stop TRACE memory. For more information, see p.12
7-2.TRACE Operation
 At the Trace Setup screen, press the 2 button.
ENGLISH
SYSTEM CONTROLLER 26 User’s Manual |
SYSTEM CONTROLLER 27 User’s Manual |

PTZ Mode
 8. AF
8. AF
 This menu is for adjusting camera focus manually or automatically after camera operation. If AF is set to OFF in the camera setup menu, set the AF of the controller to ON and then automatic adjustment is performed after camera operation.
 At the [PTZ SETUP 1 ] menu, press the
  button (see p.21).
 Press the 3 button to move to the AF Setup screen.
 Press the 1 button to automatically adjust the focus after camera operation. Press the 2 button to disable automatic focus adjustment after camera operation.
•Auto Focus Setup is also available in the OSD menu of the camera connected.
•It is recommended that you set up the AF function through the camera OSD menu.
PTZ Mode
 9. OSD
 This is used for displaying the camera menu on the monitor.
 Press the OSD button from the PTZ or DVR mode. (Warning: Execute only from the Master controller).
 Use the controller buttons to set up the camera menu.
- OSD |
: SPDToggle camera menu on/off (hold down for 2 seconds) |
|||||||
|
|
|
|
|
PELCO-D - Toggle camera menu on/off |
|||
|
|
|
|
|
PELCO-P - Toggle camera menu on/off (press(ESC(PTZ)) |
|||
|
|
|
|
|
PANASONIC - Toggle camera menu on/off (press ESC(PTZ)) |
|||
|
|
|
|
|
Samsung Electronics - Toggle camera menu on/off (press ESC(PTZ)) |
|||
|
|
|
|
|
ELMO - Toggle camera menu on/off |
|
||
|
|
|
|
|
BOSCH - Toggle camera menu on/off (press(ESC(PTZ)) |
|||
- ESC(PTZ) : Cancels the menu selection. |
|
|||||||
- ENTER(PTZ) : Selects the menu. |
|
|||||||
- |
|
|
|
|
: Moves the menu cursor right. |
|
|
only Samsung |
|
|
|
|
|
||||
- |
|
|
|
|
: Moves the menu cursor left. |
|
techwin, Panasonic, |
|
- |
|
|
|
|
: Moves the menu cursor up. |
|
Samsung |
|
|
|
|
|
|
Electronics, |
|||
|
|
|
|
|
|
|
|
|
- |
|
|
|
|
: Moves the menu cursor down. |
|
|
ELMO model |
- Joystick : Use the joystick to move the menu cursor up, down, left, and right.(Panasonic and ELMO are not supported.)
•Joystick or other button inputs cannot be used for camera operation when the camera menu is displayed on the monitor.
•PRESET, SWING, GROUP, and TRACE functions can be set in the OSD menu of the camera.
•Please refer to the camera manual for more information on the camera menu.
ENGLISH
SYSTEM CONTROLLER 28 User’s Manual |
SYSTEM CONTROLLER 29 User’s Manual |
 Loading...