


Verizon - WSE.book Page 1 Tuesday, February 9, 2010 12:25 PM
Verizon Wireless
N e t w o r k E x t e n d e r
User Manual
Please read this manual before operating your device, and keep it for future reference.

Verizon - WSE.book Page 2 Tuesday, February 9, 2010 12:25 PM
Intellectual Property
All Intellectual Property, as defined below, owned by or which is otherwise the property of Samsung or its respective suppliers relating to the SAMSUNG Device, including but not limited to, accessories, parts, or software relating there to (the “Network Extender”), is proprietary to Samsung and protected under federal laws, state laws, and international treaty provisions. Intellectual Property includes, but is not limited to, inventions (patentable or unpatentable), patents, trade secrets, copyrights, software, com puter programs,edand relat documentation and other works of authorship. You may not infringe or otherwise violate the rights secured by the Intellectual Property. Moreover, you agree that you will not (and will not attempt to) modify, prepare derivative works of, reverse engineer, decompile, disassemble, or otherwise attempt to create source code from the software. No title to or ownership in the Intellectual Property is transferred to you. All applicable rights of the Intellectual Property shall remain with SAMSUNG and its suppliers.
Samsung Telecommunications America (STA), LLC
Headquarters: |
Customer Care Center: |
1301 E. Lookout Drive |
1000 Klein Rd. |
Richardson, TX 75082 |
Plano, TX 75074 |
Toll Free Tel: |
1.888.987.HELP (4357) |
Internet Address: http://www.samsungusa.com
©
2009 Samsung Telecommunications America, Samsung LLC. Samsung is a registered trademark of Samsung Electronics America, Inc. and its related entities.
Do you have questions about your Samsung Device?
For 24 hour information and assistance, we offer a new FAQ/ARS System (Automated Response System) at:
www.samsungtelecom.com/support
Verizon NE_PM_020910_F19

Verizon - WSE.book Page 3 Tuesday, February 9, 2010 12:25 PM
EP68-00359A
Printed in Korea
Disclaimer of Warranties; Exclusion of Liability
For more information, refer to "Warranty Information" on page 25.

Verizon - WSE.book Page 1 Tuesday, February 9, 2010 12:25 PM
Table of Contents
Section 1: Getting Started .............................................. |
2 |
Introduction . . . . . . . . . . . . . . . . . . . . . . . . . . . . . . . . . . . . . . . |
2 |
What’s In the Box? . . . . . . . . . . . . . . . . . . . . . . . . . . . . . . . . . . |
2 |
System Requirements . . . . . . . . . . . . . . . . . . . . . . . . . . . . . . . . |
3 |
Quick Setup . . . . . . . . . . . . . . . . . . . . . . . . . . . . . . . . . . . . . . . |
3 |
Section 2: Using Your Device ......................................... |
6 |
Additional Setup Information . . . . . . . . . . . . . . . . . . . . . . . . . . . 6
Activating Your Verizon Wireless Network Extender . . . . . . . . . . 8
Getting Help . . . . . . . . . . . . . . . . . . . . . . . . . . . . . . . . . . . . . . . 8
Verizon Wireless Network Extender Basics . . . . . . . . . . . . . . . . 9
Components - Front View . . . . . . . . . . . . . . . . . . . . . . . . . . . . . 9
Components - Rear View . . . . . . . . . . . . . . . . . . . . . . . . . . . . 10
Features . . . . . . . . . . . . . . . . . . . . . . . . . . . . . . . . . . . . . . . . . 12
Section 3: External GPS Antenna ................................. |
13 |
Antenna Installation . . . . . . . . . . . . . . . . . . . . . . . . . . . . . . . . |
13 |
Section 4: Troubleshooting .......................................... |
16 |
Section 5: Important Safety Information ..................... |
19 |
General Precautions . . . . . . . . . . . . . . . . . . . . . . . . . . . . . . . . 19
Using Your Network Extender Near Other Electronic Devices . . 20
Radio Frequency (RF) Energy . . . . . . . . . . . . . . . . . . . . . . . . . 20
Knowing Radio Frequency Safety . . . . . . . . . . . . . . . . . . . . . . 20
FCC Radio Frequency Emission . . . . . . . . . . . . . . . . . . . . . . . . 21
User Guide Proprietary Notice . . . . . . . . . . . . . . . . . . . . . . . . . 24
Section 6: Warranty Information ................................. |
25 |
1
Standard Limited Warranty . . . . . . . . . . . . . . . . . . . . . . . . . . . 25 End User License Agreement for Software . . . . . . . . . . . . . . . 28 Open Source Announcement . . . . . . . . . . . . . . . . . . . . . . . . . 31
GNU GENERAL PUBLIC LICENSE . . . . . . . . . . . . . . . . . . . . . . . .33
NO WARRANTY . . . . . . . . . . . . . . . . . . . . . . . . . . . . . . . . . . . . 38 GNU GENERAL PUBLIC LICENSE . . . . . . . . . . . . . . . . . . . . . . . 40 TERMS AND CONDITIONS FOR COPYING, DISTRIBUTION AND
MODIFICATION . . . . . . . . . . . . . . . . . . . . . . . . . . . . . . . . . . 42 NO WARRANTY . . . . . . . . . . . . . . . . . . . . . . . . . . . . . . . . . . . . 48 Apache License . . . . . . . . . . . . . . . . . . . . . . . . . . . . . . . . . . . 49 BSD 2.0 License . . . . . . . . . . . . . . . . . . . . . . . . . . . . . . . . . . . 53 OpenSSL . . . . . . . . . . . . . . . . . . . . . . . . . . . . . . . . . . . . . . . . 54 APPLE PUBLIC SOURCE LICENSE . . . . . . . . . . . . . . . . . . . . . . 55
Index .............................................................................. |
64 |

Verizon - WSE.book Page 2 Tuesday, February 9, 2010 12:25 PM
Section 1: Getting Started
Introduction
Congratulations on the purchase of your Verizon Wireless Network Extender.
Your purchase of this Network Extender enhances the wireless telephone service that you and your family will receive while in your home or home office.
This User Guide introduces you to the Verizon Wireless Network Extender service and all the features of your new device. It includes the following sections:
•Getting Started
•Using Your Device
•External GPS Antenna
•Troubleshooting
•Important Safety Information
•Manufacturer’s Warranty
Throughout this guide, you’ll find tips and techniques that help you make the most of your new device and service.
It is important that you read each section and note any special requirements. However, if you’d liketotoa specgetrificght feature, simply locate that section in the Table of Contents and go directly to that page. Follow the instructions in that section, and you’ll be ready to use your Network Extender in no time.
Note: Due to updates in software and procedure, this printed guide may not be the most current version for your Network Extender. Visit www.verizonwireless.com/support to access the most recent version of this guide.
What’s In the Box?
•Network Extender
•Ethernet Cable
•Power Supply and Power Cord
•External GPS and antenna cable
•User Guide
•Quick Start Guide
Getting Started |
2 |
|
|
|
|
|
|
|
|
|
|
Verizon - WSE.book Page 3 Tuesday, February 9, 2010 12:25 PM
System Requirements
•An always-on broadband Internet connection with a minimum speed and available bandwidth of 300 kbps.
Note: Satellite, MiFi or wireless connections are not supported.
•An available Ethernet (LAN) port on either your broadband modem or a router connected to the modem.
Note: If you are connecting your Verizon Wireless Network Extender to a router, please ensure it supports Virtual Private Networking (VPN). Although most routers support this functionality, refer to your router’s product documentation to confirm compatibility.
Quick Setup
Setting up service on your new Verizon Wireless Network Extender is fast and easy. This section outlines the procedures needed to quickly set up the Network Extender.
Note: You may also visit www.verizonwireless.com/b2c/store/ accessory?action=gotoSetup to view the online setup and usage tutorial. Follow the onscreen prompts.
1.Confirm your package contains all components.
2.Review the "Important Safety Information" on page 19
before installing |
the Network Extender. |
3
3. Make sure that both your |
router and your Internet |
broadband modem are functioni |
ng properly. Refer to |
particular product’s documentation for more information.
Note: A router with at least one free Ethernet port is required to connect the Network Extender.
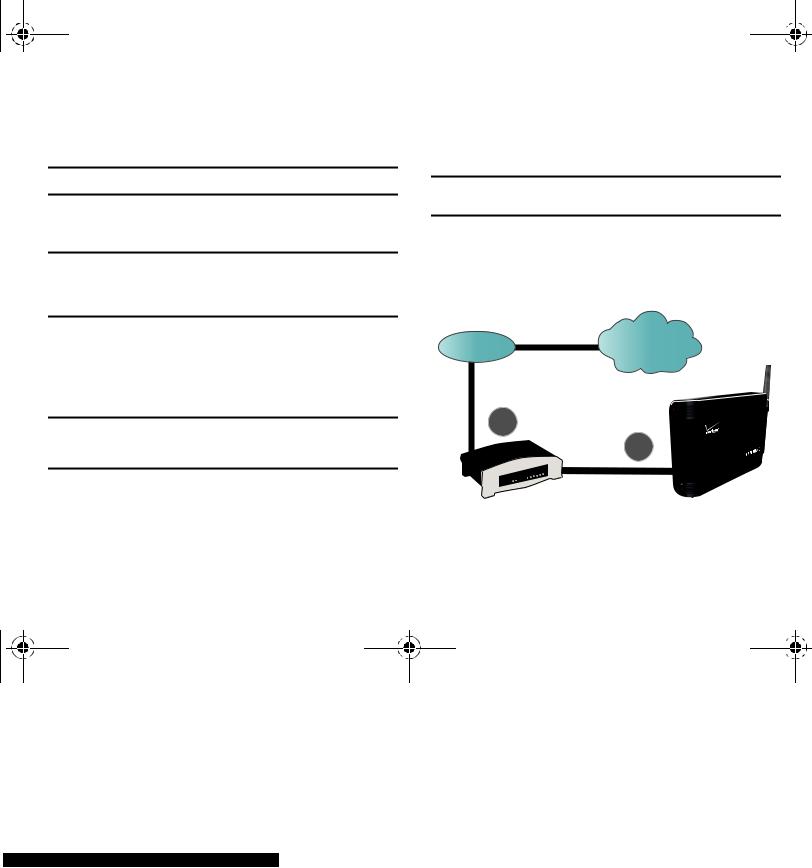
4.Place the Network Extender near a window in a central location.
•For best results, place the Network Extender in an elevated location, such as the top of a bookshelf or tall cabinet.
ISP |
Internet |
5RXWHU 1HWZRUN ([WHQGHU

Verizon - WSE.book Page 4 Tuesday, February 9, 2010 12:25 PM
5.Connect one end of the included Ethernet cable to an open LAN port on the router (1) and connect the other end to the WAN port located at the rear of the Network Extender (2).
Note: Plug the Ethernet cable into the Network Extender before connecting the power supply.
6.Plug the power supply connector into the DC 12V power port located at the rear of the Network Extender (3).
7.Insert one end of the power cord into the power supply and then plug the other end into an available power
outlet (4).
Warning!: Insert the plug into the power outlet last. Failure to do so could cause an electrical short or power surge to the Network Extender.
Note: The use of a surge protector is recommended for the Verizon Wireless Network Extender.
|
1HWZRUN ([WHQGHU |
|
|
3RZHU6XSSO\ |
3RZHU&RUG |
|
||
|
||
|
|
|
|
|
|
|
|
|
|
|
|
|
|
|
|
|
|
|
|
|
|
|
|
|
|
|
|
|
|
|
|
|
|
|
|
|
|
|
|
|
|
|
|
|
|
|
|
|
|
|
|
|
|
|
|
|
|
|
|
|
|
|
|
|
|
|
|
|
|
|
|
|
|
|
|
(WKHUQHW &DEOH |
|
|||||||||
|
|
|
|
|||||||||||||
|
|
|
|
|
|
|
|
|
|
|
|
|
|
|
|
5RXWHU |
Getting Started |
4 |
|
|
|
|
|
|
|
|
|
|

Verizon - WSE.book Page 5 Tuesday, February 9, 2010 12:25 PM
8.Confirm that the front LEDs are illuminated as indicated below:
• Power LED: should be a continuous blue light, indicating that the Network Extender is receiving power.
No illumination indicates there is an issue with the power supply or power connector.
• System LED: should be a continuous blue light, indicating that the Network Extender is properly communicating with the Verizon Wireless network. Blinks red while establishing an initial network connection. Continuous red indicates an abnormal condition.
• GPS LED: should be a continuous blue light, indicating that the Network Extender has
locked onto a valid GPS signal. If the GPS LED is red, the internal antenna may not be able to detect a GPS signal,
and installation of the external GPS antenna might be necessary.
5
•WAN LED: should be a steady blue light, indicating that the Network Extender has detected a valid Ethernet connection. A blinking blue LED indicates data communication.
Note: Allow 3 - 5 minutes for the Network Extender to complete the startup sequence and detect both its connections and available communications. The first time the Network Extender is used, it may take as long as one hour for the initial GPS acquisition. If the GPS LED is still red after one hour, relocate the GPS antenna to receive a stronger signal. See “Antenna Installation” on page 13.
9.Confirm your setup was successful and your Network Extender is functioning properly:
•Confirm that all the LEDs are blue.
•Dial #48 from your Verizon Wireless phone and listen for the "You are on the Network Extender" message.
Verizon Wireless strongly recommends you access your Network Extender account online via My Verizon on verizonwireless.com and set up a list of priority users.
•You may want to include all members of your household that have a Verizon Wireless phone.
•If you do not choose to manage the access to your Network Extender, anyone within range of your Network Extender will be able to use your Network Extender.

Verizon - WSE.book Page 6 Tuesday, February 9, 2010 12:25 PM
Section 2: Using Your Device
Additional Setup Information
Getting started with your new Verizon Wireless Network Extender is easy. This section walks you through an overview of the product, package contents, activation, and how to contact Verizon Wireless for assistance withserviceyourand your Network Extender.
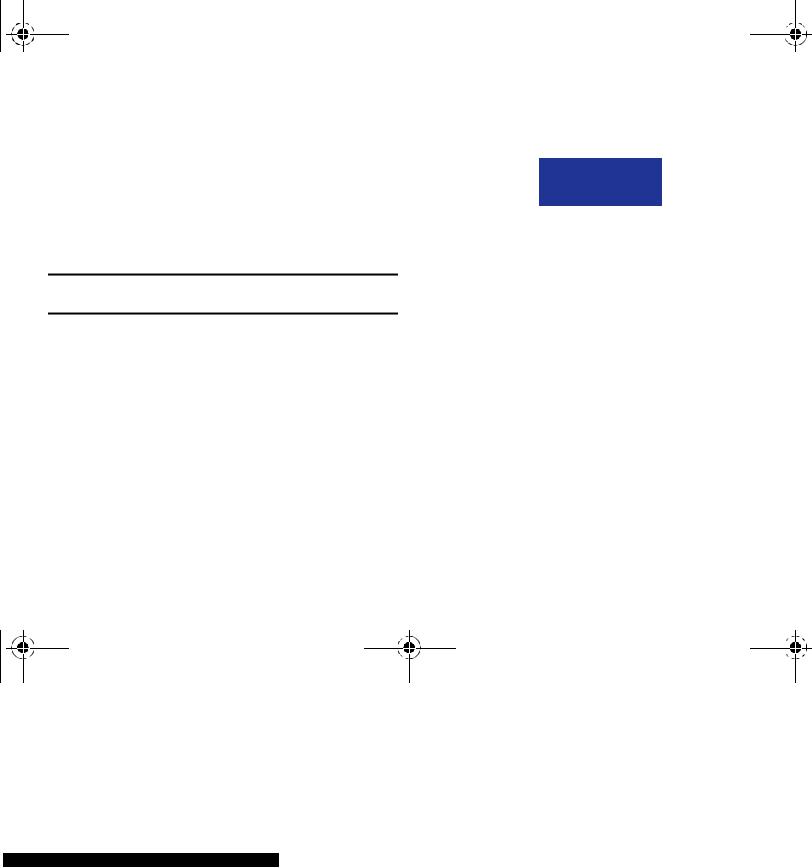
The Verizon Wireless Network Extender is used within your home or home office to extend your Verizon Wireless coverage area through an existing Internet broadband connection.
Internet 
ISP |
Security |
Verizon |
|
Gateway |
Wireless |
||
|
|||
|
|
Network |
|
Broadband |
|
|
Router
About the size of a traditional wireless access point (WAP), the Network Extender facilitates the delivery of cellular traffic through the Internet to the Verizon Wireless network, which then routes the signal to the desired party.
•Number of Users: A maximum of three (3) phones can connect to the Verizon Wireless Network Extender at any one time.
–The first three callers to initiate or receive a call will connect to the Network Extender. Additional users who make or receive a call while all Network Extender channels are in use are redirected to the nearest compatible cell tower (if available).
–As each caller ends a call, that channel then becomes available for another user to initiate (or receive) a new call.
Note: The Network Extender can be managed to ensure Verizon Wireless phone numbers you authorize will always enjoy priority access to the Network Extender network. For more information, see "Quick Setup" on page 3, or view the online Setup tutorial at: http://www.verizonwireless.com/b2c/store/accessory?action=gotoSetup
•Manage Access: Authorized account users can manage access settings for their Verizon Wireless Network Extender by logging into My Verizon at www.verizonwireless.com.
– Up to 50 Verizon Wireless cell phones can be registered.
Using Your Device |
6 |
|
|
|
|
|
|
|
|
|
|
Verizon - WSE.book Page 7 Tuesday, February 9, 2010 12:25 PM
–When the Network Extender is set to managed access mode, unauthorized users are redirected to the nearest compatible cell tower wherever possible.
•Verify on Network Extender: Users can verify that they are on the Verizon Wireless Network Extender network by dialing #48 (and receiving an audio announcement). You will also hear a short double tone on your wireless phone when making or receiving a call while on the Network Extender network. The tone is played at the beginning of the call.
Note: A fourth channel, open to all callers, is always reserved for emergency (E911) calls.
•Connect to the Network Extender: In order to establish an initial connection to the Network Extender network, your Verizon Wireless mobile phone needs to move within close proximity (approximately 15 feet) of the Network Extender unit.
•Calling on Network Extender: After connecting to the Network Extender network, you can move within a broader perimeter while remaining under Network Extender coverage (approximately 40 feet). Refer to www.verizonwireless.com/support for additional details.
•Ranges Will Vary: Both the coverage area required to establish an initial connection and the broader coverage area of the Network Extender cannot be guaranteed and may vary due to environmental factors, such as physical structures and the strength of the external cell tower coverage.
7
The table below outlines bandwidth requirements based on the number of active callers:
Simultaneous |
Download Speed |
Upload Speed |
Callers |
Requirement |
Requirement |
|
|
|
|
|
|
1 caller |
40 kbps |
40 kbps |
|
|
|
2 callers |
80 kbps |
80 kbps |
|
|
|
3 callers |
120 kbps |
120 kbps |
|
|
|
The Network Extender maximizes wireless phone utility within a small area by not only providing better voice quality, but by also allowing you to use this new service without any enhancements to your existing Verizon Wireless mobile phones.
By utilizing a built-in GPS antenna, the Network Extender is capable of maintaining exact network timing updates and providing E911 services with an accurate location.
•The current GPS location (provided by the internal antenna) is used to help the Network Extender quickly locate GPS satellites for faster GPS acquisition.
Verizon - WSE.book Page 8 Tuesday, February 9, 2010 12:25 PM
•The external GPS antenna (provided with your Verizon Wireless Network Extender) allows you to place the Verizon Wireless Network Extender further from a window and run the antenna to an area with stronger GPS reception.
Warning!: You may not be able to make 911 calls in the event of an electrical power outage, broadband connection failure, or other service disruption outside of the Verizon Wireless network coverage area. 911 services may be limited in areas outside of the Verizon Wireless network coverage area. Not all public safety answering points have location-based E911 technology. Always be prepared to report your location to the 911 operator when placing an emergency call. Mobile phones operate using radio signals which cannot guarantee connection in all conditions.
Activating Your Verizon Wireless Network
Extender
Your Network Extender should already be activated. If it is not activated, please call Verizon Wireless Customer Service at (800) 922-0204 or *611 from your Verizon Wireless mobile phone and select the option for technical support.
Note: The Network Extender must be activated for use on the Verizon Wireless network before setup. It will not work unless it has been activated.
Should you need to activate your Network Extender, you will be asked to provide the following information:
•Primary Wireless Phone Number or Verizon Wireless Account Number (located on your Verizon Wireless billing statement)
•Account Password
•MAC ID of the Network Extender found on the sticker affixed to the device.
Getting Help
Note: In order to establish an initial connection to the Verizon Wireless Network Extender network, your mobile phone needs to move within close proximity of your Network Extender unit. After connecting to the network, you can move within a broader perimeter while remaining under Network Extender coverage. Refer to www.verizonwireless.com/ support for additional details.
Note: Both the coverage area required to establish an initial connection and the broader coverage area of the Network Extender cannot be guaranteed and may vary due to environmental factors, such as physical structures and the strength of external cell tower coverage.
Reaching Verizon Wireless Customer Service
You can reach Verizon Wireless Customer Service in a number of ways:
•Call us toll free at (800) 922-0204 or *611 from your Verizon Wireless mobile phone.
•Visit the support pages at www.verizonwireless.com/support.
Using Your Device |
8 |
|
|
|
|
|
|
|
|
|
|

Verizon - WSE.book Page 9 Tuesday, February 9, 2010 12:25 PM
Verizon Wireless Network Extender Basics
•Components (page 9)
•Features (page 12)
•Maintenance Notes (page 12)
Your Network Extender is packed with features that expand your ability to stay connected to the people and information important to you. This section will guide you through the basic features and functions of your Verizon Wireless Network Extender.
Components - Front View
In addition to a wireless antenna, the Network Extender has four LED lights that are used to indicate the device connectivity status.
•Wireless Antenna provides omnidirectional transmission and reception of signals between the Network Extender and communicating Verizon Wireless mobile phones. The wireless antenna rotates 360 degrees.
•Power LED (PWR) indicates the power status.
•System LED (SYS) indicates the status of Network Extender connectivity to the Verizon Wireless network.
•GPS LED indicates the GPS connection status.
9
Note: If the unit’s GPS signal strength is weak (due to location), it is recommended that you either move the Network Extender near a window or install the external GPS antenna. For more details, see "External GPS Antenna" on page 13.
Note: GPS antenna receives signals from Global Positioning System satellites and uses them to obtain time and location information.
• WAN LED indicates the status of the Ethernet connection.
Wireless
Antenna
Power
LED
System
LED
GPS LED 
WAN LED 

Verizon - WSE.book Page 10 Tuesday, February 9, 2010 12:25 PM
|
|
LED |
Function |
Description |
||
|
|
|
|
|
|
|
|
|
|
|
|
|
|
|
|
PWR |
Power |
• |
Solid blue: normal |
|
|
|
|
|
|
• |
No light: abnormal |
|
|
|
|
|
|
|
|
|
SYS |
System connected |
• |
Solid blue: normal |
|
|
|
|
|
|
• |
Solid red: abnormal |
|
|
|
|
|
|
|
|
|
GPS |
GPS signal |
• |
Solid blue: normal |
|
|
|
|
|
|
|
(GPS is received) |
|
|
|
|
|
• |
Blinking blue or red: |
|
|
|
|
|
|
while searching for GPS |
|
|
|
|
|
• |
No light: abnormal (GPS |
|
|
|
|
|
|
signal cannot be |
|
|
|
|
|
|
received, the external |
|
|
|
|
|
|
GPS antenna is |
|
|
|
|
|
|
required) |
|
|
|
|
|
|
|
|
|
WAN |
WAN (Ethernet) connection • |
Solid blue: normal |
||
|
|
|
|
|
• |
Blinking blue: data |
|
|
|
|
|
|
communication |
|
|
|
|
|
• |
No light: abnormal |
|
|
|
|
|
|
|
|
|
|
|
|
|
|
|
|
|
|
|
|
|
|
|
|
|
|
|
|
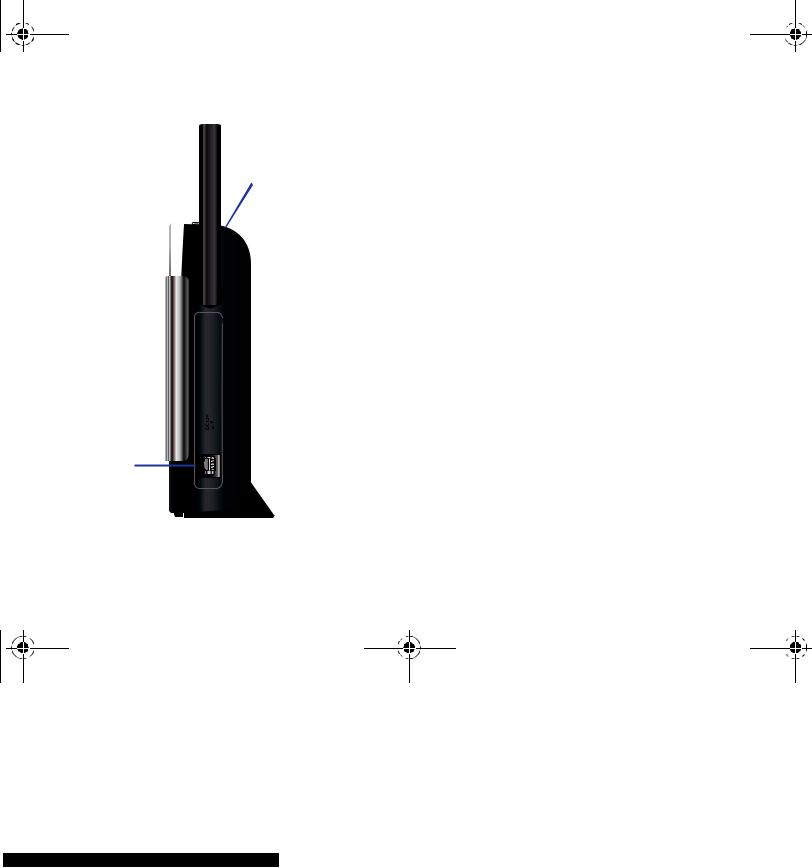
Components - Rear View
The rear of the Network Extender provides access to the WAN port, power port, and external GPS antenna.
1.GPS Antenna Port slides to provide access to the external GPS antenna for removal and relocation.
•A red GPS LED indicates a GPS signal could not be detected using the internal GPS antenna. The external GPS antenna should be connected. See “External GPS Antenna” on page 13.
2.Heat Vents provide passive ventilation for the Network Extender and allow for dissipation of internally generated heat.
Note: The Network Extender needs to remain vertical and in a well-ventilated location. The vertical position allows proper air flow to the internal components.
3.DC 12V Power Port provides power to the Network Extender when connected to the AC power supply and cord (included).
Warning!: Only use the provided power cord and supply. Using any other power source may damage the Network Extender.
Using Your Device |
10 |
|
|
|
|
|
|
|
|
|
|
Verizon - WSE.book Page 11 Tuesday, February 9, 2010 12:25 PM
|
|
|
|
|
|
4. WAN Port allows you to connect the Ethernet cable |
|
|
|
|
|
|
provided to establish communication between the Network |
|
|
|
|
|
|
Extender and your broadband router. This connection port |
|
|
|
|
|
|
is then used to transmit voice and data through the |
|
|
|
|
|
|
GPS Antenna Port |
|
|
|
|
|
|
|
|
|
|
|
|
|
Internet to the Verizon Wireless network, which then |
|
|
|
|
|
|
authenticates the Network Extender and allows |
|
|
|
|
|
|
communication with wireless phones. |
Heat |
|
|
|
|
|
• If the corresponding WAN LED does not illuminate, this indicates |
|
|
|
that although an Ethernet cable is connected, no communication is |
|||
Vents |
|
|
|
|||
|
|
|
occurring through either your router or your ISP Internet connection |
|||
|
|
|
|
|
|
|
|
|
|
|
|
|
(DSL, fiber optic, cable, etc.). |
|
|
|
|
|
|
• Please make sure your broadband connection is active and |
|
|
|
|
|
|
functioning properly. Contact your Internet Service Provider if the |
|
|
|
|
|
|
problem persists. |
|
|
|
|
|
|
|

 DC 12V Power Port
WAN
Port
11
Verizon - WSE.book Page 12 Tuesday, February 9, 2010 12:25 PM
Features
The following list highlights some of the Network Extender's features:
•The Network Extender enables users to easily install and configure the system by connecting to an existing broadband network.
•To prevent unauthorized users from accessing the Network Extender and diminishing your available bandwidth, you have the option to restrict the use of your Network Extender by logging into My Verizon at www.verizonwireless.com.
•The Network Extender is a Plug & Play device that can be installed to automatically provide enhanced wireless telephone service in a home or small office without having to change your existing mobile phone.
•The Network Extender utilizes a GPS receiver to get both timing and unit location information. In case of a weak GPS signal, install the external GPS antenna and locate it near a window to receive a stronger signal.
Note: Certain Verizon Wireless services are not compatible with the Network Extender, refer to www.verizonwireless.com/support for details.
Maintenance Notes
These notes should be carefully reviewed before using the Network Extender:
•See “General Precautions” on page 19.
•Only connect the Network Extender’s power plug to a 110–125 VAC outlet.
Note: The use of a surge protector is recommended.
•When cleaning the Network Extender, first unplug the connector from the power outlet. Do not clean the Network Extender using chemical solvents or detergents, but with an anti-static cleaning pad.
•If the Verizon Wireless Network Extender is connected to a Wi-Fi router, ensure that the unit is placed at least 2 feet away from the router (to avoid interference).
•Do not obstruct the heat vents by blocking the openings or covering the Network Extender.
•Remove the Network Extender’s power connector from the power outlet if the device will not be used for an extended period of time.
Using Your Device |
12 |
|
|
|
|
|
|
|
|
|
|

Verizon - WSE.book Page 13 Tuesday, February 9, 2010 12:25 PM
Section 3: External GPS Antenna
If your Verizon Wireless Network Extender cannot receive a Global Positioning System (GPS) signal, it may be necessary to improve the reception by installing and then positioning the external GPS antenna. This section outlines the installation and relocation of this GPS antenna.
Antenna Installation
In some cases, you may find that because of its current location, the Network Extender’s GPS antenna may not be able to properly receive an active GPS signal. If a stable GPS signal is not detected, as indicated by the red GPS LED, you will need to install the GPS antenna cable as explained in this section.
Without a valid GPS signal, the Network Extender cannot function properly, and calls will be redirected to the nearest compatible cell tower.
Warning!: Use only the GPS antenna supplied with your Verizon Wireless Network Extender.
When positioning the GPS antenna, ensure that it is:
•Installed in a horizontal position.
•Adjacent to a window and in an open area. This ensures clear reception of the GPS signal.
Note: GPS signal strength is greatly reduced when passing through walls or other hard surfaces.
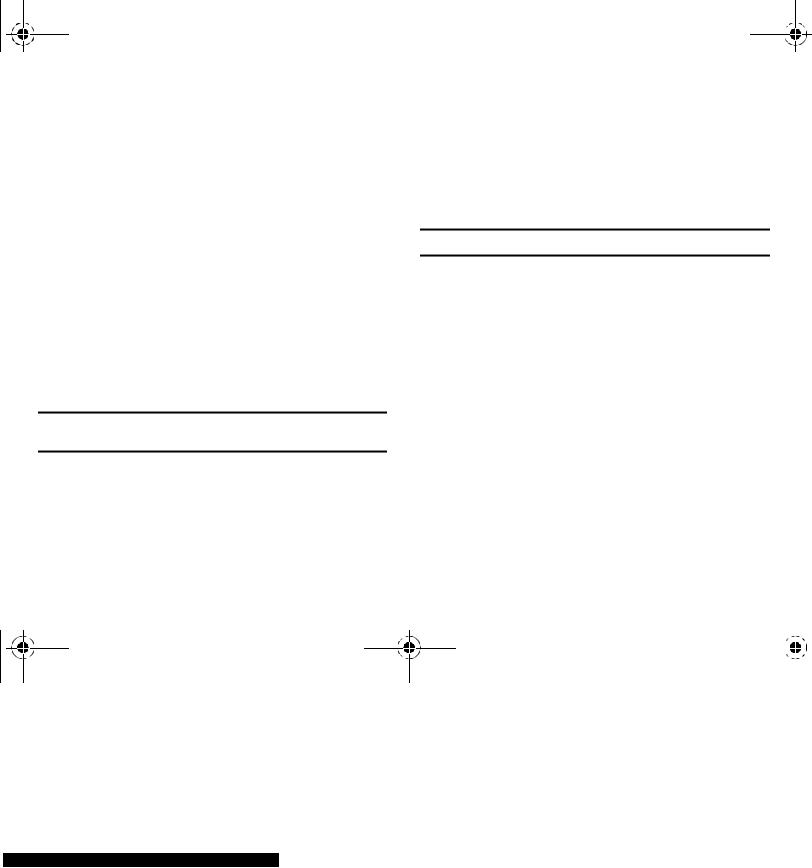
To connect the GPS antenna to the Network Extender, follow these steps:
1.Turn off the Network Extender.
2.Rotate the antenna down to provide access to the GPS antenna’s protective cover.
Note: The GPS antenna receives signals from Global Positioning System satellites and uses them to obtain time and location information.
13

Verizon - WSE.book Page 14 Tuesday, February 9, 2010 12:25 PM
|
GPS antenna |
|
|
|
cover |
|
|

3.Firmly press down on the Open groove (top of station).
4.Slide the protective cover back to expose the rectangular GPS antenna.
5.Use a blunt tool (such as a coin) to carefully pry the GPS antenna away from the Network Extender, in the same direction as shown in step 4.
6.Remove the GPS antenna from its compartment.
7.Connect and secure the GPS antenna to the end of the provided GPS cable labeled "Connect to GPS Antenna."
8.Connect and secure the terminal end of the same mini-coax cable to the port on the Network Extender (within the GPS antenna compartment).
Warning!: Do not force the connector into the GPS antenna port as this can damage the connector.
9.Replace the cover on the station. Verify the cable is threaded through the opening on the cover.
10. Rotate the antenna back up |
to its original position. |
Tip: Place the antenna near a window where the GPS signal is strongest.
Warning!: Do not use duct tape to secure the GPS antenna to its new location.
Tip: You can use double-sided tape to secure the bottom of the GPS antenna to its new location.
External GPS Antenna |
14 |
|
|
|
|
|
|
|
|
|
|

Verizon - WSE.book Page 15 Tuesday, February 9, 2010 12:25 PM
Note: If a GPS signal cannot be detected, remove the GPS antenna and place it in a new location to receive a stronger signal. This new location should be located close to a window.
Mini-coax connector
GPS antenna compartment
|
TO |
CONNECT |
GPS |
|
|
|
|
*36 $QWHQQD
11.Power on the Network Extender to allow the detection of both the external antenna connection and an available GPS signal.
15

Verizon - WSE.book Page 16 Tuesday, February 9, 2010 12:25 PM
Section 4: Troubleshooting
Now that you’ve been given an overview of the Verizon Wireless Network Extender, some situations might arise where you’ll need additional usage or connection help. This section provides some troubleshooting tips and techniques.
For more information, please visit us online at www.verizonwireless.com/support.
•My Power LED is not Illuminating.
–Make sure that one end of the power cord is securely connected to an active outlet and that the other end is properly connected to the power supply.
–Make sure the power connector is securely inserted into the rear DC 12V port on the back of the Network Extender.
•My GPS LED is not illuminating blue even after a few minutes.
Note: The first time the Network Extender is used after installation or after relocation, it can take up to one hour to acquire a GPS connection.
–The GPS antenna cannot obtain a signal.
–If possible, move the Network Extender to a location with fewer surrounding obstructions. The new location should be in an open area and closer to a window, if possible.
–If the preceding fails, remove the power cord from the wall outlet for at least 10 seconds.
–Reconnect the power connector to the DC 12V port and plug the power cord into the wall outlet. This allows the Network Extender to re-initiate its startup sequence where it detects the Ethernet connection, GPS signal, and communication with the Verizon Wireless network.
–If relocation does not produce a GPS signal, uninstall the GPS antenna from the Network Extender and relocate it to receive a stronger signal.
•My WAN LED is blue but I cannot place a call via my Verizon Wireless Network Extender.
–Check that the router is communicating properly with your ISP. The Internet activity LED on your router should be blinking. For further router troubleshooting tips, please review the router manufacturer's printed or online documentation.
Troubleshooting 16

Verizon - WSE.book Page 17 Tuesday, February 9, 2010 12:25 PM
•My System LED is solid red.
–A red System LED indicates a system error was detected and is symptomatic of a communication problem with the Verizon Wireless network.
–Confirm your Network Extender was activated at time of purchase. If your Network Extender has not already been activated, call Verizon Wireless Customer Service at (800) 922-0204 or *611 from your Verizon Wireless mobile phone and select the option for technical support.
–Before contacting the Verizon Wireless Customer Service Center, confirm the following:
•Is your WAN LED illuminating blue?
–If it is not, then there may be a communication problem between your Network Extender and the router.
–If the WAN LED is illuminating blue, then check that the router is communicating properly with your ISP. The Internet activity LED on your router should be blinking. For further router troubleshooting tips, please review either the router manufacturer's printed or online documentation.
•Is the GPS LED illuminating blue? If it is not, the Network Extender might not be receiving a GPS signal. Inability to receive a GPS signal can result in the Network Extender failing to validate your account information and network timing, which then prevents usage and reroutes you back to the nearest compatible cell tower. If this is the problem, install the external GPS antenna. See “External GPS Antenna” on page 13.
17
•The Network Extender seems to be getting too hot.
–Make sure there is nothing blocking the heat vents located along the side of the Network Extender.
–It is recommended that the Network Extender be located in a wellventilated open area at least 12 inches from any surrounding hot surfaces. It is not recommended that the Network Extender be installed in a cabinet or other enclosed location.
•How can I manage access to my Network Extender?
–You have the option to manage priority access settings for your Network Extender to specified numbers by logging into My Verizon at www.verizonwireless.com. A maximum of 50 authorized Verizon Wireless callers can be registered.
–When the Network Extender is set to open access, the first three callers detected within the device’s area are given access to place or receive calls through the Network Extender. Your Verizon Wireless Network Extender is set to open access by default.
–Anyone else who then initiates a call while all Network Extender channels are occupied is redirected to the nearest compatible cell tower when available.
–When unauthorized callers (callers not on your managed access list) within range of the Network Extender attempt to place a call, they are automatically redirected to the nearest compatible cell tower.
–If a handoff to the nearest compatible cell tower is not possible and all channels are not in use, one channel may be available for an
Verizon - WSE.book Page 18 Tuesday, February 9, 2010 12:25 PM
unauthorized user to access. Callers on the managed access list are always given priority access to the Network Extender.
Note: Both authorized and unauthorized callers may see more service bars on their Verizon Wireless handset due to their proximity to the Verizon Wireless Network Extender.
Note: A fourth channel is always reserved for emergency (E911) calls to any user within range of the Network Extender.
Troubleshooting 18
 Loading...