


 Loading...
ENGLISH
DVD Camcorder
SC-DC171/DC173(U)/DC175/DC575
AF |
Auto Focus |
CCD |
Charge Coupled Device |
LCD |
Liquid Crystal Display |
Owner’s Instruction Book
Before operating the unit, please read this Instruction Book thoroughly, and retain it for future reference.
Use only approved battery packs.
Otherwise, there is a danger of overheating, fire or explosion. Samsung is not responsible for problems occurring due to using unapproved batteries.
DVD+ReWritable |
DVD+R DL |
AD68-01230A

ENGLISH
Contents
Notes and Safety Instructions ............................. |
6 |
Getting to Know Your DVD Camcorder............... |
9 |
Features ............................................................................... |
9 |
Learning about available Discs and Their Features........... |
10 |
How to use the DVD Camcorder easily.............................. |
12 |
Accessories Supplied with the DVD Camcorder ................ |
13 |
Front & Left View................................................................ |
14 |
Left Side View..................................................................... |
15 |
Right & Top View................................................................ |
16 |
Rear & Bottom View........................................................... |
17 |
Remote Control (SC-DC175/DC575 only).......................... |
18 |
Preparation .......................................................... |
19 |
Initial Setting : System Menu Setting................ |
30 |
Setting the Clock (Clock Set) ............................................. |
30 |
Setting the Wireless Remote Control Acceptance |
|
(Remote) (SC-DC175/DC575 only).................................... |
31 |
Setting the Beep Sound (Beep Sound).............................. |
32 |
Setting the Shutter Sound (Shutter Sound) |
|
(SC-DC173(U)/DC175/DC575 only)................................... |
33 |
Selecting the OSD Language (Language) ......................... |
34 |
Viewing the Demonstration (Demonstration)...................... |
35 |
Initial Setting : Display Menu Setting................ |
36 |
Adjusting the LCD Screen (LCD Bright/LCD Color) ........... |
36 |
Displaying the Date/Time (Date/Time)................................ |
37 |
Setting the TV Display (TV Display)................................... |
38 |
Using the Hand Strap & Lens Cover .................................. |
19 |
Lithium Battery Installation ................................................. |
20 |
Using the Lithium Ion Battery Pack .................................... |
21 |
Connecting a Power Source............................................... |
25 |
About the Operating Modes ............................................... |
26 |
Using the Joystick .............................................................. |
26 |
Using the Q.MENU............................................................. |
27 |
OSD (On Screen Display) in Camera Mode/Player Mode ... |
28 |
OSD (On Screen Display) in M.Cam Mode/M.Player Mode |
|
(SC-DC173(U)/DC175/DC575 only)................................... |
29 |
Turning the OSD (On Screen Display) On/Off.................... |
29 |
DVD Camcorder: Before Recording .................. |
39 |
Using the Viewfinder........................................................... |
39 |
Using the LCD ENHANCER............................................... |
39 |
Various Recording Techniques........................................... |
40 |
Inserting and Removing a Disc .......................................... |
41 |
Selecting the Record Mode (Rec Mode) ............................ |
43 |
2

ENGLISH
Contents
DVD Camcorder: Basic Recording.................... |
44 |
Making your First Recording .............................................. |
44 |
Recording with Ease for Beginners (EASY.Q Mode).......... |
45 |
Zooming In and Out............................................................ |
46 |
Using the Fade In and Out (FADE) .................................... |
47 |
Using Back Light Compensation Mode (BLC).................... |
48 |
Using the Color Nite ........................................................... |
49 |
Using the LIGHT (SC-DC173U/DC175/DC575 only) ......... |
50 |
DVD Camcorder: Advanced Recording............. |
51 |
Cutting Off Wind Noise (Wind Cut)..................................... |
51 |
Setting the Shutter Speed & Exposure (Shutter/Exposure).. |
52 |
Auto Focus / Manual Focus................................................ |
53 |
Programed Automatic Exposure Modes (Program AE)...... |
54 |
Setting the White Balance.................................................. |
56 |
Applying Digital Effects....................................................... |
58 |
Setting the 16:9 Wide mode (16:9 Wide) ........................... |
60 |
Setting the Digital Image Stabilizer (DIS)........................... |
61 |
Zooming In and Out with Digital Zoom (Digital Zoom) ....... |
62 |
DVD Camcorder: Thumbnail index and Playlist.. |
63 |
What is the Thumbnail Index?............................................ |
63 |
What’s a Playlist? .............................................................. |
63 |
DVD Camcorder................................................... |
64 |
Playing Title Scenes .......................................................... |
64 |
Adjusting the Volume ......................................................... |
64 |
Various Functions while in Player Mode ............................ |
65 |
Deleting a Title Scene (Delete) .......................................... |
67 |
Deleting a Section of a Title Scene (Partial Delete) ........... |
68 |
DVD Camcorder: Playlist.................................... |
69 |
Creating a New Playlist (New Playlist) .............................. |
69 |
Playing the Playlist ............................................................ |
70 |
Deleting a Playlist (Delete) ................................................ |
71 |
Adding Scenes to Playlist (Scene-Add) ............................. |
72 |
Changing the Order of Scenes within a Playlist |
|
(Scene-Move) .................................................................... |
73 |
Deleting Scenes from a Playlist (Scene-Delete) ............... |
74 |
Deleting a Section of a Playlist (Scene-Partial Delete) ..... |
75 |
DVD Camcorder: Disc Manager......................... |
77 |
Disc Information (Disc Info) ............................................... |
77 |
Editing the Disc Name (Disc Info-Rename) ....................... |
78 |
Formatting a Disc (Disc Format) ........................................ |
79 |
Finalizing a Disc (Disc Finalize) ........................................ |
80 |
Playing Back on a PC with DVD drive................................ |
81 |
Playing back a finalized disc on a DVD Player/Recorder .. |
81 |
Unfinalizing a Disc (Disc Unfinalize) ................................. |
82 |
3

ENGLISH
Contents
DVD Camcorder: Connection............................. |
83 |
Setting the AV In/Out (SC-DC175/DC575 only).................. |
83 |
Viewing Recordings on a TV.............................................. |
84 |
Copying a Disc onto a Tape................................................ |
86 |
Using the Voice Plus .......................................................... |
87 |
Recording (Copying) a TV Program or Video Tape onto a |
|
Disc (SC-DC175/DC575 only)............................................ |
88 |
PictBridge™ |
|
(SC-DC173(U)/DC175/DC575 only)................... |
105 |
Printing Your Pictures-Using PictBridge™........................ |
105 |
Connecting To a Printer (USB Connect)..................... |
105 |
Setting the Number of Prints....................................... |
106 |
Setting the Date/Time Imprint Option.......................... |
106 |
Printing Images........................................................... |
106 |
Canceling the Printing................................................. |
106 |
Digital Still Camera Mode |
|
(SC-DC173(U)/DC175/DC575 only)..................... |
89 |
Using a Memory Card (Usable Memory Card) |
|
(not supplied)...................................................................... |
89 |
Memory Card Functions ............................................... |
89 |
Inserting a Memory Card.............................................. |
89 |
Ejecting a Memory Card............................................... |
89 |
Structure of Folders and Files on the Memory Card .......... |
90 |
Selecting the Photo Quality (Photo Quality)....................... |
91 |
Setting the Photo Size (Photo Size) (SC-DC575 only)....... |
92 |
Setting the File Number (File No.)...................................... |
93 |
Taking a Photo Image (JPEG) on a Memory Card............. |
94 |
Viewing Photo Images (JPEG)........................................... |
95 |
Protection from accidental Erasure (Protect) ..................... |
96 |
Deleting Photo Images and Moving Images (Delete)......... |
97 |
Formatting the Memory Card (Format)............................... |
99 |
Recording Moving Images (MPEG) on a Memory Card... |
100 |
Playing the Moving Images (MPEG) on a Memory Card .. |
101 |
Recording Still images onto a Memory Card during |
|
DVD playback .................................................................. |
102 |
Marking Images for Printing (Print Mark).......................... |
103 |
USB Interface |
|
(SC-DC173(U)/DC175/DC575 only)................... |
107 |
Using USB Interface......................................................... |
107 |
Using the Camcorder as a USB Device (USB Connect).. |
109 |
Installing DV Media PRO Program.................................... |
110 |
Connecting to a PC ........................................................... |
112 |
Disconnecting the USB Cable ..................................... |
112 |
Using the DVD Camcorder as a PC Camera............... |
113 |
Using the USB Streaming Function............................. |
114 |
Using the DVD Camcorder as a Removable Disk....... |
114 |
4

ENGLISH
Contents |
|
Maintenance ...................................................... |
115 |
Using Your DVD Camcorder Abroad ................................. |
115 |
Troubleshooting................................................ |
116 |
Troubleshooting................................................................. |
116 |
Setting menu items........................................................... |
121 |
Miscellaneous Information............................... |
123 |
Disc Type Description....................................................... |
123 |
Specifications.................................................... |
124 |
Index................................................................... |
125 |
Warranty (SEA users only)............................... |
126 |
5

ENGLISH
Notes and Safety Instructions
Notes regarding the Rotation of the LCD Screen
Please rotate the LCD Screen carefully as illustrated. Over-rotation may cause damage to the inside of the hinge that connects the LCD Screen to the DVD Camcorder.
1. Open the LCD Screen 90 degrees with your finger. 2. Rotate it to the best angle to record or play.
If you rotate the LCD Screen 180 degrees to the lens side, you can close the LCD Screen with it facing out.
This is convenient during playback operations.
Notes
Refer to page 36 to adjust brightness and color of the LCD Screen.
Make sure not to contact the magnetic stripe of your credit card near the LCD panel. Your credit card information may be removed.
Notes regarding the LCD Screen, Viewfinder, Lens
1. Direct sunlight can damage the LCD Screen, the inside of
the Viewfinder or the Lens. Take pictures of the sun only in low light conditions, such as at dusk.
2. The LCD Screen has been manufactured using high precision technology.
However, there may be tiny dots (red, blue or green in color) that appear on the LCD Screen. These dots are normal and do not affect the recorded picture in any way.
3. Do not pick up the DVD Camcorder by holding the Viewfinder, LCD Screen or Battery Pack.
4. Applying excessive force to the Viewfinder may damage it.
6
ENGLISH
Notes and Safety Instructions
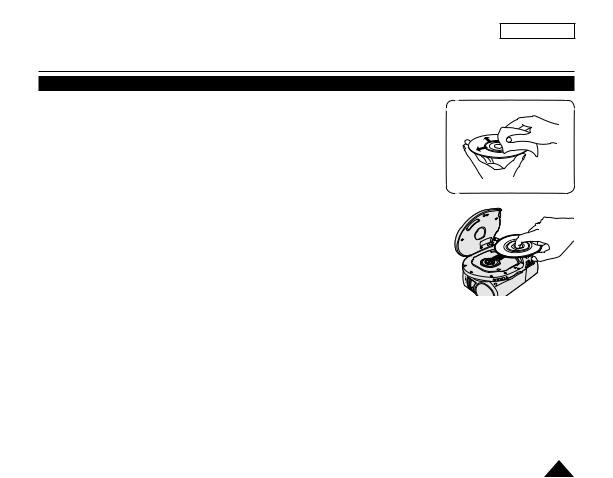
Notes regarding Disc Cleaning and Handling
Take care not to touch the recording side (the rainbow colored side) of the disc with your fingers. Discs contaminated by fingerprints or foreign substances may not play properly.
Use a soft cloth to clean the disc.
Clean lightly from the center of a disc to the outside edge. Circling or cleaning too hard may create scratches on the disc and further cause the disc to play abnormally.
Do not use benzene, thinner, detergent, alcohol or anti-static spray when cleaning the disc. It may cause a malfunction.
Press the supporting holder in the center of the disc case for easy removal of the disc.
Handle discs by the edges and the center hole to avoid finger marks on the recording side.
Do not bend or apply heat to the disc.
Always store discs vertically in their plastic cases when not in use.
Store discs away from direct sunlight, heating elements, moisture or dust.
7

ENGLISH
Notes and Safety Instructions
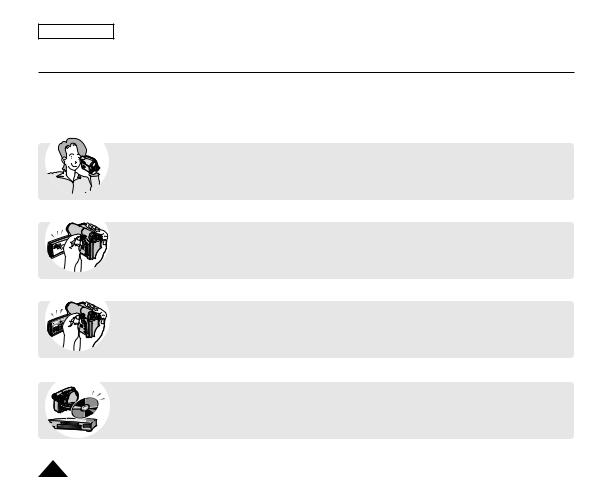
Notes regarding DVD Camcorder
Do not leave the DVD Camcorder exposed to high temperatures (above 60 °C or 140 °F). For example, in a parked car in the sun or exposed to direct sunlight.
Do not let the DVD Camcorder get wet. Keep the DVD Camcorder away from rain, sea water, and any other form of moisture.
The DVD Camcorder may get damaged if it gets wet. Sometimes a malfunction due to exposure to liquids cannot be repaired.
A sudden rise in atmospheric temperature may cause condensation to form inside the DVD Camcorder.
-When you move the DVD Camcorder from a cold location to a warm location (e.g. from outside to inside during the winter.)
-When you move the DVD Camcorder from a cool location to a hot location (e.g. from inside to outside during the summer.)
Notices regarding Copyright (SC-DC175/DC575 only)
Television programs, video tapes, DVD titles, films, and other program materials may be copyrighted. Unauthorized copying of copyrighted material may be against the law.
All the trade names and registered trademarks mentioned in this manual or other documentation provided with your Samsung product are trademarks or registered trademarks of their respective holders.
Servicing & Replacement Parts
Do not attempt to service this DVD Camcorder yourself.
Opening or removing covers may expose you to dangerous voltage or other hazards.
Refer all servicing to qualified service personnel.
When replacement parts are required, be sure the service technician has used replacement parts specified by the manufacturer that have the same characteristics as the original parts.
Unauthorized substitutions may result in fire, electric shock or other hazards.
8

ENGLISH
Getting to Know Your DVD Camcorder
Features
DVD Disc Camcorder
DVD-VIDEO recording with 3 1/2 inch (8cm) DVD-RW/ +RW/DVD-R/+R DL(Dual Layer) discs.
High Power Zoom Lens
Offers you High Power Zoom Lens with 34x (SCDC171/DC173(U)/DC175 only) Zoom Lens, 26x Zoom
Lens (SC-DC575 only).
USB Interface for Digital Image Data Transfer (SC-DC173(U)/DC175/DC575 only)
You can transfer images to a PC using the USB interface without an add-on card.
Photo Capture (SC-DC173(U)/DC175/DC575 only)
The Photo Capture function lets you capture the scene you want while the disc is in play, and save as a still image on a Memory Card.
1200x Digital Zoom
Allows you to magnify an image up to 1200 times its original size.
Color TFT LCD
A high-resolution color TFT LCD gives you clean, sharp images as well as the ability to review your recordings immediately. Also 2.7 inch Wide LCD. (SC-DC173(U)/ DC175/DC575 only).
LCD Enhancer
Gives you a clear quality image on the LCD Screen; even in bright daylight.
Mega-pixel CCD (SC-DC575 only)
Your DVD Camcorder incorporates a 1.0 mega-pixel CCD. High-resolution photo images can be recorded to a Memory Card.
Digital Image Stabilizer (DIS)
The DIS compensates for any handshake, reducing unstable images particularly at high magnification.
Various Digital Effects
The Digital Effects allow you to give your recordings a special look.
Digital Still Camera Function (SC-DC173(U)/DC175/DC575 only)
-Using a Memory Card, you can easily record and playback standard photo images.
-You can transfer standard photo images on a Memory Card to your PC using the USB interface.
Moving Image Recording (SC-DC173(U)/DC175/DC575 only)
Moving image recording makes it possible to record video onto a Memory Card.
MMC/SD Card Slot (SC-DC173(U)/DC175/DC575 only)
MMC/SD card slot can use MMC (Multi Media Cards) and SD cards.
Multi OSD Language
You can select the desired OSD language from OSD list.
9

ENGLISH
Getting to Know Your DVD Camcorder
Learning about available Discs and Their Features
This DVD Camcorder can record or play back by using 3 1/2 inch (8cm) DVD-R/+R DL/-RW/+RW discs (not supplied) only. Please check whether your disc is proper for use.


 Which discs can be used in the DVD Camcorder?
 DVD-R
DVD-R
 DVD+R DL
You can make only one recording on a disc.
You cannot delete or edit the recordings.
After finalizing the disc, you can play it back in most DVD players/recorders/drives.
 DVD-RW
You can record and edit repeatedly.
(You can delete recorded image files or format the disc and reuse it again.)
Format the disc in the mode you want according to your needs.
Video mode: Once finalized, the recordings on the disc will play in most DVD players/recorders/drives.
VR (Video Record) mode: You can easily edit the recordings on your DVD Camcorder, but you can play the disc only on a DVD Recorder that supports VR mode.
 DVD+RW
You can record on the disc repeatedly.
You can delete and format, but you cannot edit recordings.
You can play back a DVD+RW disc on other DVD players/recorders/drives without finalizing it.

 You cannot use
 the following discs.
You may not use 5 inch (12cm) CD/DVD discs.
Unusable 3 1/2inch (8cm) discs.
CD/CD-R/CD-RW/DVD-ROM/DVD+R (Single Layer)/DVD-RAM/DVD-R (Dual Layer)
Floppy Disk, MO, MD, iD, LD
10
ENGLISH
Getting to Know Your DVD Camcorder
Which discs recorded on the DVD Camcorder can be played in DVD players/recorders/drives?
DiscsmustbefinalizedbeforetheycanbeplayedinregularDVDplayers/recorders/drives.
FinalizingisaprocessrequiredtomaketheDVDdiscsyourecordedonthecamcorderplayableinDVDplayers/ recorders/drives.
|
DVD-R |
|
DVD-RW |
|
|
DVD+R DL |
In Video mode |
||
|
DVD player |
|
DVD player |
|
|
DVD recorder |
|||
|
DVD recorder |
|||
|
DVD drive-equipped PC |
|||
|
DVD drive-equipped PC |
|||
In VR mode |
||||
|
|
|||
DVD recorder that supports DVD-RW VR mode.
 DVD+RW
DVD player
DVD recorder
DVD drive-equipped PC
You can play back DVD+RW discs on other DVD players/recorders/drives without finalizing them.
Notes
We are not responsible for data loss on a disc.
You may not be able to play discs recorded from a PC or DVD recorder. When such a case occurs, the message Bad Disc! may be displayed.
We do not warranty any damage or loss incurred due to recording and playback failure caused by disc or card malfunction.
We take no responsibility and offer no compensation for any recording failure, loss of recorded or edited material and/or damage to the recorder arising from the misuse of discs.
For stable and perpetual recording and playback, use the TDK, MKM, Verbatim disks that have the sign “for VIDEO CAMERA TM” If you don’t use them, operations for recording and playback may not work properly or you may not eject the inserted disc from the DVD Camcorder.
You cannot overwrite, edit, or format the finalized disc. If needed, unfinalize the disc. (DVD-RW only) page 82
It is not guaranteed that all DVD players/recorders/drives can play discs finalized in this DVD Camcorder. For compatibility details, refer to the DVD players/recorders/drives owner’s manual.
For more information about the categories of available discs, see page 123.
11
ENGLISH
Getting to Know Your DVD Camcorder
How to use the DVD Camcorder easily
You can record any desired image and edit and playback the disc on a DVD Camcorder, most common DVD players, and PCs after finalizing the disc.
Recording
Selecting the desired disc and disc formatting page 42 Recording the desired Images page 44
Playing Back
Selecting a scene to play back from the thumbnail index screen page 64
Editing
You may edit only in DVD-RW (VR Mode). page 68
Finalizing
Discs must be finalized before they can be played on standard DVD players/recorders/drives. You may play back DVD+RW discs on other devices without finalizing them.
12

ENGLISH
Getting to Know Your DVD Camcorder
Accessories Supplied with the DVD Camcorder
Make sure that the following basic accessories are supplied with your DVD Camcorder.
Basic Accessories
1. Lithium Ion Battery Pack (SB-LSM80)
2. AC Power Adapter (AA-E9 TYPE) 3. AV Cable
4.Instruction Book/Quick Guide
5.Lithium Batteries for Remote Control (SC-DC175/DC575 only) and Clock.
(TYPE: CR2025)
6. Remote Control (SC-DC175/DC575 only)
7. USB Cable (SC-DC173(U)/DC175/DC575 only)
8.Software CD (DV Media PRO) (SC-DC173(U)/DC175/DC575 only)
9.Lens Cover
10.Lens Cover Strap
Optional Accessories
11. 3 1/2 inch (8cm) DVD-RW Disc
12. Carrying Case
Notes
The contents can vary depending on the sales region.
Parts and accessories are available at your local Samsung dealer.
13

ENGLISH
Getting to Know Your DVD Camcorder
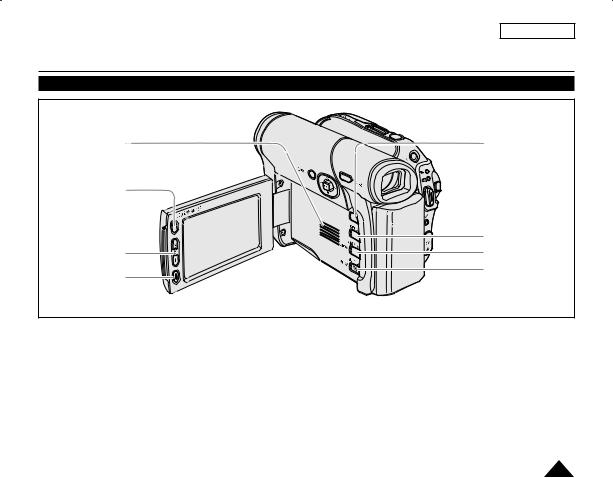
Front & Left View
1 |
7 |
2 |
8 |
|
|
|
9 |
3 |
|
4 |
10 |
5 |
|
|
Illustrations of model SC-DC173U are used |
6 |
in this owner’s instructions. Although |
the models covered in this manual look |
different, they all operate in a similar way.
1.ACCESS Indicator page 41
2.OPEN Switch page 41
3.Lens
4.LIGHT (SC-DC173U/DC175/DC575 only) page 50
5.Remote Sensor (SC-DC175/DC575 only)
6.Internal MIC
7.EASY.Q Button page 45
8.Q.MENU Button page 27
9.Joystick (Up/Down/Left/Right/OK)/FADE (page 47)/
/ / / |
<M.Player Mode> : Memory Player Mode |
||||
|
|
||||
Mode |
|
<Camera |
<M.Player Mode> |
||
|
<Player Mode> |
(SC-DC173(U)/DC175/DC575 only) |
|||
Joystick |
Mode> |
||||
|
Photo image |
Moving image |
|||
|
|
||||
Up |
- |
FADE |
- |
- |
|
Down () |
Stop |
- |
- |
Stop |
|
Left ( ) |
Backward Search/ Skip |
- |
Backward Skip |
Backward Search |
|
Right ( ) |
Forward Search/ Skip |
- |
Forward Skip |
Forward Search |
|
OK () |
Play/Still |
- |
- |
Play/Still |
|
10. TFT LCD Screen
14
ENGLISH
Getting to Know Your DVD Camcorder
Left Side View
1 |
5 |
2
|
6 |
3 |
7 |
4 |
8 |
|
1.Built-In Speaker
2.LCD ENHANCER Button page 39
3.Zoom (W/T)/VOL (/) Button page 46/64
4.Record Start/Stop Button page 44
5.MENU Button
6.DISPLAY Button page 29
7.C.NITE/LIGHT/S.SHOW Button (SC-DC173U/DC175/DC575 only) page 49/50/95 C.NITE/S.SHOW Button (SC-DC173 only) page 49/95 C.NITE Button (SC-DC171 only) page 49
8.MULTI DISP./MF/AF Button page 95/53
15

ENGLISH
Getting to Know Your DVD Camcorder
Right & Top View
|
1 |
|
7 |
|
2 |
|
|
|
3 |
|
8 |
|
|
|
|
|
|
|
9 |
|
4 |
|
10 |
|
|
|
|
|
5 |
|
|
|
6 |
|
|
1. |
PHOTO Button |
7. |
Zoom (W/T) Lever page 46 |
2. |
(SC-DC173(U)/DC175/DC575 only) page 94 |
8. |
Mode Switch (DISC/CARD) |
Focus Adjustment Knob page 39 |
|
(SC-DC173(U)/DC175/DC575 only) |
|
3. |
Viewfinder |
9. |
Disc Cover |
4. |
Record Start/Stop Button page 44 |
10. |
Hand Strap |
5.Power Switch (ON/OFF/ (Camera)/
 (Player))
6.USB Jack (SC-DC173(U)/DC175/DC575 only)
16

ENGLISH
Getting to Know Your DVD Camcorder
Rear & Bottom View
6 |
7 |
8 |
3
1 |
|
2 |
4 |
|
5
1.Charging Indicator
2.Lithium Battery Cover
3.AV Jack
4.DC IN Jack
5.Hand Strap Hook
6.Tripod Receptacle
7.Memory Card Slot (SC-DC173(U)/DC175/DC575 only)
8.BATT. RELEASE Switch
Usable Memory Cards (2GB Max) (SC-DC173(U)/DC175/DC575 only)
SD MMC
17
ENGLISH
Getting to Know Your DVD Camcorder
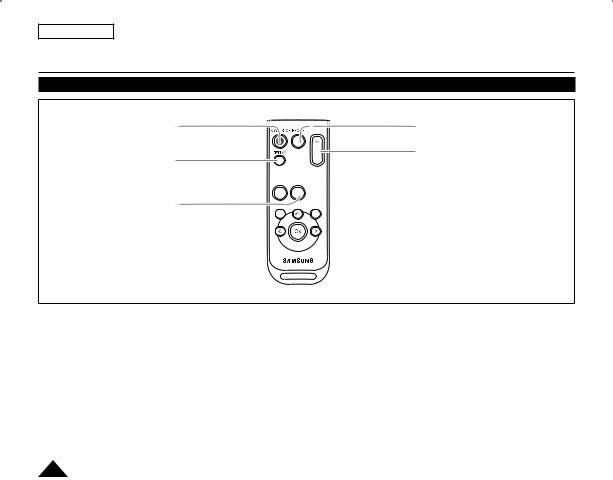
Remote Control (SC-DC175/DC575 only)
1 |
8 |
2 |
9 |
|
3 


 10
10
4 


 11 5
11 5 


6
 12
12
7

1. |
START/STOP |
8. |
PHOTO page 94 |
2. |
DISPLAY page 29 |
9. |
W/T (Zoom) page 46 |
3. |
/ (Skip) |
10. |
/ (Search) |
4. |
(Stop) |
11. |
|(Slow) |
5. |
(Play/Still) |
12. |
Q-MENU |
6.MENU
7.Up( )/Down(
 )/Left(
 )/Right(
 )/OK
)/OK
18

ENGLISH
Preparation
Using the Hand Strap & Lens Cover
It is very important to ensure that the Hand Strap has been correctly adjusted before you begin your recording. The Hand Strap enables you to:
-Hold the DVD Camcorder in a stable, comfortable position.
-Press the [Zoom] lever and [Record Start/Stop] button without having to change the position of your hand.
Hand Strap
1. |
Pull and open the Hand Strap and release the Hand Strap. |
|
|
|
|
Insert the Hand Strap into the Hand Strap Hook. |
|
|
|
2. |
Insert your hand into the Hand Strap and adjust its length. |
|
1 |
|
3. |
Close the Hand Strap. |
|
|
|
|
|
|
2 |
3 |
Lens Cover |
|
|
|
|
1. |
Hook up the Lens Cover with the Lens Cover Strap as illustrated. |
1 |
2 |
4 |
2. |
Pull and open the Hand Strap and release the Hand Strap. |
|||
3. |
Hook up the Lens Cover Strap to the Hand Strap and adjust it |
|
|
|
|
following the steps as described for the Hand Strap. |
|
|
|
4. |
Close the Hand Strap. |
|
|
|
Installing the Lens Cover after Operation
Press buttons on both sides of the Lens Cover, then insert it so it covers the DVD Camcorder Lens.
19

ENGLISH
Preparation
Lithium Battery Installation
Lithium Battery Installation for the Internal Clock
1. Remove the Battery Pack from the rear of the DVD Camcorder. 2. Open the Lithium Battery Cover on the rear of the DVD Camcorder. 3. Position the Lithium Battery in the Lithium Battery Holder, with the
positive (+) terminal face up.
Be careful not to reverse the polarity of the Battery. 4. Close the Lithium Battery Cover.
Installing the Lithium Battery in the Remote Control (SC-DC175/DC575 only)
1. |
Turn the battery holder counterclockwise (as indicated with [ ] mark), |
|
|
|
|
using your fingernail or a coin to open it. The battery holder opens. |
1 |
2 |
3 |
2. |
Insert the battery while the positive (+) terminal faces down and press it |
|||
|
firmly until you hear locking sound. |
|
|
Battery |
3. |
Place the battery holder to match its [ ] mark with the [] mark on the |
|
|
|
|
remote control, and turn the battery holder clockwise to fix it. |
|
|
Holder |
|
|
|
|
Precautions regarding the Lithium Battery
1.The Lithium Battery maintains the clock function and preset contents of the memory; even if the Battery Pack or AC Power adapter is removed.
2.The Lithium Battery for the DVD Camcorder lasts about 6 months under normal operation from time of installation.
3.When the Lithium Battery becomes weak or dead, the date/time indicator will display 12:00 AM JAN.01.2007 when you set the Date/Time to On. When this occurs, replace the Lithium Battery with a new one (type CR2025).
4.There is a danger of explosion if Lithium Battery is incorrectly replaced. Replace only with the same or equivalent type.
Warning: Keep the Lithium Battery out of reach of children. Should a battery be swallowed, consult a doctor immediately.
20
ENGLISH
Preparation
Using the Lithium Ion Battery Pack
Use the SB-LSM80 or SB-LSM160 (not supplied) Battery Pack only.
The Battery Pack may be charged a little at the time of purchase.
Charging the Lithium Ion Battery Pack
1.Turn the [Power] switch to [OFF].
2.Attach the Battery Pack to the DVD Camcorder.
3.Connect the AC Power adapter(AA-E9 TYPE) to a wall socket.
4.Open the DC IN Jack Cover.
5.Connect the DC cable to the DC IN jack on the DVD Camcorder.
The charging indicator will start to blink, showing that the Battery is charging.
6.When the Battery is fully charged, disconnect the Battery Pack and the AC Power Adapter from the DVD Camcorder. Even with the Power switched off, the Battery Pack will still discharge.
Blinking time |
|
Charging rate |
Once per second |
Less than 50% |
|
Twice per second |
50% |
~ 75% |
Three times per second |
75% |
~ 90% |
Blinking stops and stays on |
90% |
~ 100% |
On for a second and off for a |
Error - Reset the Battery Pack and |
|
second |
the DC Cable |
|
Power Switch
5
<Charging indicator>
21

ENGLISH
Preparation
Charging, Recording Times based on Battery Type
If you close the LCD Screen, it switches off and the Viewfinder switches on automatically.
The continuous recording times given in the table below are approximations. Actual recording time depends on usage.
The continuous recording times in the operating instructions are measured using a fully charged Battery Pack at 77 °F (25 °C).
Even when the power is switched off, the Battery Pack will still discharge if it is left attached to the device.
Battery Type |
|
SB-LSM80 |
|
|
SB-LSM160 (not supplied) |
||
|
|
|
|
|
|
|
|
Charging time |
|
Approx.1hr 30min |
|
|
Approx. 3hr |
|
|
|
|
|
|
|
|
|
|
|
Mode |
Continuous recording time |
Playback time |
Mode |
Continuous recording time |
Playback time |
|
|
|
|
|
|
|
|
|
LCD ON |
XP |
Approx.55min |
Approx. 1hr |
XP |
Approx. 1hr 50min |
Approx. 1hr 55min |
|
|
|||||||
Viewfinder |
|||||||
|
|
|
|
|
|
||
|
|
|
|
|
|
|
|
LCD ON |
SP |
Approx. 1hr |
Approx. 1hr 5min |
SP |
Approx. 2hr |
Approx. 2hr 5min |
|
|
|||||||
Viewfinder |
|||||||
|
|
|
|
|
|
||
|
|
|
|
|
|
|
|
LCD ON |
LP |
Approx. 1hr 5min |
Approx. 1hr 10min |
LP |
Approx. 2hr 10min |
Approx. 2hr 15min |
|
|
|||||||
Viewfinder |
|||||||
|
|
|
|
|
|
||
|
|
|
|
|
|
|
|
|
|
|
Measured times shown above are based on model SC-DC173U |
||||
The amount of continuous recording time available depends on;
-The type and capacity of the Battery Pack you are using.
-Ambient temperature.
-How often the Zoom function is used.
-Type of use (DVD Camcorder/Camera/With LCD Screen etc.). It is recommended that you have several batteries available.
22

ENGLISH
Preparation
Battery Level Display
The battery level display indicates the amount of power remaining in the Battery Pack. a. Fully charged
b. 20~40% used c. 40~80% used
d. 80~95% used (red)
e. Completely used (Blinking)
(The DVD Camcorder will turn off soon, change the battery as soon as possible.)
The Finalize/Format functions are not available when the battery level is between 
 and
and 
 .
.
At battery level ‘e’
The battery becomes low in capacity and the <
 > indicator blinks on the display. The screen will turn blue when the battery is almost completely discharged.
Battery Pack Management
The Battery Pack should be recharged in an environment between 32 °F (0 °C) and 104 °F (40 °C).
The Battery Pack should never be charged in a room with a temperature that is below 32 °F (0 °C).
The life and capacity of the Battery Pack will be reduced if it is used in temperatures below 32 °F (0 °C) or left in temperatures above 104 °F (40 °C) for a long period of time, even when it is fully recharged.
Do not put the Battery Pack near any heat source (i.e. fire or a heater).
Do not disassemble, apply pressure to, or heat the Battery Pack.
Do not allow the + and – terminals of the Battery Pack to be short-circuited. It may cause leakage, heat generation, induce overheating or fire.
23

ENGLISH
Preparation
Maintaining the Battery Pack
Please refer to the Table on page 22 for approximate continuous recording time.
The recording time is affected by temperature and environmental conditions.
The recording time shortens dramatically in a cold environment.
The continuous recording times in the operating instructions are measured using a fully charged Battery Pack at 77 °F (25 ° C). The remaining battery time may differ from the approximate continuous recording times given in the instructions.
When replacing the battery pack, only use the same type as is supplied with this DVD Camcorder and is available from your SAMSUNG retailer.
When the Battery reaches the end of its life, please contact your local dealer. The batteries have to be dealt with as chemical waste.
Make sure that the Battery Pack is fully charged before starting to record.
A brand new Battery Pack is not charged. Before using the Battery Pack, you need to charge it completely.
Fully discharging a Lithium Ion Battery damages the internal cells. The Battery Pack may be prone to leakage when fully discharged.
To preserve battery power, keep your DVD Camcorder turned off when you are not operating it.
If your DVD Camcorder is in Camera Mode, and it is left in STBY mode without being operated for more than 5 minutes with a disc inserted, it will automatically turn itself off to protect against unnecessary battery discharge.
Make sure that the Battery Pack is fitted firmly into place.
Do not drop the Battery Pack. Dropping the Battery Pack may damage it.
24

ENGLISH
Preparation
Connecting a Power Source
There are two types of power source that can be connected to your DVD Camcorder.
-The AC Power adapter: used for indoor recording.
-The Battery Pack: used for outdoor recording.
Using a Household Power Source
Connect to a household power source to use the DVD Camcorder without having to worry about the battery power. You can keep the Battery Pack attached; the battery power will not be consumed.
1. Connect the AC Power adapter (AA-E9 TYPE) to a wall socket.
The plug and wall socket type may differ according to your resident country.
2. Open the DC IN Jack Cover.
3. Connect the DC cable to the DC IN jack of the DVD Camcorder.
4. Set the DVD Camcorder to each mode by holding down |
Power Switch |
the Green Tab on the [Power] switch and turning the |
|
[Power] switch to [ON] or [OFF]. |
|
25

ENGLISH
Preparation
About the Operating Modes
The operating modes are determined by the position of the [Power] and [Mode] (SC-DC173(U)/DC175/DC575 only) switch.
Set the Operation Mode by adjusting the [Power] and [Mode] (SC-DC173(U)/DC175/DC575 only) switches before operating any functions.
Each time you move the [Power] switch downward, it toggles between [ (Camera)] and [
 (Player)] mode.
Mode Name |
<Camera Mode> <Player Mode> |
<M.Cam Mode> |
<M.Player Mode> |
[Power] Switch
[Mode] Switch
(SC-DC173(U)/DC175/ DC575 only)
The <M.Cam Mode> and the <M.Player Mode> are only available on SC-DC173(U)/DC175/DC575.
M.Cam Mode : Memory Camera Mode / M.Player Mode : Memory Player Mode
Using the Joystick
|
The Joystick is used to make a selection and to move the cursor left, |
1 |
2 |
|
right, up and down. Using the Joystick, you can easily make your |
||
|
|
|
selection and navigate the menu.
1.Move to a previous menu item / Adjust the selected item (to the left).
2.Move to a sub menu item / Adjust the selected item (to the right).
3. |
Move to a lower menu item. |
3 |
4 |
5 |
4. |
Move to an upper menu item. |
|
|
|
5. |
Press to select the chosen item (OK). |
|
|
|
26

ENGLISH
Preparation
Using the Q.MENU
Q.MENU is used to access DVD Camcorder functions by using the [Q.MENU] button.
Q.MENU provides easier access to frequently used menus without using the [MENU] button.
Functions available using the Q.MENU are as below:
|
|
|
1 |
|
|
DIS |
page 61 |
||
|
Program AE |
page 54 |
|
|
<Camera Mode> |
White Balance |
page 56 |
|
|
BLC |
page 48 |
|
||
|
|
|||
|
Shutter |
page 52 |
|
|
|
Exposure |
page 52 |
|
|
|
|
|
|
|
|
Delete |
page 67 |
|
|
<Player Mode> |
Partial Delete |
page 68 |
|
|
|
|
|
||
New Playlist |
page 69 |
3 |
||
|
||||
|
Delete |
page 71 |
|
|
|
|
|
|
|
|
BLC |
page 48 |
|
|
<M.Cam Mode> |
Photo Size (SC-DC575 only) |
page 92 |
|
|
White Balance |
page 56 |
|
||
(SC-DC173(U)/DC175/DC575 only) |
|
|||
Photo Quality |
page 91 |
|
||
|
|
|||
|
Exposure |
page 52 |
|
|
|
Delete |
page 97 |
|
|
<M.Player Mode> |
Delete All |
page 98 |
4 |
|
Protect |
page 96 |
|||
(SC-DC173(U)/DC175/DC575 only) |
||||
|
Print Mark |
page 103 |
|
|
|
Format |
page 99 |
|
For example: Setting the White Balance
1.Press the [Q.MENU] button.
The quick menu list will appear.
2.Move the [Joystick] up or down to select <White Balance>, then press the [Joystick].
3.Move the [Joystick] up or down to select desired mode (Auto, Indoor, Outdoor, or
Custom WB), then press the [Joystick].
4.To exit, press the [Q.MENU] button.
STBY SP 0:00:00 -RW 30 min VR
DIS |
Off |
|
Program AE |
|
|
White Balance |
|
|
BLC |
|
|
Shutter |
|
|
Exposure |
|
|
Q.MENU Exit |
|
|
STBY SP 0:00:00 -RW
|
30 min |
VR |
DIS |
|
|
Program AE |
|
|
White Balance |
Outdoor |
|
BLC |
|
|
Shutter |
|
|
Exposure |
|
|
Q.MENU Exit
STBY SP 0:00:00 -RW 30 min VR
16:9 Wide
<When the White Balance option in Camera mode is selected.>
27

ENGLISH
Preparation
OSD (On Screen Display) in Camera Mode/Player Mode
1.Battery Level page 23
2.Manual focus page 53 EASY.Q page 45
3.DIS page 61
4.Program AE page 54
5.White Balance Mode page 56
6.Digital Effects Mode page 58
16:9 Wide page 60
7.Shutter Speed page 52
8.Exposure page 52
9.Date/Time page 37
10.Color Nite pages 49~50
11.USB (SC-DC173(U)/DC175/ DC575 only) page 109
12.Remote (SC-DC175/DC575 only) page 31
13.Wind Cut page 51
14.BLC (Back Light Compensation) page 48
15.LIGHT (SC-DC173U/DC175/ DC575 only) page 50
16.Title scene number
17.Disc Format page 79
18.Disc Type
19.Counter
20.Remaining Time
21.Record Mode page 43
22.Operating Mode
23.Zoom Position page 46
Digital Zoom Position page 62
24.LCD Enhancer page 39
25.Volume Control page 64
26.Message Line page 117
27.Voice Plus Indicator page 87
28.AV IN (SC-DC175/DC575 only) page 83
29.Playback Speed page 66
Notes
Functions not marked with will be retained when the DVD Camcorder is powered on after turning it off.
OSD (On Screen Display) items shown here are based on model SC-DC173U.
OSD in Camera Mode
|
24 2322 |
21 20 |
19 |
|
||
1 |
|
STBY |
SP |
0:00:00 -RW |
18 |
|
2 |
|
W |
T |
30 min VR |
17 |
|
3 |
|
|
|
|
001 |
16 |
4 |
|
|
|
|
|
15 |
5 |
|
No disc! |
|
|
14 |
|
6 |
Sepia |
|
|
|
|
13 |
7 |
S.1/60 |
|
|
|
|
12 |
8 |
20 |
|
|
|
|
11 |
|
12:00 AM JAN.01.2007 |
Color N. 1/30 |
|
|||
2 |
|
9 |
|
|
10 |
|
6 |
16:9 Wide |
|
|
|
||
23 |
W |
T |
|
|
|
|
OSD in Player Mode
|
|
|
29 |
|
►► SP |
0:00:00 -RW |
|
|
1 |
VR |
|
|
|
|
|
10 |
|
001 |
|
|
AV IN |
28 |
|
25 |
No disc! |
|
|
12:00 AM JAN.01.2007
26 27
28

ENGLISH
Preparation
OSD (On Screen Display) in M.Cam Mode/M.Player Mode (SC-DC173(U)/DC175/DC575 only)
1. |
Photo Quality page 91 |
OSD in M.Cam Mode |
|
|
OSD in M.Player Mode |
|
|
|||
2. |
Photo Size (SC-DC575 only) |
|
|
|
|
5 |
|
|
|
10 |
|
page 92 |
|
|
|
|
|
|
|
||
3. |
Remaining Time (Recordable time |
|
|
|
600 |
4 |
6 |
|
5/10 |
|
|
W |
T |
8 min |
3 |
Slide |
|
|
|||
|
of moving images) |
|
|
2 |
||||||
|
|
|
|
|
|
7 |
|
1152X864 |
||
4. |
CARD (Memory Card) Indicator |
|
|
|
|
|
|
|||
|
|
|
|
|
8 |
5 |
|
|
||
5. |
Image Counter (Total number of |
|
No memory card! |
|
|
|
No memory card! |
|
|
|
|
recordable photo images) |
1 |
|
|
|
|
|
|
|
|
6. |
Slide Show page 95 |
2 |
1152 |
|
|
|
|
|
|
|
|
20 |
|
|
|
|
|
|
|
||
7. |
Erase Protection Indicator |
|
12:00 AM JAN.01.2007 |
|
|
|
12:00 AM JAN.01.2007 |
100-0005 |
9 |
|
|
page 96 |
|
|
|
|
|
|
|
SMOV001 |
9 |
8.Print Mark page 103
9.Folder Number-File Number page 93
File number of the moving image
10.Image Counter (Current Image/Total number of recorded images)
Turning the OSD (On Screen Display) On/Off
Turning OSD On/Off
Press the [DISPLAY] button on the left side control panel.
Each press of the button toggles the OSD function on and off.
Turning the Date/Time On/Off
To turn the Date/Time on or off, access the menu and change the Date/Time mode. page 37
29

ENGLISH
Initial Setting : System Menu Setting
Setting the Clock (Clock Set)
Clock setup works in Camera Mode/Player Mode/M.Cam Mode/M.Player Mode. page 26
The date/time is automatically recorded onto a disc. Before recording, please set the date/time.
1. Set the [Mode] switch to [DISC] or [CARD]. (SC-DC173(U)/DC175/DC575 only) |
4 |
2.Set the [Power] switch to [ (Camera)] or [
 (Player)].
3.Press the [MENU] button.
The menu list will appear.
4.Move the [Joystick] up or down to select <System>, then press the [Joystick].
5.Move the [Joystick] up or down to select <Clock Set>, then press the [Joystick].
The month will be highlight first.
6. |
Move the [Joystick] up or down to set current month, then press the [Joystick]. |
5 |
|
The day will be highlighted. |
|
|
|
|
|
To adjust the clock, select the Year, Month, Day, Hour, Min, or AM/PM by pressing the |
|
|
[Joystick], then move the [Joystick] up or down to set respective values. |
|
7. |
You can set the day, year, hour, minute, and AM/PM following the same procedure after |
|
|
setting the month. |
|
8. |
Press the [Joystick] after setting minute. |
|
|
A message <Complete!> is displayed. |
8 |
9. |
To exit, press the [MENU] button. |
Notes
After the Lithium Battery loses its charge (after about 6 months), the date/time appears on the screen as 12:00 AM JAN.01.2007.
You can set the year up to 2040.
If the Lithium Battery is not installed, data inputted will not be backed up.
Display illustrations in this manual
OSD illustrations of model SC-DC173U are used in this manual. Some of the OSD
items shown in this manual may differ slightly from the actual items on your DVD Camcorder.
Camera Mode |
|
|
|
|
►System |
|
|
|
|
Clock Set |
|
|
|
|
Beep Sound |
►On |
|
|
|
Language |
►English |
|
||
Demonstration |
►On |
|
|
|
Move OK Select |
MENU Exit |
|||
Camera Mode |
|
|
|
|
►System |
|
|
|
|
Clock Set |
JAN 01 2007 |
|||
Beep Sound |
||||
12 : 00 |
AM |
|||
Language |
||||
Demonstration |
|
|
|
|
Adjust OK Select |
MENU Exit |
|||
Camera Mode |
|
|
|
|
►System |
|
|
|
|
Clock Set |
JAN 01 2007 |
|||
Beep Sound |
||||
12 : 00 |
AM |
|||
Language |
||||
Demonstration |
Complete! |
|||
|
||||
 Move OK Select MENU Exit
30
Loading...